1
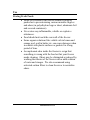
FELIX STORCH, INC.
SUMMIT APPLIANCE DIVISION®
INSTRUCTION MANUAL FOR MODEL:
ALF-620
All-Freezer
Before Putting Into Use
Before connecting the appliance to the power supply, leave it standing for about 2
hours, which will reduce a possibility of malfunctions in the cooling system due
to transport handling.
Clean the appliance thoroughly; especially the interior (See Cleaning and
Maintenance).
Instructions for Use
These instructions for use are intended for the user. They describe the appliance and
the correct and safe way to use it. The instructions were prepared for various
types/models of refrigerators therefore you may find the descriptions of some
accessories and functions that your appliance may not have.
We Care for the Environment
Our appliances are distributed in packaging made of environmental friendly
material which could safely be recycled, disposed of or destroyed without any
effects on the environment whatsoever.
Our instruction manuals are printed either on recycled paper or chlorine free
bleached paper.
Tips for Energy Savings
Try not to open the door too often, especially when the weather is hot and
humid. Once you open the door try to close it as soon as possible.
Every now and then check if the appliance is sufficiently ventilated, for
adequate air circulation behind the appliance.
Set thermostat from higher to lower settings (depending on how loaded the
appliance is, and what the ambient temperature is etc...).
The coils on the rear of the refrigerator should be cleaned periodically so
that it may be free of dust or any other impurities.
Ice and frost layer increase energy consumption, so clean the appliance as
soon as the layer is 1/8” thick.
Always consider instructions stated, in sections “Positioning and Energy
Saving Tips”, otherwise the energy consumption is substantially higher.
Do not place hot foods in the freezer.
A cool dry place allows your freezer to operate more efficiently, so keep
the freezer away from stoves and other heat sources.
Instructions for Use
Important
If you bought this appliance to replace an old one equipped with a lock
that cannot be opened from inside (lock, bolt), make sure that the lock is
broken. This will make it impossible for children to lock themselves
inside the appliance and suffocate.
The appliance must be correctly connected to the power supply. (See
Connecting to the Power Supply).
If the food has a strange smell or color throw it away because it is very
likely that it is spoiled and therefore dangerous to eat.
Disconnect the appliance from the power supply before repairing and
cleaning it (only a qualified technician should repair it).
Use only enclosed tools or tools recommended by the manufacturer.
For the sake of environmental protection be careful not to damage the rear
wall of the appliance (the condenser unit or the tubes when moving the
refrigerator) or any part of the refrigerating system inside the appliance.
Use only enclosed tools or tools recommended by the manufacturer.
The refrigerating system of the appliance is filled with refrigerant and oil,
so when the appliance is damaged handle it with care and dispose of it in
compliance with the environmental protection precautions. (See We Care
for the Environment).
Before throwing away your old refrigerator or freezer please remove the
doors and leave the shelves in place so that children may not easily climb
inside.
DANGER: Risk of child entrapment.
The rating plate is inside the appliance or outside on the rear wall.
Disposing of the Worn Out Appliance
When your appliance finally wears out, dispose of it. If the appliance has
a lock, break it to prevent eventual accidents (danger of children getting
locked inside the appliance).
Instructions for Use
Placing the Self-Standing Appliance
It is important to make sure the appliance is leveled evenly to prevent falling.
Two spacers attached to the appliance must be fitted onto the upper edge of the
condenser, thus preventing the appliance from being installed too close to the
wall. Spacers are manufactured for all-purpose functions depending on the
distance of the condenser from the wall. Therefore turn spacers correspondingly
and adjust them accordingly to the appliance.
Connection to Power Supply
Connect the appliance with the cable and plug to the power supply socket outlet
with a ground terminal (safety socket).
“DO NOT USE AN EXTENSION CORD.”
Required nominal voltage and frequency are indicated on the rating plate.
The connection to the power supply and grounding has to be made according to
current standards and regulations. The appliance resists temporary voltage
tolerance up to -15 to 10%.
Operation Control
The appliance is controlled with the thermostat knob located on the back of
the unit. Turn the knob clockwise from stop position towards max and
backwards.
Temperature Selection
•
•
•
•
•
When the freezer operates automatically, the interior temperature is
controlled by the thermostat. Higher settings on the knob mean colder
temperatures in all compartments of the appliance. The temperature in the
interior of the appliance may even drop below -25°F. Only use higher
thermostat settings when required or recommended. The most suitable
thermostat position is in the middle, between max and min.
Changes of the ambient temperature affects the temperature in the interior
of the appliance (choose the correct setting on the thermostat knob).
When the knob is on the STOP position the appliance does not operate
(the cooling system is switched off), yet the power supply is not
interrupted (the light will still come on if you open the door).
Temperature in the freezer also depends on how often you open and close
the door.
Never use a knife or any other metal objects to remove frost and/or ice.
Doing so may severely damage the refrigeration system.
Instructions for Use
Use
Storing Fresh Foods
• Foods to be stored in the freezer should be properly
packed as to prevent mixing various moisture degrees
and odors (in polyethylene bags or sheet, aluminum foil
and covered containers).
• Never store any inflammable, volatile or explosive
substances.
• Food should not touch the rear wall of the freezer.
• Some organic solutions like volatile oils in lemon and
orange peel, acid in butter etc. can cause damages when
in contact with plastic surfaces or gaskets for a long
period of time.
• An unpleasant odor inside the freezer is a sign that
something is wrong with the food or that your freezer
needs cleaning. Odors may be eliminated or reduced by
washing the interior of the freezer with a mild solution
of water and vinegar. We also recommend using
activated carbon filters to clean the air or to neutralize
odors.
Instructions for Use
Manual Defrosting of the All-Freezer
When the frost and ice layer in the freezer is 1/8” thick you should clean the
freezer.
• First turn the thermostat knob to the STOP (0) position and disconnect the
power supply. Empty the compartment and make sure that the packages
remain frozen.
• Place a suitable vessel under freezer to collect the defrost water. Leave the
freezer door open to accelerate defrosting.
Cleaning the Appliance
Disconnect the power supply before cleaning the appliance. Do not use coarse or
Aggressive cleaning agents as you can damage the surface.
• Clean the exterior with water and detergent. Varnished surfaces are
cleaned with soft cloth and an alcohol based cleaning agent (for example
glass cleaners). You may also use alcohol (ethanol or isopropyl alcohol).
The application of abrasive and especially aggressive cleaners, such as
stainless steel cleaners, is not appropriate for the cleaning of plastic and
coated parts.
• Remove the detachable accessories in the interior of the appliance and
clean it with water and liquid detergent. Plastic parts cannot be washed in
a washing machine.
• Wash the interior of the appliance with lukewarm water, in which you add
one or two spoonfuls of vinegar.
• Every now and then wipe the condenser on the rear wall. Use a soft nonmetal brush or vacuum cleaner.
• After cleaning, connect the appliance to the power supply and reload the
packages.
Instructions for Use
Trouble-Shooting Guide
During the service of your appliance, you can come across some troubles that in
most cases result from improper handling of the appliance that can easily be
eliminated.
The Appliance Fails to Operate After Connecting to the Power Supply
• Check the supply in the outlet socket and make sure the appliance is
switched on (thermostat in the operating position).
Continuous Operation of the Freezer System
• The door was frequently opened or it was left open too long.
• The door is not properly closed (the door may sag; the gasket may be
polluted or damaged).
• Perhaps you have overloaded the appliance with fresh foods.
• The reason may be inadequate ventilation of the compressor and
condenser (assures adequate air circulation and wipe off the condenser).
Ice Formation on the Inner Rear Wall
As long as the defrost water runs to the channel and through the opening to the
drain pan on the compressor, automatic defrosting of the appliance is assured. In
case the ice formation on the inner back wall is increased (1/8”), ice should be
manually defrosted.
Set the thermostat knob to the STOP position and leave the door open. Never use
electric devices for defrosting and do not scrape the ice or frost layer with sharp
objects. After completed defrosting, turn the knob to desired position and close
the freezer door.
The cause of increased ice formation may be one of the following reasons:
- The door does not seal well (clean the gasket if it is contaminated,
or replace it if it is damaged).
- The door was frequently opened or it was left opened for too long.
- The food stored in the freezer was warm.
Instructions for Use
Door swing reversal
(Stainless steel models with towel bar handles do not have reversible doors.)
If you find the direction of opening the door on your appliance inconvenient, you can
change it. Holes on the opposite side have already been prepared at the factory
1. Remove the top hinge cover and hinge (on models with a tabletop, remove the
bottom hinge instead).
2. Next remove the door and remove the bottom hinge.
3. Then remove the kick plate, slide it over to the opposite side and secure in place.
4. Place the lower hinge on the opposite side of the unit and reattach the door,
5. Reattach the top hinge on the opposite side of the unit, it should be aligned with
the bottom hinge
6. Remove handle by unscrewing, place on the opposite side and secure in place.
7. Insert plugs into the holes where the door was initially attached.
8. Check to make sure the door seals properly.
(If it does not, use a hair dryer set on medium to expand the gasket.)
1.
2.
3.
Upper hinge cover
Upper hinge
Lower hinge
4. Kick plate
5. Handle
6 Hole Plugs
Instructions for Use
Noise
The cooling in the freezer is enabled by the compressor, this produces noise.
How noisy the appliance is depends on where it is placed, how it’s used and how
old the appliance is.
• During the operation of the compressor, a liquid noise is heard and when
the compressor is not operating a refrigerant flow is heard. This is a
normal condition and it has no influence whatsoever on the lifetime of the
appliance.
• Sometimes unusual and strong noises occur which is rather unusual for the
appliance. This noise is often a consequence of inadequate placing. To
avoid the noise make sure the appliance is placed and leveled firmly on a
solid base. Make sure the appliance is not touching the wall or kitchen
units standing next to it. And always make sure you check the accessories
in the interior of the appliance; they should be placed correctly in their
positions
Before Calling for Service
Check the plug and fuse.
Test the outlet with a lamp
Be sure the control is not set to OFF
Read the manual, especially the items under the Use and Care sections.
You may find the answer to your questions.
If you don’t find the answer to your questions in this manual, find the
unit model number (on the upper back of the refrigerator) and contact
your Summit Appliance Dealer.
Specifications are Subject to Change Without
Notice.