1
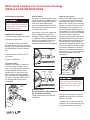
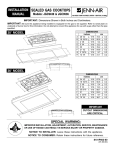
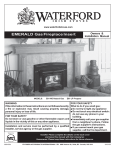
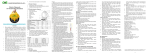
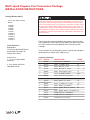
W olf Liquid Propane Fuel Conversion Package
INSTALLATION INSTRUCTIONS
Package Number 806077
•
For use with WOLF Cooktop
Models:
CT36G/S
CT36G/P
CT30G/S
CT30G/P
CT15G/S
CT36G/S-2
CT36G/P-2
CT30G/S-2
CT30G/P-2
CT15G/S-2
• Tools Needed for
Conversion:
This conversion kit shall be installed by a qualified service agency in accordance with manufactures instructions and all applicable codes and requirements of the authority having jurisdiction. If the information in these instructions is not followed exactly, a fire, explosion or production of carbon monoxide may result causing property damage, personal injury or loss of life. The
qualified service agency is responsible for the proper installation of this kit.
The installation is not proper and complete until the operation of the converted appliance is checked as specified in the manufacturer’s instructions supplied with this kit.
These instructions contain procedural information to convert a Wolf
Gas Cooktop from natural gas to liquid propane for above listed models. This kit contains extra components when converting all Gas
Cooktops.
7/8”(22mm) Socket and Ratchet
Small Blade Flat Head & #1
Phillips Screw Driver
This conversion kit was designed to convert a natural gas cooktop to
liquid propane for altitude up to 8,000’(2.4 km).
Screw Driver:
7, 11, 12 mm Open Ended
Wrenches
Contents of Package:
QTY PART #
DESCRIPTION
4, 7mm Socket with Driver
Adjustable Wrench
STAMP
1
806074
O-ring, Service, Cooktop-2
3
801319
Orifice, Jet Holder .91mm
91
3
805642
Orifice, Dist Ring .37mm
G
3
801322
Orifice, Metering Jet, .33mm
33
3
805645
Orifice, Valve Bypass .37mm
37
2
801318
Orifice, Jet Holder 1.04mm
104
2
801320
Orifice, Outer Dist. Ring .46mm
X
2
800891
Orifice, Valve Bypass Jet, .46mm
46
2
801323
Orifice, Simmer Jet, .36mm
36
1
805251
Orifice, Jet Holder, LP, 1.15mm
115
1
804125
Orifice, Simmer, LP, 15KBTU
P
1
804127
Orifice, Bypass, Main, LP, 15KBTU
60
1
804129
Orifice, Bypass, Simmer, LP, 15KBTU 39
1
803308
Rating Label, LP, CT15/30/36G
1
806323
Rating Label, LP, Conversion-2
1
803307
Instructions LP Conversion
1
W olf Liquid Propane Fuel Conversion Package
INSTALLATION INSTRUCTIONS
Conversion Instructions
Before proceeding with the conversion, shutoff the gas supply to
the appliance prior to disconnecting the electrical power.
Cooktop Pan Removal
1) Remove grates and burner heads.
2) Remove control knobs.
3) It may be necessary to carefully
pull spark igniters out of the inner distribution rings. Do not damage or bend
the electrode tip. Remove electrode
wire.
Simmer Orifice
Using the 11mm open-ended wrench,
remove the ferrule nut holding the flex
tubing. Using the adjustable wrench
and 12mm open-ended wrench,
remove the orifice fitting from the air
shutter housing. Using the 4mm socket, unscrew the orifice.
On the large 15K burner, replace the
orifice stamped S with the orifice
stamped P. On the medium 12K burner, replace the orifice stamped M with
the orifice stamped X. On the small
9.2K burner, replace the orifice
stamped J with the orifice stamped G.
FERRULE
NUT
4) Remove brass venturis with 7/8”
(22) socket.
Valve by-pass Screws
Using the #1 Phillips head screw driver, remove the ring light and rubber
splashguard to expose the valve bypass screws. On the large 15K burner,
replace the main by-pass valve screw
stamped 97 with the by-pass valve
screw stamped 60. Replace the simmer by-pass valve screw stamped 62
with the by-pass valve screw stamped
39. On the medium 12K burner,
replace the main by-pass valve screw
stampede 61 with the by-pass valve
46. Replace the simmer by-pass valve
screw stamped 57 with the by-pass
valve screw stamped 36. On the small
9.2K burner, replace the main by-pass
valve screw stamped 57 with the bypass screw stamped 33. Replace the
simmer by-pass valve screw stamped
54 with the by-pass valve screw
stamped 37.
MAIN BY-PASS
VALVE SCREW
5) Lift off cooktop pan.
Jet Holder Orifice
Using the 7mm socket, unscrew the
orifice from each jet holder. On the
large 15 K burner, replace the the orifice stamped 178 with the orifice
stamped 115. On the medium 12K
burner, replace the orifice stamped
161 with the orifice stamped 104. On
the small 9.2K burner, replace the orifice stamped 140 with the orifice
stamped 91.
AIR SHUTTER
HOUSING
ORIFICE
FITTING
ORIFICE
Cooktop Reassembly:
Anytime the cooktop is dissembled,
new o-rings must be installed (kit
#802330). Failure to replace these
o-rings could cause internal gas
leak.
JET
HOLDER
ORIFICE
SIMMER BY-PASS
VALVE SCREW
Important Note:
Do not make any adjustments to
the air shutter openings.
These settings have been tested to
7,000’(2km)
For ease of reassembly, remove the
cooktop burner box from the counter
before re-assembly.
1) Replace the o-rings as shown for
all burners. The outer distribution ring,
o-ring has a thinner cross section.
2
W olf Liquid Propane Fuel Conversion Package
INSTALLATION INSTRUCTIONS
Do not use the fatter cross section
o-ring at this location. It will cause a
gas leak when assembled. These
are special high temperature orings that cannot be substituted.
ODR UPPER
O-RING
ALIGNMENT
LIP
ODR
GASKET
OUTER
DISTRIBUTION
RING –
15,000 BTU/HR
BURNER
UPPER
O-RING
ALIGNMENT
LIP
LOWER
O-RING
3.) Replace the o-rings in the inner
distribution rings. These o-rings have
larger cross section and will have a
slip fit into the inner distribution ring to
hold it in place during installation.
Do not use the thinner cross section o-ring at this location. It will
cause a gas leak when assembled.
These are special high temperature
o-rings that cannot be substituted.
4.) Center the outer distribution rings
within the openings of the cooktop
pan. The alignment lip of the outer distribution ring must protrude through
the cooktop pan. Applying pressure to
the cooktop pan until the inner distribution ring is tightened helps ease
assembly.
5.) Tighten the brass venturi inside the
inner distribution ring to 100 in-lb.
6.) If applicable, replace electrodes,
burner caps and grates.
OUTER
DISTRIBUTION RING
9.2K & 12K BTU/HR
BURNER
2.) Install the cooktop pan in place
over the outer distribution rings. Make
sure the correct spark electrode wires
are pulled up through the appropriate
burner locations.
7.) If applicable, verify the electrode
position. Make sure it is pushed all the
way down until it is seated and captured by the alignment dimple of the
inner distribution ring. The electrode
tip should be facing toward the front of
the unit and be at the same height as
the second row of burner ports from
the top of the burner head. The spark
gap should be .100” from the burner
head.
Gas Regulator:
Convertible Gas Regulator
Use a 23mm, or 7/8” socket or wrench
to remove the regulator access cap.
On the inside of the cap, remove the
plastic insert (see illustration) and
invert it so that the disk end is out and
replace in the cap. Replace the cap
into the regulator.
SETTING FOR
NATURAL GAS
SETTING FOR
LP
Manifold Pressure:
With the conversion complete, the
manifold pressure should be 10”
(254mm) of water column. The supply
pressure should be from an approved
LP source at minimum and maximum
pressure of 11” (279mm) and 14”
(356mm) of water column respectively.
Flame Characteristics:
The flame produced by the burner
should be a quiet, blue flame with very
little yellow tipping and exhibiting no
lifting or blowing. The following illustration shows a desirable flame.
NORMAL HARD FLAME
No modifications should be need to be
made to the flame.
3
W olf Liquid Propane Fuel Conversion Package
INSTALLATION INSTRUCTIONS
Ignition System:
If the unit is operating properly after
conversion, the burners must ignite
within 4 seconds of gas flowing out of
the burner ports. If the flame is extinguished, the unit must automatically
re-ignite within 4 seconds. When the
burner is operating correctly, with a
proper, hard flame, the unit must not
be sparking.
Leak Testing:
With all orifices converted, use a specialized gas detection tool to detect
any gas leakage into the burner box.
This is done by placing the collection
end of the gas detection tool in the
access holes in the front lower corners
of the burner box. After checking for
leaks with the burners off, turn on all
the burners and recheck for leaks.
Labels:
Once installation of all orifices is complete, and all the appropriate tests
have been satisfied, fill out all applicable information and affix the appropriate LP cooktop rating label as close
as possible to the existing rating plate.
4
803307 REV-D 1-05