1
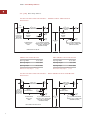
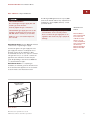
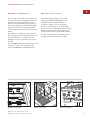
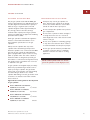
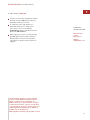
GAS BBQ GRILLS
I NSTALLATION I NSTRUCTIONS
As you follow these instructions, you will
notice WARNING and CAUTION symbols.
This blocked information is important for the
safe and efficient installation of Wolf equipment. There are two types of potential
hazards that may occur during installation.
signals a situation where minor injury or
product damage may occur if you do not
follow instructions.
states a hazard that may cause serious
injury or death if precautions are not
followed.
Another footnote we would like to identify is
IMPORTANT NOTE: This highlights information that is especially relevant to a problemfree installation.
WOLF ® is a registered trademark of Wolf Appliance Company, LLC
WO L F GAS BBQ GRILLS
I N S TA L L AT I O N R E Q U I R E M E N T S
IMPORTANT NOTE: This installation must
be completed by a qualified installer,
service agency or gas supplier.
IMPORTANT NOTE: Save these Installation
Instructions for the local inspector’s use.
Please read the entire Installation Instructions prior to installation.
Installer: please retain these instructions
for local inspector’s reference, then leave
them with the homeowner.
Homeowner: please read and keep these
instructions for future reference and be sure
to read the entire Use & Care Information
prior to use.
IMPORTANT NOTE: This appliance must be
installed in accordance with National Electrical
Codes, as well as all state, municipal and local
codes. The correct voltage, frequency and
amperage must be supplied to the appliance
from a dedicated, grounded circuit which is
protected by a properly sized circuit breaker or
time delay fuse. The proper voltage, frequency,
and amperage ratings are listed on the product
rating plate.
Record the model and serial numbers before
installing the gas BBQ grill. Both numbers are
listed on the product rating plate, located on
the rear panel of the grill.
If the information in this book is
not followed exactly, a fire or
explosion may result, causing
property damage, personal injury
or death.
Do not store or use gasoline or
other flammable vapors and
liquids in the vicinity of this or
any other appliance.
C O N TA C T
I N F O R M AT I O N
Wolf Customer
Service:
800-332-9513
Website:
wolfappliance.com
An LP gas cylinder not connected
for use shall NOT be stored in the
vicinity of this or any other
appliance.
IMPORTANT NOTE:
Installation and service must be
performed by a qualified installer,
service agency or the gas supplier.
Warranty service must be performed
by a Wolf authorized service center.
WHAT TO DO IF YOU SMELL GAS:
Shut off gas to the appliance.
Model Number
Extinguish any open flame.
Serial Number
Open the lid or hood.
If the odor continues, immediately
call your gas supplier or fire
department.
3
WO L F GAS BBQ GRILLS
P O RTA B L E L O C AT I O N S
B U I LT- I N L O C A T I O N S
L O C AT I O N C O N S I D E R A T I O N S
Your Wolf BBQ grill is designed for easy
placement into a built-in enclosure. For a
combustible enclosure, use the optional insulated liner and build your opening according to
the Installation Specifications illustration for
your specific model on pages 8–9. For noncombustible masonry or other enclosure, also
follow the specifications on pages 8–9.
Maintain specified clearances.
Consider the following when choosing a site
for using your Wolf BBQ grill:
Always maintain a minimum clearance of
24" (610) from all four sides of the grill to
any combustible surface.
The grill should be level and not be
exposed to the wind during use.
Lock the wheel casters when you have
positioned the grill in a safe location.
Both installations require a deck to support the
bottom. Review the Installation Specifications
illustration for your specific installation and
note provisions required for the gas line hookup at the rear right and bottom surfaces. It is
recommended that ventilation holes be
provided in the enclosure so that gas will not
become entrapped in the event of a leak. The
supporting deck and counter should be level
and flat. The enclosure should be strong
enough to support 400 lbs (181 kg).
Keep fuel hoses and power supply cords
away from hot surfaces.
L O C AT I O N C O N S I D E R AT I O N S
Never locate the grill in an enclosed area,
such as a garage, shed, breezeway or under
overhead combustible construction. Keep
clear of trees and shrubs.
Allow adequate area for smoke to dissipate.
Allow for an adequate supply of fresh air
for proper combustion and ventilation.
This outdoor BBQ grill is not intended to be
installed in or on recreational vehicles or
boats.
When deciding where your permanent built-in
location will be, consider the following:
Keep gas lines as short as possible.
Use only extension cords that are specified
for outdoor use.
The BBQ grill should be level and not
exposed to the wind.
Never locate the BBQ grill in an enclosed
area, such as a garage, shed, breezeway or
under overhead combustible construction.
Keep clear of trees and shrubs.
Optional insulated liner must be used if
installing into combustible material.
Allow adequate area for smoke to dissipate.
Allow for an adequate supply of fresh air
for proper combustion and ventilation.
Examine foot traffic patterns and serviceability of the unit if necessary.
4
I N S TA L L AT I O N I N S T R U C T I O N S
I N S TA L L AT I O N C O N S I D E R AT I O N S
COMBUSTIBLE S U R FA C E S
Safe and satisfactory operation of your Wolf
BBQ grill depends upon its proper installation.
The installation, adjustments and service of
this grill must be performed by a qualified
installer, service agency or gas supplier. This
is necessary to ensure proper operation and
avoid accidents which may occur through
misuse of the BBQ grill.
B U I LT- I N M I N I M U M C L E A R A N C E S
All minimum clearances to combustible
surfaces must be observed.
Be sure the appliance is properly grounded to
avoid shock hazard.
You must follow all National Electrical Code
and gas regulations. In addition, be aware of
local code or ordinances when installing your
service.
A minimum of 18" (457) from the sides and 18"
(457) from the back required above and below
the cooking surface to adjacent vertical
combustible surfaces. A minimum of 6" (152)
to the side is required for space for the rotisserie motor.
Refer to the Overall Dimensions illustration for
your specific model on pages 6–7. For exact
rough opening dimensions, refer to the
Installation Specifications illustration for your
specific installation on pages 8–9.
IMPORTANT NOTE: The optional insulated
liner is necessary when the BBQ grill is to be
placed into a combustible enclosure. Use only
the approved insulated liner which has been
specifically designed and tested for this
purpose, available through your Wolf dealer.
ACCESSORIES
Optional accessories are available
through your
Wolf dealer. To
obtain local dealer
information, visit
the Locator section
of our website,
wolfappliance.com.
Failure to locate the BBQ grill without
the proper clearances will result in a fire
hazard.
Dimensions in parentheses are in
millimeters unless otherwise specified.
5
WO L F GAS BBQ GRILLS
36" (914) G A S B B Q G R I L L S
O V E R A L L D I M E N S I O N S – B U I L T- I N M O D E L S
Model BBQ36BI shown
30" (762)
OVERALL DEPTH
30 3/8" (771) WITH HOOD OPEN
29 3/4"
26"
(756)
HEIGHT
WITH
HOOD
OPEN
(660)
OVERALL
HEIGHT
91/2" (241)
TO GRILLING
SURFACE
25 5/8" (651)
36" (914)
OVERALL WIDTH
B U I LT- I N M O D E L S
C A RT M O D E L S
Overall Width
36" (914)
Overall Width
36" (914)
Overall Height
26" (660)
Overall Height
52 3/4" (1340)
Height to Grilling Surface
Overall Depth
9 1/2" (241)
Height to Grilling Surface 36 1/4" (921)
30" (762)
Overall Depth
Dimensions may vary to ± 1/8" (3).
30" (762)
Dimensions may vary to ± 1/8" (3).
O V E R A L L D I M E N S I O N S – C A RT M O D E L S
Model BBQ36C shown
30" (762)
OVERALL DEPTH
30 3/8" (771) WITH HOOD OPEN
56 1/2"
26"
(1435)
HEIGHT
WITH
52 3/4" HOOD
(1340) OPEN
OVERALL
HEIGHT
(660)
HEIGHT
OF GRILL
36 1/4" (921)
TO GRILLING
SURFACE
26 3/4"
(680)
HEIGHT
OF CART
6"
(152)
36" (914)
OVERALL WIDTH
6
25 5/8" (651)
I N S TA L L AT I O N I N S T R U C T I O N S
48" (1219) G A S B B Q G R I L L S
O V E R A L L D I M E N S I O N S – B U I L T- I N M O D E L S
Model BBQ362BI shown
30" (762)
OVERALL DEPTH
30 3/8" (771) WITH HOOD OPEN
36" (914)
29 3/4"
26"
(756)
HEIGHT
WITH
HOOD
OPEN
(660)
OVERALL
HEIGHT
9 1/2" (241)
TO GRILLING
SURFACE
25 5/8" (651)
48" (1219)
OVERALL WIDTH
B U I LT- I N M O D E L S
C A RT M O D E L S
Overall Width
48" (1219)
Overall Width
48" (1219)
Overall Height
26" (660)
Overall Height
52 3/4" (1340)
Height to Grilling Surface
Overall Depth
9 1/2" (241)
30" (762)
Dimensions may vary to ± 1/8" (3).
Height to Grilling Surface 36 1/4" (921)
Overall Depth
30" (762)
Dimensions may vary to ± 1/8" (3).
O V E R A L L D I M E N S I O N S – C A RT M O D E L S
Model BBQ362C shown
30" (762)
OVERALL DEPTH
30 3/8" (771) WITH HOOD OPEN
36" (914)
56 1/2"
26"
(1435)
HEIGHT
WITH
52 3/4" HOOD
(1340) OPEN
OVERALL
HEIGHT
(660)
HEIGHT
OF GRILL
36 1/4" (921)
TO GRILLING
SURFACE
26 3/4"
(680)
HEIGHT
OF CART
6"
(152)
48" (1219)
OVERALL WIDTH
Dimensions in parentheses are in
millimeters unless otherwise specified.
25 5/8" (651)
7
WO L F GAS BBQ GRILLS
36" (914) G A S B B Q G R I L L S
I N S TA L L A T I O N S P E C I F I C A T I O N S – C O M B U S T I B L E E N C L O S U R E
Built-In Models
18"
(457) min
38 1/4" (972)
ROUGH OPENING WIDTH
27 3/4" (705)
ROUGH OPENING
DEPTH
18"
(457) min
E
10 1/2" (267)
LOCATE
ELECTRICAL
OUTLET FOR
ROTISSERIE
ON LEFT SIDE
ALLOW OPENING
FOR ACCESS
DOOR
10 1/2" (267)
3 1/8"
ROUGH
OPENING
HEIGHT
ROUGH
OPENING
HEIGHT
(79)
3 3/4" (95)
3 1/8"
(79)
C
L
2" (51) DIAMETER OPENING
FOR GAS SUPPLY CONNECTION
(BACK WALL LOCATION OR
BOTTOM LOCATION)
18"
(457) min
2 7/8"
(73)
C
L
2" (51) DIAMETER OPENING
FOR GAS SUPPLY CONNECTION
(BOTTOM LOCATION)
36 1/2"max
(927)
COMBUSTIBLE ENCLOSURE
NOTE: Dimensions include insulated liner.
COMBUSTIBLE ENCLOSURE
NON-COMBUSTIBLE ENCLOSURE
Opening Width
38 1/4" (972)
Opening Width
36 1/4" (921)
Opening Height
10 1/2" (267)
Opening Height
9 1/2" (242)
Opening Depth
27 3/4" (705)
Opening Depth
26 3/4" (680)
Dimensions may vary to ± 1/8" (3).
Dimensions may vary to ± 1/8" (3).
I N S TA L L A T I O N S P E C I F I C A T I O N S – N O N - C O M B U S T I B L E E N C L O S U R E
Built-In Models
6"
(152)
min
6"
36 1/4" (921)
ROUGH OPENING WIDTH
26 3/4" (680)
ROUGH OPENING
DEPTH
(152)
min
E
LOCATE
ELECTRICAL
OUTLET FOR
ROTISSERIE
ON LEFT SIDE
9 1/2" (242)
ROUGH
OPENING HEIGHT
ROUGH
OPENING HEIGHT
(54)
2 1/8"
1 7/8"
(54)
ALLOW OPENING
FOR ACCESS
DOOR
C
L
2" (51) DIAMETER OPENING
FOR GAS SUPPLY CONNECTION
(BACK WALL LOCATION OR
BOTTOM LOCATION)
NON-COMBUSTIBLE ENCLOSURE
8
9 1/2" (242)
2 1/8"
2 3/4"
(70)
3"
(76)
min
36 1/2"max
(927)
(48)
C
L
2" (51) DIAMETER OPENING
FOR GAS SUPPLY CONNECTION
(BOTTOM LOCATION)
I N S TA L L AT I O N I N S T R U C T I O N S
48" (1219) G A S B B Q G R I L L S
I N S TA L L A T I O N S P E C I F I C A T I O N S – C O M B U S T I B L E E N C L O S U R E
Built-In Models
18"
(457) min
50 1/4" (1276)
ROUGH OPENING WIDTH
27 3/4" (705)
ROUGH OPENING
DEPTH
18"
(457) min
E
10 1/2" (267)
LOCATE
ELECTRICAL
OUTLET FOR
ROTISSERIE
ON LEFT SIDE
10 1/2" (267)
3 1/8"
ROUGH
OPENING
HEIGHT
18"
(457) min
ROUGH
OPENING
HEIGHT
(79)
3 3/4" (95)
3 1/8"
(79)
ALLOW OPENING
FOR ACCESS
DOOR
CL
2" (51) DIAMETER OPENING
FOR GAS SUPPLY CONNECTION
(BACK WALL LOCATION OR
BOTTOM LOCATION)
2 7/8"
(73)
CL
2" (51) DIAMETER OPENING
FOR GAS SUPPLY CONNECTION
(BOTTOM LOCATION)
36 1/2"max
(927)
COMBUSTIBLE ENCLOSURE
NOTE: Dimensions include insulated liner.
COMBUSTIBLE ENCLOSURE
NON-COMBUSTIBLE ENCLOSURE
Opening Width
50 1/4" (1276)
Opening Width
48 1/4" (1226)
Opening Height
10 1/2" (267)
Opening Height
9 1/2" (242)
Opening Depth
27 3/4" (705)
Opening Depth
26 3/4" (680)
Dimensions may vary to ± 1/8" (3).
Dimensions may vary to ± 1/8" (3).
I N S TA L L A T I O N S P E C I F I C A T I O N S – N O N - C O M B U S T I B L E E N C L O S U R E
Built-In Models
6"
(152)
min
6"
48 1/4" (1226)
26 3/4" (680)
ROUGH OPENING
DEPTH
(152)
min
ROUGH OPENING WIDTH
E
LOCATE
ELECTRICAL
OUTLET FOR
ROTISSERIE
ON LEFT SIDE
9 1/2" (242)
ROUGH
OPENING HEIGHT
9 1/2" (242)
2 1/8"
2 3/4"
ROUGH
OPENING HEIGHT
(54)
(70)
2 1/8"
1 7/8"
(54)
ALLOW OPENING
FOR ACCESS
DOOR
CL
2" (51) DIAMETER OPENING
FOR GAS SUPPLY CONNECTION
(BACK WALL LOCATION OR
BOTTOM LOCATION)
3"
(76)
min
36 1/2"max
(927)
(48)
CL
2" (51) DIAMETER OPENING
FOR GAS SUPPLY CONNECTION
(BOTTOM LOCATION)
NON-COMBUSTIBLE ENCLOSURE
Dimensions in parentheses are in
millimeters unless otherwise specified.
9
WO L F GAS BBQ GRILLS
ELECTRICAL R E Q U I R E M E N T S
IMPORTANT NOTE: This appliance must be
properly grounded to avoid shock hazard.
I M P O R TA N T
N OT E
You must follow
all National
Electrical Code
regulations. In
addition, be aware
of local codes and
ordinances when
installing your
service.
In applications where there is a rear wall
behind the BBQ grill, locate the electrical
service on the left hand side for the rotisserie
motor. The rotisserie motor requires a 110/120
V AC supply. The 6' (1.8 m) power supply cord
on the motor is equipped with a 3-prong
grounding plug. To minimize possible shock
hazard, the cord must be plugged into a
mating 3-prong ground-type outlet, grounded
to conform with the National Electrical Code,
ANSI/NFPA 70 latest edition, or Canadian Electrical Code (CSA) and all local codes and ordinances. Refer to the illustration below.
IMPORTANT NOTE: You must have a properly
grounded, 3-prong outlet installed by a
qualified electrician.
IMPORTANT NOTE: Do not ground to a gas
pipe.
IMPORTANT NOTE: Keep the power supply
cord and fuel hose away from hot surfaces.
Do not cut or remove the grounding prong
from the plug.
Grounding Plug
Grounding-Type
Electrical Outlet
Electrical ground
10
I N S TA L L AT I O N I N S T R U C T I O N S
G A S S U P P LY R E Q U I R E M E N T S
EXPLOSION HAZARD —
Use a new approved gas supply line and
install a gas shut-off valve.
The Wolf gas BBQ grill functions up to 6,000'
(1828 m) in altitude without any adjustment. If
installation is above 6,000' (1828 m), contact
your Wolf dealer.
I M P O R TA N T
N OT E
Securely tighten all gas connections.
The maximum gas supply pressure to the
regulator should never exceed 14" (34.9
mb) WC (water column); .5 psi (3.5 kPa).
Before connecting the gas supply, make
sure all valves are in a closed position.
Failure to do so can result in explosion,
fire or death.
Do not connect the gas supply line to an
appliance that shows any sign of physical
damage.
IMPORTANT NOTE: The gas BBQ grill must be
connected to a regulated gas supply.
Connect the grill to the gas supply line. The
gas supply line must be of adequate size to
properly service all gas appliances. Wolf
recommends the use of a 1/2" (13) I.D. commercial type flex hose; a 1/2" (13) I.D. commercial
type flex is the minimum size that may be
used. All plumbing to the flex hose MUST be
3/4" (19) minimum I.D. pipe.
This installation
must conform with
local codes and
ordinances. In the
absence of local
codes, installations
must conform with
the American
National Standard,
National Fuel Gas
Code.
IMPORTANT NOTE: For complete gas
shutdown, an external gas shut-off valve must
be located near the appliance in an accessible
location. Refer to the illustration below.
SHUT-OFF VALVE
Open Position
To Appliance
Gas Supply
Line
Shut-off valve
Dimensions in parentheses are in
millimeters unless otherwise specified.
11
WO L F GAS BBQ GRILLS
G A S S U P P LY R E Q U I R E M E N T S
GAS MANIFOLD PRESSURE
For Natural Gas: Standard orifices
are set for 5" (12.5 mb) WC (water column).
A natural gas pressure regulator is
included.
For LP Gas: Standard orifices are set for
10" (25 mb) WC (water column). An LP gas
pressure regulator is connected to the hose
provided with the grill.
Gas Supply Pressure: For checking the
regulator setting, the maximum line
pressure for natural and LP gas: 14"
(34.9 mb) WC; .5 psi (3.5 kPa). Minimum
line pressure for natural gas: 7" (17.5 mb)
WC. Minimum line pressure for LP gas:
11" (27.4 mb) WC.
Gas Supply Regulator: To control and
maintain a uniform gas pressure in the gas
manifold, the unit must be used with a gas
pressure regulator. The burner orifices, etc.
are sized for the gas pressure delivered by
the supplied regulator. Do not remove the
regulator.
The maximum gas supply pressure to
the regulator should never exceed 14"
(34.9 mb) WC; .5 psi (3.5 kPa).
12
LINE PRESSURE TESTING
Testing above .5 psi (3.5 kPa) 14" (34.9 mb)
WC (gauge): The BBQ grill and its individual
shut-off valve must be disconnected from the
gas supply piping system during any pressure
testing of that system at test pressures greater
than .5 psi (3.5 kPa).
I N S TA L L AT I O N I N S T R U C T I O N S
BBQ GRILL C O M P O N E N T S
B AT T E RY I N S T A L L A T I O N
The porcelain-coated cast iron grill grates are
5" (127) wide for easy handling and cleaning.
Below the heavy-duty grill grates are the
stainless steel heat radiants located every 5"
(127). These radiants, provided with the BBQ
grill, are positioned over the grill burners to
concentrate the heat. Refer to the illustrations
below.
The battery-powered ignition uses a AAA
battery, provided with the BBQ grill, to be
installed behind each ignition button.
The radiants are supported on each end by a
pin located just above the grill burner. Be sure
the heat radiants are oriented so that the
triangular cut-out is positioned to the rear of
the grill.
To install or replace, remove the ignition
button by unscrewing in a counterclockwise
direction. Insert the AAA battery into the cavity
with the positive end in first and replace the
ignition button. Refer to the illustration below.
To make sure the sparker is operating, press
the ignition button and listen for a spark.
The Wolf BBQ grill design eliminates the use of
briquettes or lava rocks. The grill burners
produce 10,000 Btu/hr (2.9 kW) per burner.
Grill Grate
Radiant
Burner
Insert battery behind
ignition button
BBQ grill components
Dimensions in parentheses are in
millimeters unless otherwise specified.
Radiant positioning
Location of battery
13
WO L F GAS BBQ GRILLS
N AT U R A L G A S H O O K - U P
LP GAS H O O K - U P
For Wolf natural gas BBQ grill models, hook-up
is made from the rear right side with the
fittings and regulator shown. The coupling,
pipe nipple, street elbow and regulator are
provided. To hook up the fittings, refer to the
illustrations below. Make sure the flow arrow
on the regulator points in the direction of the
gas flow from the gas supply to the BBQ grill.
Wolf BBQ grills set up for use with LP gas
come equipped with a 5' (1.5 m) hose, regulator and an unfilled 20-pound LP gas cylinder.
LP (liquefied petroleum) gas is sometimes
called propane, butane or bottled gas. It is a
flammable gas which becomes liquid when
stored under high pressure inside a cylinder
and it vaporizes when released.
LP gas is heavier than air. Leaking LP gas tends
to collect in low areas and could cause a fire or
explosion. It is important there are no leaking
connections on your gas BBQ grill. Refer to the
Gas Leak Testing on page 17.
Manifold Pipe
Regulator
To Grill
Vent
Regulator
Adapter
Close Nipple
Shut-Off Valve
Natural gas hook-up
14
From
Gas Supply
Natural gas regulator
I N S TA L L AT I O N I N S T R U C T I O N S
LP GAS C Y L I N D E R
T R A N S P O RT I N G T H E C Y L I N D E R
C Y L I N D E R S P E C I F I C AT I O N S
Any LP gas cylinder used with this BBQ grill
must be approximately 12" (305) diameter and
18" (457) high. The maximum fuel capacity is
20 lbs (9.1 kg) or 5 gallons (19 L). The full
cylinder weight should be approximately 38
lbs (17.2 kg), which is 43.7 lbs (19.8 kg)
nominal water capacity. The LP gas cylinder
must be provided with an approved overfilling
preventive device (OPD).
All LP gas cylinders used with this appliance
must be constructed and marked in accordance with the specifications for LP gas
cylinders.
Always use the cylinder dust cap on the
cylinder valve outlet during transport and
when the cylinder is not connected to the BBQ
grill. The LP gas cylinder provided with the
grill is equipped with a quick connect closing
(QCC-1) cylinder valve. The valve contains a
backcheck which is designed to prevent gas
flow until it is connected to the regulator. Keep
the cylinder valve closed when it is not in use
or attached to the grill.
Transport only one LP gas cylinder at a
time. Transport the cylinder in an upright
and secure manner with the control valve
turned off and the dust cap in place.
Do not transport the cylinder in the passenger compartment.
Do not leave a cylinder in direct sunlight or
in a high heat area such as a closed car
trunk. High heat areas could cause the relief
valve to vent gas.
Do not store cylinders in a building, garage
or any other enclosed area. Store outdoors
in a well ventilated area away from people.
The LP gas cylinder must be provided with
a cylinder connection device compatible
with the connection for outdoor cooking
appliances.
Handle a filled cylinder with care. The LP
gas in the cylinder is under high pressure.
LP gas cylinders are shipped empty for safety.
Allow only a qualified LP gas dealer to fill or
repair your LP gas cylinder. The gas dealer
must purge a new cylinder of air before filling
it. Caution the gas dealer not to overfill
cylinder. After filling, have the gas dealer check
for leaks to see that the relief valve remains
free to function.
Approximate running time for the 20-pound
LP gas cylinder:
Models BBQ242BI and BBQ242C
80,000 Btu/hr (23.4 kW)
5 1/2 hours
Models BBQ36BI and BBQ36C
69,000 Btu/hr (20.2 kW)
6 1/2 hours
Models BBQ362BI and BBQ362C
4 1/2 hours
101,000 Btu/hr (29.6 kW)
Models BBQ48BI and BBQ48C
89,000 Btu/hr (26.1 kW)
Dimensions in parentheses are in
millimeters unless otherwise specified.
5 hours
15
WO L F GAS BBQ GRILLS
L P G A S R E G U L AT O R
Hold the regulator in one hand and insert
the nipple into the cylinder valve. Be sure
the nipple is centered in the valve outlet.
Hand tighten the coupling nut. Do not
cross-thread the connection.
AT T A C H I N G T H E R E G U L A T O R
The pressure regulator and hose assembly
supplied with this appliance must be used.
The pressure regulator and hose assembly
provided is factory set at an outlet pressure of
10" (25 mb) WC; .4 psi (2.8 kPa). The BBQ grill
regulator is equipped with a coupling nut.
Refer to the illustrations below. Do not attempt
to connect to any LP gas cylinder not equipped
with a mating quick connect closing (QCC-1)
cylinder valve.
The coupling nut connects to the large outside
thread on the valve outlet. To complete the
connection, follow these steps:
Make sure all grill burner valves (including
open burner and rotisserie if so equipped)
are in the OFF position.
Make sure the cylinder valve handwheel is
in the closed position. Turn clockwise (left
to right) to full stop.
Turn the coupling nut clockwise (left to
right) to tighten to a full stop.
IMPORTANT NOTE: In the connection
process, the grill side of the connection will
seal on the backcheck in the valve, resulting in
a slight resistance. An additional 1/2 to 3/4 turn
will be required to complete the connection.
Tighten by hand only. Do not use tools.
If you cannot complete the final connection,
disconnect the regulator and repeat the last
two steps. If you are still unable to complete
the connection, do not use this valve and
regulator. Call your Wolf dealer or Wolf authorized service center to order the replacement
parts.
Remove the protective caps from the
cylinder valve and coupling nut.
DO NOT insert any foreign objects into
the valve outlet. The backcheck may be
damaged. A damaged backcheck can be
the source of a leak. Leaking LP gas may
result in explosion, fires, severe personal
injury or death.
Manifold Pipe
Coupling Nut
Coupling Nut
Regulator
To Grill
LP Gas
Cylinder
Vent Points Down
Regulator
LP Gas
Cylinder
LP gas hook-up
16
LP gas regulator
I N S TA L L AT I O N I N S T R U C T I O N S
GAS LEAK T E S T I N G
Perform a gas leak test each time the LP gas
cylinder is connected to the regulator and any
time part of the gas system is disconnected or
replaced. This applies to natural gas as well as
LP gas. Perform a leak test at least once each
year whether the LP gas cylinder has been
disconnected or not.
Test for leaks at the cylinder valve, cylinder
welds, regulator (especially attached to
cylinder valves), hose and connections.
NO SMOKING! Do not use or permit sources
of ignition in the area while doing a leak test.
Conduct leak tests outdoors in a well ventilated area.
Do not use a flame, such as a lighted match to
test for leaks. Use only a soap and water
solution for leak testing, such as half liquid
soap and half water.
Have a dealer check the cylinder for deterioration when the tank is filled in accordance with
regulations. Immediately replace cylinder if
any deterioration is found.
Testing for gas leakage of the appliance
shall be conducted according to the
manufacturer’s instructions.
L E A K T E S T I N G P RO C E D U R E
Check that all the control knobs are in the
OFF position.
Mix a solution of half liquid soap and half
water.
Turn the cylinder valve knob counterclockwise one turn to open.
Apply the soap and water solution on joints
of the gas delivery system.
Bubbles in the soap and water solution
indicates that a leak is present.
Stop a leak by tightening the loose joint or
by replacing the faulty part with a replacement part recommended by the manufacturer. Do not attempt to repair the cylinder
valve if it should become damaged. The
cylinder must be replaced.
If you are unable to stop a leak, shut off the
gas supply at the cylinder valve. Remove
the cylinder from the grill. Call a Wolf
authorized service center. Do not use the
appliance until the leak is corrected.
Push in and turn any control knob to the on
position to release pressure in the hose and
manifold.
Turn OFF the control knob.
Do not store a spare LP gas cylinder
under or near this appliance.
Never fill the cylinder more than 80% full.
If this information is NOT followed
exactly, a fire causing death or serious
injury may occur.
Dimensions in parentheses are in
millimeters unless otherwise specified.
17
WO L F GAS BBQ GRILLS
I N S TA L L A T I O N C H E C K L I S T
TROUBLES H O OT I N G
IMPORTANT NOTE: To ensure a safe and
proper installation, the following checklist
should be completed by the installer to be
sure that no part of the installation has been
overlooked.
IMPORTANT NOTE: If the gas BBQ grill
does not operate properly, follow these
troubleshooting steps:
Any questions or problems about the installation should be directed to your Wolf dealer or
the Wolf Customer Service Department at
800-222-7820. You can also visit our website at
wolfappliance.com.
All internal packaging has been removed
All shipping restraints have been removed
from the burners
Radiants are oriented properly over grill
burners with triangular cut-out positioned to
the rear of the grill
Specified clearances to any combustible
materials have been maintained
Batteries are installed behind the ignition
buttons
All burners light properly, individually and
with adjacent burners lit
All flames appear normal
The drip tray slides freely and the grease
collection tray is properly placed
The correct pressure regulator is connected
for natural or LP gas and set for 5" (12.5 mb)
WC for natural gas or 10" (25 mb) WC for LP
gas
The LP gas cylinder is in an upright position
and the hose is not kinked
The grill has been tested and is free of gas
leaks
The homeowner has been informed of the
gas supply shut-off valve location
18
Verify that gas is being supplied to the BBQ
grill.
Check the gas supply and electrical
connections to ensure that the installation
has been completed correctly.
Check that gas valves are turned to the ON
position.
Follow troubleshooting procedures as
described in the Wolf Gas BBQ Grills Use &
Care Information.
If the BBQ grill still does not work, contact a
Wolf authorized service center. Do not
attempt to repair the grill yourself. Wolf is
not responsible for service required to
correct a faulty installation.
Be sure to disconnect the electrical and
gas supply before servicing.
Surface burners can be lit manually with
a match. Use extreme caution.
I N S TA L L AT I O N I N S T R U C T I O N S
I F Y O U N E E D S E RV I C E
If service is necessary, maintain the quality
built into your gas BBQ grill by calling a
Wolf authorized service center.
To obtain the name and number of a
Wolf authorized service center, check
the Locator section of our website,
wolfappliance.com or call Wolf Customer
Service at 800-332-9513.
When calling for service, you will need the
gas BBQ grill model and serial numbers.
Both numbers are listed on the product
rating plate, located on the back panel of
the grill.
C O N TA C T
I N F O R M AT I O N
Wolf Customer
Service:
800-332-9513
Website:
wolfappliance.com
The information and images are the copyright
property of Wolf Appliance Company, LLC, an
affiliate of Sub-Zero Freezer Company, Inc.
Neither this book nor any information or images
contained herein may be copied or used in whole
or in part without the express written permission
of Wolf Appliance Company, LLC, an affiliate of
Sub-Zero Freezer Company, Inc.
©Wolf Appliance Company, LLC all rights reserved.
19
W O L F A P P L I A N C E C O M PA N Y, L L C
807578
12 / 2005
P. O. B OX 4 4 8 4 8
MADISON, WI 53744
800-332-9513
W O L FA P P L I A N C E . C O M