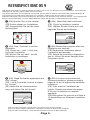
1
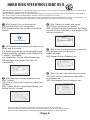
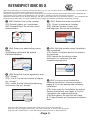
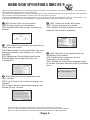
Cobra+ Slim™ External Hard Drives For the most current PDF Manual visit us online at www.ezq.com EZQuest Tech Support, Email: [email protected] or Phone: 714-694-0031x216 PACKAGE CONTAINS: COBRA+ SLIM HARD DRIVE FIREWIRE/USB 2.0 COMBO: Firewire cable (6 pin to 6 pin) Mini USB 2.0 Power Patch cable USB 2.0 MODEL: Mini USB 2.0 Power Patch cable Quick Start Guide Hard Drive Utility CD Includes: • Dantz Retrospect Backup Software • Hard Disk SpeedTools Software • PDF Manuals • Registration -Page 1- HARD DISK SPEEDTOOLS MAC OS X (EN) Hard Disk Speedtools is a formatting software that allows you to partition and reformat your drive. To install Hard Disk Speedtools, please follow these instructions: (FR) Hard Disk Speedtools est un logiciel de formatage qui vous permet de partitionner et de reformater votre disque dur. Pour installer Hard Disk Speedtools, veuillez suivre les instructions suivantes : (DE) Hard Disk Speedtools ist eine Software die es ihnen erlaubt Ihr Drive zu partitionieren und neu zu formatieren. Zur Installation der Software Hard Disk Speedtools folgen Sie bitte der Installationsanweisung wie folgt: (EN) Double Click on the installer. (FR) Double cliquer sur l’installateur. (DE) Doppelklicken Sie auf das Installationssymbol. (EN) Select the folder and Install. (FR) Choisir le dossier et installer. (DE) Wählen Sie den Ordner aus, und beginnen Sie mit der Installation, und beginnen Sie mit der Installation. (EN) Select the features you would like to install and click install. (FR) Sélectionnez les fonctionnalités que vous souhaitez installer, puis cliquez sur « install » [installer]. (DE) Selektieren Sie die Möglichkeiten die (EN) Enter your administrator password. (FR) Entrez votre mot de passe d’administrateur. (DE) Setzen Sie Ihr Passwort ein. Sie benötigen und klicken Sie dann auf “Installation“ (EN) Read the license agreement and click” Accept.” (FR) Lire le Contrat de Licence et cliquer sur “Accept.” (DE) Lesen Sie die Lizenzvereinbarung, und klicken Sie auf “Accept”. (EN) You may now reformat your drive. (FR) Vous pouvez maintenant reformater votre disque dur. (DE) Formatieren Sie Ihr Laufwerk neu. (EN) For more information, please refer to the PDF manual for this software. (FR) Pour de plus amples informations, consultez le manuel au format PDF du logiciel. (DE) Für mehr Informationen , lesen Sie bitte das PDF Formular für diese Software. -Page 2- RETROSPECT MAC OS X (EN) Dantz Retrospect is a backup software that allows you to use your Boa drive as a backup device. To install Dantz Retrospect on your Mac, please follow these instructions: (FR) Dantz Retrospect est un logiciel de sauvegarde qui vous permet d’utiliser votre lecteur Boa comme dispositif de sauvegarde. Pour installer Dantz Retrospect sur votre Mac, veuillez suivre les instructions suivantes : (DE)Dantz Retrospect ist eine BackUp Software, die Sie auch mit dem Boa Drive einsetzen können. Zur Installation der Software Dantz Retrospect auf Ihrem Apple Macintosh folgen Sie bitte der Installationsanweisung wie folgt: (EN) Double Click on the installer. (EN) Quit the installer when installation (EN) Select the folder and Install. (FR) Choisir le dossier et installer. (DE) Wählen Sie den Ordner aus, und beginnen Sie mit der Installation, (FR) Double cliquer sur l’installateur. (DE) Doppelklicken Sie auf das Installationssymbol. (EN) Enter your administrator password. (FR)Entrez votre mot de passe d’administrateur. has completed. (FR) Quitter l’installeur quand l’installation est terminée. (DE) Sobald die Installation abgeschlossen ist, verlassen Sie das Installationsprogramm. (EN) Read the license agreement and click” Accept.” (FR) Lire le Contrat de Licence et cliquer sur “Accept.” (DE) Lesen Sie die Lizenzvereinbarung, und klicken Sie auf “Accept”. (EN) You have now finished the software installation, please proceed to pages 8-10 for the appropriate hardware installation. (FR) Vous avez fini l’installation du logiciel. Passez maintenant aux pages 8-10 pour l’installation du matériel approprié. (DE) Bitte gehen Sie jetzt wie auf Seite 8- 10 beschrieben zur Hardware Installation über. (EN) For more information, please refer to the PDF manual for this software. (FR) Pour de plus amples informations, consultez le manuel au format PDF du logiciel. (DE) Für mehr Informationen , lesen Sie bitte das PDF Formular für diese Software. -Page 3- HARD DISK SPEEDTOOLS MAC OS 9 (EN) Hard Disk Speedtools is a formatting software that allows you to partition and reformat your drive. To install Hard Disk Speedtools, please follow these instructions: (FR) Hard Disk Speedtools est un logiciel de formatage qui vous permet de partitionner et de reformater votre disque dur. Pour installer Hard Disk Speedtools, veuillez suivre les instructions suivantes : (DE) Hard Disk Speedtools ist eine Software die es ihnen erlaubt Ihr Drive zu partitionieren und neu zu formatieren. Zur Installation der Software Hard Disk Speedtools folgen Sie bitte der Installationsanweisung wie folgt: (EN) Double Click on the installer. (FR) Double cliquer sur l’installateur. (DE) Doppelklicken Sie auf das Installationssymbol. (EN) Select the folder and Install. (FR) Choisir le dossier et installer. (DE) Wählen Sie den Ordner aus, und beginnen Sie mit der Installation. (EN) Select the features you would like to install and click install. (FR) Sélectionnez les fonctionnalités que vous souhaitez installer, puis cliquez sur « install » [installer]. (DE) Selektieren Sie die Möglichkeiten die Sie benötigen und klicken Sie dann auf “Installation“) (EN) Restart the computer when the installation has finished. (FR) Redémarrer l’ordinateur quand l’installation est terminée. (DE) Sobald die Installation abgeschlossen ist, führen Sie einen Neustart Ihres Computers durch. (EN) Read the license agreement and click” Accept.” (FR) Lire le Contrat de Licence et cliquer sur “Accept.” (DE ) Lesen Sie die Lizenzvereinbarung, und klicken Sie auf “Accept”. (EN) For more information, please refer to the PDF manual for this software. (FR) Pour de plus amples informations, consultez le manuel au format PDF du logiciel. (DE) Für mehr Informationen , lesen Sie bitte das PDF Formular für diese Software. -Page 4- RETROSPECT MAC OS 9 (EN) Dantz Retrospect is a backup software that allows you to use your Boa drive as a backup device. To install Dantz Retrospect on your Mac, please follow these instructions: (FR) Dantz Retrospect est un logiciel de sauvegarde qui vous permet d’utiliser votre lecteur Boa comme dispositif de sauvegarde. Pour installer Dantz Retrospect sur votre Mac, veuillez suivre les instructions suivantes : (DE)Dantz Retrospect ist eine BackUp Software, die Sie auch mit dem Boa Drive einsetzen können. Zur Installation der Software Dantz Retrospect auf Ihrem Apple Macintosh folgen Sie bitte der Installationsanweisung wie folgt: (EN) Double Click on the installer. (EN) Select the folder and Install. (FR) Choisir le dossier et installer. (DE) Wählen Sie den Ordner aus, und (FR) Double cliquer sur l’installateur. (DE) Doppelklicken Sie auf das Installationssymbol. beginnen Sie mit der Installation. (EN) Click “Continue” to confirm installation. (FR) Cliquer sur « next » (Oui) pour confirmer l’installation. (DE) Klicken Sie auf “next”, um die Installation zu bestätigen. (EN) Restart the computer when the (EN) You have now finished the installation has finished. (FR) Redémarrer l’ordinateur quand l’installation est terminée. (DE) Sobald die Installation abgeschlossen ist, führen Sie einen Neustart Ihres Computers durch. (EN) Read the license agreement and click” Accept.” (FR) Lire le Contrat de Licence et cliquer sur “Accept.” (DE) Lesen Sie die Lizenzvereinbarung, und klicken Sie auf “Accept”. software installation, please proceed to pages 8-10 for the appropriate hardware installation. (FR) Vous avez fini l’installation du logiciel. Passez maintenant aux pages 8-10 pour l’installation du matériel approprié. (DE) Bitte gehen Sie jetzt wie auf Seite 810 beschrieben zur Hardware Installation über. (EN) For more information, please refer to the PDF manual for this software. (FR) Pour de plus amples informations, consultez le manuel au format PDF du logiciel. (DE) Für mehr Informationen , lesen Sie bitte das PDF Formular für diese Software. -Page 5- RETROSPECT WINDOWS (EN) Dantz Retrospect is a backup software that allows you to use your Cobra drive as a backup device. To install Dantz Retrospect on your PC, please follow these instructions: (FR) Dantz Retrospect est un logiciel de sauvegarde qui vous permet d’utiliser votre lecteur Cobra comme dispositif de sauvegarde. Pour installer Dantz Retrospect sur votre PC, veuillez suivre les instructions suivantes : (DE)Dantz Retrospect ist eine BackUp Software, die Sie auch mit dem Cobra Drive einsetzen können. Zur Installation der Software Dantz Retrospect auf Ihrem Apple PCintosh folgen Sie bitte der Installationsanweisung wie folgt: (EN) Click on the installer. (EN) Select the type of installation you would like to perform and click “next” (FR) Sélectionnez le type d’installation que vous souhaitez exécuter, puis cliquez sur (FR) Cliquer sur l’installateur. (DE) Klicken Sie auf das Installationssymbol. « next » [suivant]. (EN) Click “next” to confirm installation. (FR) Cliquer sur « next » (Oui) pour confirmer l’installation. (DE) Klicken Sie auf “next”, um die Installation zu bestätigen. (EN) Restart the computer when the installation has finished. (FR) Redémarrer l’ordinateur quand l’installation est terminée. (DE) Sobald die Installation abgeschlossen ist, führen Sie einen Neustart Ihres Computers durch. (EN ) Read the license agreement and click” Accept.” (FR) Lire le Contrat de Licence et cliquer sur “Accept.” (DE ) Lesen Sie die Lizenzvereinbarung, und klicken Sie auf “Accept”. (EN) You have now finished the software installation, please proceed to pages 8-10 for the appropriate hardware installation. (FR) Vous avez fini l’installation du logiciel. Passez maintenant aux pages 8-10 pour l’installation du matériel approprié. (DE) Bitte gehen Sie jetzt wie auf Seite 810 beschrieben zur Hardware Installation über. (EN) For more information, please refer to the PDF manual for this software. (FR) Pour de plus amples informations, consultez le manuel au format PDF du logiciel. (DE) Für mehr Informationen , lesen Sie bitte das PDF Formular für diese Software. -Page 6- HAHARDWARE SETUP FIREWIRE/USB 2 COMBO: USB 2.0 PORT FIREWIRE PORT POWER PORT (IF NEEDED) FIREWIRE: 1. Attach Firewire cable to Firewire port on drive 2. Attach other end of Fireiwre cable to port on computer NOTE: If your computer uses a 4-pin Firewire port you will need a 6-pin to 4-pin Firewire cable (not included). If your computer uses a 4-pin Firewire port, or if you system does not supply enough power through the Firewire port you will need to use an external power supply. USB 2.0: 1. Attach the Mini port end of the USB 2.0 cable to the USB 2.0 Port on the back of the drive. 2. Attach the 2 standard USB connectors to 2 USB ports on the computer, this will supply enough power to run the drive off of bus power. NOTE: If your computer only has 1 USB 2.0 port you will need to use an external power supply. USB 2 MODEL: POWER PORT (IF NEEDED) USB 2.0 PORT 1. Attach the Mini port end of the USB 2.0 cable to the USB 2.0 Port on the back of the drive. 2. Attach the 2 standard USB connectors to 2 USB ports on the computer, this will supply enough power to run the drive off of bus power. NOTE: If your computer only has 1 USB 2.0 port you will need to use an external power supply. If your system does not provide enough bus power to run the drive, an external power adapter is available from EZQuest. You can order one through your dealer by email at [email protected], Part number is E59000. -Page 7- NOTES (EN) Please Note: If you encounter any technical issues or difficulties with your product, before sending it to the place of purchase, please call EZQuest Tech Support at 1-888-898-8380. If you’re going to remove your EZQuest Hard Drive before you shut down your computer, make sure to unmount the EZQuest Hard Drive by dragging the icon into the trash can. Failure to do this may result in damage to your directory and could result in expensive data recovery. If your intention is to use this drive on both MAC and PC platforms, please do not format this drive. This drive has been pre-formatted for this purpose. Even though this drive has come pre-formatted, if your intention is to use this drive on a Mac, we recommend you zero the media using Hard Disk SpeedTools (this will also help if you need to use any disk repair utility software in the future). PC users: perform a full format instead of a quick format. Zero media in OS9: (Plug in and turn on the EZQuest Hard Drive) 1. Open the installed HDST(Hard Disk Speedtools) program. 2. Click once on the drive within Hard Disk SpeedTools highlighting it. 3. Hold down the apple button and press “f”. This will prompt a warning box. Click “OK.” (this will take between one and three hours) 4. Once this is done you will see a window asking you to add or remove volumes, you need to cancel out of this window. 5. The HDST window will be open. Make sure the drive is highlighted, then click the setup tab in the upper right corner. 6. Click “OK” (it will only take a few seconds) 7. Set up the drive for Mac Extended and you should see it on your desktop. Zero Media in OSX: (Plug in and turn on the EZQuest Hard Drive) OSX should see the drive automatically. If it does not, go into your hard drive -> applications -> utilities -> disk utility look for a drive labelled “Indigita”. This is the EZQuest Drive. You will need to format the drive and this will erase all your data. 1. Click on the Erase tab. 2. Select the “Indigita” volume rather than the EZQuest Partition. 3. Make sure you have the option to install OS 9 drivers selected. 4. Click the options button and select “zero all data.” 5. Then click “erase” to begin the erase process. Since this is doing the low level format, it will take about 2 hours. If you just want to erase the disk, simply skip the step of select ing “zero all data.” If you have never done a low level format however, we do not suggest skipping this step. Digidesign and Final Cut Pro users may need to follow these steps: 1. Open Hard Disk SpeedTools. 2. Click once on the drive within Hard Disk SpeedTools. 3. Click the “tune” button. 4. Set the max payload size for 512 bytes and the max data transfer size to 32 kilobytes. 5. Restart We strongly recommend that you have a copy of Norton Utilities (www.symantec.com) or DiskWarrior (www.alsoft.com). These utilities are useful for repairing Hard Disk directories, should problems occur. We recommend, after major freezes, you use one of these utilities to repair your directory or repair your disk. For more information please consult your PDF manuals located on your Hard Drive Utility CD, call: 714-692-0031X216 or X219 or e-mail [email protected] or [email protected] All hardware and software mentioned is copyrighted with all rights reserved. Any product names mentioned in this manual are property of their respective owners. EZQuest makes no warranty in regards to the written material in this manual and shall not held liable for errors in incidental or consequential damage that may occur in translation or use of this manual and/or the prod described within. EZQuest logo and name are trademarks of EZQuest Inc. Use of the logo for commercial purposes can not be done without written consent from EZQuest. NOTES (FR) Si vous souhaitez retirer le disque dur EZQuest avant d’éteindre votre ordinateur, assurez-vous de démonter le disque dur EZQuest en faisant glisser l’icône dans la Corbeille. Sinon, vous risquez d’endommager votre répertoire et de subir une perte coûteuse de données. Si vous souhaitez utiliser ce lecteur à la fois sur les plates-formes MAC et PC, vous ne devriez pas formater ce lecteur. Ce lecteur a été préformaté dans ce but précis. Même si ce lecteur a été préformaté, si vous souhaitez utiliser ce lecteur sur un Mac, nous vous recommandons d’effacer toutes les données du support à l’aide du logiciel Hard Disk SpeedTools (ceci vous aidera également si vous devez utiliser un utilitaire de réparation de disque quelconque à l’avenir). Utilisateurs de PC : exécutez un formatage complet plutôt qu’un formatage rapide. Effacement des données d’un support sous OS9 : (branchez et activez le disque dur EZQuest) 1. Ouvrez le programme HDST (Hard Disk Speedtools) installé. 2. Cliquez une fois sur le lecteur au sein de Hard Disk SpeedTools pour le sélectionner. 3. Maintenez la touche « pomme » enfoncée, puis appuyez sur « f ». Ceci a pour effet d’afficher un message d’avertissement. Cliquez sur « OK » (veuillez patienter, cette opération peut prendre deux ou trois heures). 4. Ensuite, vous serez invité à ajouter ou à supprimer des volumes ; appuyez simplement sur « cancel » [annuler] pour quitter cette fenêtre. 5. La fenêtre du programme HDST s’ouvre. Assurez-vous que le lecteur est sélectionné, puis cliquez sur l’onglet « setup » [configuration] dans le coin supérieur droit. 6. Cliquez sur « OK » (cela peut prendre quelques secondes). 7. Configurez le lecteur pour Mac Extended ; vous devriez l’apercevoir sur votre bureau. Effacement des données d’un support sous OSX : (branchez et activez le disque dur EZQuest) OSX devrait détecter le lecteur automatiquement. Dans le cas contraire, allez dans votre disque dur -> applications -> utilities [utilitaires] -> disk utility [utilitaire de disque], puis recherchez un lecteur nommé « Indigita ». Il s’agit du lecteur EZQuest. Vous devez formater le lecteur, ce qui aura pour effet d’en effacer toutes les données. 1. Cliquez sur l’onglet « Erase » [effacer]. 2. Sélectionnez le volume « Indigita » plutôt que la partition « EZQuest ». 3. L’option d’installation des pilotes OS 9 doit être activée. 4. Cliquez sur le bouton « options » et sélectionnez « zero all data » [effacer toutes les données]. 5. Cliquez ensuite sur « erase » pour démarrer le processus d’effacement. Ceci effectuant le formatage de bas niveau, cela peut prendre environ 2 heures. Si vous souhaitez effacer le disque, ignorez simplement l’étape « zero all data » [effacer toutes les données]. Cependant, si vous n’avez jamais effectué de formatage de bas niveau, nous vous conseillons de ne pas ignorer cette étape. Les utilisateurs de Digidesign et de Final Cut Pro devront peut-être procéder comme suit : 1. Ouvrez le programme Hard Disk SpeedTools. 2. Cliquez une fois sur le lecteur au sein de Hard Disk SpeedTools pour le sélectionner. 3. Cliquez sur le bouton « tune » [régler]. 4. Configurez la charge maximale sur 512 octets et la taille maximale de transfert de données sur 32 Kilo-octets. 5. Redémarrez. Nous vous conseillons vivement d’obtenir une copie du programme Norton Utilities auprès de www.symantec.com ou DiskWarrior auprès de www.alsoft.com. Ces utilitaires vous serviront à réparer les répertoires de disque dur en cas de problème. Nous recommandons d’employer l’un de ces utilitaires chaque fois que votre ordinateur « se fige » afin de réparer vos répertoires ou le disque dur lui-même. Pour l’assistance technique contactez svp votre revendeur local NOTES (DE) Wenn Sie Ihr EZQuest Hard Disk von Ihrem Computer entfernen möchten bevor Sie den Computer herunter gefahren haben, stellen Sie sicher das Sie das Icon vorher in den Trash gelegt haben. Es könnte sonst passieren das Ihr Drive Probleme in der Directory hat, respektive eine komplette Datensicherung gemacht werden muss. Sollten Sie das Drive in beiden Welten sprich Mac und PC einsetzen wollen, formatieren Sie das Laufwerk nicht. Das Laufwerk muss dann vorformatiert sein für diesen Vorgang. Dieses Drive ist bei der Lieferung vorformatiert, sollten Sie es am Mac einsetzen wollen empfehlen wir Ihnen das Sie die Software Hard Disk SpeedTools verwenden ( dies ist von Vorteil sollten Sie das Laufwerk einmal reparien müssen.) Für PC Benutzer : Bitte formatieren Sie dieses Drive komplett und nicht Quick Format ! Zero Media bei Mac OS 9X ( Stecken Sie das Drive ein und schalten Sie das Medium ein ) 1. Öffnen Sie das installierte Hard Disk Speedtools Programm. 2. Klicken Sie auf das Symbol des Drives damit Hard Disk SpeedTools es erkennt. 3. Drücken Sie die Apple Taste und dann “f“. Danach erscheint eine Warnbox: Drücken Sie auf “OK“ ( Es dauert dann ca. 1 – 3 Stunden ) 4. Wenn dies einmal getan ist erscheint ein Fenster welches Sie fragt ob Sie das Volumen dazu haben möchten oder nicht, Sie müssen dann einfach diese Fenster schließen. 5. Das HDT Fenster ist geöffnet. Stellen Sie sicher das das Gewünschte Laufwerk angemarkt ist, dann klicken Sie auf den Set Up Tab in der oberen rechten Seite. 6. Klicken Sie auf OK ( das dauert dann einige Sekunden.) 7. Stellen Sie das Drive auf Mac Extendent und Sie werden das Laufwerk danach sofort sehen. Zero Media bei Mac OS X ( Stecken Sie das Drive ein und schalten Sie das Medium ein ) OSX sieht das Laufwerk automatisch. Wenn es nicht erscheint gehen Sie bitte folgender maßen vor klicken Sie auf Ihre Festplatte -> Applikationen -> Uttilities -> Disk Uttility und suchen eine Festplatte mit dem Namen “Indigita“. Das ist Ihr EZQuest Laufwerk. Sie müssen ihr Laufwerk noch einmal neu Formatieren, dies löscht allerdings alle Ihre Daten ! 1. Klicken Sie auf Löschen ( Erase ) . 2. Selektieren Sie das “Indigita Volumen” . 3. Stellen Sie sicher, das Sie die Möglichkeit haben den OS 9 Treiber zu installieren. 4. Klicken Sie auf Option und selektieren Sie “Zero all Dat “. 5. Dann klicken Sie auf Löschen ( Erase ) um den Löschvorgang zu starten. Es wird zuerst der Low Level Zustand des Laufwerkes hergestellt, das dauert ca. 2 Stunden . Wenn Sie das Laufwerk komplett löschen wollen, übergehen Sie einfach den nächsten Schritt und formatieren Sie die Platte neu. Digidesign und Final Cut Pro Anwender folgen bitte der aufgeführten Anleitung: 1. Öffnen Sie Hard Disk SpeedTools. 2. Klicken Sie einmal auf das Laufwerk das Sie bearbeiten wollen. 3. Klicken Sie einmal auf den “Tune“ Button. . 4. Setzen Sie die Payload size auf 412 Bytes und die max. Datentransferrate auf 32 kilobytes. 5. Starten Sie Ihren Rechner neu. Wir empfehlen Ihnen eine Copy von Norton Uttilities oder Disk warrier. Diese Softwares sind für Sie von Vorteil bei einer Reparatur Ihres Laufwerkes. Wir empfehlen Ihnen bei einem einfrieren Ihres Rechners diese Software zur wieder Herstellung Ihrer Daten zu benutzen. Für technische Unterstützung treten Sie bitte mit Ihrem lokalen Händler in Verbindung EZQuest Inc. Please Note: If you encounter any technical issues or diff iculties with your product, please contact EZQuest Technical Support between 8am - 5pm PST Technical Support: Phone: (714) 694-0031 Fax: (714) 694-0034 E-Mail: [email protected] Website: www.ezq.com