1
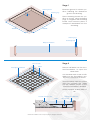
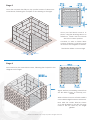
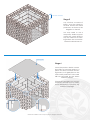
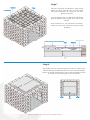
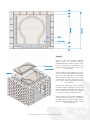
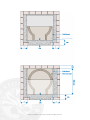
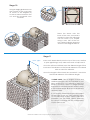
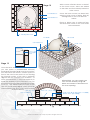
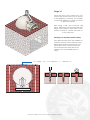
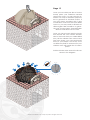
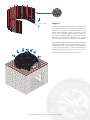
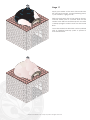
Primo Render Build Manual
The Stone Bake Oven Company
www.thestonebakeovencompany.co.uk
0845 834 0252 [email protected]
© The Stone Bake Oven Company 2014. All rights reserved.
Primo 60 Render Build Manual
© The Stone Bake Oven Company 2014. All rights reserved.
Stage 1
Shuttering boards
Excavate ground in chosen position, following the dimensions
given in the drawing.
Shuttering pegs
150
Place shuttering board into position as shown, using shuttering
pegs to stregthan the shuttering
board. Once secured, place a
waterproof membraine into the
shuttering.
1340
1210 min
1450
1320 min
Shuttering pegs
Shuttering boards
Waterproof membrane
Stage 2
Half bricks
Waterproof membrane
Rebar
Place 4 half bricks into the shutterd foundations, to suport the
rebar mesh.
Cut the rebar mesh to size so it fits
tightly into the foundations, resting on the half bricks as shown.
Once the rebar mesh is in place
add your concrete mix, make
sure the finished surface of the
concrete foundation is levelled.
Leave concrete at least 24hrs to
set.
Waterproof membrane
Poured concrete mix
Rebar
Half brick
© The Stone Bake Oven Company 2014. All rights reserved.
Stage 3
Once the concrete has fully set, lay your first cousre of dense concrete blocks, following the footprint of the drawing on the right.
Once your first block course is in
place, using the drawing above as
reference, check that the blocks
are in the correct position.
Continue to add a further three
courses of blocks to the first course
as shown in the diagram on the left.
The blocks will be 4 courses high.
110 min
110 min
Stage 4
Now start to lay the outer brick course, following the footprint in the
diagram on the right.
Again, before proceeding, check that
the first brick course is correctly positioned.
Add a further 9 courses of bricks untill 10
course brick height has been achieved.
Now add the Catnic lintel as shown
on in the diagram on the left, this may
need to be cut down by an angle
grinder.
© The Stone Bake Oven Company 2014. All rights reserved.
4 brick courses
Stage 5
Lay a further 4 courses of
bricks, over the catnic lintel and around the brick
perimeter, as shown in the
diagram on the left.
You may need to use a
temporary timber support
under the catnic lintel to
stop the chances of it flexing before the mortar between the bricks has set.
Stage 6
Once the previous 4 brick courses
have fully set, measure and cut a
piece of 12mm concrete shuttering board, so it tightly fits into the
outer brick perimeter. This board
will be supported by the dense
concrete blocks.
If there are any gaps you can use
some left over off cuts of waterproof membrane to prevent any
concrete seepage.
© The Stone Bake Oven Company 2014. All rights reserved.
Stage 7
Like the concrete foundations, using 4 half
bricks, position towards the corners within
the brick parimeter. As shown in the diagram on the left.
Cut the rebar mesh so it tightly fits within the
brick parimeter, then place onto the 4 half
bricks.
Add concrete to the shuttered enclosure.
Make sure that the concrete hearth is fully
levelled.
Stage 8
Allow 24hrs for the concrete hearth to fully set. Place the 2
calcium silicate insulation boards onto the concrete hearth,
place an equal distance from each side and 200mm from
the front of the brick base, as shown below.
© The Stone Bake Oven Company 2014. All rights reserved.
Stage 9
Place the front oven base segment
down onto the calcium silicate
insulation board, make sure the oven
base is completely centralised and
exactly 220mm from the front of the
brick base.
Once the front base segment is set in
postion, place the rear base segment
into the front segment, connecting
them, ensure that once you have
connected the rear segment to the
front, that is hasnt been knocked out
of postition.
Once both segments are in place,
measure again making sure they are
fully centralised and 220mm from the
front of the brick base and 100mm
from the back of the brick base.
Please refer to the postion diagrams
on the opposite page. It is improtant
to follow this step accurately, ensuring the following brick courses have
room to be laid.
© The Stone Bake Oven Company 2014. All rights reserved.
© The Stone Bake Oven Company 2014. All rights reserved.
Stage 10
Using an angle grinder remove
the corners of the oven base
as shown in the diagram,try
to leave 25mm between the
cut and the reccessed oven
channel.
Place the dome onto the
base of the oven, no mortar is
needed to bed this although
can be used if you require.
Using a saw, trim off the excess calcium silicate board as
shown in the diagram above.
Stage 11
500mm approx.
Insert a 45° bend directly into the top of the oven, the flue
is quite tight fitting it may take some work to fully insert it.
Once the 45° bend is fitted, insert the 330mm length of flue
into bend. This will slot into the female element of the bend
with no need for adhesive.
Once the length is fitted insert the second 45° bend into
the female element of the 330mm length.
! PLEASE NOTE: The 45 degree bends and
additional lengths are not included in your
Primo 60 Kit Oven. It is optional to have the
bends in the flue system. A straight 500mm
length flue is standard practice and the steps
in this manual simply illustrate an alterantive
aesthetic finish.
If you require additional lengths and angles
for the Primo oven, you can purchase them
on our online shop or from various online flue
specialists. You will need 130mm diameter
flue pieces to change the flue configuration
of your Primo oven.
© The Stone Bake Oven Company 2014. All rights reserved.
Stage 12
Innerrick
b course
Outer rbickcourse
Add a course of bricks shown on the left
as the inner course, these are added
to the sides and front directly inside the
outer course.
Once the inner course has been laid,
add the outer course of bricks, finish by
adding bricks to the oven base as
below.
Ensure a 20mm step is achieved from
the inner brick course to the oven base
as shown below.
No mortarrequi
red~200mm
Infill
ricks
b
Pre cast rch
a
Outer rbickcourse
Ensure 25mm
Fillet seal
joiningces
fa
atrear
Stage 13
Once the inner and outer bricks have be laid,
you can place a prefabricated archway
(included in the Primo 60 Kit oven) into position.
You will notice that there is surface space in
front of the oven for the arch to sit on. Ensuring
the internal contour of the arch is perfectly
aligned with the internal oven entrance - in
some circumstances, it may be nessesary to
bond the archway to the oven face. If so, we
recommend using a high head silicone mastic
to do so. Use mortar under the feet of the
arch if it needs raising slightly. Place some fire
cement behind the arch once it is set in place
as shown above. 70mm oven base
Alternatively, you can create your
own custom archway using half
bricks and cement to brick around
the oven opening.
25mm tile (flush with
rth) hea
25mm Calsil
board
14th rb
ickcourse
© The Stone Bake Oven Company 2014. All rights reserved.
Ensure 25mm he
re t(o a
comm odate tile kness)
thic
(Reduce mortar nt
joiifcessa
ne ry)
Stage 14
Once the arch is set in place, lay your
chosen tiles around the oven as shown
in the diagram on the left, use suitable
outdoor tile adhesive, it does not need
to be heat resistant.
Next using a tile and concrete drill
piece, drill holes to accommodate rawl
plugs, every 150mm, then screw in eye
screws or hooks to attach the mesh to
in the next step.
Painting Your Prefabricated Archway
Most silicate paints that are suitable for
exteriors can be used to paint the prefabricated archway included in your
Primo 60 Kit Oven. We recommend
the manufacturer data sheets are
checked for compatibility prior to
using.
Drill holes
every 150mm -200mm app
roximately 50 - 60mm
rom oven
f
w all
© The Stone Bake Oven Company 2014. All rights reserved.
Stage 15
Once you have laid your tiles of choice
loosely place your insulation material
around the oven, you are using the insulation not only for insulation purposes
but to generate a aesthetic shape. If
you have been provided with a box
of insulation wool from The Stone Bake
Oven Co, you may need to still add additional glass fibre insualtion to generate your chosen shape. Standard glass
fibre loft insulation can be used.
Once you have loosely laid the insulation around the oven attach chicken
wire to the hooks that you earlier drilled
into, pull the chicken wire around and
form your shape, you can pack insualtion in if your shape is not even, once
a satisfactory finish is achieved, tie your
chicken wore with cable ties to hold in
place.
Pull the chicken wire around the flue as
shown in the diagram.
© The Stone Bake Oven Company 2014. All rights reserved.
150mm approx.
Stage 16
Once your chicken wire is safley in place and
your desired shaoe is achieved, attach the
bottom of a piece of plasters lathe to the
hooks earlier inserted, then, as shown on the
leftm, with an angle grindermake incisions in
the lathe, stopping around 150mm from the
bottom of the lathe, this will aloow you to fold
the lathe in on itself and mould to your shape.
Fold all the lathe in onto your chicken wire and
apply with cable ties to hold in place. Do this
untill all the lathe is supported. Apply the lathe
to the top of the arch, so the render can be
applied to the front face of the arch, as shown.
You are now ready to render your oven.
© The Stone Bake Oven Company 2014. All rights reserved.
Stage 17
Apply your render to the mesh, this render can
be sand and cement, 4 parts plastering sand,
1 part cement, a glug of PVA.
With a trowel apply this to the mesh as shown,
until the entire oven is covered. Wait for the
render to be 90% set and then wipe it over with
a damp sponge in order to work out the trowel
lines.
Once the render has dried this can be painted
with a standard masonry paint to protect it
from he elements.
© The Stone Bake Oven Company 2014. All rights reserved.
Notes
© The Stone Bake Oven Company 2014. All rights reserved.