1
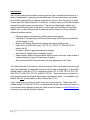
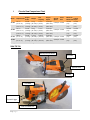
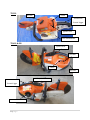
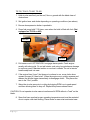
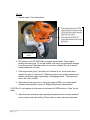
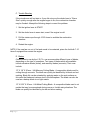
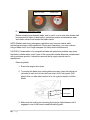
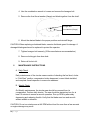
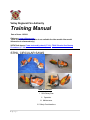
Valley Regional Fire Authority Training Manual Date of Issue: 12/2011 Reference: www.stihleusa.com. (Note: Some technical information is not available for older models. New model information is referenced only.) VRFA Task sheets: Power tool weekly check (17-1.0); TS410 Circular Saw Startup Procedures (17-2.0) STHIL CIRCULAR SAWS Table of Contents I. Stihl Rotary Saw II. Operation III. Maintenance IV. Safety Considerations 1|Page Introduction Stihl circular saws are an excellent multipurpose tool that is versatile and effective in a variety of applications, depending on the blade used. Circular saws have evolved and been refined significantly in a past few years which is obvious from the variety of styles of saws within the Valley Regional Fire Authority. However common Stihl features have remained throughout each new generation. The saws are lightweight, reliable and highly powered allowing them to be able to cut through such materials as composites, asphalt, iron, or other various types of metals as well as numerous roofing materials. Additional features include: o Electronic Ignition provides easy starting and smooth running. o IntelliCarb™ Compensating Carburetor which keeps RPM levels even when the air filter begins to clog. o Balance and Design helps reduce fatigue and makes handling easy. o Heavy-Duty Air Filtration System. The TS 410, TS 420, TS 700 and TS 800 feature the X2. o Protected Throttle Trigger helps prevent damage. o Anti-Vibration System reduces operator fatigue. o Spark Arrestor Muffler has large baffles which reduce noise level, and contains a screen designed to reduce the emission of sparks. o Semi-Automatic Belt Tensioner allows for easy adjustment of drive belt. The Valley Regional Fire Authority utilizes exclusively Stihl circular saws however model types vary depending on apparatus because of the change in technology. Current Stihl models found on front line V.R.F.A. apparatus include: L31 (TS 700, TS 510), E32 (TS 400), E33 (TS 420), E34 (TS 410), and E38 (TS 700). These saws are not exclusive to each apparatus and may change depending on department needs. It is advisable to be familiar with ALL circular saws currently used by the V.R.F.A. Lastly, replacement or reserve circular saws vary in type and size. These other Stihl models include: TS 350 and TS 360. If a replacement circular saw is placed in service, it is recommend that firefighters review the owner’s manual located on www.Stihlusa.com to become more familiar with their features. 2|Page I. Circular Saw Comparison Chart Model Displacement Engine Power TS 400 64.1 cc (3.9 cu. in.) 3.2 kW 9.1 kg 710 cc (4.4 bhp) (20.1 lbs.)* (24 oz.) Weight 66.7 cc 3.2 kW 9.4 kg (4.07 cu. in.) (4.4 bhp) (20.7 lbs.)* 66.7 cc 3.2 kW 9.6 kg TS 420 (4.07 cu. in.) (4.4 bhp) (21.2 Ibs.)* 89.2 cc 3.2 kW 13.0 kg TS 510 (5.43 cu. in.) (4.4 bhp) (28.7 Ibs.)* 98.5 cc 5.0 kW 11.6 kg TS 700 (6.0 cu. in.) (6.7 bhp) (25.6 Ibs.)* 98.5 cc 5.0 kW 13.0 kg TS 800 (6.0 cu. in.) (6.7 bhp) (28.7 Ibs.)* * Weight includes water attachment and guard TS 410 Fuel Capacity 710 cc (24 oz.) 710 cc (24 oz.) 710 cc (24 oz.) 1200 cc (40.6 oz.) 1200 cc (40.6 oz.) Engine Speed Max Spindle Speed Arbor Size Maximum Maximum Cutting Wheel Size Depth 9,000 rpm 5,350 rpm 20 mm (Elec. Gov.) 300 mm (12") 100 mm (3.9") 9,000 rpm (Elec. Gov.) 9,000 rpm (Elec. Gov.) 9,000 rpm (Elec. Gov.) 9,300 rpm (Elec. Gov.) 9,300 rpm (Elec. Gov.) 300 mm (12") 350 mm (14") 350 mm (14") 350 mm (14") 400 mm (16") 100 mm (3.9") 125 mm (4.9") 100 mm (3.9") 125 mm (4.9") 143 mm (5.6") 5,350 rpm 20 mm 5,350 rpm 20 mm 5,350 rpm 20 mm 5,350 rpm 20 mm 4,600 rpm 20 mm Stihl TS 700 Decompression Button Air Filter Ignition Lever Choke Fuel Bulb Throttle Lock Throttle Trigger Fuel Tank Reservoir 3|Page TS 510 Air Filter Choke Throttle Lock Throttle Trigger Ignition Lever Fuel Tank Reservoir TS 410 & 420 Ignition Lever Fuel Bulb Choke Air Filter Throttle Lock Throttle Trigger Fuel Tank Reservoir 4|Page Decompression Button TS 400 Ignition Lever Air Filter Choke Decompression Button Throttle Lock Throttle Trigger Fuel Tank Reservoir II. Operation A feature of the Stihl circular saws is a reversible blade and guard. If necessary the blade and guard can be mounted in the outboard position. This allows cuts to be made in close proximity to walls, floors, etc. however provides little protection from sparks or falling debris. This also maximizes the gyroscopic effect of the saw which make it more unwieldy. Another hazard of the outboard position is possible blade binding since the blade and handle are out of line with each other. Lastly, switching the blade positions can be time consuming and only recommended in extreme situations. As a result all Stihl circular saws are mounted in the inboard position. The following tips will improve the safety and effectiveness of circular saw cutting operation: 5|Page A. Determine the Operation: Due to the versatile nature of the saw, its ability to cut masonry or metal, determine the primary use for the saw. Install the correct blade; if necessary reposition the blade and guard prior to cutting operations. The most common use of circular saws for the V.R.F.A. is for forcible entry operations. The saw can be quickly deployed for opening metal doors, gates, security bars, etc. which is why it’s stored with the metal blade installed. B. Starting the saw: The circular saw should be prepared for use when removed from apparatus compartments as follows: Throttle trigger latched. Choke engaged. Compression release button "in" if circular saw is so equipped. Ignition lever in Start position. Ignition Lever Stop Run Start Choke positions 6|Page TS 700, TS 410, TS 420, TS 400 1. Hold circular saw firmly on the roof, floor or ground with the blade clear of obstructions. 2. Set ignition lever and choke depending on operating conditions (see above) 3. Ensure decompression button is pushed in. 4. Press fuel pump bulb 7-10 times, even when the bulb is filled with fuel. (Not equipped on TS 510 or 400) Fuel Bulb Fuel Bulb 5. Pull starter cord JUST ENOUGH to engage starter pawls. Crank engine smartly with short pulls. Do not pull starter cord using long strokes as damage to cord may result. Maintain tension on cord as it rewinds. Do not let starter handle snap back into saw. 6. If the engine fires (“pops”) but does not continue to run, move choke lever upward one spot to “warm start”. When the engine runs, quickly squeeze and release the throttle trigger immediately to disengage choke. This places the saw in the “Run” position. 7. Warm the circular saw prior to cutting by bringing RPM's up to peak speed and then allowing them to drop off. Repeat this process several times CAUTION: Do not operate circular saws at continuous full RPM without a "load" on the blade. 8. Saws that have reached proper operating temperature and must be restarted do not require cold start choking. Place choke in warm start and restart saw. 7|Page TS 510 1. Repeat steps 1-3 as listed above. Decompression Button 2. Pull starter cord JUST ENOUGH to engage starter pawls. Crank engine smartly with short pulls. Do not pull starter cord using long strokes as damage to cord may result. Maintain tension on cord as it rewinds. Do not let starter handle snap back into saw. 3. If the engine fires (“pops”) but does not continue to run, move choke lever upward one spot to “warm start”. When the engine runs, quickly squeeze and release the throttle trigger immediately to disengage choke. This places the saw in the “Run” position. 4. Warm the circular saw prior to cutting by bringing RPM's up to peak speed and then allowing them to drop off. Repeat this process several times CAUTION: Do not operate circular saws at continuous full RPM without a "load" on the blade. 5. Saws that have reached proper operating temperature and must be restarted do not require cold start choking. Place choke in warm start and restart saw. 8|Page C. Trouble Shooting If the circular saw will not start or if you did not move the choke lever to “Warm Start” quickly enough after the engine began to fire, the combustion chamber may be flooded. Attempt the following steps to correct the problem: 1. Set the ignition lever to START. 2. Set the choke lever to warm start, even if the engine is cold. 3. Pull the starter rope through 10-20 times to ventilate the combustion chamber. 4. Restart the engine. NOTE: If the saw has run out of fuel and needs to be restarted, prime the fuel bulb 7-10 times if equipped then restart the engine. D. Blades Circular saws in use by the V.R.F.A. can accommodate different types of blades, depending on the type of operations. Two types of blades which are available include: abrasive wheels (metal), and masonry blades (concrete). Their uses include: 12” X 1/8” X 20 mm - Hilti Masonry Cutting Blade - A composition blade used for cutting through concrete. The blade can quickly be identified by its black and red marking. Blade life can be extended by applying water on the work surface as this cools the blade and reduces dust in the atmosphere. The blade can also be used as a backup blade to cut light metals. 12” X 5/32” X 20 mm - Hilti Metal Cutting Blade - A composition blade used to cut metals that may be encountered during rescue or forcible entry situations. The blade can quickly be identified by its red and silver marking. 9|Page Masonry blade Metal blade E. Installing or changing blades Before mounting any abrasive blade, new or used, on a circular saw, blades shall be inspected for signs of deterioration, petroleum product contamination, wear, and cracks, which could render the blade unsafe. NOTE: Blades used during emergency operations may become smaller while performing extensive cutting operations. During such operations, you may continue using a blade until it is no longer adequate for safety and/or effectiveness. CAUTION: Contamination of a composition blade with petroleum products may cause the blade to shatter when used. If one of the composition blades becomes contaminated with a petroleum product, it should be removed and a supply request sent for replacement. Removing blade: 1. Ensure the engine shut down. 2. To prevent the blade from rotating while removing, insert the locking pin (provided in each tool kit) into the bore hole in the V belt guard. (See photo) Note: an alternative method is to use a gloved hand to hold the blade. Bore hole Locking pin 3. Make sure the locking pin is working by turning a slight distance until it engages in one of the bores located behind the guard. 10 | P a g e 4. Use the combination wrench to loosen and remove the hexagon bolt. 5. Remove the front thrust washer (flange) and blade together from the shaft. Hexagon Bolt Front Washer (Flange) 6. Mount the desired blade in the proper position and reinstall flange. CAUTION: When replacing a shattered blade, examine the blade guard for damage. A damaged blade guard must be replaced to protect the operator. 7. Tighten hexagon bolt securely (22 lbs manufacturer recommendation) 8. Remove locking pin from bore hole. 9. Return all tools to kit. III. MAINTENANCE INSTRUCTIONS A. Daily Check Daily maintenance of the circular saws consists of checking the fuel level, choke in “Cold Start” position, compression button depressed, correct blade installed, and complete visual inspection to ensure its readiness. B. Weekly Check On Weekly maintenance, the circular saw should be removed from its compartment. Perform daily checks. The saw should be started and run for at least 10 minutes to ensure a smooth operation. Run up RPM by alternately depressing and releasing throttle. Verify that the blade runs true and smooth without wobble or vibration. CAUTION: Do not run circular saw at full RPM without load for more than a few seconds or engine damage may result. 11 | P a g e Shut off circular saw and allow it to cool. Inspect starter cord for fraying and contamination. Top off fuel level if necessary. Return controls back to starting position (ignition lever – START, choke – Cold Start – Decompression button pushed in) NOTE: Fill out a maintenance request for any necessary repairs. C. CLEANING The circular saw shall be thoroughly cleaned after each use. It is extremely important that the blade guard area is cleaned of all dust and debris. If abrasive material is allowed to build up in the guard it can break loose in the form of small rocks and be thrown out by the force of the blade. These projectiles can cause injuries. All abrasive dust and debris should be removed by blowing with compressed air (wear goggles and respiratory protection). 1. Refuel saw as necessary. 2. Remove blade from circular saw to gain access to rear area of the guard. Clean the interior of the guard of loose debris and dust. 3. Inspect the condition of the blade. If the blade appears to be damaged or has become too small after extended use, replace the blade. NOTE: Fill out a maintenance request for a replacement blade. 4. Circular saws are equipped with automatic spring action V belt tensioning devices. If significant belt slack is observed, remove saw from operation. Fill out a repair request to have the saw inspected. 5. Remove and inspect air filter. For light debris, air filter can be cleaned by using the air compressor. For stubborn debris or sticky filter, clean the air filter using warm soap and water. Allow to air dry. 6. Reinstall the air filter once clean. 7. When cleaning particular attention should be paid to cylinder and head fins if soiled with molten tar. Use only approved cleaning agents. 12 | P a g e IV. SAFETY CONSIDERATIONS A. Safety Equipment: The following safety equipment shall be used in conjunction with circular saw operations at all times: 1. 2. 3. 4. 5. 6. Gloves Goggles Helmet Bunker gear Ear protection Chaps (when available) B. Circular Saw Hazards Two hazards unique to the rotary saw make it an extremely dangerous tool. First, the blade continues to spin at high rpms long after the throttle is released, or after the saw is shut off. Leaving the saw unattended in this condition should not be done under any circumstances. The blade should be stopped in the work area or monitored until it stops spinning. The second hazard is the gyroscopic effect caused by the spinning blade. This makes the saw somewhat unwieldy when changing its cutting angle (this is inherent to the saw and the operator should be aware of this). C. Cutting Area Particular care should be paid to the surrounding area. When cutting metal, the saw throws off hot sparks which can provide an ignition source in flammable atmospheres, or to combustible solids. Care should be taken to have firefighters and extinguishing equipment (charged hand line and/or dry chemical extinguisher) in place prior to the cutting operation if the situation calls for these precautions. Care must be taken that the area in the path of the sparks is clear prior to cutting with the saw. Hot sparks can be thrown up to 15 feet from the cutting area. D. Cutting Operations While cutting with a circular saw, most firefighters will hold the saw off of the surface. This can place unnecessary weight on the back muscles and enhance binding the blade in the cut. 13 | P a g e To help prevent or minimize the blade from binding, consider the following procedures: Adjust blade guard to control cutting depth. Enter all cuts at full rpm. Place the saw ON the surface to be cut and pull the saw into the cut. This allows the saw to glide on the blade guard and lower portion of the carrying handle, allowing the surface to support the weight of the saw and center the blade in the cut. While cutting vertical surfaces, make certain blade is kept at right angle to surface. Always cut in straight line (do not twist the saw to either side). Release throttle and immediately remove blade from cutting surface if binding occurs to avoid belt damage. E. Safety Person Cutting is an operation involving a minimum of two members: the operator and safety person. The primary responsibility of the safety person is to: 1. Alert the operator of changing or unsafe conditions 2. Prevent injury. 3. Assist the operator who is backing up while involved in cutting operations. Since a running circular saw creates a serious communication problem, the safety member will have to use gestures or "body language" to communicate effectively. The safety member must maintain contact with the operator at all times. An effective way for the safety member to remain in contact with the operator is to use an UNDERHANDED grip on an axe scabbard belt, B/A frame/webbing, etc. Safety person must be prepared to keep the saw operator from falling over objects or into the hole being cut. 14 | P a g e