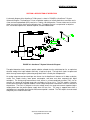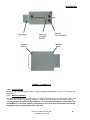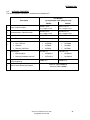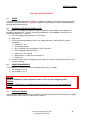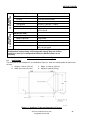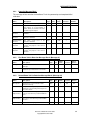
1
GENERAL INFORMATION 500 AutoSense™ AS500 Series Users Guide Copyright OSI LaserScan 2009 i GENERAL INFORMATION Revision Record Revision Date Description Original March 2006 Initial Draft 1.0 May 2006 Production Release 2.0 June 2007 - 2.2 September 2009 Contact Revisions Disclaimer The Publication No. 19479801 is subject to change without notice. Address any AutoSense™ maintenance requirements, operational questions and repair actions or comments concerning this publication to: OSI LaserScan 12525 Chadron Avenue Hawthorne, CA 90250 www.osi-laserscan.com phone # +1 (310) 978-0516 fax: +1 (310) 644-1727 e-mail: [email protected] 2009 by OSI LaserScan All rights reserved. Printed in the United States of America. AutoSense™ AS500 Series Users Guide Copyright OSI LaserScan 2009 ii GENERAL INFORMATION Table of Contents SECTION PAGE LASER CERTIFICATION.................................................................................................................... 6 WARNING SUMMARY ........................................................................................................................ 7 PREFACE............................................................................................................................................. 11 PURPOSE............................................................................................................................................. 11 HOW TO USE THIS USER’S GUIDE ................................................................................................ 11 SUMMARY .......................................................................................................................................... 11 TRADEMARKS ................................................................................................................................... 11 LIMITED ONE (1) YEAR WARRANTY............................................................................................ 12 SECTION 0: DESCRIPTION OF OPERATION................................................................................ 13 SECTION 1: INTRODUCTION .......................................................................................................... 18 1.1. SCOPE ............................................................................................................................ 18 1.2. PHYSICAL DESCRIPTION............................................................................................... 18 1.3. OPTIONAL EQUIPMENT ................................................................................................. 20 SECTION 2: GETTING STARTED.................................................................................................... 21 2.1 SCOPE ............................................................................................................................ 21 2.2 UNPACKING AND INSPECTION OF PARTS ................................................................... 21 2.3 POWER REQUIREMENTS............................................................................................... 21 2.4 INTERFACE SIGNALS..................................................................................................... 21 2.5 DIMENSIONS................................................................................................................... 22 2.6 CABLE REQUIREMENTS ................................................................................................ 23 2.6.1 Power Cable.................................................................................................................... 23 2.6.2 Communication Cable .................................................................................................... 24 SECTION 3: OPERATION OF THE AUTOSENSE™....................................................................... 27 3.1 FUNCTIONAL DESCRIPTION.......................................................................................... 27 3.2 TYPICAL INSTALLATION................................................................................................ 29 3.2.1 Look Down Angle ........................................................................................................... 29 SECTION 4: MESSAGE PROTOCOL OF THE AUTOSENSE™ .................................................... 31 4.1 DATA FRAME FORMAT .................................................................................................. 31 4.2 MESSAGE SUMMARY..................................................................................................... 31 SECTION 5: TROUBLESHOOTING THE AUTOSENSE™............................................................. 40 SECTION 6: MAINTENANCE OF THE AUTOSENSE™ ................................................................ 41 6.1 PREVENTIVE MAINTENANCE......................................................................................... 41 6.2 CORRECTIVE MAINTENANCE........................................................................................ 41 6.2.1 Packing the AutoSense™ for Shipment. ........................................................................ 41 6.3 PERIODIC OVERHAUL MAINTENANCE.......................................................................... 41 APPENDIX A - SPECIFICATIONS.................................................................................................. A-1 AutoSense™ AS500 Series Users Guide Copyright OSI LaserScan 2009 2 GENERAL INFORMATION A.1 Performance: ................................................................................................................. A-1 A.2 Physical: ........................................................................................................................ A-1 A.3 Laser Output:................................................................................................................. A-1 A.4 Data Interface:................................................................................................................ A-1 A.5 Environmental: .............................................................................................................. A-2 APPENDIX B ......................................................................................................................................B-1 APPENDIX C – AutoSense™ Quick Start Guide to Operation ........................................................ C-1 C.0 AutoSense™ Test Software...........................................................................................C-2 C.1 Getting Started...............................................................................................................C-2 C.1.1 What You Should See ....................................................................................................C-3 C.1.2 Reset Command ............................................................................................................C-3 C.1.3 Test Data Output Command ..........................................................................................C-3 C.1.4 Self Test Command .......................................................................................................C-3 C.1.5 Change Operating Mode................................................................................................C-3 C.1.6 Communicate Check Command....................................................................................C-3 C.1.7 Change Baud Rate Command .......................................................................................C-4 C.1.8 Logic Level Signal .........................................................................................................C-4 C.1.9 Minimum Valid Range....................................................................................................C-4 C.2 Testing with Vehicles.....................................................................................................C-4 C.3 Message Filtering ..........................................................................................................C-5 C.4 Software Download........................................................................................................C-5 C.5 AutoSense II LED Indicators..........................................................................................C-5 C.5.1 Message Mode ...............................................................................................................C-5 C.5.1.1 Power Up........................................................................................................................C-5 C.5.1.1.1 System Initialization.......................................................................................................C-5 C.5.1.1.2 Initial Road Calibration ..................................................................................................C-6 C.5.1.2 Normal Operation ..........................................................................................................C-6 C.5.1.2.1 Detection Idle.................................................................................................................C-6 C.5.1.2.2 Vehicle Present..............................................................................................................C-6 C.5.1.2.3 End-of-Vehicle ...............................................................................................................C-6 C.5.1.3 System Check ................................................................................................................C-6 C.5.1.4 Error Conditions ............................................................................................................C-6 C.5.1.4.1 Bad Patch.......................................................................................................................C-6 C.5.1.4.1.1 Power Up........................................................................................................................C-6 C.5.1.4.1.2 System Init .....................................................................................................................C-6 C.5.1.4.1.3 Active .............................................................................................................................C-6 C.5.1.4.2 Major System Failure .....................................................................................................C-6 C.5.2 Raw Data Mode ..............................................................................................................C-6 C.5.2.1 Power Up........................................................................................................................C-6 C.5.2.2 Normal Operation ..........................................................................................................C-6 AutoSense™ AS500 Series Users Guide Copyright OSI LaserScan 2009 3 GENERAL INFORMATION C.5.2.3 System Test ...................................................................................................................C-6 C.5.2.4 Error Conditions ............................................................................................................C-7 C.5.3 LED Indications Tables..................................................................................................C-7 C.5.3.1 Message Mode - Valid Patch..........................................................................................C-7 C.5.3.2 Message Mode - No Patch (or Bad Patch) .....................................................................C-7 C.5.3.3 Raw-Data Mode..............................................................................................................C-8 C.5.3.4 Critical Error ..................................................................................................................C-8 C.6 AutoSense – Message Mode LL_DET Signal ................................................................C-8 C.6.1 Purpose..........................................................................................................................C-8 C.6.2 Application.....................................................................................................................C-8 C.6.3 Interface .........................................................................................................................C-8 C.6.4 Function.........................................................................................................................C-8 C.6.4.1 Trigger Mode..................................................................................................................C-8 C.6.4.1.1 End-of-Vehicle Trigger...................................................................................................C-8 C.6.4.1.2 Detection Trigger ...........................................................................................................C-8 C.6.4.2 Presence Mode ..............................................................................................................C-9 C.6.4.3 Summary........................................................................................................................C-9 C.6.5 Vehicle Detection Criteria ..............................................................................................C-9 C.6.5.1 Vehicle Detection...........................................................................................................C-9 C.6.5.2 End-of-Vehicle .............................................................................................................C-10 C.6.6 Configuration...............................................................................................................C-10 C.6.7 Troubleshooting ..........................................................................................................C-10 C.6.7.1 Weather Related...........................................................................................................C-10 C.6.7.2 Slow Vehicles (Barrier Lane) .......................................................................................C-10 C.7 Software Patch Installation Procedure........................................................................C-10 C.7.1 Equipment Required....................................................................................................C-10 C.7.2 Setup............................................................................................................................C-11 C.7.3 Patch Installation .........................................................................................................C-11 C.7.4 LDM70 Wiring Diagram ................................................................................................C-12 APPENDIX D - Instructions for High Speed Data Collection ........................................................... D-1 D.1 Overview ........................................................................................................................D-1 D.1.1 Running the High-speed (raw) Data Capture Program..................................................D-1 D.2 Setup and Configuration................................................................................................D-3 D.2.1 Installation and setup of SeaLevel RS-422 Multi-Port high-speed serial card..............D-3 D.2.2 Installation and Setup of AutoSense™ High-Speed Capture Application: ...................D-4 D.2.3 Communication Port pin assignment cross reference: ................................................D-4 APPENDIX E - NOMINAL INSTALLATION INFORMATION .....................................................E-1 E.1 Side Fire Sensor Mounting and Look-Down Angle ....................................................... E-1 E.2 Typical AutoSense™ 500 Installation............................................................................ E-1 APPENDIX F - ROAD AUGMENTATION FOR REFLECTIVITY ................................................E-1 AutoSense™ AS500 Series Users Guide Copyright OSI LaserScan 2009 4 GENERAL INFORMATION F.1 Purpose:......................................................................................................................... F-1 F.2 Location of Stripe(s): ..................................................................................................... F-1 F.3 Paint Color ..................................................................................................................... F-2 F.4 Approved Hot Tape Product .......................................................................................... F-2 AutoSense™ AS500 Series Users Guide Copyright OSI LaserScan 2009 5 GENERAL INFORMATION LASER CERTIFICATION OSI LaserScan certifies that the AutoSense™ infrared vehicle sensor is a Class I laser product in compliance with U.S. standard 21 CFR §1040.10 and Class 1 laser product in compliance with the European laser product standards IEC 60825-1 2007. Lasers so classified by either standard are not considered to be hazardous. AutoSense™ AS500 Series Users Guide Copyright OSI LaserScan 2009 6 GENERAL INFORMATION WARNING SUMMARY AutoSense™ AS500 Series Users Guide Copyright OSI LaserScan 2009 7 GENERAL INFORMATION Figure A: Equipment Label and Interface Locations AutoSense™ AS500 Series Users Guide Copyright OSI LaserScan 2009 8 GENERAL INFORMATION Warnings/Personal Safety Precautions AVERTISSEMENT/ PRECAUTIONS POUR votre SECURITE The AutoSense™ contains voltages that can be FATAL and invisible laser radiation that may cause permanent eye damage if opened. Service must be performed ONLY by trained, experienced OSI authorized personnel. Do not attempt to open or access the inside of the AutoSense™. Read and obey all WARNINGS contained in the text of this User’s Guide. The AutoSense™ is equipped with several safety features designed to protect the operator under normal operating conditions. The following WARNINGS are contained in the text of this User’s Guide: L’AutoSense™ contient des tensions electriques qui peuvent etre FATALE ainsi qu’un rayonnement laser invisible qui pourait causer des degats permanents aux yeux si le dispositif est ouvert. Les revisions et reparations doivent etre effectue SEULEMENT par un personnel qualifie, experimente et autorise par OSI. Prier de ne pas tenter d’ouvrir ou d’acceder a l’interieur de l’AutoSense™. Lire et respecter toutes les consignes de securite figurant dans le mode d’emploi. L’AutoSense™ est equipe de plusieurs dispositifs de securite concu pour proteger l’operateur dans des conditions normales d’utilisation. Les AVERTISSEMENTS suivant font parties du manuel de mode d’emploi : WARNINGS AVERTISSEMENTS DO NOT OPEN THE AUTOSENSE™ AND/OR ATTEMPT TO OPERATE THE AUTOSENSE™ OPENED. OPERATION WITH THE AUTOSENSE™ OPENED, MAY RESULT IN EXPOSURE TO INVISIBLE CLASS 3B LASER RADIATION, AND WILL PROVIDE ACCESS TO VOLTAGE THAT CAN KILL. NE PAS OUVRIR L’AUTOSENSE™ ET/OU TENTER DE FAIRE FONCTIONNER L’AUTOSENSE™ OUVERT. TOUT FONCTIONNEMENT DE L’AUTOSENSE™ OUVERT, PEUT ENTRAINER UNE EXPOSITION AU RAYONNEMENT LASER INVISIBLE DE CLASSE 3B, ET DONNERA ACCESS A UNE TENSION POUVANT ENTRAINER LA MORT. DO NOT ATTEMPT TO SERVICE OR REPAIR THE AUTOSENSE™. SERVICE WILL REQUIRE ACCESS TO HARMFUL VOLTAGE THAT CAN KILL, AND MAY RESULT IN EXPOSURE TO INVISIBLE CLASS 3B LASER RADIATION. SERVICE AND REPAIR OF THE AUTOSENSE™ MUST BE PERFORMED ONLY BY OSI AUTHORIZED MAINTENANCE TECHNICIANS. NE PAS TENTER DE FAIRE L’ENTRETIEN OU REPARER L’AUTOSENSE™. LE SERVICE D’ENTRETIEN EXIGE L’ACCES AUX TENSIONS NUISIBLES POUVANT ETRE FATALE, ET PEUT PROVOQUER L’EXPOSITION AU RAYONNEMENT LASER INVISIBLE DE CLASSE 3B. L’ENTRETIEN ET REPARATION DE L’AUTOSENSE™ DOIT ETRE EFFECTUE SEULEMENT PAR UN TECHNICIEN QUALIFIE DE OSI. AutoSense™ AS500 Series Users Guide Copyright OSI LaserScan 2009 9 GENERAL INFORMATION General Equipment Cautions PRECAUTIONS General CONCERNANT L’Equipment CAUTION Check the AutoSense™ power requirements label on the case, prior to applying power. AVERTIR le Contrôle l'AutoSense™ les conditions de pouvoir étiquètent sur le cas, avant appliquer de pouvoir. CAUTION For proper installation, it is necessary to connect all three conductors to the specified power and ground connections. A fuse or circuit breaker must be used between the AutoSense™ unit and the source of power. DO NOT USE A FUSE OR CIRCUIT BREAKER IN THE EARTH GROUND LINE. LA PRUDENCE Pour l'installation correcte, c'est nécessaire de connecter tous les trois conducteurs au pouvoir spécifié et les connexions de sol. Un fusible ou le disjoncteur doit être utilisé entre l'AutoSense™ l'unité et la source de pouvoir. Ne PAS UTILISER UN FUSIBLE OU DISJONCTEUR DANS LA LIGNE DE SOL DE TERRE. CAUTION DO NOT ATTEMPT TO OPEN THE AUTOSENSE™ HOUSING! The AutoSense™ housing is nitrogen purged and hermetically sealed prior to shipping, and should only be opened in a laboratory environment by OSI authorized personnel. All of the screws in the main housing are seal screws and should not be loosened. All calibration and internal alignment adjustments are set during final test, and no field adjustments are required. Opening the housing could damage the unit and will void the warranty. AVERTIR ne PAS TENTER D'OUVRIR L'AUTOSENSE™ LE LOGEMENT ! L'AutoSense™ le logement est de l'azote purgé et hermétiquement scellé avant l'expédition, et devrait être seulement ouvert dans un environnement de laboratoire par OSI a autorisé le personnel. Toutes les vis dans le logement principal sont les vis de cachet et ne devraient pas être desserrées. Tout calibrage et tous ajustements d'alignement internes sont réglés pendant le test final, et aucuns ajustements de champ sont exigés. L'ouverture du logement pourrait endommager l'unité et annulera la garantie. General Safety Practices Consignes Generales de securite Report all hazards. If, at any time, you detect a hazard, report the hazard, as soon as possible, to OSI LaserScan to ensure the hazard is corrected. Refer to the OSI LaserScan contact information on the front cover or page ii of this User’s Guide. Rapporter tous les problemes. Si, a aucun moment vous constatez un danger adressez-vous aussi tot que possible a OSI LaserScan pour etre sure que le probleme soit resolu. Consultez le guide de l’utilisateur a la premiere page ou a la page ii pour les coordonnees de OSI LaserScan. AutoSense™ AS500 Series Users Guide Copyright OSI LaserScan 2009 10 GENERAL INFORMATION PREFACE PURPOSE This User’s Guide provides familiarization and reference information necessary for setup and operation of the AutoSense™. HOW TO USE THIS USER’S GUIDE First, become familiar with the GENERAL INFORMATION in the front matter. Then read the summary of each section, before using the Table of Contents. The Table of Contents may be used to locate related information on any titled subject. Titled subjects are listed by their numbered paragraphs, tables, figures, and page numbers within each section. SUMMARY • Section 1, INTRODUCTION, is an overview of the AutoSense™, a general physical description of components and a list of optional equipment. • Section 2, GETTING STARTED, describes removal of the AutoSense™ from the shipping container, power requirements, interface signals, and cable requirements. • • • • Section 3, OPERATION OF THE AUTOSENSE™, provides a general functional description of the AutoSense™, including sample messages, and typical installation procedures. Section 4, MESSAGE PROTOCOLS OF THE AUTOSENSE™, provides tables, describing the various messages. Section 5, TROUBLESHOOTING THE AUTOSENSE™, provides fault symptom troubleshooting procedures, if you suspect the AutoSense™ is not operating properly. Section 6, MAINTENANCE INSTRUCTIONS, provides instructions for packing and shipping the AutoSense™ to an authorized service center, if required. Information for contacting an authorized service center is also provided. There is no authorized corrective maintenance of the AutoSense™ by the user. TRADEMARKS Product names mentioned in this User’s Guide may be trademarks and are used for identification only. AutoSense™ AS500 Series Users Guide Copyright OSI LaserScan 2009 11 GENERAL INFORMATION LIMITED ONE (1) YEAR WARRANTY OSI LaserScan (OSI) warrants each AutoSense™ unit for one (1) year from the date of shipment according to the following terms. Any part of the AutoSense™ unit manufactured or supplied by OSI and found in the reasonable judgment of OSI to be defective in material or workmanship will be repaired or replaced by OSI without charge for parts or labor. The AutoSense™ unit, including any defective part, must be returned to OSI within the warranty period. All shipping expenses for warranty repair will be paid for by the buyer. OSI's responsibility with respect to warranty claims is limited to making the required repairs or replacements, and no claim of breach of warranty shall be cause for cancellation or rescission of the contract of sale of any AutoSense™ unit. This warranty does not cover any AutoSense™ unit that has been subject to misuse, negligence or accident. This warranty does not apply to any damage to the AutoSense™ unit that is the result of improper use or maintenance. The warranty does not cover any AutoSense™ unit that has been altered or modified so as to change its intended use or for which repairs have been attempted and seals have been broken without OSI's approval. In addition, the warranty does not extend to repairs made necessary by the use of parts, system interface or accessories, which are either incompatible with the unit or adversely affect its operation. The AutoSense™ laser components require a dry environment that is maintained by the use of dry nitrogen and desiccant internal to the sealed unit. If the dry environment is not maintained by following the instructions specified in the operation and maintenance manual the warranty will be void. OSI reserves the right to change or improve the design of any laser system or accessory without assuming any obligation to modify any system previously manufactured. The foregoing Express Warranty is in lieu of all warranties, express or implied OSI's OBLIGATION UNDER THIS WARRANTY IS STRICTLY AND EXCLUSIVELY LIMITED TO THE REPAIR OR REPLACEMENT OF DEFECTIVE PARTS. OSI ASSUMES NO RESPONSIBILITY FOR INCIDENTAL, CONSEQUENTIAL OR OTHER DAMAGES INCLUDING, BUT NOT LIMITED TO: LOSS OR DAMAGE TO PROPERTY, LOSS OF REVENUE, LOSS OF USE OF THE UNIT, LOSS OF TIME OR INCONVENIENCE. AutoSense™ AS500 Series Users Guide Copyright OSI LaserScan 2009 12 GENERAL INFORMATION SECTION 0: DESCRIPTION OF OPERATION A schematic diagram of the AutoSense™ 500 system is shown in FIGURE 0.1 AutoSense™ System Schematic Diagram. The AutoSense™ laser rangefinder employs an InGaAs diode-laser transmitter and a silicon avalanche photodiode (APD) receiver in a side-by-side configuration. The transmitter consists of the diode laser and its driver circuit and a collimating lens. The optical receiver is comprised of an objective lens, narrow-band optical filter, detector/amplifier, and threshold detector. FIGURE 0.1 AutoSense™ System Schematic Diagram The optical detection circuitry converts optical radiation reflected from the vehicle/road to first, an equivalent electrical analog of the input radiation and finally, a logic-level signal. The logic-level signals are processed within the range counter logic to yield analog range data, which is read by the microprocessor. An analog range-measurement technique was chosen for the AutoSense because of its better resolution, smaller size, simpler circuitry, lower power consumption, and lower cost when compared with digital techniques. The analog range measurement circuit, known as a time-to-amplitude converter (TAC), has an accuracy of 1 percent of measured range and a resolution of ±7.6 cm (±3 in). The TAC employs a constantcurrent source to charge a capacitor to obtain a linear voltage ramp whose instantaneous value is a measure of elapsed time. The circuit is designed so that the voltage across the range-measurement capacitor begins ramping down from the positive power supply when the laser fires. The ramp is stopped when either a reflected pulse is received or the end of the measurement period is reached. The TAC output is then converted to digital by a fast 10-bit A/D converter. AutoSense™ AS500 Series Users Guide Copyright OSI LaserScan 2009 13 GENERAL INFORMATION The pulsed time-of-flight range measurements are read by a Digital Signal Processor and converted into distance measurements. When no vehicles are present, the range measurements are equal to the range to the road. When a vehicle is present beside the sensor, the distance to the side surface of the car will be measured and provides a transverse side profile of the vehicle on each scan. The vehicle speed, determined by the time interval between the interceptions of the two laser beams by the vehicle is used to space the transverse profile appropriately by straightforward geometric transformation to obtain the full three-dimensional vehicle profile. This vehicle profile is processed by the sensor to provide detection details and messages for the vehicle. The AutoSense employs a scanning laser rangefinder to measure three-dimensional vehicle profiles that can be used for very accurate vehicle detection. The narrow laser beam width permits the detection of closely spaced vehicles moving at high speed; even a two-inch-wide tow bar can be detected. The AutoSense is ideal for applications involving electronic toll collection from vehicles at freeway speeds, where very high detection accuracy is mandatory. The AutoSense relies on an inherent laser characteristic – narrow angular beam width – to provide the high resolution required for accurate vehicle profiling. The AutoSense beamscan geometry is shown in Figure 0.2. The system scans two narrow laser beams, at a fixed angular separation, across the width of a lane at a rate of 360 scans per second (sps), (180sps on each beam). Pulsed time-of-flight range measurements provide accurate ±7.6 cm (±3 in.) side profiles of a vehicle on each scan. The vehicle speed, determined from the time interval between the interceptions of the two laser beams by the vehicle, is used to space the transverse profiles appropriately to obtain the full three-dimensional vehicle profile. An algorithm, similar to those developed for military target recognition, is applied to the three-dimensional profile for vehicle-detection purposes. FIGURE 0.2 AutoSense™ Beam Scan Geometry An example of the AutoSense 500 series three-dimensional profiling capability is provided by the range images shown in Figure 0.3. This range image of a sport utility vehicle (SUV) pulling a trailer traveling at a speed of 45 mph was obtained by the AutoSense unit operating with a scan rate of 360 scan/s. The pixel spacing resulting from the 1° scan resolution is more than adequate for vehicle detection purposes. FIGURE 0.3 : 3-D Range Image of SUV Towing a Trailer AutoSense™ AS500 Series Users Guide Copyright OSI LaserScan 2009 14 GENERAL INFORMATION As described above, the AutoSense employs a rotating polygon with alternating facet angles to achieve the fixed angular separation needed to line scan the diode-laser rangefinder across a lane of a highway. Alternating facet angles on the polygon allows the laser beam to trace the two lines across the road as the polygon rotates. Each range measurement for this laser beam illuminates a 5 mm (0.2”) by 120 mm (4.7”) spot on the pavement, as shown in Figure 0.4, which provides 3.66 meter (12 feet) total coverage when mounted appropriately alongside the traffic lane. The three-dimensional side profile generated for this coverage area is processed by the sensor to provide vehicle detection details. Figure 0. 4: AS 550 Laser Beam Footprints on Road Surface The AutoSense transmits four messages when operating in the detection mode for each vehicle detected within its field of view. In normal circumstances, each message and the order in which it is transmitted is listed below: #1 #2 #3 #4 First Beam Vehicle Detection Message Second Beam Vehicle Detection Message First Beam End of Vehicle Message Second Beam End of Vehicle Message An illustration of the vehicle’s position for each message is shown in Figure 0.5. The four messages uniquely identify the vehicle and its position in the lane. AutoSense™ AS500 Series Users Guide Copyright OSI LaserScan 2009 15 GENERAL INFORMATION FIGURE 0. 5 AutoSense™ Output Messages Interfaces The AutoSense provides an RS-422 serial interface operating at a user selectable data rate of 19.2, 38.4 or 57.6 kilobits per second, 8 data bits, 1 start, 1 stop, no parity. The default data rate for normal operation is 57.6 Kilobits per second. The sensor can optionally be configured for RS-232. An optional fiber optic interface is under development and will be available in late 2005. Vehicle Detection Trigger The AutoSense provides a real time signal to facilitate the triggering of camera’s or vehicle enforcement systems. The solid state trigger can be configured for front or rear vehicle detection. In addition, the sensor also generates a trigger report as part of serial message #4. Test Self-Test The AutoSense™ has continuous self-test capability. The self-test checks include the following parameters. • Memory tests: RAM • • Motor Control Calibration and Threshold AutoSense™ AS500 Series Users Guide Copyright OSI LaserScan 2009 16 GENERAL INFORMATION Calibration and Adaptation Automatic Calibration The AutoSense™ performs an automatic calibration upon power up. The calibration accuracy is not compromised by vehicles passing through the AutoSense™ field of view. Automatic Site Adaptation The AutoSense™ has automatic calibration at varying installation sites under the following conditions. • Slope 9% • Grade 7% • Road Reflectivity • Barrier and Guard Rails AutoSense™ AS500 Series Users Guide Copyright OSI LaserScan 2009 17 INTRODUCTION SECTION 1: INTRODUCTION 1.1. SCOPE The AS500 Series AutoSense vehicle detection sensor, as shown in figure 1.1, is a Class I laser system that is ideally suited to providing toll authorities with vehicle detection, presence and separation information. The sensor is intended to be mounted alongside the travel lane on a pole arm or toll plaza structure. Please see Section 3 and Appendix E for detailed installation information. The AutoSense 500 scans the roadway in front the sensor, taking range measurements across the width of the lane at two locations in front of the sensor. These measurements are processed to generate messages that uniquely detect each vehicle, and give its speed and position in the lane. The AutoSense automatically initializes the vehicle detection process upon power-up, and its self-calibration process eliminates the need for any field adjustments. This User’s Guide covers safe and correct setup and operation of the AutoSense. 1.2. PHYSICAL DESCRIPTION The descriptions provided here are limited to support understanding of how to use and operate the AutoSense™. For a detailed description, refer to Appendix A, Specification. There is no authorized corrective maintenance of the AutoSense™ for user/operator performance. Access to the inside of the case is restricted to OSI-trained and authorized personnel. No description of the inside of the case is contained in this User’s Guide. Figure 1-1 shows the AutoSense™ in the fully operational configuration. 1.2.1. Case The AutoSense™ laser and control system are housed in a durable weather proof case. 1.2.2. Power Input Connector (3-Pin) Located on the side of the case is the 3-pin power input connector. The connector provides for connection of the power input cable. Functional details of connector are provided in paragraph 2.6.1. 1.2.3. Communication Connector (10-Pin) Located above the power input connector is the 10-pin communication connector. The connector provides for connection of the communication cable. Functional details of connector are provided in paragraph 2.6.2. 1.2.3.1. High-Speed Communication Connector (10-Pin) Located just above the widow shroud is the 10-[in high speed data communication connector. The connector provides for connection of a communication cable. This connector is reserved for use by OSI LaserScan. 1.2.4. Red and Green Indicators Located next to the connectors are a Red and two Green LED indicators. The Red and adjacent Green indicators flash when the AutoSense™ performs self-test at start up and indicate status during operation. The second Green LED indicates system power. 1.2.5. Laser Output Window Located at the front of the housing, the laser output window protects the AutoSense™ components from the environment, and allows the laser to scan the traffic lane. AutoSense™ AS500 Series Users Guide Copyright OSI LaserScan 2009 18 INTRODUCTION FIGURE 1- 1. AutoSense™ 1.2.6. Carrying Handle Located on the case, the carrying handle is used to transport the AutoSense™ and assist in the mounting procedures. 1.2.7. Mounting Hardware The mounting hardware consists of; four each, 1/4-20 bolts with lock washers and flat washers; and 2 each 1/4-20 shoulder screws. The mounting hardware is used to secure and align the case to the mounting plate.The hardware included with the AutoSense™ is for use with the AutoSense™ Mounting Plate sold by OSI, Inc. If any other mounting arrangement is to be used, care must be taken not to break through the case by using hardware that is too long. AutoSense™ AS500 Series Users Guide Copyright OSI LaserScan 2009 19 INTRODUCTION 1.3. OPTIONAL EQUIPMENT The following optional equipment is available for the AutoSense™: Part Number (as required per input voltage of unit) Description 120VAC 240VAC A Power Cable Assembly 9291011-9-xxx xxx = length in feet 9291111-9-xxx xxx = length in feet B Communications Cable Assembly 9291010-9-xxx xxx = length in feet 9291010-9-xxx xxx = length in feet C RS-4SS to RS-232 Converter LDM70-ST LDM70-SE D Beam Finder 9301000-9 9301000-9 E Start-up Kit CD Rom User’s Manual Software Warranty Certificate 19471024-9 19479200 19479601 19479201 19471024-9 19479200 19479601 19479201 F Mounting Kit Mounting plate Mounting hardware and tools 19471017-9 19476022-1 19471023-9 19471017-19 19476022-1 19471023-9 G Supplemental Communications Cable Surge Suppressor 81000143-9 81000143-9 H RS422 Comm Board (High Speed) SeaLevel 7108S-20.0000 or SeaLevel 7205S-20.0000 AutoSense™ AS500 Series Users Guide Copyright OSI LaserScan 2009 20 GETTING STARTED SECTION 2: GETTING STARTED 2.1 SCOPE The following procedures provide instructions for unpacking, inspection, and general interface and power requirements of the AutoSense™. WARNING: Installation of the AutoSense units must be performed by qualified and trained technicians. 2.2 UNPACKING AND INSPECTION OF PARTS The AutoSense™ is shipped in a container. Inside the container, extra protection of the equipment is provided by foamed inserts. The items used with the AutoSense™ are imbedded in the foam inserts. Unpack the AutoSense™, as follows: a. Place the shipping container down on a flat surface. b. Open the lid. c. Ensure the following components are in the shipping container; check Packing List against components: 1. AutoSense™, Unit 2. Two Shoulder Screws 3. Four 1/4-20 Bolts, four Lock Washers, four Flat Washers 4. Swivel Mounting Bracket and Plate 5. AutoSense™ User’s Guide 6. Optional Items, as shown on the Packing List 7. Packing List. d. Remove the items from the shipping container; place on a flat work surface (table or bench), and inspect for damage. 2.3 POWER REQUIREMENTS The AutoSense™ is configured for one of two power requirements, as follows: a. 120 V, 50/60 Hz, 2.0 A b. 240 V, 50/60 Hz, 3.5 A. CAUTION Check the AutoSense™ power requirements label on the case, prior to applying power. AVERTIR le Contrôle l'AutoSense™ les conditions de pouvoir étiquètent sur le cas, avant appliquer de pouvoir. 2.4 INTERFACE SIGNALS The AutoSense™ default serial interface is RS-422, but may be configured fro RS-232. Both are full duplex. Signals for each of the interfaces are presented in Table 2-1. AutoSense™ AS500 Series Users Guide Copyright OSI LaserScan 2009 21 GETTING STARTED OPTIONAL CONFIGURATION STANDARD CONFIGURATION Description Specification RS-422 * Function Serial data communication Mode of Operation Differential Configuration No Parity, 8 data bits, 1 stop bit Baud Rate 19.2, 38.4, 57.6 Kbaud Maximum Cable Length Dependent upon data rate, ≅ 3300 feet @ 57.6 Kbaud RS-232 (EIA 232D) * Function Serial data communication Mode of Operation Single ended Configuration No Parity, 8 data bits, 1 stop bit Baud Rate 19.2, 38.4, 57.6 Kbaud Maximum Cable Length Dependent upon cable capacitance, 2500 pF Max, 165 feet typical *Note: The AutoSense can be configured for either RS-422 (default factory setting) or RS-232(optional factory setting / field configurable setting). Only one of these interfaces is active (i.e. If configured for RS-422, the RS-232 interface is not functional). Table 2- 1. AutoSense™ Interface Signals 2.5 DIMENSIONS The dimensions of the AutoSense™ are listed below. Figure 2-1 shows the mounting holes on the base of the case. a. Height: 6.1 inches (15.5 cm) c. Depth: 17.9 inches (45.5 cm) b. Width: 9.6 inches (24.4 cm) d. Weight: 21 pounds (9.5 kg). Figure 2- 1. AutoSense™ Housing Dimensions (In Inches) AutoSense™ AS500 Series Users Guide Copyright OSI LaserScan 2009 22 GETTING STARTED 2.6 CABLE REQUIREMENTS 2.6.1 Power Cable Input Power Connector pin functions are described in Table 2-2. The three-conductor power cable should be shielded and have a minimum wire size of 18 AWG. Alpha 5163/1C is an acceptable, recommended cable. OSI provides an environmentally sealed cable as an accessory. See page 10. Pin Function A AC B AC – neutral TN style C Earth Ground Table 2- 2. Input Power Connector Pin Functions For proper installation, the AutoSense unit power must be permanently connected to a Breaker Box or Fuse Panel with all three conductors connected to the specified power and ground connections. DO NOT use any type of quick connect or temporary plugs or receptacles. A fuse or circuit breaker MUST be placed between the AutoSense™ unit and the source of power. Make sure that the Earth Ground conductor is properly terminated to provide stated IP Ratings. The cable shield is to be grounded on the connector end of the cable ONLY and should NOT be connected to the earth ground in the breaker box. CAUTION For proper installation, it is necessary to connect all three conductors to the specified power and ground connections. A fuse or circuit breaker must be used between the AutoSense™ unit and the source of power. DO NOT USE A FUSE OR CIRCUIT BREAKER IN THE EARTH GROUND LINE. LA PRUDENCE Pour l'installation correcte, c'est nécessaire de connecter tous les trois conducteurs au pouvoir spécifié et les connexions de sol. Un fusible ou le disjoncteur doit être utilisé entre l'AutoSense™ l'unité et la source de pouvoir. Ne PAS UTILISER UN FUSIBLE OU DISJONCTEUR DANS LA LIGNE DE SOL DE TERRE. Connect the power cable plug to the AutoSense™ power input connector, as shown in Figure 2-2. AutoSense™ AS500 Series Users Guide Copyright OSI LaserScan 2009 23 GETTING STARTED Figure 2- 2. Power Cable Connection 2.6.2 Communication Cable Communication Data Connector pin functions for the AutoSense are described in Table 2-3. The cable used should be a shielded, low-capacitance, polyethylene type, such as BELDEN 9807. For RS-422 operation, maximum cable length for reliable operation is determined by data rate. For RS-232 total cable capacitance will determine the maximum cable length, and should not exceed 2500 pF. For BELDEN 9807, which has a capacitance of 50.4 pF/meter, the maximum length is 165 feet (50 M). OSI provides an environmentally sealed cable as an accessory. See page 10. Note: The AutoSense can be configured for either RS-422 (default factory setting) or RS-232(optional factory setting ). Only one of these interfaces is active (i.e. If configured for RS-422, the RS-232 interface is not functional). AutoSense also has a high-speed (1.25 Mbps) RS-422 interface capability. The high-speed interface is used in applications requiring transmission of the sensor’s raw range and intensity data. A connection diagram for a high-speed RS-422 interface is presented in Appendix B. AutoSense™ AS500 Series Users Guide Copyright OSI LaserScan 2009 24 GETTING STARTED Pin Function Direction A K Ground Camera Trigger out B C * RS-422 TX + * RS-422 TX - out F G * RS-422 RX + * RS-422 RX - in H J ** RS-232 TX ** RS-232 RX out D E Cable Shield Unused out in in Note Twisted Pair Twisted Pair Twisted Pair Twisted Pair out Notes: * RS-422: Default communication interface. ** RS-232: Optional communication interface. Only one of these interfaces is active (i.e. If configured for RS-422, the RS-232 interface is not functional). The RS-232 interface is not active in the default factory configuration. The sensor can be ordered with RS-232 instead of RS-422. It may also be re-configured in the field by editing the parameters using the AsMgr2 application. Table 2- 3. Communication Data Connector Pin Functions Connect the communication cable to the AutoSense™ communication connector, as shown in Figure 2.3. AutoSense™ AS500 Series Users Guide Copyright OSI LaserScan 2009 25 GETTING STARTED H G A K F B J E C D CONNECTOR P2 PIN-OUTS ENLARGED VIEW SHOWN FROM WIRING SIDE OF CONNECTOR SCALE: NONE P2 A K B C G F H J D E BLK A GND RED K LL DET WHT B RS 422 TX+ BLK C RS 422 TX- BLK G RS 422 RX- GRN F RS 422 RX+ BLU H RS 232 TX BLK J RS 232 RX DRAIN WIRE Reserved Note: All signals are relative to the AutoSense Sensor (i.e. TX = transmit from sensor) WIRING DIAGRAM COMMUNICATION Figure 2-3. Communication Cable Connection AutoSense™ AS500 Series Users Guide Copyright OSI LaserScan 2009 26 OPERATION SECTION 3: OPERATION OF THE AUTOSENSE™ 3.1 FUNCTIONAL DESCRIPTION The AS500 Series AutoSense provides timing, position, and speed of vehicles passing through its field-of-view. The AS500 Series AutoSense is designed to be installed on a pole arm or support structure in a toll plaza scanning side fire across the traffic lane. The AutoSense is designed to communicate with a roadside computer through its serial data connector, using either RS-422 (default) or RS-232 (configuration option). It also provides a camera trigger signal as a discrete through the same connector. For each vehicle passing through its field-of-view, the AutoSense will output four serial data messages and a camera trigger, as shown and described in Figure 3-1 and Table 3-1. A Vehicle ID number assigned by the unit will be used to identify the passing vehicle for all four messages. Regardless of the installation location the AutoSense will provide vehicle detection, separation and camera trigger information. When enough pixels per scan find an object for enough consecutive scans of the first beam of the AutoSense, the unit will detect the presence of the vehicle, assign a Vehicle ID number, and send a “1PstP Beam Vehicle Detection” message to the roadside computer. When enough pixels per scan find an object for enough consecutive scans of the second beam, the AutoSense will send a “2PndP Beam Vehicle Detection” message to the roadside computer. This message contains the Vehicle ID number and the vehicle’s speed. When no object has been found for enough consecutive scans under the first beam, the unit will send a “1PstP Beam End of Vehicle” message to the roadside computer. This message contains the Vehicle ID number,. When no object has been found for enough consecutive scans under the second beam, the ndP AutoSense outputs a camera-trigger signal and sends a “2P Beam End of Vehicle” message to the roadside computer. This message contains only the Vehicle ID number. The camera trigger is generated as a discrete output on pin K of the Communications Data Connector. It is a complementary 5 Volt digital signal, 1 µsec in length. In addition, the AutoSense runs self-tests on a periodic basis and will report any detected failures by sending a Self-Test Message to the roadside computer. NOTE: Refer to Section 4, Message Protocol, for a complete list of output messages. In addition, the AutoSense™ runs self-tests on a periodic basis and will report any detected failures by sending a Self-Test Message to the roadside computer. NOTE: Refer to Section 4, Message Protocol, for a complete list of output messages. AutoSense™ AS500 Series Users Guide Copyright OSI LaserScan 2009 27 OPERATION FIGURE 3-1: AutoSense™ Output Messages Versus Vehicle Location. Number 1 of 4 Message 1st nd Beam Vehicle Detection ID = 49 2 of 4 2 Beam Vehicle Detection Speed (mph): 6 ID = 49 3 of 4 1st Beam End of Vehicle ID = 49 4 of 4 2 Beam End of Vehicle Trigger on Pin K ID = 49 nd TABLE 3-1. AutoSense™ Sample Output Messages. As described in Table 3-1, The AutoSense will transmit 4 messages for each vehicle that is detected within its field of view. In normal circumstances, each message and the order in which it is transmitted is listed below. #1 First Beam Vehicle Detection Message #2 Second Beam Vehicle Detection Message #3 First Beam End of Vehicle Message #4 Second Beam End of Vehicle Message AutoSense™ AS500 Series Users Guide Copyright OSI LaserScan 2009 28 OPERATION Each message will include a corresponding vehicle ID. For a vehicle to be validated, messages #1 through #4 must be received when the same vehicle ID. If any message is not received, or if all of the messages do not have the same vehicle ID, then the vehicle is not valid and should not be counted. Normal Vehicle Message Sequence: [Msg#1, ID=1] [Msg#2, ID=1] [Msg#3, ID=1] [Msg#4, ID=1] However, if the AutoSense 500 unit is installed incorrectly or if a vehicle were to back-up through the detection zone (i.e., travel in the opposite direction of traffic, the AutoSense 500 will also transmit the messages out of sequence. This will allow the off-board computer system to identify and filter this detection as an invalid detection. Reverse Vehicle Message Sequence: [Msg#2, ID=1] [Msg#1, ID=2] [Msg#4, ID=2] [Msg#3, ID=1] 3.2 TYPICAL INSTALLATION DO NOT ATTEMPT TO SERVICE OR REPAIR THE AUTOSENSE™. SERVICE WILL REQUIRE ACCESS TO HARMFUL VOLTAGE THAT CAN KILL, AND MAY RESULT IN EXPOSURE TO INVISIBLE CLASS 3B LASER RADIATION. SERVICE AND REPAIR OF THE AUTOSENSE™ MUST BE PERFORMED ONLY BY OSI AUTHORIZED MAINTENANCE TECHNICIANS. NE PAS TENTER DE FAIRE L’ENTRETIEN OU REPARER L’AUTOSENSE™. LE SERVICE D’ENTRETIEN EXIGE L’ACCES AUX TENSIONS NUISIBLES POUVANT ETRE FATALE, ET PEUT PROVOQUER L’EXPOSITION AU RAYONNEMENT LASER INVISIBLE DE CLASSE 3B. L’ENTRETIEN ET REPARATION DE L’AUTOSENSE™ DOIT ETRE EFFECTUE SEULEMENT PAR UN TECHNICIEN QUALIFIE DE OSI. Typically, the AutoSense 500 is mounted between 0.457 meters and 0.609 meters (1.5 and 2.0 feet) from the edge of the traffic lane, as shown in Figure 3-2. The AutoSense 500 has mounting holes located at each corner of the base. Mounting bolts are supplied with each unit. A unique mounting plate and bracket are available that allows the sensor to be mounted and angled appropriately to achieve the desired look down angle on the road. The mounting bracket is designed to be affixed to vertical pole with a diameter from 2 to 3.5 inches (50 to 90 mm). The maximum mounting height is 4.572 meters (15.0 feet). Please reference APPENDIX E for nominal installation information. 3.2.1 Look Down Angle The AutoSense 500 will meet the specifications as defined herein when mounted with the correct angle. The recommended mounting angle is 10 degrees for the first beam and 0 degrees for the second beam. These beam angles are achieved by mounting the sensor with a 5-degree forward tilt as shown in Figure 3-2. AutoSense™ AS500 Series Users Guide Copyright OSI LaserScan 2009 29 OPERATION FIGURE 3-2. Typical AutoSense™ Mounting. AutoSense™ AS500 Series Users Guide Copyright OSI LaserScan 2009 30 MESSAGE PROTOCOL SECTION 4: MESSAGE PROTOCOL OF THE AUTOSENSE™ 4.1 DATA FRAME FORMAT For normal operation, the AutoSense II is configured for 57.6 Kbaud, no parity, 8 data bits, and 1 stop bit. No hardware or software handshaking is used. The AutoSense II will send messages as it detects vehicles. Each data frame will consist of a 2 byte synchronization header, followed by the message/command, and ending with a 1 byte checksum, as shown in the following table. The sections that follow describe the message blocks for each of the AutoSense II messages. All 16-bit data is transferred low byte first. Name Descriptions Size Value Frame Sync First byte of a two byte synchronization header. 1 Byte A5 hex Frame Start Second byte of a two byte synchronization header. 1 Byte 5A hex Message Block The message/command data will be inserted into this location. 1–N bytes See 4.2 through 4.13 Checksum Byte-wise exclusive-OR of Message block 1 Byte 0 to FF hex 4.2 MESSAGE SUMMARY Command Power-On Message Message ID Response Description 6 Power-up Report st 1 10° Vehicle Detection nd 2 0° Vehicle Detection st 3 0° Vehicle Detection 2 Beam End of Vehicle 4 0° Vehicle Detection Reset Command Block 16 Reset command Command Knowledge 8 Test Data Output Message 9 N/A Test Data Output Message Self Test Message Block 7 N/A Self Test Status Message Heartbeat Message 12 N/A Periodic communication. Detection Clear Message 13 N/A No Vehicle Present Version Report 29 N/A Version Report 1 Beam Detection 2 Beam Detection 1 Beam End of Vehicle nd AutoSense™ AS500 Series Users Guide Copyright OSI LaserScan 2009 31 MESSAGE PROTOCOL 4.2.1 Power-On Message Block This message will be sent after the AutoSense™ unit has powered up and completed initial calibration. Name Descriptions Type Size Range/ Value Precision Unit of Measure Message ID Defines the start of a message Byte 1 6 N/A N/A Self-Test Results Any faults detected by the internal selftest routines. A set bit indicates a failure. All bits are defined in the SelfTest Message Description Word 1 0-7FFh N/A N/A Firmware Major Revision The primary version level of AutoSense Firmware Byte 1 0-99 1 N/A Firmware Minor Revision The secondary version level of the AutoSense Firmware Byte 1 0-99 1 N/A Firmware Patch Revision The patch version AutoSense Firmware the Byte 1 0-99 1 N/A Range to Road Beam #2 The range from the AutoSense to the road for every degree of the scan for Beam #2 Byte 30 0-255 0.25 ¼ Feet Range to Road Beam #1 The range from the AutoSense to the road for every degree of the scan for Beam #1 Byte 30 0-255 0.25 ¼ Feet 4.2.2 level of First Beam Vehicle Detection Message Block: (Message #1) Name Descriptions Type Size Range/ Value Precision Unit of Measure Message ID Defines this as a First Beam Vehicle Detection Message Byte 1 1 N/A N/A Vehicle ID Unique number assigned by the AutoSense upon detection of a new vehicle Byte 1 0-255 1 N/A 4.2.3 Second Beam Vehicle Detection Message Block: (Message #2) Name Descriptions Type Size Range/ Value Precision Unit of Measure Message ID Defines this as a Second Beam Vehicle Detection Message Byte 1 2 N/A N/A Vehicle ID Unique number assigned by the AutoSense corresponding to Message #1 for the same vehicle. Byte 1 0-255 1 N/A Vehicle Left Edge Position Defines where the left edge (with respect to the sensor) of the vehicle is positioned within the lane Byte 1 0-29 1 Degrees Vehicle Right Edge Position Defines where the right edge (with respect to the sensor) of the vehicle is positioned within the lane Byte 1 0-29 1 Degrees Vehicle Speed Speed at the leading edge of the vehicle Byte 1 0-255 1 MPH AutoSense™ AS500 Series Users Guide Copyright OSI LaserScan 2009 32 MESSAGE PROTOCOL 4.2.4 First Beam End of Vehicle Detection Message Block: (Message #3) Name Descriptions Type Size Range/ Value Precision Unit of Measure Message ID Defines this as a First Beam End of Vehicle Detection Message Byte 1 3 N/A N/A Vehicle ID Unique number assigned by the AutoSense corresponding to Messages #1 and #2 for the same vehicle Byte 1 0-255 1 N/A Vehicle Left Edge Position Defines where the left edge (with respect to the sensor) of the vehicle is positioned within the lane Byte 1 0-29 1 Degrees Vehicle Right Edge Position Defines where the right edge (with respect to the sensor) of the vehicle is positioned within the lane Byte 1 0-29 1 Degrees 4.2.5 Second Beam End of Vehicle Detection Message Block: (Message #4) Name Descriptions Type Size Range/ Value Precision Unit of Measure Message ID Defines this as a Second Beam End of Vehicle Message Byte 1 4 N/A N/A Vehicle ID Unique number assigned by the AutoSense corresponding to Messages #1, #2, and #3 for the same vehicle Byte 1 0-255 1 N/A 4.2.6 Reset Command Block This command can be sent by the roadside computer to reset the AutoSense 500 unit. Name Descriptions Type Size Range/ Value Precision Unit of Measure Command ID Defines this as a Reset command Byte 1 16 N/A N/A 4.2.7 Command Acknowledged Block This message will be sent in response to the AutoSense™ unit receiving a Reset Command (4.2.7) or any command requiring an Acknowledge response. Name Message ID 4.2.8 Descriptions Type Size Range/ Value Precision Unit of Measure Defines the start of a message Byte 1 8 N/A N/A Test Data Output Command Block This command can be sent by the roadside computer to receive range and intensity data from the AutoSense™ unit. The Test Data Output Message (4.2.9) will be sent in response to this command. AutoSense™ AS500 Series Users Guide Copyright OSI LaserScan 2009 33 MESSAGE PROTOCOL Name Command ID 4.2.9 Descriptions Defines this as a Test Data Output Command Type Size Range/ Value Precision Unit of Measure Byte 1 17 N/A N/A Test Data Output Message Block This message will be sent after the AutoSense™ unit has received the Test Data Output Command (4.2.8). Descriptions Type Size Range/ Value Precision Unit of Measure Message ID Defines the start of a message Byte 1 9 N/A N/A Range to Road Beam #2 The range to the road for every degree of the scan for Beam #2 Byte 30 0-255 0.25 Feet Intensity of Road Beam #2 The intensity (signal strength) for every degree of the scan for Beam #2 Byte 30 0-127 1 N/A Range to Road Beam #1 The range to the road for every degree of the scan for Beam #1 Byte 30 0.255 0.25 Feet Intensity of Road Beam #1 The intensity (signal strength) for every degree of the scan for Beam #1 Byte 30 0-127 1 N/A Name 4.2.10 Self-Test Command Block This command can be sent by the roadside computer to initiate a self-test by the AutoSense™. The Self-Test Message (4.2.11) will be sent in response to this command. Name Command ID Descriptions Defines this as a Self-Test Command Type Size Range/ Value Precision Unit of Measure Byte 1 7 N/A N/A AutoSense™ AS500 Series Users Guide Copyright OSI LaserScan 2009 34 MESSAGE PROTOCOL 4.2.11 Self-Test Message Block This message will be sent in response to receiving a Self-Test Command (4.2.10) or when the AutoSense™ detects a failure. Name Descriptions Type Size Range/ Value Precision Unit of Measure Message ID Defines the start of a message Byte 1 7 N/A N/A Faults Any faults detected by the internal self-test routines. A set bit indicates a failure. See SELF-TEST RESULTS FLAGS (section 4.2.12.1) for a description of each item. Word 1 0-7FFh N/A N/A Bit 0 = EPROM Checksum Bit 1 = EEPROM Checksum Bit 2 = Internal RAM Bit 3 = External RAM Bit 4 = Motor Control Bit 5 = 5-Volt Supply Bit 6 = APD Temperature Bit 7 = Air Temperature Bit 8 = Calibration Bit 9 = Threshold Bit 10 = High Voltage Bit 11 = T0 Warn Bit 12 = N/A Bit 13 = N/A Bit 14 = N/A Bit 15 = N/A 4.2.11.1 SELF TEST RESULT FLAGS Bit Name Description 0 Application Image This test checks the CRC checksum of the application image in FLASH. A failure of this test will prevent the application code from running. (Only the Bootloader will operate if this test fails). 1 Parameters Image Parameter Settings FLASH image Checksum. This test will fail if the parameters in FLASH are corrupted. This failure requires reloading of the parameter image for the unit from an archive. (Only the Bootloader will operate if this test fails) 2 Internal RAM Microprocessor Internal RAM Read/Write test. 3 External RAM External SRAM Read/Write test. 4 Motor Control Indicates the motor speed is out of tolerance. 5 - 6 APD Temperature 7 Air Temperature 8 Calibration 9 THRESHOLD Laser receiver threshold setting test. A failure indicates a problem in the HVC controller electronics. 10 High Voltage Laser receiver APD High voltage gain setting out of range. A failure indicates a problem in the HVC controller electronics. 11 T0 warning 12 - Not used. Laser receiver APD temperature reading out of acceptable limits. Possibly defective temperature sensor. The window temperature sensor value is not within the acceptable limits (0.02 to 3.00 volts.) Indicates the laser range calibration numbers are out of acceptable limits. Indicates that ten percent or more range readings were less than the minimum range threshold during a three hour period.. Not used. AutoSense™ AS500 Series Users Guide Copyright OSI LaserScan 2009 35 MESSAGE PROTOCOL Bit Name Description 13 - Not used. 14 - Not used. 15 - Not used. 4.2.12 Heartbeat Message This message will be sent periodically to indicate that the system is operating nominally. The message will be sent only if no other message has been sent during the defined time interval. Name Descriptions Type Size Range/ Value Precision Unit of Measure Heartbeat Indicates Status of Sensor Byte 1 12 N/A N/A Beam #0 Detection Indicates Detection Active on Beam #2 Byte 1 0-255 N/A N/A Beam #1 Detection Indicates Detection Active on Beam #1 Byte 1 0-255 N/A N/A 4.2.13 Detection Cleared Message This message will be sent to indicate that there currently is no vehicle currently in detection. Name Field of View Clear Descriptions Indicates all vehicles have cleared the sensor. Type Size Range/ Value Precision Unit of Measure Byte 1 13 N/A N/A 4.2.14 Version Report This message is sent in response to receiving a Version Report Request message (4.2.15). Type Size Range/ Value Precision Unit of Measure Byte 1 29 N/A N/A Non-zero indicates the application firmware is running. Byte 1 0-FFh N/A N/A Boot Loader Firmware Major Revision The primary version level of Boot Loader Firmware. Byte 1 0-99 1 N/A Boot-Loader Firmware Minor Revision The secondary version level of the Boot Loader Firmware. Byte 1 0-99 1 N/A Boot-Loader Firmware Patch Revision The patch version level of the Boot Loader Firmware. Byte 1 0-99 1 N/A Reserved Boot loader development number. Byte 1 0-255 1 N/A Name Command ID Operating mode Description Defines this as a Version Report message. AutoSense™ AS500 Series Users Guide Copyright OSI LaserScan 2009 36 MESSAGE PROTOCOL Application Firmware Major Revision The primary version level of Application Firmware. Byte 1 0-99 1 N/A Application Firmware Minor Revision The secondary version level of the Application Firmware. Byte 1 0-99 1 N/A Application Firmware Patch Revision The patch version level of the Application Firmware. Byte 1 0-99 1 N/A Reserved Application Firmware development number. Byte 1 0-255 1 N/A Serial Number The sensor serial number. 32-bit Word 1 0FFFFFFFFh 1 N/A 4.2.15 Sensor Input Message (Commands) The sensor accepts the following messages from the Controller via the 57.6 kbps RS-422 Interface. Command Message ID Response Description Heart-Beat Configure/Request 12 Heart-beat message (5.1.10). Time, in seconds, allowed to elapse with no message before a Heart-Beat report will be sent. 255 = disable. This value will only be retained until the sensor is reset. To permanently change the value, Change the setting in the FLASH Parameters. Reset Command Block 16 Command Acknowledge (5.1.7) Resets the unit. Test Data Output Command 17 Test Data output (5.1.8) Test Data Output Command Self Test Command Block 7 Self Test Message (5.1.9) Self Test Status Request Command Version Request 29 Version Report (5.1.12) Defines this as a Version Request Command. Soft Reset Command 15 Command Acknowledge (5.1.7) Restarts the application without running the boot-loader. Comm Check Command 21 Detection messages 1, 2, 3, 4, 5 Communication interface test. 4.2.16 Heart-Beat Configure/Request Request a heart-beat report from the sensor. Optionally enables / disables the heart-beat report until the next power or RESET event. Name Command ID Heart-beat period Type Size Range/ Value Precision Unit of Measure Defines this as a Heart-beat request Command. Byte 1 12 N/A N/A Time, in seconds, allowed to elapse with no message before a Heart-Beat report will be sent. 255 Byte 1 1 seconds Description 10 – 254, AutoSense™ AS500 Series Users Guide Copyright OSI LaserScan 2009 255 = 37 MESSAGE PROTOCOL = disable. disable This value will only be retained until the sensor is reset. To permanently change the value, Change the setting in the FLASH Parameters. 4.2.17 Reset Command Block This command can be sent by the off-board computer to reset the AS500 Series unit. Name Command ID Descriptions Defines this as a Reset command Type Size Range/ Value Precision Unit of Measure Byte 1 16 N/A N/A 4.2.18 Test Data Output Command Block This command can be sent by the roadside computer to receive range and intensity data from the AS500 Series unit. The Test Data Output Message (4.2.9) will be sent in response to this command. Name Command ID Descriptions Defines this as a Test Data Output Command Type Size Range/ Value Precision Unit of Measure Byte 1 17 N/A N/A 4.2.19 Self-Test Status Command Block This command can be sent by the roadside computer to request a self-test status from the AS500 Series unit. The Self-Test Message (4.2.11) will be sent in response to this command. Name Command ID Descriptions Defines this as a Self-Test Command Type Size Range/ Value Precision Unit of Measure Byte 1 7 N/A N/A 4.2.20 Version Request This message is sent to the sensor to request a Version Report message (4.2.14). Name Description Type Size Range/ Value Precision Unit of Measure Command ID Defines this as a Version Request Command. Byte 1 13 N/A N/A 4.2.21 Soft Reset The Soft Reset command causes the sensor to reload and initialize the Application. This differs from the Reset command (0x10) by bypassing the Boot Loader mode. The sensor responds with the Command Acknowledge Response message. AutoSense™ AS500 Series Users Guide Copyright OSI LaserScan 2009 38 MESSAGE PROTOCOL Name Command ID Description Defines this as a Soft Reset Command message. Type Size Range/ Value Precision Unit of Measure Byte 1 15 N/A N/A 4.2.22 Communications Check This command used to test communication with sensor. It requests a simulated detection event sequence from the sensor. The sensor responds with a 5 message sequence (msg 1,2,3,4 & 5) simulating a vehicle detection. Also the trigger outputs are inverted for 0.5 seconds. Name Command ID Description Defines this as a Communications Check Command message. Type Size Range/ Value Precision Unit of Measure Byte 1 21 N/A N/A AutoSense™ AS500 Series Users Guide Copyright OSI LaserScan 2009 39 TROUBLESHOOTING SECTION 5: TROUBLESHOOTING THE AUTOSENSE™ a. PROBLEM: AutoSense™ does not power-up. CORRECTIVE ACTIONS 1. Ensure the main power cable is properly plugged into the power in receptacle and into the facility outlet with appropriate power available. Refer to paragraph 2.3 for input power requirements. 2. Ensure the main power supply is on. 3. Should the problem still exist, go to paragraph 6.2. b. PROBLEM: AutoSense™ does not function. CORRECTIVE ACTIONS 1. Check the power to the sensor and ensure that normal current is drawn. Refer to paragraph 2.3 for input power requirements. 2. Confirm that the sensor is mounted at least 4.00 Feet (1.2 Meters) from any surface. 4. Refer to Software User’s Manual to run the Communication Self-check and view the range and signal strength. 5. In the event that these tests fail to remedy the fault, it is recommended that the unit be returned to the supplier or OSI LaserScan. (Go to paragraph 6.2.) c. PROBLEM: AutoSense™ messages indicate that vehicle speed and length are always “0”. CORRECTIVE ACTIONS 1. Confirm that AutoSense™ is mounted so that the 1st beam intercepts the vehicle before the 2nd beam. AutoSense™ AS500 Series Users Guide Copyright OSI LaserScan 2009 40 MAINTENANCE SECTION 6: MAINTENANCE OF THE AUTOSENSE™ CAUTION DO NOT ATTEMPT TO OPEN THE AUTOSENSE™ HOUSING! The AutoSense™ housing is nitrogen purged and hermetically sealed prior to shipping, and should only be opened in a laboratory environment by OSI authorized personnel. All of the screws in the main housing are seal screws and should not be loosened. All calibration and internal alignment adjustments are set during final test, and no field adjustments are required. Opening the housing could damage the unit and will void the warranty. AVERTIR ne PAS TENTER D'OUVRIR L'AUTOSENSE™ LE LOGEMENT ! L'AutoSense™ le logement est de l'azote purgé et hermétiquement scellé avant l'expédition, et devrait être seulement ouvert dans un environnement de laboratoire par OSI a autorisé le personnel. Toutes les vis dans le logement principal sont les vis de cachet et ne devraient pas être desserrées. Tout calibrage et tous ajustements d'alignement internes sont réglés pendant le test final, et aucuns ajustements de champ sont exigés. L'ouverture du logement pourrait endommager l'unité et annulera la garantie. 6.1 PREVENTIVE MAINTENANCE The AutoSense™ is designed to require very little maintenance. The only maintenance requirement for the AutoSense™ is keeping the window clean. When the window becomes dirty, range errors may occur. The window should be cleaned with optical lens tissue to avoid possible scratches and damaging the window. This should be done at intervals of approximately six months, or as conditions require. 6.2 CORRECTIVE MAINTENANCE There is no authorized repair or service of the AutoSense™ by the user/operator. Should the AutoSense™ need service or repair, contact OSI per the contact information provided on page i of this User’s Guide. Any unauthorized repairs performed on the AutoSense™ will void the equipment warranty. For all repairs and services, contact OSI per the contact information provided on page i of this User’s Guide. Obtain a Return Material Authorization (RMA) number and directions for shipping the AutoSense™. 6.2.1 Packing the AutoSense™ for Shipment. Pack the AutoSense™ in a suitable shipping container along with a brief description of the problem and the RMA number. DO NOT pack any accessories unless instructed to do so by your OSI service representative. Be sure the AutoSense™ is surrounded on all sides by 2 to 3 inches (50 to 75 mm) of packing material and is restrained from movement. The unit contains sensitive optical and electrical components which may be damaged by rough handling. Label and ship the unit per the instructions of your OSI representative. Be sure the RMA number is displayed on the outside. 6.3 PERIODIC OVERHAUL MAINTENANCE After significant use, the AutoSense™ will require overhaul maintenance by qualified OSIauthorized maintenance technicians. Recommended time between overhauls is tied to the Mean Time Between Failures and is currently 4 years. To schedule overhaul maintenance of the AutoSense™, contact OSI per the contact information provided on page iii of this User’s AutoSense™ AS500 Series Users Guide Copyright OSI LaserScan 2009 41 MAINTENANCE Guide. The AutoSense™ and its associated parts and accessories are listed in Table 6.1 below. Part Number (as required per input voltage of unit) Description 120VAC 240VAC 1 AutoSense 550, 120VAC 2 AutoSense 550, 240VAC 3 Power Cable Assembly 9291011-9-xxx xxx = length in feet 9291111-9-xxx xxx = length in feet 4 Communications Cable Assembly 9291010-9-xxx xxx = length in feet 9291010-9-xxx xxx = length in feet 5 RS-422 to RS-232 Converter LDM70ST LDM70SE 6 Beam Finder 9301000-9 9301000-9 Start-up Kit CD Rom 19471024-9 19471024-9 7 AS550-120-422 AS550-240-422 User’s Manual Software Warranty Certificate Mounting Kit 8 19479200 19479601 19479201 19471017-9 Mounting plate Mounting hardware and tools 9 Supplemental Communications Cable Surge Suppressor 10 RS422 High Speed Comm Board 19479200 19479601 19479201 19471017-19 19476022-1 19471023-9 81000143-9 19476022-1 19471023-9 81000143-9 SeaLevel 7108S-20.0000 or SeaLevel 7205S-20.0000 TABLE 6-1: AutoSense™ Parts List AutoSense™ AS500 Series Users Guide Copyright OSI LaserScan 2009 42 APPENDIX A APPENDIX A - SPECIFICATIONS The following specifications are subject to change without notice: A.1 Performance: Vehicle Detection Accuracy >99.9% (one vehicle in field-of-view) Vehicle Spacing Resolution 10 feet at 125 mph (1.2 m at 200 kph) 4 feet at 62 mph (0.6 m at 100 kph) 1.5 feet at 10 mph (.35m @ 18.2 kph) A.2 Trailer Tow Bar Detection >2 inches tall, >2 feet long up to 125 mph (>5 cm tall, >60 cm long up to 200 kph) End-of-Vehicle Detection Signal ~1 foot (0.3 M) after vehicle exits 2P Lane Width Coverage 10 feet at 12 feet mounting height (3.048m at 3.657m) Maximum Mounting Height 15 feet (4.572 meters) Minimum Mounting Height 12 feet (3.657 meters) Vehicle Speed Accuracy ± 10% ndP beam Physical: Power Input 240 V, 50-60 Hz, 3.5A or 120 V, 50-60 Hz, 2.0A A.3 A.4 Power Consumption 35 watts nominal, 157 watts maximum (motor startup and heaters on) Dimensions 17.9 x 9.6 x 6.1 inches (Length x Width x Height) (45.5 x 24.4 x 15.5 cm) Weight 21 pounds (9.5 Kg) Laser Output: Wavelength 904 nm Pulse Width (MAX) 8 nanoseconds Energy per pulse (MAX) 60 nanojoules Driving current Approximately 6 amps Unit Warm-up for Stabilized Laser Output Approximately 30 seconds Data Interface: RS-422 or RS-232 Serial 19.2, 38.4, 57.6 Kbps (User selectable) 8 data bits, 1 start, 1 stop, no parity AutoSense™ AS500 Series Users Guide Copyright OSI LaserScan 2009 A-1 APPENDIX A A.5 Environmental: Temperature -40 to +160 degrees F (with sun loading) Thermal Shock 60 degrees F/minute Humidity 0 to 100% condensing Rain 0.8 inches/hour (20 mm/hour) operating 4 inches/hour (100 mm/hour) maximum Snow Loading 20 lb./ftP (98 Kg/mP ) Ice Loading Accumulation to 0.6 inches (15 mm) Wind Loading 43 knots steady, 73 knots gusts Dust 1g/mP Vibration 5 to 30 Hz, 0.5 G for 3 minutes in each axis Shock 10 G in each axis Electrostatic Discharge 2,000 volts Reliability >35,000 hours (Mean Time Between Failures) Maintainability 15 minutes (Mean Time To Replace) IP Rating IPx4 Per IEC60950-22 2005 Version Certifications CE Mark, UL, CSA, CB Scheme 2P 3P 2P with particles 10-100 micrometer diameter AutoSense™ AS500 Series Users Guide Copyright OSI LaserScan 2009 A-2 APPENDIX B APPENDIX B B.1 High-Speed RS422 Interface: This table shows cable wiring from the sensor to a 1.25 Mbps high-speed communications card using a DB25 connector. Wire colors are for OSI supplied cable. AutoSense Signal TX+ AutoSense Connector PC Signal RS530 / SeaLevel 25-pin D (PT06P-12-10S) B (white) SeaLevel FastCom 9-pin D 9-pin D RXD+ 16 1 8 RXD- 3 2 9 TXD+ 14 4 4 TXD- 2 3 5 GND 7 5 1 twisted pair TX- C (black) RX+ F (green) twisted pair RX- G (black) GND A(black) n/a K(red) n/a H(blue) n/a J(black) n/a D n/a n/a E n/a Cable Shield Drain Wire twisted pair n/a twisted pair n/a Notes: (1) The data cable is paired and has twisted conductors (1 and 2, 3 and 4, etc. per P1) (2) Only two pairs (RS422 TX and RX) are used. See Appendix D for more information on High-Speed (Raw) data capture. AutoSense™ AS500 Series Users Guide Copyright OSI LaserScan 2009 B-1 APPENDIX C APPENDIX C – AUTOSENSE™ QUICK START GUIDE TO OPERATION Serial Communication LCU AutoSense™ (customer supplied) Detect Signal, TTL Power, 110 VAC Serial Communication • • • • Detection Messages o Beam #1 Detection o Beam #2 Detection o Beam #1 End-of-Detection o Beam #2 End-of-Detection o Vehicle Classification o FoV Clear Self-Test Communication Test Version Detect Signal, TTL • • • Vehicle Presence End-of-Vehicle Trigger o May be used to trigger camera Vehicle Detection Trigger Figure C.1 AutoSense™ Interface AutoSense™ AS500 Series Users Guide Copyright OSI LaserScan 2009 C-1 APPENDIX C C.0 AutoSense™ Test Software The AS2TEST program supplied with each sensor is used to verify the operation of the AutoSense. This software, which runs on a computer running the standard disk operating system (DOS), is used to control AutoSense and to display message data in the standard operating mode. The standard operating mode outputs a series of 4 messages for each vehicle detected. The messages are sent via RS-422 or RS-232 serial interface at a rate of 57.6 Kbaud. C.1 Getting Started Mount the AutoSense as shown in Figure 2.1 such that the distance from the front of the sensor to any other objects within the 30 degree field of view, is between 1 meters (3.28 feet) and 4 meters (13.1 feet). Now apply power to the AutoSense. The Green and Red LED’s will flash once, then turn off while the scanner motor reaches operating speed. At the end of the initialization period the Green and Red LED’s will flash synchronously several times, then the LED’s will turn off for a few seconds while final loop-back adjustments are made to the motor control and the laser high voltage control. When the final adjustments are made, both LED’s will flash again and then remain on. The initialization process usually takes approximately 30 seconds to complete unless the unit is operating in a very cold environment. In cold environments, heaters are turned on prior to initialization. In these circumstances, initialization can take up to 30 minutes. The following sequence of events will occur within this time period. After power is applied to the unit, if the temperature is below 15degree C, the onboard heaters will be activated. Power to the processor is removed if the ambient temperature is below 0 degrees C. Once the temperature reaches 0 degrees C and the processor is active, the heated window is turned on and the system waits until the ambient temperature reaches 10 degrees C or 10 minutes has passed, whichever comes first. This allows for the window to clear before the unit begins scanning. Once the system is active the normal startup sequence is followed. Now run the AS2TEST.EXE software on a 486 or higher PC and select the Configure Software option from the Main Menu. Select the serial communication port that the AutoSense II is connected to on the PC. This software will only support COM1 or COM2. Make sure that all power management functions are disabled in the PC BIOS settings. This will ensure that the PC’s serial port is not in a “powered down” state, which would prevent proper communication with the AutoSense II. This is a common problem when using notebook type PC’s. After the correct serial port is selected, choose the Save PC Configuration option so that the software will always default to the correct serial port where the AutoSense II is connected. The default baud rate is fixed at 57.6 Kbaud. However, other baud rates are supported. The Configure Software menu also provides the user with the option of saving all of the data to an ASCII text file. The file name field is large enough to allow the data to be redirected to another drive. **Please note that on slower computers, it is recommended that the data be written to a RAM drive. Writing the data to slow hard drives and floppy drives may cause some data messages to be lost.** AutoSense™ AS500 Series Users Guide Copyright OSI LaserScan 2009 C-2 APPENDIX C C.1.1 What You Should See After the PC software is configured, select the Show All Message Data option from the Main Menu. The AutoSense will send a power-on message approximately 45 - 60 seconds after the unit is powered on. The power-on message will contain the self test results, firmware version number, and the measured range to the road for each sample in both beams. If the baud reference point for the AutoSense is not found initially, the power-on message mat be delayed up to 2 minutes as the unit continually self calibrates. At the bottom of the screen, function keys will be listed. The operation of these keys is described below. C.1.2 Reset Command F1 will send a Reset command to the AutoSense. The AutoSense should respond with a Command Accepted message. After 45 - 60 seconds, another Power-On message will be sent. C.1.3 Test Data Output Command F2 will send a Test Data Output command. The response will include the range and intensity data for each sample in both beams. The top section of the response will show the range data (displayed in feet) for the second beam (0 degree beam). The next section shows the corresponding intensity data for the second beam. The numbers will be in the range of 0 to 127. The next two sections are the range and intensity for the first beam (10 degree beam). Please note that occasionally a bad sample will appear in the output data. The bad range may appear as a short range (~2 feet) or a max range (~50 feet) with the corresponding intensity value equal to 0. This is caused by the fact that the command is sent asynchronously to the range measurement period of the AutoSense. The AutoSense may be in the process of updating the data when the request is received. C.1.4 Self Test Command The F3 key sends a Self Test Command to the AutoSense. The response will include a pass / fail result for each test. C.1.5 Change Operating Mode The F4 key switches the AutoSense to a 1.25 Mbaud demonstration mode. This mode requires a high speed RS-422 DMA card (OSI part 86000426-1) and additional software (AS2DEMO.EXE). Without the additional hardware and software, the AutoSense must be powered down and back up again before it will return to the standard operating mode. The ASMgr software will not communicate with the AutoSense when it is in the demonstration mode. C.1.6 Communicate Check Command The F5 key (ComCheck) runs a communication self check to test that the serial port, cables, 422-232 Converter, and the AutoSense are all configured properly. When the F5 key is pressed, the following message will be displayed in yellow “Sending COM Check Command”. If everything is working correctly, the AutoSense will respond with a sample set of the 4 vehicle detection messages that it sends for each vehicle. These detection messages will immediately be displayed on the screen. If no messages are displayed, then all components of the communication interface will have to be verified before proceeding any further. AutoSense™ AS500 Series Users Guide Copyright OSI LaserScan 2009 C-3 APPENDIX C C.1.7 Change Baud Rate Command The F6 key will change the baud rate at which the AutoSense sends messages and receives commands. The AutoSense supports 9600 bps, 19.2 kbps, 28.8 kbps, 38.4 kbps, and 57.6 kbps. The 57.6 kbps is the default baud rate when the AutoSense leaves the factory. The baud rate is saved in the AutoSense non-volatile memory and can only be changed by sending another baud rate change command. To activate the new baud rate, the AutoSense must be reset either by cycling power or by sending a reset command. Please note that after the AutoSense baud rate has been changed, the AS2TEST program must also be changed to the same baud rate using the Configure Software menu item. C.1.8 Logic Level Signal The F7 key allows the user to select the function of the LL_Det output signal between “Trigger Pulse” and “Presence Signal”. The change will not take effect until the unit has been RESET. When “Presence Signal” is selected the LL_Det signal remains active while a vehicle is detected in the second beam. When “Trigger Pulse” is selected the LL_Det signal pulses active for 1 microsecond when the vehicle exits the second beam or enters the leading beam depending on whether leading or trailing trigger mode is programmed from the factory (the default is trailing). C.1.9 Minimum Valid Range The F9 key allows the user to select the minimum valid range from the sensor to the top of a vehicle. The default minimum range is the greater of 4.0 feet or mounting height minus 14.0 feet. This allows for a minimum mounting height of 18.0 feet. If the unit must be mounted lower than 18.0 feet above the road, this parameter will allow the minimum range to be adjusted to less than 4.0 feet. However, mounting the sensor lower than the recommended minimum mounting height will result in reduced lane coverage and classification accuracy. This setting does not take effect until the unit has been RESET. This function is applicable to patch version 1.01.41 or later. It will have no effect on previous patch versions. C.2 Testing with Vehicles The AutoSense will transmit as many as 4 messages for each vehicle that is detected within its field of view. In normal circumstances, each message and the order in which it is transmitted is listed below. #1 First Beam Vehicle Detection Message #2 Second Beam Vehicle Detection Message #3 First Beam End of Vehicle Message #4 Second Beam End of Vehicle Message Please refer to Section 4.0 for details on the information contained within each message. The Show All Message Data option will show all 4 messages for each vehicle. AutoSense™ AS500 Series Users Guide Copyright OSI LaserScan 2009 C-4 APPENDIX C C.3 Message Filtering An incomplete message sequence is possible if the vehicle is at the extreme edge of the sensor’s field of view. In this case, the vehicle may only be seen by the sensor’s first or second beam resulting in a message #1 & #3, or a message #2 & #4 message sequence. In another case, since the AutoSense is capable of detecting and tracking up to 3 vehicles at the same time within the detection field of view, extra messages may be transmitted for uniquely shaped vehicles or trailers. Vehicles loaded with building supplies which extend beyond the normal dimensions of the vehicle, and unloaded trailers, such as unloaded boat trailers, may produce additional messages from either the first or second beams as shown in the test output listed below. 1st BEAM VEHICLE DETECTION ID = 49 2nd BEAM VEHICLE DETECTION Left Edge Pos: 23 Rght Edge Pos: 29 Speed (mph)..: 6 ID = 49 1st BEAM END of VEHICLE Left Edge Pos: 20 Rght Edge Pos: 29 ID = 49 1st BEAM VEHICLE DETECTION ID = 50 1st BEAM END of VEHICLE Left Edge Pos: 21 Rght Edge Pos: 28 ID = 50 2nd BEAM END of VEHICLE ID = 49 C.4 Software Download The Software Download Command option from the Main Menu is used to update the AutoSense firmware. A firmware update file will be provided by OSI when modifications to the AutoSense firmware are necessary. C.5 AutoSense II LED Indicators C.5.1 Message Mode C.5.1.1 Power Up On initial power-up the RED and GREEN LEDs are both turned off. C.5.1.1.1 System Initialization After a 30 second delay to allow for motor spin-up the RED and GREEN indicators blink alternately for several seconds to indicate patch initialization. If a valid patch is not found the alternating LEDs indication is not performed. After a short delay the indicators blink together for about 2 seconds. AutoSense™ AS500 Series Users Guide Copyright OSI LaserScan 2009 C-5 APPENDIX C C.5.1.1.2 Initial Road Calibration During initial road calibration the GREEN LED is turned ON and the RED LED is turned OFF. The RED LED is turned on when calibration is completed. This can be from a couple of seconds up to a couple of minutes. C.5.1.2 Normal Operation The RED LED remains ON during normal operation. The GREEN LED indicates vehicle presence, as defined below. C.5.1.2.1 Detection Idle Used when no vehicle is detected in beam 2. Both LEDs remain ON. C.5.1.2.2 Vehicle Present GREEN LED turns OFF when a vehicle is detected in beam 2. C.5.1.2.3 End-of-Vehicle GREEN LED turns ON when an end-of-vehicle is detected in beam 2. C.5.1.3 System Check When the "Comm Check" command is processed the GREEN LED is inverted for ½ second. C.5.1.4 Error Conditions C.5.1.4.1 Bad Patch A bad patch is indicated by the following power-up sequence: C.5.1.4.1.1 Power Up On power-up both LEDs remain OFF. C.5.1.4.1.2 System Init After approximately 30 seconds both LEDs FLASH together several times. C.5.1.4.1.3 Active Both LEDs remain ON. C.5.1.4.2 Major System Failure If a major system failure occurs, which prevents the processor from operating, both LEDs will remain ON during power-up. C.5.2 Raw Data Mode C.5.2.1 Power Up On initial power-up both LEDs will flash for several seconds. Then both LEDs will remain ON. C.5.2.2 Normal Operation In normal raw data operating mode both LEDs remain ON at all times. C.5.2.3 System Test During system test both LEDs remain ON at all times. AutoSense™ AS500 Series Users Guide Copyright OSI LaserScan 2009 C-6 APPENDIX C C.5.2.4 C.5.3 Error Conditions There is no change in LED status to indicate error conditions. If a major system failure occurs, which prevents the processor from operating, both LEDs will remain ON during power-up LED Indications Tables C.5.3.1 Message Mode - Valid Patch Status Step GREEN RED OFF OFF Power Up System Initialization Init Indication Description Initial power-up. Waiting for motor spin-up. Approximately 30 seconds. ALTERNATING Running patch initialization code. If the LEDs do not flash alternately, then the patch is not valid or the unit is operating in Raw-Data mode. FLASH Together Done with patch initialization code. Ready to run patch code. Patch Ready to Run Patch Road Calibration OFF Road Cal Active The initial road calibration is being performed. This may take up to 2 minutes if the sensor does not see valid road ranges. ON Road Cal Complete The initial road calibration is complete. ON Normal Operation System Test C.5.3.2 Detection Idle ON 0º Detect OFF 0º End-of-Detect ON Comm-Check OFF ½ second No vehicle detected in 0º beam. ON ON Vehicle Detection Vehicle detected in 0º beam. End-of-Vehicle Vehicle exited 0º beam. Comm check When a “Comm Check” command is received the GREEN indicator switches for ½ second. The LogicLevel Detect signal is also switched at the same time. Message Mode - No Patch (or Bad Patch) Status Step Power Up System Initialization Normal Operation System Test Ready to Run Patch Detection Idle Comm-Check GREEN RED OFF OFF Indication Description Initial power-up. Waiting for motor spin-up. Approximately 30 seconds. FLASH Together Done with patch initialization code. Ready to run patch code. ON ON No vehicle detected in 0º beam. ON ON Comm check AutoSense™ AS500 Series Users Guide Copyright OSI LaserScan 2009 When a “Comm Check” command is received the GREEN indicator switches for ½ second. The Logic-Level Detect signal is also switched at the same time. C-7 APPENDIX C C.5.3.3 Raw-Data Mode Status Step Power Up RED Indication Description FLASH Together Initializing. ON ON Normal operation Step GREEN RED Critical Failure ON ON Normal Operation C.5.3.4 GREEN Critical Error Status Power Up Indication Description System is not operating C.6 AutoSense – Message Mode LL_DET Signal C.6.1 Purpose This section explains the function of the LL_DET (Trigger) signal of the AutoSense . C.6.2 Application The LL_DET mode selected has no effect on the vehicle detection and classification operation of the AutoSense2. C.6.3 Interface The LL_DET signal is an active low TTL level signal located on pin K of the communications interface connector of the AS2. This signal is referenced to the ground pin (pin A) of the communications interface connector. C.6.4 Function The LL_DET signal activates to indicate a detection event. The event which activates the signal is selected by configuration parameters contained within the system EEPROM parameters. The event can be End-of-Vehicle Trigger, Vehicle Detection Trigger or Vehicle Presence. NOTE: The LL_DET mode selected has no effect on the vehicle detection and classification operation of the AutoSense2. C.6.4.1 Trigger Mode In Trigger Mode the LL_DET signal pulses low for one microsecond. The trigger can be configured to occur either at the end-of-vehicle (trailing) or at vehicle detection (leading). C.6.4.1.1 End-of-Vehicle Trigger For End-of-Vehicle Trigger mode the LL_DET pulse occurs when the end-of-vehicle is detected on the second beam. This pulse occurs just prior to message 4 being sent. The end-of-vehicle occurs approximately one foot after the vehicle exits the second beam. C.6.4.1.2 Detection Trigger For Detection Trigger mode the LL_DET pulse occurs when a vehicle is detected on the first beam. This pulse occurs just prior to message 1 being sent. The vehicle detection occurs when a vehicle is detected in the first beam for 8 consecutive scans. AutoSense™ AS500 Series Users Guide Copyright OSI LaserScan 2009 C-8 APPENDIX C When Detection Trigger mode is selected the first beam detection message (message 1), second beam detection message (message 2) and end-of-vehicle message (message 3) contain two extra bytes. In message 1 they define the left and right edges of the vehicle at detection. In messages 2 and 3 they define the range to the left and right edges of the vehicle. C.6.4.2 Presence Mode For Presence mode the LL_DET signal goes active (low) when a vehicle is detected in the second beam. It goes inactive (high) when the vehicle is no longer detected in the second beam. The active edge corresponds with message 2, while the inactive edge corresponds to message 4. C.6.4.3 Summary Mode Signal Type Signal Activation End-of-Vehicle 1µs Pulse 2 beam end-ofdetection. 1µs Pulse 1 beam vehicle detection Active low 2 beam vehicle detection (Trailing) Detection (Leading Edge) Presence C.6.5 C.6.5.1 Signal DeActivation Multi-Vehicle Behavior nd N/A A pulse for each vehicle. st N/A A pulse for each vehicle. nd 2 beam end-ofdetection. nd The presence signal is active as long as any vehicle nd is in the 2 beam. Vehicle Detection Criteria The vehicle detection criteria explain the thresholds used by the AutoSense2 to determine vehicle detection and end-of-vehicle detection. These criteria are completely independent of the LL_DET mode of operation. This information is included in this document for completeness only. Vehicle Detection Vehicle detection occurs for a beam (1st or 2nd) if an object is detected for 8 consecutive scan lines. Scan lines occur at a rate of 360 per second for each beam. The table below shows the distance the vehicle travels from when it breaks a beam until it is detected. Speed (mph) Speed (fps) Detection Distance (feet) Detection Time (ms) 20 29.3 0.64 22.2 30 44.0 0.98 22.2 45 66.0 1.47 22.2 60 88.0 1.95 22.2 80 117.3 2.60 22.2 120 176.0 3.91 22.2 AutoSense™ AS500 Series Users Guide Copyright OSI LaserScan 2009 C-9 APPENDIX C C.6.5.2 C.6.6 End-of-Vehicle End-of-Vehicle detection for each beam (1st of 2nd) is speed dependent and is calculated to occur one foot beyond the last detection. The table below shows the number of scans and time for end-of-vehicle determination at different speeds. Speed (mph) EoV Scans == 1 foot Time (ms) Minimum 120 333 20 12 33 30 8 22 45 5 14 60 4 11 80 3 8 120 2 6 Maximum 2 6 Configuration The Selection of Trigger mode between Detection (Leading Edge) or End-of-Vehicle (Trailing Edge) is performed at the factory at production time. It is currently not field changeable. Changing between Trigger mode and Presence mode is performed using AS2test.exe. To change between Trigger and Presence: 1. After the sensor has completed power-up and is operating normally, select “Show All Message Data” from the main menu. 2. Press the <F7> function key to display the LL_DET mode options. 3. Using the up arrow and down arrow cursor keys select the desired mode and press the <Enter> key. 4. A prompt will display indicating a RESET is required. Press the <F1> function key to RESET the sensor. The new LL_DET mode is now configured. C.6.7 Troubleshooting C.6.7.1 Weather Related In inclement weather conditions (heavy rain, fog or snow) or when the road surface under the sensor is very wet (pooling water) the LL_DET signal may fail to pulse at the end of the vehicle. In Detection mode the signal may remain active (low). This can be verified by observing the message data and observing whether or not the corresponding message (message 4) is occurring. C.6.7.2 Slow Vehicles (Barrier Lane) When a vehicle is moving very slowly (less than 20mph) under the sensor, multiple detection messages may occur as the vehicle passes through the beams. This may result in additional trigger pulses in Trigger mode or early deactivation of the presence signal in Presence mode. C.7 Software Patch Installation Procedure C.7.1 Equipment Required AutoSense™ AS500 Series Users Guide Copyright OSI LaserScan 2009 C-10 APPENDIX C 1. PC Computer with MSDOS mode and one available Serial Communications port (COM1 or COM2). 2. AutoSense II (AS2) Test application (AS2test.EXE). 3. AS2 patch code (“OSI101nn.HEX”, where “nn” is the patch version, i.e. OSI10139.hex is patch 39). 4. RS422 to RS232 converter, DataForth LDM-70 with 12VAC wall transformer. (May use other equivalent 422 to 232 converter capable of 57,600 bit-per-second data rate). 5. AS2 Communications Cable (P/N 9291010-9-xxx). 6. AS2 Power Cable (P/N 9291011-9-xxx). 7. PC Serial Interface Cable, DB25M to DB25F (or DB9F). C.7.2 Setup 1. Connect the LDM70 converter to the AS2 comm cable as shown below. 2. Connect a 25-pin Serial communications cable from the LDM70 to COM1 or COM2 on the PC. (A 25-pin to 9-pin adapter may be required.) 3. Power up the AutoSense unit. 4. Reboot the computer connected to the AutoSense in MSDOS mode. 5. Create a directory and copy the files “AS2test.exe” and “OSI101nn.HEX”, where “nn” is the patch version (i.e. OSI10139.hex is patch 39), to the directory. 6. Type AS2test followed by the enter key. The software should now be running. 7. Select “Configure Software” from the menu using the arrow keys and pressing the <Enter> key. 8. Select the COM port the AS2 is connected to. 9. Select the “Baud Rate” menu item. Press the enter key (<Enter>) until “57.6” is displayed. 10. Select the “Save PC Configuration” menu item and press <Enter> to save the configuration. 11. Press the escape key (<Esc>) to return to the main menu. C.7.3 Patch Installation 1. From the menu select "Software Download Command" using the arrow keys followed by the enter key (<Enter>). 2. Change the value from “OSI101xx.HEX” to “OSI101nn.HEX”, where “nn” is the patch version (i.e. OSI10139.hex is patch 39). 3. Press <Enter>, “Programming: nnnn:10 xx xx xx xx … xx xx” will be displayed at the bottom of the display to indicate the code is being loaded. The “nnnn” will count up from “0000” to “3xxx” indicating the address being programmed. 4. n/a 5. When programming is complete (after about 5 minutes) the “File Name” prompt will disappear. Press <Esc> to return to the main menu. 6. Select “Show All Message Data” and press <Enter>. AutoSense™ AS500 Series Users Guide Copyright OSI LaserScan 2009 C-11 APPENDIX C 7. Press <F1> to RESET the AutoSense2. After about 2 minutes a message should appear with the new patch version (nn) as “Software Revision: 01.01.nn”. 8. The new Software Patch is now installed. Exit the test program by pressing the <Esc> key until the main menu appears, then select Exit Software using the arrow keys followed by the <Enter> key. C.7.4 LDM70 Wiring Diagram AS2 Comm Cable <===> LDM70 Converter RS422 Interface Connections AS2 P2 LDM70 B RS422 TX + B (White) C RS422 TX - C (Black) F RS422 RX + F G RS422 RX - A K B (White) 3 RD+ (Green) C (Black) 4 RD- G (Black) F (Green) 5 TD+ Gnd A (Black) LL_Det K (Red) G (Black) 6 TD- 1 12VAC H J D 2 AC GND Cable Shield E Wall Transformer PT3, 120VAC Figure C-1 AutoSense™ AS500 Series Users Guide Copyright OSI LaserScan 2009 C-12 APPENDIX D APPENDIX D - INSTRUCTIONS FOR HIGH SPEED DATA COLLECTION The AutoSense 600/500 Series sensor is capable of transmitting both message data and high speed (raw) data simultaneously. The message data interface is typically transmitted via the RS422 or RS232 interface. The high speed data is transmitted at 1.25Mbs over a dedicated RS422 interface. In order to access this information, the AutoSense unit must be connected to a computer running the “AutoSense High Speed Capture” software application. This appendix provides an overview of setting up the high speed data capture system. D.1 Overview In order to establish the high speed data capture, the AutoSense 500 will need to be interfaced to a Windows based PC running the AutoSense High Speed Capture software program. In addition, there are several required hardware elements listed in Table D-1 below. D.1.1 Running the High-speed (raw) Data Capture Program The High-Speed (Raw) data capture program is a Windows-based application. 1. If the computer has not been setup for the high speed data capture follow the instructions in section D.2 Setup and Configuration to install the hardware and software required. 2. Start “AutoSense High Speed Capture” and select the proper device (e.g. AS1000). Also select the “Channel Data” check box. 3. From the main menu select “Configuration”->”High-Speed Comm” and select the COM port for the first system (default would be COM5) then close the dialog. 4. Select the “View or Record High Speed Data” menu item. 5. Press the “Start” button to start capturing data. 6. The application will now automatically capture vehicle images in the raw data. When a new file is captured text line above the “Advanced” and “Stop” buttons will be updated for the new file name. 7. When finished, press the “Stop” button. Multiple instances of AutoSense High Speed Capture may be run simultaneously to capture data from additional sensors. Be sure to designate a different capture directory for the different COM ports (See section “D.2.2 Installation and Setup of AutoSense High Speed Capture application” for setup instructions). AutoSense™ AS500 Series Users Guide Copyright OSI LaserScan 2009 D-1 APPENDIX D Manufacturer Part Number Quantity Any - 1 ≥1GHz Windows 2000 or XP Pro machine with 128MB (256MB for XP) ram. ≥ 2.6 GHz Pentium 4 for connection to 2 sensors. Iomega REV 35GB/90GB 1 Iomega REV drive, Internal, ATAPI. Uses removable cartridges for data collection 7205S-20.0000 1 Dual channel high speed RS422 serial communications card with 20.0 MHz oscillator. KT106 1 SeaLevel Systems CA176 2 DB9 to RS530 Adapter cable, 12inch OSI LaserScan 19471010 – XX 1 AutoSense™ Communications Cable (XX – denotes length) www.iomega.com SeaLevel Systems www.sealevel.com SeaLevel Systems Description ATAPI drive Dual DB9 to 18 Screw Terminal and 2 – 72inch DB9 cable. Comments One channel for message data. One channel high-speed data. Use if AutoSense™ data cables are not terminated. Use if AutoSense™ data cables are terminated with 25-pin D connector Table D-1. Hardware required for setup High Speed Data Capture Manufacturer Part Number Quantity OSI LaserScan 19471010 -9XXX 1 Description Comments AutoSense™ Communications Cable (XX – denotes length) Table D-2 – Alternate High-Speed Capture Serial Port Solutions Alternate High-speed capture serial port solutions Manufacturer Part Number Quantity Description 7208S20.0000 1 PCI RS-232, RS-422, RS-485 Isolated Serial Interface with Standard Size PCI Bracket with 20.0 MHz oscillator. Single channel. KT104 1 Terminal Block - DB25 Female to 25 Screw Terminals and DB25 Female to DB25 Male Extension Cable, 72" in Length 2106 1 USB to RS-422 adapter TB05 1 Terminal Block - DB9 Female to 9 Screw Terminals. Single channel Laptop solution – may drop data during Windows screen updates. 3602-SE20.0000 1 PCMCIA RS-422, RS-485, RS-530 Serial Interface Card with 16C850 UART and 20MHz oscillator. 1 Terminal Block - DB25 Female to 25 Screw Terminals and DB25 Female to DB25 Male Extension Cable, 72" in Length. SeaLevel Systems www.sealevel.com SeaLevel Systems SeaLevel Systems KT104 AutoSense™ AS500 Series Users Guide Copyright OSI LaserScan 2009 Comments Single channel Laptop solution. D-2 APPENDIX D D.2 Setup and Configuration High-speed (Raw) data capture requires the installation of a special RS422 serial communications card in a Windows 2000 or XP Pro based PC. It is also recommended that an Iomega REV removable cartridge drive be installed for collecting the data. D.2.1 Installation and setup of SeaLevel RS-422 Multi-Port high-speed serial card These instructions are for installing the SeaLevel 7205S-20.0000 dual channel RS-422 serial communications card. The -20.0000 denotes a 20-Megahertz oscillator option required to achieve the 1.25 Mega-bits-per-second data rate the raw data channel uses. Other RS422 serial interfaces capable of this data rate may be substituted. (If capturing with a Laptop computer, the SeaLevel 2106 422-toUSB converter may be used. However, some data dropouts may occur due to the way Windows handles USB devices.) 1. Install the SeaCom Software BEFORE installing the card! 2. Set Switches J1A & J2A as follows: P P T L L Connect Connect Connect No Connect No Connect 3. Set Switches J1B & J2B as follows: AT RT NE No Connect No Connect No Connect 4. Remove the dip-shunts from E1 & E3 and place them on E2 & E4. This sets the board for RS422. E1 E2 E3 E4 open shunt open shunt 5. Install the card in a PCI slot. 6. Connect the 25-pin to dual 9-pin adapter cable (P/N CA-203) to the back of the card. 7. Start computer. 8. Install the driver: a. When Found New Hardware Wizard appears select “Next”. b. Select “Search for a suitable driver” and press “Next”. c. Deselect all options and press “Next”. Press “Next” again. d. Respond “Yes” to the “Digital Signature not found” message. e. Several “new device found” messages will be displayed. 9. Configure the ports: a. Start “Device Manager” and click on “Ports (COM & LPT)” AutoSense™ AS500 Series Users Guide Copyright OSI LaserScan 2009 D-3 APPENDIX D b. Right-click on “ULTRA COMM+2.LPCI: PCI 2 port RS-232/422/485 (Port1) (COMn)” and select “Properties”. c. Select “Port Settings” tab, select the “Advanced” button. Set the “COM Port Number” to “COM5”. d. Select the “Advanced” tab: e. Make sure “FIFO Enabled” is selected. f. Select “Suppress Modem Control”. g. Set “Trigger Level” 64 Receive FIFO and 64 Transmit FIFO. h. Set “Oscillator Options” to “20000000”. (20Mhz). D.2.2 i. Press the “OK” button. j. Repeat steps b through i for Port 2, selecting “COM6” at step c. k. Exit Device manager. Installation and Setup of AutoSense™ High-Speed Capture Application: 1. Use Control Panel->Add/Remove Programs to remove any previously installed “AutoSense High Speed Capture” or “AutoSense Manager” application. 2. Install the new AutoSense High Speed Capture application. 3. Start “AutoSense High Speed Capture” and select the proper device (AS615,AS705,…). 4. From the main menu select “Configuration”->”High-Speed Comm” and select the COM port for the first system (default would be COM5) then close the dialog. 5. Select the “View or Record High Speed Data” menu item. 6. Select the “Advanced” button in the “HighSpeedData” window. 7. In the “Saved File Directory” box enter a unique path for this channel (i.e. “d:\as2dat\leftlane\”). Then press the “Accept” button. 8. Repeat steps 3 through 7 for the other com port (COM6). In step 7, use a different path than for the other COM port (i.e. “d:\as2dat\rightlane\”). 9. Each high speed application will now save to the directory associated with that COM port. D.2.3 Communication Port pin assignment cross reference: AutoSense™ RS422 to Communications Adapter pin assignments. (Signal names are from AutoSense™) AutoSense Signal TX+ AutoSense Connector PC Signal RS530 / SeaLevel 25-pin D (PT06P-12-10S) B (white) SeaLevel FastCom 9-pin D 9-pin D RXD+ 16 1 8 RXD- 3 2 9 TXD+ 14 4 4 TXD- 2 3 5 GND 7 5 1 twisted pair TX- C (black) RX+ F (green) twisted pair RX- G (black) GND A(black) twisted pair n/a K(red) n/a AutoSense™ AS500 Series Users Guide Copyright OSI LaserScan 2009 D-4 APPENDIX D n/a H(blue) n/a J(black) n/a D n/a n/a E n/a Cable Shield Drain Wire twisted pair n/a NOTES: • • • B and C is a twisted pair. F and G is a twisted pair. GND is optional. AS6xx, AS7xx Hi-speed Communications interface Cable, Rs422 mode, SeaLevel 9-pin SeaLevel 9-pin D J2 AS High-speed COM A GND B TX + C TX - (optional) A GND : P1, Pin 5 P1 DB-9-S B (White) RXD+ : P1, Pin 1 C (Black) RXD- : P1, Pin 2 (twisted pair) D E F RX + G RX - F (Green) TXD+ : P1, Pin 4 G (Black) TXD- : P1, Pin 3 (twisted pair) H J K AutoSense™ AS500 Series Users Guide Copyright OSI LaserScan 2009 D-5 APPENDIX D AS6xx, AS7xx Hi-speed Communications interface Cable, Rs422 mode, RS-530 (25-pin D) J2 AS High-speed COM RS-530 (25-pin D) A GND B TX + C TX - (optional) A GND P1, Pin 7 P1 DB-25-S B (White) RXD+ : P1, Pin 16 C (Black) RXD- : P1, Pin 3 (twisted pair) D E F RX + F (Green) TXD+ : P1, Pin 14 G RX - G (Black) TXD- : P1, Pin 2 (twisted pair) H J K AutoSense™ AS500 Series Users Guide Copyright OSI LaserScan 2009 D-6 APPENDIX E APPENDIX E - NOMINAL INSTALLATION INFORMATION As was previously described in Section 3.0, the AS500 is intended to be mounted between 1.3 and 2 meters (4-6 feet) from the edge of the traffic lane. The maximum recommended mounting height is typically 4.572 meters (15 feet). If the recommended minimum mounting setback distance cannot be achieved, please contact OSI for additional information on mounting options. To ensure optimal performance of the unit, it is imperative that when determining the overhead mounting location, the respective field of view for the AS500 unit is free of any non-stationary objects, such as cables, flags, banners, moving gate arms, etc.. This is imperative because the AS500 unit will detect the movement of the objects if the movement occurs within the detection zone beneath the unit and generate associated detection messages. E.1 Side Fire Sensor Mounting and Look-Down Angle Typically, the AS500 is mounted between 0.457 and 0.609 meters (1.5-2.0 feet) from the traffic lane in a toll plaza installation as shown in figure 3-2. The AS500 has mounting holes located at each corner of the base. Mounting bolts are supplied with each unit. A mounting plate is also available that allows the sensor to be mounted to vertical poles with a diameter from 2 to 3.5 inches (50 to 90 mm). The maximum mounting height is a function of the setback distance of the pole from the curb, typically 4.572 meters (15 feet). For your particular installation, you will need to supply the OSI-LaserScan engineers with the lane width and the setback distance at your planned installation site so that the optimal mounting height of the sensor can be determined. This will also allow OSI-LaserScan to create the proper angular spacing between pixels to ensure proper pixel density to adequately cover the vehicle at any position in the lane. The correct side fire mounting angle of the sensor relative to the pole will be determined once the setback distance from the curb and the mounting height of the sensor on the pole have been determined. Correct mounting will ensure that the side fire AS500 will have enough pixels to track a vehicle’s detection under the trailer of the tractor trailer with the tallest height under the trailer. Initial placement of the sensor is best accomplished using the OSI-LaserScan beam finder to ensure that the first pulse of laser will hit the lane where expected. The mounting angle relative to the pole can then be measured and applied to subsequent mounting of sensors using the same geometry. The recommended mounting angle for the side fire AS500 relative to the cross section of the lane of vehicle traffic to be monitored is 0 degrees (perpendicular to the lane) for the first beam and -10 degrees (10 degree lagging) for the second beam. The data from the perpendicular first beam will be used to apply the algorithm for vehicle detection. E.2 Typical AutoSense™ 500 Installation To facilitate the initial design and installation of the AS500 units, please refer to figures E-1. These figures are intended to serve as a reference only, as variability’s in toll plaza designs exist. Prior to finalizing design and installation, consult with the engineering staff at OSI LaserScan. AutoSense™ AS500 Series Users Guide Copyright OSI LaserScan 2009 E-1 APPENDIX E Figure E-1. Side Fire Mounting and Look-Down Angle AutoSense™ AS500 Series Users Guide Copyright OSI LaserScan 2009 E-2 APPENDIX F APPENDIX F - ROAD AUGMENTATION FOR REFLECTIVITY F.1 Purpose: The AutoSense™ products utilize an eye-safe laser to detect and classify vehicles. In order for the AutoSense™ unit to function properly, the unit must be able to detect a “receive” laser pulse from either an object (i.e., car) or the road. Since many road surfaces do not provide a consistent reflective pattern for the laser, augmentation of the surface may be required in order to ensure adequate reflectivity for the laser. Road reflectivity is best on “clean” concrete road surfaces and worse on newly installed black asphalt. Over time, the dark non-reflective surface of black asphalt will fade, thereby improving reflectivity, however, until such time, the performance of the AutoSense™ will be impaired. To minimize the impact of poor road reflectivity, OSI LaserScan recommends that an application of either, Thermaplastic, Duraset or System 400 Cold Plastic or Hot Tape in the color specified below be applied to the road surface where the AutoSense™ laser strikes the road. F.2 Location of Stripe(s): One or two stripes can be used. The goal is to apply the road striping where the laser beam contacts the road. The distance between the beams on the road is based on the mounting height and the 10 degree beam separation. At a height of 7 meters, the beams are separated by 1.23 meters. For a single stripe, we suggest a 1.5 meter stripe width. For 2 stripes, they need to be separated by 1.23 meters. The laser beam diameter is less than 5mm, so 2 stripes with a width of 100mm or 4 inches will be sufficient. For specific beam separation information, please see Appendix E, Table E-1. To locate the beams, an AutoSense™ Beamfinder should be used. Figure F-1: Location of Stripe(s) AutoSense™ AS500 Series Users Guide Copyright OSI LaserScan 2009 F-1 APPENDIX F F.3 Paint Color A semi-reflective surface with the following color hues has shown to provide adequate reflectivity. The specification for both color hues is given below. F.4 Hue = 160 Lum = 160 Hue = 160 Lum = 181 Dark Color Specification 6% cold gray Pantone PMS-429U 3.9% black 2.3% reference blue 93.8% white Equiv: Sherwin Williams #SW1232 Light Color Specification 3% cold gray Pantone PMS-428U 1.9% black 1.1% reference blue 97.0% white Equiv: Sherwin Williams SW1234 Approved Hot Tape Product OSI LaserScan has tested and approved the following Hot Tape product for use with the AutoSense™ units. Part Number 894014 Description Hot Tape, Grey Sample Width: 4 inch (101.6 mm) Thickness: 125 mil Manufacturer Zumar Industries P.O. Box 44549 Tacoma, WA 98444-0549 Phone: (253) 536-7740 Toll Free: (800) 426-7967 Note: Due to the variations in climatic conditions, traffic loads, the effects of road salt and chemical deicing agents, it is difficult to predict how often the paint stripe will need to be applied. However, empirical evidence on has indicated that using a traditional road stripe epoxy in the color hues specified above, the paint stripe provided sufficient reflectivity for a period of 2 years without maintenance. AutoSense™ AS500 Series Users Guide Copyright OSI LaserScan 2009 F-2