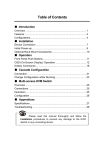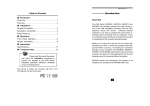
1
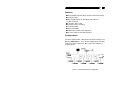
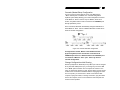
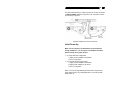
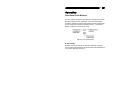
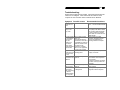
Keyboard/Mouse/Monitor
SharingSwitch
User's Manual
SV831SUN
Table of Contents
Introduction
Overview
Features
Configurations
1
2
2
Installation
Console Connection
Computer Connection
Initial Power up
19” Rack Mount Accessories
4
5
6
7
Operation
Front Panel Push Buttons
Hot Key Commands
9
10
Appendices
Specifications
Trouble Shooting
12
13
1
Introduction
Overview
The SV831SUN, 8 Port StarView KVM switch, represents another
addition of reliable KVM switches from StarTech.com. It allows one user
to control up to 64 SUN computers with one keyboard, mouse and
monitor.
Each SUN computer is connected to the StarView by only two cables,
one for the keyboard/mouse and the other for the VGA monitor.
Automatic keyboard and mouse simulation technology ensures troublefree SUN computer boot-up and seamless switching among SUN
computers. Selecting a SUN computer is as easy as pressing
pushbuttons or hot key commands. Easy-to-use automatic scan ability
catches system failure early.
The SV831SUN builds on StarTech.com’s proven success with the PS/2
StarView line, including hot plug-and-play, hot configurability, reliable
switching and ease of use. This pure SUN KVM switch is the most costeffective solution for contemporary server room management. Now,
save space, eliminate extra costly peripherals, enhance control and
improve the manageability of your IT data center with the SV831SUN.
2
Features
nManage 8 SUN computers with 1 keyboard, mouse and monitor
nHot plug-and-play
nSelect a SUN computer by front panel push buttons or
hot key commands
nHi resolution 1920 x 1440
nAuto Scan for easy monitoring
n19” rack mountable
nTwo-tier cascadable
nAudible buzzer for switching configuration
nDual colour LEDs for each SUN computer
Configurations
Connect a SUN keyboard, a SUN mouse and monitor directly to the
Master’s CONSOLE port. Then, connect multiple sets of mini DIN8
cables and monitor cables to the “PC x” ports of the StarView, as
shown in figure 1.
Figure 1: SV831SUN StarView configuration
3
Cascade (Master/Slave) Configuration
You can connect a second level of one or more StarViews to
"PC 1"~”PC 8” ports of a Master unit. Cascade configuration
expands system ability allowing you to select computers connected
to the Master or Slaves. There is only one Master, which has a
mouse, a keyboard and a monitor connected to its CONSOLE port
directly operated by a user.
Once connected, StarViews automatically configure themselves to
either Master or Slave. Slaves of different StarView models can be
mixed in cascade configuration.
Figure 2: A cascade StarView configuration
Throughout this manual, Master is the StarView that has a
physical keyboard, mouse and monitor connected to its
CONSOLE port. Slave is a StarView that has its CONSOLE port
connected to a Master's “PC x” port. Slave only exists in
cascade configuration.
Change Configuration while Running
Devices (computers or StarViews) at any ‘PC x’ port can be changed
at any time after initial power up. If you change any one of the “PC
1” to “PC 8” ports connection from a computer to a Slave or vice
versa, or replace the devices of a port; the new Slave must be turned
off before it is connected to the Master. Before unplugging the cable
from a computer, you should issue a STOP-A command for that
computer, unplug the cables, re-arrange connection, plug the cables
back to the computer, issue a GO command for that computer and
resume normal operation
4
Installation
Make sure all computers and StarViews are powered down
during installation.
Console Connection
Monitor:
A SUN monitor with either 13W3 or HDB15 connector
can be connected to the CONSOLE as shown in
figure 3 and 4.
A regular VGA monitor with HDB15 connector may also
be connected to the CONSOLE as shown in figure 4.
Keyboard and mouse: A SUN keyboard and a SUN mouse should
be connected to the CONSOLE as shown in
figure 3 and 4.
Figure 3: Master console connection
for monitor with 13W3 connector
5
Figure 4: Master console connection
for monitor with HBD15 connector
Computer Connection
Each SUN computer is connected to the StarView with one straight
through (1-1, 2-2, 3-3… 8-8) mini DIN8 cable (as shown in figure 5)
and one male-to-male HDB15 VGA cable.
Figure 5: Straight through 1-to-1 mini DIN8 cable
6
For SUN computers using a 13W3 connector for monitor connection,
a 13W3-to-HDB15 adapter is required for such computer’s monitor
port as shown in figure 6.
Figure 6: Adapter and monitor connection
Initial Power-Up
Make sure all computers and StarViews are powered down
during installation. You must power up the Master StarView
before turning on any other devices.
4 For single StarView configuration:
1) Apply a power adapter to the Master.
2) Turn on computers.
4 For cascade StarView configuration:
1) Apply a power adapter to the Master.
2) Apply power adapters to all Slaves.
3) Turn on computers.
Note: You may hot plug additional powered-down computer and
Slave without turning any existing StarView or computer off after
initial power up.
7
19” Rackmount Accessories
Figure 7 shows how to attach optional mounting brackets to the
StarView unit for standard 19-inch rack cabinet.
Figure 7: Attaching rack mount bracket
8
Figure 8 shows how to assemble rack cable support then screw it to
the back and inside the rack cabinet vertical post.
Figure 8: Assembling rack cable support
Now, route the keyboard, mouse and monitor cable over the cable
support bar. Then, use plastic ties to bundle the cables in pairs
through the holes on the bar for each computer.
9
Operation
Front Panel Push Buttons
You may select a computer by pressing the front panel push button
directly by issuing hot-key commands. The front panel indicator
changes to reflect the computer port selected (red) and whether the
port is connected to a powered computer (green). The indicator
flashes red when it is in Auto Scan mode.
Figure 9: Front panel indictor
< AUTO SCAN
StarView provides an easy to use feature to start Auto Scanning.
You can press down both the front-panel number 7 and 8 buttons for
2 seconds to start Auto Scanning.
10
Hot-key commands
Hot-key command is a short keyboard sequence to select a
computer, to activate computer scan, etc. StarView interprets
keystrokes for hot-keys all the time. A hot-key sequence starts with
two left <CTRL> keystrokes followed by one or two more keystrokes.
A built-in buzzer generates a high-pitch beep for correct hot-key
command; otherwise, one low-pitch beep for error and the bad key
sequence will not be forwarded to the selected computer.
g To select a computer by hot-key command, you must know its
channel address, which is determined by the StarView connection.
For a computer connected to a Master, its address is represented by
the PC port label (1~8 or A~H). For a computer connected to a
Slave, two characters represent its address. The first character is the
channel address of the Master unit (1~8) and the second one is the
channel address of the Slave (1~8 or A~H). Please note that only
Master's 'PC 1' ~'PC 8' ports can be connected to a Slave.
Left Ctrl + left Ctrl + 7
Selects a computer connected to port 7 of the Master.
Left Ctrl + left Ctrl + 6 + 3
Selects a computer connected to port 3 of a Slave connected to port
6 of the Master.
g To start Auto Scan, automatically scan power-on computers one
by one at a fixed interval:
left Ctrl + left Ctrl + F 1
When Auto Scan detects any keyboard or mouse activity, it
suspends the scanning till activity stops; it then resumes with the next
computer in sequence. The length of the Auto Scan interval (Scan
Rate) is adjustable, see below. To abort the Auto Scan mode, press
the left Ctrl key twice.
g To adjust Scan Rate which sets the duration before switching to
the next computer in Auto Scan:
left Ctrl + left Ctrl + F3
The StarView sends one to four beeps indicating scan interval of 3, 8,
15 and 30 seconds respectively.
11
g Audio Stick
An optional multimedia module can be LINKed to the back of each
StarView for selecting microphone and stereo speaker signals.
There are two options for Audio Stick: ON and Off. When set to 'On',
audio selection follows computer selection. When set to 'Off', audio
selection stops following computer selection. It is useful if you want
to listen to a particular computer's audio signal while operating
other computers.
left Ctrl + left Ctrl + F5
The StarView generates 1 or 2 beeps corresponding to On and
Off respectively.
g Return to the previously selected computer
This is used to toggle back and forth between the currently selected
computer and the previously selected one. It is handy if there are two
computers of great interest requiring your attention
Left Ctrl + left Ctrl + F7
Note: If you issue an incorrect hot key command the StarView sends
out a warning with one long beep followed by a short one.
12
Appendices
Specifications:
Specifications
# of Console ports
# of SUN computer ports
Keyboard/mouse supported
1
8
SUN (type 4, 5, 6)
VGA bandwidth
180 MHz
VGA resolution
1920 x 1440
Computer power status LED
8
Computer selected LED
8
Front push buttons
Scan interval
8
3, 8, 15, 30 seconds
VGA connectors to SUN
HDB15 x 8
Keyboard/mouse to SUN
Mini DIN8 x 8
Console connector for VGA
Console connector for
keyboard/mouse
Weight
HDB15 x 1
Mini DIN8 x 1
4.8 kgs
Power Supply
DC 9V 500mA
Dimension (mm)
(in)
44 x 436 x 180
1.7 x 17.1 x 7.0
13
Troubleshooting:
Ensure that all cables are well seated. Check that keyboard/mouse
cables are not swapped. Label and bundle the cables for each
computer to avoid confusion when connected to the StarView.
Symptom
Possible causes
Recommended solutions
Keyboard and
mouse do not
work
Incorrect mini DIN8 cable Use only straight through, 1-to-1,
2-to-2,…8-to-8 mini DIN 8 cables
VGA image is
fuzzy or not
very clear
Poor quality VGA cable
An LCD monitor
is connected to
the Console
port, but
nothing is on
the monitor
when certain
SUN computers
are selected
Most VGA problems come from
poor quality VGA cables. Please
use UL-2919 rated VGA cables
for video connection, because
those cable use coaxial wires for
R/G/B signals.
When a SUN computer
When booting up a SUN
power up, it
computer, wait till the boot-up
communicates with the
process is finished before
VGA devices, and LCD is selecting a different computer.
not available on power up
sequence; therefore, the
SUN sets its VGA
resolution to a default
which is not in applicable
for some LCD monitors
The switch is low on
Be sure the power adapter is
operating power
properly connected
Keyboard or
mouse does not
work from time
to time
Hot-key
Incorrect hot-key
command is not sequence
effective
Cascade unit
does not work
There is no
VGA output
after connecting
a 13W3-toHDB15 adapter
to a computer
To select a computer connected
to the Master: three keystrokes
are necessary.
To select a computer connected
to a Slave: four key strokes are
necessary
Incorrect power up
Turn on the Master then the
sequence
Slave switches
Incorrect 13W3-to-HDB15 Use only the adapter specifically
pin assignment
designed for SUN computers
14
Limited Warranty
IN NO EVENT SHALL THE DIRECT VENDOR'S LIABILITY FOR DIRECT OR
INDIRECT, SPECIAL, INCIDENTIAL OR CONSEQUENTIAL DAMAGES, LOSS
OF PROFIT, LOSS OF BUSINESS, OR FINANCIAL LOSS WHICH MAY BE
CAUSED BY THE USE OF THE PRODUCT EXCEEDS THE PRICE PAID FOR
THE PRODUCT.
The direct vendor makes no warranty or representation, expressed or
implied with respect to the contents or use of this documentation, and
especially disclaims its quality, performance, merchantability, or
fitness for any particular purpose.
The direct vendor also reserves the right to revise or update the
product or documentation without obligation to notify any user of
such revisions or updates. For further information, please contact
your direct vendor.
All the brand names and registered trademarks are the property of
their respective owners.