1
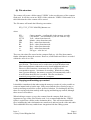
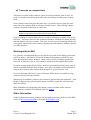
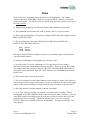
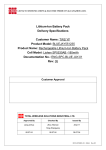
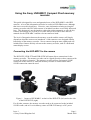
Using the Sony HVR-MRC1 Compact Flash memory
recorder
This guide is designed for users and potential users of the HVR-MRC1 with HDV
cameras. A lot of this information will also be useful to HVR-DR60 users, although
that is not covered in detail here. Likewise, some information relating to using the
memory recorder with DVCAM cameras is included, but these are not fully discussed
here. This document is not designed to replace the product manuals, as only the key
features and settings are covered, so it is also likely to be useful to have the user
manuals for the HVR-MRC1 and the relevant camera to hand.
The level of integration between the memory recorder and the camera will largely
depend on when the camera was introduced. Older cameras were designed without
knowledge of the memory recorder. Newer cameras integrate more tightly and will
include more features directly relevant to the memory recorder, such as a dedicated
status display screen.
Connecting the HVR-MRC1 to the camera
The HVR-Z5E, HVR-Z7E and HVR-S270E all feature direct connections for the
memory recorder. The memory recorder can be clipped directly to these cameras with
no need for cables or batteries. The memory recorder will use an internal i.LINK
connection to the camera, so while the memory recorder is connected the main
i.LINK connection cannot be used.
Figure 1. Images of HVR-MRC1 on back of the HVR-Z7E (left) and on the side
of the HVR-S270E (right)
For all other cameras, the memory recorder needs to be connected to the included
i.LINK cradle, and an L-series battery (same as HVR-Z1E battery) or DC power
Issue 1
© Sony United Kingdom Ltd
Page 1
March 2009
supply connected to the cradle. Figure 2 shows a rear view of the HVR-MRC1 with
the i.LINK cradle and a battery connected.
Figure 2. HVR-MRC1 with i.LINK cradle and battery
The combined recorder can then be mounted onto the camera using an optional
mounting bracket or the supplied 1 shoe adaptor.
Figure 3. Images of HVR-MRC1 mounted on a HVR-V1E using the supplied
shoe adaptor (left) and the optional VCT-1BP mounting plate (right).
Configuring the HVR-MRC1 and the camera
In this section we will look at the settings of the following controls:CAM LINK – This setting is on the memory recorder
CAM LINK SEL – This setting is in the menus of the memory recorder and only
makes a difference when CAM LINK is enabled.
EXT REC CTRL – This control is in the menu of newer HDV cameras, and will only
make a difference when CAM LINK is enabled and CAM LINK SEL is set to
SYNCHRO.
1
Only supplied with the HVR-MRC1. Not supplied as part of the HVR-Z7E or HVR-S270E.
Issue 1
© Sony United Kingdom Ltd
Page 2
March 2009
(a) Selecting the appropriate CAM LINK SEL setting for your
camera
In most situations, the selection of this setting will depend on which camera is being
used. Newer cameras can send dedicated control signals to the memory recorder, and
tell the memory recorder when to start and stop recording. For use with these cameras,
SYNCHRO should be selected. For older cameras, the memory recorder needs to
follow the action of the tape drive. For these cameras, FOLLOW should be selected.
Note. When FOLLOW is being used, a tape must be placed in the tape
drive with enough time remaining to capture the clip.
SYNCHRO – Follows controls from newer cameras – Typically use with DSR-450,
DSR-570, HVR-V1E, HVR-Z5E, HVR-Z7E and HVR-S270E
FOLLOW – Follows the tape drive in the camera – Use with older cameras such as
DSR-PD150, DSR-PD170, DSR-250, HVR-A1E and HVR-Z1E
Note. Some of the older cameras can work with this setting set to
SYNCHRO, but will still require a tape to be in the camera, so for
reasons of simplicity the settings above are recommended.
The CAM LINK SEL setting is found in the menu of the HVR-MRC1. Follow
SETTINGS -> CAM LINK SEL to find these options. Use the buttons indicated by ‘1’
in Figure 4 to navigate the menus on the unit.
3
2
1
Figure 4. Front view of the HVR-MRC1 memory recorder
Issue 1
© Sony United Kingdom Ltd
Page 3
March 2009
(b) Follow the record trigger button on the camera
The next thing that needs to be decided is whether you would like the memory
recorder to start and stop recording by following the record trigger button on the
camera. The alternative is for the recorder to operate independently from the camera.
The setting that relates to this is called CAM LINK, and this is controlled by a button
on the memory recorder (see number 2 on Figure 4). When CAM LINK is ENABLED,
the memory recorder will look to take control from or follow the operation of the
camera. Exactly how it behaves will depend on which model of camera is being used,
and on the CAM LINK SEL setting. When CAM LINK is enabled an offset arrow
symbol will be displayed on the LCD (see number 3 on Figure 4). Don’t forget that if
you are using an older camera you may need to have a tape in the camera to allow the
memory recorder to operate with the record trigger button on the camera.
When CAM LINK is DISABLED, the symbol will not be displayed and the recorder
will operate independently from the camera. In this mode, the record and stop buttons
on the memory should be used to trigger recording to the compact flash card.
CAM LINK ENABLED – Memory recorder follows tape and/or camera control
CAM LINK DISABLED – Memory recorder operates independently. Use controls
on back of the memory recorder.
Of course, whether CAM LINK is enabled or not may change on a use by use basis,
but it is important to understand this function before looking at the next setting.
Note. When using HDV, each time the tape starts recording in the
camera, a short discontinuity occurs on the iLink output while the
camera resets the video encoding structure for the tape. The effect of
this is that the memory recorder will start a new clip and about half a
second of the content will not be recorded onto the compact flash.
This restarting does not occur when using DV/DVCAM so a single
seamless clip will be captured.
(c) Settings in the camera
In order to get the greatest flexibility from the memory recorder, it is also necessary to
configure some settings in the camera.
For HDV cameras, then the main setting to consider is the EXT REC CTRL. This
control is only found in the newer cameras and is in the menu under IN/OUT REC ->
EXT REC CTRL. This setting will only have any effect if CAM LINK is ENABLED.
The options for this setting are below, although not all options will be available in
every camera.
OFF - This setting will configure the camera not send control signals to the memory
recorder. The recorder will not follow the record trigger control and the camera will
behave as a tape based camera.
Issue 1
© Sony United Kingdom Ltd
Page 4
March 2009
SYNCHRONOUS – This will enable recording to both tape and compact flash. The
camera will still start recording if one media type is missing.
RELAY – Will record only to tape until there is less than 5 minutes remaining on the
tape. At this point it will start recording to compact flash as well, and the compact
flash recording will continue after the tape runs out.
EXT ONLY – The camera will disable recording to tape. Recording will only occur
onto compact flash.
Down-converting prior to record to compact flash
As the memory recorder uses the i.LINK connection from the camera, then by default
it will record at the same resolution as the camera. However, if the camera is set to
record to HDV, then the i.LINK down-conversion settings can be used to configure
the i.LINK output to SD. This will enable the recording of HD onto tape, while
recording SD onto compact flash. It is not possible to record SD onto tape, while
recording HD onto compact flash.
Status information
The newer cameras can also display status information relating to the attached
memory recorder. The exact status information supported will depend on the camera.
Typically this will consist of some brief information in the main on-screen display,
and an additional page in the status menu.
Figure 5. Screen shots from HVR-Z7E showing main screen on-screen display
(left) and the additional page in the status menu (right)
File structure and Timecode
(a) File types
The memory recorder can record 3 different file types; .m2t, .dv and .avi. .m2t files
will be created whenever an HDV signal is being recorded. When recording an SD
signal, it is possible to choose in the menu of the memory recorder (SETTING -> DV
FIlETYPE) whether to record .dv files or .avi files. Generally .avi files will work
better on windows based systems, and .dv will work better on mac based systems,
although many NLEs and playback software will support both filetypes.
Issue 1
© Sony United Kingdom Ltd
Page 5
March 2009
(b) File structure
The camera will create a folder named ‘VIDEO’ in the root directory of the compact
flash card. It will also create an ‘HVR’ folder within the ‘VIDEO’ folder and it is in
this folder that the video content will be stored.
The file names will match the following convention:XX_CCCC_YYYY-MM-DD_hhmmss.ext
where
XX
CCCC
YYYY
MM
DD
hh
mm
ss
ext
Camera number – configurable in the memory recorder
Clip number – will increment by one for each new clip
Year – taken from timecode
Month – taken from timecode
Day – taken from timecode
Hour – taken from timecode
Day – taken from timecode
Day – taken from timecode
File type - .m2t/.dv/.avi
There are also other files stored on the compact flash (eg. .idx files) that contain
further information about the content. However, all the audio and video is recorded
within the .m2t/.dv/.avi file.
Note. The compact flash cards are formatted following the FAT32
specification. This format can be read/written on both Windows and
Mac based platforms without the need to install additional software.
However, this format has a maximum file size of 4GB, which
corresponds to approx. 16 minutes of recording. When the recording
time is greater than this, the memory recorder will automatically start a
new file when the 4GB size is reached. The files can then be
seamlessly merged back together on a computer.
(c) Copying and backing up content
It should be remembered, that when using the memory recorder it is also possible to
create an instant back-up on the tape. Many users find the idea of having a tape as
back-up and long term archive as their preferred solution. For backing up the files,
there are varying tools that can help with copying and backing up content, although
these are not covered here.
When looking to remove or copy the content from the compact flash, then it is
important to copy all the files from the card. It is recommended that the ‘VIDEO’
folder is copied into a folder on the destination drive. This will ensure that all the
files, including the index information are transferred, and not just the video and audio.
These additional files may enable better integration with the editing system
Issue 1
© Sony United Kingdom Ltd
Page 6
March 2009
(d) Timecode on compact flash
Timecode is usually used to indicate a place on a linear medium, such as tape. As
such, it is worth reconsidering how timecode is used when recording onto compact
flash.
If the content is also being recorded onto tape, it is usually best to record the same
timecode to the compact flash as is being recorded to tape. This will help with the
locating of content on the tapes at a later date.
Note. The timecode recorded to tape and compact flash will match to
within a few frames, but will not be an exact match.
If just recording to compact flash, then it is worth considering recording ‘time of day’
timecode. The main reason for this is that the filenames will then all contain the time
and date that the clip was recorded. This gives an easy way of identifying which clips
are required, and in multi-camera shoots, aligning the shots taken by multiple cameras
on a NLE timeline.
Working with an NLE
It is generally recommended that you run the latest version of the editing system that
you have chosen. The latest version will include all the updates available for bug
fixes and support for newer products. Many older versions of editing systems may
not work, or may not work as well, with the content from the compact flash cards.
If you are running Apple Final Cut Pro, then first you should install the Sony plug-in
which is available from the Sony website. Once this is installed it will be possible to
bring in the content off the compact flash using the ‘Log and Transfer’ tool.
If you are working with Sony Vegas or Thomson Edius, then it is possible to bring
content in directly onto the timeline.
When using Avid Media Composer, the content be imported into the media bin. Avid
Media Composer can perform a quick import for HDV content and will extract the
audio for editing.
More information on integrating with editing systems and links to the software
downloads are available for download from our website.
Other information
Further information on these products can be found on the Sony products in the HDV
section at www.sonybiz.net/hdv or from the HVR-MRC1 page.
Issue 1
© Sony United Kingdom Ltd
Page 7
March 2009
FAQs
Some of the more frequently asked questions are included below. For further
questions about the HVR-MRC1 memory recorder and HDV cameras, you should
contact your dealer. For details of the accredited Sony Specialist Dealers please go to
the Sony website.
Q. What’s the minimum specification of compact flash card that can be used?
A. The minimum specifications are 2GB or greater, and 133x speed or faster.
Q. How long recording time will I get on a compact flash? Does this change between
HDV and DV/DVCAM?
A. The recording time on compact flash does not differ between HDV and
DV/DVCAM. Recording times are:8GB 36mins
16GB 72mins
32GB 144mins
Moving to compact flash recording is a great way of getting longer recording times
out of the small cameras.
Q. Is there an advantage to using higher specification cards?
A. As long as the CF card is a minimum of 133x speed, then it won’t make a
difference to how the system behaves during recording. However, using faster cards
does enable faster file copying or ingest to the NLE, assuming all the other parts of
the system (inter-connection, hard disc, NLE software etc) can handle the increased
transfer rate.
Q. Do I need to have a tape in the camera?
A. If you are using the record control buttons on the memory recorder itself, then it is
not necessary to have a tape in the camera. If you are looking to use the record trigger
button on the camera, then this will depend on the type of camera as described in 0.
Q. Does the memory recorder support cache/pre-recording?
A. Yes. The memory recorder can support 14-seconds cache recording. This is
configurable in the REC MODE setting on the memory recorder. However, if you are
using HDV and are recording to tape as well, there will be a break in the files at the
point the tape starts recording. This break will not occur if you are recording
DV/DVCAM or are recording only to the HVR-MRC1. See the note on Page 4 for
more details.
Issue 1
© Sony United Kingdom Ltd
Page 8
March 2009