1
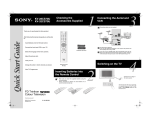
SONY©
S
®
KV-14FV1U
KV-21FV1U
1
Checking the
Accessories Supplied
Quick Start Guide
Thank you for purchasing this Sony product.
After following this step by step guide you
will be able to:
2 Batteries
3
Connecting an Indoor
Aerial (only for KV-14FV1U)
For a better reception we recommend you connect an external aerial.
However, if your local UHF signal is strong, you can connect the
supplied loop aerial as follows:
1
Insert the loop aerial into the holder on top of the Video TV until it
clicks.
2
Connect the aerial connector to the aerial socket
of the set.
3
After turning on the Video TV, adjust the aerial for optimum
reception.
on the rear
Insert Batteries into the Remote Control.
Connect the Aerial to your TV.
Select the language of the menu screens.
Tune your TV.
Change the Programme order of the TV
channels.
Adjust Automatically clock settings.
1 Loop aerial
(only for KV-14FV1U)
Connecting an Outdoor
Aerial
Remote Control
RM-C815
View TV Programmes.
Inserting Batteries into
the Remote Control
FD Trinitron
Colour Video
Television
j
PAL NTSC 4.43
4-205-769-01 (1)
©2000 by Sony Corporation
Printed in Spain
Ecological Paper - Totally Chlorine Free
2
Connecting cables are not supplied.
4
Switching on the Video
TV
5
Automatically Tuning the TV
You need to tune the Video TV to receive channels (TV
Broadcast).
By following the instructions below, this TV automatically
searches and stores all available channels for you.
Do you want to start
automatic tuning?
Press on the mark on the front
of the Video TV to reveal the front
control panel.
Press the OK button on the remote
control to select Yes.
Yes
No
Connect the TV plug to
the mains socket
(220-240V AC, 50Hz)
7
By following the instructions below, you can rearrange
the order in which the channels appear on the screen.
a) If you do not wish to change the channel order:
·
Programme Sorting
Programme:
Confirm:
01 -> 01
Select channel: PROG +
Select new position:
Exit: OK
OK
b) If you wish to change the channel order:
Please confirm that
aerial is connected
Confirm that the aerial is connected
and then press the OK button on the
remote control.
Confirm
OK
Programme Sorting
Programme:
Confirm:
·
Press the PROGR + or - button to
select the programme number
with the channel (TV Broadcast)
you wish to rearrange. This TV
Broadcast will appear on the
screen.
·
Press the or button to select
the new programme number
position for your selected channel
(TV Broadcast), then press the OK
button.
The word Confirm is
highlighted for a few seconds
to confirm that the new
programme position is stored.
·
Repeat steps b)1 and b)2 if you
wish to change the order of the
other channels.
·
When you have finished
rearranging the order of the
channels, press OK.
01 -> 01
Select channel: PROG +
Select new position:
Exit: OK
OK
Programme Sorting
Programme:
Confirm:
This Video TV set works with menu screens. By following the
instructions below, you can select the desired language of the
menu screens.
The first time that you switch on
your TV, the Language menu appears
automatically.
Language
English
Deutsch
Netherlands
Français
Italiano
Español
Português
Select Language:
6
OK
Auto Tuning
Programme:
System:
Channel:
01
I
C21
Select Language:
OK
Press the or button on the
remote control to select the language,
then press the OK button on the
remote control to confirm your
selection.
When the automatic tuning is finished, the
Programme Sorting menu appears on the
screen.
Programme Sorting
Programme:
Confirm:
The Video TV starts to automatically
search and store all available
channels (TV Broadcast) for you.
02 -> 04
Select channel: PROG +
Select new position:
Exit: OK
OK
This procedure could take some
minutes.
Please be patient and do not press
any button while the automatic
tuning is in progress. Otherwise
the automatic tuning will not be
completed.
Searching...
01 -> 01
Select channel: PROG +
Select new position:
Exit: OK
Language
English
Deutsch
Netherlands
Français
Italiano
Español
Português
OK
9
Adjusting Automatically
the Clock Settings
The Video TV
automatically adjusts the clock
setting, and after a few seconds date
and time settings will be displayed.
Auto Clock Set
Adjusting Clock...
Auto Clock Set
23.09.2000
The Automatic Tuning menu appears on
the TV screen in the selected language.
Do you want to start
automatic tuning?
Press the OK button on the
remote control and go to step 9.
OK
Press the main
on/off button on the TV set to
turn on the Video TV.
Selecting the language of
the menu screens
8
Changing the Programme
Order of the TV channels
SAT
12:00
If you want to change the time
settings, you can adjust it manually
through the menu system (for details,
see “Setting the Clock Manually”
section of the instruction manual.
Exit: OK
Yes
No
Press the MENU button to remove
the menu from the screen.
OK
Your Video TV is now ready
for use.
Your television stations are now stored in your television’s memory.