1
SONY.
3-755-847-22 (1)
t
ColorRear FideoProl'ector
OperatingInstructions
[or2 models
Before operating the projection TV,'please read this manual
thoroughly and keep it for future reference.
KPR-41EXR95
KPR-46EXR15
KPR-53EXR15
© 1992 by SonyCorporation
To prevent fire or shock hazard, do not
expose the unit to rain or moisture.
RISK OF ELECTRIC
SHOCK
: TO REDUCE THE RISK OF ELECTRIC
DO NOT REMOVE
REFER SERVICING
SHOCK,
COVER (OR BACK),
NO USER-SERVICEABLE
TO QUALIFIED
PARTS INSIDE.
SERVICE
• One blade of the plug is wider than the other for safety
purposes and will fit into the power outlet only one way. If
you are unable to insert the plug fully into the outlet,
contact your dealer.
• If you spill or drop anything liquid or solid into the cabinet,
unplug the projection TV and have it checked by qualified
personnel before operating it any further.
DO NOT OPEN
CAUTION
• Operate the projection TV only on 120 V AC.
PERSONNEL.
This symbol ts intended to alert the
user to the presence of uninsulated
"dangerous voltage" within the product's enclosure that may be of sufficient magnitude to constitute a risk of
electric shock to persons.
This symbol is intended to alert the
user to the presence of important
operating and maintenance (servicing)
instructions in the literature accompanying the appliance.
• Do not place anything containing liquids (vases, coffee
cups, etc.) on the optional VCR tray. Spilled liquid may
enter and damage the projection TV.
• Unplug the projection TV from the wall outlet if you are not
going to use it for several days or more. To disconnect the
cord, pull it out by the plug. Never pull the cord itself.
If you have any questions or problems concerning the
projection -rv, contact your nearest Sony dealer.
Note to CATV system Installer
in the USA
This reminder is provided to call the CATV system installer's
attention to Article 820-40 of the NEC that provides
guidelines for proper grounding and, in particular, specifies
that the cable ground shall be connected to the grounding
system of the building, as close to the point of cable entry as
practical.
Use of this projection TV for other than private viewing of
programs broadcast on UHF or VHF or transmitted by cable
companies for the use of the general public may require
authorization from the broadcaster/cable company and/or
program owner.
I CAUTION: I
TO PREVENT ELECTRIC SHO_, DO NOT USE THIS
POLARIZED AC PLUG WITH AN EXTENSION CORD,
RECEPTACLE OR OTHER OUTLET UNLESS THE
BLADES CAN BE FULLY INSERTED TO PREVENT
BLADE EXPOSURE.
Owner's
Record
The modeland serialnumbers are locatedat the rear
of the projection TV. Recordthese numbersin the
spacesprovidedbelow. Refer to them wheneveryou
call yourSony dealer regardingthis product.
Model No.
Serial No.
1 Preface
Contents
Preface
Precautions .................. :.................................................
Welcome ........................................................................
Features ...................................................................
Important Information .....................................................
2
4
4
5
Chapter 1: Setting Up
Unpacking and Viewing Area .........................................
Locating Controls and Connectors .................................
Making Antenna Connections ......................................
Connecting Other Equipment ....... ................................
Connecting a VCR, video disc player
or Camcorder equipped with
an S video output jack ........................................
Connecting a VCR, video disc player
or Camcorder not equipped with
an S video output jack ........................................
6
7
13
15
15
16
Connecting two VCRs (equipped with an
S video output jack) for tape editing ...................
Connecting two VCRs (not equipped with an
S video output jack) for tape editing ...................
Connecting an audio system ...................................
Using the On-Screen Menus ........................................
Changing the menu language .................................
Adjusting Color Registration (CONVERGENCE) ..........
Setting CABLE ON or OFF ..........................................
Presetting TV Channels ...............................................
17
18
19
20
22
24
26
28
Chapter 2: Using Basic Features
Watching TV Programs ................................................ 34
Using Convenient Features .......................................... 35
Muting the sound - MUTING .................................. 35
Keeping the displays on-screen - DISPLAY ........... 35
Setting the sleep timer - SLEEP ............................. 35
Switching quickly between
two channels - JUMP ........................................
35
Previewing the features - DEMO ............................ 35
Selecting a Picture and Sound Mode ........................... 36
Chapter 3: Using Advanced Features
Watching Two Pictures at Once (PIP) ..........................
Adjusting the Projection TV ..........................................
Adjusting the picture ................................................
Adjusting the sound ................................................
Customizing the Screen Display ...................................
Setting channel captions - CH CAPTION ...............
Setting VIDEO LABEL ............................................
38
42
42
47
51
51
53
Using Timer-Activated Functions.................................. 54
Setting DAYLIGHT SAVING ................................... 54
Setting the clock- CURRENT TIME SET ............. 55
Setting the ON/OFF TIMER .................................... 57
Setting CHANNEL BLOCK ...................................... 60
Setting FAVORITE CHANNEL ..................................... 62
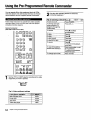
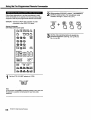
Using the Pre-Programmed Remote Commander ........ 64
Selecting a VCR mode directly
DIRECT PLAY ................................................... 69
Appendix
Troubleshooting ...........................................................
71
Specifications ..................................... _......................... 72
Index ..........................................................................
73
PrefaceI
3
Welcome
WelcOmeto theSony EXR series.By followingthe inst_
in this manual,you willbe able toenjoythe
advancedtechnologywhichbringsyou usefulfeaturesand highqualityviewing.
This manual covers three different models. The illustrations
are based on model KPR-41EXR95. If a particular function
does not apply to your model, this will be noted in the
manual.
We highly recommend that you read this manual before
using your projection TV, to set up and make connections
safely and to make maximum use of the many functions.
Then keep the manual handy for future reference.
Sony'e unique features
• The multi-band VHF/UHF/CATV tuner lets you receive up
to 125 cable channels, for a total of 181 possible off-air
and cable channels.
• The built-in Multichannel TV Sound (MTS) decoder lets
you receive stereo programs and Second Audio Program
(SAP) broadcasts.
• You can receive superior VCR playback by connecting a
VCR with an S video output jack to the S VIDEO IN jack.
• You can receive hi-fi sound by connecting an audio
system to the audio output jacks.
EXR series special features
• Automatically preset all receivable channels with AUTO
PROGRAM.
• Switch quickly between two channels, using JUMP.
• Watch another TV channel, video or cable image as a
window picture, using Picture-in-Picture.
• Operate the projection TV, plus Sony and most other
manufacturers' video equipment, a cable converter box
and a Sony multi disc player with the supplied Remote
Commander, using the Pre-Programmed feature.
• Call up on-screen menus to set time-related functions
(ON/OFF TIMER, CHANNEL BLOCK, DAYLIGHT
SAVING), to customize the screen (CH CAPTION, VIDEO
LABEL) and to adjust the picture and sound.
• Set optional video equipment on the projection TV, by
mounting the optional VCR Tray (see the separate VCR
Tray installation instructions).
EXR series advanced technology
• DynamicPictureTM systemadjustspicturecontrast
automatically
to producemore detailin both brightand
dark areas ofthe picture.
• VelocityModulation(VM) circuitryproducesclean and
sharpblackand white contrasts.
• Dynamic FocusTM circuitryautomaticallyfocuses the
scanningelectronbeamfor enhancedsharpnessover the
entirepicture,especiallyat thecomers.
• Trinitone
TM controlallowsyou to adjustthe picture's
color
temperature(tint)for the bestpossible co!dr.
I Preface
Important
Information
Please read the followi'ng information on using and maintaining the projection TV, for optimum viewing quality.
_lbT£
• Poor color registration (the red, green and blue signals do
not ovedap properly) may be caused by the influence of
the earth's magnetism. Correct this with the
CONVERGENCE adjustment (pp. 24- 25).
• Avoid touching the screen, and take care not to scratch
the surface with hard objects.
• Displaying a still picture for long periods of time, for
instance, when using the FREEZE function (p. 40) or
when operating a video game or personal computer, may
damage the picture tube. To avoid this, keep the picture
contrast level low (PICTURE adjustment, pp. 42 - 43).
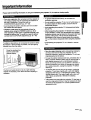
To obtain a clear picture, do not expose the screen to direct
illumination or direct sunlight. If possible, use spot lighting
directed down from the ceiling.
Cover
thescreen
windows
face the
withthat
opaque drapery.
The floorand walls shouldnotbe of a light-reflecting
material.If necessary,coverthem withdark carpeting or
wallpaper.
• To prevent intemal heat built-up, do not block the
ventilation openings.
• Do not install the projection TV in a hot or humid place, or
in a place subject to direct sunlight, excessive dust or
mechanical vibration.
_==_.
OL"_
• Avoid operating the projection TV at temperatures below
5°C(41°F).
• After transporting the projection TV directly from a cold to
a warm location, or if the room temperature has changed
suddenly, pictures may be blurred or show poor color over
portions of the picture. This is because moisture has
condensed on the mirrors or lenses inside the projection
TV. Let the moisture evaporate before using the projection
TV.
• Avoid placing the projection "IV on a slanted or uneven
floor.
• Save the original shipping carton and packing material to
use if you ever have to ship your projection TV. For
maximum protection, repack your projection TV as it was
originally packed at the factory.
• To keep the cabinet looking brand-new, periodially clean it
with a soft cloth. Stubbom stains may be removed with a
cloth slightly dampened with a mild detergent solution.
Never use strong solvents such as thinner or benzine, or
abrasive cleansers since these will damage the cabinet.
As a safety precaution, unplug the projection TV before
cleaning it.
• To remove dust from the front of the screen, unplug the
projection TV and wipe it gently with a soft cloth slightly
dampened with water or a mild detergent solution, using
vertical strokes only. Then wipe it again with a dry, soft
cloth. Never use solvents or thinners for cleaning
purposes.
• If the picture tums dark after the projection TV has been in
use for a long period of time, it may be necessary to clean
the inside of the projection TV. Consult qualified service
personnel for this.
I5
==_!
i=__
O
=S
I
Chapter
1: Setting Up
Unpacking
andViewing
.area
Carefullycarton
followto
theunpack
instructions
on the outside
of the
packing
the projection
TV.
Forthe best picturequality,tryto position the projection
TV so thatyou canviewthe screenfrom withinthe
areasshownbelow.
Notes
• The supplied accessories are packed in the bottom of the carton.
Be sure not to throw them away.
Horizontal viewing area
• Keep the original carton and packing materials to safely transport
the projection TV in the future.
Check to make sure that the following is included:
Universal Remote Commander RM-Y112 (1)
with 2 size AA (R6) EVEREADY batteries
If the Remote Commander is missing, contact your dealer.
Placethe projection
TVthe
in asidesare
cool, drynot
placewhere
ventilation
openingsat
blocked. the
Optimum viewing position
Plugthe projectionTV powercordintoan AC 120 volt
poweroutlet.
For further precautions, see p. 2.
Vertical viewing area
Optimum viewing position
] Chapter 1: SettingUp
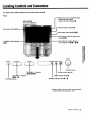
LocatingControls
andConnectors
For details,see the pages indicatedby the numberedblackcircle,_Q
Front
Main pictureinputmode/videolabel
Channelnumberdisplay
SLEEP, MUTING displays•
KPR-41EXR95
(The screendisplaysare
the samefor all models.)
caption display •
MTS.(SAP) mode display •
•
PIP (Picture-in-Picture) input mode
display • •
Bar displayfor volume,pictureor
soundadjustment• • - • •
CURRENT
0O
€"} -i= I
-__<
POWER
=..,
(IIW
TVN]DEO
--
VOLUME
(
,
--
+
CHANNEL
+
STEREO TIMER
0
)
i
CHANNEL +/- buttons*
POWER button*
Remote control detector
00000
VOLUME +/- buttons*
TIMER indicator lamp •
00-0
TVNIDEO
button*
STEREO indicator lamp •
- •
* Buttonswith thesame function are also located
on the Remote Commander (p. 10):
Chapter
1: Setting Up ]
7
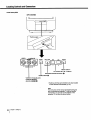
LocatingControlsandConnectors
Front inner I_nel
KPR-41EXR95
[I
i
o
U
Push to open
VIDEO
@
LVIDEI
DEMO
@E
RETURN
,/_
MENU
)3 IN J
MENU button*
AN window A+/_RETURN/FAVORITE
buttons*
button* •
DEMO button •
VIDE(
3 IN (input) jacks
(VIDEO/L(MONO)AUDIO-R) _ _ O
* Buttonswith the same function are also located
on the RemoteCommander(p. 10).
Note
The instructions in this manual are based for the._ost
part on operating the projection "IV with the Remote
Commander. You can also use the buttons on the
projection TV that have the same function.
I Chapter 1: Setting Up
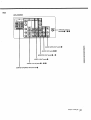
Rear
KPR-41 EXR95
I. '__I°+,,+:_i+
VHF/UHF antenna
terminal• - • •
AUDIO (VAR) OUT jacks •
==-
AUDIO OUT jacks lid •
o_
MONITOR OUT jacks •
- •
o
=_
.j
t'l}
VIDEO 3 OUT jacks •
t-,
VIDEO 1/2/3 IN jacks (_ - •
1_)
CENTER SPEAKER IN terminals •
Chapterl:SettingUpI 9
LocatingControlsandConnectors
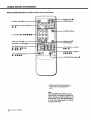
Remote
Con_mander
RM-Y112
(with the video control cover closed)
MUT,.G
MUTING buttonO
PIP (Picture-in-Picture)
SLI.__
_..
CH+
FREEZETVNIDEO SWAP
CH-
POSITIONAUDIO
SLEEP button•
POWER button*
PIP
buttons
O-O
FI
nnrl
OFF
TVNIDEO
0-9
bu"onsO-00000_
DISPLAY button O
button*
®®®1
JUMP
PICTURE +/-buttonsO
JUMP button •
ENTER button
NV WINDOW buttons,
0-00-00-0
0-00-0
CH (channel) +/- buttons*
_R1-2-3
00000
MDP selector
0-0000
TV/CABLE BOX selector •
* Buttons with the same function are
also located on the projection TV
(p.7).
Note
If the TV/CABLE BOX selector is set to
CABLE BOX, the Remote Commander is
able to control a connected cable box, not
the projection TV (p. 68). Set the selector
to TV to control the projection TV with the
Remote Commander.
10 1Chapter
1: Setting Up
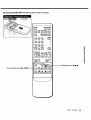
Remote Commen_srRM-Y112=(with
the video control cover open)
MUTING
SLEEP POWER
r-i
r--I C=I
CH+
FREEZEWNIOE0 SWAP
PIP
CH-
POSITIONAUDIO
OFF
r--i F-I r--i F-1 r--!
r-l [--i r--i
O (_) (_)
_,N,_o
®®®
®®®
=_
r--!
NV WINDOW
CH
VOL
o
r=l
VTR1-2-3
MDP
===
o
..=
TV CABLESOX
Q
o
_
STANDARD
STANDARD button _ _)
Video operating buttons _) - _)
Chapter 1: Setting Up
I 11
LocatingControlsand Connectors
1
Push open the lid (rear of the Remote Commander).
Installare
ends
twoinserted
size AAas
(R6)
shown.
batteries so that the (_ and O
3
Replace the lid,
About battery life
Under normal operation, batteries will last up to half a year.
if the Remote Commander does not operate properly, the
batteries might be worn out. Replace both of them with new
ones.
To avoid damage from possible battery leakage
Remove the batteries if you do not plan to use the Remote
Commander for a fairly long time.
12 1
Chapter 1: Selting Up
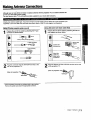
MakingAntennaConnections
-
.÷
.
Although you can use either an indoor or outdoor antenna with the projection TV, an outdoor antenna will
provide you with better picture quality.
You can receive cable TV by connecting a cable supplied by your local cable company.
Check your antenna cable type. If you have 75-ohm coaxial cable (round), attach an F-type connector (not
supplied). If you have 300-ohm twin-lead cable (flat), attach a 300-75 ohm adaptor (not supplied).
Using 75-ohm
coaxial
cable (round)
connector
shown
below.
Prepare theasend
of the
cable by attaching the F-type
Using 300-ohm
twin-lead
cable (flat)
Prepare
ohm
adaptor
the end
as shown
of the cable
below.by attaching the 300-75
7 mm(1Ainch) 10 mm (% inch)
b
F-type connector
.....
3 mm11,_inch)
_[L-'_--'_I
300-75 ohm
Loosen with
a screwdriver.
¢1 _'J
Attach the
cable and
fasten with a
screwdriver.
Plug of
rear
thethe
connector
projectioninto
TV.the VHF/UHF terminal at the
.=,__
om
•-2 -,i
Plug
of
thethe
projection
adaptor TV.
into the VHF/UHF terminal at the rear
(Rear of projection TV)
(Rear of projection TV)
VHF/UHF
VHF/UHF
* Mostcombinationantennas are equippedwith a signalsplitter.
Remove the splitterand attachthe appropriateconnector.
Chapter 1: Setting Up
I13
MakingAntennaConnections
UHF
VHF
,,,,,F/Ill
"_,Wl/
(Rear of projection TV)
Use an EAC-66 UN mixer(not supplied).
Prepare the(p.VHF
connector
13). antenna cable using the appropriate
Connect the cable to the UN mixer.
Connect the UN mixer to the VHF/UHF terminal.
When you use the UN mixer
Snow and noise may appear in the picture when viewing
cable TV channels over 37 (W + 1).
141
Chapter'l:
Setting Up
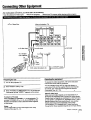
Connecting
OtherEquipment
Altermaldngthese c_necUons, you willbe able to do the following:
• Viewthe playbackof videotapes
• RecordTV programs
/,t___: Signal flow
• Recordone "IV programwhileviewinganotherprogram
(Rear of projection TV)
IN
OUT
VH /UHF
_x
O_
to S videoinput
to VHF/UHF
to audio input
===_,
o=-
A
YC-15V/30V
(not supplied)
:=.-!
to
S video
RK-74A
(not supplied)
._'a=
J'=" O_
output
J
Preparing
_
I
to
output
VCR, video disc player, etc.
audio
for use
I
to VHF/UHF output
Operating the equipment
1
Turn on the projection "iV.
To operate the video equipment, refer to the instruction
manual that comes with the equipment.
2
Set S-VIDEO to "ON" (p, 46).
3
Press TVNIDEO on th_orojection TV or on the Remote
Commander so that _VIDEO 1" appears on the screen.
You can operate a Sony VCR or video disc player, or
a non-Sony VCR with the supplfed Remote Commander.
For details, see "Using the Pre-Programmed Remote
Commander" (pp. 64 - 70).
To return to TV mode
PressTV/VIDEO or CHANNEL +/- on thec)rojection TV,
or pressTV/VIDEO, CH +/- or 0 - 9 and ENTER on the
Remote Commanderso thata channelnumberappears
on the screen.
About S video input
Video input and output signals can be separated into Y
(luminance or brightness) and C (chroma or color) signals.
Usually these two signals are combined in a VCR and sent
as one signal to a projection TV. Separation of the Y and C
signals prevents them from interfering with one another,
thereby improving picture (especially color) quality.
This projection "IV is equipped with S video input jacks
through which these separated signals can be input directly.
You can watchbotha TV anda VCR image at once,using
Picture-in-Picture(pp. 38 - 41).
Chapter 1: Setting Up
I 15
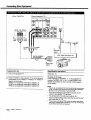
ConnectingOtherEquipment
: Signal flow
(Rear of projection TV)
IN
OUT
VHF/UHF
Q
(Front inner panel)
video
input
to
_
audio
input
to
to
VHF/
UHF _'_r
to video_
input
_
_
_ to audio
input
" ' \ _ _" n_//
,, ,_,.,,_//
Z_
to
VHF/UHF
output
II
I
VMC-810S/820S
_(not_supplied)
Preparing
VCR, video disc player, etc.
for use
1
Turn on the projection TV.
2
Press TV/VIDEO on the projection TV or on the Remote
Commander so that "VIDEO 1," "VIDEO 2" or "VIDEO 3"
appears on the screen.
VIDEO 1: for equipment connected to VIDEO 1 IN
VIDEO 2: for equipment connected to VIDEO 2 IN
VIDEO 3: for equipment connected to VIDEO 3 IN
i
I
audio/video
_ output
Operating the equipment
Same as p. 15.
To return to TV mode
Press TVNIDEO or CHANNEL +/- on the projection "IV,
or press TVNIDEO, CH +1- or 0 - 9 and ENTER on the
Remote Commander so that a channel number appears
on the screen.
Notes
• If you try to use equipment that is connect_l to the front and rear
VIDEO 3 IN jacks at the same time, the picture will be distorted.
Be sure you turn off one piece of equipment first.
• If you have connected to a Camcorder's input jacks, do not
connect to the projection TV's input jacks.
• You can label each of the video input modes (p. 53).
• You do not need to select a video mode when you use the direct
play function (pp. 69 - 70).
•
161
Chapter 1: SettingUp
If you connect a monaural VCR, connect the audio output of the
VCR to the L (MONO) jack of VIDEO IN (1, 2 or 3). The monaural
sound will be heard from both speakers.
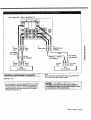
: Signalflow
(Rear of projection TV)
IN
VIDEO2
to
S video
input
OUT
V1DE03
V1DE03[_
to
audio
input
to
audio output
to
o
=t
€1
MONITOR OUT
S VIDEO*
€1
o
YC-15V/30V
"_YC-15V/30V
RK-74A
(not supplied)
tin
=!
=
(not supplied)
to
S video
output
I
RK-74A
audio
to
output
VCR
(for playback)
I
Preparing for use/Operating the equipment
Same as p. 15.
* It is not necessaryto connectto the MONITOR OUT S VIDEO
jackto receivethe S videoinputsignal.You can makethe
connectionas shownabove,or connect the MONITOR OUT
jacks to the VCR for recording,usingthe VMC-810S/820S
connector (not supplied). P
m
to _
audio
input
_
_(not to S
supplied)
video
input
(for recording)
Note
Do not change the input signal while editing through MONITOR
OUT, or the output signal will also change.
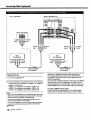
ConnectingOtherEquipment
_'q--q:
Signal flow
(Rear of projection TV)
IN
OUT
(Front inner panel)
to video j_ _
input
_
_
to audio
input
,
I
to video _
_
_ to audio
, ', .
to video_
_
_
to audio
i
I
toaud,o
Preparing
for use
1
Tum on the projection TV.
2
Press W/VIDEO on the projection TV or on the Remote
Commander so that =VIDEO 1," =VIDEO 2" or "VIDEO 3"
appears on the screen.
VIDEO 1: for_quipment connected to VIDEO 1 IN ..
VIDEO 2: for equipment connected to VIDEO 2 IN
VIDEO 3: for equil_Lqentconnected to VIDEO 3 IN
Notes
• If you try to use equipment that is connected to the front and rear
VIDEO 3 IN jacks at the same time, the picture will be distorted.
Be sure you tum off one piece of equipment first.
• If you have connected to a Camcorder's input jacks, do not
connect to the projection TV's input jacks.
• If you connect equipment to the rear VIDEO 3 IN S VIDEO jack,
you cannot receive the output signal from the VIDEO 3 OUT
,_,l=Y_J
DEO_ack.
1 8
I Chapter 1: Setting Up
tovideo
r o 0,o0),
/
tO video _
_
_
!O audio
o ,0u,\ijout0u,!
VMC-810/S820S
(not supplied)
_
--
j
VMC-810/$820S
(not supplied)
Watching a different image while duplicating
The VIDEO 3 OUT jacksonlyoutputthe signalfrom the
VIDEO 3 inputjacks.
If you connecta VCR for playbackto the front or rear VIDEO
3 IN jacks, and a VCR for recordingto the VIDEO 3 OUT
jacksto duplicateyourrecordedtapes, you can watch input
images differentfromthe image beingoutputfor recording.
To watch a different input image
Press W/VIDEO on the projection TV or on 11_eRemote
Commander to select the input image you want to watch.
: Signal flow
IN
(Rear of projection TV)
RK-74A
OUT
(not supplied)
to line input
Speaker
Speaker
to audio
output
Stereo amplifier
Set the amplifier's function to line input.
(Rear of projection TV)
:Signal flow
o
IN
R
IN
OUT
€1
m
L
to left_) terminal
€=
o
::r
Speaker
cords
rIPi
to center
output
eD,
tlD
Dolby* Pro Logic-compatible amplifier
to dghtG terminal
Preparing for use
Adjusting the sound level
Display the mode set menu and set SPEAKER to
=CENTER" to cut off the projection TV speaker sound
(p. 50), and listen to the projection TV's sound solely
through the audio system speakers.
If you connect a stereo audio system to AUDIO (VAR) OUT,
leave the amplifier volume, bass and treble controls at their
mid position, and adjust the level with the VOLUME +/buttons on the projection TV or the VOL +/- buttons on the
Remote Commander.
Using the projection TV speakers as center speakers
You can only connect a Dolby* Pro Logic-compatible
..
amplifier to CENTER SPEAKER IN; always make the
connection as shown abov_,..Never connect to the right
(R (_)O) or left (L (_e) termlhals only.
Caution
• Alwaysturnoff the"amplifierpowerbeforeconnectingto CENTER
SPEAKER IN.
• Alwaysmatchthe speakercord andterminalcolorswhenmaking
the connection.
If you connect a stereo system to AUDIO OUT or a
monaural system to CENTER SPEAKER IN, adjust the
speaker volume with the amplifier controls.
Note
By connecting to AUDIO (VAR) OUT, you can adjust the bass,
treble and balance, or select an SRS (Sound Retrieval System) or
an MTS (Multichannel TV Sound) mode, using the on-screen
menus (pp. 47 - 49).
* Manufactured under license from Dolby Laboratories Ucensing
Corporation. Additionally licensed under one or more of the
fol_g
paints: U.S. numbers 3,632,886, 3,746,792 and
3,959,590. "DOLBY" and the double-D symbol O_are
trademarks of Dolby Laboratodes Licensing Corporation.
Chapter 1: Setting Up
119
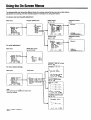
UsingtheOn-Screen
Menus
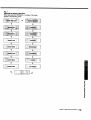
The followingfl6_tChartshowsthe differentlevelsof on-screenmenusthatyou can use to make various
adjustmentsand settings.See the indicatedpages for instructionson usingeach feature.
For picture and sound quality adjustment
Main menu
Program palette menu
_mSTANDARD
mMOVIE
aSPORTS
mNEWS
VIDEO
AUDIO_
_MENU
I,r71PROG PALETTE
[]MODE SET
_TIME
_SET UP
[]]ENGLISH
I_qCONVERGENCE
SEtEC_
A. R(TUR.EXZT_B_)
Adjustment screen
(p. 42)
VIDEO screen
(pp. 42 - 45)
r'JqvIDEO
I_PICTURE It]lllllllfillltfllllttlll
......
HUE
"".........
I'", ......
,COLOR
IIIIIMIII.........
'....
BRIGHT Illll]flllillgl
...........
SHARP
IllWIII!ll
_ ..........
TRINITONE: LOW
NR:0FF
PICTURE
iltlltllllllllllllllll!llllllllllllllllllllBl_,".-,
st_(_¢ Rrrun Em_)
AUDIO screen
Adjustment
(p. 47)
(pp. 47 - 48)
[]_]AUDIO
bTREBLE Illlllllllifllll
................
BASS
IIIIHlflillllll
................
BALANCE...............
| ..............
mSRS AUTO
mSRS STEREO
mSRS OFF
:>
For mode adjustment
MODE SET screen
Main menu
(pp. 46, 49, 50)
D-IPROG PALETTE
_[]MODE SET
_)TIME
_SET UP
mENGLISH
F_ICONVERGENCE
SELECT_
RETURN
[]
I,S-VIDEO
MTS
SPEAKER
_MENU
SELECT€
RE_RR
EX|T_
:OFF
:MAIN
:MAIN
EXIT_
CURRENT TIME SET screen
(pp. 55 - 56)
For time-related
"-_CURRENTTIME SET
settings
Main menu
Time menu
• .._ --:-AM
OAYLIGHT SAVING
Set DAYLIGHT SAVING
first If needed.
SELECT
ITIPROG PALETTE
[]MODE SET
•GTIME
I_]SET UP
{;I:]ENGLISH
I_-ICONVERGENCE
SELECT_
RETURN
®
_CURRENT TIME SET u
ONIOFF TIMER
CHANNEL BLOCK_
DAYLIGHT SAVING:NO
;_HENU
EXI¥(_)
_
UETURN
EXIT
_
I_._)
ON/OFF TIMER screen
(pp. 57 - 58)
_N/OFF
TIMER
• 1 .......
--:--AM .H CH.__
2 .......
--:--AM
H CH__.
3 ........
Note
Menu items that are shaded are inactive and
cannot be selected.
--:--AM
.H CH_..
Select a program.
SELECT
_
lET=JUg
EXIT
;HANNEL BLOCK screen
(pp. 60 - 61)
_CHANNEL
BLOCK
--:--AM _H CH_._
$(LECT
20 1
Chapter 1: Setting Up
_
It(TURN
D-IVIDEO
EX]T
screen
I_IAUDIO
TREBLE
IIII!lllltlllllllllllllllltllill
...........................
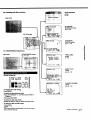
For presetting end 6(her functions
AUTO PROGRAM
screen
(p.29)
Main menu
CH (channel)
ERASE/ADD screen
(pp. 31, 33)
SET UP screen
CH (channel)
CAPTION screen
23
(pp. 51 - 52)
r-o0
m
:1
lid
For CONVERGENCE
adjustment
o
:l
Main menu
CONVERGENCE
(pp. 24 - 25)
screen
_IDEO
VIDEO LABEL
screen
(p. 53)
LABEL
• VZOEm:VZOEO
Z
VIDEO2:
VIDEO 2
VIDE03:
VIDEO 3
R|TUII
OJ
O=
--j
CD
€
O_
EXIT_)
"_DI RECT PLAY
"_-
DIRECT PLAY
screen
(pp. 69 - 70)
Remote Commander
JUMP
D_Y(_
ENTER
/VV WINDOW
CH
VOL
MENU
_FAVORITE
CHANNEL
•:..
FAVORITE CHANNEL
screen
(pp. 62 - 63)
To display the main mertlt_
Press MENU.
°
To return to the previous menu
Press AN WINDOW +/- until the cursor points to
" :_ MENU."
Then press RETURN.
Set the
position
to
tnput the
chann_,,
:
"--"
"""
To retum to the main menu
Repeat the above, until you reach the main menu.
To return to the normal screen
Press MENU.
Note"_
The menusdisappearautomatically,if you do notpressa
buttonwithin90 seconds.
Chapter 1: Selting
Up
I21
Usingthe On-ScreenMenus
F
MUTING
SLEEP POWER
r--i
r-3_
CH+
FREEZE WNIDE0 SWAP
PiP
r_ r-I !_ !_ E3
CH-
POSITION AUDIO
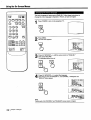
The menu languageis factory-setto ENGLISH. Followthese instructions
to
changethe menu languageto Spanishor French,or backto English,
OFF
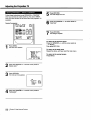
1
Press POWER to tum on the projection TV.
POWER
0©®
®®®
®®®
r-!
Press
Themainmenuappears.
MENU.
AN WINDOW
CH
VOL
_,I_'IP
ROG PALETI'E
IB'_MOD
E SET
V'rR1-2-3
MDP
1_/ CABLE BO)
Press press
AN WINDOW
Then
RETURN. +/- until the cursor points to "ENGLISH."
Thelanguagedisplayturnsred.
RETURN
J
Each
press A/V+/-WINDOW
"ESPAIVOL," "FRAN_AIS" and
Press time
AN you
WINDOW
to select+/-,thethelanguage.
=ENGLISH" menus appear.
%
Note
Certain parts of the "ESPAI_IOL" and "FRAN(_AIS" menus remain in English.
22 1
Chapter 1: Setting Up
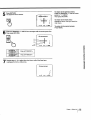
To retum to the normal screen.
Press MENU.
The
is selected.
Presslanguage
RETURN.
Notes concerning menus
• During PIP (Picture-in-Picture) mode, the
on-screen menus may overlap the window
picture.
RETURN
• The menus disappear automatically, if you do
not press a button within 90 seconds.
Spanish menu
.=_
:=
a
,-b
:T
m
o
=
:l
:l
Chapter,;
Se.,og
UpI 23
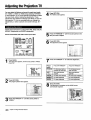
Adjusting
ColorRegistration
(CONVERGENCE)
In a projection TV, the projection tube image appears on the screen in three color
layers (red, green and blue). If these layers are not in proper registration, the
color is poor and the picture blurs. To correct this, perform the CONVERGENCE
adjustment.
SLEEPIER
MUTING
CH+
FREEZE TVNIDEO SWAP
CH-
POSITIONAUDIO
r-1
PIP
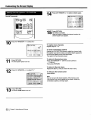
Press
Themainmenuappears.
MENU.
OFF
r--I r-lO
O®®
®®®
®®®
r-l
AN WINDOW
VTR1-2-3
MOP
r--1
CH
VOL
2
Press AN WINDOW +/- until the cursor points to "CONVERGENCE."
"iV CABLEBO)
Press
The CONVERGENCE
RETURN.
screenand the coloredadjustmentlinesappear.
RETURN
_
R=Red
G = Green
B = Blue
J
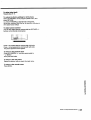
Press
+/- until
thethecursor
points to the symbol representing
the
lineAN
youWINDOW
want to adjust
(see
key below).
Adjustment
24 1
Chapter 1: Seffing Up
key
(red vertical: left/right adjustment)
(red horizontal: up/down adjustment)
I
(blue vertical: left/right adjustment)
(blue horizontal: up/down adjustment)
---
line symbols
I
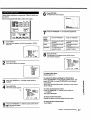
To return to the previous menu
Press AN WINDOW +/- until the cursor
=
Theadjustment
line is selected.
Press
RETURN.
points to = _ MENU."
Then press RETURN.
RETURN
I
5
${LECT_
RETUgg
_
EXET_
To return to the main menu
Repeat the above,untilyou reachthe
main menu.
To return to the normal screen.
Press MENU.
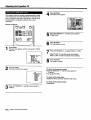
Press press
AN WINDOW
Then
RETURN, +/- until the line converges with the center green line.
I_'ICONVERGENCE
G
I
5
D_
G,._B
Press AN WINDOW
+.
Press AN WINDOW
-.
/
S[LECT
*
RETURN
EX,T_
_0
A
7
epea.tsteps4form
- 6a
towhitecross.
adjustthe otherlines,untilall the lineshave
overlappedto
t_
Z
i-rl
_J
I'_"1
CONV E RGENC E
/'1"1
Z
€-J
m
I
I
5
SEL(CT¢
RETU_m
EX'_)
Chapter 1: Setting Up
125
SettingCABLE
ONorOFF
MUTING
SLEEP POWER
r--l
r-! r--1
CH÷
FREEZE TVNIOEO SWAP
PIP
r-] r_ !_ IZI r-i
CH-
POSITION AUDIO
r--i
OFF
D F-I r--i
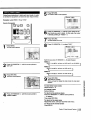
If you have cable connected to the projection TV, follow the steps below to set
the cable connection on or off. Set CABLE OFF to preset or watch VHF or UHF
channels, and set CABLE ON to preset or watch cable TV channels.
Note
If the projection "rv is in video mode, the =CABLE" display is shaded and cannot be
selected.
Press TVNIDEO
to change to TV mode.
Press MENU.
Themain
menuappears.
®®®
r-!
A/V WINDOW
CH
VOL
._
MENU
RETURN
r=!
Press AN WINDOW +/- until the cursor points to "SET UP."
VTR1-2-3
MDP
"rv CABLEBO)
%
Press
ThesetRETURN.
up menu appears,and the cursor points to"CABLE."
RETURN
Press
The
modedisplayturnsred.
RETURN again.
RETURN
26 1
Chapter 1: Setting Up
|
5
.
•
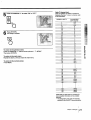
Cable "IV channel chart*
PressAN WINDOW +/- to select=ON"or =OFF."
Cable TV systems use letters or numbers to
designate channels. To tune in a channel, refer
to the chart below.
:E:
REC17;FL_
Press
The
settingis
RETURN.
complete.
RETURN
To return to the previous menu
PressAN WINDOW +/- untilthe cursorpointsto = _ MENU."
Then press RETURN.
To return to the main menu
Repeat the above, untilyou reachthe main menu.
To return to the normal screen.
PressMENU.
Number on this TV
1
Corresponding
CATV channel
A-8
5
6
A-7
A-6
14
15
16
17
18
19
20
21
22
23
24
25
26
27
28
29
30
31
32
33
34
35
36
37
38
A
B
C
D
E
F
G
H
I
J
K
L
M
N
O
P
Q
R
S
T
U
V
W
W+I
W+2
39
W+3
€o
==
f-.
m
O
Z
O
-rl
-I-i
:
93
94
95
96
97
98
99
100
101
102
W+57
W+58
A-5
A-4
A-3
A-2
A-1
W+59
W+60
W+61
:
123
124
125
W+82
W-P83
W+84
Check with your local cable TV company for
more complete information on the available
channels.
* The designation of the cable TV channels
conforms to the EIAiNCTA recommendation.
Chapter 1: Setting Up
27
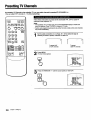
Presetting
TVChannels
By presettingTV _hannels to the projectionTV, you can selectchannelsby pressing
=CH (CHANNEL) ÷1-.
(You can selectVHF channels2-13 withoutpresetting.)
MUTING
SLEEP POWER
r--!
CH+
C23r--1
FREEZE "WM_O
SWAP
PIP
r-n r-n r--l r-n r-n
CH-
POSITIONAUDIO
OFF
r--1 r-! r--1
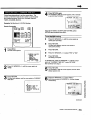
Follow these instructions to preset all the receivable VHF, UHF or cable "IV
channels to the projection TV.
Notes
• If the projectionTV isin video mode,the =AUTOPROGRAM"displayisshaded and
cannotbeselected.PressW/VIDEO to changeto TV mode.
• Performauto programmingduringthe day ratherthan lateat night,whensome channels
may notbe broadcasting.
®®®
®®®
Set the cable
connection
on VHF/UHF
or off (pp. or
26 cable
- 27) TV.
to select the type of
channel
you want
to preset,
,o,,
CH
A/V WINDOW
To preset VHF
or UHF channels
VOL
To preset
cable TV channels
MENU
RETURN PICTURE
•_
V'rR1-2-3
MDP
r-_
TV CABLE BO)
m
Press
Themainmenuappears.
MENU.
5iilHODE SET
(_TIHE:
_ISET UP
rT'IENGLTSH
F_'ICONVERGENCE
StL[CT# .rr_
Ex._
J
8
Chapter 1: Setting Up
3
Press A/V WINDOW +/- until the cursor points to =SET UP."
lit
|"
"
Press
The setRETURN.
up menu appears.
RETURN
"CABLE: ON
AUTO PROGRAM
C½ ERASE/ADD
CH CAPTION
VIDEO LABEL
DIRECT PLAY
FAVORITE CHANNEL
_MENU
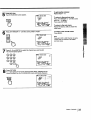
Receivable channels for this projection
TV
VHF: 2 - 13
UHF: 14 - 69
Cable: 1 - 125
To select TV channels without
presetting
Press the 0 - 9 buttons and ENTER.
To return to the previous menu
Press AN WINDOW +/- until the cursor
Press AN WINDOW +/- until the cursor points to "AUTO PROGRAM."
points to" _ MENU."
Then press RETURN.
€_
CABLE:
ON
"AUTO
PROGRAM
CH CAPTION
VIDEO
LABEL
CH ERASE/ADD
FAVORITECHANNEL
_MENU
DIRECT PLAY
To return to the main menu
Repeat the above, until you reach the
main menu.
To return to the normal screen.
Press MENU.
Press RETURN.
-!
RETURN
"I
B
"AUTO PROGRAM" appears on the screen and receivable channels (other than the
channels already preset) are preset in numerical sequence. The channels previously
preset will not remain in the projection TV's memory.
When no more channels are found, auto programming stops and the screen returns
automatically to the set up menu.
Press CH +/- to check or view the preset channels.
CH
Chapter
1: Setting Up
I ;:)9
PresettingTV Channels
Followthese instructions
to erase unnecessaryTV channels,so that whenyou
pressCH +/-, the channel(s)are skipped.
MUTING
CH+
FREEZE W/VIDEO SWAP
PIP
CH-
POSITIONAUDIO
OFF
EZl{_ F-I El E3
Press
MENU
The
mainmenuappears.
r--1 r--i r--1
0®®
®®®
0®®
_v_o
Press AN WINDOW +/- until the cursor points to "SET UP."
V'I'R1-2-3
MDP
I'JqPROG
PALETTE
h'_MODESET
_TIME
_I_]SET UP
mENGLISH
I_'ICONVERGENCE
"rv CABLE BOX
SELECT_
RETURN
ERIT_
Press RETURN
Theset
upmenuappears.
RETURN
4
Press AN WINDOW +I-until the cursor points to =CH ERASE/ADD."
%
30
]
Chapter 1: Setting Up
'CABLE: ON
AUTO PROGRAM
CH ERASE/ADD
CH CAPTION
VIDEO LABEL
DIRECT PLAY
FAVORITE CHANNEL
_MENU
CABLE: ON
AUTO PROGRAM
"CH ERASE/ADD
CH CAPTION
VIDEO LABEL
DIRECT PLAY
FAVORITE CHANNEL
_MENU
-r'
"
"
TheCHRETURN.
ERASE/ADD screen appears,andthe cursorpointsto "ERASE."
Press
To erase another channel
Repeat steps6 - 7.
To return to the previous menu
Press A/V WINDOW +/- until the cursor
points to = ;:) MENU."
Then press RETURN.
RETURN
To return to the main menu
Repeat the above, until you reach the
main menu.
Press
The channeldisplayappears.
CH +/- to select the channel you want to erase.
CH
@
To return to the normal screen
PressMENU.
Note
If youerase a VHF or UHF channel,the same
numbercableTV channelis also erased(and
vice versa).
-:=
A =--"sign
Press
RETURN.
appearsin frontof the channelnumberdisplay,indicatingthat the channel
is erased;then the CH ERASE/ADD screenautomaticallyreappears.
==_
_P
Ib)
€1
(I)
RETURN
_O
Chapter1:SettingUP I 31
PresettingTV Channels
i
SLEEP POWER
MUTING
r--1 r--1
CH+
FREEZE W/VIDEO SWAP
Follow these instructions to add TV channels one by one to the selection
memory, or to replace a "iV channel you previously erased (pp. 30 - 31).
PIP
[--I r--I r--I F-) [::1
POSITIONAUDIO
CH-
OFF
Press
Themain
MENU
menuappears.
r--1 r---ir---I
000
OO0
0O0
JUMP
D_Yo
ENTER
i
A/V WINDOW
CH
VOL
Press AN WINDOW +/- until the cursor points to "SET UP."
MENU
RETURN
t_
VTR1-2-3
PICTURE
r-=-i
MDP
[_MODE SET
TV' CABLE BO)
Press
ThesetRETURN.
up menuappears.
_'CABLE
•:ON:
AUTO PROGRAM
CH ERASE!ADD
CH CAPTION
VIDEO _BEL
IRECT PLAY
FAVORITE CHANNEL
_MENU
RETURN
J
i
4
Press AN WINDOW +/- untilthe cursorpoints to "CH ERASE/ADD."
_
i_l ¸
_ _ _i
CABLE:ON
AUTOPROGRAM
I_CHERASE/ADD
CH CAPTION
VIDEOLABEL
D'IRECTPLAY
FAVORITECHANNEL
_MENU.
32 IGhapter
1: Setting Up
To add another channel
Repeat steps 7 - 8.
The CHRETURN.
ERASE/ADD screenappears.
Press
_]CI{ ,,,EBASEIADO
To return to the previous menu
PressA/V WINDOW +/- untilthe cursor
points to = _ MENU."
Then pressRETURN.
,ERASE
RETURN
Select the channel.
ERASE:CHANNEL+/ADD:
[O-9]+[ENTER]
m_m,_ mm =EZT_
6
To return to the main menu
Repeat the above, until you reach the
main menu.
To return to the normal screen
PressMENU.
Press AN WINDOW +/- until the cursor points to "ADD."
ERASE'AO0
]
E_SE
/
,,?,D
|
Select the channel.
J
ERASE:CHANNEL+/J
ADD:
[O-9]+[ENTER]I
_EECT¢ '_TUU E=._
J
Note
If you add a VHF or UHF channel, the same
number cable TV channel is also added
(and vice versa).
Press
0 - 9 and ENTER to select the channel you want to add.
The
channeldisplayappears.
@®®
®@®
®®®
=l"
_CH ERASE/ADD
¢1
10
ERASE
,ADD
Select the channel.
ERASE:CHANNEL +/ADD: [O-9]÷[ENTER]
_LE_
•
RETUM
EXIT
A
=+" sign
appears in front of the channel number display, indicating that the
Press
RETURN
channel is added; then the CH ERASE/ADD screen automatically reappears.
"_CH_:ERASE/ADD
RETURN
Select the channel.
ERASE:CHANNEL+/ADD:_Ii_[O-9]+[ENTER]
o.
I
chapter
2: Using Basic Features
Watching
W Programs
Make sure that the TV/CABLE BOX selector on the Remote Commander is set
to TV, in order to control the projection TV with the Remote Commander.
MUTING
Set the cable
channel
you want
connection
to watch,
onVHF/UHF
or off (pp. or
26cable
- 27) TV.
to select the type of
CH÷
FREEZE TVNIDE0 SWAP
PIP
POSITION AUDIO
OFF
[ZI r-I [_ r--I r--I
CH-
r--1 r--1 r--1
TVNIDEC
Q®Q
To watch VHF
or UHF channels
To watch
cable TV channels
®®®
JUMP
Select
channel
inchannels
one of theinfollowing
two
ways:
To
scana the
preset
numerical
sequence,
_)ress CH +/-.
CH
AN WINDOW
CH
VOqL
PICTURE
@
r-=-i
VTR1-2-3
MDP
TV CABLE BOX
To select a channel directly, press 0 - 9 and then ENTER.
For example, to select channel 10, press 1, 0 and ENTER.
®®®
®®®
®®®
ENTER
Press VOL +/- to adjust the volume.
VOL
l
I
Press + to increase the volume.
Press - to decrease the volume.
If VIDEO 1, VIDEO 2 or VIDEO 3 appears on the screen
Press TVNIDEO until a TV channel number appears.
To select channels more easily
Set FAVORITE CHANNEL (pp. 62 - 63).
To turn off the projection TV
Press POWER.
4
I Chapter 2: Using Basic Features
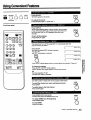
UsingConvenient
Features
i
RETURN
DEMO
_
iX
O
Q©D
FAVORITE
MENU
-
4-
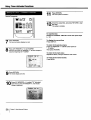
Press MUTING.
"MUTING" appearson the screen.
MUTING
To restore the sound
Press MUTING again, or press VOL +.
Front inner panel
SLEEP POWER
MU'nN_
m
mar-7
CH+
FREEZE WNIOEO SWAP
PIP
CH-
POSITION AUDIO
OFF
r_ r-1 r_ r_ r-1
DISPLAY
To turn off the displays
Press DISPLAY again.
The sleep timer tums off the projection TV automatically after the
amount of time you select.
000
000
000
Press SLEEP.
Each timeyoupressSLEEP, the timeincrements
"30/'60''90"
and "OFF"mode appearin sequence.
r-!
AN WINDOW
Press DISPLAY.
All the existingdisplaysappear:channelnumber,channelcaption
(if sat),MTS mode ('SAP"only),windowpictureinputmode,and
the currenttime ('AM" or "PM"disappearsafterabout three
seconds).
_1
CH
SLEEP
VOL
f
f
,
I
SLEEP 30 1
SLEEP 6q
SLEEP 90 1
SLEEP
OFF_
_
A red "SLEEP*displayappearsaboutone minute before the projection TV goes off.
VTR1-2-3
MDP
TV CABLEBOX
To cancel the setting.
Press SLEEP until OFF mode appears.
A green "SLEEPOFF"displayappearsfor aboutthreeseconds.
OR
Tum the projection TV off.
Thesleep timer settingis cancelled.
_o
Use this function to keep track of two programs alternately.
JUMP
To recall the channel you were watching previously
Press JUMP.
To switch back to the first channel
Press JUMP again.
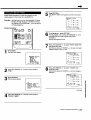
Press DEMO (front inner panel).
Functionsand menusare displayedone by one.
DEMO
To restart DEMO from the beginning
Press DEMO again.
To stop DEMO
Press any button.
Chapter 2: Using Basic Features
] 35
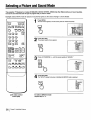
Selectinga PictureandSoundMode
ThisprojectionTV'features fourmodes(STANDARD, MOVIE, SPORTS, NEWS) that offerdifferentpictureand soundqualities.
Choosethe one that bestsuitsthe typeof programthat you wantto watch.
Example: Select MOVIE mode for picture and sound that gives you the sense of being in a movie theater.
Press
MENU.
The
mainmenuappears,and
thecursorpointsto "PROG PALETTE."
MUTING
SLEEP
POWER
r--1 r-!
CH+
FREEZETVNIOE0 SWAP
PIP
r--i r--1 (--I r--I _
CH-
POSITIONAUDIO
r--z
OFF
r--zr-l IZI
®®®
©®®
Press
RETURN.
Theprogrampalette
menuappears.
"'STA.O_R
JUMP
RETURN
-NEWS,:
NV
WINDOW
CH
VOL
_
I
RETURN FICR_IE
VTR1-2-3
TV/VTR
r---!
MDP
"rv CABLE BO)
CODE SET
Q
STANDARD
_
3
Press A/V WINDOW +/- until the cursor points to "MOVIE."
%
)r_¸¸i!il
iii_i
i_i:iii!i_!_!i_ii_
i!_
mSTANDARD
mMOVl E "_
mSPORTS
•NEWS
VIDEO: "
AUDIO (
_MENU
Press
RETURN.
The "MOVIE"displayturnsgreen,
indicatingthatMOVIE modeis selected.
RETURN
mMOVIE
mSPORTS
=NEWS
VIDEO
AUDIO
MENU
(with video control
cover open)
6
I Chapter 2: UsingBasic
Features
To select a different mode
Repeat steps 3 - 4.
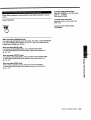
Followthese instructions
to selectstandardmodewithoutusingthe on-screen
menus.
To return to the l_revious menu
Press AN WINDOW +/- until the cursor
points to _ _ MENU."
Then press RETURN.
Press STANDARD.
To return to the main menu
Repeat the above, until you reach the
main menu.
STANDARD
To return to the normal screen.
Press MENU.
When you select STANDARD mode
- You receive standard picture and sound quality. Any video or audio adjustments
you made (=Adjustingthe Projection TV," pp. 42 - 50) are cancelled and the
original factory settings are restored.
When you select MOVIE mode
You receive a finely detailed picture, and a theatrical audio effect.
To further adjust picture and sound qualities, follow the instructions on
pp. 42 - 50.
When you select SPORTS mode
You receive a vivid, bright picture, and sound with a sports stadium effect.
To further adjust picture and sound qualities, follow the instructions on
pp. 42 - 50.
ra_
D
When you select NEWS mode
Picture noise is reduced, and you receive clear voice reproduction.
To further adjust picture and sound qualities, follow the instructions on
pp. 42 - 50.
=1
W
w
=1
=l.
o
t,=l
=l.
D
=1.
m
Chapter 2: Using Basic Features
I "_7
I
Chapter
3: Using Advanced
Features
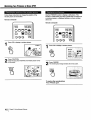
Watching
TwoPictures
atOnce(PIP
You can watch both the main picture and a window picture
simultaneously, using the Picture-in-Picture (PIP) function.
The projection TV is equipped with one-tuner PIP. To watch
two IV channels simultaneously, you must first connect a
VCR to the projection TV, which will enable you to watch a
second "IV channel through the VCR tuner. (See
"Connecting Other Equipment," pp. 15- 16.)
Remote Commander
MUTING
SLEEP POWER
r--1 r--!
CH+
FREEZEWNIOEO SWAP
PIP
CH-
PORTION AUDIO
OFF
r-'l r--I r-7 O IB
i_
r mm
Main picture
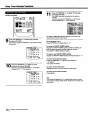
Press PIP to display a window picture
_
Window picture
Picture-in-Picture special features
When watching the main picture and a window picture,
you can:
• Swap the main and window pictures (SWAP).
• Change the position of the window picture (POSITION).
• Display a still picture (FREEZE).
• Choose the sound from the main or window picture
(AUDIO).
Inputsourcemode or TV channel
forthe main picture
PIP
1/4-size
Inputsource modeor TV channel
for the windowpicture
PIP
l/s-size
Notes
• The window picture sound is also output from the AUDIO (VAR)
OUT jacks. The AUDIO OUT and MONITOR OUT jacks output
the main picture sound only.
A window picture appears in the last mode you watched.
Each time you press PiP, a 1/4 or 1/9 size window picture appears
alternately.
To turn PIP function
off
Press OFF.
The window picture disappears.
• The video label and channel caption will not appear with the
window picture even if you have set them.
• If you select a blocked channel in the window picture, the display
=BLOCKED" appears with the window picture. (See =Setting _.
CHANNEL BLOCK, _ pp. 60 - 61.)
To receive the window picture sound
Press AUDIO.
The J_ displayappearsfora fewseconds,indicatingthatthe
windowpicturesound is beingreceived.
To restore the main picture sound
Press AUDIO again.
8
I Chapter 3: Using Advanced Features
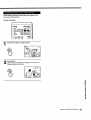
To use Picture-in-Picture with pay cable TV input, make the
connections to your cable converter box as shown below.
Remote Commander
(Front inner panel)
MUTING
r--1
CH+
SLEEP POWER
r--l r--1
FREEZEWNIDE0 SWAP
PIP
lE r-1 ma r_ _
CH-
POSITIONAUDIO
OFF
r--i r--1 r--1
.,,,t_, : Signal flow
(Rear of projection TV)
Press PIP to display a window picture.
6
®1®1
VMC-810S/820S
Press
TVNIDEO
the Picture-in-Picture control area
to
select
the inputin
mode.
Each timeyoupress TV/VIDEO, "-I-V,""VIDEO 1,""VIDEO2"
and -VIDEO 3" appearin sequence.
(not supplied)
I Signal
CATV
cable
TVNIDEO
I
To change TV channels in the window picture
Press CH +/- in the PiP control area.
VCR
I ! 1
_
Decoder
box
After making the above connections, turn the cable
connection on by following the steps on pp. 26 - 27; then
continue with the steps below.
m_ _
3
4
Follow steps
1 - 2 inon
"Changing
window
picture
input mode"
this page the
to select
the
video input mode for your connected VCR.
Put your VCR on an inactive channel (channel 3 or 4).
O'
"O
L'_
Change pay cableTV channelswiththe decoderbox.
=
C_
=
€ID
To control your cable converter box with the supplied
Remote Commander
See p. 68.
Chapter 3: Using Advanced Features
139
WatchingTwoPicturesat Once(PIP)
Follow these instructions to change the position of the
window picture on the screen.
Remote Commander
p_
Use the FREEZE function to display a still picture. This
function is useful when you want to write down a recipe from
a cooking program, a displayed address or phone number
and so on.
Remote Commander
r-
MUTING
SLEEP POWER
r--1
CH+
r-1 r--1
FREEZEW/VIDEO SWAP
MUTING
PIP
SLEEP POWER
r-1 r--1
El r-_ El m--ilm
CH-
r_
PO_llON AUDIO
OFF
FREEZEWNI0EO SWAP
CH--
POSi110NAUDIO
PIP
mn m-1r--=
000
1
CH+
F--Irl
OFF
El
Press PIP to display a window picture.
VIDEO 1
PiP
1
Press PIP to display a window picture.
PIP
Each time
you press POSITION,
Press
POSITION.
as illustrated.
the window picture moves
Thewindow
pictureimage remainsstillon the screen.
Press
FREEZE.
POSITION
FREEZE
To restore the normal picture
Press FREEZE again.
0
I Chapter 3: Using Advanced Features
Followthese instructionsto swapthe inputsignalsof the
mainand windowpictures.
Remote Commander
MUTING
CH+
_
CH--
FREEZEW/VIDEO SWAP
r--I CI !
POSITIONAUDIO
PiP
B
OFF
r--1 r--i r--i
1
Press PIP to display a window picture.
6
PIP
Each
you press SWAP, the images from the main and
Press time
SWAP.
window pictures switch places.
w
0
"I0
CA
=
0
A
Adjusting
theProjection
TV
You can adjust the'picture and sound for each input mode
('I'V, VIDEO 1, VIDEO 2, VIDEO 3) by pressing TVNIDEO
on the projection TV or on the Remote Commander to select
the input mode, before making the adjustments. These
adjustments are retained in memory even when you turn off
the projection TV, but are cancelled after you change the
adjustments, or select a picture and sound mode (pp. 36 37).
Press
RETURN.
The VIDEO
screenappears.
FmVi EO
_eZ_TuREm]nmm_lammm,_
/
|
l
|
/
'
_ _.",',1"_
COLOR IIIIIIIIIIH.,....!!;,!
BRIGHT
Ililil]ltllllNl',,,!','!,.!_",
SHARP !lHIItll]WII].,,,.","i':
TRIN ITONE : LOW
I
, NB_OF_ ....
Follow these instructions to adjust PICTURE, HUE, COLOR,
BRIGHT (brightness) and SHARP (sharpness).
Remote Commander
(with video control cover open)
A/V WINDOW
CH
Press
ANwant
WINDOW
+4- until the cursor points to the
item you
to adjust.
VOL
MENU
Press
The adjustment
RETURN.
screen appears.
VTRt-2-3
TV/VTR
MDP
TV CABLE BO>
CODE SET
r-i
STANDARD
Press AN WINDOW
Pressmain
MENU.
The
menu appears, and the cursor points to _PROG
PALETTE. _
Picture
bI'71PROG PALETTE
I_HODE SET
(DT]HE
E_SET UP _
ITIENGLISH
I_'ICONVERGENCE
SELECT_
RET.IIII
+/-
Press AN WINDOW
to make the adjustment.
-
Press AN WINDOW +
qu=_
PI_RE
For decreased picture
contrast with soft color
For increased picture
with vivid color
Skin tones become
Skin tones become
purplish
greenish
For less color intensity
For more color intensity
For less brightness
For more brightness
For less sharpness
For more sharpness
[_t|'lr _
_jG_
Press
RETURN.
The programpalette
menuappears.
Press
The adjustment
RETURN.is complete, and the VIDEO screen
automatically reappears.
I
I
]
]
"VIDEO."
Press AN WINDOW +/- until the cursor points to
42 1
Chapter 3: Using Advanced Features
_;;_HUE
__ _:" I._"_
_':_.....
,_
:,;;SXA_e_!D_II_
/'_TR!NITONE:LON
,_::,
_i _
To adjust other itenls
Repeat steps-5- 8.
"
To restore the factory settings for all the items
Select "STANDARD" on the program palette menu, and
press RETURN;
or, press STANDARD on the Remote Commander.
Allthe items, includingTRINITONE (p. 44) and NR (p. 45) returnto
theiroriginalfactorysettings.
To adjust picture contrast
You can also adjust picture contrast with the PICTURE +/buttons on the Remote Commander.
Press+ to increasepicturecontrast with vividcolor.
Press- to decrease picturecontrast with softcolor.
Thepictureadjustment
screenappears.
To return to the previous menu
PressA/V WINDOW +/- untilthe cursorpointsto
" ;_ MENU."
Then press RETURN.
To return to the main menu
Repeat the above, until you reach the main menu.
To return to the normal screen
Press MENU.
:=.
=:
5"
€11
€I1
5"
::1
Chapter 3: Using Advanced Features
I
43
Adjustingthe ProjectionTV
Color picture tubes are usually manufactured with a fixed
color temperature (tint) that determines the "warmth" (red
tint) or =coolness" (blue tint) of the picture. Use the Sony
Trinitone feature to adjust the picture color to your
preference.
Press
RETURN.
The VIDEO
screen appears.
Remote Commander
JUMP
D_Y(_)
ENTER
I--I
AN WINDOW
CH
VOL
Press AN WINDOW +/- until the cursor points to
"I'RINITONE."
VTR1-2-3
MDP
TV CABLEBOX
Press
The
mode
RETURN.
displaytums red.
The main
Press
MENU.
menu appears, and the cursor points to "PROG
PALETTE."
Press AN WINDOW +/- to select "HIGH" or =LOW."
• I-#IPROG PALETTE
IE4HODE
SET
_TIME
I_]SET UP
mENGLISH
I_'ICONVERGENCE
_L[CT_
R(TORI
Select =HIGH" to make the picture cool (bluish).
Select =LOW" to make the picture warm (reddish).
Press
RETURN.
Thesettingis
complete.
[XIT_
Press
RETURN.
The
programpalette
menuappears.
G_
• BSTANDARD
mHOVIE
mSPORTS
mNEWS
VIDEO
AUDIO
_MENU
To return to the previous menu
Press AN WINDOW +/- until the cursor points to
" _ MENU."
Then press RETURN.
To return to the main menu
Repeat the above, until you reach the main menu.
To return to the normal screen
PressMENU.
"VIDEO."
Press AN WINDOW +/- until the cursor points to "
44 [ Chapter
3: Using Advanced Features
Follow these instructions to reduce picture noise.
"NR."
Press AN WINDOW +/- until the cursor points to
Remote Commander
• PI CTURE']l_i_illilllliUlt'
i
HUE
...............
I...............
COLOR litll_lllll(I(l(
............
",
BRIGHT Illlltlllllll(t(
............
;;,,
SHARP glmlifl"""",'"_
TRINITONE:LOW
JUMP
D_Y(_
ENTER
r-_
/VV WINDOW
CH
VOL
MENU
RETURN
L_
VTR1-2-3
MDP
"rv CABLE(30)
Press
RETURN.
Themodedisplayturnsred.
Press
The main
MENU.
menu appears, and the cursor points to "PROG
PALETTE."
Press A/V WINDOW +/- to select "ON" or =OFF."
Select "ON" to reduce picture noise.
Select "OFF" to restore the normal picture.
Press
The
settingis
RETURN.
complete.
Press RETURN.
Theprogrampalette
menuappears.
To return to the previous menu
Press A/V WINDOW +/- until the cursor points to
" _ MENU."
Then press RETURN.
To return to the main menu
Repeat the above, untilyou reachthe main menu.
To return to the normal screen
Press MENU.
Press A/V WINDOW +/- untilthe cursorpointsto
"VIDEO."
O
Press
The VIDEO
RETURN.
screen appears.
P
E
Chapter3: UsingAdvancedFeatures ( 45
Adjustingthe ProjectionTV
Follow these instructions to set S-VIDEO on or off,
depending on the kind of video equipment you have
connected to the projection TV. For instructions on
connecting video equipment, see pp. 15 - 18.
Note
If the projection TV is in TV, VIDEO 2 or VIDEO 3 mode, the
Press
The
modedisplaytums
RETURN.
red.
PressAN WINDOW +/- to select"ON"or "OFF."
=S-VIDEO" display is shaded and cannot be selected.
Press TV/VIDEO on the projection TV or on the Remote
Commander to change to VIDEO 1 mode.
Remote Commander
JUMP
D_Y(_
Press
Thesettingiscomplete.
RETURN.
ENTER
AN WINDOW
CH
VOL
MENU
VTR1-2-3
MDP
W CABLEBO:,
m
To return to the previous menu
Press AN WINDOW +/- until the cursor points to
= ;) MENU."
Then press RETURN.
To return to the main menu
Repeat the above, until you reach the main menu.
Press
MENU.
Themainmenuappears.
Press AN
"MODE
SET."
WINDOW +/- until the cursor points to
Press
RETURN.
The mode
set menu appears, with the cursor pointing to "SVIDEO."-
46 1
Chapter3:
Using Advanced Features
To return to the normal screen
PressMENU.
Follow these instructions to adjust the TREBLE, BASS and
BALANCE.
PressRETURN.
The adjustment screen
appears.
', AUOIO
Remote Commender (with video control cover open)
NV WINDOW
CH
; i!iiii!
¸ i
;" k;
;
VOL
REII_N
;
VTR1-2-3
MDP
fc,
TV CABLEBO)
mr -n
TVNTR
BASS
:
;
It Hillit i111111111_
"""
."7
,-
m
CODE SET
Q
Press AN
STANDARD
WINDOW
+/- to make the adjustment.
_4
Sound
Press AN WINDOW -
Press AN WINDOW +
To decrease the treble
To increase the treble
response
response
To decrease the bass
To increase the bass
response
response
To emphasize the left
speaker's volume
To emphasize the right
speaker's volume
quality
TREBLE
Press
MENU.
The
main
menu appears, and the cursor points to "PROG
PALETTE."
BASS
BALANCE
,I-_PROG PALETTE
I_HODE SET
_TIHE
I_SET UP
mENGLISH
seLect_ _etut. elites)
Press
The adjustment
RETURN. is complete, and the AUDIO screen
automatically reappears.
rTIAUDIO
TREBLE illlllitltllltll...,..,...
,BASS
IHitlIlIIIIIIIIItlItlI,,,."
BALANCE",",''"'1"""' """
iSRS AUTO
mSRS STEREO
mSRS OFF
Press RETURN.
Theprogram
palette menuappears.
121
,1STANDARD
1HOVIE
mSPORTS
mNEHS
VIDEO
AUDIO
_HENU
"AUDIO."
PressNVWlNDOW+/-untilthe
cursor pointsto
To adjust other items
Repeat steps 5 - 9.
To restore the factory settings for all the Items
Select "STANDARD" on the program palette menu, and
press RETURN; or, press STANDARD on the Remote
Commander.
Allthe items, includingSRS mode(p. 48) returnto theiroriginal
factorysettings.
i
Press
RETURN.
TheAUDIO
screenappears.
FJqAUDIO
"TREBLE IIIIIIIItMII
...............
BASS
IIIIIIIit111t111
................
BALANCE..............
I ..............
ISRS AUTO
=SRS STEREO
=SRS OFF
To return to the previous menu
Press AN WINDOW +/- until the cursor points to,
" _ MENU."
Then press RETURN.
SELiCt_
Repeat the above, until you reach the main menu.
H_n
l=lt_)
i
To return to the main menu
To return to the normal screen
Press MENU.
PressAN WINDOW +/- untilthe cursorpointsto the
.._
youwant to adjust.
C ,e,3:O.i°0
I 47
Adjusting the Projection TV
For lifelike sound reproduction, follow the instructions below
to select the SRS mode you prefer.
_AUDIO."
Press AN WINDOW +/- until the cursor points to
In SRS AUTO mode, SRS functions in both monaural and
stereo modes.
Monaural sound programs will have a 'simulated stereo'
effect.
In SRS STEREO mode, SRS functions only when a stereo
program is received.
The STEREO lampon the TV lightsup whenever a stereo
broadcastis received.
Press
TheAUDIO
RETURN.
screenappears.
Select SRS OFF mode to retum to normal sound mode.
Remote Commander
JUMP
D_Y(_
r--1
ENTER
AN WINDOW
CH
VOL
SRS
Pressmode
AN WINDOW
you want. +/- until the cursor points to the
MENU
RETURN
VTR1-2-3
MOP
1_ CABLEBO)
Press
The
modeis
RETURN.
selected.
1
Press MENU.
Themain menuappears,and the cursorpoints to "PROG
PALETTE."
,, PROG
IZT'dMO
DE SET
_TIME
,
To change the SRS mode
Repeat steps 5 - 6.
To return to the previous menu
Press AN WINDOW +/- until the cursor points to
= _ MENU."
Then press RETURN.
To return to the main menu
Repeat the above, until you reach the main rnenu.
Press RETURN.
Theprogram
palette menuappears.
8
I Chaptei" 3: Using Advanced Features
To return to the normal screen
Press MENU.
PressAN WINDOW +/- untilthe cursorpointsto
=MTS."
Follow these instructions to select an MTS mode.
Select MAIN mode to listen to stereo sound.
The STEREO lampon theprojectionTV lightsup whenever a
stereobroadcastis received.
Select SAP mode to listen to Second Audio Programs.
The modedisplayturnsred.
Press
RETURN.
Select MONO mode to eliminate excessive noise during
stereo broadcasts, caused by a weak incoming signal.
Note
If the projectionTV is in video mode,the "MTS" displayis shaded
andcannotbe selected.
PressTVNIDEO on the projectionTV or on the Remote
Commandertochange to TV mode.
Each time
Press
A/V you
WINDOW
press AN+/-WINDOW
to select+/-,the"MAIN,"
mode "SAP"
you want.
and
=MONO" appear in sequence.
Remote Commander
r7
D_Y@
r7
ENTER
AN WINDOW
Themodeis
selected.
Press
RETURN.
JUMP
GH
VOL
MENU
RETURN
L_
VTR1-2-3
MDP
To retum to the previous menu
Press AN WINDOW +/- until the cursor points to
" _ MENU."
TV CABLEBO)
Then press RETURN.
To return to the main menu
Repeat the above, until you reach the main menu.
To return to the normal screen
Press MENU.
Press
MENU.
The
main
menuappears.
Press AN WINDOW +/- until the cursor points to
"MODE SET."
Press RETURN.
p
The mode set menuapp_rars,
o
i
7
_ _ ._
_,m;_
_:_.'_ ,i
ZN I
Chapter 3: Using Advanced Features
t 49
Adjustingthe ProjectionTV
Follow these instructions to set SPEAKER to "CENTER"
Press
RETURN.
Themodedisplayturnsred.
when you connect an audio system (p.19), and to "MAIN"
when you want to listen to the sound from the projection TV
speakers.
=CENTER."
PressNVWINDOW
Remote Commander
+/-toselect"MAIN"or
JUMP
D_Y(_
r--1
ENTER
AN WINDOW
OH
VOL
MENU
_N
PICTURE
Press
Thesettingis
RETURN.
complete.
VTR1-2-3
MDP
TV CABtE BOX
P
To return to the previous menu
Press AN WINDOW +/- until the cursor points to
" ;:) MENU."
Then press RETURN.
Press
MENU.
Themain
menuappears.
To return to the main menu
,[_IPROG PALETTE
IIT;IMODE
SET
_TIME
I_]SET UP
mENGLISH
I'_-ICONVERGENCE
S(LECT _
_t_.
EXII(_
Press AN
WINDOW +/- until the cursor points to
"MODE
SET."
Press
RETURN.
The
modeset
menuappears.
[]
,S-VIDEO
MTS
SPEAKER
_MENU
PressNVWlND(3ggV+_
"SPEAKER."
50
untilthecursorpointsto
I Chapter 3: Using Advanced-Features
:OFF
:MAIN
:MAIN
Repeat the above, until you reach the main menu.
To return to the normal screen
Press MENU.
Customizing
theScreenDisplay
Press
TheCHRETURN.
CAPTION screenappears.
Follow these instructions to caption each channel number
display with a name, for instance, the television station call
letters. (You can set up to four letters or numbers).
Example: Caption channel 15 as "NBC."
Remote Commander
000
®0@
®®®
channel
Press CH=15."
+/-, or press 1, 5 and ENTER to set
JUMP
r--1
....
_)
_i:_
A/V WINDOW
CH
i _ _i!_
i_ •
i_ i _ ii
,_
VOL
Use [0- 9]+[ENTER]
Lo select the char_nel_
r=-i
]
Press MENU.
Themain
menuappears.
Press
RETURN.
The firstcaptionspace
turnsred.
I*[Z)PROG_PALETTE
[Z_IHODE
; SET
mENGt]SH
I-'_CONVERGENC
E
8
Press A/V WINDOW
+/- to select "N."
Each time you press A/V WINDOW +/-, "0"- =9," "A'-
"Z,"
=&," _/," "-" and =_" (.blankspace) appear in sequence.
_H
CAPTION
=SET
Press UP."
A/V WINDOW +/- until the cursor points to
Thesetupmenu
Press
RETURN.appears.
--
_b
i
I_CABLE: ON
AUTO PROGRAH
CH ERASEIADD
CH CAPTZON
VIDEO LABEL
DIRECT PLAY
FAVOR[ TE CHAN NEL
; _HENU
Press
The secondcaption
RETURN. spacetums red.
N_
m-.,_
(Continued)
Press
WINDOW +/- until the cursor points
to
=CHA/V
CAPTION."
Chapter 3: Using Advanced Features
] 51
_E
Customizingthe ScreenDisplay
4
Press AN WINDOW +/- to select a blank space.
Remote Commander
JUMP
AN WINDOW
CH
VOL
="=HH
mLW
PICTURE
VTR1-2-3
MDP
mr_n
10
15
TV CABLEBOX
m
Press RETURN.
The setting is complete.
When you select or display the channel number, the
channel caption also appears.
Press AN WINDOW +/- to select "B."
15
To caption more channels
Repeat steps 6 - 15,
To erase unnecessary captions
Display the CH CAPTION screen, select the channel with
the caption you want to erase, and select blank spaces for
the channel caption; then press RETURN.
The caption forthatchannelis erased.
11
12
Press RETURN.
The thirdcaptionspace turnsred.
To return to the previous menu
Press AN WINDOW +/- until the cursor points to
" _ MENU."
Then press RETURN.
To return to the main menu
Repeat the above, until you reach the main menu.
Press AN WINDOW +/- to select "C."
To return to the normal screen
Press MENU.
Note
You can set up to 32 channel captions. If the memory is full,
"The memory is full, sorry" appears on the screen. Erase any
unnecessary captions, and begin again.
13 Pre RETU""
Thefourthcapff_ space turnsred.
52 1
Chapter 3: Using Advanced Features
Press
The VIDEO
RETURN.
LABELscreenappears.
Followtheseinstructionsto labeleach inputmode, in order
to identifythe equipmentconnectedto each inputterminal.
Example: Label VIDEO 1 IN as =VHS."
Remote Commander
JUMP
AN WINDOW
CH
VOL
Pressmode
AN WINDOW
+/- label.
until the
points
the
input
you want to
(In cursor
this case,
the to
cursor
is already pointing to =VIDEO 1.")
VTR1-2-3
MDP
TV CABLEBOX
Press
The labeldisplayturnsred.
RETURN.
Press
MENU. appears.
Themainmenu
8
Press AN WINDOW +/- to select =VHS."
"-_VIDEO
LABEL
VIDE01: VHS
VIDEO2: VIDEO 2
VIDE03: VIDEO 3
•
_ SELECTV'_
RETURI4
EXH
Each timeyoupressA/V WINDOW +/-, the labelchanges:
VIDEO 1
VIDEO 1_ BETA _ 8mm--_ VHS _ LD _ S-VIDEO --=
=SET
PressUP."
AN WINDOW +/- until the cursor points to
/
VIDEO 2
VIDEO 2--I_ BETA --b. 8mm_
VHS_
LD "--I
!
VIDEO 3
VIDEO 3---I_ BETA _8mm
Press
The
setRETURN.
up menuappears.
_VHS---I_LD
-_
!
The setting
Press
RETURN.
is complete.
When you select or display the video mode, the video label
appears.
To label other input modes
Repeat steps 6 - 9.
Q
To change a label
Same as above.
PressANLABEL."
WINDOW +/- untilthe-cursorpointsto
"VIDEO
O
Q
To return to the previous menu
Press AN WINDOW +/- until the cursor points to
= :;:) MENU."
Then press RETURN.
o
To retum to the main menu
Repeat the above, until you reach the main menu.
To retum to the normal screen
Press MENU.
Chapter 3: Using Advanced Features
I 53
UsingTimer-Activated
Functions
If you live in an area that uses daylight savings time, set
DAYLIGHT SAVING to "YES" or "NO" depending on the
season, before setting the current time. At the next daylight
savings date, you will be able to automatically adjust all the
time-related settings (CURRENT TIME, ON/OFF TIMER
and CHANNEL BLOCK) simply by changing the DAYLIGHT
SAVING setting.
When setting DAYLIGHT SAVING:
• After the first Sunday 5n April (spring daylight savings)
Set to "YES" before setting the current time.
Then, on the last Sunday in October (fall daylight
savings), set to =NO."
All the time-relatedsettingsautomaticallymove onehour back.
• After the last Sunday in October (fall daylight savings)
Set to "NO" before setting the current time.
Then, on the first Sunday in April (spring daylight
savings), set to =YES."
All the time-relatedsettingsautomaticallymoveone hourahead.
Press
Thetimemenuappears.
RETURN.
PressAN WINDOW +/- untilthe cursorpointsto
=DAYLIGHTSAVING."
Press
The modedisplayturnsred.
RETURN.
Remote Commander
JUMP
D_Y(_
ENTER
/VV WINDOW
CH
VOL
Press AN WINDOW +/- to select =YES" or =NO."
MENU
RETURN_n_tE
VTR1-2-3
MDP
TV CABLE BOX
r
Follow these instructions
"YES" or "NO."
Press
The
settingis
RETURN.
complete.
to set DAYLIGHT SAVING to
To return to the previous menu
Press AN WINDOW +/- until the cursor points to
= _ MENU."
Then press RETURN.
Press
MENU.
Themainmenuappears.
To return to the main menu
Repeat the above, until you reach the main menu.
mENGLISH
?I_"ICONV
ERGENC
E.....
Press AN WINDOW +/- until the cursor points to
"TIME."
4
Chapter 3: Using Advanced Features
To retum to the normal screen.
Press MENU.
Follow these instructions to set the current time. The
correct current time must be set in order to use the other
time-related functions (DAYLIGHT SAVING, ON/OFF
TIMER, CHANNEL BLOCK).
4
Press RETURN again.
The CURRENT TIME SET screenappears,witha reminder
toset DAYLIGHT SAVING.
Example: Set the time to 3:15 PM, Monday.
Remote Commander
JUMP
D_Y(_
ENTER
A/V WINDOW
CH
If you do not need to set DAYLIGHT SAVING, press
RETURN and continue from step 5.
VOL
To set daylight
V'FR1-2-3
MDP
a
TV CABLEBO>
m
b
saving
Press AN WINDOW +/- until the cursor points to
"DAYLIGHT SAVING."
Press RETURN.
The time menu appears, and the cursor points to
=DAYLIGHT SAVING."
Press
Themain
MENU.
menuappears.
,rTIPROG PALETTE
ImIMODE
SET
_TIME
I_SET UP
mENGLISH
[_]CONVERGENCE
SELECT
_
R[TUIM
[_]T_
C
Press RETURN.
d
Press AN WINDOW +/- tO select =YES" or "NO."
e
Press RETURN.
Thesetting is complete.
To set the time, press AN WINDOW +/- until the cursor
points to "CURRENT TIME SET"; press RETURN,
then continue from step 5.
PressAN WINDOW +/- until the cursor points to
"TIME."
Press
RETURN. TIME SET screen appears, and the "SUN"
The CURRENT
display appears (red).
Press
RETURN.
The timemenuappears,
andthe cursorpointsto "CURRENT
TIME SET."
Presstime
AN you
WINDOW
to select
Each
press AN+/-WINDOW
+/-,"MON."
the day changes
consecutively.
C
:l
.-.I
"CURRENT TIME SET
ON/OFF TIMER
-CHANNEL BLOCK
DAYLIGHT SAVING:NO
:;)MENU
€3
_D
€1.
-rl
=:
:l
n
(Con_nued)
Chapter 3: Using Advanced Features
J 55
UsingTimer-ActivatedFunctions
1
Press
Thecursor
RETURN.
pointsto "START."
Remote Commander
AN WINDOW
CH
VOL
2
!2E3
V'I'R1-2-3
MDP
the
clock.
Check
the actual time, and press RETURN to start
Thesettingis complete.
TV _BOX
To reset the Ume
Display the CURRENT TIME SET screen and repeat steps
5-12.
To display the current time
Press DISPLAY.
Press
Thehourandarn/pmdisplaysturnred.
RETURN.
Each time
Press
AN you
WINDOW
press A/V+/-WINDOW
to set =3:00PM."
+/-, the hour changes in
sequence beginning with "12:00AM. "
To retum to the previous menu
Press AN WINDOW +/- until the cursor points to
- _ MENU. _
Then press RETURN.
To return to the main menu
Repeat the above, until you reach the main menu.
To return to the normal screen.
Press MENU.
Press
The
minutedisplayturnsred.
RETURN.
10
Press AN WINDOW +/- to select =15" (minutes).
Each timeyoupress A/V WINDOW +/--, the minutes
change in sequence.
_.
56 [
Chapter 3: Using Advanced Feature_
-..
Followthese instructions
to make the program of your
choiceappearon the screenat a specifiedtime.
The ON/OFF
Press
RETURN.
TIMER screen appears, and the cursor points
to"l."
(_ON/OFFTIMER
Example: Set the timer to turn on the projection TV every
Monday through Friday at 1:30 AM for 3 hours,
on channel 8, as PROGRAM 1. (You can set up
to three programs.)
1"1.......
--:--AM H CH_._
2 .......
--:--AM H CH___
3 .......
--:--AM _H CH___
D
Select a program.
Remote Commander
SELECT
_
RETURN
EllT
JUMP
D_Y(_
F-1
ENTER
r'_
AN WINDOW
CH
VOL
To set
press
RETURN.
(To
set program
program 1,2 or
3, press
AN WINDOW +/- until
the cursor points to that program; then press
RETURN.)
Theday inputspace turnsred.
MENU
RETURN PICTURE
VTR1-2-3
MDP
TV CABLE BOX
Presspress
AN WINDOW
then
RETURN. +/- to select "EVERY MON-FRI";
Each time you press AN WINDOW +/-, the days of the week
change as shownin Fig. 1 (p. 59).
Press
MENU.
Themainmenuappears.
GON/OFF TIMER
1.EVERY MON-FRI
--:--AM .H CH...
1,171PROG PALETTE
[]MODE SET
GTIME
_]SET UP
ITIENGLISH
F_ICONVERGENCE
SEL_T
_
RETURN
EXIT
=TIME."
Press AN WINDOW +/- until the cursor points to
2 .......
--:--AM
_H CH...
3 .......
--:--AM H
CH___
Set the time.
$[LE{T_
RETUU=
EXIT_)
press RETURN.
Press
AN WINDOW +/- to select "1:00AM"; then
Each time you press AN WINDOW +/-, the hour changes in
sequence.
(_ON/OFFTIMER
I.EVERY MON-FRI
1:00AM H CH_._
2 .......
Press
The
timemenuappears.
RETURN.
®
1,CURRENT TIME SET
ON/OFF TIMER
CHANNEL BLOCK
DAYLIGHT SAVING:NO:>MENU
--:--AM _H CH___
3 .......
--:--AM .H CH._.
D
Set the time.
SELECT_
RETURN
==
m,
-1
--I
EXITed)
€ID
(Continued)
I-,
--i
Press AN TIMER."
"ON/OFF
WINDOW +/- until the cursor points to
0
GO
Chapter 3: Using Advanced Features
I
57
UsingTimer-ActivatedFunctions
11
Remote Commander
JUMP
D_Y(_
ENTER
AN WINDOW
CH
Press/VV WINDOW +/- to select "8" (channel);
then press RETURN.
The TIMER lamplights,indicatingthatthe se_ng is
complete.
Each time youpressAN WINDOW +/-, the channel
numberchangesfrom 1- 125in sequence.
VOL
MENU
VTR1-2-3
MDP
TV CABLE BOX
The display"TIMER WILLBE OFF" appearson the screenone
minutebefore the timerdurationends.
then
Presspress
A/V WINDOW
RETURN. +/- to select "30" (minutes);
Each timeyoupressAN WINDOW +/--, the minutes change
in sequence.
I
1. EYERYHON_FR[
:,_
2._._
To set program 2 or 3.
Press RETURN and repeat steps 6 - 11.
To erase an ON/OFF TIMER setting
Display the ON/OFF TIMER screen, select the setting you
want to erase, and select a blank space for the day.
The ON/OFF TIMER setting is erased.
To enter a new ON/OFF TIMER setting
Display the ON/OFF TIMER screen and repeat steps 6 - 11.
10
Press A/V WINDOW +/- to select =3" (hour
duration); then press RETURN.
Each timeyoupressAN WINDOW +/--,the duration
changesfrom"1" - "6"in sequence.
_N/OFF
TillER
1. EVERY HON_-FRI
:t:_AH
3H CH
2..'_ _._: -,
_:_:_ _AI4 .H CH__
To return to the previous menu
Press A/V WINDOW +/- until the cursor points to
" _ MENU."
Then press RETURN.
To return to the main menu
Repeat the above, until you reach the main menu.
To return to the normal screen.
Press MENU.
Note
Set. t.he channel.
58
I Chapter 3: Using Advanced Features
If you unplug the projection TV or a power failure occurs, both the
clock and timer settings will be erased. Reset the current time; then
set the timer.
Fig. 1
Selecting the day(s) of the week
When you press AN WINDOW +, the days of the week
appear in the following order:.
t
t
L
.,_I
e€I
.--4
3
m
.<
=I
o
€I
eA
Chapter 3: Using Advanced Features
I 59
UsingTimer-ActivatedFunctions
=
Follow these instructions to prevent a channel from
appearing on the screen during the time that you specify.
You can use this function to prevent children from watching
unsuitable programs.
Example:
Set CHANNEL BLOCK every Saturday at
4:30 PM for I hour, on Channel 12.
Press AN WINDOW
"CHANNEL
BLOCK." +/- until the cursor points to
Press
RETURN.BLOCK screen appears, and the cursor
The CHANNEL
points to the day input space.
Remote Commander
JUMP
D_Y(_
VTR1-2-3
r-i
ENTER
MDP
"Iv CABLEBOX
Press
RETURN.
Theday
inputspace turnsred.
Note
If you have not set the current time, the "CHANNEL BLOCK" display
is shaded and cannot be selected.
Press
The
main
MENU.
menuappears.
Press RETURN.
AN WINDOW +/- to select "EVERY SAT'; then
press
Each timeyoupressA/V WINDOW +/-, the daysof the week
changeas shownin Fig. 1(p. 59).
Press AN WINDOW +/- untilthe cursorpointsto
"TIME."
Press
Thetimemenu
RETURN.
appears.
60
I Chapter 3: Using Advanced Features
press RETURN.
Press
AN WINDOW +/- to select "4:00PM"; then
Each b'meyoupressA/V WINDOW +/-, the hourchangesin
sequence.
Press RETURN.
press
A/V WINDOW
+/- to select =:30" (minutes);
then
Each time you press A/V WINDOW +/--, the minutes change
in sequence.
GCHANNEL
To enter a new CHANNEL BLOCK setting
Display the CHANNEL BLOCK screen and repeat steps
4 - 10. (You can only set one CHANNEL BLOCK at a time.)
BLOCK
EVERY SAT
4:30PM _H CH.__
Set the duration.
mt_r#
.ram. mr_
10
To erase a CHANNEL BLOCK setting
Display the CHANNEL BLOCK screen and select a blank
space for the day.
The CHANNEL BLOCKsettingis erased.
To return to the previous menu
Press AN WINDOW +/- until the cursor points to
" _ MENU."
Then press RETURN.
To return to the main menu
Repeat the above, until you reach the main menu.
Press NV WINDOW +/- to select "1" (hour
duration); then press RETURN.
Each timeyoupressA/V WINDOW +/-, the duration
changesfrom"1"- "6" in sequence.
To return to the normal screen.
Press MENU.
Note
If the ON/OFF TIMER is set for an overlapping time (pp. 57 - 59),
the later time setting takes precedence. For example, it CHANNEL
BLOCK is set for 2:00 PM and ON/OFF TIMER is set for 3:00 PM,
ON/OFF TIMER will take effect at 3:00 PM.
11
Press AN
WINDOW
+/- to select "12" (channel);
then press RETURN.
The setting is comp/ete.
Each time you press AN WINDOW +/-, the channe/
number changes from "I "- "125" in sequence.
+/++ +_:_30PH:i1H++CH++12
++++++_++'++++++++]_+++++++++++++++++++:+
+ +++
+ +'+++++ +:_+++t++++
.=
At the specified time, "BLOCKED" appears in red on the screen,
and the picture of the specified channel is blocked and the sound is
muted.
B _KE
++
m
=l
--I
w
D ++:+
+!++++++
+
"11
c-
+++++
+ +5_'++;
+ +_+++++5
+++-:+_+_+_i
++ +'Y+++ :; +F+++ ;+
o
p+_+
;+;+
==
Chapter 3: Using Advanced Features
I
61
SettingFAVORITE
CHANNEL
By setting FAVOR'ITE CHANNEL, you can select the
channels you use most frequently (up to seven channels)
simply by pressing RETURN.
Press
RETURN. CHANNEL screen appears, and the cursor
The FAVORITE
points to the first channel position.
Remote Commander
_FAVORITE
CHANHEL_
II,.°_
TVMDEO
®®0
000
OOQ
C23
Set. the
POSltton to
_tnput the
channel.
--"----
ENTER
Press/VV then
WINDOW
+/- to select the channel
position;
press RETURN.
AN WINDOW
CH
VOL
r-=-i
7
Press 0 - 9 and ENTER to set the channel number.
FAVORITECHANNEL
.........
: 28
Follow these instructions to set the channels.
Press
MENU.
The
mainmenuappears.
The
settingis
complete.
Press
RETURN.
Press UP."
_SET
A/V WINDOW +/- until the cursor points to
To set other channels
Repeat steps 6 - 8.
Press RETURN.
Theset
up menuappears.
To erase a favorite channel setting
Press AN WINDOW +/- until the cursor points to the
channel number you want to erase; then press RETURN,
press 0 and ENTER.
1
To reset a favorite channel setting
Display the FAVORITE CHANNEL screen and repeat steps
6-8.
To return to the previous menu
Press AN WINDOW +/- until the cursorpoints to
= _ MENU."
Then press RETURN.
Press AN WINDOW
=FAVORITE
CHANNEL."
+/- until the cursor points to
To return to the main menu
Repeat the above, until you reach the main menu.
To retum to the normal screen.
Press MENU.
62 1Chapter3: UsingAdvancedFeatures
Selectinga favoritechannel
Aftersetting
thechannels,
followtheseinstructions
toselect
thechannel
youwanttowatch.
Press
RETURN.CHANNEL displayappears.
The
FAVORITE
Note
If you have set channel captions (pp. 51 - 52), the captions appear
with the channel numbers.
Pressto,aJVWINDOW
+/- toRETURN.
select the channel you
want
watch; then press
The channelis selected.
If you press RETURN on the Remote Commander before
setting FAVORITE CHANNEL, this screen appears.
Follow steps 1 - 8 to set your favorite channels, and then
make the selection.
O_
=_
"11
o
-I
m
€=j
Z
Z
rn
r-
Chapter 3: Using Advanced Features
I 63
UsingthePre-Programmed
RemoteCommander
You can operate other video equipment (such _s VCRs,
video disc-players and cable boxes) that have an infrared
remote detector with this supplied Remote Commander.
Follow these instructions to operate Sony video cassette
recorders (Beta, 8 mm and VHS) and video disc players
(including multi-disc players).
Remote Commander
(with video control cover open)
CH+
To turn on or off
Press POWER.
To change channels
(when watching TV
programs through the
VCR's tuner)
Press CH +/-.
To record
Press • and REC
FREEZEWMDE0
simultaneously.
C21r-! C21
CH-
To play
Press I_.
To stop
Press I1.
To fast forward
Press IH_.
To rewind the tape
Press <141.
To pause
Press I1.
To resume normalplayback,
pressagain;
To search the picture
forward and backward
Keep pressing _
or
during playback.
Toresume normalplayback,
re/easethe button.
To change input mode
Press TVNTR.
Posm0N
cZl
r---i
0©®
®®®
®®®
JUMP
AN WINDOW
CH
VOL
Ig=FIFI
PK;I_E
r=!
VTR1-2-3
MDP
TVNTR
1_/ CABLE BO>
CODE SET
_
STANDARD
Q
Set
the VTR1-2-3
MDP
selector according to the video
equipment
you want
to operate.
VTR1-2-3
MDP
Fig. 2: Video equipment settings
B_a, EDB_aVCR
VTR 1
8 mm VCR
V'I-R 2
VHSVCR
VTR 3
Video discplayer
4
Use the video
operating buttons to control the
connected
equipment.
Chapter 3: Using Advanced Features
MDP
lr'rlmmmllm
To rum on or off
Press POWER.
To play
To stop
Press I_.
To pause
Press II.
To resumenormalplayback,
pressagain.
Note
Thisfunctionis effectiveonlyfor
CAV (standard-playdisc).WithCLV
(extended-playdisc),the projection"IV
goesoff(standbymode)if youpressII.
To search the
picture forward
and backward
Keep pressing _
or <I<I
during playback.
To resumenormalplayback,
release the button.
Press II.
Notes
• If the video equipment does not have a certain function, the
corresponding button on this Remote Commander will not
operate.
• If you set another manufacturer's code to a VTR1-2-3 MDP
selector position (pp. 66 - 67), you must also set the Sony code
to operate Sony equipment.
Caution
When you replace the batteries,do so withinapproximately
30 minutes.Otherwisethe settings youmade underthe
Pre-Programmedfunction (pp. 66 - 68) may be erased.
e:l
::T
"O
3
O
II.
:o
m
3
o.
Q
O
m
-!
a.
Chapter 3: Using Advanced Features
I 65
Usingthe Pre-ProgrammedRemoteCommander
Follow these instructions to set the manufacturer's code,
which will enable you to operate non-Sony and Sony video
equipment with the pre-programmed Remote Commander.
Example:
Operate an RCA video cassette recorder
connected to the VIDEO 2 IN jacks.
While
pressing
SET,
0, 7 and ENTER
set RCA's
code CODE
number.
(Forpress
manufacturer
code to
numbers, see Figs. 5, 6 and 7 on p. 67.)
CODE SET
Remote Commander
(with video control cover open)
CH+
FREEZEWNIOE0 SWAP
PiP
r--t r-1 [-1 r_ r-1
CH-
IK)sm0N AUDIO
OFF
El r--! r-1
W/VIDE0
@0@
®@®
JUMP
r---i
/VV WINDOW
CH
VOL
F!: =HH
PICTURE
VTR1-2-3
TVNTR
MDP
CODE SET
_
1
"IV CABLE BO:<
STANDARD
Q
r-l
Set the V'I'R1-2-3 MDP selector to V'rR2.
VTR1-2-3
_
MDP
v
Note
To use another manufact"_er's equipment besides a Sony VCR, set
the selector to a position not being used for your Sony video
equipment.
6
Chapter 3: Using Advanced Features
Use the video
operating(see
buttons
toon
operate
the
connected
equipment.
Fig. 3
p. 64 and
Fig. 4 on p. 65.)
Fig. 5: VCR manuf_turer
Rg. 7: Sony Equipment and Code Numbers
code numbers
SONY
01, 02, 03
Beta, ED Beta VCR
01
CANON
05
8 mm VCR
02
EMERSON
22, 30, 33
VHS VCR
03
FISHER
10, 11, 12, 15
Video disc player
04
FUNAI
29
GENERAL ELECTRIC
05, 08
GOLDSTAR
25
HITACHI
07, 08, 36
JVC
16, 35
MAGNAVOX
05, 06, 09
MITSUBISHI
18, 19, 26, 27-
MULTITECH
29
NEC
16, 23, 31
PANASONIC
05, 06
PHILCO
05, 06
PHILIPS
05, 08, 09
QUASAR
05, 08
RCA
07, 08
SAMSUNG
24, 32
SANYO
11, 15
SCO'I-r
21
SHARP
13, 14
SHINTOM
34
SYLVANIA
05, 06, 09
SYMPHONIC
29
TEKNIKA
28, 29
TOSHIBA
20, 21
TOTE VISION
25
ZENITH
17
Fig. 6: MDP manufacturer
Note
In some rare cases, you may not be able to operate your non-Sony
video equipment with the supplied Remote Commander. This is
because your equipment may use a code that is not provided with
this Remote Commander. In this case, please use the equipment's
own remote control unit.
For your convenience
Write the manufacturer
name and code number for
your equipment onto one of
BRAND
1
the supplied self-adhesive
labels and affix the label to
the Remote Commander for
easy reference.
CODE"
2
3
•
code numbers
04
KENWOOD
58
MAGNAVOX
52
MARANZ
,
C
=1
54
MITSUBISHI
51
PANASONIC
55
--Z
"
?
"D
I1€1
PHILIPS
52
PIONEER
51
RCA
51
SANYO
57
SHARP
58
YAMAHA
53
O
Ira.
o
Q
O
3
B
W
=l
=l,
Chapter 3: Usil_g Advanced Features
67
Usingthe Pre-ProgrammedRemoteCommander
Follow these instructions to set the manufacturer's code,
which will enable you to operate a connected cable
converter box with the pre-programmed Remote
Commander.
While
pressing CODE
SET,
press
6 and 8 (Zenith's
code number-see Fig.
5) and
ENTER.
CODESET
-t-
Example: Operate a connected Zenith cable converter box.
Remote Commander
(with video control cover open)
MUTING
SLEEP POWER
rn
CH+
EI_
FREEZETVN1DE0 SWAP
r--] El
PIP
r--I r--i r--]
CH-
POSITIONAUDIO
1221
Usethe and
projection
TVtocontrolbuttons(POWER,
0 - 9,
ENTER
CH +/-)
operatethe cable converter
box.
OFF
r--i IZI r-]
®®®
®@®
POWER
@®®
®®®
®®®
°
®g
®®®
_
NV
CH
r--!
WINDOW
CH
VOL
To return to the normal screen
Set the W/CABLE BOX selector to TV; then use the
projection -rv control buttons to control the projection "IV.
PICTURE
r=-i
VTR1-2-3_MDP
For more details on operating the cable box
Refer to the operating instructions that come with the
cable box.
_BOX
Fig. 8: Cable box manufacturer code numbers
TVNTR
CODE SET
r-l
1
Q
STANDARD
!-7
Set the TV/CABLE BOX selector to CABLE BOX.
TV
CABLE
BOX
Notes
• If morethan onecode numberis listed,tryenteringthem one by
one, untilyoucome to the correctcodefor yourequipment.
• If youentera new code number,the code numberyoupreviously
enteredat that settingis erased.
• In some rare cases, yourequipmentmay usea codethat is not
providedwiththisRemoteCommanderand youmay notbe able
to operateyourcable converterboxwiththe suppliedRemote
Commander.In thiscase, usethe equipment'sown remote
controlunit.
68 1
Chapter 3: Using Advanced Features
MANUFACTURER
CODE
JERROLD
60, 61,62, 63, 64, 65
PIONEER
69, 70
SCIENTIFIC ATLANTA
66, 67
TOCOM
71, 72
ZENITH
68
[_r'_llii.i
_.1 L7_o];4
into].[--]
-D]l-'i_e,Ii I_W_41:
[.il|--loll|_-
Press AN PLAY."
"DIRECT
WINDOW +/- until the cursor points to
Follow these instructions to switch from TV to VCR mode by
simply pressing the I_ (playback) button on the supplied
Remote Commander.
Example:
Connect your VCR to the VIDEO 2 IN jacks, and
set the VTR1-2-3 MDP selector to VTR2. When
Press
RETURN.
A
messagescreenappears.
you press I_, the input mode changes to the
VCR connected to the VIDEO 2 IN jacks.
LAY
After completingthe stepsbelow, the VTR selectorpositionis
retainedin the projectionTV's memory.
Remote Commander (with video control cover open)
AN WINOOW
CH
VOL
Note
L_.IL
r-'l
VTR1-2-3
TVNTR
MDP
TV CABLEBOX
CODE SET
r-!
STANDARD
n
This screen reminds you to
set the manufacturer's code, if you
have not already done so (pp. 66 - 67).
Press
The
DIRECT
RETURN
PLAYagain.
screenappears.
_/_DIRECT
PLAY
_VIDEOI: VTR 1
VIDE02: OFF
VIDE03: OFF
VT_P
SELECT_
RETUN
(XJTI_
Press
Themain
MENU.
menuappears.
Press
AN WINDOW
+/- until
the cursor
pointsis
to the
video input
mode. (When
the video
equipment
connected to VIDEO 1 IN, select =VIDEO1 .")
Press
The modedisplaytums
RETURN.
red.
PressAN
=SET
UP."WINDOW +/- untilthe cursorpointsto
e€I
ee,
"0
(Continued)
Press
ThesetRETURN.
up menuappears.
"0
D
=l
o
0
=i
o
m
O
3
w
Chapter 3: Using Advanced Features
[ 69
Usingthe Pre-ProgrammedRemoteCommander
Remote Commander
JUMP
AN WINDOW
CH
VOL
/R-=HH
MENU
RETURN PICTURE
VTR1-2-3
MDP
TV CABLE BO_
Press you
AN have
WINDOW
select the
V'I'R selector
mode
set on+/-thetoRemote
Commander.
(When the VTR1-2-3 MDP selector is set to VTR2,
select =VTR 2.")
Each timeyoupressA/V WINDOW +/--, "VTR 1,""VTR2,"
"VTR3," "MDP"and "OFF"appearin sequence.
0
Press
RETURN.
Thedirectplay
setting is complete.
To set direct play for other connected video equipment
Repeat steps 7 - 10.
To return to the previous menu
Press AN WINDOW +/- until the cursor points to
= _ MENU,"
Then press RETURN.
To retum to the main menu
Repeat the above,untilyou reach the mainmenu.
To return to the normal screen.
Press MENU.
0
Chapter 3: Using Advanced Features
I
App_ndix
Troubleshooting
Disturbances in pictui:e and sound can often be elimihated by checking the symptoms and following the suggestions listed here.
If the problem still cannot be solved, contact your nearest service facility.
Possible causes and remedies
symptom
No picture (screen not lit), no sound
• Make sure POWER is switched on.
• Check the power cord connection.
• Check that the TVNIDEO and VTR1-2-3 MDP controls are set
correctly.
• Make sure that the TV/CABLE BOX selector is set to TV.
Poor or no picture (screen not lit), good sound
• Adjust the picture using the VIDEO screen (pp. 42 - 45).
• Check the antenna/cable connections.
• Adjust the color registration (pp. 24 - 25).
• Press VOLUME + on the projection TV or VOL + on the Remote
Commander.
• Press MUTING on the Remote Commander.
• Check the MTS setting (p. 49).
• Check that the TVNIDEO and VTR1-2-3 MDP controls are set
correctly.
• Make sure SPEAKER is set correctly (p. 50).
Good picture,no sound
No color for color programs
• Check the HUE and COLOR settings (pp. 42 - 43).
Snow and noise only
• Check that it is an active or correct channel.
• Check the cable setting.
• Check antenna/cable connections.
Dotted lines or stripes
This is often caused by local interference (for example, cars, neon
signs and hairdryers). Adjust the telescopic aerial for minimum
interference.
Doubleimagesor ghosts
Reflectionsfrom nearbymountainsor buildingsoftencause this
problem.Connectinga highlydirectionaloutdoorantennaor a
CATV cable may improvethe picture.
Remotecontroldoes not operate
• Checkthe batteryinthe RemoteCommander.
No pictureand/orsoundfor the
connected equipment
•..Checkthat the TVNIDEO buttonis set correctly.
• Checkthat the connectionsare propedymade.
• Checkthat the powerof the connected equipmentis turnedon.
• Checkthat the connectedequipmentisset correctly.
,-4
€:
Try another channel. It could be station trouble.
E
en
tA
0
=__.
:1
u:l
Specifications
Structure
""Screen and projactor, rear projection type
Projection system
3 picture tubes, 3 lenses, horizontal in-line
system
Picture tube
7 inch high-brightness monochrome
tubes (5.5 raster size), with optical coupling
and liquid cooling system
Projection lenses
High performance, large-diameter
hybrid lens F 1.0
Screen material
Plastic lenticular,
Plastic Fresnel
Resolution
KPR-41EXR95
760 lines
KPR-46EXR15
850 lines
KPR-53EXR15
900 lines
AUDIO (VAR) OUT
(phono jacks)
More than 900 mVrms (100%
modulation) at the maximum
volume setting (variable)
Impedance: 5 kilohms
AUDIO OUT
(phono jacks)
900 mVrms (100% modulation)
Impedance: 5 kilohms
Speaker
Two-way coaxial speaker system
Woofer 130 mm (5 inches) diameter
Twe_er 35 mm (1.4 inches) diameter
Speaker output
12 W x 2
CENTER SPEAKER input
16Q NORM. 30 W
Projected picture size (in inches, measured diagonally)
., ioi
Power requirements
Power consumption
Screen brightness (cd/rrF)
2,000
Dimension (w/h/d)
KPR-46EXR15
1,600
KPR-41EXR95
KPR-53EXR15
1,250
930x 1,185 x 505 mm
(36% x 46% x 20 inches)
72 kg
(158 Ib 12 oz)
KPR-46EXR15
1,029 x 1,287 x 543 mm
(40% x 50% x 211/=inches) j
9O kg
(198 Ib 7 oz)
1,164 x 1,336 x 651 mm
(457A x 52% x 25% inches)
92 kg
(202 Ib 13 oz)
American TV standards
Channel coverage
VHF: 2 - 13
UHF: 14 - 69
Cable TV: 1 - 125
Antenna
75 ohm extemal antenna
terminal for VHFAJHF
Input jacks
Video (phono jacks): 1 Vp-p, 75-ohms
unbalanced, sync negative
Audio (phono jacks):
500 mVrms (100% modulation)
Impedance: 47 kiiohms
VIDEO IN 2 and 3
Video (phono jacks): 1 Vp-p, 75-ohms
unbalanced, sync negative
Audio (phone jacks):
500 mVrms (100% modulation)
Impedance: 47 Idlohms
MONITOR OUT
S VIDEO MONITOR OUT
(4-pin mini DIN)
Y: 1 Vp-p, 75-ohms
'
unbalanced, sync negative
*_deo (phono jacks): 1 Vp-p, 75-ohms
unbalanced, sync negative
Audio Lobeno
jacks):500 mVrms
(10o%modulation)
Impedance: 10 kilohms
72
I APP
endix
KPR-53EXR15
Weight
Supplied accessories
Remote Commander RM-Y112 (1)
with 2 size AA (R6)
EVEREADY batteries
Optional accessories
U/V mixer EAC-66
VIDEO IN 1
S VIDEO IN (4-pin mini DIN)
Y: 1 Vp-p, 75-ohms unbalanced,
sync negative
C: 0.286 Vp-p (Burst signal)
75-ohms
Outputjacks
310 W (max.)
7 W (standby mode)
KPR-41EXR95
Television system
MAX 50 W
120 V AC, 60 Hz
Connecting cable
RKo74A
VMC-810S/820S
YC-15V/30V
VCR Tray SU-PJT1
Design and specifmations are subject to change without notice.
The CO) SoundRetrievalSystemis manufacturedby Sony
Corporationunderlicensefrom the HughesAircraft
Company,a subsidiaryof GM Hughes Electronics.It is
coveredby U.S. PatentNo. 4,748,669. Other U.S. and
foreign patentspending.
(Q) , SOUND RETRIEVAL SYSTEM an_:lSRS® are
trademarksof the HughesAircraftCompany,asubsidiary
of GM Hughes Electronics.
Index
Ix
r4
Adjustment
audio (balance, bass, treble) ............................... 47
picture (bright, color, hue, sharp) ........................ 42
AUDIO OUT jacks .....................................................
19
AUDIO (VAR) OUT jacks .......................................... 19
AUTO PROGRAM ............................................
28 - 29
AN WINDOW buttons ...................................... 21 - 33,
36 - 37, 42 - 63, 69 - 70
Cable TV channel chart ............................................
Cable converter box ..................................... 10, 39,
CABLE ON/OFF ...............................................
26 CENTER SPEAKER IN terminals ............................
CH CAPTION ...................................................
51 CH +/- buttons ..................................... 28 - 31, 34,
Channel
adding .........................................................
32 erasing ........................................................
30 presetting ....................................................
28 Connecting
antenna cable .............................................
13 audio system .......................................................
other equipment ..........................................
15 CONVERGENCE .............................................
24 -
27
68
27
19
52
51
_q_NR
B
r_
33
31
29
ENTER button ..................................
14
19
19
25
29, 51, 62, 66, 68
_=_ FAVORITE CHANNEL .....................................62 - 63
Front...........................................................................7
_]_
m
JUMP button.............................................................35
20 - 21
Rear ............................................................................
S-VIDEO ON/OFF ..............................................
15,
SLEEP button ...........................................................
SRS mode ................................................................
STEREO lamp ..................................................
48 SPEAKER ................................................................
STANDARD button ....................................... 37, 43,
DEMO button ............................................................
35
DIRECT PLAY ..................................................
69 - 70
DISPLAY button .......................................................
35
r'-.i
On-screen menus .............................................
45
PICTURE +/- buttons .............................................. 43
Picture and sound mode .................................. 36 - 37
Picture-in-Picture (PIP) .................................... 38 - 41
POWER button ........................................................
22
Pre-programmed Remote Commander ........... 64 - 70
_I
El
ON/OFF ..............................................................
m
9
46
35
48
49
50
47
Timeractivated functions
channel block .............................................. 60 current time set ........................................... 55 daylight saving ............................................ 54 on/off timer ..................................................
57 TIMER lamp .............................................................
TV/CABLE BOX selector ..........................................
TVNIDEO button ...................... 15- 18, 26, 28, 64,
Trinitone ...................................................................
61
56
55
58
56
68
66
44
VCR ........................ 15 - 18, 38 - 39, 54 - 67, 69 VHF/UHF antenna terminal ........................ 13- 16,
VIDEO 1, 2, 3 IN jacks ............................... 15- 18,
VIDEO LABEL ..........................................................
Video operating buttons ................................... 64 VOL +/- button ............................................. 19, 34,
VTR1-2-3 MDP selector .................................. 64 VIDEO 3 OUT jacks ...................................... ... 17-
70
39
39
53
66
35
67
18
MONITOR OUT jacks .......................................
17 - 18
MTS mode ................................................................
49
MUTING button ....................................................
35
=='=
N
xl73
ColorRear Hdeo Projector
KPR-41EXR95
Sony Corporation
Printed in USA
KPR-46EXR15
KPR-53EXR15