1
KD-30XS955
t KD-34XS955
i KD-36XS955
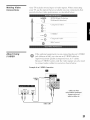
WARNING
_[b red_L_e the _ik ill fi_e o_ shock hazard,
rai_
or" t_oistu
do not expose
the TV to
re,
RiSK OF ELECTRIC
SHOCK
DO NOT OPEN
Use of thL_ television receiver for other than private viewing of
programs
broadcast on U HE or VHF or transmitted
by cable
companies
for the use of {he genera[ public may require
authorization
from the broadcaster/cable
company
and/or
program owner.
ATTENTION
RISQUE
DE CHOC ELECTRJQUE,
NE PAS OUVRIR
NOTIFICATION
PRECAUOION
RIESGO
CAUTION:
DE CHOOUE
ELECTRICO
NO ABRIR
TO REDUCE THE RISK OF ELECTRIC SHOCK,
DO NOT REMOVE COVER (OR BACK).
NO USER-SERVICEABLE PARTSINSIDE,
REFERSERVKJING TO QUAHFIED SERVICE PERSONNEL
This
symbol
presence
within
sufficient
electric
is intended
to alert
of uninsulated
the prod uct's
magnitude
shock
Note to CATV System Installer
-[his reminder is provided to call the ('A'fV system installer's
attention
to Article 820-40 of the National Electrical Code (NEC)
that provides guidehnes
for proper grounding
and, in partkulac
specifies that the cable ground shall he connected to [be grounding
system of the building, as close to the point of cane entry as
practical.
the user
"d mgerous
enclosure
to constitute
to the
\'o[tage"
that may
a risk
he of
of
This equipment
has been tested and {ound to comply with the
limits k_r a Class B digital device pursuant
to Part 15 of the FCC
Rules. These bruits are designed to provide reasonable
protection
against harmful
interference
in a residential
installation.
This
equipment
generates, uses, and can radiate radio _requency energy
and, if not installed and used in accordance
with the instructkms,
may cause harmful interference
with radio communications.
HoweveB there is no guarantee
that interference
will not occur i_ a
particular
installation.
If this equipment
does cause harmful
interference
to radio or television
reception, which can be
determined
by turning the equipment off and on, [he user is
encouraged
to try to corwct the interference
by one or more of the
follow\ i_g measures:
[]
[]
[]
Reorient or relocate the receiving antennas.
Incwase the separation
between the equipment
and n-ceiver.
Connect the equipment
into an outlet on a circuit different
from that to which the receiver is connected.
[]
Consuh the de.Jet or an experienced
radio/TV
technician for
help.
You are cautioned
that any changes or modifications
not
exp ress[y approw'd in this manual couk:[ void your authority
to operate this equipment.
to persons.
This symbol is intended to alert the user to the
presence of importan t opera ting and maintenance
(ser_ icing) k_structions in the [iterature
accompanying
the appliance.
Installing
CAUTION
[]
TO I?REV ENT ELECT/_dC SHOCK, MATCH
PLUG TO W:[DE SLO'f_ FU LLY INSERT.
WIDE BLADE OF
CAUTION
[]
When using TV games, computers,
and similar products with your
TV, keep the brightness
and contrast functions at low settings. [f a
fixed (non-moving)
pattern is left on the screen for long periods of
time at a high brightness
or contrast setting, the image can be
permanently
imprinted
onto the screen. Continuously
watching
the same program can cause the imprint of station Iogos onto the
TV screen. These types of imprints are not covered by your
v\arranty because they are the result of misuse.
Warning
(KD-34XS955
only)
The ('RT in this product empto?s a prote< tiw" film on the face. This
film must not be removed as it serves a safety function and
removal will increaae the risk of serious injury.
Note on Caption
Vision
This telexision recei _r pro ic'e displa? of tele%sion closed
captioning in accordance
_ith _15.119 of the FC(' rules.
Note
on Cleaning
[]
the TV
('lean the TV v_ith a soft, dr)_ cloth. Never use strong sob ents such
_s thinner or benzine, whkh might damage the finish of the
cabinet.
To prevent internal heat buildup, do not block the ventilation
openings.
Do not install the TV in a hot or [tumid place, or in a place
subiecf to excessive dust or mechanical vibration.
The A( pot\ er cord is attached
to the rear of the TV with
hooks. Do not attempt to remove the cord from these hooks.
Doing so could cause damage to the TV.
Owner's
Record
The model and serial numbers arc provided on the front of thi_
instruction
manual and at the rear of the TV_ Refer to them
whenever
you call upon your
Sony dealer
regarding
this prod uct.
Note
This digital television is capable of recetvit_g anatog basic, digital
basic and digital premium
cable television programming
by direct
connection
to a cable system providing
such programming.
A
security card provide<:[ by your cable operator is required
to view
encrypted
digital programming.
Certain ad ranted and interactive
digital cable services such as video-on-demand,
a cable operator's
enhanced
program guide and data-enhanced
television services
may require the use of a set-top box. For mow infot'mation
call
your local cable operator.
This television also includes a QAM demod ulator v\ hich should
allot\ you to receive unscrambled
digital cable television
programming
via subscription
service to a cane service provider.
N ailability of digital cable television programming
in your area
depends on the type of ptx_gramming
and signal provided by your
cable service provider:
IMPORTANT
SAFEGUARDS
For your protection,
please read these instructions
keep this manual for future reference.
completely,
and
CarefuUy Observe and comply with all warnings,
c rations and
i_stmctions
p[aced on the set, or described
in the operating
i_structions
or service mammal
WARNING
-[b girard against i_liury., thefo[low_ng
should be observed i_ the installation,
basic safety precautions
use, and servicing of the set.
Use
Power
Object
and Liquid
Entry
Never push objects of any, kind into theset
through the cabinet slots as they may touch
dangerous
voltage points or abort out parts that
could result in a fire or electric _,bock. Never spill
liquid of any kind on the set.
Attachments
Do not ttse attachments
not recommended
manuf _ctureb as trey may cause hazards.
Do [tot place any objects, especially
This set should be operated only from the type
of power source indicated
on the serial/model
plate. If you are not sum of the type of elect ricM
power supplied
to your home, consult your
deMe: or torn[ power compan)_: For those sets
designed to operate from battery po_\ el; refer
to the operatk_g instructions.
Cleaning
Unplug the set from the wall outlet before
cleaning or polM_ing it. Do not use liq uid
cleaners or aerosol cleaners. Us_ a cloth lightly
dampened
with water for cleaning the exterior
of the set.
or Polarization
This et is equipped
v\ith a polarized A(' power cord plug (a plug
havk_g one blade v\ider than the other), or with a three-wire
grounding
type plug (a plug having a third pin for grounding).
Follow the instructions
be[ow:
For the
set with
hea W objects,
on tc!p of the set. The Object may fall from the set,
causing injur _:
Sources
Grounding
by [be
a polarized
AC power
cord
plug
/_/.
_
-F ,
If a snapping
or popping sound from a TV set is
continuous
or frequent while the TV is operating,
unplug the TV and consult your dealer or sert k:e
t_cbnician, h is normal for some TV sets to mak_
.......... kraal snapping
or popping
.......
ds, ......
particularly
when being
turned on
or off
v;_ L ?/')_
'_ )- .!/!
_
"
'_"
:,:_k*
_]lJ
Installation
Tills plug will fit into the po_ er outlet only one
........
wax. This is a safer\ feature. K you are un _ble to
_),t,_ ;s
....
/r _. -- .....
insert the plug full} into the outlet, tr} re ersing
the plug. If the ph._g shot.dd stilt fail to fit, contact your elect titian to
have a suitable outh't installed. Do not defeat the safety, purpose
of
the po[a rized plug by R_rcing it in.
Alwa}s use two or morn people to lift or move the set. The set is
heavy and the bottom surface is flat. Serious ini_wy can result from
trying to move the set by yourself alone, or from unsteady
handling. Install the set on a stable, [eve[ surface.
Alternate
Do not use power-line operated sets near
v\ater
for example, near a bathtub,
_\ ashbow [_kitchen sink, or lam_dry t_tb, in a
wet basement, or near a swimming
pool, etc.
For the
Warning
set with
a three-wire
grounding
This plug will oMy, fit into a grolmding-ty
pe
power outlet. [his is a safety feature. If you are
unable to insert the plug into the outlet, contact
your electrician to bare a suitable outlet installed.
Do not defeat the safety purpose of the grounding
type
AC plug
pMg.
Overloading
Do not o erload wall outlets, extension cords or
convenience
receptacles
beyond their capacit>
since {his can resu[t i_ fire or electric shock.
A[v\ ays turn the set off when it is not to be
used. When the set is [eft unattended
and
unused for long periods of time, unplug it
from the watt outlet as a precaution
against
the possibility of an internal maKuncdon
that
could create a fire hazard.
Water
Memory Stick
Tb protect small children from injury from Memory Stick Media,
remo_ e all Memory Stick media from the TV's Memory Slick slot
and store it in a safe location when it is not in use.
Moisture
Accessories
Do not place the set on an m_stah[e cart, stand,
tripod, bracket, table or shelf. The set may fall,
causing serious injury to a child or an adult, and
serious damage to the set. Use only a cart or stand
recommended
by the manufacturer
for [be
specific mode[ of TV_ Any mounting of the
product should follow the manufacturer's
instructions,
and should use a mounting
accessory recommended
by the manu(acturer.
An
appliance and cart combination
should be moved
with care. Quick stops, excessive force, and
uneven surfaces may cause the appliance
and cart
comhinatio_
Do not disconnect
the antenna or the power cord during a heavy
storm. Lightning may strike _\ hid you are homing the cable or
cord, causing serious injury.. Turn off your TV and _\air for the
weather to improx e.
and
to
ovecttlrn.
Disconnect
a[[ cables and cords from
move the set.
the set before _ttempting
Do not allow chiM ren or pets to chmb up onto, or push against,
set. The set may fall, causing serious injury,.
to
the
Ventilation
_he slots and openings
in the cabinet and in the
back or bottom are provided for rtecessary
ventiiaticm. ]\_ ensure reliable operation
of the set,
and to protect it from ovecbeatirlg,
[bese slots and
openings m ust never he blocked or covered.
Lightning
For added protection
for ibis tele\ iskm receiver during a lightning
storm, or when it is left unattended
and unused for long periods of
time, unplug it from [he wall outlet and disco[inert
the antenna.
This will prevent damage to the receiver due to lightning and
power [iIle surges.
[]
Never cover the slots _nd opemngs
cloth or other materials.
Service
[]
Ne_er t>[ock the slots and openings by
placing the set on a bed, sofa, rug or other
simi[a r surface.
wffh a
Damage
[]
[]
[]
Power
Neer
place the set in a confined space, such
as a bookcase, or built-in cabinet, unless
proper
ventilation
Do not
p[a(e
or heat
regb_ter,
Cord
Requiring
Service
Unplug the et from the wall outlet and refer set
set ice personnel
under {he fo[lowiilg conditions:
icing to qualified
When the po'_ er cord or plug
is damaged or frayed.
is provided.
the set
hi!at
or w}_ere
or o
If liquid has been spilled into
the set or objects have fallen into the
product.
er a radiator
it is exposed
to direct
sunlight.
Protection
If the set has been exposed
watet_
Do not allow anyEbing to rest on or col[ over Ehe
power cord, and do not place the set where the
power cord is subject to wear or abuse.
If the
Antennas
set has
shock
has
been
by being
been
subiect
dropped,
to rain or
to excessive
or the cabinet
damaged.
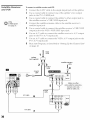
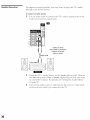
Outdoor Antenna Grounding
If ;m outdoor antelma is installed, follow the precautions
belong. An
outdoor antenna system should not he located in the vicinity of
overhead power lines or other electric light or power circuits, or
v\here it can come in contact v\ ith such po_\ er lines or circuits.
[]
W HEN IN STALLING A N OU T_KK)R AN TEN N A SYSTEM,
EXTREME CARE SHOU/D BE TAKEN TO KEEP FROM
CON rACT/NG SUCH POWER LINES OR C IRC UITS AS
CONTAC F VV/TH THEM IS AKMOST INVAR[ABI Y FATAL.
Be sum the atlterma system is groum-led so as to provide some
protection against voltage surges a_'_dbui[bup static charges.
Section 810 of the National Electrical Code (NEC) in USA and
Section 54 of the Canadian Electrical Code in Cailada provide
i_formatiot_
v\ith respect to proper grounding
of _he mast and
supporting
structure, grom_ding of the lead-in wire to an antenna
discharge
unit, sDe of grouIlding coild uctors, [oca tioll of antenna
discharge
unit, connection
to groum-ling electrodes,
and
requiremeI_ts
for the grounding
electrode.
Antenna Grounding According to the National
Electrical Code, ANSIINFPA70
Antenna lead in wire
[]
If the set does not operate normally
when
following _be operating
instmctior_s.
Adjust only those co_ltro[s that ace
specified in the operating instmcfions.
Improper adjustment
of other controls
may result in damage and will often
require exte_lsive work by a qualified
teclmicia_l to wstore the set to normal
oper _tiom
Whell
{he set exhibits
a distinct
indicates
a need
for service.
change
in performance,
it
Servicing
Do not attempt to service the set yourself ince
opening the cabinet may expose you to dangerous
voltage or other hazards. Refer all ser_ icing to
quahfied service personnel
Replacement
Parts
Whe_l replacement
parts are required,
be sure {he
sec ice technician certifies ill writing that he has
used replacement
parts specified by the
manufacturer
that have the same characteristics
as
the original
Unauthorized
other hazards.
parts.
substitutions
m_y resuh
in fire, electric shock
or
Safety Check
rounding conductors
(NEC5edion 810 21)
Groundclamps
NEC:National Eleddcal Code
.....
Powerselvice grounding electrode
system(NEEArt 250 Palt H)
Upon completkm
of any set%re or repairs to _be
set, ask the service techmcian to perform routine
safety checks (as specified by the manufacturer)
to
determine
that the set is ill sah, operating
condErioIl, and to so certif}_ When the set reaches
the end of its useful life, improper
disposal could
result in a picture tube implosion.
Ask a qualified
set\ ice technician to dispose of the set.
3
Trademark
Information
WOW, _u_Lrrol.md
and the (@) _},'mbo[ are trademarks of SRS
Labs, [nc. WOW and TruSurround
[echnolog k are incorporated
under license from SRS Labs, [nc.
DD[-_"
_
D I G I T A L
Manufactured
under [i.........
f...... L)o[bv
L
:boratories
ILk:easing
Corporation.
D_;lby
and _hedoub[e-D_,)mbolaretrademarksof
Dolby Laboratories
Licensing Corporation.
Manufactured
under license from BBE Sound, Inc. Licensed by BBE
Sound, Inc. under USP4638258, 5510752 and 5736897. BBE and BBE
symbol are regk-;tered trademarks
of BBE Sound, Inc.
M rni
This TV incorporates
High-I_)efit:ition
technology. HI)M[, the HDM] [(>go and
High-Definition
M uffimedia later£:ce are trademarks
or registered
trademarks
of HDM[ Licensing LLC.
Cab[eCARD
>: is a tr :dem :rk of Cable
l\.[e_ ision Laboratories,
Inc.
Wega, FD Trinitroa, Steady Sound, DigRa[ Rea[Ry Creation,
CineMo{ioa, Memory Stick, Memory Stick Duo, Memory Stick
PRO, Memory Stick PRO Duo, MagicGate, Super Fine I?i'rch, MID,
Clear Edge, C[earEdge VM and I-H) Detailer are trademarks
of
Sony Corpora tic:::.
4
Introducing
the FD Trinitro
n We g a
Overview
Presenting"
...............9
........................................................................
the FD Trinitron
Wega ....................................................
,
Pack_g_ e.........
Contents
...........................................
Features
...............................................................................
Setting
Up the
TV
Overview
.....9
..................................
? "
About the AC Power.....Cord ............................................
.1 !
12
TV Controls,
and Connectors
............................................................
............................................
Fron t Panel ..........................
Rear ?anel ......................................................................................
Basic
Connections;
Connecting
About Using CableCARD
a Cable or Antenna
.......................................
9
9
.............
.. 12
!3
15
.................................
_196
Cable or Antenna Only ..................................................................
Cable arid Antenna
Only .................................................................
Cab_ e Box and CabJe .....
Ony
Cab e Box Onh/,. .................
Connecting"
Op tional
MakngVideo-
.......................................................
..............................................
17
18
19
,,,.
20
Equipment
......................................................
Connect. ons ....................................................
,21
,21
Usin g 5 VIDEO ............. .......................................
......................................
VCR an d Cable ..........................
VCR and Cable Box ...........
.............................................
.22
About
Two VCRs for Tape
Sate
te Receiver
Editing
...........
24
26
'..............................................
"
28
...................................................
30
Sate lte Receiver. and VCR ".............................................
"" .
DVD Player with Cornponent
Jldeo Col_nectors .............................
DVD Payer with S VIDEO and Audio Connectors
..........................
.............................................
Car corder ...............................
Aud'o Receiver..............
DV-E quipped
32
..34
35
36
37
..................................................
Device
.........
.38
...............................................
HDk!_I-E_I ui p_.oed Device
......
..................................................
39
.................................
Connecting
a Device with an Optical IN Connector
,40
Using the cONTROL S Feature "..................................................
_,,_41
Using
CableCARD
.....................................................................
About Using CableCARD "......................................................
""
Actvat
Setting
'n g CableCARD
_
.
Service,"
....................................
Rern ov n g the. CableCAB,
D.
......................................................
e
Channel
List
..................................................
Up th
......
Usin9
Initial Setup
4!
41
,....
42
43
. ....................
43
................................................
5
Using
the Remote
Control
Overview
.....................................................................................................
Inserting
Button
.......................................................................................
45
Descriptions
....................................................................................
46
Programming
Using
the
the Remote
Control
............................................................
Overview
.....................................................................................................
51
Watching
TV ................................................................................................
52
Using
Program
53
the
Guide ...........................................................................
Program
Guide Options .........................................
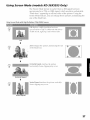
Using
Screen
Mode
(models
KD-SO/S4XS955
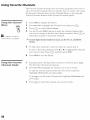
Using
Screen
Mode
(models
KD-36XS955
Using
Favorite
Channels
Using the
Using
Other
Channel
Equipment
Memory
Stick
OMy) .......................................
Menu .................................................................
with
AH Equipment
Only) ..................................
.............................................................................
Using the Favorite Channels
the
Guide
Your
55
57
58
58
58
TV Remote
Control
...........................
59
..........................................
59
Operating
a VCR ........................................
59
Operating
a Satellite
59
Operating
a Cable Box
Operating
a DVD Player ..................................
60
Operating
a DVD/VCR
60
Receiver
60
Combination
Unit
Memory
Stick ...................................................................................
Features ..........................................................................................
Inserting
Stick Compatibility
62
Memory
Stick Functionality
62
and Removing
hserting
the
a Memory
Memory
Brick ..................................................
Stick .................................................................
Stick
Stick Index
66
67
58
68
Photo Menu
69
Bar Options
Movies ............................................................................................
Movie Controls ................................................................................
Movie
Memory
64
Photos ...........................................................................................
Photo Controls ................................................................................
Using Zoom and Pan
Using Rotate ....................................................
Playing
54
65
Stick Index ...................................................................
Using the Memory
Viewing
63
63
a Memory
a Memory
Removing
Using
51
61
Memory
File Compatibility
Trademark
Information
Menu
Stick Index
Slide Show
Contents
Memory
Notes
54
Viewer
About
70
70
71
71
Bar Options ............................................
72
Menu
73
Bar Options
Menu Options
Menu Options
....................................................
...............................................................
...............................
Stick Menu
on Using Memory
Stick Media ........................................................
About DCF File Names .....................................................................
Memory
6
49
Features
Using Additional
Using
45
Batteries
Stick Precautions
73
74
74
75
75
76
Using
the Menus
Overview
.....................................................................................................
Through
Navigating
Other
Menus
.......................................................................
77
77
Using
the
Video
Menu
................................................................................
78
Using
the Audio
Menu
...............................................................................
80
Using
the Screen
Menu
(models
82
Using
the Screen
Menu
(model
Using
the
Channel
Using
the
Parent
Using
the
Setup
Using
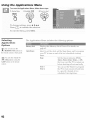
the Applications
Menu
Menu
Menu
KD-30/34X5955
KD-35XS955
On/y)
...........................
On/y) ..................................
83
............................................................................
84
...............................................................................
85
................................................................................
89
Menu .....................................................................
92
Information
Overview
.....................................................................................................
95
Glossary
.......................................................................................................
95
Contacting 5ony ..........................................................................................
97
Troubleshooting
Remote
97
97
..........................................................................................
Control ...............................................................................
Channels
98
CableCARD
Memory
Audio
Stick
Video
99
100
101
General
Specifications
98
............................................................................................
Optional Accessories ...............................................
Index ..........................................................................................................
101
103
104
105
7
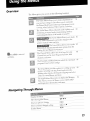
Overview
This chapter describes the contents
shipped and provides an overview
Presenting
the FD Trinitron
of the package in which the TV is
of the _eatures of your Wega TV.
Wega
The FD Trirfitron Wega (pronounced
VAY-GAH) is characterized
outstanding
eo-atrast uncompromising
accurac_ and corrter-tocorner detail.
by
You will recognize the superiority of Wega tedmology almost
immediately
The first thing you will probably notice is minimal glare
from the fiat picture tube. This flat-screen ted-mology improves
pictare detail without distortion, unlike conventional curved screens.
The FD Trinitron delivers outstanding image detail not only at the
screen center, but also at the corners -- so you can enjoy a bright,
clear picture from any location in a room,
Package
Features
(7onten_s
Along with your new Trinitron TV, the packing box contains a remote
control al_d two AA (R6) batteries. These items are all you need to set
up and use the TV.
Some of fl-le features
that you will enjoy with your new TV include:
guiltqn Digita! Television Receiver: Ybu can watch digital
television programs and enjoy the iraproved audio/video
quality
offered by these programs. With high-definition
signal reception,
you can watch TV Mgnals broadcast in HDTV for the clearest
possible broadcast picture.
CableCARD slot: Provides cable subscribers with access to
digitally encrypted cable channels -- without the need for a settop box -- that will enable you to receive not only standard
definition but also high definition television. The CabIeCARD,
which is provided by your cable TV compan?; is inserted into the
TV% rear panel CableCARD slot. After the service is activated
with your cable TV compan> the card replaces the _eed for a
separate set-top box. (Check with your cable TV company about
CableCARD service details, limitations, pricing, and availability.
For more information about CableCARD in this manual, see
pages 15 and 41.)
9
[]
Screen Mode: Enables you to resize the picture.
[]
Super Fine Pitch CRT: Created especially for displaying high
resolution pictures, the new Super Fine Pitch CRT -- along with a
new electron gun and high intensity luminescent phosphor -improves image resolution, providing the highest picture quality
reproduction
from corner to corner.
[]
DRC ® (Digital Reality Creation) Multifunction:
Unlike
conventional
line doublers, the DRC Multifunction
feature
replaces the sljual s NTSC waveform with the near-HD
equivalent, while doubling the number of vertical and horizontal
lines. This results in four times the density for quality sources,
such as DVD, satellite, and digital camcorders. The Video Menu
allows you to select interlaced, progressive, or CineMotion TM
output.
[]
Favorite Channels:
channels.
[]
ClearEdge VM
Velocity Modulation:
definition by enhancing vertical lines.
[]
Steady Sound®: Equalizes volume levels so there is consistent
output between programs and commercials.
[]
Memory Stick ® Viewer: Lets you watch digital photo (JPEG) and
movie (MPEG1) files that tare stored on Memory Stick media.
[]
Component
Video Inputs: Offers the best video quality for DVD
(480p, 480i), and digital set-top box (HD1080i, 720p) connections.
[]
HD DetailerT_: Wideband video amplifier has a high bandwidth
frequency rating, which allows it to send more video information
to the screen, resulting in finer picture quality, especially for HD
sources.
[]
CineMotion_:
Reverse 3-2 pulldown processing provides
optimal picture quality for film-based sources (media originally
shot in 24 frames-per-second
format).
[]
Parental Control: V-Chip technology al!ows parents
unsuitable programming
from younger viewers.
[]
HDMI (High-Definition
Multimedia
Interface): Provides tan
uncompressed,
all-digital audio/video
interface between this TV
and any HDMI-equipped
audio/video
component, such as a settop box, DVD player, and A/V receiver. HDMI supports
enhanced, or high-definition
video, plus two-channel digital
audio.
TM
Allows you to select from 16 of your favorite
Sharpens
picture
to block
0 vervie
w
This chapter
TV Controls
includes
illustrated
instructions
and Connectors
Basic < onnections:
Connecting
a Cable or Antenna
22
24
26
28
30
32
34
35
36
DVI-Equipped
Device
HDMI-Equipped
Devbe
37
38
39
S Feature
40
Using CableCARD
Setting Up the Charme]
TV.
15-19
Two VCRs for Tape Editing
Satellite Receiver
Satel!ite Rece>er and VCR
DVD Player with Component
Video Connectors
DVD Player with S VIDEO and Audio Connectors
Camcorder
Audio Receiver
Using the CONTROL
the AC
Cord
up your
12-14
Connecting Optiona! Equipment
VCR and Cable
VCR and Cable Box
about
Power
for setting
41
List
43
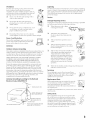
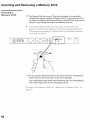
The AC power cord is attached to the rear of the TV with a hook. Use
caution when removing tire AC plug from its holder. Gently slide the
plug upward to remove it from the hook. Once removed, the AC
power plug should automatically
disengage from its stored location.
connections.
You can detach
the cord from
this hook
11
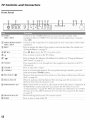
TV Controls
Front
and
Connectors
Panel
[]
S VIDEO
VIDEO2 INPUT
Connects to the S VIDEO OUT }ack on your camcorder or other video
equipment that has S VIDEO. Provides better picture quality than composite
video ([]).
[]
VIDEO/L(MONO)-AUDIO-R Connects to the composite
VIDEO2 INPUT
equipment.
[]
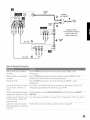
MENU
Press to disphy the Menu. Press again to exit from the Menu.
"Using the Menus" on page 77.
[]
4,_ _, *
Press t1,_ _, * to move the TV's on-screen
[]
-÷.
Press to select an item in the TV's Menu.
[]
_
Press to display the Memory
ucK wewer
on page 61.
Press repeatedly
video h_p uts.
A/V output
jacks on your camcorder
For
details,
see
cursor.
Stick Menu. For details,
to cycle through
or other video
see "Using the Memory
[]
TV/VIDEO
the video equipment
connectec[ to the TV's
[]
-CHANNEL+
Press to scan through channels. %9 scan quickly
hold down either CHANNELbutton.
[]
PROSTD/DUO__
Memory Stick insertion
Stick" on page 64.
[]
Memory Stick LED
When lit, indicates that the Memory Stick is being read. (Do not remove
Memory Stick when the indicator is lit.)
[]
TIMER/STANDBY LED
Blinks when the TV is turned on, then shuts off when the picture is displayed. If
the LED blinks continuously, this may indicate the TV needs service (see
....Contacting Son}."
"
" on page 97). When lit, indicates one of the timers is set. When
the timer is set, this LED will remain lit even if the TV is turned off. For details,
see page 92.
[]
Infrared Receiver (IR)
Receives
[]
POWER
Press to tt_rn on and off the TV.
Press
..............................................
toadiustthevolume.
through
channels,
press and
slot. For details, see "Inserting _ and Removh_g a Memory
IR signals from the TV s remote control.
the
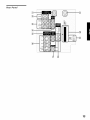
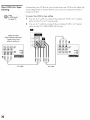
Rear Panel
[]
13
[] VHF/UHF
RF input that connects
[] S VIDEOIN 1/3
Connects to the, S VKFEO OUT jack of your VCR or other video equipment
that has
S VIDEO. S VIDEO provides better picture quality than either composite vkieo ([_)
or VHF/UHF
([]) comrections.
[] VIDEOIN 1/3/4
VIDEO/L(MONO)
-AUDIO-R
Connect to the composite A/V output jacks on your VCR or other vkteo
component.
A fourth component A/V input jack (VIDEO 2) is located on the front
panel of the TV. This video connection provides better picture quality than the
VHF/UHF
([]) connection.
[]
Lets you record the program you are watching to a VCR. When two VCRs are
connected, you can use the TV as a monitor for tape-to-tape editing (not available
with digital channels or with 480i, 480p, 720p, or 10801 when _he input is set to
VIDEO 5, 6, or 7).
MONITOROUT
to your VHF/UHF
antenna
or cable bow
[] AUDIOOUT (VAR/FIX) Connects to the left and right audio input iacks of your audio or video equipment.
You can use these outputs to listen to your TV's audio through your stereo system.
[]
HD/DVDIN5/6
(1080i/720p/480p/480i)
Connect to your DVD l- layer s or digital set-top box's component video (Y, PB, PR)
and audio (L/R) jacks. Component
video provides better picture quality than [],
[], or []).
[] CONTROLS
INtOUT
Allows the TV to receive (IN) and send (OUT) remote contro! signals to other Sony
infrared-controlled
audio or video equipment that has the CONTROL S function.
[]
HDMI (High-Defh_ition
Multimedia hrterface) provides an uncompressed,
alldigital audio/video
interface between this TV and any HDMI-equipped
audio/video
component,
such as a set-top box, DVD playel% and A/V receiver.
HDMI supports enhanced, or high-definition
video, plus two-channel digital audio.
HDMI
(VIDEO7 IN)
[] DIGITALAUDIOOPTICALConnect to the optical audio
OUTPUT
PCM compatible.
(DOLBYDIGITALPCM)
input
of an audio
component
that is Dolby* Digital and
without the need for a set-top box -- that will enable you to receive not only
standard definition butt also high definition television. The CableCARD,
which is
provided by your cable TV company, is inserted into this slot. After the service is
actiw_ted with your cable TV company, the card replaces the need for a separate settop box. Check with your cable TV company about CableCARD service details,
limitations, pricing, and availability. For more information,
see page 41.
[] Cable
RF input that connects
to your cable signal.
* Dolby andthe double-Dsymbo!are trademarks of Dolby kaboratorfesLicensingCorporation,
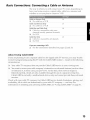
Basic
Connections:
Connecting
a Cable
or Antenna
The way in wldch you will connect your 7V varies, depending on
how your home receives a signal (cable, cable box, antenna) and
whether or notyou plantoconnecta VCR.
Cable or Antenna Only
No cable box or VCR
16
Cable and Antenna
17
Only
No cable box or VCR
Cable Box and Cable OMy
Cable
box unscrambles
channels
(usually
18
only
premium
some
channels)
No VCR
Cable Box Only
19
Cable box unscrambles a!l channels
No VCR
If you are connecting a VCR
[21 See the connections described
About
UMng
on pages 22 and 24
Cab#oCARD
Ii you are planning to use a separate cable box for digital cable TV serwces, you may be able
ro receive programming
using this TV with the CableCARD instead
except in the following
circumstances
_1 Your cable TV compan}
_1 You want to
on-demand
bidirectional
CableCARD
services
does not provide
CableCARD
service in your wewmg
arem
access your cable company's interactive or advanced features, such as videoor. in some cases, pay-per-wewL
At this time. these serwces reqmre a
link, which are only available through the use of a separate set-top box.
is currently a umdirectional
device onl?) and cannot provide these advanced
Check with your cable TV company for CableCARD service details, limitatior_s. Eric ng, and
availabilitv, all of which are determined by your cable TV company -- not Son): For
information
on installing and activating CableCARD. see "Using CableCARD" on pag< 41.
15
Cable
Only
or Antenna
For best results, use one of the following connections if you are connecting a
cable or an antenna and you:
[]
Do not _eed a cable box to m_scramble
charmels.
(If you have a
cable box, see pages 18-19.)
[]
Do not intend
and 24.)
to connect
a VCR. (If you
The connection
you choose depends
your home, as described
below.
Cable Type
Connect As Shown
VHF €)l_ly or
combiaed
75-ohm
VHF/UHF
coaxial
__1_
cable
(;able
have a VCR, see pages
on the cable
type
I_
VHF/UHF
75-ohm
coaxial
__11_
cable
Cable Type
Connect
As Shown
VHF
€)_aly or
300-ohm twin
UHF
Only
lead cable
or
VHF/UHF
combin_,d
CABLE
HF
_
Antenna connector
(not supplied)
Cable Type
VHF
m_d UHF
Connect As Shown
75-ohm
coaxial cable
_UN
__1_J
300-ohm twin
lead cable
mixer
VHF/UHF
(not supplied)
you
have in
22
Cable and Antenna
Only
Forbest results, use this connectionif you:
[] Have a cable and an arttenna.
(This is corwerdent if you are using a separate rooftop ar_terma 1o
receive additional channels that are not provided by your cable
company.)
[]
Do not have a cable box or VCR. (If you have a cable box, see
pages 18 to 19. If you have a VCR, see pages 22 and 24.)
(:able TV (CATV)
and Antenna
Antenna cable
V.F,U.F
C_,BtE
CAWcable
Notes on Using This Connection
Switch the' TV's input
between the cab]e and
Pt_essANTto switch back and forth between the TV's VHF/UHF and CABLE
inputs.
_llltenna
17
Cable Box and
Cable Only
For best results, usethis connection if:
[]
Your cable compar_y
scrambles
channels
(which requires
you
scramble
all channels.
[]
Ybu do not have
some charmels,
such as premium
to use a cable box), but does not
a VCR. (If you
have a VCR,
With this connection you can:
[] Use the TV remote control to change
the cable box to the TV% VHE/UHE
program the remote control for your
"Programming
the Remote Control"
[]
see pages
22 and
24.)
channels coming through
input jack. (Ybu must first
specific cable box; see
on page 49.)
Use the TV remote control to change channels coming directly
into the TV's CABLE input, (The TV's tuner provides a better
signal than the cable box,)
I_trrm
CATV cable
Coaxial cable
[_e"Lg__--_
_
Coaxial cable I L_ °uT
I
I
Coaxial cable
VHFIUHF
CABLE
Notes on Using This Connection
Use
the cable
box
Tune [he TV to the channel
the cable
and [hen Ltse [he cable box to switch
Set up the TV _emoke
contro!
Program
to open'ate the cable box
Activate
opera[e
the remote
[he cable
con[rol
the remote
control.
box is set to (usually
cham_e]s.
See "Programming
the Remote
channel
3 ot_4)
Control"
on
pages 49-50.
[o
Press
SAT/CABLE FUNCTION.
box
Switch the TV's input
between the cable box and
cable
Press ANTto swi[ch back and forth be[ween the TV's VHF/UHF (scrambled
channels)
and CABLE (unscrambled)
inputs_
Cable Box Only
Forbest results, use this connectionif:
[] Your cable company scrambles
to use a cable box.
[]
all chamtels, which
requires
you
You do not have a VCR. (If you have a VCR, see pages 22 and 24.)
With this connection you can:
[] Use the TV remote control to change channels coming through
the cable box to the TV's VHF/UHF jack. (You must first
program the remote control for your specific cable box.)
Toconnect the cable box
1
Connect
2
Use a coaxial cable to connect
CAW
cable
Coaxial cable
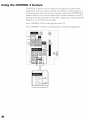
|
3
the CATV cable to the cable box's input jack.
the cable box's output jack to the
VHF/UHF
|
Run Auto Program,
on page 43.
as described
in "Setting Up the Channel
List"
Notes on Using This Connection
Use the table box
Set up the TV remote
Tune the TV to the channel the cable box is set to (usually channel 3 or 4)
and then use the cable box to switch channels.
control
Program
the remote
control
See "Programming
the Remote
Control"
on
to operate the cable box
pages 49.
Activate the remote control to Press SAT/CABLE
FUNCTION,
operate
the cable box
19
Connecting
Optional
Equipment
Use the directions
equipment:
in this section to connect the following
VCR and Cable
22
VCR and Cable Box
24
Two VCRs for Tape Editing
Satellite Receiver
26
28
Satellite Receiver
30
and VCR
DVD Player with Component
Connectors
Video
,32
DVD Player with S VIDEO and Audio
Connector's
34
Camcordet"
35
Audio
36
Receiver
DVI-Equipped
HDMI-Equipped
Device
Device
37
38
optional
Making
Video
Connections
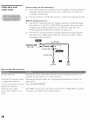
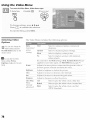
Your TV includes severaltypes of video inputs.When connecting
your TV, use the inputs that are available
on your components
that
provide
the best video performance,
as described
below.
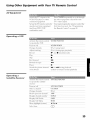
H_ml
HDMI (High-Definition
(_
0
_
--
Multimedia
Interface)
Component
video
ps
s_,oEo@
S VIDEO
V,DEO
@
Composite
video
RF/Coaxial
About
Usfng
$ WDEO
If the(shown
optional at equipment
youuseareanconnecting
has anforS VIDEO
jack
left), you can
S VIDEO cable
improved picture quality (compared to an A/V cable).
Because S VIDEO carries only the video signal, you also need
to connect audio cables for sound, as shown below.
Example of an SVIDEO Connection
in
SVIDEO
cable
ilii
V_DEO_
LINE OUT
AUDIOR AUDIO L VIDEO
S'
?
Connect red to _ed,
white to white, etc.
Audiocable
21
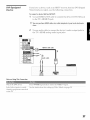
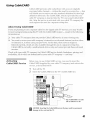
VCR and
Cable
For best results, usethis connection if:
[]
Your cable
comparly
does r_ot require
you to use a cable
box.
To connect the VCRand cable
USing
SV!IDEOjacks?
See page 21.
1
Connect
2
Use a coaxial cable to connect the VCR's VHF/UHF
to the TV's CABLE jack.
3
Use an A/V cable to connect the VCR's A/V output jacks to the
TV's A/V input jacks.
4
Run Auto Program,
on page 43.
the CATV cable to the VCR's VHF/UHF
as described
Coaxial cable
.......
•
/
L
1
LINE
NJ010 R AUDIO L VIDEO
A/V c
OUT
output jack
in "Setting Up the Channel
in
V......
i_put jack.
_1
CaNes are often
co[or<oded to connectors.
white to white, etc.
List"
Notes
onUsing
ThisConnection
Watch the VCR
Press TVNIDEOrepeatedly
illLLstration),
to select the VCR input (VIDEO 1 in the
Watch cable channels
Press TVNIDEOrepeatedly
illustration).
to select the cable input (CABLE in the
to operate the VCR
Activate the TV remote
"Programming
the Remote
Press VCR/DVDFUNCTION.
contro! to operate
(..ontrol
/J
on pages 4C_)-50.
the VCR
Contro! VCR functiol_s
the TV remote contro!
with
Label video inputs to easily
identify equipment
connected
to the TV
See
Operating
a VCR" on page 59,
See the instructions
for setting up Video Labels on page 90.
23
VCR and
Cable
Box
For best results, usethis connection if:
[]
Your cable company
scrambles
channels
(which requires
you
scramble
all channels.
some cham_els, such as premium
to use a cable box), but does not
With this connection you can:
[] Use the TV remote control to change channels coming through
the cable box. (You must first program the remote control for
your specific cable box; see "Programming
the Remote Control"
on page 49.)
[]
Use the TV remote control to change channels coming directly
into the TV's CABLE jack. (The TV's tuner provides a better
signal than the cable box.)
[]
Record channels coming through
coming directly into the I_,
the cable box and channels
To connect a VCRand cable box, you need:
[] A splitter, which is a small, inexpensive device that you ca__
purchase at your local electronics store.
[] Four coaxial cables.
[]
Two A/V cables or two S VIDEO cable with audio cables.
To connectthe VCRand cable box
_
_
Using
S V!l)EO jacks?
1
Connect
2
Use a coaxial cable to connect one of the splitter's
jacks to the rfV's CABLE jack.
3
Use a coaxial cable to connect the splitter's
the cable box's input jack.
4
Use a coaxial cable to connect the cable box's output
VCR's RE input jack.
5
Use an A/V cable to connect the cable box's A/V output jacks to
the TV's A/V input jacks.
6
Use an A/V cable to connect the VCR's A/V output jacks to the
TV's A/V input jacks.
7
Run Auto Program,
on page 43.
See page 21.
the CATV cable to the single (input) jack of the splitter.
as described
two output
other output jack to
jack to the
in "Setting Up the Channel
List"
D
Coaxial
cable
Splitter
2
(not supplied)
1
CATV
cable
Coaxial
cable
3
Cables are Often
co_oPcoded to connectors,
Connect _ed to red,
I
AtV cable
l
I
I
white to white, etc.
Coaxial
cable
S
A/V cable
Notes on Using This Connection
Watch
cable
(unscrambled)
Press
channels
Watch
cable
box (scrambled)
Press
channels
Watch
operate
the VCR
the cable
the remote
the cable
Label
Use the cable
Press TVNIDE0 repeatedly
illustration).
box or
control
"Programming
to
box or VCR
Control
specific cable box and
VCR functions
with the TV
remote
TVNIDE0 repeatedly
illustration).
to operate
VCR
Activate
TVNIDE0 repeatedly
to select
the cable
input
(CABLE
to select
the cable
box input
in the
illustration)_
For the cable
to select
the Remote
box, press
box to change
the VCR
Control"
(VIDEO
3 in the
channels.
input
on pages
(VIDEO
1 in the
49-50.
SAT/CABLE FUNCTION. For the VCR, press
VCR/DVD
FUNCTION.
See "Operating
a Cable
Box'* on page
60 and "Operating.
a VCR"
on I"ag_e 59.
contro!
video
inputs
identify equipment
to the TV
to easily
See the instructions
for setting
up Video
Labels
on page
85.
connected
25
Two VCRs for
Editing
/_
Tape
Using
SVIDEO jacks?
see page 21.
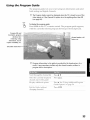
Connecting two VCRs lets you record from or_e VCR to the oLher. By
connecting them as shown below, you can view (monitor) what is
being recorde&
Toconnect two VCRsfor tape editing
1
-Use an A/V
jacks
2
Use an A/V
jacks
cable
to compeer
to the _FV's A/V
cable
input
the p_ayback
to connect
to the TV's MONITOR
VCR's
A/V
output
jacks.
the recording
VCR's
A/V
input
OUT jacks.
Ill
to connectors
co,or:coded
Connect
white
red to red,
to white,
I
I
2
etc.
._o.o_..o.o_ooo
® ® ©]o0T,,
.,_ oo_
A/V cable
26
AtV cable
Notes on Using This Connection
View
(monitor)
what
is being
recorded
contro!
the VCR(s)
"Programming
the TV remote
to operate
video
inputs
identify equipment
to the TV
Press
to select
the VCR
input
(VIDEO
1 in the
above).
the Remote
Control"
on pages
49-50.
VCR/DVD FUNCTION.
the VCR(s)
Control
VCR functions
the TV remote
control
Labe]
TVNIDE0 repeatedly
illustration
to operate
Activate
Press
with
to easily
•
See
l
Oper
•
_r
_tmg
a VCR"
See the instructions
on page
for setting
59,
up Video
Labels
on page
90.
connected
27
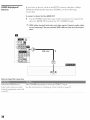
Satellite
Receiver
To connect a satellite receiver
1
Using
sV!DE_
iacki?
Connect
the satellite antenna
satellite
input jack.
cable to the satellite
2
Use cm A/V cable to connect the satellite receiver's
jacks to the rW's A/V input jacks.
3
Connect a CATV cable from your cable or _ntenna
CABLE jack.
4
Run Auto Program,
on p_ge 43.
See page 21.
_s described
receiver's
A/V output
to the TV's
in "Setting Up the Channel
List"
CAW cable
Satellite
SATE_
VHF/UHF
ou-,;wEou__
I
cable
1
I
I
2
A!V cable
antenna
color,coded
to connectors.
CabJes
often
white
to are
white,
etc.
Notes on Using This Connection
Watch
the satellite
receiver
Press
TVNIDEO repeatedly
(VIDEO
Set tip the TV remote
satellite
control
to operate
the
receiver
If you lrave
_ non-Sony
the remote
control.
on pages
Activate
the TV remote
the satellite receiver
Control
satellite
receiver
TV 1'emote control
Label
video
equipment
inputs
connected
contro!
to operate
functions
to easily
identify
with
Press
the
Go select
the satellite
receiver
input
1 in the illustration).
satellite
receiver,
See "Programn_ing
you
must
the Remote
program
Control"
49-50.
SAT/CABLE FUNCTION.
See "Operating
See the instructions
a Satellite
Receiver"
for setting
on page
tip Video
59.
Labels
on page
90.
to the TV
29
Satelfite
Receiver
and VCR
SVmEOjacks
?
Toconnecta satellite receiverand VCR
I
Connect
2
Use a coaxial cable to connect one of the splitter's
jacks to the rFV's CABLE jack.
]
4
Use a coaxial cable to connect the splitter's other output jack to
the satellite receiver's VHF/UHF input jack.
Connect the satellite antenna cable to the satellite receiver's
5
satellite input jack.
Use a coa×ial cable to connect the satellite receiver's
See page 21,
the CATV cable to the single (input) jack of the splitter.
output jack to the VCR's VHF/UHF
two output
VHF/UHF
input jack.
6
Use an A/V cable to connect the satellite receiver's
jacks to the TV's A/V input jacks.
7
Use an A/V cable to connect the VCR's A/V output jacks to the
TV's A/V input jacks.
8
Run Auto Program,
on page 43.
as described
A/V output
in "Setting Up the Channel
List"
cable
Splitter
(not supplied)
1
CATV
T_
Satellite
antenna
cable
Coaxial
/
cable
5
4
L_9
coRor:codedto connectors.
Connect red to red,
white
cable
_
A/V cable
6
:H_H
AIV cable
7
AUDIOR AUDIOL VIDEO
to white,
etc.
Notes on Using This Connection
Watch
the satellite
receiver
Press
TVNIDEO repeatedly
to select
the VCR
input
(VIDE()
Press TVNIDEO repeatedly
to select
(VIDEO 1 in the illutstration).
the input
to which
3 in the
ilMstration).
Watch
the VCR
to operate
the satellite
receiver
or VCR
Activate
contro!
receiver
the TV remote
to operate
or VCR
VCR functions
remote
control
Label
remote
video
the satellite
with
inputs
identify equipment
to the TV
the TV
to easily
control.
See "Programming
For the satellite'
receive1;
press
the Remote
the VCR is connected
Control"
on pages
49-5U.
SAT/CABLE FUNCTION. For the VCR, press
VCR/DVD FUNCTION.
page
59.
See the instructions
for setting
up Video
Labels
on page
90.
connected
31
D VD Player
with
Component
Video Connectors
For best results, use this connection
component video (Y, PB, PR) jacks.
if your DVD player has
Toconnecta DVDplayer
video connectors
I
with component
-Use three separate component video cables to connect the DVD
player*s Y, PB and PR jacks to the Y, PB and PR jacks (VIDEO 5) on
the TV.
!_ :heY,PB
_ndP_iockS
onyOo_
Dw piayei
_reSometimes
_belod
x
CB and CR, or Y, B-Y and R-Y. ff so, connect
2
the canes
Use an audio cable to connect the DVD player's
jacks to the TV's VIDEO 5 audio input jacks.
to like colors.
audio
Component video cables
Ill,
color<oded
to connectors,
Connect
white
m
red to red,
to white,
etc.
Audio cable
output
Notes
onUsing
ThisConnection
Watch the DVD player
Press TVNIDE0 repeatedly
illustration).
to operate
See "Programming
Activate
control
the DVD
player
the TV remote
to operate
Press
to select the DVD input (VIDEO 5 in the
the Remote
Control"
on pages
49-5U.
VCR/DVD FUNCTION,
the DVD
player
Contro] DVD
the TV remote
Label
video
functiorts
control
inputs
identify equipment
to the TV
with
to easily
•
See
/
•
O[:%er ltlng
See the instructions
a [-)V[) Player"
for setting
on page
60.
up Video
Labels
on page
90.
connected
X_ You cannot record the signal from any equipment
connected
into the Y, PB,
P_ jacks.
33
D VD Player with
S WDEO and Audio
Connectors
Use this cormection if your DVD player does not have component
video (Y, PB, PR) jacks,
Toconnect a DVDplayer with A/Vconnectors
1
Use an audio cable to connect the DVD player's
jacks to the TWs audio input jacks.
2
Use an S VIDEO cable to connect
jack to the TV's S VIDEO jack.
audio output
the DVD player's
S VIDEO
Z
S VIDEO
cable
uNsout
?
coloPcoded to connectors,
Connect red to red,
white to white, etc.
Audio cable
Notes on Using This Connection
Watch
the DVD
to operate
Activate
control
phyer
the DVD
player
the TV remote
to operate
Press W/VIDEOrepeatedly
illustration).
See "Programming
Press
to select the DVD input (VIDEO 1 in the
the P.emote
Control"
on pages
up Video
Labels
49-50.
VCR/DVD FUNCTION.
the DVD
player
the TV remote
Label
video
control
inputs
identify
equipment
to the TV
to easily
connected
See the instructions
for setting
on page
90.
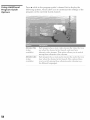
Camcorder
For easy connection of a camcorder, the TV has front A/V input jacks.
If you prefer, however, you can connect the camcorder to the TV%
rear A/V input jacks.
Using
sV!DEO
ia ki.
Toconnect a camcorder
See page 21.
1
v
VIDEO
-Use A/V cables to connect
the TV's A/V input jacks.
2
the camcorder's
A/V
output
jacks
to
INPUT
AN cable
To AtV output
Ifyou have a mono camcorder,connectitsaudio outputjackto the
TV% L MONO audio jack.
Notes on Using This Connection
Watch the camcorder
Press TVNIDEO
repeatedly 1o select the camcorder
input[
(VIDEO 2 in the
illustration).
Label
video
inputs
to easily
See the instructions
for setting
up Video
Labels
on page
90.
identify equipment connected
to the TV
35
Audio
Receiver
For improved sound qualit_
through your stereo system.
you may want to play the TV's audio
Toconnect an audio system
1
Use an audio cable to connect the TV's audio output jacks to the
audio receiver's line input jacks.
2
Using the TV's Audio Menu, set the Speakeroption to Off.Then set
the AudioOut option to Fixedor Variable,depending on how you want
to control the volume. For details, see "Using the Audio Menu"
on page 80.
3
Turn on the audio receiver, and then set the receiver's
to the jack into which you connected the TV.
line input
D VI-Equipped
Device
If you have a device, such as art HDTV receiver, that has DVI (Digital
Video Interface)
output,
use the following
connection.
Toconnect a device that has DVI OUT:
1
Use an HDMI-to-DVI
cable
to the TV's HDMI IN jack.
to connect
the device's
DVI OUT jack
/_Yo.can
pU,_hoSe
HDMJ
_ab_oS
(or
Cable
adoptersl
_tyo._
local
e_oct,oni_
store.
2
Use an audio cable to connect
the TV's HDMI analog audio
the device's
input jacks.
audio
output
jacks to
Bi
HDMI-to-DVI
cable
Note on Using This Connection
Watch the DVI device
Press TVNIDEOrepeatedly
Label video inputs to easily
identify equipment
connected
to the TV
See the instructions
to select the VIDEO 7 input.
for setting up Video Labels on page 90.
37
HDMI-Equipped
Device
If you have a device, such as an HDTV receiver, that has a HighDefinition Multimedia Interface (HDMI), use the following
connection_
To connect a device that has HDMI OUT:
1
Use the HDMI cable that came witl-_ your device to c:onr_ect the
device's
HDMI OUT jack to the TV's HDMI IN jack.
_1 HDMI cabJestransmit both audio and video signals, (Separate audio cables
are not necessary.)You can purchase HDM_ Cablesat your Rocalelectronics
Store.
m
HDMI cable
'1
I-'1D'JtkvJI
i_
Note on Using This Connection
Watch the HDMI device
Press TVNIDEOrepeatedly
Label video inputs
identify equipment
to the TV
See the instructions
to easily
connected
to select the VIDEO 7 input.
fo__ setting up Video Labels on page 90.
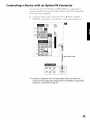
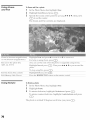
Connecting
a Device
with
an Optical
IN Connector
You can use the TV's DIGITAL AUDIO
OPTICAL
output
jack to
connect an audio device that is Dolby Digital and PCM compatible,
such as an audio amplifier.
[]
Using an optical
OIrFICAL output
cable, connect the TV's DIGITAL AUDIO
jack to the device's
audio optical input jack.
Optical audio cable
o0T
@Auo_o
@
connect the TV's analog audi o output jacks tO the amplifier%
input jacks, as described on page 36.
ana!0g aud!0
39
Using
the
CONTROL
S Feature
CONTROL S _llows you to control your system _r_d other So_y
equipment with one remote control. In _ddition to _llowing you to
control multiple devices with one remote control, the CONTROL S
fe_ature tallows you to always point your remote control at your TV,
instead of h_wing to point it _t the other equipment, which might be
hidden or out of direct line of sight.
Use CONTROL
S IN to send signals to the rgV.
Use CONTROL
S OUT to send signals to connected
I
I
equipment.
Using
CableCARD
CableCARD provides cable subscribers with access to digitally
encrypted cable channels -- without the need for a set-top box -- that
will enable you to receive not only standard definition but also high
definition television. The CableCARD, which is provided by your
cable TV company, is inserted into the TV's rear pane! CableCARD
slot. After the service is actiwlted with your cable TV company, the
card replaces the need for a separate set-top box.
About
Using
CableCARD
If you are plamung to use a separate cable box for digital cable TV servwes, you may be able
,o receive prograrnmmg
using this TV with the CableCARD instead m except in the following
211_cumstartce_:
.J
Your cable TV company
.J
Yon want to
on-demand
bidirectional
CablcCARD
does not provide
CableCARD
service in your viewing
area.
access your cable company's interactive or advanced features, snch as videoor, in some cases pay-per-view}.
At this time. these services reqmre a
link, which are only available through the use of a separate set-top box.
is currently a unidirectional
device onlvt and carmot provide these advanced
services
Check with your cable TV company for CableCARD service details, limitations, prlmng, and
availability, all of which are determined by your cable TV company -- not Sony
AcCfvatfng
CabteCARD
Service
Before you can use CableCARD service, you need to insert the
CableCARD (supplied by your cable TV comparty) and activate
service, as described below:
1
Turn off theTV.
2
Insert the CableCARD
into the TV's CableCARD
i
the
slot.
:¸¸¸¸i¸¸¸
ii!!!ii i
CARD is on same
side as indicator on slot
CAUTION:Inserting theCabteCARD incorrectly may result in permanent
damage to the card and the TV.
41
[]You
can also access
3
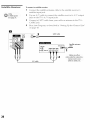
Gently push the card into the slot until it locks into place.
4
Turn on the T_ZAfter 1-2 minutes, the CabIeCARD setup screen is
displayed. This screen includes information
your cable TV
company will request before they can activate your service.
5
Follow the displayed instructions: Phone your cable company.
representative
will guide you through the activation process.
6
After your CableCARD is activated, your cable TV company will
download the service information, including the chacmel list, to
the CableCARD.
information about your
CableCARD in the Applications
Menu (see page 93).
A
After the CableCARD has acquired channels from your cable TV
compans the TV tunes to the lowest available channel.
Removing
CabteCARD
the
In the event
you want
to cancel
your
service,
contact
your
cable
TV
company.
CableTVprogramming servkes that require CableCARD.
1
Turn off the TV.
2
Push the eject button on the TV's CableCARD
card.
slot to release the
CabI_OARD
:jeer button
3
Pull the CableCARD
straight
out of the slot to remove
To install a different CableCARD, follow the instructions
"Activating CableCARD Serx r ice ' ' on p%eO" 41.
it.
in
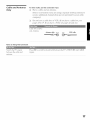
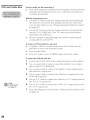
Setting
Up the
Channel
List
After you finish connecting the TV, you need to run the k£tial Setup
feature, which automatically
creates a list of available analog and
digital channels and lets you correct tilt and vertical correction
settings. The Initial Setup screens appear when you turn on your TV
for the first time after hooking it up.
Using
Initial
Setup
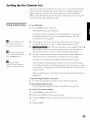
Torun InitialSetup
1 Press POWERto turn on the TV.
The Initial Setup screen appears.
Using the remote control, move the highlight to the desired
lan_mage,o
, then press _
to select that language. The Tilt
Correction screen appears.
IL'II For more details on using
Tilt Correction and Vertkal
Correction, see pages 89-9£
_To
2
Press _, ,_ to correct any tilt of the picture. You can choose a
correction between +7 and -7. When finished, press _.
3
_
The Vertical Correction screen appears. Press
_, to make a vertical correction to the picture. You can choose a
correction between +5 and -5. When finished, press _.
4
The next screen instructs you to connect your cable/antemm.
Check that you've connected your signal source correctly.
exit the Tilt Correction
andVerticalCorrectionscreens,
presstbe MENUbutton.
To start Auto Program,
_lf
youare usinga
CabbCARD,Auto Programis
disabledfor the CABLEinput,
highlight
Yesand then press _.
Auto Program automatically
creates a list of receivable analog
and digital channels. Auto Program may take ,50minutes or more
to complete. A progress bar is displayed while the channel list is
being created.
When Auto Program
displayed.
is finished,
the lowest numbered
Torun Auto Programagain at a later time
[] Use the Auto Program feature as described
Toadd individual digital channels
Use the Digital Channel feature as described
charmel is
on page 84.
on page 84.
Toreset the IV to factory settings
1 Press POWER
to turn on the TV.
2
Hold down
RESET
on the remote control.
3
Press TVPOWERon the TV. (The TV will turn itself off, then back
ort.)
4
Release RESET.
43
Overview
This chapter describes
remote control.
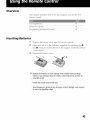
Inserting
how to set up, program,
and use the TV's
Batteries
45
Button Descriptions
Inserting
46
Programming
the Remote
Contro!
49
1
Remove
the battery
cover
2
Insert two size AA (R6) batteries
and O terminals
on the batteries
Batteries
from
the remote
control.
(supplied)
by matching
the O
to the diagram
inside the battery
compartment.
3
Replace
the battery
cover.
2
_* Remove the batteries to avoid damage from possible battery leakage
whenever you anticipate that the remote control wH[ not be used for an
extended period.
Handle the remote control with care.
Avoid dropping it, getting it wet, placing it in direct sunlight, near a heater,
or where the humidity is high.
45
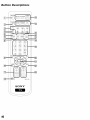
Button
Descriptions
_C_]_T_,'MUTIN
,,,_@OFF
VOR/DVD
SAT/CABLE
POWER
SAT/CABLE
@
TV
[]
PICTURE
DRC
SCREEN
DISPLAY
RM-Ylg9
[]
MUTING
Press
to mute
the sound.
[]
SYSTEM OFF
Press to turn off all Sony brand audio/video
equipment
at once. (May not function
with older Sony equipment.
Does not function
with DVD/VCR
combination
unit.)
[]
TVNCR/DVD
Press
Transport
Buttons
_
to change
Press
the VHF/UHF
again
or press
output
VOL+ to restore
the sound.
of the VCR (or DVD/VCR
combination
unit).
Rewind
•
Record
•
Stop
II
Pause
Fast
(press
together
with
_)
forward
[]
JUMP
Press to jump back and forth between
two channels.
The TV alternates
current
channel
and the last channel
that was selected.
[]
ANT
Press
to switch
between
the sources
connected
repeatedly
until
the TV displays
between
and
the
to the TV's
VHF/UHF
(:ABLE
in minutes
(15, 30, 45, 60, or 90) that
inputs.
[]
SLEEP
Press
},out want
the TV to remain
Sleep Off appears.
time.
[]
PICTURE MODE
Press
While
repeatedly
on page
[]
DRC MODE
Press
repeatedly
Viewer"
O F hone
on page
61. Also
Press
to reset
clear
Fax orite
Channels
Press
to adjust
[]
CODE SET
Press
video
To cancel
press
until
once to display
the remaining
picture
Vivid, Standard,
For details,
modes:
see "Selecting
Video
Options"
to program
the available
available
the remote
control
the Remote
VCR/DVD: Press
Buttons
SAT/CABLE: Press
to turn
TV: Press
to turn
on and off the TV.
to turn
The indicator
Buttons
remote
in the Applications
Creation
Menu.
modes:
For details,
see
defaults.
Menu
See pages
(page
92).
43, 79, and
81. Also
usec[ to
58).
lights
control
VCR/DVD: Press
to operate
Control"
POWER
FUNCTION
Reality
in the Video
78-79.
to the factory
(see page
Digital
a\ aihble
the volume.
see "Progranwning
[]
is set, press
Menu.
Also
on pages
the settings
VOL +/-
[]
off automatically.
the available
through
CineM0ti0n.
Video
[]
[]
feature
in the Video
to cycle
Progressive,
"Selecting
RESET
through
a_ ailable
shutting
78.
Interlaced,
[]
the Sleep
to cycle
Movie, Pro. Also
the time
on before
non-Sony
on page
on and off the VCR or DVD
on and off the satellite
up momentarily
when
video
equipment.
For details,
49.
player.
receiver
pressed
or cable
to show
box.
which
.........
equipment
the
is operating:
to have
the remote
control
SAT/CABLE: Press
to have the remote
control
TV: Press
the remote
operate
to have
control
operate
the VCR or DVD
operate
the' satellite
player.
receiver
or cable
box.
the TV.
TV/SAT
When the remote
control is set to operate
the satellite
the satellite
receiver's
TV and SAT (satellite)
inputs.
•
When
Audio
receiver,
press
to switch
between
the remote
control is set to operate
the TV, press repeatedly
to step through
Effect options.
Also available
in the Audio
Menu. For details,
see page 8U.
the
47
[]
TVNIDEO
Press repeatedly
[]
DISPLAY
Press
set) and other
[]
SCREEN MODE
Press
0-9
(_
ENTER_
[]
GUIDE
[]
_
Press
change
55-57.
MENU
channels
CH +/-
the TV s video
Also
channel
Press
again
the Screen
avaihble
a channel;
Mode
options.
the channe!
digital channels
pa_e 52.
(for example,
2.1). For details
Press
to display
the progr
Press
t1._ _, ,_ to move
When
no n-tent.is are displayed,
Press
Press
down
of your
the on-screen
cursor.
to display
the Menu.
on page
Favorite
Press
again
after
button
m_ guide
about
(pages
changes
the (_
time,
with
Channels,
3 seconds.
digital
Screen
press
the Favorite
see page
Mode,
Press
ENTER to
channels,
to select
see
_.
Channels
screen.
58.)
the Menu.
For details,
see "Using
77.
to scan through
channels.
either CH button.
To scan
quickly
(if
provider.
an item,
displays
to exit from
on using
0-9 and ENTER buttons
program
To select
C_
label
82-83).
on selecting
satellite
and channel
off.
For details
Menu
Use
information
current
to turn Display
in the Screen
pressing
m E uts.
number,
immediately.
the Menus"
[]
between
0 - 9 to select
(For more
[]
through
the current
information.
to toggle
see pages
[]
to cycle
once to display
through
channels,
press
and
hold
Programming
the
Remote
Ifyou have
Control
video
equipment
other than Sony
brand
(or ifyou
have a
Sony DVD/VCR combination unit) that you want to control with the
TV's remote control, use the following procedure to program the
remote control.
f-_Theequipment
musthaveinfrared
(JR)rem0te
Capability
i_ordei
tobeused
with the remotecontrol
1
Turn to the list
the three-digit
equipment.
(If
number
listed
2
Press
3
Press the VCR/DVDFUNCTIONor SATICABLE
FUNCTIONbutton.
4
Using the 0-9 buttons,
number.
S
Press the ENTERbutton.
of "Manufacturer's
Codes" on page 50, and find
code number
for the manufacturer
of your
more than one code number
is listed, use the
first.)
CODESET.
enter
the three-digit
manufacturer's
code
z
steps
2 through
z
5[
To check if the code number works, aim the TV's remote control
at the equipment and press the POWERbutton that corresponds
with that equipment. If it responds, you are done. If not, try using
another code listed for that manufacturer.
Notes
[]
If more than one code number is listed, try entering them one by
one until you come to the correct code for your equipment.
[]
If you enter a new code number,
entered at that setting is erased.
[]
In some cases, you may not be able to operate your equipment
with the supplied remote control. In such cases, use the
equipment's
own remote control.
[]
Whenever you remove the batteries to replace them, the code
numbers may revert to the factory setting and must be
reprogrammed.
the code number
you previously
49
Manufacturer's
Codes
VCRs
DVD Players
Sony
Admi_:a[
(M. Ward)
::;01,302, 303
327
Aiwa
Atidio
338, 344
31'4 337 .........
Sansui
309, 330, 328,
335, 324, 338
314
So!2y
Apex
General
Samsur_g
Sanvo
.......
322, 313, 321
_30,
? ._3_.............
Hibachi
IVC
Broksonic...............
319, 317
Scott
Canon
30 }, o08
Ci{-iZ_,n........................................
3:32......................................
312, 313, 321,
%_., 32;, o24,
325, 326
Magnavox
Mitsubishi
Oritlon
C;aig
327, 328
Panasonic
D_;nan_ic
.......................
302 332 ..................
Realistic
Sha[p .................
Cri;erion
.............. 315 ............
Signature 2000
338, 327
Curtis Math_is
30;, 338; 3{39
(ME ;_grd)
.................
I3aeWoo ...........................................................
................... SV2000
338
...................................
DBX
Dimensia
.
314, .336, 337
.... 304 ..........
•
Z3shffo
.....
Z_ttu_g
2_,ac
Funai ...................... 338 ..............
General Ei_!c[ric
329 3642509 ......
_Tchnies .........
Toshiba
4o {qaoo ..............................................
322 339; 3i0 ......
Golds[at ........
332
Hitachi
306, 304, 305, 338
Wards
327, 328, 335,
3:31,332
Ya_})ah _ ................. 31L 3_0, 336, 337
lnst _int
Z _'nith .........
Motorola
JC Penne>
309,
330,
JVC
314,
345,
Kenwood
....
314,
LXi (Stows) .....................
332
Magnavox
Marantz
............
305, 304,
314,336, 337
336, 337,
346, 347
336,332, 337
30513;0"_
.........
q 35, 338
3082 3001310
314, 336, 337
Laserdisc
753
332
Samsung
2bshiba
Emersolq ........................
319£ 32(} 3] 6, ............
317, 318, 341
Fisher
330, 335
...........................
.........................
757...................................
761
759.....
..............
308, 309, ._38, 310
.......
338.....................
.....
758
756
ph!lips
............................................
757 ...........................................
Piom,or
752
RCA / Pi:oscan
75__
,)
Svlx _la
S_Tmph°nic
E]ectric
75!.....
762
755
758
754
Zeniih ....................... 760
-}
4
...............
M4, 3o6, _38, o37
Cable Boxes
309, 308
312, 311
Sony
2,30
Hamlin/Regal
222, 223, 224,
225,224)
201,202, 203,
....
331
Players
Sony
701
.............................................................................
Panasonic
704, 710
PioJ_oer
........... 702
DVD/VCR Combination
Units
Jerro[d/G.
I./
204,205,
206,
207, 208, 218
Oak
227, 228, 229
Pai'_asonic
..................
2i9122()_
Pioneer......................... 214, 215
................................................................
_\)comSCient!fic
Atlanta
216,209'
217
............
Zenith
212, 213
..................................................
Satellite Receivers
Marta
..........................................
...................................
332.......................................
Son_.........................................
601...........
M emote\
Minolta
Mitsubishi/
MGA
Multitech
NEC
C
,o
30 L ,K_5
305, 304
'_ ' 324,
' 32.,q 026
",
a23,
g
25,
338, 321
Broksonic
J\,'C
Panasonic
802
1bshiba
Hitachi
805
Hughes
Mitsubishi
Panasonic
804
809
803
RCA/
PRDSC AN
802, 808
_\}shiba
806, 807
D!ympic......................................................
399_308................................
327
:,17
...........
Panasonic
Pentax
308, 30% 306, 307
2305,304
Philco
308, 309
Philips
Pioneer
308, 309, .310
308
Quasar
RCA/
PROSCAN
308, 309,306
304, 305,308,
309,311,312, 313,
310, 329
S°ns:.................................
8!91..........................................
Dish Network
810
................................810
Echostar
Samsun 8...........................
603.....................................General Electric
314, %q 6, o37
Optimus
Orion
605
604
609
602
Overview
T_is chapter
describes
ho_*7 to use _he features
of your
TV.
51
Watching
[]For
TV
a complete list of all
the functions of the remote
Activate
control, see pages 45-50.
operate
the remote
control
to
Press
TV FUNCTION
Press
TV POWER
tire TV
Turn
on/off
Tune
directly
the TV
to a channel
To tune to analog
then ENTER.
For digital
press
subchannels,
0-9 again,
For example,
press
channels,
and
press
then
to select
2+1 +O+1
press
0-9 and
0-9, C),
ENTER.
subchanne121.13,
+3, and then
press
ENTER.
....
............
program
details.
Adiust
Mute
the volume
the sound
Alternate
between
back and
two
forth
channels
Press
VOL +/-
Press
MUTING (press
Press
JUMP
Tire TV alternates
channel
Display
the current
channel
number
(and
inform
other
gu!d e. See page s 531:or
and
number,
current
Switch
the TV's
VCR, DVD
connected
input
playei;
Press
video
options,
customize
TV's video
and audio
set parental
equipment
controls,
details,
and
page
the channe!
and channel
label
to turn
Display
to cycle through
connected
to the
inputs,
MENU to disp1 _y the Menu.
Press
the TV's
tuned,
to display
time,
TVNIDEO repeatedly
the video
equipment
Change
setup,
to the
or other
the current
channel
DISPLAYagain
(if set). Press
off.
to unmute)
between
the last
DISPLAYonce
Press
_tion)
again
see
Usnrg
the Menu_
For
on
77.
nlore
Switch
sources
VHF/UHF
the TV's input between
connected
to the TV's
and
CABLE
inputs
Press ANT to alternate'
between
sources
connected
to tlre TV's VHF/UHF
and
CABLE
inputs.
Using
the Program
Guide
The program
guide lets you review
both analog and digital channels.
program
information
and
select
video !nputs or if the ¢hannel Fix option is set to anything other than Off
(see page 84),
GUIDE
Todisplay the program guide:
Press GUIDEon the TV's remote control The program guide appears,
with the currently selected program showing in the background.
Program title and
description, program
duration
Channel number, call
etc.
remaining, rating
information, closedcaption availability, etc.
result, it may sometimes include only the channel number, without a
program title or description.
Scroll through
the channe!
list
Press 4" €,
Select the currently disphyed
channel and exit the guide
Press _.
Display
Press ,_. Se'e "Using Additiona!
Guide Options" on page 54.
additional
options
Exit the Guide (without
changhag channels)
Program
Press GUIDE
53
Using Additional
Program Guide
Options
Press ,_ while in the program guide's channel list to display the
following options, which allow you to customize the settings of the
program o1l the currently tuned channel
Alternate
Video
Each
program
(when
see whel_
available)
alternate
among
Alternate
Audio
has a main
the channe]
victeo
these
Each
program
(when
hear
when
available)
you
among
languages).
stream
tinted),
This option
video
has a main
the chamrel
to switch
for different
strearrts.
alternate
video
is first
that you
may have
allows
you
to switch
streams.
audio
is first
these
(the video
and
stream
tuned).
alternate
(the audio
This
audio
option
streams
that you
a]]ows
(e.g.,
Using
Screen
Mode
(models
The Screen Mode
standard-definition
_I_ You can also access the Screen
Mode settings in the Screen Menu.
For details, see page 82.
Using Screen Mode with
Standard
KD-30/34XS955
feature lets you change the picture
(480i/480p)
and high-definition
size for both
(720p/1080i)
sources,
[]
Press SCREEN
MODErepeatedly
Screen Mode settings.
Definition
(480i/480p)
picture
proportionately.
edges of the picture
1(5:9 screen.
to toggle through
the following
Sources
Wide Zoom enlarges
SCnEFN
Only)
the center
portion
The
left and
are stretched
of the
right
to fil! the
Wide Zoom
I
Normal displays the 4:3 picture in its original
size, Bars are shown to fill the 16:9 screen.
SCnEEN
Normal
Full stretches
the 4:3 picture
the 16:9 screen.
SCnEEN
horizontally,
to fill
Full
Zoomenlarges the 4:3 picture proportionately
to fill the 16:9 screen. Some clipphrg may
occur. Zoom is useful for watching Letterbox
movies.
SCnEEN
Zoom
When you change channels or inputs, the Screen Mode settings revert
to the 4:3 Defaultsetting in the Screen Menu. To retain the current
Screen Mode setting as channels and inputs are changed, set 4:3 Default
to Off.For details, see page 82.
55
Using Screen Mode with High-Definition (720p/10800 Sources
SCnEEN
Full displays
the picture
If the source
is a 16:9 high-ctefinition
(720p/1080i)
signal,
at its original
the picture
size.
fills the
screen,
Full (native 16:9)
If the source
signal
shown
is a 4:3 standard-definition
that has been upconverted,
to fill the 16:9 screen.
bars
Full(upconverted 4:3)
Zoom enlarges
both vertically
the picture
proportionately,
and horizontally.
Some
clipping
occur.
may
Zoom
Horizontal Expandstretches the picture
horizontally. SOl%reclipping may occur.
SOREEN
Horizontal Expand
Vertical Expand stretches the picture
vertically. Some clipping may occur.
SOREEN
Vertical
Expand
are
Using
Screen
Mode
(models
KD-36XS955
Only)
The Screen Mode feature is useful whe_ a 480i signal has been
upconverted
to a 720p or 10801 signal, which results in undesirable
"black bars" appearing
on al! four sides of the picture, Using the
Screen Mode feature, you can enlarge these )ictures,
minimizing
the
size of the black bars.
Using Screen Mode with
High Definition
(720p/1080i)
Full displays
SCREEN
_Lpconverted
visible
Sources
a 480i signal
to 720p
at left, _ight,
that
has been
or 1080i with
top, and
bottom
black
bars
sides.
Full
Zoom enlat_ges the picture,
of the black bars.
SCRE[N
minimizing
the size
Zoom
Horizontal Expand stretches the picttn_e
horizonta!l)t
Some clipping may occult.
SCRE[N
Horizontal Expand
Vertical Expand stretches the pictm'e verticall):
Some clipping may occur=
SCREEN
Vertical Expand
57
Using
Favorite
Channels
The Favorite
Channels
feature
up to 16 favorite
channels
that
the Favorite
Channel
option in
Add to Favorites
feature in the
Using
Menu
the
Channel
MENU
r_For detailson usingthe
ChannelMenu,seepage84,
lets you select programs
from a list of
you specify. You can create a list using
the Channel
Menu, or by using the
Favorite
Channels
guide.
1
Press
MENUto display
2
Press
• or _, to highlight
3
Press
_
4
Use the 0-9 altd ENTERbuttons
to select
you want to assign
select that channel
the Menu.
the Channel
icon and
press
(_.
Favorite Channels.
to enter
the channel
to the Favorite
Channel
as a Favorite
Channel.
number
number
that
Press
_
/_ Too,tei,igitaLc,a.,ei .,_b_isi. step4._sethe0;%o.a.d EN:ER
buttons,
5
To add
more
channels
to your
To clear a Favorite
Channel,
you want to clear. Press @
Using the Favorite
Channels
Guide
to
favorites
list, repeat
press 4, or • to highlight
and then press RESET.
6
Press
1
During normal
viewing
(with no menus
The Favorite
Cham_els list appears.
2
Press
4, or • to highlight
the current
highlight
To change
press _.
Press
4.
the channel
MENUto exit the Menu.
To add
3
step
_
the channel
channel
Favorite
to select
you want
to the list of Favorite
Add to Favorites and
your
on screen),
press
Channels
the channel
press
_.
to watch.
Chalmels,
C_.
list, highlight
you want
Edit Favorites and
to watch.
Using
Other
Equipment
with
Your
TV Remote
Control
AH Equipmen*
Switch
the TV's input
VCR, DVD
connected
playe_;
Press TVNIDEOrepeatedly to cycle through
the video equipment connected to the
TV's video inputs.
to the
or other
equipment
operate non-Sony equipment
(and Son), DVD/VCR
combination
unit)
Opera#ing
first time you use it. See "Programming
the Remote Contro!" on page 49.
a VCR
Activate
the remote control
Turn on/off
VCR/DVDFUNCTION
VCR/DVDPOWER
Record
Play
P'*
fi
.................
Fast forward
Rewind
Pause
........
Operatfngl
Satellite
a
Retelver
the tape
ii ..........
or backward
(release to resume normal
Activate the remote control
SATtCABLEFUNCTION
to operate
playback)
the satel]ite
re_ceiver
Turn
......................................................................
on/off
SATiCA£[[ POW'[R............
Select..............................................
a channel
...................
CH +/-
59
Operating
a Cable
Box
Activate
the remote
SAT/CABLEFUNCTION
SAT/CABLE
POWER
Select a channel
0-9, ENTER
Change
channels
Back to previous
Operating
Player
control
to operate the cable box
Turn on/off
CH +/channel
JUMP
a DVD
Activate
the remote
to operate
control
VCR/DVDFUNCTION
the DVD
Turn on/off
VCR/DVDPOWER
Play
Stop
Pause
•
II
Step through different
tracks of the disc
_
Step through different
chapters of a video disc
CH+ to step forward
Select tracks directly
Display the DVD menu
0-9, + ,_ (to move cursor),
MENU
Move highlight
(cursor)
Unft
Activate
the remote
to operate
[]When
the VCR is not
playing, TV/VCR/DVD switches
between the DVD player and
the VCR's tuner,
Switch between
Display
to step backward
or CN- to step backward
ENTER
4" _I' + ,i_
control
VCR/DVDFUNCTION
the DVD/VCR
Turn on/off
player
or _
SELECT
Select item
Operating
a
D VDfVCR
Combfnatfon
to step forward
VCR/DVDPOWER
the DVD
TVNCR/DVD
and VCR
the DVD menu
MENU
Play
I_
Stop
•
Pause
II
or backward
Move highlight (cursor)
and select (DVD)
4" _I,+ ._
Record (VCR)
Change
channels
Ad}ust tracking
(VCR)
(VCR)
CH +/- or 0-9, ENTER(using tuner)
CH +/- (during
tape playback)
About
Memory
Stick
Memory Stick (sold separately) is a compact, portable, and versatile
hrtegrated Circuit recording medium with a data capacity that makes
it perfect for portable applications, such as digital photography.
Memory Stick is specially designed for sharing digital data among
Memory Stick compatible products such as digital cameras and
digital video cameras. Because it is removable, Memory Stick can also
be used for external data storage.
The Memory Stick Viewer on your TV al!o_zs you to view files that
are stored on Memory Stick media. You can view:
[]
Digital photos (JPEG files)
[]
Movies (MPEG1 files)
You can also play slide show background
music using MP3 files (or
m3u playlists) stored on your Memory Stick.
For more information about handling Memory Stick media, see
H Nctes
)
on Using Memory Stick Media*' on page 75.
Features
With the Memory
Stick Viewer, you can:
[]
View photo (]PEG) and movie (MPEGI)
index or Slide Show
files in a thumbnail
[]
Set customized Slide Show options,
backgromrd audio
[]
Pan, zoom, and rotate photos
[]
Mark photos and set quantities of prints to be output when the
Memory Stick is inserted into your photo printer (not supplied)
[]
Lock (protect)
including
or delete files on the Memory
transitions
and
Stick
61
Memory
Stick
Compatibility
This television is compatible
Stick media types:
with the following
[]
Memory
[]
Memory Stick Duo and PRO Duo Media
Stick adaptor)
standard
Sony brand Memory
Stick Media
and compact
versions af Memory
(without
the Memory
Stick. It is not necessary to Use
an adapter for Memory St!ok Duo and Memory St!ok PRO Dua_ ff you usean
adapter it may damage the adapter and Memory Stick slot,
[]
Memory
Stick Media
[]
Memory
Stick PRO Media
with
Memory
Select
Function
About Memory Stick PROMedia
Memory
Stick PRO media features vary by and are dependent
upon
tlie design of liost liardware
devices.
Memory
Stick PRO in tliis
television
has been tested to support
up to 1 GB media capacity
and
does not support
high-speed
transfer, MagicGate
copyright
protection
technology,
or access control security
features.
Memory S*ick
Functionafity
Sony cannot guarantee or assure tlie Memory
this television in tile following cases:
brand Memory
Stick functionality
[]
You tire using non-Sony
[]
You tire usin oo" _r ideo or audio clips that ha_ r e been processed
computer.
[]
You tire using files tliat were obtained
printed film processing center.
[]
The Memory
Stick has been formatted
on
Stick media.
from tile Internet
on tl personal
on a
or from a
computer.
Sony recommends that you back up till data stored on Memory Stick
media to avoid potential data loss. In the above two cases, in order to
avoid potential data corruption that may occur, be sure to back up
data prior to use with the TV's Memory Stick Viewer. Sony cannot
accept responsibility in the event that data recorded to Memory Stick
media is lost or damaged. For certain non-Sony brand Memory Stick
media, you can view images, but you cannot rotate, delete or
protect/unprotect
images on the television. An error message will
occur if you attempt tiny of these operations. This is a result of the
unique file directory structure on these particular flash memory
media and is not a malfunction of the television.
File
Compa*ibffity
The Memory
Stick Viewer is compatible
with JPEG images taken with
Sony digital still cameras and MPEGI* movies taken with Sony
digital cameras and camcorders. In order to be viewable in the
Memory Stick Viewer, the files must have the following file name
extensions:
Trademark
in format fort
JPEG
.iPg
.jpeg
MPEG1
.mpg
_mpeg
Memory Stick, Memory Stick Duo, Memory Stick PRO, Memory
PRO Duo, and MagicGate are trademarks of Sony Corporation.
Stick
*Some variations of MPEGI movies may not play back correctly',
63
Inserting
Inserting
Memory
and
Removing
a Memory
Stick
a
Stick
Standard
and Compact versions
an adapter
adapter
far Memory
of Memory
Stick, It is not necessary to use
stick DuO and Memory
it may damage the adapter
St!ck PRO Duo. If you use an
and Memory
Stick slot,
Locate the Memory Stick slot (see page 12) and insert the
Memory Stick into the Memory Stick slot as illustrated below.
When inserted properly, it should slide in with little resistance
and click into place.
I
ha
Be sure to inseit the Memoiy
Insert only Memory
insert other
stick
in the Correct directionl
St!ok media into the Memory
objects into the Mot may damage
To remove the Memory
page 65.
Stick, see "Removing
If the Memory
Stick slot, Attempting
the TV.
a Memory
Stick" on
to
Removing
a
Memory
Stick
Toremove a Memory Stick
1
Check that the Memory Stick indicator is off. (When the light is
on, this indicates that the TV is reading data from the Memory
Stick.)
Memary Stick LEDon the TV's front pane! !s!!t) may damage the Memory
Stick or its contents.
2
Push the Memory Stick gently into the slot, and then release it
The Memory Stick media is ejected.
TV's
3
locking mechanism
Pull the Memory
may become damaged.
Stick completely
out of the slot.
Memory Stick media from the TV's Memory
location when it is not in use.
St!ok s!ot and store !t!n
asafe
65
Using
the Memory
Stick
Turn
or1 the TV and insert
movie
.............
¢_
/D
Index
files you want
a Memory
to view.
Stick that
For details,
cor_tains
see page
the photo
if the Memory Stick Index does not appear, press the MEMORY STICKbutton
on the remote €ontroJ.
The Memory Stick Index appears, wl-ficl-t displays
of the files stored on the Memory Stick.
tl-mmbnail images
Informationabout the
highlightedphoto or movie
Highlighted
Thumbnailsof photos
movies
MemoryStickMenu
About the Icons on the Thumbnail
Images
(JPEG) file.
(;M_
f.;)
or
64.
Indicates the thLuTLbm_i]is locked. Locked files cannot be changed
or deleted. For details, see "Protect" on l:_ag_e69.
Indicates
that the photo is marked
Indicates
that the photo has an associated
to be printed.
voice 1Ytenro,
Using the Memory
Stick index
The following
Move
describes
the highlight
to a photo,
memo
how
Press
to use the Memory
Stick Index,
4" _, 4, ,_.
voice
(_;:_5),or
movie (_)
thumbnail
Display
the
highlighted
voice
photo,
fnelTtO,
movie
Press
(Z_"
page
68 ;rod ' Phying
For details,
see
Vle_,. mg Phot;
Mo_ ies ' on page
s
on
71.
or
file full
screen
Disphy
page
the next
! Press
_' to select
of thumbnails
2 Press
{ to display
! Press
•
to select
V.
2 Press
_1, to select
_.
Disphy
the
previous
page
or next
of thumbnails
V.
the next
page
of thumbnails.
page,
press
4".
3 To go to the previous
To go to the next page,
Use
the Memory
Stick Menu
access
bar to
additiona!
options
1 Press
•
2 Press
4, or ,_ to select
to select
press
,I,.
_'i
Slide Show, Contents,
or
Memory Stick.
3 Press
t1"or !1' to select
the option
you
want
to
change.
For details
Index
Move
from
the highlight
the Memory
Stick Menu bar back
to the thumbnails
Exit Memory
Viewer
Stick
on these
Menu
options,
Bar O} hons
1 Press
4, or ,!_ to select
2 Press
4" to return
thumbnails,
thumbnails.
Press the
control.
see "Memory
on page
Stick
73.
_'i
to the currently
or { to display
MEMORY STICK button
displayed
the next page
of
on the remote
67
Viewing
Photos
When you select a photo from the Memory Stick index (described
page 66), it displays as sl-town below, with the following controls.
on
Information about
selected photo
Selectedphoto --
Previous/nextbuttons -Photo Menubar --
in fu!! SCreen.This iS a result of the way digital video cameras record Still
images, and is not a result of a malfunction with the TV.
Photo
Controls
Display
the next or
previous
[]When
the Menu is hidden,
press41,or ,_ to go to the
previous or next photo.
Highlight
file on the
Then
Memoz 7 Stick
Hide
the
Menu
only
bar,
the photo
With
(Previous/Next)
button.
4, to go to the prex ious
go to the next
the Photo
displaying
press
file, or ,_ to
file.
the highlight
in the Photo
Menu
bar, press
_.
Display
the hidden
Menu bar
Photo
Press
Phy the JPEG voice
(_(9 files only)
memo
Highlight
_" (Phy) and then press (Z).
To
pause the voice memo, highlight
Ill (Pause) and
then
Display
Index
the' Memory
Stick
t'.
press
Highlight
_.
Index in the Photo
Menu
bar
and
Index,
see
press _.
again
For details
page 67.
on the Memory
Access additional
options
in the Photo Menu
bat'
See "Photo
Menu
Exit Memo17
Press the M EMORY STICK button
contro!.
Stick
Viewer
Stick
"
Bar 0 F3 ttons
_Y
on page
69,
on the remote
The Photo Menu bar lets you access additional
options,
photo viewing
Toaccess the Photo Menu bar
I
Press 4, or ,i, to select SlideShow,View, or File.
2
Press
to select
the desired
option.
Index
Displays the Memory Stick Index, with the highlight on the
thumbnail of the currently displayed photo. For details, see
"Using the Mernoi'y Stick Index" on page 66.
Slide Show
Displays the Slide Show Menu. For details,
MenLLOptions" on page 73.
View
Rotate
A]lows you to rotate the photo in 90 degree
increments clockwise or com_terclockwise, For
details,
[JPEG
filesthat areprotected
File
see "Using Rotate"
on page 70,
Z00m/Pan
Allows you to magnify and pan across the
photo. For details, see "Using Zoom and Pan"
on page 70.
Protect
Allows you to the protect the pEG file from
any changes. When a JPEG file is protected, it
cannot be rotated or delete& Select On or Off,
Print Quantity
Xllows y(_t_to h_dicate tl-Lenumber of p_inis to
make of the specific photo when the Memory
Stick is inserted into a compatible photo
plinter (not supplied).
Delete
Deletes the JPEG file from the Memory
Stick.Your cannot delete a JPEG file that has
been protected (or if the Memory Stick is
locked).
are indicatedby the Lock_,_
icon.
[]The Print Quantity feature is
also known as DPOF(Digital
PrintOrderf:ormat).
see "Slide Show
69
Using Zoom
and Pan
To Zoom and Pan a photo
1
h-_the Photo Menu bar, highlight
2
Highlight
3
Specify the zoom center point by pressing _.._ 4" _, ; then press
to set the center.
The Zoom and Pan controls
Zoom
in (h_crease
magnification)
Highlight
Zoom and press
are displayed.
4" to zoom
or out (decrease magnification)
For help on using Zoom, press @.
Pan
(You can use Pan
(move
the photo
left,
right, up, down)
View.
ZoomtPanand press _.
only
when
in or { to zoom
the photo
Highlight Panand press _.
is magnified
out,
using
Zoom.)
Then press 4, ,_ 4" _ to pan around the
photo.
To stop using Pan, press @.
Exit the Zoom/Pan
Exit Memory
Using
controls
Rotate
Exit and press
Highlight
Stick Viewer
Press
C_.
the, MEMORY STICK button
on the remote
control.
ToRotate a photo
1
In the Photo Menu bar, highlight
2
Highlight
]
To rotate clockwise,
Rotate.
highlight
To rotate counterclockwise,
The photo
View.
is rotated
90 degrees
Clockwiseand press _.
highlight
Counterclockwiseand press
each time you
press
(_.
Playing
Movies
When you select a movie from @reMemory Stick Index (described
page 66), it displays as shown below, with the following controls.
on
Information about
selected movie
Selectedmovie
Enlargebutton -Play/pausebutton -Previous/nextbuttons -MovieMenu bar --
Movfe
Controls
Thequality of the movie
when enlargeddependson the
resolutionof the MPEG1file.See
yourcamera'sinstructionmanual
for details.
Enlarge
the movie
Highlight
window
Play
the movie
with
movie
controls
Pause
the movie
Display
Enlarge, and then
press
_.
display
the movie controls
again,
When the movie ends, the movie
the
displayed
again.
Highlight
_ (Play)
Highlight
||
Highlight
the
and
then
press
_.
displayed
the previous
or
(Pause)
and
then
press
Then press 4, to go to the previous
go to the next file.
Hide
With
the Movie
Menu
only
the
the highlight
button.
file, or,i,
to
bar, press
in the Movie
Menu
Bar Options"
on page
_'.
Display
the hidden
Movie Menu bar
Press
Access additiona!
options
in the' Movie Menu bar
See "Movie
Exit Memory
Viewer
Press the MEMORY STICK button
control.
Stick
_.
(Previous/Next)
next file on the Memory
Stick
bar, displaying
nlovie
To
press _.
controls
are
4t
Menu
72.
on the remote
71
To access the Movie Menu bar
MPEG1filesthat are
protectedare indicatedbythe
Lock_-_ icon.
1
Highlight
2
Pt_ess 4, or ,_ to select
3
Select
Index in the Movie Mel_LLhal:
the desired
Index, Slide Show, or File,
option,
Index
Displays the Memory Stick Index, with the highlight
thL_mbl_ail of the cu_relrtly disphyed
movie.
Slide Sh0w
Displays the Slide Show Menu. For details,
MenLLOptions" on page 73.
File
Protect
Allows yot_ to the protect the MPEG1 file from
any chalrges. When _urMPEG1 file is
protected, it cannot be deleted. Select On or Off.
Delete
Deletes the MPEG1 file f_orn the Memory
Stick.Yot_ cannot delete an MPEG1 file that has
been protected
lockect).
see
_l
on the
•
•
Shde
Sho_
(or if the Merno_'y Stick is
r
Memory
Stick
Index
Slide Show Menu
Options
Menu
The Slide
Start
NThe
Bar Options
Show
Menu
includes
Starts the Slide
the following
options:
Show.
Slide Show Menu is the
same whether you select it from
the Memory Stick Index
Slide
Show.
Off
(page 66), Photo (page 68), or
No additional
during
Movie (page 7I) Menus,
with
the, JPEG
Plays
Stick
Piano MP3 file and
Piano (built-in)
is played
that
is associated
files will
all MP3 files on the Memory
any MP3
play.
Stick. The
file, playlists
are'
played.
Plays
the MP3 file stored
frt e'rr[o
in the TV's
internal
level
of the
f_L
Files and
playlists
found
Playlists)
Memory
Stick. To show
List, it may take a moment to
display the list of all IVlP3files,
audio
Audio
or MPEG1
Play Memory
not
_d_ When you select Complete
background
the Slide Show.
at the top
(root)
additional
stored in other folders
select Complete List,
MP3
on the Memory
files
Stick,
List
[]Some
JPEG files may take
Effect
the next
file in the Slide Show.
longer to display than others,
which may make it seem longer
than the interval you selected for
Slide Advance.
DISPLAYbutton on the remote
controL
Fast
Slide
advances
after
about
3 seconds.
Medium
Slide
advances
after
about
6 seconds.
Slow
Slide
advances
after
about
12 seconds.
Manual
Slide
ach ances
only
after
File
Determines
Information
displayed
Repeat
On
Slide
Show
continuously
Off
Slide
Show
plays
whether
full screen.
file information
Select
you press
is shown
when
4, or *.
the file is
On or Off.
once
loops.
through
all files and
ends.
73
Contents
Menu
The Contents
Menu
includes
the following
options:
Options
Select Folder
Allows you to select different
Memory Stick Viewer.
Digital Camera
Folders
folders to view in the
Selects all folders within the directories
defined by the DCF rules used by Sony
digital cameras (see page 75). JPEG and
MPEG1 files in those directories are
recognized even if they do not conform
to the DCF file naming rules,
Select a Folder
FileOrder
NThe
Allows you to change the order in which
Stick files are displayed,
DateOrder
Rotate function does not
change the file's modification
date,
Filter
Stick
folders
the Memory
Displays files in chronological
modification
date.
order by
Date Order Reverse Displays files in reverse chronological
order by modification
date.
Alphabetical
Me_rlory
Menu
Allows you to access individual
on the Memory Stick.
Displays files in alphabetical
filename.
order by
Allows you to selectively display specific file types
within the selected folder,
Show Photos and
Movies
Displays
all readable
files,
Show PhotosOnly
Displays
only photo (JPEG) files.
Show Movies 0nly
Displays
only movie (MPEG1) files.
Show All Print
Marks
Displays all files that are marked
printing. For details, see "Print
Quantity" on page 69.
for
The Memory Stick Menu displays the current status of the Memory
Stick, including total capacit_ used capacity, and free capacity.
Notes
About
Names
on Using
DCF File
Memory
Stick
Media
Most Sony bra_d digital sti!! and video cameras
sti!! photo and movie files using DCF compliant
automatically
record
directory and file
ng_mes,
If you selected the DigitalCamera Foldersoption, as described on page 74,
you might want to have your digital camera's instruction manual
handy in order to check how files and directories are organized for
your specific model of digital camera.
DCF stands for "Design Rules for Camera File Systems," which
specifications established by the Japar_ Electronic Industry
Development
Association (JEIDA).
are
75
Memory
5tick
Precautions
When
using
Memory
Stick media,
follow
these
precautions:
[]
To avoid permanent
damage
to still image data, do not turn
off the TV or remove
Memory
Stick media from the insertion
slot while data is being read (as indicated
by the Memory
Stick indicator
light being on).
[]
Avoid touching
the terminal
bringing
it into contact with
[]
Do not drop,
shock.
[]
Do not disassernble
[]
Avoid
getting
[]
Apply
labels
[]
To avoid
store
bend,
liquid
or submit
High
[]
High humidity
[]
[]
Direct sunlight
Corrosive substances
[]
[]
Magnetic fields
Excessive dust
[]
Static electricity
[]
Electric surges
to external
Stick media.
label area.
to still image
in a location
(such
or
Stick media.
the designated
damage
[]
Stick media
Memory
on Memory
Stick media
temperature
Memory
or modify
only within
permanent
Mernory
of Memory
Stick media
a metal object.
as near
data,
subject
a heater
do not use or
to:
or inside
a hot
or electric noise
[]
Store and carry Memory Stick media in its original
ensure protection of stored data.
[]
Save a backup
of stored data.
case to
Overview
The Menu
_
gives
you
access
to the fotlov, zing features:
The Vide{) Menu allows you to make adiustrnents
to
your picture settings. It also allows you to customize
the Picture Mode based on the type of program you are
_ iewing, select Advanced Video options, and more.
78
The Audio Menu Offersenhanced audio optionssuch
as listelfing to second audio progiammhrg
(SAP) or
customizing the Effect of the sound on your TV.
80
Screen Mode adiustments and make changes
screensvertical center and size
to the
Screen Mode adjustments and select options
Analog ]&9 anti Digital 16:9 features.
from the
Channel
list, run the Auto
ohannels, and rctore.
label
Press MENU to enter and
exit Menus.
programs
based on their
Program
function,
ratings.
The Setup Menu provides options for setting up your
system, including selecting closed caption modes,
labeling video inputs, seleeting the language and color
ofthe,
on-screen_![en_ts,
and more.
89
Stick Viewer, set on/off Timers, access CableCARD
and diagnostics information,
and mo_'e,
Navigating
Through
Menus
Display
the Menu
Move lhrough
MENU
the Menus
4" _ ,_,
Select an option to ch[mge
Select (confinYt) changed
Exit the Menu
setting
_
or _,
MENU
77
Using
the
Video
Menu
To access the Video Menu, follow
1. Display Menu
these steps:
2. Highlight
3. Pressto seea
MENU(_
_fb change
Press (_
_
settings,
press • • 4, ,I_.
to confirm the selection.
_[b exit the Menu.
Selecting
Options
Wdeo
press
MENU.
The Video
Mode
Menu
includes
Vivid
Select
Customizcd
PICTUREMODE button on the
remote control
[]You
options:
for enhanced
picture
contrast
and
sharpness.
Standard
Select
for standard
Movie
Select
to display
Pro
Select to display
enhancements,
can alter the Video
Menu settings (Picture,
To control
Brightness, Color, etc.) for each
Mode.
applied
Picture
the following
Adjust
decrease
how
picture
a softer
picture.
a picture
with
the Mode settings
to each
video
to increase
picture
input,
picture
contrast
settings.
minimum
(Vivid, Standard,
Movie, Pro) are
see Mode Memory on page
contrast
and deepen
and soften
[he color.
79.
the color, or
Brightness
Adjust
to I_righten
or darken
the picture.
Color
Adjust
to increase
or decrease
color
Hue
Adjust
to increase
or decrease
the green
Sharpness
Adjust
to sharpen
or soften
Color Temp.
Cool
Select to give the white
colors a blue tint.
Whit_
Neutral
Select to give the white
colors a neutral
Warm
Select to give the white
(NTSC-Standard).
colors
intensit)_t
tones.
the picture.
a red
tint
tint.
ClearEdge VM
Sharpens
edge.
picture
definition
Se]ect from
to give every
object
a sharp,
clean
High, Medium, Low, Off.
ModMa_io_
_You
can alsochangethe
DRCMode using the DRC
MODEbutton on the remote
control
Advanced
Select Program to choose
Video
DRC Mode .....
among
the Advanced Video options.
Creaies
a high-resoluiiOn
density,
for high
player,
satellite
Interlaced
pict[[re
quality
with
sources
4x
(i.e.: DVD
receiver).
Recommended
for moving
pictures.
Progressive
Recommended
texL
CineMotion
Provides
for still images
an optimized
automatica]]y
content
process.
pictures
more
Color Axis
Allows
you
display
detecting
and apt lvmg
p u!ldown
and
by
film
a reverse
o/2
Moving
will appear
clearer
and
naturalqooking.
to control
the emphasis
of red
tones.
Mode Memory
Default
Emphasizes
Monitor
De-emphasizes
Allows
you
to control
(Vivid, Standard,
viewing,
video
input.
Off
tones.
red
how
tones.
the Mode settings
Movie, Pro) are applied
Memory
see page
red
Stick
viewing,
For details
about
to TV
:urd each
Mode
settings,
78.
Set to Off to apply
the same
settings
to all video
Changing
inputs
Mode
inputs.
does
not
change
the Mode setting.
On
Set to On to customize
Mode
settings
input.
Changing
for each
inputs
video
might
change
the
Mode setting.
Torestore the factory default settings for Video settings:
Press RESETon the remote control when ill the Video
Menu.
79
Using
the Audio
Menu
To access the Audio
Menu, follow these steps:
1. Display Menu
2. HJghhghl
3. Pressto seect
MENU
1b change
Press @
settings,
press 4. _1.4. ,.
to confirm the selection.
Ib exit the Menu
Selecting
dt adio
press
MENU.
The Audio
Menu
includes
the following
options:
Options
Treble
Adjust
to decrease
or increase
higher-pitched
Bass
Adjust
to decrease
or increase
lower-pitched
Balance
Adjust
to emphasize
Steady Sound
Auto
Select
to stabilize
Off
Select
to turn
left or right
balance.
the volume.
off Stead),
Za The Steady Sound option
You can also change the
Effect using the 0 button
on the remote controk
speaker
sounds.
sounds.
Sound,
is not avaHabJe (it is grayed out}
use Steady Sound, set Effect to Off.
Effect
TruSurround
Select for surround
sound
(for stereo programs
only).
MTS
Simulated
Adds
Off
Normal
stereo
Stereo
Se]ect
for stereo
E_/oy stl?r_'o,
bili,,Zgurda,,d
a surroundqike
Auio %,P
mon0 pr0_n_ms
programs
SAP signal
mode.)
Select
during
_;I
programs.
reception.
reception
when
viewing
a
in stereo.
seleci to auiomatical D, swffch the TV to second
audio
M0n0
or mono
broadcast
program
effect to mono
MTS is available
when
is present,
for mono
weak
a signal
reception.
stereo
is received.
the TV remains
(Use
to reduce
broadcasts.)
only with analog
programs.
(If no
in Stereo
noise
Speaker
On
Select
to t_m_ on the TV speakers.
Off
Se]ect
toturnofftheTV speakers
andlisten
to
the TV's sound
audio
Audio Out
This
E_sy co_tn_l _
to Off,
option
_,ohm,e
Vaiiable
system
can be set only
The TV's
volume
The TV's
vo]tuYte
through
speakers
are iurned
external
audio
by the TV's
remote
speakers
are turned
remote
volume
your
eontro]
audio
system
can still
control.
off and
of the TV is fixed.
ac dio reeei_ ers
is set
off, BUt the
from your
output
through
ynur
v\,hen the Speaker option
output
be controlled
Fixed
only
speakers.
the
Use your
to adiust
the
system.
Torestore the factory default settings for Treble, Bass, and Balance
PressRESETon theremotecontrolwheftintheAudio },Aertu.
81
Using
the
Screen
Menu
(models
KD-30/34XS955
Only)
To access the Screen Menu, follow these steps:
1. Display Menu
2. HigNigM
3. Pressto seea
MENU
T() change
Press _
settings,
press ,It ,1__, ,1_.
to confirm the selec tlon.
"ib exit the Menu,
Se/ectfng
Screen
Mode Options
press
MENU
The Screen Menu includes
Screen Mode
Enables
the following
you to change
definition
options:
the picture
(480i/480p)
size for both
and high-definition
standard-
(720p/lg80i)
SOUrCeS.
SCREEN MODE button on the
remote control,
Wide Zoom, Normal, Full, Zoom.
For 480i/480p
Select
sources
For details,
see page
For
Select
Full, Zoom, Horizontal Expand,
720p/1080i
from:
55.
Vertical Expand. For details,
sources
L_
from:
In Some cases, wideiscreen
programs
aspect ratios that require the display
bottom
4:3 Default
see page
56.
Will be shown in
of bars at the top and
of yeur 15:9 screen. For more detai_s, see page 101,
Select the default
Screen Mode
To select
Mode
a Screen
to use for 4.,9 sources.
to use when
channels
or inputs
are
changed,
select from: Wide Zoom, Normal, Full, Zoom. ]nor
details, see ")a _e' r_rq
To continue
channel
Vertical Center
using
or input
Allows
you
the current
is changed,
to move
in the window.
Screen
select
the position
(Avaihble
only
Mode
setting
when
of the picture
in Wide
Zoom
up and down
and
Zoom
mo&,s.)
Press
t1"or _, and press
+15 and
mode).
Vertical Size
Allows
(Avaihble
-15 (Zoom
you
to adjust
only
@
mode),
Press t" or I, and press
+7 and -7.
to choose
Zoom
_
a correction
and t-5 and -5 (Wide
the vertical
in Wide
the
Off.
size
of the picture.
and Zoom
to choose
between
Zoom
modes.)
a correction
between
Using
the
Screen
Menu
(model
KD-36XS955
Only)
To access the Screen Menu, follow these steps:
1. Display Menu
2. HighligM
3. Pressto seea
MENU
To change
Press _
settings, press ,It ,1__, ,1_.
to confirm the selec tlon.
]b exit the Menu,
Selecting
Screen
Mode Options
press
MENU
The Screen Menu includes
Screen Mode
the following
Enables
you
options:
to change
standard-definition
the picture
(480i/480p)
size for both
and high-defhrition
(72gp / 1080i) so urces.
SCREENMODEbutton on the
remotecontrol,
Select from:
Full, Normal, Horizontal Expand, Vertical Expand,
For details/see
page
57.
aspect ratios that require
top an d bottom
see page 101,
L"t TouseAnalog 16:9 with
widescreenDVDs,set your DVD
playerto I6:9 aspectratio,
(Aspectratio isthe ratio of width
to height of the screen.I6:9 is
alsoreferredto aswidescreen
format,)
Analog 16:9
Provides
enhanced
(anamorphic)
option
VIDEO
l:_icture resolution
sources,
is available
1-7,
the display
of bars at the
of your ! 5:9 screen. For more detai!s _
only
such
for widescreen
as selected
when
DVD
titles.
This
the TV is set to
On
Auto
when
you switch
input
o1' change
To activate
signal
!5:9
Allows
video
automatically
when
a 16:9
is received,
signa! from you r DVD player, select on t o
manually
Digital 16:9
to another
channels,
you
turn on the 16:9 Enhanced feature,
to determine
tire formatting
for digital
16:9
pictures.
Pan-n-Scan
...........................
Letterbox
The
left and right
sides
of the picture
are c!!pped
!o f!! !he 4:3 screen,
The picture
is made
left and
right
edges
smaller
.................
so that
the
fit the' 4:3 screen.
No clipping
results,
but bars
the top and
bottom
of the picture.
appear
at
83
Using
the
Channel
Menu
To access the Channel Menu, follow these steps:
I DIspmay
Menu
2. HigMighl
3. Pressto seea
MENU
-Jib change
Press C_
settings,
press _ • 4, ,_.
to confirm the selection
Ib exit the Menu,
Selecting
Options
Channel
press
MENU.
The Channel
Favorite Channels
Menu
includes
the following
Lets you set up a ]ist of your
...........................
Channel Fix
options:
Off
favorite
channels.
For
Fa,f! ,-i e
...................
Tm'ns off Channel
Fix.
2-6
......
(VHF/UHF
input)
or sate]li!e
receiver
to change
channe!s
C2-C6
Fix V( u__TV's channel
setting to C2-C6
(CABLE input) and use the cable box or
.......................
sate!l!t e _'ece!yer
Video 1
Use this setting
equipment
IF_ if you are using a
CaBIeCARD, Auto Program is
and use the cab]e box
Digital Channels
Add
Auto Program
Automatically
sets
z'eceivab]e
channe]s.
Select
!o change
if you
to the A/V
to ad d digital
up the channel
cha!-mels: .........
have
inpu_
channels.
connected
the
lacks.
........
list on the TV for all
disabled for the CABLE input.
However, you can run Auto
Program for the VHF/UHF
input
A progres s bar Will display the approximate progres s of
the Auto Program and Digital Channels/Add sequences,
[]Channels
thatyousetto
Hidden
canbeaccessed
0nly
withthe0-9buttons,
Show/Hide
Channels
Allows
you
Program
buttons
Guide
(page 53) and when you use the CH+/to channe!
surf. Channels
that are set to Hidden do
to show
or hide
channels
not appear
in the Program
CH+/- buttons.
Guide
Press t1"or • to highlight
to show or hide.
that
appear
or when
you
the channel
in the
use the
that you want
To move between the Maior and Digital subchanne!
lists, press 4, or "_.
2
To change
a channel's
setting
to Shown or Hidden,
press _.
........................................
3 r_ showor hiae morech_!-_nels,
rope,
a! steps_ and 2.
Label Channels
Allows
you to assign ]abels
channel numbers.
1
Press
to highlight
2
Press
4" _' to scroll
Then
press
you
4
want
(such as station
Channel and
_
through
the channel
to highlight
Label and press
Press
4" _ to scroll
through
Repeat
Then
to add
To assign
labels
numbers.
number
that
a label.
Press
0-9, etc.).
character.
to
_.
the channel
to select
to assign
press
call letters)
press
_
characters
to more
(_.
the hbel
characters
to select
(A-Z,
the highlighted
to the label.
channels,
Press _, to return to the Channel
M EN U to exit the Menus.
repeat
Menu,
steps
1-4.
or press
85
Using
the
The
Parent
Parent
content
Menu
Menu
and
allows
you
to set
up
the
_gM to block
programs
according
to their
rating levels.
To access the Parent Menu, follow
1. Display Menu
these steps:
2. High[tghl
3. Pressto seect
MENU
Use the 0-9 buttons on the remote
enter a four-digit
password.
control
to
_$_
If this is the first time you are creatn_g this password
confirm
entering
it again. (The Parent Menu options appear. !
To change
settings,
-l_) exit the Menu.
press
press
tt _, 4, ,_. Press
_
the password
by
to contlrlTL the selection.
MENU.
J:l You need your password for any future access into the Parent Menu. [f you lose your
password, see "Lost password" on page 101
Selecting
Parent
The Parent
Menu includes
the following
options:
Menu Opdons
_{f
you are not familiar with
Parental Lock
Off
the Parental Guide%e rating
system, you should se{ect Chi{d,
on/offal_d
sdccf a
Child
Youth, or Young Adult to help
Parental
lock is off. No programs
blocked
from
Maximum
ratings
permitted
US: TV-Y, TV-G, G
Canada:
simplify the rating selection. ]o
set more spedfic ratings, select
Custom.
Youth
Maximum
G
Y.Adult
ratings
US:TV-PG,
Maximum
C8+,
ratings
Canada:
Canada:
For changing
U.S.A.
Canada
your
PG, 8 ans+,
permittect
14+, 13 ans+,
TV-PG
are:
TV-14
87 for details.
See page
88 for details.
password.
Select to use USA
Se]ect
page
are':
PG-13
US: See page
Select Country
permitted
PG
US: TV-14,
Change Password
are:
C, G, TV-Y
Canada:
Fordescriptionsof Child,
Youth, and YoungAdult
ratings,seepage 87_
are
viewing.
ratings
to use Canadian
88).
(see page 87).
ratings
(see
US Models:
5electing
Custom
Rating Options
For US models, the Custom Rating Menu includes
options. (For Canadiar_ models, see page 880
Movie Rating
[]The Content-BasedRatings
are linkedto the bveJof the
Age-BasedRating.Forexampb,
a programwith an Age-Based
Ratingof TV-PGV (Viobnce)
rating may containmoderate
viobnce,while a TV-14V
moreintenseviolence,
H
G
All children and General Audience.
PG
Parental Guidance suggested.
PG-13
Parenta]
R
Restricted
viewing, parental guidance
suggested for children under !7.
No one 17 or under allowed.
NC-17
and X
Guidance
for children
TVRating
Age-BasedRatings
TV-Y
All children.
ht/tlwir rr_tin2,,
confetti or both
TV-Y7
TV-G
Directed to cMldren
General Audience.
TV-PG
Parental
TV-14
Parents
TV-MA
Mature Audience
To ensure maximum
blocking capability, set the AgeBased Ratings,
[] If you blockunratedTV
programs,be awarethat the
following types of programs
may be blocked:emergency
the following
Guidance
Strongly
under 13.
is
age 7 and older.
suggested.
cautioned.
only,
Content-BasedRatings
D
Suggestix e Dialogue.
L
Strong Langtmge.
S
Sexua! situations.
V
Violence.
Unrated
Block
Blocks al! programs and movies that are'
broadcast without a rating.
or movie's that
are broadcast
Allow
Allows programs and rrtovies that are
broadcast without a rating.
sports,news,publicservice
announcements,religious
programsandweather.
without a rating
Wew/ng
Programs
Btocked
You can view blocked programs by entering the password.
ENTERbutton when tuned to a blocked program, then enter
password. This temporarily switches off the Parental Lock.
reactivate the Parental Lock settings, turn off the TV. When
turned on again, your Parental Lock settings tare reactivated.
Press the
the
To
the TV is
87
Canadian
Models:
Setect/ng
Custom
Rat/ng
Opt/ons
For Canadian models, the Custom Rating Menu includes
following options. (For US models, see page 87.)
English Rating
FrenchRating
U.S.A.Rating
Wewfng
Programa
Btodted
the
C
All children,
G
General programming.
PG
Parental
14+
Viewers
18+
Adult
G
General programming.
8 ans+
Not
13 ans+
Not recommended for ages under 13.
16 ans+
Not recommended for ages under 16.
18 ans+
Programming
G uidance.
!4 and older.
programming.
recommended
for young
restricted
children,
to adults.
See "US Models" on page 87 for details.
You can view blocked programs by entering the password.
ENTER
button when tuned to a blocked program, then enter
password. This temporarily switches off the Parental Lock.
reactivate the Parental Lock settings, turn off the TV. When
turned on again, your Parental Lock settings are reactivated.
Press the
the
To
the TV is
Using
the
Setup
Menu
To access the Setup Menu, follow these steps:
1. DisNay Menu
To change
Press C_
2. Highhghl
3. Pressto se ecz
settings,
press 4, _!,4, ,_.
to confirm the selection.
To exit the Menu.
press
betub
Menu
TOt KD-30/34XS955
MENU,
SetL O Menu
Selecting
Setup Options
The Setup
Menu
Caption Vision
includes
the following
Allows
modes
you to select
(for pt_ograms
tot
KD-36XS95[
options:
from
that
sevet_al closed caption
are broadcast
with closed
caption).
On
Caption
Vision
is turned
on.
Off
Caption
Vision
is tin'ned
off.
Program
Allows
you
Caption
to set basic
Vision
"P_og_amming
pa_e
Inf0 Banner
remaining
broadcaster
channel
offers
Vision"
on, displays
and other
is changed
See
Caption
on
91.
Set to On or Off. When
time
and advanced
options.
the program
infom_ation
this service),
Displays
or the' DISPLAYbutton
name,
(if the
when
the'
is pressed.
89
Label Video Inputs
Allows
you to identify
to the TV, such
you
have
a DVD
jack, you
input.
change
input
1
player
can select
Then
when
inputs,
IK_The Skip label is useful for
you connected
etc. For example,
if
to the VIDEO
5
DVD for the VIDEO
5
the TVNIDE0 button
to
Label
you
assigned
to that
on screen.
you
want
press
_
Press
t1"or • to highlight
to select
Then
You can select
equipment connected to
them.
press
t1"or 4 to highlight
labels.
inputs that do not have
the label
you
1-7) to which
2
equipment
DVD,
comrected
the Video
appears
Press
A/V
as a VCR,
Video 1-7
press
from
the video
to assign
input
(VIDEO
a label.
Then
the input.
_
one of the displayed
to select
the following
the label.
labels
VHS, DVD, Receiver, Satellite,
for each
input:
Cable Box, 8mm,
DTV, Game, LD, Web, Beta, HI), PVR, Skip
IK_ Normally, Tilt Correction
Tilt Correction
and Vertical Correction only
Press
need to be adjusted the first
time you turn on the unit and
after the unit is moved to a
new location.
Allows
you
and press
Vertical Correction
to correct
_, or ,_ to choose
Allows
picture.
Press
any tilt of the picture.
a correction
between
+7 and -7
_.
you to make a vertical
4" or _" to choose
correction
a correction
to the
between
+5 and
and press _.
Language
Select to display
of choice.
Menu Color
Enables
1Tten
US.
you
all on-screen
to select
a specific
Menus
color
in your
language
for the on-screen
-5
Programming
Caption
Vision
If you selected the Programoption under
can change the following
settings:
CaptionVision (see page 89), you
options.
CC1, CC2,
Displays
CC3, CC4
sotmd effects of a p_ograrn.
to CC1 fo_' most programs.)
a printed
version
Text1,Text2,
Displays
Text3,Text4
p_"esented
network/station
Advanced
Override
Allows
yo_t to select
caption
options.
Allows
you
advanced
Select
to "fot'ce '' the close
only
captioning
setting
is in effect
until
channels,
inputs,
o__ttu_n off the T_
captioning,
(EIA-708)
the available
608). This
o__
be set
or the whole
Fo__closed
digita!
from
(Should
information
L_sing eithe_ _half
sc_een (if available).
set to CC1.
of the dialog
you
closed
options.
to analog
(EIA-
change
Set to On or Off.
Advanced
Allows
Settings
708) closed caption
you to make
additiona!
setti_'_gs foc digital
(EIA-
options.
As Broadcast
Large Text
Small Text
settings:
Character Size
Small, Standard, Large
Character Style
Style 1-7
Character Color
None, Color 1-8
Edge Color
Color 1-8
Edge Type
None, Raised,
Depressed, Outline,
Left shadow,
Right shadow
Background Color
None, Color 1-8
Window Color
None, Color 1-8
91
Using
the Applications
To access the Applications
1. D_splayMenu
Menu
Menu, follow these steps:
2. High_ghl
3. Pressto seleK
MENU
7b chan_e
Press _
setnng% press ,It _ 4, ,_.
to confirm the selection.
Ib exit the Menu
Selecting
Applications
Options
f_]
_J
You can also use the
MEMORY STICKbuttons on
press
MENU.
The Applications
Memory Stick
Menu includes
Displays
page
Clock!Timers
the Memory
Stick
options:
Viewer.
For details,
see
61.
Select
to set the clock,
the remote control or front panel,
your TV to turn
times.
_You
Sleep
can alsochangethe
Sleepoptions usingthe
SLEEPbuttonon the remote
controk
the following
set the Sleep
timer,
and to program
on and off at two scheduled
viewing
Set the time irt minutes
(15min,
30min, 45min, 60min, 90min, or Off)
that
you
before
want
the TV [o remain
shutting
offautomatically.
on
Timer 1
You can use the Timers
Timer
2
theTV toturnon andoffandtune
to a specific
scheduled
channel
viewing
to program
at two
times.
[]To
Timer 1 and Timer 2 are not available
the Current Time.
go directlyto
1
programmingTimer1 or 2,
press_
insteadof
pressing,_.
Press 4" o_" ,I. to highlight
to be set until
you set
Timer 1 ol- Timer 2. To set the
time1, press ,,I..
2
P_'ess 4"o_" _, to highlight
one of the following
options,
then press (Z).
Program
Select to set the Timer by day,
time, duration,
and channel.
off
Select
to turn
previous
[]To
returnto the Timer
3
If you
number.
hour,
Press
minute,
_
pre_ ious
4
duratior_,
4" and
_, _o set
and channe!
or ,_. [o confirm
ntove to the next setting.
(Your
are' saved.)
Program in step 2, Press
selected
the day(s),
Menu after programmingone
of the Timers,press
when the highlight is in the
channelnumberfMd.
off the' Timer.
settings
each
setting
and
Press _. to 80 back to the
setting.
Press
MENU to exit the M[enu. An LED on the front
panel
will light,
indicating
the timel'
has heen
set.
Current Time
H
Toreturnto the Timer
Menu after settingthe
Current Time,press
when the highlight is in the
minute field.
1
Press _
2
P_e, ss tl. and
minute).
move
Diagnostics
_, to set the current
Press
_
time
or ,_ to confirm
to the next setting.
previous
3
to select Current Time.
Press
(da}, horn,
each
and
setting
_, to go hack
and
to the
setting.
Pi'ess
MENU toexit
theMenu.
Disp]ays
thestrength
oftheterrestrial
digita]
bn-mdcast
signal,
to help you
adjust
VOLU"antenna
to optimize
signal
reception.
CableCARD
This list of se]ectable
depending
on your
CableCARD
cable
options
will
vao,,
ser_ ice provider.
93
Overview
This chapter
Glossary
includes
the following
topics:
96
97
97
103
!04
Index
!05
95
Glossary
analog
signal
A signaling method that uses continuous changes in the amplitude or frequency of an
electronic transmission to convey informatiom
aspect ratio
Refers to the ratio between the width and height of the screen. KD-36XS955 models have a
4:3 aspect ratio; KD-30/S4XS955 models have a a 16:9 (widescreen) aspect ratio,
4:3 aspect ratio
component video
16:9 aspect ratio
Component video is sent through three cables: two color shade (chrominance) signals and one
brightness (luminance) signal, Component video achieves greater color accuracy than
composite video or S VIDEO by splitting chrominance into two separate portions,
composite video
degauss
digital television (DTV)
HDMI (High-Definition
Multimedia Interface)
Compositevideo is sent through a singlecable.Compositevideo combinesthe colorshade
(chrominance)andbrightness(luminance)informationinto onevideo signal
A processthat demagnetizesthe metalcomponentsin the TVmonitor,whicheliminatesimage
distortionthat canresultfrom magneticchargesacquiredby the TV'scomponents,YourTV
degaussesautomaticallywhen it isturned on,
A newtechnologyfor transmittingandreceivingbroadcasttelevisionsignals.DTVprovides
clearerresolutionandimprovedsoundquality overanalog television.
Providesan uncompressed,all-digital audio/videointerfacebetweenthis TVand any HDMIequippedaudio/videocomponent,suchasa set-topbox, DVDplayer,and A/V receiver,HDMI
supportsenhanced,or high-definitionvideo,plus two-channeldigital audio,
National Television System
Committee (NTSC)
A unit of the FederalCommunicationsCommission,Washington,DC,that establishes
televisionstandardsin the United States,suchas NTSCColor,the standardusedinthis f'_!
RF
RadioFrequency,
That part of the frequencyspectrumthat is usedto transmitTVandradio
signals.
S VIDEO
SVIDEOrequiresa single cable,whichcarriesthe brightness(luminance)and color
(chrominance)signalsof the picture separately.SVIDEOprovidesbetter resolutionthan
compositevideo,which carriesthe signalstogether,
VHF/UHF
VHF(VeryHigh Frequency)isthe part of the frequencyspectrumfrom 30 to 300 megahertz.
UHF(Ultra HighFrequency)isthe part of the frequencyspectrumfrom 300 to 3,000
megahertz.
480i (SD)
Provides480 linesof resolution,Displaysimagesusing interlacedscanning,whichfirst
transmitsall the odd lineson the TVscreenandthen the evenlines,
480p (SD)
Provides480 linesof resolution,Displaysimagesusingprogressivescanning,which transmits
eachlinefrom top to bottom,
720p (HD)
Provides720 linesof resolution,Displaysimagesusingprogressivescanning,which transmits
eachlinefrom top to bottom,
1080i (HD)
Provides 1080 lines of resolution. Displays images using interlaced scanning, which first
transmits all the odd lines on the TV screen and then the even lines. I080i is one of the
formats used by HDW (High Definition fV).
Contacting
II
Sony
If, after reading these operating instructions,
you have additional
questions related to the use of your Sony television, please call our
Customer Information Services Center tat 1-800-222-SONY (7669) (US
residents only) or (416) 499-SONY (7669) (Canadian residents only).
Before calling Sony customer support, please write down the model
and serial numbers of your TV. You'll find this information on the
front cover of this manual.
Troubleshooting
Remote
Remote
does
Control
control
not
operate
_
The batteries
_
Check
Press
the remote
control
Make
cord
sure
the TV's
If you
video
equipment
in;_dvertently
the remote
is connected
3-4 feet away
_
non-Sony
If you
securely
from
fluorescent
to change
channels,
pressect
control
the
to SAT or
to the wall outlet.
lights.
There
Fixoption
are using
replaced
m_y
attempting
There
device
your
to "fix"
TV from
the channel
the channel
based
be sure
you have
3 or 4 setting.
on the hookup
you
not
Use
the
used
(see
84).
the video
_
another
switched
FUNCTION button
operate
changes
button.
page
control
power
the TV at least
Channel
not
the batteries.
You may have
which
inadvertently
does
Replace
of the batteries.
the TV FUNCTION button.
If ),oct are ushrg
Remote
be weak.
SAT/CABLE FUNCTION button,
CABLE mode.
Locate
with
could
the orientation
another
device
to change
for that
device.
For example,
the batteries
equipment
be more
to the remote
may need
than
channels,
be sure
to press
if you are ush_g your
recentl)5
the
cable
_he code numbers
box
for
to be reset.
one code
for the equipment
that you
are
to operate.
is ;_possibility
tlrat some
your Sony TV remote.You
remote
control.
may
non-Sony
need
equipment
cannot
to use the equipment's
be operated
by
original
97
/
Channels
Cannot_eceive
uppe_
_
channe]s
using
(UHF)
N_l UseAutoProgram
intheChannelMenu toaddreceivab]e
channe]s
thata_'e
w]ren
not pt_esent]y
in the, TV's
TV is fixed
to one channe]
_
Use Auto Program in the Channel
not presently
Check
Cannot
receive
any
_
channels
when
cable TV
using
Cannot
or select
_'eceive
(see page
your
Channel
N_l
being
cab]e
channels
N_l
displayed
84).
in the TV's
(see page
Menu
memory
Certain
in TV memo
Check
with
Check
your
have
with
cable
your
channe]s
that
are
TV channels
that
84).
]imitations
TV company
are
84).
to add receivab]e
cable
that
84).
(see page
Menu
channe]s
84).
to add receivab]e
O, (see page
cab]e TV companies
channels.
to add receivable
(see page
Fix settings
Use Auto Program in the, Channel
cable
N_l
Menu
memory
Use Auto Program in the Channel
are not presently
digita!
at_e not
in the TV's
not presently
channe]s
Some
memory
an antenna
on the broadcast
TV company
if the channels
of digital
for mot"e information.
are scrambled
or
enc_Tpted.
Youwillneeda(_ableCARDoraseparate
set-top
boxtoview
those channels.
Some
opfiona]
your
cable
broadcast
cable
N_l
digital
cable
TV company
formats,
you
TV company
The digital
cable
broadcast
fom]ats
is broadcasting
will need
to view
channe!
those
may
may not
be suppo_ted.
signals
in unsupported
digital
a separate
set-top
box provided
If
by your
channels.
be set to Hide in the Channel
Menu
(see
page 85).
Use
the Digital
page
Channels
feature
to search
for new
digital
channels
(see
84).
CableCARD
Problems
using
CableCARD
or
CableCARD
setwices
N_l
C!>'ck
N_l
The CableCARD
you
N_l
that
the CabDCARD
must
can t_eceive
pages
Check
digital
41-42.
the Diagnostics
be useful
in providing
is inserted
be activated
cable
and
TV services,
CabIeCARD menu
infoimation
person.)
Contact
your
cable
propetqy
by your
TV company:
(see pages
local
cable
See' _he activation
options
to an authorized
41-42).
TV provider
before'
instructions
(see page
technician
93). (This
on
can
or repair
Memory
5tick
Image
not
does
_
display/Cannot
see all files
Make
sure
.ropes)
the image
Make
sure
the Memory
the Filter option
Check
the Select Contents
in DCF
directories
currently
selected
The maximum
image
undesirable
displays
or flicker
not saved
Stick
is elected
after
Memory
Stick
Viewer
_
or
is
properly
(see page
setting
folder
JPEGs
(see page
(see page
74) and ensure
of files the Memo
all JPEG,
a Memory
captured
and
using
_
This
Stick
a digital
with
64).
that
and
files are either
(see page
74), or in the
(see page
W Stick Viewer
MPEG1,
74).
can display
is
MP3 files.
the Memo
a result
Stick might
the image
W Select
function,
try
The file might
not have
camera
might
camera
of the way
may tppear
digital
of a malfunction
be locked.
with
Unlock
information
records
motion
record
still
the TK
he hrsufficient
(EXIF data)
a photo.
Stick
and try,
space
on the Mernot'y
fi!es and rotating
Cannot
Rotate, Zoom, Pan or _
Print Mark MPEG files
These
are available
only
Cannot
show (or hide) file
information
in full screen or
Set the File/Inf0rmati0n
option
that is usually
In this case,
one or more
_
to display
cameras
the Mernot'v,
file. Try deleting
functions
video
again.
when a digital
[he rotation.
There
video
is a result
is not
The Memory,
rotating
closed
Slide
(.mpg,
74).
if Select a Folder is selected
including
are ushrg
images,
Memory
setting
number
in full screen.
in full screen
Rotation
file or an MPEG1
chang!rig
thtposit!olo!theA/Bselectsw!tch.
............................................
_
motion
.jpeg)
if Digital Camera Folders is selected
files total,
If you
JPEG
(.jpg,
Stick is inserted
Check
2,000
.................................
file is a JPEG
file.
for JPEG
generated
it is not possible
Stick to save
the image
to save
the rotated
again.
files.
to On or Off (see page
73).
Show
Cannot
see Menu
Cannot
hear
using
audio
Memory
while
Stick
MP3
setting
the print
_
Press
'_ to display
_
Check
the TV's
_
To hear
onM rz, ry
Stick are included
when
Music/C0mplete
List option
selected
73)
JPEG
quantity
again.
the Menu
voice
again.
or Speaker (page
volume
memo
option
and set the Filter option
Check
that
the Music option
81) settings.
in ful! screen
view,
select
the Digital Camera
is not to set to Off (see page
73).
TheM zory gti 'kViewercaZd%i4; a
the
including
al! JPEG,
and MP3
Make
Cannot see MP3 l{s{to play
_
MP3 f{l_,soi{your Memory c;t{ckonly can be piayed as background rntMc
during
a Slide
the file is named
Show
(see page
with
000
files.
_
lTt[.tSiC
that
MPEG1,
is
(page
sure
Folders
to Show All.
the file extension
(.rap3).
73).
co<rect!v...............................................
128 kbps !k!lobits per second!: .............................................................................................
MP3 files on the Memo
Stick are not listed
O,
_
Only MP3 files that
in the list.
Music
files are playing
in
_
MP3 files are played
wrong
order
they are stored.
alphabetically
MP3
playlist
are named
in alphabetical
If you
want
in the order
(.m3u
with
to change
in which
the file extension
order,
according
the playing
you
want
them
(.rap3)
are displayed
to the folder
order,
rename
to play
in which
your
or create
files
an
file) on a PC.
99
MPEG1 movie does not
play back correctly
MPEG1 quality is poor when
erdarged (page 71)
Error message
is displayed
CI
_
CI
CI
CI
CI
Some variations of MPEG1 movies 1Tray not be compatible with the
Memory Stick Viewer.
The, quality of the movie when enlarged depends on the resolutiorL of the
MPEG1 file. See your camera's instruction manual for details.
No Memory Stick
There is no Memory Stick in the slot.
Memory Stick
The lock mechanism on the Memory Stick is
Locked
engaged.
Memory Stick Error
The Memory Stick in the slot might be damaged;
tt7 a different Memory Stick.
Format Error
The Memory Stick may have been formatted using
a PC or other device that is not compatible with
cameras.
Error icon is displayed
The file is not a valid MPEG1 or JPEG format.
The thumbnail
is not DCF-compatible.
The file is a JPEG or an MPEG1, but the thumbnail
is unreadable.
The file is unreadal_le.
Audio
Good picture,
no so unct
_
Cannot gain enough volume
when using a cable box
Sound seelTtS weak or
insufficient
_
...........................
Cannot raise the volume
externa! audio speakers
on
_
_
Press MUTINGso that the word Muting disappears from the screen (see page
47).
Make sure the Speaker option is set to On in the Audio Menu (see page 81).
Make sure the MTSoption is set to Stereo or M0no (see page 80).
Increase the volume of tire cable box using the cable box's remote control.
Then press TVFUNCTIONand adic st the TV s vole me.
The TV's audio might be set to Auto SAPor M0no, when it might be better set
to Stereo. In the Audio Menu (see page 80), set the MTSsetting to Stereo. If
already set to Stereo, switch to M0n0 (which may reduce background noise
dming _ e!!k s!ere° broadcasts).
............................................................................
If the Speaker option is set to Off and the Audio Out option is set to Fixed (in
order to output the sound to your audio system) use your audio receiver to
adjust
the
sound
(see
page
Audio Out option to Variable.
To turn on the TV speakers,
100
80).
set
Or,
to use
the
TV
remote
contro!,
the Speaker option to On (see
set
the
page 80),
Video
No picture
(screen
_
not lit), no sound
If your
TV does
_
_
good
sound
No color
Only
snow
appear
and noise
on the screen
....
Dotted
lines
or stripes
Double
images
or ghosts
Call
your
on, and
Sony
keeps
Make
Press
sure the power
cord is plugged
in.
the POWER button on the front of the TV.
Press
the IV/VIDE0 button
channel;
local
a red light
service.
Try another
Dark, poor or no
picture
(screen lit),
not tunr
need
to cycle
it could
flashing,
your
through
be, station
the, connected
video
sources.
trouble.
Adjust
Adjust
the Picture option in the Video Menu (see page 78).
the Brightness option
in the Video Menu (see page 78).
_
Check
the antenna/cable
_
Adjust
the Color option
_
Check
the antenna/cable
_
Try another
_
connections.
in the Video
Menu
(see page
78).
connections.
channel;
it could
Press
ANT to change
the input
_
Adjust
the antenna.
_
Move the TV away
dryers.
_
Ushrg
a highly
TV may
Serx ice Center.
from
be station
mode
noise
directional
trouble.
(see page
47).
such
as cars,
sources
outdoor
antenna
neon
or a cable
signs,
may
or hair-
solve
the
problem.
Blac k b< x
_ n screen
_
You have
selected
(See page
89 to reset
a text option
Setup
in the Setup
selections.)
Caption Vision option to Off. If you were
select CCl instead
oEIEXI 1-4.
Bars appear
top and
at the
bottom
_
of the screen
Some
than
wide-screen
16:9, such
programs
as 2,35:1.
trying
are filmed
(This
Menu
To turn
to select
in aspect
is especially
your
DVD
(or contact
Turn
on the TV. While
your
program
no text is avaihb]e.
set the
closed
captioning,
that
are greater
ratios
common
releases).
Your TV will show these programs
bottom
of the screen. For more details,
check
with
and
off this feature,
with
theatrical
with bars at the top and
the documentation
that came
provider).
General
How
factory
How
to reset
TV to
_
settings
to restore
Video
settings
_
to factor)." settings
How
to restore
holding
down
the RESET button
on the remote
control, press the POWER button on the TV. (The TV will
back on again.) Release the RESET button.
Audio
settings
to factory
Cannot
cycle
_
settings
through
the
_
Press
the RESET button
page
78).
Press
the RESETbutton
page
80).
Be sure
turn
itself
off, then
on the remote
control
while
in the, Video
Menu
(s_,e
on the remote
control
whiD
in the Audio
Menu
(see
the Video Label option
is not
set to Skip (see page
90).
other video equipment
connected
to the, TV
Cannot
operate
Menu
_
If a Menu
which
Lost password
_
option
the Menu
In the password
4357. The
used
master
to temporarily
appears
in gra}, this indk:ates
option
is not available.
screen
(see page
password
unblock
clears
86), enter
your
that the TV is in a state
the following
previous
password;
master
in
password:
it cannot
be
channels.
101
TV makes
[ o[ ping
when turned
on
TIMER/STAND
front
pane!
sound
BY LED on
_
This
each
_
The LED
is lit
is a normal
sound that
time it is turned
on.
when
(see pa8_, 12) blinks
the picture
this may
indicate
cable
box does
not
_
work
Cannoi
channels
102
retort{ digital
to VCR
_
If you
the timer
on page
designed
to work
company
for details.
alialog
the TV is turned
service.
When
24, you
with
channels
your
must
cable
use a special
digital
cm{ be recorded
cable
box using
to your
off
a minute,
that the timer
lit even
when
a sp!ittec
as
bi-directional
V(JR.
shuts
than
lit, indicates
box. Contact
degaussing
on, then
for more
is set, this LED will remain
a VCR and digital
described
Only
the TV automatically
If the LED blinks
the TV needs
are connecting
from
when
is disphyed.
set (page 92). When
TV is turned
off.
Digital
results
your
splitter
cable
that
TV
is
the
is
Specifications
Picture
....................................
Tube
FD ?J:lMtron ;i tub_, ............................................................................................................
Antenna
75 ohm external
7Tlevision
Channel
Power
System
Cover _,,e_
Ri,quirements
terminal
for VHF/UHF
NTSC
American
ATSC (8VSB terrestrial)
ATSC compliant
TV Standard
QAbl on cable
ANSI/SCTE
_lTn estrial (analog)
2-69
Cable TV (analog)
1-125
3TH'estrial (digital)
2-69
Cable TV (digital)
1-135
8VSB
07 2000
120K 60 Hz
inputs/Outputs
HDMI IN
Video
Audio
Video (IN)
4 total (I on front panel)
i Vp-p, 75 ohms unbalanced,
S Video (IN)
3 total (1 on front pane[)
Y: I Vp-p, 75 ohms unbalanci,d,
sync negative
C: 0.286 Vp-p (Burst signal), 75 ohms
Audio
7 total (l on front panel)
500 mVm_s (100% _lodulation)
hnpedance:
47 kilohm
Y: 1.0 \/p-p, 75 ohms unbalanced,
PB: 0.7 Vp-p, 75 ohms
PR: 0.7 Vp-p, 75 ohms
(IN)
1080i, 7201b 480p, 480i
_Xw channel h _a PCN1 _2, 441 and 48 kHz, 16_
20 and 24 bit
Component
Video Input
2 (Y, PB, PR)
CONTROL
S (IN/OUT)
1
Variable/Fixed
Audio (OUT)
sync negative
sync negative;
Mon, than 408 m\h nls at the n'laxin*turn volume
1
setting (Variable)
More than log m\hms (Fixed)
Impedance
Digital Audio Optical Output
PCM/DoIb?¢ Digital
1
CableCARD
PCMCIA
Supplied
Slot
Accessories
Visib[{, Screen Size
(picture
measured
Actual CRT Size
(picture measured
Speaker
diagonally)
Output
Dimensions
Mass
diagonally)
(_,'%x H x D)
Remote
Optical
(output):
2 kilohms
Rectangular
Type 1/II
Control
RM-Y199
AA (R6) Batteries
KD-30XS955
2 supplied for remote control
30 in (762 ram)
KD-MXS _55
31 in (863.6 ram)
KD-36XS955
36 in (914.4 ram)
KD-30XS955
KD-34){$955 ........
32 in (812.8 ram)
36in (9i i imnii ......................................
KD-36XS955
38 in (965.2 ram)
7.5 W x 2 + 15 W subwoofer
KD-30XS955
898 x 604 x 564.5 mm
(35 3/8 x 23 3/4 x 22 1/4 in)
KD-34XS955
991 x 651 x 601 mm (39 i/8 x 25 3/4 x 23 3/4 in)
KD-36XS955
994 x 776.5 x 634 mm (39 I/8 x 30 5/8 x 2. m)
KD-30XS955
67 Kg (148 [bs)
KD-34XS955
93 Kg (205 lbs)
KD-36XSO85
108.2 Kg (Z,8._) lbs)
103
Power
Consumption
KD-30XS955
KD-34XS955
In
]n
In
In
Use: 220 W
Standby: 3 W
CableCARD Standby:
Use: 250 W
KD-36XS955
In Standby: 3 W
In CableCARD Standby:
In Use: 270 W
]n Standby: 3 W
In CableCARD Standb}
Design
and
specifications
are subject
to change
without
20 W
20 W
: 20 W
notice.
Optior_M
A ccessorfes
Cables
TV Stands
104
Audin/Video
VMC-810/820/830
Audio
RKC-515HG
Component
KD-30XS955
Video
VMC-10/30
SU-30HX1
KD-34XS955
SU-34HX1
KD-36XS955
SU-36HX!
HG
HG
0-9 buttons 48, 52
4:3 Default settings 82, 83
A
channel
Channel
list, setting
Menu
77
up
Channe!
Skip/Add
85
CineMotion
Advanced
Video
Alternate
Audio
Alternate
ANT
Video
button
antenna,
ClearEdge
54
ClearEdge
VM Velocity
Modulation
10
52
ratio 83
Menu
77
Audio
Out
16
81
AUDIO OUT jack 14
audio receiver,
connecting
Auto
Program
43,
Auto
36
(channel
setup)
84
SAP,
MTS setting
80
adiusting
audio
blocking
programs.
brightness,
Built 9
in remote
45
closed
CODE
caption
modes
77,
SET button
47
color,
adjusting
S_'e ratings,
adjusting
Video
S 40
CONTROL
described
S IN/OUT
14
Coo!, Color
Ten'tperature
16
connecting
22
connecting
with
24
using with
control
TV rernote
60
VCR
iack, described
9, 14,
CableCARD
slot
CableCARD,
activating
CableCARD,
inserting
CableCARD,
removing
102
AUDIO
iacks,
hue,
adding
card
41
42
adiusting
78
84
Info Banner
10
Initial Setu E 43
interlaced
10, 47,
79,
96
player
JUMP button 47, 52
using with TV remote
contro!
60
t
with
Language,
A/V
button
connectors,
34
90
Memo W Stick
b _ttton 47
48,
messages,
features
52
Memory
Stick
F
Fast-forward
setting
M
47
button
Favorite
89
J
Retdify Creation.
100
41
card
(Screen
56_ 57
79
See Difgital
ENTER
error
Expand
38,
iack
E
42
14
High-Definition
Multimedia
Interface
(HDMI)
10, 37,
96
78
OPTICAL
channels,
Effect
15_ 41
14, 41,
Vision 89
S_'_'cable
button
Channels
47
CH buttons 12_ 48
Channel
using
Index
61
66
indicator
(LED)
inserting
insertion
64
slot
panning
photos
photo
10
clearing
58
in Channel
Menu
Fix 84
(1080i/720p/480p/480i)
}acks, descibed
connecting
14
CableCARD
Caption
CATV.
10
10
I
digital
DVD
CABLE
Inputs
Mode,)
cable
53
IN
Horizontal
DRC.
with VCR,
cabb' box
HD Detailer
DRC MODE bu_tton 47
C
48,
H
89
HD/DVD
Component
CONTROL
DRC Mode
78
button
58
78
Digital
Reality Creation
DISPLAY
button
52
80
connecting
Channels
14
bass, adjusting
80
batteries,
inserting
bilingual
Favorite
degauss
DIGITAL
80
55, 56
G
GUIDE
D
B
balance,
Full (Screen Mode)
VM 79
clearing,
conrLecting
9
Fixed audio setting81
Full 56
79
79
54
aspect
Audio
10_ 47,
features
43
84
12
options
playing
precautions
removing
12
movies
70
69
71
76
65
58
105
R
rotating
photos
70
slide show options
73
troubleshooting
99
vie, wing
68
photos
zooming
photos
Memory
Stick button
Memory
Stick
MENU
Menus
button
10
52, 58,
77
OUT
MUTING
80
options
81
Video
options
79
66
47,
SAT/CABLE
52
Color Temperature
(Screen Mode)
55
78
POWER
off the TV
on, turning
12
on the TV 12
parental
control,
described
10
86
photos
viewing
PIC MODE
picture
contrast,
Play button
47
POWER button
adjusting
78
on/off,
81
troubleshooting
Sound,
described
Steady
Sound,
setting
OFF
10
80
80
10
80
button
47
43_ 90
treble,
buttons
47
adjusting
80
Program
Guide
83
troubleshooting
TruSurround
80
program
guide
53
TruSurround,
Effect
progressive, 10, 47, 79, 96
106
81
tilt, correcting
43_ 90
TIMER indicator
102
transport
97--
VIDEO (L/R)/AUDIO
described
14
Menu
turning
on/off
TV FUNCTION
14
iacks,
77
12, 47,
78
52
Color
Temperature
wictescreen
78
9
10, 83
Z
Steady
Super _Fine Pitch
surround
sound
Mode)
Vertical Size, adiusting
82
VHF/UHF
jack, described
Wega, described
Wide Zoom 55
speakers
Stereo, MTS setting
Stop button
47
90
(Screen
56, 57
Warn'b
on/off
external
Tilt Correction
the TV 12
43,
Expand
22
W
T
presetting
channels
84
Pro (Video) mode 78
problems,
102
78
specifications
104
Stmdard mode 78
SYSTEM
from
Correction
Vertical
VOL buttons
89
12
power
cord, removing
holder
11
powering
66
thumbnails
button
47
Vertical
Video
speakers
86
password,
changing
Pause button
47
TV
connecting
Center
82
30
Vertical
Setup Menu
using
77,
47
cable, connecting
satellite receiver,
Screen Mode
55, 57_ 82_ 83
SCREEN MODE button
55
turning
Menu
with
81
box, connecting
Video modes,
selecting
Vivid mode 78
P
Parent
12, 14
button
using
59
setting
with cable
24
with
with
button
sharpness,
adjusting
Simulated,
Effect 80
SLEEP button
47
O
turning
58
47
satellite
receiver,
remote
control
Neutral,
Norma!
Channels
58
Audio
audio
using with TV remote
control
59
49--50
programming
S VIDEO jack, described
SAT/CABLE
FUNCTION
N
oil
77
S
thumbnails
button
Variable
VCR
control
Rewind button 47
14
MTS setting
mode 78
V
resetting
89
77
viewing
80
blocked
insertingbatteries45
movies
MTS
86--88
removing,
Favorite
RESET button
47,
77, 86
MONITOR
viewing
remote
12, 48,
Par_,nt
Mono,
Movie
70
12
Viewer
Channel
Setup
Video
setting
ratings,
programs
87, 88
Record
buttons
47
77
Audio
ratings,
TV POWER button 47, 52
TV/VIDEO button 48, 52
97-102
80
the TV 12
button
47, 52
Zoom
(Screen
Mode)
55,
56