1
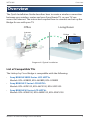
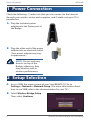
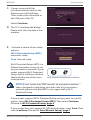
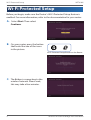
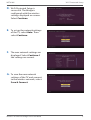
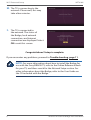
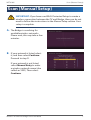
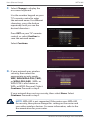
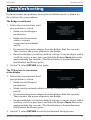
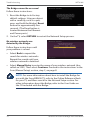
Special Instructions for
Sony Bravia Owners
Please use this guide for
installation instructions,
and disregard the
contents of the Start Here
envelope in the Linksys
by Cisco package.
QUICK INSTALLATION GUIDE
Wireless-N Ethernet
Bridge with Dual-Band
Model:
WET610N
Package Contents
• Wireless-N Ethernet Bridge with Dual-Band
• Setup Software and User Guide on CD-ROM
• Quick Installation Guide
• Network Cable
• Power Adapter
WET610N
Table of Contents
Table of Contents
Overview. . . . . . . . . . . . . . . . . . . . . . . . . . . . . . . . . . . . . . . . . . . . . . . 1
1 Power Connection. . . . . . . . . . . . . . . . . . . . . . . . . . . . . . . . . . . 2
2 Setup Selection. . . . . . . . . . . . . . . . . . . . . . . . . . . . . . . . . . . . . . 2
Wi-Fi Protected Setup. . . . . . . . . . . . . . . . . . . . . . . . . . . . . . . . . . . 4
Scan (Manual Setup). . . . . . . . . . . . . . . . . . . . . . . . . . . . . . . . . . . . 7
Troubleshooting. . . . . . . . . . . . . . . . . . . . . . . . . . . . . . . . . . . . . . . 11
Wireless-N Ethernet Bridge with Dual-Band
i
Table of Contents
ii
WET610N
Wireless-N Ethernet Bridge with Dual-Band
WET610N
Overview
Overview
The Quick Installation Guide describes how to create a wireless connection
between your wireless router and your Sony Bravia TV, so your TV can
access the Internet. The instructions explain how to connect and set up the
Bridge for use with your TV.
Office
Living Room
Internet
Bridge
Modem
TV
Router
Diagram of a Typical Installation
List of Compatible TVs
The Linksys by Cisco Bridge is compatible with the following:
•
Sony BRAVIA XBR9 Series LCD HDTVs Models: KDL-40XBR9, KDL-46XBR9, KDL-52XBR9
•
Sony BRAVIA Z Series LCD HDTVs Models: KDL-40Z5100, KDL-46Z5100, KDL-52Z5100
•
Sony BRAVIA W Series LCD HDTVs Models: KDL-40W5100, KDL-46W5100, KDL-52W5100
Wireless-N Ethernet Bridge with Dual-Band
1
Power Connection
WET610N
1 Power Connection
Check the following: 1) make sure that you can connect to the Internet
through your wireless router and computer, and 2) make sure your TV is
powered on.
A. Plug the included power
adapter into the Power port of
the Bridge.
B. Plug the other end of the power
adapter into an electrical outlet. (Your power adapter may vary
in appearance.)
NOTE: Do not stack any
devices on top of the
Bridge; otherwise, they
may interfere with its
wireless performance.
2 Setup Selection
A. Access XMB, the menu system of your Sony BRAVIA TV. Go to Settings > Network > Network Setup. (For more information about
how to use XMB, refer to the documentation for your TV.)
B. Select Wireless Bridge Setup. Then select Continue.
2
Wireless-N Ethernet Bridge with Dual-Band
WET610N
Setup Selection
C. Connect one end of the
included network cable to the
Ethernet port of the Bridge. Then connect the other end to
the LAN port of the TV. Select Continue.
D. The TV is checking the Bridge. Please wait; this may take a few
minutes.
E. You have a choice of two setup
options:
Wi-Fi Protected Setup (WPS) automatic setup
Scan manual setup
Wi-Fi Protected Setup (WPS) is a
feature that makes it easy to set
up your wireless network. If your
router supports Wi-Fi Protected
Setup, then it will have a button
that looks like one of the icons
in the picture. Wi-Fi Protected Setup Button on Router
NOTE: If your router uses WEP security, an encryption method
that is designed to help keep your data safe, for your wireless
network, please note that WEP is not supported by Wi‑Fi
Protected Setup.
If your router supports Wi‑Fi Protected Setup and you want to use this
option, select Wi-Fi Protected Setup (WPS). Then select Continue. Proceed to Wi-Fi Protected Setup, page 4.
If your router does not support Wi-Fi Protected Setup, select Scan. Then
select Continue. Proceed to Scan (Manual Setup), page 7.
Wireless-N Ethernet Bridge with Dual-Band
3
Wi-Fi Protected Setup
WET610N
Wi-Fi Protected Setup
Before you begin, make sure the Router’s Wi-Fi Protected Setup feature is
enabled. For more information, refer to the documentation for your router. A. Select Start. Then select
Continue.
B. On your router, press the button
that looks like one of the icons
in the picture.
Wi-Fi Protected Setup Button on the Router
C. The Bridge is connecting to the
wireless network. Please wait;
this may take a few minutes.
4
Wireless-N Ethernet Bridge with Dual-Band
WET610N
Wi-Fi Protected Setup
D. Wi-Fi Protected Setup is
successful. The Bridge is
configured with the wireless
settings displayed on-screen. Select Continue.
E. To set up the network settings
of the TV, select Auto. Then
select Continue.
F. The new network settings are
displayed. Select Continue if
the settings are correct.
G. To save the new network
settings of the TV and connect
to the wireless network, select Save & Connect.
Wireless-N Ethernet Bridge with Dual-Band
5
Wi-Fi Protected Setup
WET610N
H. The TV is connecting to the
network. Please wait; this may
take a few minutes.
I. The TV is connected to
the network. The status of
the Bridge, local network
connection, and Internet
connection are displayed. Select
OK to exit this screen.
Congratulations! Setup is complete.
If you encounter any problems, proceed to Troubleshooting, page 11.
NOTE: For more information about how to install the Bridge for
use with the Sony BRAVIA TV, refer to the Online Reference Book
for your TV, and then search for the Network Setup section. For
other information about the Bridge, refer to the User Guide on
the CD included with the Bridge.
6
Wireless-N Ethernet Bridge with Dual-Band
WET610N
Scan (Manual Setup)
Scan (Manual Setup)
IMPORTANT: If you have used Wi-Fi Protected Setup to create a
wireless connection between the TV and Bridge, then you do not
need to follow the instructions in the Manual Setup section. Your
setup is complete.
A. The Bridge is searching for
available wireless networks. Please wait; this may take a few
minutes.
B. If your network is listed, select
it, and then select Continue. Proceed to step D.
If your network is not listed,
select Manual Entry to enter
a wireless network name (also
called an SSID). Then select
Continue.
Wireless-N Ethernet Bridge with Dual-Band
7
Scan (Manual Setup)
WET610N
C. Select Change to display the
on‑screen keyboard.
Use the number keypad on your
TV’s remote control to enter
the network name. For different
characters, press the button
repeatedly until you see the
desired characters.
Press ENT on your TV’s remote
control, or select Confirm to
save the network name.
Select Continue.
D. If your network uses wireless
security, then select the
appropriate security mode:
WEP, WPA/WPA2-PSK (TKIP),
or WPA2-PSK (AES). (WPA- or
WPA2-PSK is also known as
WPA- or WPA2-Personal.) Select
Continue. Proceed to step E.
If your network does not use security, then select None. Select
Continue. Proceed to step F.
NOTE: WPA-AES is not supported. If the router uses WPA-AES
for security, then please change this setting on the router and
your other wireless devices. For more information, refer to the
documentation for your router.
8
Wireless-N Ethernet Bridge with Dual-Band
WET610N
Scan (Manual Setup)
E. Select Change to display the
on‑screen keyboard.
Use the number keypad on your
TV’s remote control to enter
the security key. For different
characters, press the button
repeatedly until you see the
desired characters.
Press ENT on your TV’s remote
control, or select Confirm to
save the security key.
Select Continue.
F. To set up the network settings
of the TV, select Auto. Then
select Continue.
G. The new network settings are
displayed. Select Continue if
the settings are correct.
Wireless-N Ethernet Bridge with Dual-Band
9
Scan (Manual Setup)
WET610N
H. To save the new network
settings of the TV and connect
to the wireless network, select Save & Connect.
I. The TV is connecting to the
network. Please wait; this may
take a few minutes.
J. The TV is connected to
the network. The status of
the Bridge, local network
connection, and Internet
connection are displayed. Select
OK to exit this screen.
Congratulations! Setup is complete.
If you encounter any problems, proceed to Troubleshooting, page 11.
NOTE: For more information about how to install the Bridge for
use with the Sony BRAVIA TV, refer to the Online Reference Book
for your TV, and then search for the Network Setup section. For
other information about the Bridge, refer to the User Guide on
the CD included with the Bridge.
10
Wireless-N Ethernet Bridge with Dual-Band
WET610N
Troubleshooting
Troubleshooting
If you encounter any problems during the installation process, please try
the solutions for your problem.
The Bridge is not found.
1. Follow these instructions until
your problem is solved:
•• Make sure the Bridge is
powered on.
•• Make sure the network
cable is securely
connected to the Bridge
and TV.
•• Disconnect the power adapter from the Bridge. Wait five seconds. Then connect the power adapter to the Bridge.
•• Reset the Bridge to its factory default settings. Using an object with a
small tip, such as a pen, press and hold the Bridge’s Reset button for
approximately five seconds. (The Reset button is located between
the Ethernet and Power ports.)
2. On the TV, select RETURN to try again.
The TV has lost its connection
to the Bridge.
1. Follow these instructions until
your problem is solved:
•• Make sure the Bridge is
powered on.
•• Make sure the network cable is securely connected to the Bridge and TV.
•• Disconnect the power adapter from the Bridge. Wait five seconds. Then connect the power adapter to the Bridge.
•• Reset the Bridge to its factory default settings. Using an object with a
small tip, such as a pen, press and hold the Bridge’s Reset button for
approximately five seconds. (The Reset button is located between
the Ethernet and Power ports.)
2. On the TV, select RETURN to restart the Network Setup process.
Wireless-N Ethernet Bridge with Dual-Band
11
Troubleshooting
WET610N
The Bridge cannot be accessed.
Follow these instructions:
1. Reset the Bridge to its factory
default settings. Using an object
with a small tip, such as a pen,
press and hold the Bridge’s Reset
button for approximately five
seconds. (The Reset button is
located between the Ethernet
and Power ports.)
2. On the TV, select RETURN to restart the Network Setup process.
No wireless networks are
detected by the Bridge.
Follow these instructions until
your problem is solved:
•• Select Back to repeat the
search for wireless networks. Repeat the search until your
wireless network is detected.
•• Select Manual Entry to enter the name of your wireless network (also
called an SSID). Then select Continue. Proceed to the instructions in the
Scan (Manual Setup) section, step C, on page 8.
NOTE: For more information about how to install the Bridge for
use with the Sony BRAVIA TV, refer to the Online Reference Book
for your TV, and then search for the Network Setup section. For
other information about the Bridge, refer to the User Guide on
the CD included with the Bridge.
12
Wireless-N Ethernet Bridge with Dual-Band
WET610N
Wireless-N Ethernet Bridge with Dual-Band
Notes
13
Notes
WET610N
09072110NC-JL
14
Wireless-N Ethernet Bridge with Dual-Band
For more information about how to install the Bridge for use with the Sony Bravia TV, refer
to the Online Reference Book for your TV, and then search for the Network Setup section. For other information about the Bridge, refer to the User Guide on the CD included with the Bridge.
Sony Website
http://www.sony.com
Linksys by Cisco
http://www.linksysbycisco.com
© 2009 Cisco Systems, Inc. All rights reserved. Cisco, the Cisco logo, and Linksys are trademarks or registered trademarks of Cisco Systems, Inc. and/
or its affiliates in the United States and certain other countries. All other trademarks mentioned in this document or website are the property of
their respective owners. The use of the word partner does not imply a partnership relationship between Cisco and any other company.
3435-00546