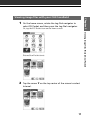
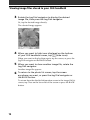
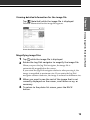
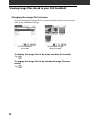
1
4-656-104-12(1)
Chapter 1
Viewing image files
(PictureGear Pocket)
Chapter 2
Add-on
Application
Guide
Playing a movie
(gMovie player)
Chapter 3
Setting the “Memory
Stick” automatic start
function (MS Autorun)
Chapter 4
Copying the data to the
“Memory Stick” media on
your CLIE handheld (MS
Import/Export)
Personal Entertainment Organizer
PEG-N610C
© 2001 Sony Corporation
On the supplied software
• Copyright laws prohibit reproducing
the software or the software manual in
whole or in part, or renting the software
without the permission of the copyright
holder.
• In no event will SONY be liable for any
financial damage or loss of profits,
including claims made by third parties,
arising out of the use of the software
supplied with this player.
• In the event a problem occurs with this
software as a result of defective
manufacturing, SONY will replace it at
SONY’s option or issue a refund.
However, SONY bears no other
responsibility.
• The software provided with this player
cannot be used with equipment other
than that which it is designated for use
with.
• Please note that, due to continued
efforts to improve quality, the software
specifications may be changed without
notice.
Program © 2001 Sony Corporation, © 2001
Palm, Inc. or its subsidiaries. All rights
reserved.
Documentation © 2001 Sony Corporation
Sony, Memory Stick, the Memory Stick logo,
OpenMG, and PictureGear are trademarks
of Sony Corporation.
Walkman is a registered trademark of Sony
Corporation
Graffiti, HotSync, PalmModem, and Palm
OS are registered trademarks, and the
HotSync logo and Palm are trademarks of
Palm, Inc. or its subsidiaries.
IBM and PC/AT are registered trademarks
of International Business Machines
Corporation.
Microsoft, Windows, Outlook and the
Windows 98 logo are registered trademarks
of Microsoft Corporation.
MMX and Pentium are registered
trademarks of Intel Corporation.
AvantGo, the AvantGo Client and the
AvantGo logo are registered trademarks of
AvantGo, Inc.
Pumatech, the Pumatech log, Intellisync and
Intellisync Lite are trademarks of Pumatech,
Inc. that may be registered in some
jurisdictions.
QuickTime and the QuickTime logo are
trademarks used under license. QuickTime
is registered in the U.S. and other countries.
This product includes fonts owned by
TypeBank Co., Ltd. under license.
All other trademarks are trademarks of their
respective owners.
CAUTION
Please contact your nearest Sony dealer
regarding the problem you are experiencing
with your Sony product.
2
Table of contents
Chapter 1
Viewing image files
(PictureGear Pocket)
What you can do with PictureGear
Pocket .............................................. 6
Installing .......................................... 7
Installing the PictureGear Pocket
application to your CLIE handheld ..... 7
Installing the PictureGear 4.4Lite
software to your computer ................ 8
Viewing image files stored in your
CLIE handheld .................................. 9
Transferring image files to your CLIE
handheld ........................................... 9
Viewing image files with your CLIE
handheld ......................................... 11
Viewing image files stored in
“Memory Stick” media .................. 15
Copying image files ....................... 17
Saving image files stored on your
CLIE handheld to a “Memory Stick”
media (Export) ................................. 17
Saving image files stored on
a “Memory Stick” media to your
CLIE handheld (Import) .................... 18
Displaying image files one after
another (PhotoStand) .................... 20
Making a PhotoStand setting .......... 20
Using PhotoStand ............................ 21
Viewing sample image files ........... 22
How to read the online manual ..... 23
PictureGear Pocket menu items ..... 24
Chapter 2
Playing a movie (gMovie player)
What you can do with gMovie player
software ......................................... 28
Installing ........................................ 29
Install PictureGear 4.4Lite software
to your computer ............................. 29
Playing movies with your CLIE
handheld ........................................ 30
Transferring movies to your CLIE
handheld ......................................... 30
Playing movies ................................. 32
Playing sample movie files ............ 34
How to read the online manual ..... 35
gMovie software menu items ........ 36
Chapter 3
Setting the “Memory Stick”
automatic start function (MS
Autorun)
What you can do with the
MS Autorun application ................. 38
Setting Auto-run for an Application . 40
How to read the online manual ..... 42
Chapter 4
Copying the data to the “Memory
Stick” media on your CLIE
handheld (MS Import/Export)
What you can do with MS Import/
Export application ......................... 44
Installing ........................................ 45
Installing CLIE applications using
MS Import/Export .......................... 46
Using your CLIE handheld as a
removable disk .............................. 48
How to read the online manual ..... 49
3
About this manual
Welcome to the Sony Personal Entertainment Organizer (referred to as
the “Sony CLIE Handheld” or “CLIE handheld” in this manual).
Your Sony CLIE Handheld comes with three manuals:
Read This First
The Read This First manual gives an overview of your CLIE
handheld’s features, hardware and software setup, installation
instructions, and other important details. Before reading the other
manuals, read the Read This First manual.
Operating Instructions
The Operating Instructions manual describes all you need to know
about how to use your CLIE handheld and the Personal Information
Management (PIM) applications that come with it.
This manual shows you how to:
■ Turn on and off your CLIE handheld, reset the CLIE handheld, and
enter data in greater detail (Chapter 1)
■ Use the Personal Information Management applications: Date
Book, Address Book, To Do List, Memo Pad, Expense, and
Calculator (Chapter 2)
■ Perform a HotSync operation with your computer (Chapter 3)
■ Exchange data with another handheld by beaming or via “Memory
Stick” media (Chapter 4)
■ Personalize your CLIE handheld with your own preferences
settings (Chapter 5)
■ Maintain your CLIE handheld and use the Troubleshooting guide
and other technical information (Chapter 6)
Add-on Applications Guide (this manual)
The Add-on Applications Guide describes how to install and use the
supplied add-on applications which include:
■ PictureGear Pocket/PhotoStand/PictureGear 4.4Lite
■ gMovie
■ MS Autorun
■ MS Export/Import
4
Viewing image files
(PictureGear Pocket)
This chapter explains how to view image files
on your CLIE handheld.
Chapter 1
Chapter 1
What you can do with PictureGear Pocket
PictureGear Pocket is a picture album application for your CLIE
Handheld.
Anytime anywhere...
Using PictureGear Pocket, you can store still image files from various
sources including those taken with a digital camera or those
downloaded from the Internet to your CLIE handheld. You can look at
your favorite image files anytime and anywhere.
Using PictureGear Pocket as a photo stand or a clock
Using the photostand function, you can display image files that are
drawn on a computer or image files taken with a digital camera.
You can also use your CLIE handheld to display the current time on
your CLIE handheld screen while using the photostand function.
Beaming my image files ...
Use IR (Infrared) communication to exchange image files easily with
other CLIE handheld users. You cannot beam image files to other Palm
OS based devices.
Pasting a image file to an address record
You can paste an image to address information.
For details, refer to the Operating Instructions manual.
6
Installing
1
Double-click the CLIE Palm Desktop icon on the Windows
desktop.
The CLIE Palm Desktop software starts.
2
Click Install.
The Install Tool dialog box appears.
3
4
Select a user name from the user list.
Click Add.
Make sure that the Add-on folder is selected.
If the Add-on folder is not selected, select it manually.
At the default setup, the Add-on folder is stored in the Sony
Handheld folder of the Program Files folder.
5
6
Double-click the PictureGear Pocket folder.
Click pgpocket.
pgpocket is added to the File Name list.
7
Repeat steps 4 and 5, and then click PhotoStand.prc and
PSLaunch.prc.
PhotoStand.prc and PSLaunch.prc are added to the File Name list.
8
9
Click Done.
Press the HotSync button on the cradle.
Files specified in steps 6 and 7 are installed on your CLIE handheld
during the HotSync operation.
7
Viewing image files (PictureGear Pocket)
You can install PictureGear Pocket using the hard disk on your
computer.
Place your CLIE handheld in the cradle, and then install the CLIE Palm
Desktop software on your computer from the supplied CD-ROM.
Chapter 1
Installing the PictureGear Pocket application to your
CLIE handheld
Installing
Installing the PictureGear 4.4Lite software to your computer
You can convert the image files stored in your computer using
PictureGear 4.4Lite. To view image files or movies with your CLIE
handheld, use PictureGear Pocket or gMovie player.
1
Insert the Installation CD-ROM into the CD-ROM drive.
The installation launcher window appears.
2
Click CLIE Image Software.
The dialog box used to select an installation option appears.
3
Click Install PictureGear 4.4Lite.
A confirmation dialog box appears.
4
Click Yes.
The PictureGear 4.4Lite software installation starts.
Follow the instructions on-screen to finish installation.
5
Click Exit.
To start PictureGear 4.4Lite
From the Start Menu, click Programs, PictureGear 4.4Lite,
and then PictureGear 4.4Lite.
For details on how to use PictureGear 4.4Lite, see the Help files of the
PictureGear 4.4Lite software.
8
Viewing image files stored in your CLIE
handheld
Chapter 1
You can transfer image files taken by a digital still camera or
downloaded from the Internet, etc. These items can be managed using
the PictureGear 4.4Lite software on your computer. You can also
prepare optimize photos to display on your CLIE handheld using
PictureGear 4.4Lite software before transferring them to your CLIE
handheld.
For details on how to save image files in the format supported by
PictureGear 4.4Lite software, refer to the instruction manual of the
devices or imaging software you are using.
Viewing image files (PictureGear Pocket)
Transferring image files to your CLIE handheld
Prepare image files you want to display on your CLIE handheld, and
then transfer them to your CLIE handheld.
1
Start PictureGear 4.4Lite.
See page 8 for details.
2
Select the image file you want to send.
You can also select multiple images by holding down the Ctrl or
Shift keys while clicking.
3
From the File menu, select Output services and then
Install the image during the next HotSync.
The User name dialog box appears.
4
Click the arrow V to the right of the text box, and then
select a user name.
If necessary, click “Still settings” and make size and compression
settings for the image file you want to send in the Settings for
PictureGear dialog box.
5
Click OK.
The image file you want to send and the user name are registered in
PictureGear.
6
Place your CLIE handheld in the cradle, then press the
HotSync button on the cradle.
The registered image file(s) are automatically sent to your CLIE
handheld during the HotSync operation.
9
Viewing image files stored in your CLIE handheld
When you want to save an image file to “Memory Stick”
media
You can also transfer image files to “Memory Stick” media directly.
Select Output CLIE Handheld format file to Memory Stick in step 3 on
page 9.
To view image files stored in “Memory Stick” media, see page 15.
10
1
Chapter 1
Viewing image files with your CLIE handheld
On the home screen, rotate the Jog Dial navigator to
select PG Pocket and then press the Jog Dial navigator.
Or, tap the PG Pocket icon on the home screen.
Viewing image files (PictureGear Pocket)
PictureGear Pocket starts.
2
Tap the arrow V on the top center of the screen to select
Internal.
11
Viewing image files stored in your CLIE handheld
3
Rotate the Jog Dial navigator to display the desired
image file, then press the Jog Dial navigator.
Or, tap the desired image directly.
The selected image appears.
4
When you want to hide icons displayed on the bottom
of your CLIE handheld screen, tap
(hide icons).
When you want to display them again, tap the screen, or press the
Jog Dial navigator or the BACK button.
5
When you want to show another image file, rotate the
Jog Dial navigator.
Another image file appears.
6
To return to the photo list screen, tap the screen
anywhere you want, or press the Jog Dial navigator or
the BACK button.
To return from the detailed information screen to the image file list
screen, tap Close on the lower left of the screen or press the BACK
button.
12
Tap
Chapter 1
Viewing detailed information for the image file
(detailed) while the image file is displayed.
Detailed information for the image file appears.
Magnifying image files
1
2
Tap
while the image file is displayed.
Rotate the Jog Dial navigator to magnify the image file.
When you press the Jog Dial navigator, the image file is
automatically magnified on the screen.
If you rotate the Jog Dial navigator clockwise after pressing it, the
image is magnified to maximum size. If you rotate the Jog Dial
navigator counter-clockwise, the image is reduced to minimum size.
3
When you want to see the rest of the image that is not
currently displayed on the screen, scroll down or up, as
necessary.
4
To return to the photo list screen, press the BACK
button.
13
Viewing image files (PictureGear Pocket)
Show detailed information
Viewing image files stored in your CLIE handheld
Changing the image file list screen
You can change the image file list screen to display items by name and
date, or by thumbnail image.
By name and date
(List mode)
By thumbnail image
(Preview mode)
To display the image file list by name and date (List mode)
Tap
.
To display the image file list by thumbnail image (Preview
mode)
Tap
14
.
Viewing image files stored in “Memory
Stick” media
On the home screen, rotate the Jog Dial navigator to
select PG Pocket and then press the Jog Dial navigator.
Or, tap the PG Pocket icon on the home screen.
PictureGear Pocket starts.
2
Insert the “Memory Stick” media into the “Memory
Stick” slot.
3
Tap the arrow V on the top center of the screen to select
MS.
Continued on next page
15
Viewing image files (PictureGear Pocket)
1
Chapter 1
Image files shot by a digital still camera or digital video camera
recorder and recorded in a “Memory Stick” media are stored in the
DCF format. This format differs from the PGP format which is
standard for PictureGear Pocket software.
You can view both PGP format image files and DCF format image files
using PictureGear Pocket. In addition, you can convert DCF format
image files into PGP format image files, and save them to your CLIE
handheld or “Memory Stick” media.
Viewing image files stored in “Memory Stick” media
4
If you want to view DCF image files taken by digital still
cameras etc., tap DCF.
If you want to view image files converted by the PictureGear Pocket
or PictureGear 4.4Lite software, tap PGP.
Note
You cannot move, copy or transfer DCF format image files using the MS Gate
application. However, you can convert them into PGP format image files using
PictureGear Pocket, and save them to your CLIE handheld.
Notes on DCF format
• DCF (Design rule for Camera File system) is an industry standard format for
storing image files established by JEIDA (Japan Electronic Industry
Development Association).
• Using the PictureGear Pocket application, you cannot view image files shot by
a device that does not support the DCF format such as the Sony digital video
camera recorder DCR-TRV9000 or Sony digital still camera DSC-D700/D770.
• DCF format image files are stored in the DCIM directory of the “Memory
stick” media.
• In order to display clearer pictures with PictureGear Pocket, it is recommended
that you use PictureGear 4.4Lite on your computer when converting the image
files to PGP format before storing them in a “Memory stick” media.
16
Copying image files
Display the image file you want to save to a “Memory
Stick” media. (page15)
2
Tap
(Import/Export).
The Import/Export screen appears.
• To change the category of the image files, tap the arrow V and
select the desired category.
• If you want to delete the original image file stored on your CLIE
handheld, tap to select Delete the original image.
3
Tap OK.
The selected image file is converted to the PGP format and saved to
the “Memory Stick” media.
To cancel the operation
Tap Cancel in step 3 above.
Saving multiple image files in a “Memory Stick” media at one
time
1
In the photo list screen, tap
(Import/Export).
The check boxes used to select image files appear.
2
Tap the check box to select the image file you want to
save.
Continued on next page
17
Viewing image files (PictureGear Pocket)
1
Chapter 1
Saving image files stored on your CLIE handheld to a
“Memory Stick” media (Export)
Copying image files
3
Tap Export.
The export screen appears.
4
Tap OK.
Saving image files stored on a “Memory Stick” media
to your CLIE handheld (Import)
1
2
Display the image file you want to save.
Tap
(Import/Export).
The import screen appears.
• When you want to save a PGP format image file
To change the category of the image files, tap the arrow V and
select the desired category.
If you want to delete the original image file stored in a “Memory
Stick” media, tap to select Delete the original image.
• When you want to save a DCF format image file
To change the number of colors of the image, tap to select 16-bit
or 8-bit colors.
3
Tap OK.
The selected image file is converted to the PGP format and saved to
the CLIE handheld. It may takes a few seconds to save the image
depending on the image file.
To cancel the operation
Tap Cancel in step 3 above.
18
1
In the photo list screen, tap
(Import/Export).
The check boxes used to select image files appear.
Tap the check box to select the image file you want to
save.
3
Tap Import.
Viewing image files (PictureGear Pocket)
2
The import screen appears.
4
Chapter 1
Saving multiple DCF image files to your CLIE handheld at one
time
Tap OK.
The selected image file is converted to the PGP format and then
saved to your CLIE handheld. Depending on the image file, it may
take a few seconds to save the image.
19
Displaying image files one after another
(PhotoStand)
You can display image files one after another when you place your
CLIE handheld in the cradle (PhotoStand function).
You can also use your CLIE handheld as a clock by displaying the
current time using the PhotoStand application.
Making a PhotoStand setting
1
In the photo list screen of PictureGear Pocket, tap
(PhotoStand).
The check boxes used to select image files appear.
2
Tap to select the image file(s) which you want to display
with the Photo Stand function.
3
Tap PhotoStand.
The PhotoStand application starts, and the Settings screen appears.
4
Make your settings.
• Title: enter the desired Photo Stand title.
• Sort By: select the order in which to display the image files.
• Effect: select the transition effect to be used between images or
the clock type.
• Display Interval: set an interval to determine the length of time
an individual image file will be displayed.
20
Tap Save.
The image files that you selected in Step 2 and the settings you
made in Step 4 are saved with a PhotoStand title.
Using PhotoStand
1
On the home screen, rotate the Jog Dial navigator to
select PhotoStand and then press the Jog Dial navigator.
Or, tap the PhotoStand icon on the home screen.
PhotoStand starts.
2
3
Tap the PhotoStand title you want to play.
Tap Start.
Image files in the selected category appear one after another.
Exitting the PhotoStand
Press the Jog Dial navigator or tap the screen.
If you created the PhotoStand show on the “Memory Stick”
media
You will select to “VMS” in PhotoStand.
21
Viewing image files (PictureGear Pocket)
5
Chapter 1
• Loop: if you want to repeat image files automatically from the
start, tap to select this check box.
• Autorun: if you want to start PictureGear Pocket when you
insert the “Memory Stick” media into your CLIE handheld, tap
to select this check box. This option appears only when you
select the image stored in the “Memory Stick” media for the
PhotoStand.
Viewing sample image files
You can view sample image files installed on your computer.
Install the CLIE Palm Desktop software to your hard disk using the
supplied CD-ROM and then place your CLIE handheld in the cradle.
1
Double-click the Palm Desktop for CLIE icon on the
Windows desktop.
The Palm Desktop for CLIE software starts.
2
Click Install.
The Install Tool dialog box appears.
3
4
Select a user name from the user list.
Click Add.
Make sure that the Add-on folder is selected.
If the Add-on folder is not selected, select the folder manually.
At the default setup, Add-on folder is stored in the Sony Handheld
folder of the Program Files folder.
5
6
Double-click the PG Pocket samples folder.
Double-click the sample image file you want to view on
the screen of your CLIE handheld.
The selected image file name is added to the File Name list.
If you want to view other sample images, repeat this step.
7
8
Click Done.
Press the HotSync button on the cradle.
The selected sample image files will be installed on your CLIE
handheld.
9
Start PictureGear Pocket.
For details, see page 11.
22
How to read the online manual
1
Viewing image files (PictureGear Pocket)
Insert the supplied CD-ROM into your computer’s CDROM drive.
The install screen appears automatically.
2
3
Click Manuals.
Double-click PictureGear Pocket Manual.pdf.
The online manual appears.
If the Acrobat Reader software is not installed
1
Insert the supplied CD-ROM into your computer’s CDROM drive.
The install screen appears automatically.
2
3
Click Exit.
4
Right-click the CD-ROM drive icon, and then click Open
from the shortcut menu.
5
6
7
Click the PC folder.
Chapter 1
Detailed information of the PictureGear Pocket application is provided
in the online manual in the supplied CD-ROM.
To see the online manual, the Adobe Acrobat Reader software must be
installed on your computer.
Double-click the My Computer icon on the Windows
desktop.
Double-click the Acrobat folder.
Double-click ar500enu.exe to install the Acrobat Reader
onto your computer.
23
PictureGear Pocket menu items
The following items appear when you tap the MENU icon.
This section explains the menu commands specific to PictureGear
Pocket. See “Using the Edit menu ” in the Operating Instructions
manual.
Photo list screen
View menu
List
Changes the view of the photo list screen.
PhotoStand
Starts the Photostand application.
Image menu
Import/Export
Shows the Imports/Export screen.
Tap to select the image file(s) you want to import/export. For details,
see “Copying image files” on page 17.
Delete
Shows the Imports/Export screen.
Tap to select the image file(s) you want to delete. For details, refer to
the online manual.
Categorize
Shows the Categorize screen.
Tap to select the image file(s) you want to categorize. For details, refer
to the online manual.
24
Preference (available only when you view image files stored in
the “Memory Stick” media)
Shows the Preference screen.
Tap to select the default image format.
Chapter 1
Options menu
Viewing image files (PictureGear Pocket)
Version information
Shows the version information of PictureGear Pocket.
Image file screen
View menu
Back
Returns to the Photo list screen.
Detail Info.
Shows detailed information for the image file.
Zoom
Magnifies the image file. For details, see “Magnifying image files” on
page 13.
First Image
Shows the first image file.
Prev Image
Shows the previous image file.
Next Image
Shows the next image file.
Last Image
Shows the last image file.
Show/Hide tool bar
Shows/hides the toolbar on the bottom of the screen.
Continued on next page
25
PictureGear Pocket menu items
Image menu
Import/Export
Imports/exports the currently selected image file. For details, see
“Copying image files” on page 17.
Delete
Deletes the currently selected image file. For details, refer to the online
manual.
Beam
Beams the currently selected image file to another CLIE handheld.
Options menu
Preference
Shows the Preference screen.
About PictureGear Pocket
Shows the version information of PictureGear Pocket.
26
Chapter 2
Playing a movie (gMovie player)
This chapter explains how to play a movie on your CLIE
handheld.
Chapter 2
What you can do with gMovie player
software
gMovie is an add-on application which allows you to display or play
back movie file created with Windows® applications such as
PictureGear 4.4Lite, on your CLIE handheld.
Playing movies on your CLIE handheld
You can play a movie that has been converted to the proper format
and then transferred from your computer, or stored in the “Memory
Stick” media.
You can enjoy your favorite movies anytime, anywhere.
28
Installing
You do not have to install gMovie player on your CLIE handheld
The gMovie player application is factory pre-installed.
Install PictureGear 4.4Lite software to your computer
Install PictureGear 4.4Lite software to your computer according to the
instructions on page 8.
Chapter 2 Playing a movie (gMovie player)
29
Playing movies with your CLIE handheld
You can transfer movies shot by a digital still camera or downloaded
from the Internet, etc., which are managed by the PictureGear 4.4Lite
software on your computer. You will need to optimize movies on your
CLIE handheld by the PictureGear 4.4Lite software before transferring.
For details of operations or how to save the movies in the format
which is supported by the PictureGear 4.4Lite, refer to the online Help
of the PictureGear 4.4Lite.
Transferring movies to your CLIE handheld
Prepare the items you want to display on your CLIE handheld, and
then transfer them to your CLIE handheld.
1
Start PictureGear 4.4Lite.
See page 8 for details.
2
Select the movie you want to send.
You can also select multiple movies by holding down the Ctrl or
Shift keys while clicking.
3
From the File menu, select Output services and then
Install the image during the next HotSync.
The User name dialog box appears.
4
Click the arrow V to the right of the text box, and then
select a user name.
If necessary, click Movie settings and make size and compression
settings for the image you want to send in the “Settings for Movies
on CLIE Handheld” dialog box.
5
Click OK.
The images you want to send and the user name are registered in
PictureGear.
6
Place your CLIE handheld in the cradle, and then press
the HotSync button on the cradle.
The registered images are automatically sent to your CLIE handheld
during the HotSync operation.
30
When you want to save a movie to the “Memory Stick”
media
You can also transfer a movie to the “Memory Stick” media directly.
Select “Output CLIE format file to Memory Stick” in step 3 on page 30.
Chapter 2 Playing a movie (gMovie player)
31
Playing movies with your CLIE handheld
Playing movies
1
On the home screen, rotate the Jog Dial navigator to
select gMovie and then press the Jog Dial navigator.
Or, tap the gMovie icon on the home screen.
gMovie player starts and the movie list screen appears.
2
Tap the movie you want to play.
Playback starts.
To stop playback
Tap
(Stop).
To resume playback, tap
(Play).
To locate the start point of the movie
Tap
32
(Locate).
To return to the movie list screen
Tap
(Return) at the upper-right corner of the screen.
To play the next movie
Tap
(Next) at the upper-right corner of the screen.
To play movies one after another (continuous playback)
Tap (Next) at the upper-right corner of the screen for a few seconds.
The icon changes into
(Continuous) and movies stored in your CLIE
handheld are played one after another.
To return to the normal playback, tap
(Continuous) for a few
seconds.
To delete a movie
Display the movie you want to delete, and then tap
Menu
.
2
3
Tap Delete.
Chapter 2 Playing a movie (gMovie player)
1
Tap OK.
The selected movie is deleted, and then the movie list screen
appears.
33
Playing sample movie files
You can view sample movie files installed on your computer.
Install the CLIE Palm Desktop software to your hard disk using the
supplied CD-ROM and then place your CLIE handheld in the cradle.
1
Double-click the Palm Desktop for CLIE icon on the
Windows desktop.
The Palm Desktop for CLIE software starts.
2
Click Install.
The Install Tool dialog box appears.
3
4
Select a user name from the user list.
Click Add.
Make sure that the Add-on folder is selected.
If the Add-on folder is not selected, select the folder manually.
At the default setup, Add-on folder is stored in the Sony Handheld
folder of the Program Files folder.
5
6
Double-click the gMovie samples folder.
Double-click the sample movie file you want to play on
the screen of your CLIE handheld.
The selected movie file name is added to the File Name list.
If you want to view other sample movies, repeat this step.
7
8
Click Done.
Press the HotSync button on the cradle.
The selected sample movie files will be installed on your CLIE
handheld.
9
Start gMovie player.
For details, see page 32.
34
How to read the online manual
Detailed information on gMovie player software is provided in the
online manual on the supplied CD-ROM.
To see the online manual, the Adobe Acrobat Reader software must be
installed on your computer.
1
Insert the supplied CD-ROM into your computer’s CDROM drive.
The install screen appears automatically.
2
3
Click Manuals.
Double-click gMovie Manual.pdf.
The online manual appears.
If the Acrobat Reader software is not installed
Insert the supplied CD-ROM into your computer’s CDROM drive.
The install screen appears automatically.
2
3
Click Exit.
4
Right-click the CD-ROM drive icon, and then click Open
from the shortcut menu.
5
6
7
Click the PC folder.
Double-click the My Computer icon on the Windows
desktop.
Double-click the Acrobat folder.
Double-click ar500enu.exe to install the Acrobat Reader
onto your computer.
35
Chapter 2 Playing a movie (gMovie player)
1
gMovie software menu items
The following items appear when you tap the MENU icon on your
CLIE handheld screen.
This section explains the menu commands specific to gMovie player.
Media menu
When you tap Menu
appear.
in the media list screen, following items
About gMovie
Shows version information of the gMovie application.
When you tap Menu
appear.
in the movie file screen, following items
Details
Shows detailed information on the current media.
Beam Media
Transfers the data contained in the current media to another CLIE
handheld via the IR port. For details about beaming, see the Operating
Instructions manual supplied with the CLIE handheld.
Delete
Deletes the current media. Tap OK in the Delete Media dialog box to
perform deletion. Tap Cancel to cancel deletion.
Preferences
Displays options for movie playback option available:
• Loop movie playback: if you want to play the current movie file
repeatedly, tap to select this check box.
When you tap to clear the check box, you cannot play the next movie
file by tapping (Next) at the upper-right corner of the screen. In
this case, tap
(Play) manually to play the movie file.
About gMovie
Shows version information of the gMovie application.
36
Chapter 3
Setting the “Memory Stick” automatic start
function (MS Autorun)
This chapter explains how to set the “Memory Stick”
automatic start function on your CLIE handheld.
When you want to start an application in the “Memory
Stick” media from home screen, refer to the Operating
Instructions manual.
Chapter 3
What you can do with the MS Autorun
application
“Memory Stick” Autorun (hereafter referred to as MS Autorun) is an
add-on application which allows your CLIE handheld to copy and
start a specified application automatically when “Memory Stick”
media is inserted into the CLIE handheld. Removing the “Memory
Stick” media automatically deletes the application copy from the
memory of the CLIE handheld. MS Autorun functions as virtual
memory to effectively utilize the memory of the CLIE handheld.
Starting an application (.prc) on the CLIE handheld automatically
When you use a digital still camera that is compatible with “Memory
Stick” media, you can view your images by inserting the “Memory
Stick” media into the CLIE handheld. In this example, you would use
the auto-run setting to start the PictureGear Pocket application on your
CLIE handheld.
Starting an application (.prc) in a “Memory Stick” media
automatically
This setting is for automatically starting an application which does not
access any data, such as game applications, or an application which
accesses data in the CLIE handheld (not in the “Memory Stick” media).
Starting a pre-selected application (.prc) and related database
files (.pdb, .prc) in a “Memory Stick” media*
This setting automatically displays a specific image or file with an
application such as an image viewer or a document reader. You need
to specify an application and the related database files before using
this auto-run setting.
Starting an application (.prc) on the CLIE handheld automatically
with specific database files (.pdb, .prc) from a “Memory Stick”
media*
This setting is used when the application is located on the CLIE handheld
and the corresponding database files are located on a “Memory Stick”
media. You can also display the desired data automatically by inserting
the “Memory Stick” media into your CLIE handheld.
* If you specify PictureGear Pocket as an auto-run application, tap the arrow V
on the top center of the screen in PictureGear Pocket to select “MS.” Likewise,
if you specify gMovie player as an auto-run application, tap the movie file you
want to play.
38
Notes
• We do not recommend using MS Autorun with the Address Book, Date Book,
To Do List, Memo Pad, Calculator or Mail applications. Problems may occur if
the data of these applications do not reside on your CLIE handheld when you
perform a HotSync operation.
• The specified application may not start automatically depending on the
application in use when you insert the “Memory Stick” media into your CLIE
handheld. In this case, return to the home screen, and then insert the Memory
Stick media again.
You do not have to install MS Autorun on your CLIE
handheld
The MS Autorun application is factory pre-installed.
Chapter 3 Setting the “Memory Stick” automatic start function (MS Autorun)
39
Setting Auto-run for an Application
To automatically start an application stored in a “Memory Stick”
media, perform the following procedure. This example is for when the
PictureGear Pocket application is set to start automatically when a
“Memory Stick” media containing photos is inserted to the CLIE
handheld.
1
Install an application you want to start automatically
(PictureGear Pocket) on the CLIE handheld.
2
Insert the “Memory Stick” media for which you want to
set the autorun function into the “Memory Stick” slot.
3
On the home screen, rotate the Jog Dial navigator to
select MSAutorun and then press the Jog Dial navigator.
MS Autorun starts.
Or, tap MSAutorun icon on the home screen.
4
Press the Jog Dial navigator.
The application list in your CLIE handheld appears.
5
Tap the application (PictureGear Pocket) for which you
want to set the auto-run function.
6
Tap Set.
The setting is stored in the “Memory Stick” media, and the
confirmation dialog box appears.
7
Tap OK.
The auto-run setting is completed.
8
9
40
Tap Home
to return to the home screen.
Remove the “Memory Stick” media.
To use the auto-run function with this example
When the home screen is displayed and you insert “Memory Stick”
media into your CLIE handheld, the PictureGear Pocket application
starts automatically.
In this case, if you remove the “Memory Stick” media, the PictureGear
Pocket quits automatically and the home screen appears.
For further information, refer to the online manual for MS Autorun.
Note
If “Internal” is displayed at the top center of the PictureGear Pocket screen
during operation described above, the image files stored in your CLIE handheld
are displayed.
To view image files stored in the “Memory Stick” media, tap the arrow V on the
top center of the screen to select “MS.”
Chapter 3 Setting the “Memory Stick” automatic start function (MS Autorun)
41
How to read the online manual
Detailed information on MS Autorun software is provided in the
online manual on the supplied CD-ROM.
To see the online manual, the Adobe Acrobat Reader software must be
installed on your computer.
1
Insert the supplied CD-ROM into your computer’s CDROM drive.
The install screen appears automatically.
2
3
Click Manuals.
Double-click MSAutorun Manual.pdf.
The online manual appears.
If the Acrobat Reader software is not installed
1
Insert the supplied CD-ROM into your computer’s CDROM drive.
The install screen appears automatically.
42
2
3
Click Exit.
4
Right-click the CD-ROM drive icon, and then click Open
from the shortcut menu.
5
6
7
Click the PC folder.
Double-click the My Computer icon on the Windows
desktop.
Double-click the Acrobat folder.
Double-click ar500enu.exe to install the Acrobat Reader
onto your computer.
Chapter 4
Copying the data to the “Memory Stick”
media on your CLIE handheld (MS Import/
Export)
This chapter explains how to copy the data on your
computer to the “Memory Stick” media on your CLIE
handheld directly without performing HotSync operation.
Chapter 4
What you can do with MS Import/Export
application
Both MS Import and MS Export are applications designed to help you
copy the data on your computer to the “Memory Stick” media on your
CLIE handheld directly without performing a HotSync operation.
When copying the data on your computer
You have to use both the “Memory Stick” (MS) Import application for
your CLIE handheld and the “Memory Stick” (MS) Export software for
your computer at the same time.
Before using MS Import/Export
You have to install the MS Import application on your CLIE handheld
and MS Export on your computer (page 46).
Installing CLIE applications without performing a HotSync
operation
Using MS Import/Export, you can install application files (.prc or
.pdb) for your CLIE handheld without performing a HotSync
operation.
Using your CLIE handheld as a removable disk
Using MS Import/Export, you can use your CLIE handheld as you
would a removable disk from the Windows desktop on your
computer. You can not only read the data stored in the “Memory
Stick” media on your CLIE handheld from your computer, but also
write data to the “Memory Stick” media from your computer.
44
Installing
1
Insert the installation CD-ROM into the CD-ROM drive of
your computer.
The setup program starts automatically.
2
3
Click to select Install CLIE Add-on Software.
Click to select Install Memory Stick Import/Export.
The installation starts.
Follow the instructions displayed on the screen.
After the installation is completed, the installation screen reappears.
4
Click Exit
The installation of MS Export software ends.
5
Press the HotSync button on the cradle.
MS Import application is installed on your CLIE handheld during
the HotSync operation.
Copying the data to the “Memory Stick” media on your CLIE handheld (MS Import/Export)
Before install MS Import application to your CLIE handheld and MS
Export software to your computer, perform procedures in the Chapter
2 of Read This First manual on your first setup of your CLIE handheld.
Chapter 4
45
Installing CLIE applications using
MS Import/Export
You can install applications for your CLIE handheld into the “Memory
Stick” media without performing HotSync operation using MS
Import/Export.
1
Connect the cradle to a computer in which you have
installed MS Export software.
2
Insert the “Memory Stick” media into your CLIE
handheld.
3
4
Place your CLIE handheld on the cradle.
On the home screen, rotate the Jog Dial navigator to
select MS Import and then press the Jog Dial navigator.
MS Import starts.
Or, tap the MSImport icon on the home screen.
5
Drag add-on application files (.prc or .pdb) for your CLIE
handheld to MS Export shortcut icon on your Windows
desktop.
These files are automatically copied to appropriate folders.
If you drag the application file which the MS Export cannot
recognize its type
The registration dialog box appears.
In this case, enter the application name and destination folder to
which the application will be copied.
6
When you finish the operation, tap Disconnect.
Note
Do not remove the “Memory Stick” media while connecting to your computer.
When you use the computer with the Windows 2000/Windows
Me
A warning message appears when you tap Disconnect on your CLIE
handheld.
Click OK, and then continue operations.
46
After starting the MS Export again, and then click Memory Stick Drive
tab of the MS Export software.
Note
You cannot copy applications by dragging them to the Memory Stick Drive
window of the MS Export software.
Copying the data to the “Memory Stick” media on your CLIE handheld (MS Import/Export)
Making sure the contents of the “Memory Stick” media after
copying the application
Chapter 4
47
Using your CLIE handheld as a removable
disk
1
Connect the cradle to a computer in which you have
installed MS Export software.
2
Insert the “Memory Stick” media into your CLIE
handheld.
3
4
Place your CLIE handheld on the cradle.
On the home screen, rotate the Jog Dial navigator to
select MS Import and then press the Jog Dial navigator.
MS Import starts.
Or, tap the MSImport icon on the home screen.
5
Operate the desired file or data using your Windows
Explorer, and so on.
You can not only copy or delete the data stored in the “Memory
Stick” media, but write data in your computer to the “Memory
Stick” media.
Note
When you copy the application to the Palm\Launcher folder of the
“Memory Stick” media, some applications on your CLIE handheld may not
display the file list of the “Memory Stick” media appropriately.
6
When you finish the operation, tap Disconnect.
Note
Do not remove the “Memory Stick” media while connecting to your computer.
When you use the computer with the Windows 2000/Windows
Me
A warning message appears when you tap Disconnect on your CLIE
handheld.
Click OK, and then continue operations.
48
How to read the online manual
1
Insert the supplied CD-ROM into your computer’s CDROM drive.
The install screen appears automatically.
2
3
Click Manuals.
Double-click MSImport.pdf.
The online manual appears.
If the Acrobat Reader software is not installed
1
Insert the supplied CD-ROM into your computer’s CDROM drive.
The install screen appears automatically.
2
3
Click Exit.
4
Right-click the CD-ROM drive icon, and then click Open
from the shortcut menu.
5
6
7
Click the PC folder.
Double-click the My Computer icon on the Windows
desktop.
Double-click the Acrobat folder.
49
Chapter 4
Double-click ar500enu.exe to install the Acrobat Reader
onto your computer.
Copying the data to the “Memory Stick” media on your CLIE handheld (MS Import/Export)
Detailed information on MS Import/MS Export software is provided
in the online manual on the supplied CD-ROM.
To see the online manual, the Adobe Acrobat Reader software must be
installed on your computer.
For the latest support information,
check our official Sony CLIE Web site
http://www.sony.com/clie/
Printed in Japan