1
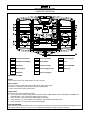
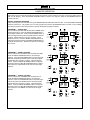
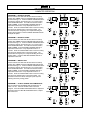
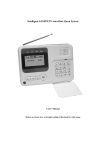
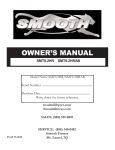
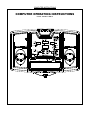
COMPUTER INSTRUCTIONS
COMPUTER OPERATING INSTRUCTIONS
MODEL NUMBER: LED 12
2
LED 12 COMPUTER INSTRUCTIONS
COMPUTER OPERATION
A
Time/Distance/Height
F
Incline UP/DOWN
K
Preset Programs
B
Speed/Calories/Weight
G
Speed Profile
L
Start
C
Scan/Hold
H
Pulse/Incline/Age
M
Speed UP/DOWN
D
Metric/English
I
Custom Program Save
N
Safety Key
E
Stop/Enter
J
Recovery Program
BUTTON FUNCTIONS:
START
Press to start exercise at an initial speed of 0.5 mph / 0.8 km/h.
STOP / ENTER
a. Press to confirm program and preset function values during setting mode.
b. Press to run setting procedure before pressing the START button.
c. Press to stop exercise during workout time.
SCAN / HOLD
Switches the LED window display information:
a. The computer has a factory setting that auto switches between TIME, SPEED, PULSE, DISTANCE, CALORIES and
INCLINE LEVEL. Each value will be displayed for 10 seconds.
b. Press the button once to display only TIME, SPEED and PULSE.
nd
c. Press the button a 2 time to display only DISTANCE, CALORIES and INCLINE LEVEL.
rd
d. Press the button a 3 time return to the auto switch display.
CUSTOM PROGRAM
When selecting the custom program from C1 to C3, follow the instructions to press this button and save the program as your
own custom workout program. Follow the C1-C3 CUSTOM PROGRAM operating instructions for details.
3
LED 12 COMPUTER INSTRUCTIONS
COMPUTER OPERATION
RECOVERY
Press to start the RECOVERY function to test your physical condition after a workout. Follow the RECOVERY operating
instructions for details.
SPEED UP / DOWN
a. Press to increase/decrease exercise speed by 0.1mph / km/h.
b. Hold the button to rapidly increase/decrease speed by 0.5mph / km/h per second. Release the button to stop the function.
c. Press to select programs and preset related function value.
INCLINE UP / DOWN
Press up or down to change incline level.
IMPORTANT INFORMATION:
SAFETY KEY
The safety key must be inserted into the slot on the console in order to operate the treadmill. Always insert the safety key
and attach the clip to your clothing at your waist before beginning your workout. If you should encounter problems and need
to stop the motor quickly, simply pull on the cord to disengage the safety key from the console. To continue operation first
turn the power switch to OFF and set the speed controller to stop. Next turn the power switch to ON and reinsert the safety
key into the console.
ENGLISH / METRIC CONVERSION
The treadmill computer display can show METRIC and ENGLISH information. This should be preset for your area by the
factory. However, in case the treadmill needs to be converted between METRIC and ENGLISH readout, please follow the
procedure below:
Set the POWER SWITCH to ON. Press the START button on the computer and hold it. Insert the SAFETY KEY then
release the START button. The computer will sound one short beep. Press the START button to switch between ENGLISH
and METRIC and press STOP/ENTER button to confirm the setting. The computer will sound a long beep and will return to
the POWER ON mode with the new setting.
POWER ON
Set the POWER SWITCH, located on the base frame, to ON
and insert the SAFETY KEY. All LED windows light up with
a short beep sound. “U1” displays in the LAP window,
TIME/DISTANCE displays the user weight factory setting
value “150”lbs or “68”kg, SPEED/CALORIES displays the
user height factory setting value “67”inches or “170”cm, and
PULSE/INCLINE displays the user age factory setting value
“35”. If there is any user information that has been input and
saved, all LED windows will display the information from the
last input user information. If no further button inputs are
made within 3 minutes, the computer will enter the SLEEP
MODE. Press any button to return to the POWER ON mode.
SLEEP / DISPLAY MODE
When the power is ON the computer will automatically enter SLEEP MODE if it is left idle for 3 minutes without receiving any
input. Press any button to return to POWER ON status when the computer is in the SLEEP MODE.
To cancel the SLEEP MODE feature using the DISPLAY MODE and always keep the console display on, pull out the safety
key, press and hold the SPEED UP and DOWN buttons, insert the safety key to power on the treadmill. After one short beep
sound the PULSE LED window will show “1”. Press the START button then TIME LED window will show “ON” (SLEEP
MODE feature on) or “OFF” (SLEEP MODE feature off). Press the INCLINE UP and DOWN buttons to switch between “ON”
and “OFF” then press STOP/ENTER to save the setting and return to POWER ON mode.
4
LED 12 COMPUTER INSTRUCTIONS
COMPUTER OPERATION
OPERATING INSTRUCTIONS:
QUICK START
When the treadmill is in POWER ON status, press the START button to activate the QUICK START program. The SPEED
LED will count down 3 seconds with 3 short beep sounds then start from 0.5 mph / 0.8 km/h. Press the SPEED UP/DOWN
buttons to change the speed. Press the INCLINE UP/DOWN buttons to elevate the treadmill. The TIME, CALORIES and
DISTANCE will count up from 0.
PAUSE / STOP
During the workout press the STOP/ENTER button once to pause the treadmill. Press the STOP/ENTER button twice to
delete all workout data and return to POWER ON status.
COOL DOWN
After completion of each program the TIME LED window will
show “COOL” and blink then start a one-minute cool down
procedure. Time counts down from 01:00 to 00:00 and
speed stays at 2 mph / 3.2 km/h and the incline level stays
at level 0. After the time counts down to 00:00 the belt stops
and returns to PAUSE/STOP status. Press the
STOP/ENTER button to return to POWER ON status. To
escape the cool down procedure press the STOP/ENTER
button once anytime during the process to enter the
PAUSE/STOP status and press the STOP/ENTER button
again to enter the POWER ON status.
RECOVERY
Recovery is the feature to let the user test their physical condition after a workout. The recovery rating is determined by
measuring how quickly the user’s pulse slows down after the workout to justify the user physical condition. The faster the
pulse slows down, the better the user’s physical condition. User’s can record their recovery rating after each workout to use
for reference. To operate the RECOVERY, press the RECOVERY button after completing a workout. The treadmill will enter
the PAUSE/STOP status. Put both hands on the hand pulse sensors within 10 seconds (for models equipped with a chest
belt pulse transmitter, keep the chest belt on, no need to hold the hand pulse). The pulse receiver will scan and detect the
user’s pulse in 10 seconds and enter the RECOVERY procedure. TIME counts down from 01:00 to 00:00. The SPEED LED
window will show the RECOVER RATING after the one-minute count down. The lower the number the better the fitness
level. Record the rating for future comparison.
During the RECOVERY procedure, if you want to stop the RECOVERY and stop workout, press the STOP/ENTER button
and return to POWER ON status.
During the RECOVERY procedure, if you want to continue the previous program, press the START button to continue the
previous program.
After pressing the RECOVERY button, if the pulse receiver fails to scan and receive the user’s pulse the computer will stay at
PAUSE/STOP status. Press the STOP/ENTER button to return to POWER ON status or press the START button to continue
the previous program.
COMPUTER OPERATION:
Before selecting the program, a user ID needs to be selected. For the first time user, please set up the user information and
assign your USER ID from U 1 to U 9. Press the SPEED UP/DOWN buttons to select the user ID when the computer is in
POWER ON mode.
SET UP USER INFORMATION
After selecting the USER ID the SPEED LED window will show the previous setting for user body weight or the factory setting
value of “150” lbs or “68” kg and be blinking. Press the SPEED UP/DOWN buttons to set the user body weight then press
the STOP/ENTER button to confirm and save.
After setting the user height the TIME LED window will show the previous setting for user height or the factory setting value of
“67” inches or “170” cm and be blinking. Press the SPEED UP/DOWN buttons to set the user height then press the
STOP/ENTER button to confirm and save.
5
LED 12 COMPUTER INSTRUCTIONS
COMPUTER OPERATION
After setting the user weight the PULSE LED window will show the previous setting for user age or the factory setting value of
“35” and be blinking. Press the SPEED UP/DOWN buttons to set the user age then press the STOP/ENTER button to
confirm and save.
SELECT OPERATING PROGRAM
After completing the user information set up the SPEED PROFILE LED window will show “P1”. Press the SPEED UP/DOWN
buttons to select a P1 – P8 program or C1-C3 user program then press the STOP/ENTER button to confirm. Prior to starting
the selected program, follow the procedure to operate the different programs as below:
PROGRAM 1 – TARGET TIME
If P1 is selected, the TIME LED window shows “30:00” as the
preset workout time. Press the SPEED UP/DOWN buttons
to set target workout time. Press the STOP/ENTER button to
save the target time and press the START button to start the
program. Speed starts from 2.0 mph / 3.2 km/h. Incline
starts from level 0. Press the SPEED UP/DOWN buttons to
adjust the speed and press the INCLINE UP/DOWN buttons
to adjust the incline level. TIME counts down from the target
time to zero.
PROGRAM 2 – TARGET DISTANCE
If P2 is selected, the DISTANCE LED window shows “0.00”.
Press the SPEED UP/DOWN buttons to set the target
distance. Press the STOP/ENTER button to save the target
distance and press the START button to start the program.
Speed starts from 2.0 mph / 3.2 km/h. Incline starts from
level 0. Press the SPEED UP/DOWN buttons to adjust the
speed and press the INCLINE UP/DOWN buttons to adjust
the incline level. DISTANCE counts down from the target
distance.
PROGRAM 3 – TARGET CALORIES
If P3 is selected, the CALORIES LED window shows “0”.
Press the SPEED UP/DOWN buttons to set the target
calories. Press the STOP/ENTER button to save the target
calories and press the START button to start the program.
Speed starts from 2.0 mph / 3.2 km/h. Incline starts from
level 0. Press the SPEED UP/DOWN buttons to adjust the
speed and press the INCLINE UP/DOWN buttons to adjust
the incline level. CALORIES count down from the target
calories.
6
LED 12 COMPUTER INSTRUCTIONS
COMPUTER OPERATION
PROGRAM 4 – INTERVAL INCLINE
If P4 is selected, the TIME LED window shows the factory
setting value “24:00” and the PULSE/INCLINE LED window
shows a blinking “L 1”. Press the SPEED UP/DOWN buttons
to select the intensity of workout from L1 to L12 then press
the STOP/ENTER button. The TME LED window shows a
blinking “24:00”. Press the SPEED UP/DOWN buttons to
adjust the workout time. Every adjustable section is 4
minutes. Press the STOP/ENTER button to save the setting
then press the START button to start the program. The
incline level will be changed by the computer following the
factory setting pattern. Press the SPEED UP/DOWN buttons
to adjust the speed.
PROGRAM 5 – INTERVAL SPEED
If P5 is selected, the TIME LED window shows the factory
setting value “24:00” and the PULSE/INCLINE LED window
shows a blinking “L 1”. Press the SPEED UP/DOWN buttons
to select the intensity of workout from L1 to L12 then press
the STOP/ENTER button. The TME LED window shows a
blinking “24:00”. Press the SPEED UP/DOWN buttons to
adjust the workout time. Every adjustable section is 4
minutes. Press the STOP/ENTER button to save the setting
then press the START button to start the program. The
speed will be changed by the computer following the factory
setting pattern. Press the INCLINE UP/DOWN buttons to
adjust the incline level.
PROGRAM 6 – WEIGHT LOST
If P6 is selected, the TIME LED window shows the factory
setting value “30:00” and the PULSE/INCLINE LED window
shows a blinking “L 1”. Press the SPEED UP/DOWN buttons
to select the intensity of workout from L1 to L12 then press
the STOP/ENTER button. The TME LED window shows a
blinking “30:00”. Press the SPEED UP/DOWN buttons to
adjust the workout time. Every adjustable section is 5
minutes. Press the STOP/ENTER button to save the setting
then press the START button to start the program. The
speed and incline level will be changed by the computer
following the factory setting pattern.
PROGRAM 7 – 5K SELF LEARING AND COMPETITION
If P7 is selected, the DISTANCE LED window shows “3”
miles or “5” km. Press the START button to start the
program. Press the SPEED UP/DOWN buttons to adjust the
speed and press the INCLINE UP/DOWN buttons to adjust
the incline level.
7
LED 12 COMPUTER INSTRUCTIONS
COMPUTER OPERATION
PROGRAM 8 – HEART RATE CONTROL
If P8 is selected, the TIME LED window shows the factory
setting value of “60:00” and is blinking. Press the SPEED
UP/DOWN buttons to adjust the workout time. Every
adjustable section equals 3 minutes. Press the
STOP/ENTER button to save the setting then the TARGET
HEART RATE displays in the PULSE LED window and is
blinking. The factory TARGET HEART RATE setting is
based on 85% of the maximum user heart rate. The
maximum user heart rate is calculated using the
formula: 220 minus the user age. As an example, for age
35 the maximum user heart rate should be 185 and 85%
of the maximum user heart rate will be 157. Press the
SPEED UP/DOWN buttons to adjust the TARGET HEART
RATE according to your own physical condition or your
doctor’s instruction then press the STOP/ENTER buttons to
save the setting.
Press the START button to start the three minute WARM UP program. Speed starts from 2.0 mph / 3.2 km/h and the
INCLINE LEVEL starts from level 0. Keep your hand on the hand pulse grips all the time during this workout in order to
monitor your pulse correctly. During the program, if the heart rate monitor fails to sense the user’s pulse you will see “P”
blinking in the PULSE LED window. If the heart rate monitor senses the pulse properly the PULSE DOT LED blinks and the
correct pulse readout shows on the PULSE LED window. The computer will sense the user’s pulse every 30 seconds.
During the warm up program you can press the STOP/ENTER button to pause or stop the program or press the START
button to re-start the program. Other buttons will not react during this warm up process.
During the warm up program, if the heart rate monitor fails to sense the user’s pulse (the PULSE LED will display a blinking
“P”) the computer will not change the speed. If the heart rate monitor senses the user’s pulse properly but the actual user’s
pulse does not reach 65% of the max. heart rate (( 220-age) x 65%) then the speed will increase by 0.5 mph / 0.8 km/h every
30 seconds. If the actual pulse reaches 65% of the max. heart rate the speed will remain unchanged. If the actual pulse
remains at 65% of the max. heart rate for more than one minute the speed will be maintained until the warm up program is
finished.
If the actual user’s pulse fails to reach 65% of the max. heart rate within the first 3 minutes of the warm up program, the
computer will continue a second 3 minute warm up program. All workout information continues to count up and the timer
counts down from 3:00. During the second 3 minute warm up the computer will change the incline level instead of the speed.
If the heart rate monitor fails to sense the user’s pulse (the PULSE LED will display a blinking “P”) the computer will not
change the incline level. If heart rate monitor senses the user’s pulse properly but the actual user’s pulse does not reach
65% of the max. heart rate (( 220-age) x 65%) then the incline level will be increased by 1 level every 30 seconds. If the
actual pulse reaches 65% of the max. heart rate the incline level will remain unchanged. If the actual pulse remains at 65%
of the max. heart rate for more than one minute the speed will be maintained until the warm up program is finished.
If the actual user’s pulse fails to reach 65% of the max. heart rate within the second 3 minute warm up, the computer will
continue a third 3 minute warm up program. All workout information continues to count up and the timer counts down from
3:00. During the third 3 minute warm up both speed and incline remain unchanged regardless the actual pulse. If the time
counts down to 0 and 65% of the max. heart rate still cannot be achieved then the TIME LED will show “FAIL” and the
program will stop and return to POWER ON status.
After the warm up program is completed, if the actual pulse reaches 65% of the max. heart rate, the computer will enter the
HEART RATE CONTROL program. TIME keeps counting down. Distance and Calories continue to count up from the warm
up program. During the HEART RATE CONTROL program the heart rate monitor will sense the actual user’s pulse every 30
seconds. If the actual user’s pulse does not reach 85% of the max. heart rate then the incline level will be increased by 1
level every 30 seconds. If the actual user’s pulse reaches 85% of the max. heart rate then the treadmill performance will be
remain unchanged. If the actual user’s pulse is greater than 85% of the max. heart rate, the incline level will be reduced by 1
level. Speed will remain unchanged until the incline level increases up to 15% or down to 0%. If the incline level is up to
15% and 85% of the max. heart rate still cannot be reached then the speed will be increased by 0.5 mph /0.8 km/h every 30
seconds. If the incline level decreases down to 0% and the actual user’s pulse is still greater than 85% of the max. heart rate
then the speed will be decreased by 0.5 mph / 0.8 km/h every 30 seconds.
8
LED 12 COMPUTER INSTRUCTIONS
COMPUTER OPERATION
If the actual user’s pulse remains above 85% of the max. heart rate for more than 3 minutes the HEART RATE CONTROL
program will shut down and enter a one minute COOL DOWN program.
When the TIME counts down to 0, the HEART RATE CONTROL program is completed and the computer enters a oneminute COOL DOWN program.
After the COOL DOWN program the computer will return to POWER ON status.
The purpose of HEART RATE CONTROL program is to keep the user’s pulse between 65% of the max. heart rate and 85%
of the max. heart rate to achieve the most efficient workout result.
C1 – C3 CUSTOM PROGRAM ( USER PROGRAM )
The program can allow 3 custom programs to be set by users and store the settings for repeated workouts. The maximum
workout time of each user program is 60 minutes. During the workout after the TIME counts up to 60:00, the treadmill will
start a one-minute cool down procedure automatically. To set and store the user programs, please follow the procedure
below:
SET AND SAVE THE USER PROGRAM
Select between C1 to C3 and press the STOP/ENTER button
to enter the user program then press the START button.
Speed starts at 2.0 mph / 3.2 km/h and the incline level starts
at level 0. Each section of SPEED/INCLINE is one minute.
Press the SPEED UP/DOWN buttons to change the speed
and press the INCLINE UP/DOWN buttons to change the
incline during the workout. The computer will take the actual
speed and incline level at the last second of each minute
section and temporary save as the speed and incline level of
that minute section. Continue the workout until you want to
stop. Press the STOP/ENTER button to enter the oneminute cool down session. The computer will automatically
enter the save program status after the one-minute cool
down session. If you want to skip the cool down procedure,
press the STOP/ENTER button to enter the save program
status.
When the computer is in save program status, the “CUSTOM SAVE” button will blink slowly. Press the button to save this
program or press the STOP/ENTER button to delete the program and return to POWER ON status.
EDIT PREVIOUS SAVED PROGRAM
Edit the Speed and Incline without extending the previously saved workout time:
Simply press the SPEED UP/DOWN and INCLINE UP/DOWN buttons to change the speed and incline level during the
workout then follow the SET AND SAVE procedure after completing the workout.
Extend the workout time from the previously saved program:
If you want to extend the total workout time from the previously saved program press the START button anytime during the
workout. The LED of the CUSTOM SAVE button will light up and blink for 10 seconds then stay lit up. After completing the
previously saved program the treadmill will start a one-minute cool down session. Press the START button again during the
cool down session and the treadmill will skip the cool down procedure and continue running at a speed of 3.2 km/h / 2.0 mph
and incline of level 0. Press the SPEED UP/DOWN and INCLINE UP/DOWN buttons for every minute section then follow the
SET AND SAVE procedure after completing the workout.
If you already press the START button once during the workout and intend to extend the workout time but decide not to
extend the workout time, press the START button again to switch off the LED light of CUSTOM SAVE button. Or wait till the
previous saved program complete and complete the cool down procedure then follow the SET AND SAVE procedure.
9
LED 12 COMPUTER INSTRUCTIONS
COMPUTER OPERATION
USING THE CHEST BELT HEART RATE MONITOR (optional feature dependant on model purchased):
For proper operation, the chest belt should be worn across the front of your body just below the chest line as shown in the
drawing. To ensure a proper operation the chest belt needs to be moisturized, please make the 2 rubber pads under the chest
belt wet prior to exercising.
Strap chest belt across the front below the chest line.
Smooth Fitness
112 Gaither Drive
Mt. Laurel, NJ 08054
Toll Free Customer Service:
1.888.800.1167
Website:
www.smoothfitness.com
Copyright © 2005