1
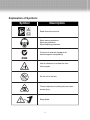
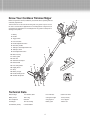
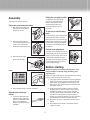
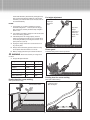
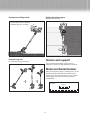
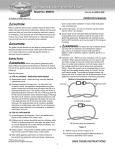
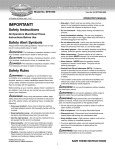
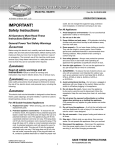
Lithium-ion 2-IN-1 Cordless Trimmer/Edger
Model No. TRJ600C
Form No. SJ-TRJ600C-880E
OPERATOR’S MANUAL
A Division of Snow Joe, LLC
IMPORTANT!
• Ensure you always have proper footing and balance.
This will provide better control of the power tool in
unexpected situations.
Safety Instructions
• Do not overreach. Keep proper footing and balance at
all times. This enables better control of the power tool in
unexpected situations.
All Operators Must Read These
Instructions Before Use
• Dress properly. Do not wear loose clothing or jewellery
Keep your hair, clothing and gloves away from moving
parts. Loose clothes, jewellery or long hair can be caught in
moving parts.
General Power Tool Safety Warnings
• If devices are provided for the connection of dust
extraction and collection facilities ensure that these are
connected and properly used. Use of these devices can
reduce dust-related hazards.
m WARNING
Read all safety warnings and all
instructions Failure to follow all warnings and
Power Tool Use and Care
instructions may result in electric shock, fire or serious injury.
• Do not use the power tool for applications that are
beyond it's capacity. Use the correct power tool for your
application. The correct power tool will do the job better
and safer at the rate for which it was designed.
Save all warnings and instructions for
future reference
Work Area
• Keep work areas clean and well lit. Cluttered and dark areas
invite accidents.
• Do not use the power tool if the switch does not turn it
ON and OFF. Any power tool that cannot be controlled with
the switch is dangerous and must be repaired.
• Do not operate power tools in explosive atmospheres,
such as in the presence of flammable liquids, gases, or
dust. Power tools create sparks which may ignite the
dust or fumes.
• Disconnect the battery from the power source before
making any adjustments, changing accessories, or
storing power tools. Such preventive safety measures
reduce the risk of starting the power tool accidentally.
• Keep children and bystanders away while operating a
power tool. Distractions can cause you to lose control.
• Store the tool out of the reach of children. Do not allow
people unfamiliar with the power tool or these instructions
to operate the power tool. Power tools are dangerous in the
hands of untrained users.
Personal safety
• Stay alert, watch what you are doing and use common
sense when operating a power tool. Do not use a power
tool while you are tired or under the influence of drugs,
alcohol, or medication. A moment of inattention while
operating power tools may result in serious personal injury.
• Always maintain the power tool. Check for misalignment
or binding of moving parts, breakage of parts, or other
conditions that would affect it's operation. If damaged, have
the power tool repaired before use. Many accidents are
caused by poorly maintained power tools.
• Use safety equipment. Always wear eye protection.
Safety equipment such as a dust mask, non-skid safety
shoes, hard hat, or hearing protection used for appropriate
conditions will reduce personal injuries.
• Keep cutting tools sharp and clean. Properly maintained
cutting attachments with sharp cutting edges are less likely
to bind and are easier to control.
• Only use the tool, accessories, and attachments as
described in these instructions. Using the tool for
operations it is not intended for could cause damage to the
tool and hazardous situations. Always consider the working
conditions and the work to be performed.
• Avoid accidental starting. Ensure the switch is in the offposition before plugging in. Carrying power tools with your
finger on the switch or plugging in power tools that have the
switch on invites accidents.
• Remove any adjusting key or wrench before turning the
tool ON. A wrench or a key that is left attached to a rotating
part of the power tool may result in personal injury.
Service
• Have the power tool serviced by a qualified repair personnel
using only manufacturer's recommended replacement
parts. This will ensure that the safety of the power tool is
maintained.
© 2010 by Snow Joe, LLC
All rights reserved. Original instructions.
1
SAVE THESE INSTRUCTIONS
Additional safety rules for line trimmers
• After use, disconnect the tool from the power supply and
check for damage. If you have the slightest doubts, contact
an authorized service center.
• Always wear adequate protective clothing when operating
the tool to avoid injuries to face, eyes, hands, feet, head or
hearing. Use safety glasses or a face shield, high boots or
sturdy shoes, long trousers, work gloves, a hard hat and
hearing protection.
• Only use the tool according to the instructions given in this
manual.
• Check regularly that the screws are tight.
• When starting up and when the tool is in operation,
keep the cutting section away from all parts of the body,
especially the hands and feet.
• Do not try to repair the tool or access internal parts.
Contact authorized service centers only.
• Do not get distracted and always concentrate on what
you are doing. Use common sense. Never operate the tool
when you are tired, sick or under the influence of alcohol or
other drugs.
• Do not start the tool when it is upside down or when it is
not in the operating position.
• Switch the motor off and remove battery when the tool
is not being used, left unattended, being cleaned, being
moved from one place to another or when the spool is
being changed or the length of line manually adjusted.
Unpacking
Due to modern mass production techniques, it is unlikely that
your power tool is faulty or that a part is missing. If you find
anything wrong, do not operate the tool until the parts have
been replaced or the fault has been rectified. Failure to do so
could result in serious personal injury.
• Do not operate the tool near people, especially children
or pets. Turn it off if they get too close. Maintain a safe
distance of at least 5m from other people when using the
tool.
• Keep a balanced and stable stance while using the tool.
Contents of carton
• Ensure that the area being cut is free from strings, stones
and debris.
• Debris shield
• Do not cut against hard objects. This could cause injury to
the operator and damage to the tool.
• Edging wheel
• Never use the tool without the guard. Never use the tool if
the guard is damaged.
• Strap
• 1 x Li-ion battery pack
• Battery charger
m WARNING
The guard is vital for your and other people’s safety and for the
tool’s operating efficiency.
• Do not try to stop the cutting device (nylon line) with your
hands. Always let it come to a stop by itself.
Warning. After switching off the tool, the cutting device
continues to rotate for a few more seconds.
• Only use the original type of nylon line. Under no
circumstances use metal line instead of nylon.
• Do not use the tool to cut grass which is not on the ground.
For example, do not cut grass which is on walls or rocks.
• Do not switch on the tool in enclosed or poorly ventilated
spaces or in the presence of inflammable and/or explosive
substances such as liquids, gasses and powders.
• Only cut during broad daylight or with adequate artificial
light.
• Check that all grass cuttings and dirt have been removed
from the ventilation vents.
• Do not cross roads or gravel paths with the tool still running.
• When the tool is not in use, store it in a dry place and out of
reach of children.
2
Explanation of Symbols:
Symbol
Description
Read instruction manual.
Wear hearing protection.
Wear eye protection.
Wear breathing protection.
Conforms to relevant standards for
electromagnetic compatibility.
Use at a distance of at least 5m from
other people.
Do not use in the rain.
Thrown objects and rotating line can cause
severe injury.
Sharp blade.
3
Know Your Cordless Trimmer/Edger
Before using the line trimmer, familiarize yourself with all the operating features
and safety requirements.
1. Battery
2. Handle
3. Trigger switch
4. Lock-off button
5. Handle adjustment button
6. Secondary handle
7. Telescopic shaft adjustment knob
8. Telescopic shaft
9. Head adjustment button
6
90
°
This line trimmer is to be used for trimming soft, new growth only. Do not use
the tool or accessories for applications it is not designed for. Using the tool,or
accessories for applications it is not designed for may present a safety risk or
damage to the product.
4
20
5
90
°
1
19
7
10. Motor housing
8
11. Flower guard
12. Helix-line
13. Automatic feed spool
14. Debris shield
15. Line cutting blade
11
16. Edging wheel
10
17
9
17. Strap
18. Battery charger
16
19. Handle rotating knob
18
20. Shoulder Strap Bolt
12
13
14
15
Technical Data
Rated voltage
110-120VAC, 60Hz
Line Thickness
0.065 inch/1.5mm
Battery Power
20V-1.3Ah
Cutting line length
1x15ft (1x4.5m)
No Load Speed
9000 min Charging time
1 Hour Approx.
Tool Weight
34.2 lbs./15.5Kg
Battery pack
1x20V Li-ion
Cut Diameter (swath)
9.8 inch/250mm
-1
4
2
3
Assembly
Fitting the secondary handle
To adjust the secondary handle
press in the secondary handle
buttons and rotate the handle
to the desired position then
release the buttons to lock it
into place.
(See page 4 for location of parts.)
Fitting the guard and guide wheel
1. Align the 3 screw holes in the
guard with the screw holes in
the base of the unit.
To remove or install battery
pack
Locate latches on side of battery pack
and depress both sides to release
battery pack from your grass trimmer.
Remove battery pack from your grass
trimmer. After recharging the battery
pack insert it into the battery slot of
the trimmer..
2. Attach the edging wheel to
your trimmer by Fastening the
screw. (*Note, the wheel is
attached for edge cutting only.)
Vertical head adjustment
The head can be adjusted so that it at
horizontal with the ground, this feature
helps you get access to areas such as
under bushes and garden furniture.
3. Attach the flower guard
to the motor housing.
The head can be lowered by pressing
the head adjustment button (9) and
set to the desired angle.
Before starting
Attach the
Flower Guard
in place here
The battery pack for this tool has been shipped in a low
charge condition. You should charge the battery pack
fully before use.
NOTE:
Before use, follow these steps to check that the tool is working
properly and the length of the line is correct:
1. Your trigger switch is locked OFF to prevent accidental
starting. Depress lock off button (4) then the ON/OFF
trigger switch (3) and release lock off button (4), your
switch is now ON. To switch OFF just release the ON/
OFF trigger switch (3).
2. Examine the general condition of the tool. Inspect
the guard, switch, cord set. Check for loose screws,
misalignment, binding of moving parts, improper
mounting, broken parts and any other condition that
may affect its safe operation. If abnormal noise or
vibration occurs during operation, turn the line trimmer
off immediately and have the problem corrected.
4. Attach shoulder strap to shoulder strap bolt.
Adjusting the telescopic
handle
1. Loosen the telescopic shaft
adjustment knob, adjust the
shaft to a comfortable height.
Make sure to tighten the
knob once the desired length
is suitable.
3. Ensure that you are on a flat surface and have secure
footing.
4. Check that the line touches or extends beyond the
edge of the guard.
5
Increasing the cutting line
from the top. Do not cut damp or wet grass. Do not
overload your trimmer.
1. Before the first cutting, ensure
the cutting line is the correct
length. Remove the cover and
take out the spool.
5. Avoid wearing the line out quickly by knocking against
hard objects (stones, walls, fences etc.).
2. If the line is too short release
the line from the automatic
feed spool and at the same
time pull the line out so that
it extends a few centimeters
past the edge of the guard.
7. After finishing the cutting operation, keep the head
close to ground level, release the switch, and allow
the motor to come to a complete standstill. Place the
trimmer on the ground, switch OFF.
6. Be alert for possible kickback when there is impact
with hard objects.
NOTE: Periodically clean out the grass between the spool and
the rim of the guard to prevent the tool from vibrating.
3. Reload the spool and lock the
cover.
Using as an edger
4. During operation to increase
the cutting line simply switch
the line trimmer off and then
on again, this with restore the
line to the correct length.
NOTE: Always unplug the trimmer before carrying out any
maintenance or making any adjustments to the line trimmer.
1. Loosen the handle rotating knob (19) and rotate the
shaft 90 degrees, so the handle is facing the opposite
direction.
Switching ON and OFF
1. Connect the battery pack to
trimmer.
4
2. Tighten the rotating button (19), ensuring that the
handle is in position for edging.
3
3. Ensure the cutting line is the correct length (see
Increasing the cutting line). You can now use the line
trimmer as an edger. The wheel guides the line trimmer
along the ground.
2. Press the lock-off button (4),
then press the trigger switch (3).
3. To switch OFF, release the
trigger switch.
m WARNING. The tool runs
for approximately 5 seconds after it has been switched off. Let
the motor come to a complete standstill before setting the tool
down.
Trimming
m WARNING. Ensure the work area is free from
rocks, debris, lines and other foreign objects.
1. Start the trimmer before approaching the grass to be
cut.
Trimming
Edging
Changing a line spool
m WARNING. Ensure the cutting line blade cover
2. The automatic line feed mechanism releases 12mm
from each line when the trimmer reaches a certain
speed. If you need the spool to release more than
12mm of line per side, release the trigger until the
speed falls beyond the trigger point then press the
switch again. As the speed picks up a further 12mm
will be released for both lines.
is replaced.
1. Turn the line trimmer upside down.
2. Hold the spool holder firmly with one hand and with the
other hand squeeze the tabs on either side of the spool
cover and remove the cover.
3. Cut the grass by swinging the trimmer from right to
left and proceed slowly keeping the trimmer inclined
forwards at an angle of about 30°. Light cuts are better
than heavy cuts as they allow the cut grass to fall away
from the spool preventing the grass from clogging the
spool.
3. Remove the empty spool and clean out the spool
cover.
4. Align the cutaway sections in the spool opposite the
eyelets and thread the line of the new spool through
the eyelet in the spool holder and insert the spool.
4. High grass should be cut in layers always beginning
6
m CAUTION. After changing the line spool, run the
• Do not charge appliance in rain, or in wet locations
• Do not use battery operated appliance in rain
trimmer under no load for at least a minute to verify the
line and the tool are both operating correctly. Use only the
line spool as recommended by the manufacturer. To order
replacement line spool, visit www.snowjoe.com model #
TRJ601R3
• Remove or disconnect battery before servicing, cleaning or
removing material from the gardening appliance.
• Use only the battery recommended by manufacturer.
• Do not dispose of the battery(ies) in a fire. The cell
may explode. Check with local codes for possible special
disposal instructions.
Maintenance and cleaning
1. Store the tool, instruction manual and accessories in a
secure, dry place. Doing so will ensure you always have
the information available.
• Do not open or mutilate the battery(ies). Released
electrolyte is corrosive and may cause damage to the eyes
or skin. It may be toxic if swallowed.
2. Keep the tool’s air vents unclogged and clean at all
times.
• Exercise care in handling batteries in order not to
short the battery with conducting materials such as
rings, bracelets, and keys. The battery or conductor may
overheat and cause burns.
3. Remove dust and dirt regularly. Cleaning is best done
with a rag.
Charging the battery
4. All bearings and bushes are lubricated for life.
5. Never use harsh agents to clean plastic parts.
The battery pack for this tool has been shipped in a low
charge condition. You should charge the battery pack
fully before use.
m CAUTION. Do not use cleaning agents to clean the
plastic parts of the tool. A mild detergent on a damp cloth is
recommended. Water must never come into contact with
the tool.
Step 1: Press the battery pack release latch
Step 2: Pull the battery pack, make it separate form the main
part of the appliance.
General inspection
Step 3: Install battery in charger (See Installing battery in
charger below).
Regularly check that all the fixing screws are tight. They may
vibrate loose after extended use.
Step 4: Replace fully charged battery pack and assemble to
the main part of the appliance.
Storage
m WARNING. Do not use an extension cord.
m WARNING. Charge indoors only.
m WARNING. Do not throw used batteries into a fire
1. Keep the trimmer out of direct sunlight.
2. Do not store in a nylon bag as this can encourage the
formation of mold.
3. At the end of the season, give the trimmer a complete
cleaning and a thorough check.
or water: it could cause an explosion! Please hand in nonworking or used batteries, or tools with built-in batteries, to
the environmentally safe disposal unit at a municipal wastedisposal center, or to your dealer.
4. Do not leave the trimmer resting on the floor for
extended periods as it could cause the shape of the
guard to alter, posing a safety risk. Hang it off the floor
by the top handgrip.
Installing battery in charger
Electrical Safety for Charger
Turn the battery upside down and slide it into the matching
slots in the charger stand. Do not insert the battery the wrong
way.
• Power tool plugs must match the outlet. Never modify
the plug in any way. Do not use any adapter plugs with
earthed (grounded) power tools. Unmodified plugs and
matching outlets will reduce risk of electric shock.
NOTES:
• Avoid body contact with earthed or grounded surfaces
such as pipes, radiators, ranges and refrigerators. There
is an increased risk of electric shock if your body is earthed
or grounded.
a) Make sure the battery slides fully into the slots in the
charger.
• Do not expose power tools to rain or wet conditions.
Water entering a power tool will increase the risk of electric
shock.
c) The red light will come on and green light flash ,when
the battery is properly inserted into the charger stand.
b) The red indicator light will come ON when the electrical
outlet is “live”.
d) When the green and red light will come on steady, this
7
means that the battery has been fully recharged. Only
then can the power plug be pulled out of the socket.
The battery can then be taken out of the base and can
be used immediately.
For height adjustment
Telescope
aluminium
tube
NOTES:
1. A new battery or one that is completely run down
should be charged for 1- 1.5 hours (for first charge).
After normal use, a battery should be fully charged in
about 1 hour.
Operation
height
adjustment,
telescope
length max.
60cm
2. It is normal for the battery charger to hum and be warm
to the touch during operation.
3. If the battery does not charge properly, check to
make sure the electrical outlet is “live” and that the air
surrounding the battery and charger is between 10º C
(50º F) and 40º C (105º F).
4. Unplug the charger when not in use and store it in a
dry, secure place.
5. Always remove the battery pack and store it in a dry,
secure place when the trimmer is not in use.
Flower guard
6. Battery charging should only be carried out indoors.
Rotatable steel guard for flowers protection
m WARNING. Never leave a battery on charge once
it’s warm.
7. Charge LED light indicators
Charge Position
Green Light
Red Light
Free Off On
Charging Flash
On
Fully Charged On On
Over Heat Warning Off Flash
Battery Malfunction Off Flash
Pivoting head for corner working
Pivoting head for corner working
With quick release locking
With quick release locking
- Clockwise rotate
- Max. 90 degree
Anti-clockwise rotate
8
Rotatable front lifting handle
Edging with wheel support
With quick release locking
- Quick locking for ease of trimming
Rota
- Rotatable angle max. 70 degree
70º
te
Service and support
Compact body size
For convenient carrying and storage
If your Cordless Trimmer/Edger requires service or
maintenance, please call 1-866-766-9563 for assistance.
Model and Serial Number
When contacting the company or reordering parts, you will
need to provide the model and serial numbers of your
product. These are found at the bottom of your Cordless
Trimmer/Edger. Copy these numbers into the space
provided below.
Record the following numbers from the housing or handle of your
new product:
Model #:
T R J 6
0
Serial #:
9
0 C
A Two-Year Full Warranty
for residential use
in the United States and Canada
General Conditions:
Snow Joe, LLC warrants this product to the original purchaser for two years against defects in material or workmanship when used for
normal residential purposes. Snow Joe, LLC will repair any defect in material or workmanship, and repair or replace any defective part,
subject to the conditions, limitations, and exclusions set forth herein. Such repair or parts replacement will be free from charge to the
original purchaser except noted below.
The duration of the warranty applies only if the product is put to personal use around the household or residence. If the product is put
to any business use, commercial or industrial, then the duration of this warranty is 90 days from the date of original purchase. If any
product is rented or leased, the duration of the warranty is 90 days from the date of original purchase.
It is the owner’s responsibility to perform correctly all maintenance, and minor adjustments explained in the owner’s manual.
Electric Products:
To obtain a replacement electric powered unit or repair the existing electric powered unit, you must return the complete unit and
postage prepaid to: Snow Joe Return Center, 86 Executive Avenue, Edison, NJ 08817.
Gasoline / Battery Products:
Limitations
• Batteries are warranted only for the period of 12 months after the date of purchase on a prorated basis. Rechargeable batteries
will be replaced free from charge during the first 90 days. After the initial 90 days, batteries will be replaced at prorated cost to
the customer
• Idlers, cables, and electrical components are warranted to the original purchaser for use at household or residence for a period
of two years
Exclusions
• Snow Joe brand engines are covered under this warranty. All other engines and engine accessories are covered only by the
engine manufacturer’s warranty and are not covered by this warranty
• Parts used that are not genuine Snow Joe parts are not covered by this warranty
• Damages resulting from misuse, alteration, improper assembly, improper adjustment, neglect, or accident which requires repair
is not covered under this warranty
• Belts, augers, and tines are not covered under warranty – belts, augers, and tines wear out and can be purchased at
www.snowjoe.com or by calling 1-866-766-9563
Snow Joe, LLC may from time to time change the design of its products. Nothing contained in this warranty shall be construed as
obligating Snow Joe, LLC to incorporate such design changes into previously manufactured products, nor shall such changes be
construed as an admission that previous designs were defective.
This warranty is intended to cover product defects only. Snow Joe, LLC is not liable for indirect, incidental, or consequential damages
in connection with the use of the Snow Joe Products covered by this warranty. This warranty does not cover any cost or expense
incurred by the purchaser in providing substitute equipment or service during reasonable periods of malfunction or non-use of this
product, while waiting for completion of repairs under this warranty. Some states do not allow exclusions of incidental or consequential
damages, so the above exclusions may not apply in all states. This warranty may give you specific legal rights in your state.
If you wish to contact Snow Joe, please direct inquiries to the:
Customer Service Department
Snow Joe Center
86 Executive Avenue
Edison, NJ 08817
Customers who have purchased Snow Joe products exported from the United States and Canada should contact their Snow Joe
Distributor (Dealer) to obtain information applicable for your country, province, or state. If for any reason, you are not satisfied with the
distributor’s service, or if you have difficulty obtaining warranty information, contact your Snow Joe seller. If in the event your efforts
are unsatisfactory, please write to the Snow Joe Center at the above address.
If you have any questions about your product warranty, please call 1-866-SNOW-JOE or visit us online at www.snowjoe.com.
10