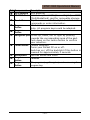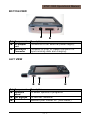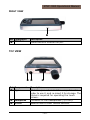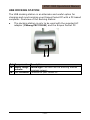
1
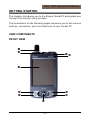
RTW-1000 Operational Manual RTW-1000 Operation Manual Empus Version 1.2 Copyright © 2004-2005, All rights reserved. Microsoft®, MS-DOS®, and Windows are registered trademarks of Microsoft Corporation in the U.S. and other countries. Pentium® is a registered trademark of Intel Corporation. The names of actual companies and products mentioned herein may be the trademarks of their respective owners. Information in this document is subject to change without notice. RTW-1000 Operational Manual INDEX READ ME FIRST ...................................................................................... 3 MAINTENANCE .............................................................................. 3 CARE OF THE DISPLAY ................................................................ 3 NOTES ON THESE OPERATING INSTRUCTIONS ........................ 3 SUPPLIED ITEMS........................................................................... 3 DEVICE INITIALIZATION................................................................ 4 GETTING STARTED................................................................................. 5 VIEW COMPONENTS..................................................................... 5 FRONT VIEW ....................................................................... 5 BOTTOM VIEW ..................................................................... 7 LEFT VIEW ........................................................................... 7 RIGHT VIEW ......................................................................... 8 TOP VIEW............................................................................. 8 USB DOCKING STATION............................................................... 9 INITIAL SET-UP OF THE POCKET PC ......................................... 10 STEP 1: CHARGING THE POCKET PC BATTERY.............. 10 STEP 2: SWITCHING ON THE POCKET PC....................... 12 STEP 3: CONNECTING TO THE COMPUTER .................... 12 STEP 4: USING THE POCKET PC...................................... 13 WORKING WITH MEMORY CARDS............................................. 14 INSERTING MEMORY CARDS ........................................... 14 REMOVING MEMORY CARDS ........................................... 14 ACCESSING MEMORY CARDS.......................................... 14 DATA EXCHANGE VIA CARD READER.............................. 15 RESETTING THE POCKET PC .................................................... 16 SOFT-RESET...................................................................... 16 HARD-RESET ..................................................................... 16 BASIC SKILLS........................................................................................ 17 USING THE STYLUS.................................................................... 17 USING THE NAVIGATION PAD.................................................... 17 STATUS ICONS............................................................................ 18 NAVIGATION .......................................................................................... 20 GPS NAVIGATION SOFTWARE................................................... 20 TIPS FOR NAVIGATION...................................................... 20 GPS DIAGNOSE........................................................................... 21 STARTING NAVIGATION ............................................................. 21 FAQ ........................................................................................................ 22 CUSTOMER SERVICE ........................................................................... 23 FAULTS AND POSSIBLE CAUSES .............................................. 23 ADDITIONAL SUPPORT............................................................... 25 ~2~ RTW-1000 Operational Manual READ ME FIRST MAINTENANCE Congratulations on purchasing the Empus Pocket PC. Please follow the instructions in this booklet in order to ensure a long and enjoyable experience with your purchase. l There are no self-cleanable or self-serviceable parts inside the Pocket PC. l Always disconnect all power and cables before cleaning. l Clean the Pocket PC only with a damp, lint-free cloth. l Do not apply solvents, caustic or gas-based cleaners. CARE OF THE DISPLAY l l l l Ensure that no traces of water remain on the screen. Water can cause irreversible discoloration. Use only soft, and lint-free cloth to clean the screen. Do not expose the screen to direct sunlight or ultraviolet radiation. Avoid excessive scratching of the display surface, as this can cause damage to the screen easily. It is strongly recommended to apply a replaceable display protector to avoid scratches. Please ask the nearest dealer for this accessory. NOTES ON THESE OPERATING INSTRUCTIONS Extensive help notes can be found on the Pocket PC as well as on the included CD-ROM. Please read the FAQ section of this manual for answers to the frequently asked questions. The purpose of this manual is to assist you in enjoying the Empus Pocket PC. SUPPLIED ITEMS Please check the integrity and completeness of the contents in your purchased Pocket PC package. The package contents include: Ø Pocket PC Ø AC adaptor, adaptor plug (for the country in question) ~3~ RTW-1000 Operational Manual Ø Ø Ø Ø Ø Ø Ø Ø Ø Ø Microsoft Companion CD Instruction manual (this manual) Power cable for 12V cigarette lighter CD with navigation software USB docking station (charging/synchronization)* ActiveSync-cable* for charging and synchronizing* Car holder of the Pocket PC with flexible neck* Earphones* Protective case and storage pocket with transparent window* Pre-installed memory card(s) MMC/SD* * Optional DEVICE INITIALIZATION Please follow the important steps listed below upon using your Empus Pocket PC for the first time. 1. Charge the device continuously for 8 hours at least. 2. Upon completing the charging process, perform a hard reset of the Empus Pocket PC. Note. To perform a hard reset of the Empus Pocket PC, hold down the power button and press in the reset button (as page 16) briefly. ~4~ RTW-1000 Operational Manual GETTING STARTED This chapter introduces you to the Empus Pocket PC and guides you through the friendly setup process. The illustrations on the following pages introduce you to the various buttons, connectors, ports and features of your Pocket PC. VIEW COMPONENTS FRONT VIEW Œ • ’ Ž ” • • • ‘ ~5~ “ RTW-1000 Operational Manual Ref Component Œ GPS antenna • SD/MMC Slot Description GPS antenna Insert an optional SD (Secure Digital) or MMC (MultiMediaCard) card for removable storage. Touch Screen Tap the screen with the stylus to select menu Ž commands or enter information. Start screen • Program Button Note: All program keys could be adapted. Contacts • Program Button ‘ Navigation pad Moves up, down, left or right by pushing towards the corresponding area of the pad. Push down on the centre button to confirm your selection. ’ Power Button Powers backlight Turns your Pocket PC on or off. Switches on / off the backlight if this button is pressed for approximately 3 seconds. Microphone “ Records sound and voice Calendar ” Program Button The programs(e.g. Navigator) can be run using the • Program Button program key. ~6~ RTW-1000 Operational Manual BOTTOM VIEW Œ Ref Component Œ AC adaptor port • ActiveSync Connector • Description Connection to an external power supply. Connects to your PC based computer for synchronizing data and charging. LEFT VIEW Œ Ref Component Œ Selection wheel • Ext. antenna Ž Reset Button Ž • Description To select options in programs. To use ext. antenna. Restarts your Pocket PC. (Soft-Reset) ~7~ RTW-1000 Operational Manual RIGHT VIEW Description Œ Ref Component Œ GPS-Button Description Turns the GPS function on/off. TOP VIEW Œ • Ref Component Œ Stylus • Headphone Ž IR Port Ž <POCKETPC B Description Slide the pen outward of its compartment in order to use it, and re-insert it for storage. The stylus is required for operating the touch screen. Connects to the headphones (3,5 mm). Beams files to other mobile devices. ~8~ RTW-1000 Operational Manual USB DOCKING STATION The USB docking station is an alternate and useful option for charging and synchronizing your Empus Pocket PC with a PC-based computer. Overview of the docking station: l The docking station is only to be used with the supplied AC adapter (Phihong PSC11R-050) and the Empus Pocket PC. Ref Component Description Ref Component Œ• Description Yellow light - as soon as the docking station receives power. Œ Battery Charge Indicator • PPC Connector Connects to your Pocket PC. ~9~ RTW-1000 Operational Manual INITIAL SET-UP OF THE POCKET PC The following section provides a friendly step-by-step guide that assist you through the initial set up of the Empus Pocket PC. STEP 1: CHARGING THE POCKET PC BATTERY The Empus Pocket PC can be conveniently charged with either the supplied AC adaptor or the optional USB dock. 1. Slide the adaptor plug into the guide rail at the back of the AC adaptor. Plug the AC adaptor into a wall outlet that is easily accessible. 2. The charging status display flashes green until the Pocket PC is charged. Do not interrupt the charging process before the battery is fully charged. This may take a few hours. The Pocket PC is fully charged if the charging display lights green. (Remember to charge the Empus Pocket PC for at least 10 hours for the first time.) 3. Leave the mains adapter connected to the Pocket PC for around 24 hours, so that the backup battery also charges-up fully. ~ 10 ~ RTW-1000 Operational Manual As an alternative to the USB docking station, you can also connect the AC adaptor directly to the Pocket PC or use the optional ActiveSync-cable. • Attach this connector to your Pocket PC ŒUSB connector Attach the USB connector (Œ) to an available USB port of your PC and the ActiveSync® connector (•) to the ActiveSync port of your Pocket PC. The PC must be switched on for charging through the ActiveSync cable. Installing the included active-sync Software first before connecting the ActiveSync cable! INSTALLING MICROSOFT ACTIVESYNC In order to synchronize your data (e-mails, contacts, dates, etc.) between your PC and the Pocket PC, you need the Microsoft ActiveSync program. Your Pocket PC includes a license for this Microsoft ActiveSync program which can be found on the CD. ² If you do not have Microsoft Outlook 2002 on your PC, please install Outlook 2002 following the directions above. ² Attention: You should not connect the Pocket PC to your computer yet. 1. Start Windows and re-insert the CD supplied in order to again display the installation menu you are already familiar with. 2. Click Install ActiveSync . ² On the right side of the window you will see more details about the ActiveSync software and additional hints for installation. 3. Click now on Install. 4. A dialog box appears that informs you that a program now has to be installed. Click OK. 5. You are now asked whether you want to open the file or store it on the PC. Select the Open option here and follow the instructions on the screen. ~ 11 ~ RTW-1000 Operational Manual 6. If testing the connection options, insert the Pocket PC in the charging/synchronization docking station. ² If other programs have been bundled, you will find these on your Companion CD under: Enhance Your Experience → Mobility or Entertainment. STEP 2: SWITCHING ON THE POCKET PC 1. Press the On/Off switch in order to start the Pocket PC. The Pocket PC will automatically starts in the initial set-up screen. The brand logo appears and a few seconds later the Pocket PC displays the Windows Mobile 2003 welcome screen. 2. With the stylus, give the screen one short touch and follow the instructions that are displayed to you. 3. Select the time zone by tapping on the dateline on the start-up screen and adjust time and date. STEP 3: CONNECTING TO THE COMPUTER 4. Start the Pocket PC, by a short press of the On/Off switch. 5. Ensure that the Pocket PC is inserted in the USB docking station. 6. Plug the USB plug into a free USB slot on your computer. ² The hardware installation assistant will now detect a new device and install a suitable driver. This may take a few minutes. Please repeat the connection attempt if the Empus Pocket PC is not successfully recognized. 4. Follow the instructions on your screen. The program will now set up a partnership between your PC and the Pocket PC. As a result of the synchronization, your data (mail, contacts, appointments, etc.) will be automatically synchronized between the Empus Pocket PC and your personal computer. SYNCHRONIZATION BETWEEN POCKET PC AND PC When you insert the Pocket PC in the charging/synchronization docking station, Microsoft ActiveSync is automatically started. The program checks if the Pocket PC is one with which a partnership has already been established. If this is the case the changes that have taken place on the PC and ~ 12 ~ RTW-1000 Operational Manual on the Pocket PC since the last synchronization are compared and reconciled. In the Settings menu of the Microsoft ActiveSync program you can define precisely which rules are to be applied during synchronization. Call up the program Help (by pressing F1) in order to see the effects of the corresponding settings. If the Pocket PC is not recognized as a partner, restricted guest access is automatically activated that allows, for example, data to be exchanged. If this should occur even though there is a registered partnership, remove the Pocket PC from the charging/synchronization docking station and switch it off and on again. Re-insert the Pocket PC in the charging / synchronization docking station in order to restart the identification process. If this still does not work, repeat the process and also restart your PC. If you have changed the device name in the Pocket PC this may be the cause of this malfunction. Please remember this if you change the name of the Pocket PC under Start → Settings . Change the device name of the Pocket PC if necessary, if it does not correspond with the device name stored by ActiveSync. STEP 4: USING THE POCKET PC OPERATING THE POCKET PC 1. Take the Pocket PC out of the docking station. In order to execute a function or a program, - Use the stylus to tap Start and then tab your desired operation on the drop down list. - Press the program keys of the Pocket PC in order to start the desired program. The underlying programs can be defined using Start → Settings → Buttons . 2. Explanations of the operation and functionality of the programs can be obtained from Start → Help . ~ 13 ~ RTW-1000 Operational Manual WORKING WITH MEMORY CARDS Your Pocket PC supports MMC and SD memory cards. INSERTING MEMORY CARDS 1. Carefully take the memory card out of its packing (if included). Take care not to touch or dirty the contact points. 2. Push the memory card carefully into the card slot as shown. The side of the memory card wearing the label must point upwards. The memory card should slightly lock in place. REMOVING MEMORY CARDS ² Do not remove the memory card while it is being accessed. This could result in the loss of data. 1. To remove the card press lightly on the SD card and it will eject itself. 2. Pull the card out without touching the contacts. 3. Store the memory card in the packing or in another safe location. ² Memory cards are very fragile. Take care not to dirty the contacts and not to force the card. ACCESSING MEMORY CARDS Memory cards are normally shown as Storage Cards in the Windows Explorer. You can access the memory card like a normal drive to store, rename or delete files. ² The Pocket PC only supports memory cards in the FAT16/32 file format. If you insert a card prepared with a different format (e.g. in cameras, MP3 players), your Pocket PC may not recognize it and will ask you to format it again. Warning: Formatting the memory card wipes out all data. ² Likewise you cannot just copy files onto the memory card. In some cases, the files must be converted by the Microsoft ActiveSync program. ~ 14 ~ RTW-1000 Operational Manual DATA EXCHANGE VIA CARD READER You can transfer or synchronize data via ActiveSync®. This is also the correct method, in particular, if files are to be transferred that must be converted into a Pocket PC-readable format. However, if you wish to copy large quantities of data (MP3 files, navigation maps) to the memory card, these can also be stored directly to the memory card. Many computers already have memory card devices. Insert the card in this and copy the data directly to the card. Because of the direct access significantly faster transfer will be achieved. Note: SD information update issue. Due to Microsoft's internal design que, users need to perform the following steps in order to read the SD card information upon the removal and insertion of the SD card. 1. Tap on the "start" icon 2. Tap on "Programs" on the drop down list 3. Tap on "File Explorer" 4. Tap on the "Storage Card" tab. Users will be able to read the current information that is stored inside your SD card (if presented). Upon the insertion/removal of the SD card, please tap on the "Storage Card" tab again, in order to get the refreshed information on your newly inserted SD card. ~ 15 ~ RTW-1000 Operational Manual RESETTING THE POCKET PC There are two options for resetting the Pocket PC. SOFT-RESET This option restarts the Pocket PC, without reinstallation being necessary. A soft-reset is often used in order to reorganize the memory. In doing so all programs that are running are interrupted and the working memory is reinitialized. Choose this option if your Pocket PC is not responding or working properly. Perform the soft-reset as follows: 1. If possible save the files that your Pocket PC has just been processing. 2. Press the tip of the stylus into the soft-reset switch opening. After a few seconds the Pocket PC displays the start screen. Your configuration and your saved files will not be deleted. HARD-RESET Warning: A hard-reset deletes all data on your Pocket PC and causes it to return to its initial state. It is not necessary to install the software on your synchronization computer again, however. Perform the hard-reset as the following: 1. If possible, back up all the files needed from your Pocket PC. To do this use the programs bundled with the Pocket PC (see online help or the manual on CD). 2. Hold down the On/Off switch and carry out a soft reset. ~ 16 ~ RTW-1000 Operational Manual BASIC SKILLS This chapter familiarizes you with the basic operations of your Pocket PC such as using the stylus, navigation button, navigation pad, menus and programs. You will also know how to enter information. USING THE STYLUS The stylus serves as a mouse for computers. It is used to navigate and select objects on the screen. Pull the stylus out of the slot and extend it for ease of use. Store it in the slot when not in use. Ø Tap Touch the screen once with the stylus to open items and select options. Ø Drag Hold the stylus on the screen and drag across the screen to select text and images. Drag in a list to select multiple items. Ø Tap and hold Tap and hold the stylus on an item to see a list of actions available for that item. On the pop-up menu that appears, tap the action you want to perform. USING THE NAVIGATION PAD With the navigation pad, you can move up, down, left and right within a menu by pressing the corresponding area of the pad. This is particularly useful for one-hand operation. To activate the selected item, press the center of the pad. ~ 17 ~ RTW-1000 Operational Manual STATUS ICONS When the Today screen is displayed, you may see the following status icons on the Command bar or Navigation bar. In most cases, you can tap a status icon to display the associated control panel or more information related to the item. For example, tap the battery status icon to open the Power control panel. I Icon Meaning Speaker is on. Speaker is off. Battery is charging. Battery is low. Battery is very low. Battery is fully charged. Connection is active. Connection is not active. One or more e-mail messages were received. More icons to be displayed than there is room to display them. Tap the icon to view all status icons. ~ 18 ~ RTW-1000 Operational Manual The table below contains a partial list of the programs and their icons: Icon Program Description ActiveSync Synchronize information between your Pocket PC and desktop computer. Calendar Keep track of your appointments and create meeting requests. Contacts Keep track of your friends and colleagues. Inbox Send and receive email messages. Pocket Internet Explorer Browse Web and WAP sites and download new programs and files from the Internet. Notes Create handwritten or typed notes, drawings and recordings. Tasks Keep track of your tasks. Windows Media Player Pocket Excel Pocket Word Play digital audio and video files. Create new workbooks or view and edit Excel workbooks created on your desktop computer. Create new documents or view and edit Word documents created on your desktop computer. ~ 19 ~ RTW-1000 Operational Manual NAVIGATION GPS NAVIGATION SOFTWARE Please refer to the included “GPS Software Guide”. TIPS FOR NAVIGATION Ø Do not manipulate the navigation system during driving to protect yourself and others from accidents! Ø In the event that you do not understand the voice instruction or if you are in doubt of your heading, the arrow on the map of your Empus Pocket PC will be able to provide you with a quick orientation. Only look at the display when you are in a safe driving situation! Ø Attention: The road layout and driving rules take precedence over the instructions of the navigation system. Only follow the instructions when circumstances and driving rules permit it! The navigation system will guide you to your destination even when you have to deviate from your planned route. Ø Plan routes before you leave. Never drive and operate your Empus Pocket PC at the same time. Ø In order to receive the GPS signal correctly, provide the best angle between your Empus Pocket PC and open sky. Attach the Pocket PC to the inside of the windscreen or near the windscreen with the sucker. Try different positions in your vehicle in order to get the best reception. ~ 20 ~ RTW-1000 Operational Manual GPS DIAGNOSE There are two ways to turn on/off your Empus Pocket PC's GPS function manually. 1. Thru embedded software. Users will notice the GPS icon on the button right of the Today screen. Tab on it will bring up a quick diagnose window, which allows the users to switch on and off the GPS function of the Empus Pocket PC manually. 2. Thru embedded hotkey operation. The GPS function of the Empus Pocket PC can be turned on/off by operating the GPS button on the right side of the Empus Pocket PC (see page 8). By holding the GPS button, the users will be able to detect the change in GPS status by the change of color of the GPS icon. The green GPS icon represents the Empus Pocket PC is running with the GPS function turned on. The red GPS icon represents the Empus Pocket PC is running with the GPS function turned off. Note: Normally, the GPS function of the Empus Pocket PC will be automatically turned on by the navigation system. STARTING NAVIGATION 1. Switch on the Pocket PC. Start the navigation program in the program directory of your Pocket PC. ² Hint: The GPS-receiver will require some minutes for initialization when deployed for the first time. Even when GPS signal reception is indicated the navigation could be imprecise. In all future instances it will take about 30-60 seconds until a correct GPS-signal is available. 2. Click on Enter a destination to specify your destination. In order to obtain detailed information about how to use the program click on the Help button. ~ 21 ~ RTW-1000 Operational Manual FAQ Where can I find more information about the Pocket PC. iDetailed operating instructions for navigation (optional) and operation of the Pocket PC programs can be found on the corresponding CDs, which accompany your Pocket PC. For additional assistance use the extensive help functions that are available at the touch of a button (usually F1 on your PC) or by typing the question mark (on the Pocket PC). These help options will be made available to you when you use the computer or the Pocket PC. Useful notes and additional help can be obtained from the Internet at www.pocketpc.com, www.royaltek.com or from corresponding forums. What do I need the accompanying CDs for? iThe Companion CD contains: - ActiveSync® for synchronization. - The information management program Outlook and other help programs from Microsoft. - Additional programs (optional). - A comprehensive User manual for operating the Pocket PC programs. The Pocket PC is no longer responding. What should I do? iCarry out a soft-reset (see page 16). How can I adjust the lighting? i1. Manually. 2. On the Pocket PC under Start → Settings → System → Backlight. How can I find out information on the configuration of the Pocket PC? iOn the Pocket PC under Start → Settings → System . What sort of processor must I choose if I want to install software that has been written for various platforms? iChoose ARM. ~ 22 ~ RTW-1000 Operational Manual CUSTOMER SERVICE FAULTS AND POSSIBLE CAUSES The Pocket PC does not respond anymore. Ø Press the reset button. Elements have inadvertently been overwritten. Ø In the Settings menu of the ActiveSync program you can define precisely which rules are to be applied during synchronization. Call up the program Help (by pressing F1) in order to see the effects of the corresponding settings. The Pocket PC shows that insufficient memory is available. Ø Terminate any unnecessary programs in order to free-up sufficient memory space again. In addition under Start → Settings → Memory → Current programs terminate applications that are no longer needed. Remove unnecessary files. Check temporary Internet files. Multimedia files (MP3, AVI, BMP etc.) can be very big. Check if you still need these. Once I have installed ActiveSync I get error messages from a maintenance program. Ø In the temporary folder created by the system, the program creates the WCESCOMM.LOG file which cannot be deleted. If another program tries to do this a corresponding error message appears. The GPS-receiver cannot be initialized. The GPS receiver cannot be initialized or found. If the GPS receiver cannot be initialized or found, and this can be caused by the following: Ø The GPS receiver is configured for one of the other connectors and not for COM1 of the Pocket PC. Solution: 1. Click on Settings in the Main Menu of the navigator. 2. Select GPS from the list in the window Settings. 3. Activate COM1 and observe the GPS can be initialized, you have successfully activated the COM1 port. 4. Click on Save. ~ 23 ~ RTW-1000 Operational Manual Ø The GPS receiver does not start automatically. Solution: GPS cannot be initialized even after the configuration of the COM1 port, 1. Close the navigation program. Check the GPS reception settings under Start – Settings – System – GPS. It is recommended to use the automatic start when accessing COM1. Restart the navigation program. The display jitters / slows down, responds sluggish or the program aborts. This may be due to reduced memory availability. Normally, The navigation software requires approximately 10-15 MB of free main memory (for swapping-out files, etc.). If this is no longer available, the stated problems may arise. The Pocket PC may also go into energy-saving mode, which can lead to the memory card no longer be recognized correctly. Solution: Ø Close down all programs. Ø Delete unnecessary files (MP3, PDF etc.) or save them externally. Ø Start the navigation program again. Ø Carry out a soft-reset (see page 16). ~ 24 ~ RTW-1000 Operational Manual ADDITIONAL SUPPORT If the suggestions in the above section have not solved your problem, please contact your local reseller or visit RoyalTek web site. However, before you contact your service people, please have the following information available: - How is your computer configured? - What additional peripherals do you use? - What messages, if any, appear on your screen? - What software were you using when the error occurred? - What steps have you already undertaken to solve the problem? - Have you upgraded or removed drivers or hardware? - Can you manually repeat the problem? - If you have been given a customer number previously, please give this number to the technician. ~ 25 ~