1
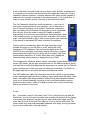
PreSonus StudioLive 16.4.2
A Sixteen Channel Digital Recording and Live Performance Mixer
Mike Rivers
PreSonus has been building compressors, preamps, audio interfaces and studio
accessories for over ten years so they’re no stranger to the field, but in all that
time, they’ve never built a mixer - StudioLive is their first. Nearly all of their
products, from their initial entry, the DCP8 digitally controlled 8-channel analog
compressor, have involved some sort of digital technology (PreSonus was the
first to market the now ubiquitous 8-channel mic preamp with ADAT optical
output), and the mixer is no exception - all the guts between the mic preamp and
analog output are digital, both in process and control. I expected, and I found, all
the advantages and disadvantages of a digital console during its stay here.
Features
The StudioLive is a 16-channel mic/line mixer with the familiar 4-bus architecture.
Inputs can be assigned to the main stereo mix and/or the four subgroups, with
the subgroups assignable to the main mix. Six auxiliary sends can be used
individually as mono effect or monitor sends or, two can be linked as a pair for
stereo headphone mixes or a recording mix. There are two built-in effect
processors as well as two stereo analog auxiliary returns to accommodate
outboard processors or other line level sources. Rounding out the I/O is an
auxiliary 2-track input and a phantom powered talkback mic input which can be
routed to the auxiliary and main outputs.
Mic inputs are on XLR connectors with individual phantom power switching.
Balanced line inputs are on ¼” TRS jacks. Each of the sixteen main input
channels has a ¼” unbalanced insert send/return jack. The main mix outputs are
on XLRs, duplicated on balanced ¼” and unbalanced RCA jacks, plus there’s a
separate mono (Left + Right) XLR output. In addition, a coax S/PDIF digital
output normally carries the main stereo mix, but it can be sourced from just about
anywhere. A pair of TASCAM-wired DB-25 connectors provide pre-insert direct
analog outputs from the sixteen mic or line inputs, handy for a multitrack recorder
backup. Control Room and Headphone outputs each have their own jacks and
volume controls.
Conspicuously absent are high impedance instrument pickup inputs, a feature
often included in mixers of this size which find frequent use in a personal studio
or with small stage act. You’ll need to supply your own DI, or better yet, mic up
your amplifier or guitar.
The Fat Channel (the “channel strip”) offers polarity reverse (“phase”), a variable
high-pass filter, four band semi-parametric EQ, gate/expander, compressor, and
1
limiter for each input channel and (minus polarity reverse and high-pass filter) the
main and auxiliary outputs, internal and external effects returns, and subgroup
outputs. The sixteen 15-step LED meters become indicators for the Fat Channel
control settings when a channel is selected for tweaking. A dedicated LED above
each meter indicates channel clipping regardless of the display mode. The latest
firmware adds a 31-band graphic equalizer which can be applied to the main
(left/right) outputs.
The sixteen input channels plus your choice of eight other outputs including the
main stereo mix, auxiliary sends, internal effects outputs, external effect returns,
even the talkback and solo bus are available to the computer via the integrated
Firewire interface. The Firewire recording signal path is always post-insert and,
on a per-channel basis, can be set to include or bypass Fat Channel processing.
Eighteen playback channels from the computer are hardwired to the sixteen input
channels and a 2-track input. Sample rate is 44.1 or 48 kHz, 24-bits. The
StudioLive ships with a copy of Capture, a very straightforward 18-track
recording program, tailored, as its name suggests, to capturing what comes into
the mixer during a show for later mixdown.
A small but clear backlit LCD is used for selection and adjustment of the internal
effects, some configuration defaults, and saving and loading of “scenes,” which
are snapshots of all mixer settings – faders, Fat Channel, effects, practically the
whole enchilada.
Two StudioLive mixers can be linked together (PreSonus even offers an optional
bracket to secure them) with options for cascading buses. Presently Capture only
supports a single mixer’s worth of channels, but a 48-channel version is in the
works.
It’s important to understand what the StudioLive isn’t. With no communication
between the mixer and computer other than audio, it offers no DAW control
functions, nor time code based dynamic automation. I would have liked to see at
least transport controls and track arming buttons on the mixer, but there’s really
no space for them in the present layout.
Gozintas and Gozoutas
Hooray! All the connectors, with exception of a BNC for an optional gooseneck
lamp, are on the rear – no cables to get in the way of the operating controls or
meters, though the manual still refers to the connector area as “the patch panel.”
With exception of the RCA Tape I/O and insert jacks, all analog inputs are
differential, on XLR or ¼” TRS jacks. Main outputs are bipolar and balanced, all
other outputs including the DB-25 direct outputs are single-ended balanced. The
¼” Main outputs seem happy driving an unbalanced input even with the low (ring)
2
side grounded, although at 6 dB lower than the nominal level since only half of
the output is being used. The Main stereo and mono outputs each have a rear
panel level control, useful for matching the mixer output to any input from mic
level to pro line level (maximum output +20 dBu). Maximum level from the RCA
Tape outputs is +8 dBu. Kudos to PreSonus for recognizing that these days The
“tape” outputs will most likely be connected to a pocket-sized recorder, many of
which can be overdriven with the peaks from a nominal +4 dBu output.
Mic input trims have a 40 dB range, enough so it’s practically impossible to clip
the preamps. Low frequency response remains quite flat even at full gain. Input
impedance varies between 1.2 kΩ and 1.8 kΩ over the range of the gain trim
control, which is a bit unusual. The mic input is slightly unbalanced, with (at a
mid-gain) one leg presenting 620Ω and the other presenting 630Ω to ground. The
same is true with the balanced line inputs, nominally 27kΩ, with 20kΩ and 6.7kΩ
between the two sides and ground. This suggests that the common mode
rejection might be compromised, and in fact the StudioLive’s mic input CMRR
measures about 8 dB poorer than a Mackie Onyx.
Inserting a plug into a Line Input jack appears to lower the gain of the input stage
rather than simply attenuating the line signal to mic level. Consequently, a
channel can’t have both a mic and line source connected simultaneously. This
may be an inconvenience in a studio setup. Phantom power is 44.5v, dropping to
42v when powering a random assortment of ten condenser mics.
The preamps are clean and have little if any coloration, but they appear to be a
bit noisier than those on other mixers of this class. On the other hand, maximum
gain (measured from mic input to analog direct output) is 67 dB, about 6 dB more
than what’s found on most contemporary mic inputs. At 60 dB gain, quiescent
noise is –66 dBu, about 5 dB more than a Mackie Onyx. This represents a noise
level of about -85 dBFS RMS to the DAW. I was able to confirm the EIN
(equivalent input noise) specification of –126 dBu. EIN, which is primarily a
designer’s parameter, isn’t the best way to specify noise performance of a mic
preamp, but manufacturers like to publish it since it’s a low number which has
something to do with noise. While I didn’t find the noise to be bothersome in
normal use, some hiss was noticeable when recording a quiet source with a mic
that required maximum gain.
The Fat Channel User Interface
For the past fifty years or so, we’ve had a pretty standard model for a console
that nearly every manufacturer followed – once you learned one console, you
could get around pretty easily on any one. Each knob was its own indicator –
simply looking at the position of its pointer tells you how far the knob is turned.
Buttons were either pressed or not (and sometimes illuminated when pressed).
3
To move from tweaking one channel to tweaking another was a matter of just
moving to the right or left. It was all very intuitive.
Then along came digital consoles. Because nearly all processing and routing is
performed digitally, there’s no longer an electrical need to have one dedicated
control associated with each function on every channel. Taken to the extreme,
it’s feasible to operate a console with just two controls – one to adjust whatever
needs adjusting and the other to select what it’s adjusting at the moment. This
isn’t really practical for speedy and intuitive operation (though it’s not far from the
concept of operating a DAW’s mixer using only a mouse), so most digital
consoles share a single group of controls for the “channel strip” functions –
panning, EQ, auxiliary sends, maybe compression, with a button for each
channel which “connects” the set of controls to that channel
Given the space and cost constraints, PreSonus has done a pretty good job with
the StudioLive user interface. All of the channel strip controls are contained in the
Fat Channel, a name borrowed, intentionally or not, from the Mackie d8b digital
console.
The StudioLive Fat
Channel is
composed of
sixteen rotary
encoder knobs
physically aligned
with the input
channel faders.
Each knob has a
corresponding LED
ladder array which
serves double duty.
In (what I consider to be) the normal mode, the LEDs display the channel’s input
or output level or gain reduction when the compressor is engaged. Pressing a
channel’s SELECT button activates the Fat Channel for that channel and
switches the LEDs to indicate the setting of their associated controls.
The Fat Channel human interface design is a bit inconsistent in that you rotate a
knob to make an adjustment, however the knob’s position is
indicated by a pointer on a vertical linear scale. While this
arrangement can save some panel space and doesn’t
require any special components, I much prefer the “V-Pot
layout used by some other manufacturers, where the knob’s
virtual position is indicated by a lighted ring surrounding it –
just like a knob pointer only digital..
4
A fact of life with a console of this nature is that in order to make an adjustment,
it’s necessary to first select the channel and then adjust the parameter. Once a
channel is selected, however, it remains selected until either another channel is
selected or the console is returned to the metering mode. It’s a console that, in
order to move around it quickly, you need to work with both hands.
The Fat Channel is divided into functional sections – pan, low cut
filter, gate, compressor/limiter, and equalizer - so it’s fairly easy to
zero in on each function’s set of controls. The limiter, compressor,
gate, and each of the EQ bands can be turned on or off (bypassed)
with a button. Since the scale on each LED ladder is labeled
appropriately for the function controlled by its associated knob, when
in the metering mode, you may need to look at another LED meter’s
scale, one that’s labeled in dB, in order to read level or gain reduction
if the channel’s associated LED array is labeled for frequency.
There’s a minor inconsistency within the High Pass filter group.
Instead of a button to turn the filter on or off, setting the cutoff
frequency to OFF disables it. Not to waste the space where the
ON/OFF button should be, the polarity reverse (Φ) button is located
directly below the High Pass Freq knob, with the legend “High Pass”
printed directly below the “Φ” button. More than once I flipped the
channel polarity when meaning to engage the low cut filter.
The compressor’s threshold, attack, release, and make-up gain knobs each have
its own LED ladder, but the gain reduction meter for the selected channel, which
you may like to watch while adjusting the compressor, is outside the Fat Channel
group, requiring you to take your eyes off where you’re working. You’ll find it in
the upper right corner along with the main and subgroup meters.
The LED ladders are called into alternative service as a guide to moving faders
to their saved gain positions when recalling a scene (more about this later). Since
there’s no means to de-select a channel (other than to select another channel),
once you’re finished tweaking, returning to the Level Meters display requires
pressing another button, which is located in another area of the console than
where your attention is focused.
In Use
So? – How does it sound? How does it mix? For my first shot at a mix with the
StudioLive, I put up a 16-track recording from a recent folk festival, set the faders
to their unity gain positions, set pans by eye, and initially didn’t apply any EQ
other than to set all of the High Pass filters at 75 Hz to reduce wind noise. The
mix sounded very clean and reasonably balanced, with things coming into better
focus in short order after a few adjustments.
5
My initial impression was that the faders, with practically no damping, had little
tactile feel and rattled a bit, but it didn’t take very long to get used to them.
What’s quite amazing about the StudioLive is that it’s nearly impossible to clip
internally. With a sine wave input on all sixteen channels at maximum level, and
with all faders set to their unity position, the output meters were slammed and
audible clipping was quite evident at the control room output. But it was only the
analog output stage that was clipping. Simply pulling the master fader down
20 dB or so to bring the main output meters back on scale cleaned the output
right up. This is what 32-bit internal processing does for you. As long as you’re
careful to watch the input levels so as not to clip the A/D converters, the
StudioLive has nearly unlimited headroom. That’s really important in live
applications where the level can rise substantially as the band and audience gets
warmed up.
The Main and Sub meters display the output level on a dB scale running from -80
to OL (which represents +20 dBu at the ¼” TRS analog outputs). There’s enough
quiescent noise in the mixer so that the bottom LEDs of this meter stack are
nearly always flickering on. There’s no practical reason to display 100 dB of
dynamic range on a console meter – that’s reserved for the lab test equipment.
Re-scaling the meter with the lowest LED indicating –60 or –50 dBu and adding a
few more steps between the 0 and OL LEDs (presently that important 20 dB
range is covered by only three intermediate LEDs) would be a welcome
improvement.
“Zero latency” monitoring is about as close to zero as most digital audio devices
get. At 44.1 kHz, delay from mic input to headphone output is about 1.8 ms (80
samples?). This delay causes no problem when playing an instrument, but when
listening to your own voice in the phones, if the headphone level is in the ballpark
of the natural acoustic level of your voice, some comb filtering can be observed,
resulting from the not quite simultaneous arrival of the headphone signal and
acoustic sound at your ear drum . Most people either don’t notice this or
overcome it by raising the headphone volume so that it swamps out the acoustic
sound, but to others it’s painfully obvious.
The high pass (low-cut) filter, with its cutoff
frequency continuously adjustable between
24 Hz to 1 kHz, is a very nice feature. It works
well to remove wind and air handler noise, and is
also useful for getting that choppy rhythm
acoustic guitar sound or removing leakage from
cymbal mics. But with a slope of 6 dB per
octave, it works differently from the more
common single frequency 12 to 18 dB per octave low-cut filter.
6
The four band EQ is fairly gentle, even in
the Hi-Q mode. Hi-Q (approximately 0.5
octave bandwidth) is more effective for
cutting, while I preferred the standard
bandwidth (approximately 1.5 octave) for
boosts. The High and Low bands can be
switched between peaking and shelving
response. With the High-mid band
extending up to 5 kHz, I found that the
High band was most useful in the shelf mode for adding some “air” to vocals.
The compressor’s Auto (program-based attack and release) mode worked fine
most of the time but manual attack and release controls are available for more
control. The gate, located at the beginning of the Fat Channel chain, can be
configured in adjacent channel pairs to either gating (gain drops essentially to
zero below threshold) or downward expansion (gain gets lower as the input level
drops below threshold).
Since analog clipping occurs at essentially 0 dBFS, the limiter, being at the end
of the processing chain, can’t protect against an input surprise. It goes into action
if the fader plus an EQ boost tries to take the channel level above full scale and
that’s where it clamps the level.
Adjacent channels can be linked, but PreSonus’ definition of “link” is not what I
expected. Pressing the Link button applies the Fat Channel settings of the
selected channel to its adjacent (linked) channel. What it doesn’t do is link the
faders, so when using a linked pair of channels with a stereo source (which I
would think is the most likely application), it’s necessary to move both faders
when adjusting the “linked” pair.
Further, with a conventional stereo channel, Pan adjusts left/right balance. On
the StudioLive, the Pan control blends the two linked channels when it’s set
anywhere other than full left and full right. For example, with the linked channels
assigned to the Main bus, with Pan fully left, the odd channel goes to the left bus
and the even channel goes to the right bus. When panned full right, the channels
are reversed. With the Pan at dead center, both channels are of equal level in
both the left and right Main bus (mono). There may be some creative use for this
linked Pan behavior, but it hasn’t occurred to me yet. If I linked channels (and I
probably wouldn’t bother), I’d be inclined to leave the pan full left and spare
myself some confusion. While applying the same EQ to both channels of a true
stereo pair is sometimes just what you want (and other times not), not having the
channel levels linked greatly reduces the usefulness of this seemingly handy
function.
When a pair is un-linked, the “master” channel of the pair (the one that was
selected when you pressed the Link button) retains the current Fat Channel
7
settings, while the other channel reverts to its pre-linked settings. Two Fat
Channel settings can be compared quickly by a clever application of the Link
function. Select a channel, tweak it until you think you like it, then link it to its
adjacent channel, assuming that adjacent channel is vacant. Tweaking the linked
adjacent channel’s settings will also change the settings on the working channel.
By toggling the Link, you can compare your initial setting with your “maybe this is
better” setting. If it’s not better, then just unlink and you’re back to where you
started. If you like your second try, you can copy those settings to the “clipboard,”
unlink, and paste the settings to the working channel.
Linking two Auxiliary Sends provides a stereo aux bus, great for creating stereo
headphone mixes or a broadcast mix where you may have some additional or
alternate microphones from those used for live sound. Select one Aux of the
linked pair and the Fat Channel knobs become Aux Send level controls; select its
linked partner and the knobs become pan pots for the Aux mix. Like the channel
faders, however, the Aux output level controls aren’t tied together, so both must
be adjusted in order to maintain left/right balance.
Fat Channel processing can be applied to the Aux outputs. While the EQ isn’t
narrow enough to notch out feedback without taking away too much of the
spectrum, it may prove useful for smoothing out the sound of peaky wedge
monitors, while the compressor might be handy for protection when using in-ear
monitors. Since it’s fairly common to use a 1/3 octave graphic equalizer in the
stage monitor feed, the ability to route the StudioLive’s 31-band graphic EQ to an
Aux output would be a welcome feature, but as of now, it’s only available on the
Main outputs.
Aux sends are selectable pre- or post-fader from the front panel. Furthermore, a
setup menu configures each Aux send individually to be either pre-everything
(but the gate) or post-EQ and compressor. Although we usually prefer a prefader monitor mix, I’ve often wanted to be able to use some EQ on the individual
channels going to the monitor feed. With the StudioLive, that option is available.
Solo Illogic
Conventionally, pressing a channel Solo button interrupts whatever you’re
listening to (almost always the main mix) and puts that channel’s signal on the
monitor bus (the control room speakers or engineer’s headphones). Releasing
the Solo automatically returns to the normal monitor source. In the StudioLive,
each source that’s available for monitoring (L/R mix, 2-track input, Firewire stereo
return, and the solo bus) has an associated on/off button. The monitor bus sums
all of these sources that are turned on. If you’re listening to the mix and want to
hear a channel by itself, you must mute the Main mix feed to the monitor bus by
toggling the Main button off. To return to what for me is the normal monitor signal
– the main mix, you must turn the main mix monitor switch back on. If you don’t
turn off the main mix in the monitor, when pressing a Solo button (assuming the
8
Solo switch in the monitor section is on) you’ll hear the mix with the soloed
channel boosted – probably not what you’re expecting. And if Solo isn’t turned on
in the monitor section, you’ll hear nothing. It’s possible to get the conventional
solo function with the StudioLive, it just takes some extra button presses.
I was a bit surprised to find several users posting on line in various audio forums
(including PreSonus’ own) who were enthusiastic about how StudioLive’s solo
function is implemented. A little prodding for answers yielded some clever
applications, though most agreed that it was somewhat awkward to use Solo in
the conventional manner. One user liked to keep the Solo button latched on a
group of channels (for example all of the vocals). By pressing both the Solo and
Main buttons in the monitor section, he could switch between hearing the main
mix and the “vocal quartet.” Another used the additive Solo function as a quick
way to boost the level of a channel, often the track that’s currently being
recorded, in the headphones. Me, I just use the faders for that.
Someone just used the Solo function to turn a selected channel on and off in the
headphones, and was happy not hearing anything from them when a solo was
not engaged. Perhaps hearing the PA mix was sufficient for him. Some live
consoles have a dedicated solo-only output to drive a speaker, so it’s not an
unheard-of practice. That’s an idea borrowed from broadcast consoles, nearly all
of which have a Cue function which works like the StudioLive with both Main and
Solo buses selected in the monitor section. You can cue up the next record
without taking your ear off what’s going out over the air. In fact, the knob that
controls the level of the “solo” signal on the StudioLive is labeled Cue! Hmmmm.
A club DJ could make good use of the Main-plus-Solo mode to audition a loop in
order to beat-match or pitch-match it with what’s currently playing before
blending it into his mix. So there’s some value here, just not in the typical
recording studio or live sound environment. There’s a one-button solo-in-place
(SIP) mode which mutes all the channels except those selected for solo. But
since this turns off the channel signals to the buses, you can’t use SIP when
mixing a live show or recording the main or subgroup outputs.
The channel signal feeding the Aux buses is taken ahead of the Mute switch
(which some live sound users will curse) so in SIP mode, the the Aux mixes
remain unaffected by soloing channels. In the studio, during setup, SIP can
substitute for the conventional solo without interrupting the musicians’
headphone feeds, but I’d really rather simply have the real thing. The solo bus
feed is post-pan (contrary to the block diagram), so solos, even when not using
SIP, appear in their actual panned positions. This has its benefits, but most of the
time, I prefer my solos mono, in the center.
Since I primarily use Solo to identify channel sources or to locate problems, I
want to be able to quickly solo any channel and get back to business with a
minimum of button-pressing. I rarely dwell on a soloed channel to adjust EQ or
9
dynamics when I’m not hearing it in the context of the mix, but it’s pointless to
argue with personal mixing styles.
Scenes and Memories
One of the most significant features of a digital console is the ability to save the
console setup and recall it at a later time. Whether it’s a band returning to the
studio for another session after a tour, or a band with a well rehearsed show
doing yet another performance, instant recall of all the routing, levels, EQ and
dynamics settings can save a lot of time.
Exactly what happens when you recall a
scene requires some understanding.
There’s a menu that allows you to
choose what’s recalled when a stored
scene is loaded. This is a useful feature
because there are some things that you
may prefer to set manually depending
on the circumstances. Recall of Faders
and Pots can use a little explanation.
When Faders are included in the scene recall, the Fat Channel meters switch to
the Fader Locate mode, guiding you in positioning the faders to coincide with
their stored electrical position. If you don’t touch the faders when recalling the
scene, your mix will still come up with the levels as stored, however, when you
switch out of the Fader Locate mode, the channel levels will jump to coincide with
the current physical position of the faders. You can always go back to the Fader
Locate mode and reposition them using the LEDs as a guide to get your mix
back, but if you recalled the band’s setup and accidentally hit a wrong button, you
could be in for a surprise when they start playing.
“Pots” refer to the rotary knobs that control things such as the control room and
headphone volume, cue level, 2-track and Auxiliary returns. Like the faders, their
electrical positions are recalled, but as soon as you turn one of the recalled
knobs, the level changes to correspond to its current position. But since, unlike
the faders, they have no physical position indicators, you may think you’re turning
down the control room level but find that it actually jumps up because the knob is
physically at a higher level than the level that was saved with the scene. It’s a
minor inconvenience that you should be aware of so you’ll know what happened,
if it happens.
One thing on my wish list is that input trim settings be included in the scene.
These appear to be digital controls (though I haven’t confirmed this), so why not?
Sigh . . . It’s probably not in the hardware architecture.
10
It may occur to you that since everything can be saved in a scene, stored scenes
could serve as a poor man’s automation, since the StudioLive has no automation
functions. For example, you might have separate scenes for verse and chorus
with different vocal levels. Unfortunately, there’s a brief mute when switching
scenes, so while you can sometimes get away with switching scenes between
songs, you can’t really use scene switching to make changes during a song.
In addition to storing the entire mixer setup, a selected channel’s settings can be
copied to a clipboard-like memory, then pasted to another channel (or the same
channel in another scene), as well as named and stored as a channel preset.
While I’m not a big fan of using someone else’s EQ and dynamics settings for my
specific applications, many of the included
library of fifty Fat Channel presets provide a
good starting point for a beginner. However,
if it took a radical vocal EQ curve like this
preset (VCL-Male2) to make a vocal track
sound good, I’d probably first consider
changing the mic, its position, or the singer.
An additional scene memory lurks in the background, continuously monitoring
your mix, and storing the whole setup every ten seconds or so. This memory is
automatically recalled whenever the mixer is powered up, so it always comes up
in the state where you left off. It can save your bacon in a live show if someone
kicks out the power plug or trips a circuit breaker, but it’s also handy in the studio
when it’s time to pack up for the night and come back to work on the same mix in
the morning. A fitting companion to this feature is Scene 1, a factory setting
named Zero Out and the only scene you can’t edit or overwrite. It sets up the
console in a ready-to-mix state, with the levels down so it won’t make any
surprising noises until you start mixing.
Effects
The built-in effect processors sound quite good, better than those I’ve found on
other small format mixers. They’re mostly reverbs, with a small handful of delays
which can be set up using a Tap button. There’s no modulation, so you’ll find no
chorus, flange, or vibrato effects, but the reverbs are just fine, probably all you’ll
need for live sound, and good for routine studio work. There are a few tweakable
parameters, and settings can be named and saved. There are plenty of useful
effect presets here.
Un-Presets
The Lockout mode allows Fat Channel, channel faders, master fader, Aux levels,
and Scene recall to be selectively disabled. This is useful for installed sound
applications where someone may be trained to turn on the mixer and select a
11
scene (Sermon, Choir, Youth Band, Board Meeting), but you don’t want his or
her hands on the mix.
Software
Both Windows and Mac OS require installation of a driver and control panel
software. Since these things are constantly being updated, at least for the first
several months, it’s probably best to install files downloaded from the PreSounus
web site rather than using the supplied setup disk. The latest release for
Windows is compatible with any version from XP through Vista 64. The Mac
version requires OSX 10.4.11 or above.
My Windows installation went without a hitch and the mixer and computer happily
recognized each other. PreSonus has a downloadable document listing known
compatible and known troublesome Firewire interface chipsets and cards. This is
good to know if you can identify the chipset in your computer (or computer or
Firewire interface card that you plan to buy to use with the StudioLive) but this
information isn’t always easy to uncover. For what it’s worth, the StudioLive
worked fine with three different computers here, one with an Agere, one with an
NEC, and one with an unidentified chipset. All I ever have to say about this is that
things are better than they used to be, but you may need to experiment.
Updating the mixer firmware is done from the software control panel. I performed
two firmware updates while I had the mixer in house and both went smoothly.
Loading the firmware overwrites the entire internal memory which includes stored
scenes, channel presets, and effects processor edits. PreSonus expects to have
a librarian program for saving and loading user-stored data some time later this
year, most likely incorporated in a control software update. Until then, be
cautious about updates.
The StudioLive ships with Capture, a really simple and straightforward multitrack
recording. As its name implies, it’s designed to capture whatever goes into the
mixer with the least amount of fooling around. One button puts all the tracks into
Record and you’re rolling, though you can select individual tracks for recording.
No plug-ins, no time code sync, it’s emphatically described as not a DAW, but a
really handy recorder for live shows. It’s only 18 tracks with the 16 channel direct
outputs assigned to tracks 1-16 and one stereo track which is usually the main
mix, but can be set to record (in pairs) the subgroups, auxiliary sends, effect
sends, auxiliary returns, even the talkback mic or solo bus. Installation went
without a hitch, and it was stable and always worked. Since there are hooks for
cascading two StudioLive mixers, there will be a future update to Capture that will
record 48 tracks, which is the full set of 32 input channels and all of the stereo
sources.
12
Of course the StudioLive can be used with any DAW program that supports an
ASIO or WDM driver. Yes, it will work as the Windows default audio playback
device so you can use it to hear YouTube videos when surfing the web with your
studio computer (never a good idea, but you already knew that). It’s worth noting
that by setting up the routing so that you record tracks dry and monitor through
the Fat Channel, the combination of the StudioLive and a DAW (even Capture)
works very much like a multitrack recorder and in-line console. This is a very
sensible workflow model, one that has done us well for nearly 50 years.
Understanding this tracking and monitoring concept will help you to understand
how to best work in a pure DAW environment.
Quirks
I usually ran the StudioLive at 44.1 kHz, and occasionally I’d find that it had
switched to 48 kHz. I never quite pinned this down, but since sample rate is set
from the mixer setup menu when not connected to a computer, and from the
control software when connected, this sample rate change may occur when the
computer is turned off before turning off the mixer. For analog-in-analog-out
applications, sample rate really makes no noticeable difference, but if you’re
recording digitally, it’s important to check the sample rate setting.
When used as a stand-alone mixer (with no computer connection), word clock is
provided by an internal crystal oscillator. When the mixer is connected to a
computer via Firewire, the computer becomes the word clock synchronization
source. If the Firewire connection is lost, so is the word clock; no word clock
means no data processing, therefore no sound. Although my setup was perfectly
stable, some users have reported losing several seconds of audio when
recording a live show, presumably as a result of the Firewire link dropping out for
some reason. It’s not just a loss of recorded audio, but of the analog outputs of
the mixer (house mains and monitors) as well – not good for the show. With no
BNC word clock input or output an independent external clock source for the
mixer and computer can’t be used as an alternative sync setup. PreSonus is
aware of the problem resulting from Firewire communication dropout and is
looking into a firmware solution, likely allowing the word clock “coast” over a short
term loss of Firewire sync and switching to the internal clock if it looks like the
sync loss isn’t just a short glitch.
Since a lot of live sound work involves mixing outdoors in sunlight, I took the
StudioLive out to my back yard on a sunny afternoon to see what I could see.
Darn little! The LED meters/indicators, LCD, and lighted buttons were completely
washed out and could only be read if shaded. The large LED that displays the
selected channel number was barely readable. It’s possible to make some
adjustments “blind” as long as you have confidence in what you’re hearing and
don’t need to look at a scale. Daylight visibility is a common problem even with
consoles costing many times the price of the StudioLive, but it’s something to
consider if your work takes you outdoors. On the other side, when working in the
13
dark, I found the selected channel LED display to be blindingly bright for my 67
year old eyeballs. I never found any reason to depend on that one anyway so I
wouldn’t mind just putting a piece of black tape over it.
Docs
The manual is complete and accurate, though the printed version didn’t cover the
latest firmware changes (the web version is current). Features and functions are
clearly explained, though illustrations were of little help in locating controls and
indicators on the panel. Rather than, or in addition to the cropped pictures of
individual controls and buttons (all of which look pretty much the same) I’d like to
have a pullout drawing of the Fat Channel, master, and control sections with
callouts referenced to text. A series of short how-to videos on the PreSonus web
site supplement the manual nicely and are well worth watching.
The manual includes thirty-some well written tutorial pages covering topics such
as microphones and placement, mixing, dynamics, equalization, use of effects,
and studio procedures. This will be very useful to a beginner for whom the
StudioLIve may be the hub of his first entry to the world of live sound or the
recording studio.
I didn’t perform my usual open chest exploratory surgery on the StudioLive that I
usually do for a review. I like to check out component and build quality, the ICs
used in analog circuits, A/D and D/A converters, and the host (Firewire) interface,
but without an service documentation, I was uncertain where to make the first
incision. Aside from a single fuse accessible from the rear panel, there’s not
much in the way of user serviceability here.
Summary
The PreSounus StudioLive is an incredible bargain. For its $2,000 US street
price, you get sixteen decent mic preamps, a 4-bus mixer, several auxiliary line
level inputs, two good sounding effect processors, all the necessary controls for
studio work including talkback, mono or stereo cue mixes, and a multi-channel
Firewire computer interface, plus a simple and solid multitrack recording
program. For those of us accustomed to conventional console ergonomics,
working smoothly and confidently takes a different mindset and some getting
used to. Some things are faster and easier than in the old school, some are more
complex and slower.
PreSonus’ conceived the StudioLive to be as flexible as possible so as to fill the
needs of a wide range of users. Although their priorities aren’t always the same
as mine, I think they’ve done an admirable job of creating a mixer that many
diverse users will be happy to own. The company seems to be willing to consider
reasonable feature requests from users, and they have a reputation for good
support when help is needed. Since all the routing and switching is done with
14
firmware, it wouldn’t be difficult to add a “conventional” solo function, so I might
get my wish in a future firmware update. They’re also taking that clock dropout
issue seriously and will probably have a fix for that shortly.
The main StudioLive product web page:
http://www.presonus.com/products/Detail.aspx?ProductId=52
See if your Firewire chipset is on the list:
http://www.presonus.com/media/pdf/hardware_compatibility.pdf
Quick Facts and Observations:
•
•
•
•
•
•
•
•
Lots of bang for the buck
It’s mostly pretty good bang
Scene store/recall is handy for quick return to
previous mix setups
Expandable up to 4 cascaded mixers with logical
mixer-to-mixer busing
Unconventional solo operation
Linking doesn’t include faders (channels) or output
levels (Aux sends)
A bit noisy at high gain
Display nearly disappears in bright sunlight
Street price: $2000
Contact:
PreSonus Audio Electronics
7257 Florida Blvd
Baton Rouge LA 70806
225-216-7887
15