1
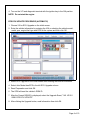
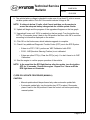
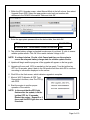
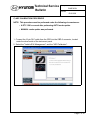
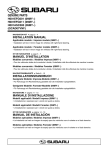
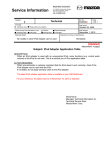
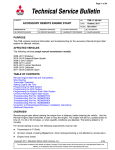
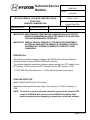
Technical Service
Bulletin
Group
CAMPAIGN
Number
09-01-008
Date
Subject
EPS ECU UPDATE - DTC WITH THE EPS(C1259) &
ESC(C1260)
(SERVICE CAMPAIGN T80)
CIRCULATE TO:
[X] SERVICE ADVISOR
MARCH, 2009
Model
[ ] GENERAL MANAGER [X] PARTS MANAGER
[X] SERVICE MANAGER [X] WARRANTY MGR
2009MY ELANTRA
[X] TECHNICIAN
[ ] SALES MANAGER
IMPORTANT: DEALERS MUST PERFORM THIS CAMPAIGN ON ALL AFFECTED
VEHICLES WHENEVER AN AFFECTED VEHICLE IS IN THE SHOP
FOR ANY MAINTENANCE OR REPAIR.
IMPORTANT: WHEN A VEHICLE ARRIVES AT THE SERVICE DEPARTMENT,
ACCESS HYUNDAI MOTOR AMERICA'S "WARRANTY VEHICLE
INFORMATION" SCREEN VIA WEBDCS TO IDENTIFY OPEN
CAMPAIGNS.
DESCRIPTION:
This bulletin provides information related to the EPS (Electronic Power Steering)
software update of certain 2009 ELANTRA(HD) vehicles.
The vehicles illuminate malfunction indicator lamps resulting from DTC related to the
EPS system, C1259 and from the DTC related to the the ESC system, C1260.
- C1259: SAS-Electrical malfunction, - C1260: Steering sensor circuit-signal.
VEHICLES AFFECTED:
Model: 2009 ELANTRA (HD) 2.0L vehicles
Applicable vehicle production date range: From January 22, 2009 to February 11,
2009.
NOTE: To verify the vehicle is affected, check the version of the vehicle's EPS
control unit ROM ID with reference to the ROM ID Information Table
mentioned below before attempting to update the control unit software.
Page 1 of 10
ROM ID INFORMATION TABLE:
ROM ID
MODEL
EPS ECU P/N
PREVIOUS
NEW
4HDD0811
4HDC0807
56310-2H201
Elantra HD
56310-2H301
CAUTION: After the EPS ECU UPDATE , be sure to check the DTC(s) in the EPS
system. If there is a DTC C1261, you must perform an 'ASP
Calibration' with GDS - C1261: ASP(Absolute Steering Position) is not
calibrated. If there are other DTC(s), clear the DTC(s) only, you do not
have to perform the 'ASP Calibration'.
CAUTIONS DURING CONTROL UNIT UPDATE
1. Make sure the vehicle's battery has reasonable charge. If the vehicle has been in
storage for days, run the engine to ensure an adequate battery charge state for
reliable update results.
2. Turn off all lamps (Do not leave head lamp switch in auto mode.) and all
accessories (including heater, A/C, blower, radio, seat warmer, defroster, etc.) not
to allow the battery to be discharged during update.
3. Perform update with the ignition switch in the ON position.
4. Ensure the transportation fuse is engaged before attempting update.
5. Be careful not to disconnect any cables connected to the vehicle or scan tool during
update.
6. Do not start the engine during update.
7. Do not turn off the ignition switch during update.
SERVICE PROCEDURE:
Page 2 of 10
Technical Service
Bulletin
Group
CAMPAIGN
Number
09-01-008
A) GDS (GLOBAL DIAGNOSTIC SYSTEM) INSTALLATION PROCEDURE
A: Diagnostic terminal
B: VCI (Vehicle Communication Interface)
C: USB (Universal Serial Bus) cable
D: Power supply cable
E: DLC cable (16-pin)
1. Connect the power supply connector to the diagnostic terminal.
NOTE: If attempting to perform the update with the power supply cable
disconnected from the diagnostic terminal, make certain that the
diagnostic terminal is charged enough for the update. If not, the update
may fail in progress. Therefore, it is strongly recommended to connect
the power supply cable to the diagnostic terminal during the update
procedure.
2. Connect the USB cable between the VCI and the diagnostic terminal.
NOTE: When performing the update using the GDS, wireless communication
between the VCI and the diagnostic terminal is NOT available. Therefore,
be sure to connect the USB cable between the VCI and the diagnostic
terminal.
3. Connect the 16-pin DLC cable from the VCI into the vehicle's DLC connector under
the driver side instrument panel.
Page 3 of 10
4. Turn on the VCI and diagnostic terminal with the ignition key in the ON position.
NOTE: Do not start the engine.
EPS ECU UPDATE PROCEDURE (AUTOMATIC)
1. Choose VIN or ECU Upgrade on the initial screen.
2. Enter the vehicle information by entering the VIN or selecting the vehicle model,
model year, engine/fuel type and EPS as the system and then click OK.
3. Select ECU Upgrade on the initial screen after entering the vehicle information.
4. Select Auto Mode then EPS in the left ECU Upgrade column.
5. Read Preparation and click OK.
6. The GDS will read the vehicle's ROM ID.
7. After the Current ROM ID is displayed, select the Upgrade Event, "140. HD 2.0
09MY EPS ECU UPDATE."
8. After clicking the Upgrade button, read Information then click OK.
Page 4 of 10
Technical Service
Bulletin
Group
CAMPAIGN
Number
09-01-008
9. The vehicle battery voltage is checked to make sure it is at least 12 volts to ensure
reliable update results. Click OK if the results indicate Voltage is OK.
NOTE: If voltage is below 12 volts, click Cancel and then run the engine to
ensure an adequate battery charge state for reliable update results.
10. Update will begin and the progress of the upgrade will appear on the bar graph.
11. Upgrade will occur until 100% is reached on the bar graph. Turn the ignition key
OFF for 10 seconds, place it back in the ON position and then click OK to continue
according to information displayed on the screen.
12. Click OK on the final screen, which indicates upgrade is complete.
13. Check if any additional Diagnostic Trouble Codes (DTC) are in the EPS System.
• If there is a DTC C1261, perform an 'ASP Calibration' with GDS.
• C1261: ASP(Absolute Steering Position) is not calibrated.
• If there are other DTC(s). Clear the DTC(s) only. You don't have to do 'ASP
Calibration'.
14. Start the engine to confirm proper operation of the vehicle.
NOTE: In the event that the EPS light flashes after the update, turn the ignition
OFF for 10 seconds. Restart the engine. Repeat 2 or 3 times until the
EPS light does not illuminate.
C) EPS ECU UPDATE PROCEDURE (MANUAL)
CAUTION:
• Manual update should be performed only when automatic update fails.
• If automatic update fails, turn the ignition key OFF for about 10 seconds,
place it back in the ON position to reset the control unit before performing
manual update.
Page 5 of 10
1. Within the ECU Upgrade screen, select Manual Mode in the left column, then select
Upgrade Event #140. Select the appropriate control unit part number with
reference to the ROM ID Information Table and click OK.
2. Enter the appropriate password from the below table, then click OK.
MENU
PASSWORD
D 2.0 EPS ECU : :56300-2H001/101/201/301/501/601
2601
3. The vehicle battery voltage is checked to make sure it is at least 12 volts to ensure
reliable update results. Click OK if the results indicate Voltage is OK.
NOTE: If voltage is below 12 volts, click Cancel and then run the engine to
ensure an adequate battery charge state for reliable update results.
4. Update will begin and the progress of the upgrade will appear on the bar graph.
5. Upgrade will occur until 100% is reached on the bar graph. Turn the ignition key
OFF for 10 seconds, place it back in the ON position and then click OK to continue
according to information displayed on the screen.
6. Click OK on the final screen, which indicates upgrade is complete.
7. Must do 'ASP Calibration & EPS Type
Recognition'.And then, clear The DTC(s)
with GDS.
8. Start the engine to confirm proper
operation of the vehicle.
NOTE: In the event that the EPS light
flashes after the update, turn the
ignition OFF for 10 seconds.
Restart the engine. Repeat 2 or 3
times until the EPS light does not
illuminate.
Page 6 of 10
Technical Service
Bulletin
Group
CAMPAIGN
Number
09-01-008
C) ASP CALIBRATION PROCEDURE
NOTE: This procedure must be performed under the following circumstances:
• A DTC 1261 occurred after performing AUTO mode update.
• MANUAL mode update was performed.
1. Connect the 16-pin DLC cable from the GDS into the OBD-II connector, located
under the driver's side of the instrument panel.
2. Select the "Vehicle S/W Management", and the "ASP Calibration".
Page 7 of 10
3. Check the message on the screen, and then turn the steering wheel until message
is changed.
4. Turn the steering wheel to straight ahead position, and then press OK button.
Page 8 of 10
Technical Service
Bulletin
Group
CAMPAIGN
Number
09-01-008
5. When the calibration is completed, the message will be displayed on the screen as
follows:
D) EPS TYPE RECOGNITION PROCEDURE
NOTE: This procedure must be performed under the following circumstances:
• MANUAL mode update was performed.
1. Connect the 16-pin DLC cable from the G-Scan into the OBD-II connector, located
under the driver's side of the instrument panel.
Page 9 of 10
2. Select the "Vehicle S/W Management", and the "EPS Type Recognition". Confirm
the vehicle type, and then press OK button.
3. When the EPS Type recognition completed. the message will be displayed as
follows:
WARRANTY INFORMATION:
OP CODE
90B008R1
OPERATION
EPS ECU UPGRADE
OP TIME
0.3 M/H
NOTE: Submit claim using the Campaign Claims Screen.
Page 10 of 10