1
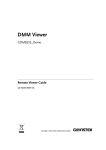
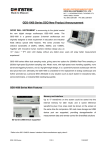
Excel Add-In GDM-8300 Series GDM-8300 Series Excel Add-In Manual GW INSTEK PART NO. ISO-9001 CERTIFIED MANUFACTURER This manual contains proprietary information, which is protected by copyrights. All rights are reserved. No part of this manual may be photocopied, reproduced or translated to another language without prior written consent of Good Will company. The information in this manual was correct at the time of printing. However, Good Will continues to improve products and reserves the right to change specifications, equipment, and maintenance procedures at any time without notice. Good Will Instrument Co., Ltd. No. 7-1, Jhongsing Rd., Tucheng Dist., New Taipei City 236, Taiwan. Table of Contents TABLE OF CONTENTS INTRODUCTION ........................................................................................................... 4 Overview...................................................................................................................................... 4 SETUP ............................................................................................................................. 5 Connection .................................................................................................................................. 5 Installation .................................................................................................................................. 7 Uninstallation .............................................................................................................................. 8 Configuration ............................................................................................................................ 10 DATA LOGGING REMOTE CONTROL ........................................................................ 13 View Add-In Software Version................................................................................................... 21 3 GDM-8300 Series Excel Add-In Manual INTRODUCTION This manual is suitable for any of the GDM-8300 Series DMMs (GDM-8341/8342/8351). This manual is to be used with all versions of Excel from 2003 and onwards with Windows PCs (Windows XP, Vista and 7: 32 or 64 bit, Windows 8: 32 bit). Please note that Macros must be enabled for the Add-In to function. The GDM-8300 Excel AddIn software is an Add-In for Microsoft Excel. The Add-In allows you to log measurements from the DMM and to plot the resulting data as a graph or a histogram using the built-in Excel graphing functions. Overview About Icon Save/Load Multimeter Settings Connect to Multimeter 4 Setup/Run Logging Worksheet Setup Multimeter Play/Pause/ Stop Connect to Multimeter: Clicking this icon will allow you to establish a connection to the DMM. Save/Load Multimeter Settings: Clicking this icon will let you save or load settings to/from the multimeter. Setup Multimeter: Clicking this icon will allow you to choose the measurement function, range and rate to use for the data logging. Setup/Run Logging Worksheet: Clicking this icon will allow you to setup the data logging and graphing functions for the software. Play/Pause/Stop: These control keys will allow you to start, pause and stop data logging. About: The about icon will display the software version. SETUP SETUP Connection GDM-8341/GDM-8342 Before using the Excel Add-In you must set the baud rate for the GDM-8342/8341 in the USB menu. This configuration will be used when using the software to connect to the DMM remotely. Note: This Add-In cannot be used with the GPIB option. 1. Connection 1. Connect the rear panel USB B port on the DMM to a USB port on the PC using a Type A to Type B USB cable. 2. Configure the DMM 2. Press MENU. CA L U SI B R E AT O N IO LYN 3. Go to I/O on level 1. 4. Go to USB on level 2. 5. Set the baud rate to an applicable rate. 6. Press Enter to confirm the baud rate settings. 7. Press EXIT to exit from the USB menu. 5 GDM-8300 Series Excel Add-In Manual GDM-8351-USB The GDM-8351 can connect to the software using either the USB CDC or the USB TMC interface. Functionally there is no difference in which interface is chosen to interface with the PC. 1. Connection 1. Connect the rear panel USB B port on the DMM to a USB port on the PC using a Type A to Type B USB cable. 2. Configure the DMM 2. Press MENU. CA L U SI B R E AT O N IO LYN 3. Go to I/O on level 1. 4. Go to USB on level 2. 5. Set the interface to either CDC or TMC. 6. Press Enter to confirm the settings. 7. Press EXIT to exit from the USB menu. Note Unlike the GDM-8342/8341, the baud rate does not need to be set when the CDC interface is used. GDM-8351-RS232 The RS232 connection is the easiest way to use the add-in software with the GDM-8351 as no drivers are required. 1. Connection 1. Connect the rear panel RS232 port on the DMM to a RS232 port on the PC using a RS232 crossover cable. 2. Configure the DMM 2. Press MENU. 3. Go to I/O on level 1. 4. Go to RS232 on level 2. 5. Set the baud rate. 6. Press Enter to confirm the settings. 7. Press EXIT to exit from the RS232 menu. 6 SETUP Installation Up to three items need to be installed, the USB driver (not needed if using the RS232 interface), the GDM-8300 Series Excel Addin Software and the NI VISA Run-Time. 1. Installing the USB driver 1. Connect the DMM to the PC using the supplied USB TypeA to TypeB cable (GTL-246). 2. The Windows Found New Hardware Wizard will detect the DMM as a new device and ask for the device driver. Choose to locate the driver manually. Direct the Wizard to the USB_DRIVER directory on the User Manual CD, or download the USB driver from the GW Instek Website. 3. Follow the instructions on the Hardware Wizard to finish the installation. 2. Installing the Excel Add-In 1. On the User Manual CD, go to the Excel Add-in subdirectory under the Software directory and execute the Setup.exe file. 2. If the Microsoft User Account Control Shield appears, allow the setup file to be executed. 3. Follow the InstallShield Wizard to install the GDM-8300 Excel Addin. 1. The NI VISA Run-Time must be installed to use the 3. Installing the NI VISA Run-Time Excel Add-in software. This is available on the NI website, http://www.ni.com/download/ni-visa-run-time-eng ine-5.4/4231/en/. 2. Please follow the instructions on the NI website for installation details. 7 GDM-8300 Series Excel Add-In Manual Uninstallation Follow the procedures described in this section when the Excel Add-In or one of the USB drivers needs to be updated or removed. Uninstalling the USB driver To update or remove the USB driver, it must be uninstalled from the Windows Device Manager. 1. Launch Device Manager from the Start menu. StartControl PanelDevice Manager (XP, Windows 7, Windows 8: 32 bit) 2. For VCP driver: Double-click Ports (COM & LPT). Right-click GDM83XX VCP PORT (COMXX) and choose the Uninstall option. For CDC driver: Double-click Ports (COM & LPT). Right-click GDM- Series CDC (COMXX) and choose the Uninstall option. For TMC driver: Double-click Test and Measurement Devices. Right-click Test and Measurement Device (IVI) and choose the Uninstall option. 8 SETUP 3. Select Delete the driver software for this device, then press the OK button. The driver will uninstall automatically. Uninstalling the Excel Add-In 1. From the Windows Start menu select the Start All Programs GWINSTEK DMM GDM-8300 Series directory and choose Uninstall GDM-8300. 2. Select Yes to uninstall the product. 3. The Uninstaller will automatically finish the uninstallation. 9 GDM-8300 Series Excel Add-In Manual Configuration 1. Configure the PC 1. To make sure the DMM is recognized by the PC, open the Device Manager (Start Control Panel (System) Device Manager. 2. For RS232/VCP/CDC connections, check which COM port the device is assigned to and make note of it. 3. For TMC connections, check to make sure the DMM is recognized in the Test and Measurement node. 2. Configure the Add-In 10 1. From the Windows Start menu select: Start All Programs GWINSTEK DMM GDM-8300 Series GDM-8300 Excel Addin SETUP 2. Opening GDM-8300 Series Excel Addin will automatically open an Excel Spreadsheet. If asked by Windows to enable Macros, choose Enable Macros. 3. For Excel 2007 and up: Go to the Add-Ins tab in the Ribbon UI. For older versions such as Excel 2003: Go to the Tools menu and select the Add-Ins option. 4. The Add-In will be shown in a custom tool bar. 5. Click on the Connect to Multimeter icon. 6. In the Connect window that appears, click Search to scan for the DMM. 7. After the DMM has been detected, click on your DMM in the Select Address window. A number of devices may be returned. If the model name and serial number of your device are not returned, click the Search key again. 8. Press Connect. 11 GDM-8300 Series Excel Add-In Manual 9. The Splash screen will close automatically after the connection is successful. 10. Move on to Measurement. Disconnect Press Disconnect to end the remote control session. Cancel and Exit Press Close to exit from the Connection window without connecting or disconnecting. 12 DATA LOGGING REMOTE CONTROL DATA LOGGING REMOTE CONTROL 1. Establish remote connection Follow the procedures for connection and configuration on page 5 and page 10. 2. Setup 1. Press the Setup Multimeter icon. 2. The Set Up Multimeter window appears. 3. Choose a measurement item. 4. Choose the measurement range. 5. Choose the measurement rate. 6. Press OK to confirm the settings and exit automatically. 7. Press Exit to cancel and exit with making a setting. 13 GDM-8300 Series Excel Add-In Manual 3. Save/Recall Load Settings 1. Press the Save/Load Multimeter Settings icon. 2. The Save/Load Multimeter Settings panel appears. 3. Choose to Load Multimeter Settings from File or Save Multimeter Settings to File. If saving a file, choose a directory and filename. Click Save to save the file. The file will be saved as XXXXX.DMM. After a few moments, if the save was successful a message “Saved OK!” will appear. Click OK. If loading a file, choose a previously saved setup and click Open. A message will appear if the setup has been loaded successfully. Click OK. The panel will close automatically after saving/loading settings. 14 DATA LOGGING REMOTE CONTROL 4. Setup Data Logging 1. Press the Record Setup Start icon. This icon will only be available after a measurement has been selected with the Setup Multimeter icon (page 13). 2. Choose the Logging tab. 3. Set the logging start time in Begin Logging Data panel. Immediately: Choose this option to begin logging measurements as soon as the “Play” icon is pressed. (see page 19 for details) At Time: This option allows you to choose the exact time that the logging will start. The start date, hour, minute and second can be chosen. On Receiving External Trigger: This option will only start logging after the TRIG key is pressed on the DMM front panel (GDM-8342/8341) or pin 5 on the Digital I/O port is triggered (GDM-8351). 15 GDM-8300 Series Excel Add-In Manual 4. To select the logging interval, configure the With Interval option. This option can set how often the DMM will trigger, down to the number hours, minutes and seconds between each measurement. 5. Use the Terminating Upon panel to set when to stop the data logging. Number of Readings: Configures the logger to stop after a set amount of measurements. Duration: Sets the logger to stop logging measurements after a set amount of time or number of readings. 16 DATA LOGGING REMOTE CONTROL 6. By default the measurements are not plotted. Press the Chart tab to edit the chart behavior. The Chart Type panel selects which type of graph, if any, to plot. No Chart: This option will disable plotting a graph. This is the default option. Graph: This will plot each point in a graph as soon as it is logged. Strip Chart: This option creates a graph that allows you to view detailed sections of the graph using Excel Format controls. Number of Data Points: This option allows you to specify the number of data points to graph. This number cannot exceed 1000. 17 GDM-8300 Series Excel Add-In Manual 7. Use the Place Charts In… panel to draw the chart in the same Excel sheet or to plot the graph in a new Excel sheet. Separate: Places charts in a new sheet each time logging is started. Same Sheet: Places charts in the same sheet as the logging data. 8. The Histogram option will open a new sheet and perform statistical analysis on the logged data in real-time so that a histogram can be created. The average, median, standard deviation as well as minimum and maximum values will also be calculated. This option will disable the graphing option mentioned above. The number of bins for the data (and thus the interval) is determined automatically by the software. This can be changed after data logging has stopped. 9. 18 Press the OK button to save the settings and exit. DATA LOGGING REMOTE CONTROL 5. Starting Data Logging 1. After the data logging setup has been completed, the Play, Pause and Stop icons will become available. The icons are colored orange when they are available. To start measurement, press the Play icon. Measurements will automatically start to be logged. If the Chart or Histogram options were selected, then they will also be plotted as the data is logged. Press the Pause icon to pause logging. Press the Play icon again to resume. Press the Stop Icon to stop data logging prematurely. Each time you use the data logging function, a new sheet will be created for the data and for the histogram data, if the Histogram option is enabled. Note that the other icons are now disabled until logging has finished or is stopped. Play Stop Pause 19 GDM-8300 Series Excel Add-In Manual Chart Example Excel Add-In icons Data statistics Logged data Chart Histogram Example Excel Add-In icons Data statistics Logged data Histogram 20 DATA LOGGING REMOTE CONTROL View Add-In Software Version 1. View software version 1. Click on the About Icon to view the software version number. About Icon 2. The About Multimeter splash screen will appear displaying the software version number. 21 GDM-8300 Series Excel Add-In Manual 22