1
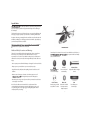
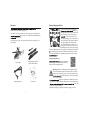
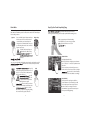
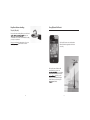
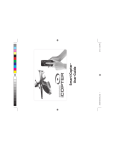
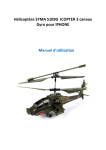
Smart iCopter
User Guide
TM
Special Notice
y the helicopter without completely reading the manual
may cause injury to yourself and people in the vicinity, as well as damage to
the helicopter.
The Smart iCopter is not a toy! If misused, it can cause serious bodily harm and
damage to property. Fly only in open areas indoors following all instructions.
Keep items that can get entangled in the rotor blades away from the main and
tail blades, including loose clothing, pencils and screwdrivers. Especially keep
your hands away from the rotor blades.
at hard surface for optimum sensor detection.
y on
Introduction
Additional Safety Precautions and Warnings
This model is controlled by a Bluetooth signal that is subject to interference
from many sources outside your control. This interference can cause
momentary loss of control so it is advisable to always keep a safe distance in
all directions around your model, as this margin will help to avoid collisions or
injury.
Smart iCopter™ is a Smart iOS Accessory for use with iPod touch®, iPhone® or
ying experience with user-friendly
controls and much more.
• Never operate your model with low battery or damaged / broken rotor blades.
• Always operate your model in an open area away from people.
• Keep all chemicals, small parts and anything electrical out of the reach of
children.
and
hover automatically.
E-Land
One touch to land
automatically.
Altitude Slider
Adjustable slider for height
control.
• Moisture causes damage to electronics . Avoid water exposure to all
cally designed and protected for this purpose.
• Never lick or place any portion of your model in your mouth as it could cause
serious injury or even death.
Note: These checklists are not intended to be a replacement for the
content included in this instruction manual . Although they can be used
as a quick start guide, we strongly suggest reading through this manual
completely before proceeding .
2
Accelerometer
Control using your iPod
touch, iPhone or iPad.
Bluetooth®
Bluetooth® enabled
helicopter with no
adapter required.
3
Trim
Re-calibrate your
Smart iCopter.
Battery Charging and Care
Overview
ying the
traditional RC Control Copter but gave up?
The Smart iCopter features unique Easy-Fly and gyroscope technology for the
ight experience ever. Authentic, detailed styling adds
ying like a Pro.
The following accessories come together in the box when you purchase your
Smart iCopter:
Please ensure that you have adequately
ying by using
the USB Cable included in your Smart iCopter
box. First, make sure the Smart iCopter is
. The ON/OFF switch is located
next to the Charging Socket on the bottom of
the Smart iCopter. Then, plug the USB Cable
into the Charging Socket. Plug the other
end of the USB Cable into your Mac, PC or a
5V charger to charge. If done properly, a red
light will appear on the front of your chopper.
This same light will turn blue once the chopper is fully charged and ready for
ight. At that point, disconnect the USB Cable from the chopper and from
your computer. PLEASE NOTE: Requires approximately 60 minutes charge
ight.
Long Lasting Satisfaction
2x Extra Main Rotor Blades
1x Extra Tail Rotor Blade
Smart iCopter
ight time consideration,
the Smart iCopter comes with a built-in Lithium
Polymer (LiPo) Rechargeable Battery.
Warning: Lithium Ion or Lithium Polymer Rechargeable Battery
Inside (No Lithium Metal). Risk of explosion if battery is replaced
with an incorrect type. Don’t open or puncture the batterry, short
re, high temperatures, or water. Keep battery
out of reach of children.
User Manual
USB Charging Cable
4
cantly more volatile than the Alkaline, Ni-Cd or NiMH batteries used in RC applications. All instructions and warnings must be
re, personal
injury, and/or property damage.
• By handling, charging or using the included Li-Po battery you assume
5
all risks associated with lithium batteries. If you do not agree with these
conditions, return your complete Smart iCopter model in new, unused
condition to the place of purchase immediately.
• You must charge the included Li-Po battery in a safe area away from
ammable materials.
• Never charge the battery unattended. When charging the battery you should
always remain in constant observation to monitor the charging process and
react to potential problems that may occur.
ight, the battery must be cooled to ambient temperature
before charging .
• DO NOT USE A Ni-Cd or Ni-MH CHARGER. Failure to charge the battery with
re resulting in personal injury and/or
property damage.
Bluetooth Pairing
Bluetooth Pairing
y your Smart
iCopter, please ensure that you pair via
Bluetooth.
Turn on your Smart iCopter. On your
Device, go to Settings > General
> Bluetooth > and switch it to the
“ON” position.
Once the Bluetooth locates the chopper
“Smart iCopter” will appear in the Devices
eld. If it shows as “Not Paired” simply
tap on the “Not Paired” to activate. If
done properly, it will read as “Connected”
Bluetooth Enabled RC Helicopter
own entirely via Bluetooth with No
Additional Adapter required. The Smart iCopter has a built-in Class II Bluetooth
ight
radius of 33 feet (10 meters).
Note: This model is controlled by a Bluetooth signal that is subject to
interference from many sources outside your control. This interference can
cause momentary loss of control so it is advisable to always keep a safe
distance in all directions around your model, as this margin will help to avoid
collisions or injury.
6
Please note that Bluetooth uses a lot of
your iPod touch, iPhone or iPad battery
Bluetooth
when you are not using it to conserve
battery power.
Pairing successful!
7
Smart iCopter App Download
Understanding the App Menu
rst
time, you will be prompted to download the free Smart iCopter App. Tap Yes
to connect to the iTunes Store and download the App.
Alternatively you can download the Smart iCopter App manually through
the App Store or entering the following URL on your internet browser http://
itunes.apple.com/my/app/smart-icopter/id463689548?mt=8
Visit the App Store
Download
8
Launch & Enjoy!
9
Smart iCopter App Quick Guide
Play Mode
Easy-Fly Mode - One Touch Experience
When we designed the Smart iCopter series, we
ying an enjoyable fun-tastic
experience for you.
With the Easy-Fly feature, the Smart iCopter series
rst in the world to introduce the One Touch
ying this class of RC Copter.
Accelerometer
Activates Motion Control Mode
where your device becomes
the controller. Icon will light
up when triggered.
Controls
Multi-directional
JoyPad.
Search Light
Turns on front
headlights.
Nav. Lights
Turns on the
blinking lights.
/ E-Land
/ land and
auto hover at 3.9 feet
(1.2 meters). Press again
Trim
to land.
Corrects drifts or erratic rotation.
Move the trim sliders in the
opposite direction of drift.
In the Advanced Manual Control
mode, you will be able to further
take control of your Smart iCopter,
while retaining key Easy-Fly features.
Settings
Goes to Settings page.
Bluetooth
Indicator lights up
when connection is
established.
Battery
Battery indicator.
Altitude
Adjustable slider.
Advanced Mode
Exit
Back to main page.
Ignition
Press and hold for 2
seconds until main
rotor rotates.
Height Indicator
Displays current
height.
Hover
Hovers Smart iCopter at
3.2 feet (1.0 meters).
(Applicable only in
Advanced Mode)
Advanced Manual Control
mode tries to emulate the
feel of having to control Pitch,
Throttle and Rudder steering of a
helicopter with both hands.
Advanced Mode - Horizontal view
10
11
Drive Mode
Easy-Fly; One-Touch Simplicity Flying
The Smart iCopter comes with the ability to be driven on the ground. Use the
Drive Mode to familiarize yourself on directional controls of the Smart iCopter
before taking to the air.
ying traditional RC helicopters know it is a
challenge and the learning curve is usually a painful and frustrating process.
Ignition
Press and hold “Ignition” button until rotor
blades start to turn. Use the directional
control to Drive your Smart iCopter on
the ground. Use Altitude slider to increase
power during drive mode. Press and hold
Engine Stop to stop.
Only drive the Smart iCopter on
at solid surface. Wheels may
oor or
Engine Stop
With our proprietary and Patent Pending
Easy-Fly features, you can now enjoy instant
ying experience with our One Touch
ying.
Altitude Slider
balanced.
...
In-Flight Adjustable slider
Once you are comfortable with the directional controls, with a single touch of
and Auto Hover” feature, launch your Smart
iCopter into the air.
. In Easy-Fly
Land
mode, the height is preset between 2.6 - 3.9
feet (0.8 - 1.2 meter). Press Land button to
land your Smart iCopter.
at solid
ight. Soft
or carpeted surface may interfere
with height sensor signal.
please note that your Smart
iCopter will tilt in unexpected direction due
ects or outside
interference, compensate by gently pulling
the controls in the opposite direction.
12
In Easy-Fly mode, the height is preset between
2.6 - 3.9 feet (0.8 - 1.2 meter) for optimum sensor
detection
Please note that your Smart iCopter uses on
board sound sensor to detect surface to height
ying over table or other furniture,
and it will auto correct its altitude accordingly.
Trim (Rudder)
Should your helicopter begin to drift in a
certain direction or spin erratically, you will
need to adjust your trim to regain control.
In order to trim your chopper, move the
Trim Dial in the opposite direction that your
helicopter is drifting/spinning.
13
Easy One-Gesture Landing
Easy-Fly Auto Call Assist
Mayday! Mayday!
Easy One-Gesture Landing allows you to land and
ipping your
controller Device faceside down without needing
you to press any button.
Please ensure that the Orientation Lock on your
for this feature to work.
The Easy-Fly feature comes with an Auto
Call Assist which is applicable for iPhone
users only.
The Easy-Fly Auto Call Assist will
activate when you receive an
ying your Smart
iCopter. The Smart iCopter will auto
so that you can
receive your call without having to
bother about your Smart iCopter
unattended.
14
15
Auxiliary Controls
Settings Menu
Search Light
Activates lights located on the front
of the Smart iCopter, to perform like
search lights.
Unit Measurement Settings
Choose between the Metric or
Imperial system to monitor your
Altitude.
Orientation
Toggle to switch main
controls for Left or Right
handed use.
Navigation Light
Turns on the blinking lights located on
both sides of the Smart iCopter.
Battery Indicator
Indicator shows the status of the battery
for your Smart iCopter.
16
Accelerometer
Toggle your
Accelerometer mode to
”
automatically.
ects
Toggle in-App
ects
ight.
Sensitivity
Controls the sensitivity
of the controller in
Accelerometer mode.
17
Safety Guidelines
Help Menu
The Smart iCopter is NOT a TOY and only suitable for INDOOR use.
WARNING: Suitable for Ages 14 and up. This product may contain small
parts which may pose as a choking hazard to children.
y your Smart iCopter,
and make sure you are always conscious of your own personal safety and the
safety of others. Be conscious of your surroundings and environment when
operating the Smart iCopter.
Safety Guidelines
Failure to follow these safety instructions could result
re, electric shock, or other injury or damage to
your Easy-Fly Smart iCopter or other property.
y under following conditions
In-App User
Manual
Please read
thoroughly
before
attempting to
y the Smart
iCopter.
Troubleshoot
A quick guide to solving your
problems.
About Us
• In an area that has wind drafts. The Smart iCopter is STRICTLY for indoor
ying only. Common household items such as Fan, Air Conditioner or
ying conditions.
• If model feels hot due to overheated rotor motor from prolonged
ying.
• If model has been in contact with rain, moisture, or contaminants.
• In cold climate conditions - plastics are very susceptible to damage due to
cold climates. Optimum operating temperature is between 20˚- 45˚C.
re or high heat - plastics and electronics
components are very susceptible to damage or deformation due to heat.
• In crowded areas of the home. Avoid operating your model in the street
where injury or damage can occur. Never operate the model out on the
street or in populated areas for any reason.
• Near roads, railways, or power lines.
uence of drugs or alcohol.
• If beginner or individual(s) planning to operate a borrowed helicopter
unfamiliar with model or safety instructions.
18
19
Safety Guidelines
Troubleshooting
General Issues
Inspect All Parts
ight, check for damaged parts and verify all parts are operating
y if blades are damaged.
normally with all functions in order.
ect the
ight of the helicopter.
• Verify battery on board helicopter and your iPod touch, iPhone or iPad to
cient level of charge.
• Verify there is no introduction or exposure to water or moisture in any form.
During operation of helicopter
• Always be aware of your surroundings. DO NOT ALLOW Children to operate
the Smart iCopter without Adult Supervision.
• Maintain safe distances from aircraft and rotating main/tail rotor blades.
Recommended safe distance is 10 feet (3 meter).
• Always be conscious of your actions.
• Wear appropriate clothing that does not interfere with your iPod touch,
iPhone or iPad or Smart iCopter.
• Never leave your model unattended. Carefully follow all
directions and warnings.
• Maintain eye contact with your Smart iCopter during all aspects of operation.
20
y
my Smart iCopter.
• Press and hold Ignition button for 2-3 seconds and a sound will indicate
there is Ignition.
y my Smart iCopter.
• Please ensure that the power button is turned on at your Smart iCopter.
button.
• Please ensure that the Bluetooth icon is lighted up to indicate that your iPod
touch, iPhone or iPad is paired with your Smart iCopter.
but seems erratic and is having
.
at and hard surface as the sensors
may have trouble detecting height and will cause your Smart iCopter to
perform erratically.
Unable to connect Bluetooth.
• Please ensure that only ONE of your iPod touch, iPhone or iPad is connected
to your Smart iCopter.
le on your iPod touch, iPhone or iPad Bluetooth
connection in Settings > General > Bluetooth > Tap blue arrow icon > tap
“Forget this Device” and re-pair.
The Smart iCopter seems to be drifting a lot or rotates without being
controlled.
• Please re-calibrate your Smart iCopter by using the Trim function on the App.
Dial the Trim button to the opposite side of the drift or rotation.
ying 2 or more Smart iCopter in the same airspace, please
pair one at a time.
21
Disclaimer and Copyright Notice
Troubleshooting
App Issues
My Smart iCopter App doesn’t seem to be launching after I download it
from the App Store.
• Delete the App completely from your iPod touch, iPhone or iPad and from
your iTunes and re-download the App.
My Smart iCopter seems to be out of control or the controls are not
responsive in the App.
your Smart iCopter and completely exit your App by double
clicking your Home Button > click and hold Smart iCopter App till it jiggles >
press the minus button > restart the App > turn on your Smart iCopter and
play again.
If you recently restored the software on your iPod touch, iPhone or iPad,
you will need to re-download your Smart iCopter App.
Battery Issues
The battery won’t charge
• Please ensure that you correctly connected the charger to your Smart iCopter.
• If you are charging from your keyboard, please ensure it has a
high-powered USB 2.0 port.
The battery loses charge fast.
• Please ensure that you give the battery a complete charge before use.
the power on your Smart iCopter
when not in use.
The Smart iCopter rotors are rotating erratically and the unit is
but unable to.
• Low in power, please recharge your Smart iCopter.
22
This equipment complies with Part 15 of FCC RF Rules. Operation is subject to
the following two conditions:
1) This device may not cause interference and 2) This device must
accept any interference, including interference that may cause
undesired operation of the device.
The d-Red, Smart iCopter™ and Easy-Fly™ word mark and logo are trademarks
of d-Red™ Technologies Ltd., registered in Hong Kong, China and U.S. Patent
ying.
Apple®, iPad®, iPhone®, iPod® and iPod touch® are trademarks of Apple Inc.,
registered in the U.S. and other countries.
The Bluetooth® word mark and logos are registered trademarks owned
by Bluetooth SIG, Inc., and any use of such marks by d-Red™ Technologies
Limited is under license.
©2012 EB Brands
23
FCC Part 15 Compliance
cations not expressly approved by the party responsible for compliance could void
the user’s authority to
operate the product.”
AND
2. “NOTE: This product has been tested and found to comply with the limits for a Class B digital device,
pursuant to Part 15 of the
FCC Rules. These limits are designed to provide reasonable protection against harmful interference in a
residential installation. This
product generates uses and can radiate radio frequency energy and, if not installed and used in accordance with the instructions,
may cause harmful interference to radio communications. However, there is no guarantee that interference will not occur in a
particular installation. If the product does cause harmful interference to radio or television reception,
which can be determined by
and on, the user is encouraged to try to correct the interference by one or
more of the following measures:
- Reorient or relocate the receiving antenna.
- Increase the separation between the product and receiver.
erent from that to which the receiver is connected.
- Consult the dealer or an experienced radio/TV technician for help.
Product replacement policy only covers normal wear and tear when the product is used as directed. Normal wear and tear does not include damage caused
by crashes, collisions, or any use other than directed.
Distributed by EB Brands
Hazleton, PA 18202
www.goexrc.com
[email protected]
Distributed in the United Kingdom by:
EB Brands UK, Worcester WR4 9FA
© 2012 EB Brands
er slightly from photograph.
XC9847IS01EXC