1
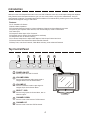
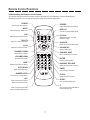
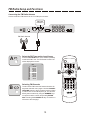
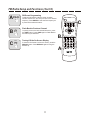
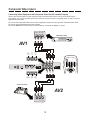
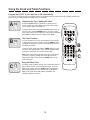
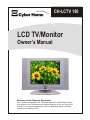
CH-LCTV 150 LCD TV/Monitor Owner’s Manual Welcome to the Flatpanel Revolution! Your CyberHome Flatpanel LCD TV/Monitor has a thin, small-footprint design that replaces bulky Televisions and Computer Monitors to give you more room to work or enjoy home entertainment. And Low-Radiation makes it a healthy alternative to traditional CRTs! Important Safety Precautions Keep away from water and magnets Keep the unit away from flower vases, tubs, sinks, etc. If liquids are spilled into the unit, serious damage could occur. Keep magnetic objects, such as speakers, distant from the player. CAUTION RISK OF ELECTRIC SHOCK DO NOT OPEN WARNING: TO REDUCE THE RISK OF FIRE, ELECTRIC SHOCK OR ANNOYING INTERFERENCE, DO NOT EXPOSE THIS APPLIANCE TO RAIN OR MOISTURE AND ONLY USE THE RECOMMENDED ACCESSORIES. Condensation If moisture forms inside this unit, it may not operate properly. In this case, turn off the power and wait about one hour for the moisture to evaporate. Moisture may form in the following cases: immediately after a heater has been turned on in a steamy or very humid room the unit is moved from a cold environment to a warm one CAUTION: TO REDUCE THE RISK OF ELECTRIC SHOCK, DO NOT REMOVE THE COVER (OR BACK). NO USER-SERVICEABLE PARTS INSIDE. REFER TO QUALIFIED SERVICE PERSONNEL FOR SERVICING. The lightning flash with arrowhead symbol, within an equilateral triangle, is intended to alert the user to the presence of not isolated dangerous voltage within the inside of the product that may be sufficient magnitude to constitute a risk of electric shock to persons. Power cord protection To avoid any malfunctions of the unit and to protect against electric Shock, fire or personal injury, please observe the following: The exclamation point within an equilateral triangle is intended to alert the user to the presence of important operating and servicing instructions in the literature accompanying the appliance. Hold the plug firmly when connecting or disconnecting the AC power cord to this unit. Do not connect or disconnect the AC power cord with wet hands. Keep the AC power cord away from heating appliances. Never put any heavy object on the AC power cord. Do not attempt to repair or reconstruct the AC power cord in any way. Remove dust, dirt, etc. on the plug at regular intervals. If the unit has been dropped or otherwise damaged, turn off the power and disconnect the AC power cord. If smoke, odors or noises are emitted from the unit, turn off the power and disconnect the AC power cord. When using this DVD player, basic precautions should always be followed, including the following: Read these instructions Keep these instructions Heed all warnings Follow all instructions Do not use this apparatus near water Clean only with dry cloth Do not block any ventilation opening, Install in accordance with the manufacture's instructions Do not install near any heat sources such as radiators, heat registers, stoves, or other apparatus (including amplifiers) that produce heat. Do not defect the safety purpose of the polarized plug. A polarized plug has two blades with one wider than other. The wide blade is provided for your safety. If the provided plug does not fit into your outlet, consult an electrician for replacement of the obsolete outlet. Protect the power cord from being walked on or pinched particularly at plugs, convenience receptacles, and the point where they exit from the apparatus. Only use attachments / accessories specified by the manufacturer. Use only with the cart, stand, tripod, bracket, or table specified by the manufacturer, or sold with the apparatus. When a cart is used, use caution when moving the cart / apparatus combination to avoid injury from tip-over. Unplug this apparatus during lightning storms or when unused for long periods of time. Refer all servicing to qualified service personnel. Servicing is required when the apparatus has been damaged in any way, such as power-supply cord or plug is damaged liquid has been spilled or objects have fallen into apparatus, the apparatus has been exposed to rain or moisture, does not operate normally, or has been dropped. No fingers or other objects inside Touching internal parts of this unit is dangerous and may cause serious damage to the unit. Do not attempt to disassemble the unit. Do not put any foreign object on the disc tray. Non-use periods When the unit is not used, turn the power off. When the unit is unused for a long period of time, the unit should be unplugged from the household AC outlet. Placement Avoid placing the unit in areas of: direct sunlight, heating radiators or closed automobiles high temperature [over 35° C (95° F)] or high humidity (over 90%) excessive dust vibration, impact or where the surface is tilted, as the internal parts may be seriously damaged Stacking Place the unit in a horizontal position and do not place anything heavy on it. Do not place the unit on amplifiers or other equipment, which may become hot SAVE THESE INSTRUCTIONS 2 Table of Contents General Information Safety Precautions . . . . . . . . . . . . . . . . . . . . . . . . . . . . . . . . . . . . . . . . . . . . . . . . . . . . . . . . . . . . . . . . 2 Table of Contents. . . . . . . . . . . . . . . . . . . . . . . . . . . . . . . . . . . . . . . . . . . . . . . . . . . . . . . . . . . . . . . . . . 3 Controls and Functions Introduction . . . . . . . . . . . . . . . . . . . . . . . . . . . . . . . . . . . . . . . . . . . . . . . . . . . . . . . . . . . . . . . . . . . . . . 4 Top Control Panel . . . . . . . . . . . . . . . . . . . . . . . . . . . . . . . . . . . . . . . . . . . . . . . . . . . . . . . . . . . . . . . . . 4 Bottom Connector Panel . . . . . . . . . . . . . . . . . . . . . . . . . . . . . . . . . . . . . . . . . . . . . . . . . . . . . . . . . . . . 5 Remote Control Preparing and Using the Remote Control . . . . . . . . . . . . . . . . . . . . . . . . . . . . . . . . . . . . . . . . . . . . . . . 6 Remote Control Functions. . . . . . . . . . . . . . . . . . . . . . . . . . . . . . . . . . . . . . . . . . . . . . . . . . . . . . . . . . . 7 Watching TV Television Setup and Functions. . . . . . . . . . . . . . . . . . . . . . . . . . . . . . . . . . . . . . . . . . . . . . . . . . . . . . . 8 FM Radio FM Radio Setup and Functions . . . . . . . . . . . . . . . . . . . . . . . . . . . . . . . . . . . . . . . . . . . . . . . . . . . . . . 10 Using External Video Equipment Composite Video Inputs. . . . . . . . . . . . . . . . . . . . . . . . . . . . . . . . . . . . . . . . . . . . . . . . . . . . . . . . . . . . 12 S-Video & Component Video Inputs . . . . . . . . . . . . . . . . . . . . . . . . . . . . . . . . . . . . . . . . . . . . . . . . . . 13 VGA Monitor Input . . . . . . . . . . . . . . . . . . . . . . . . . . . . . . . . . . . . . . . . . . . . . . . . . . . . . . . . . . . . . . . . 14 Advanced Functions Using the Clock and Timer Functions . . . . . . . . . . . . . . . . . . . . . . . . . . . . . . . . . . . . . . . . . . . . . . . . . 15 Changing Settings Using the On-Screen Setup Menu. . . . . . . . . . . . . . . . . . . . . . . . . . . . . . . . . . . . . . . . . . . . . . . . . . . . 16 On-Screen Menu Options . . . . . . . . . . . . . . . . . . . . . . . . . . . . . . . . . . . . . . . . . . . . . . . . . . . . . . . . . . 17 Using Parental Control. . . . . . . . . . . . . . . . . . . . . . . . . . . . . . . . . . . . . . . . . . . . . . . . . . . . . . . . . . . . . 18 Further Information Specifications. . . . . . . . . . . . . . . . . . . . . . . . . . . . . . . . . . . . . . . . . . . . . . . . . . . . . . . . . . . . . . . . . . . . 19 Index . . . . . . . . . . . . . . . . . . . . . . . . . . . . . . . . . . . . . . . . . . . . . . . . . . . . . . . . . . . . . . . . . . . . . . . . . . 20 *Specifications are subject to change without notice. *All trademarks, logos, brand names and company names are the property of their respective owners. 3 Introduction Welcome to the LCD Flatpanel Revolution! Your new LCD TV/Monitor has a thin, small-footprint design that replaces bulky Televisions and Computer Monitors to give you more room to work or enjoy home entertainment. And your new Flatpanel TV/Monitor is a healthier alternative to traditional TVs and Monitors, producing none of the potentially harmful electromagnetic energy of CRT tubes. Features: q q q q q q q q q q q 15” Viewable LCD Screen Built-In Stereo Speakers Full-function Remote Control for Volume Adjustment, Channel and Input Selection and more Inputs for (2) Composite Video Sources, such as DVD Players, VCRs or Camcorders S-Video Input Component Video Input via D1 Connector FM Radio with On-Screen Channel Selection and Setup Headphones Jack for Private Listening On-Screen Setup Menu to adjust Video Options, Select Input Channel and more Parental Control with Password to Block Selected Channels Sleep Timer, Auto-Scan Channels, Flash-Back and many more Advanced Features! Top Control Panel 1 3 2 4 5 6 POWER VOLUME - 1 SELECT + CHANNEL OSD POWER ON/OFF Press to power the LCD TV On/Off. 2 VOLUME DOWN 3 VOLUME UP 4 SELECT / OSD Press to Decrease the audio output signal or navigate Down in the On-Screen Menu. Press to Increase the audio output signal or navigate Up in the On-Screen Menu. Press to bring up the On-Screen Menu, then to select an option. 5 CHANNEL DOWN 6 CHANNEL UP Press to move to the Previous TV/FM channel. Press to move to the Next TV/FM channel. 4 Front View Bottom Connector Panel 1 2 4 3 5 6 7 9 10 11 8 12 13 14 15 Bottom View 1 HEADPHONES JACK 9 Stereo Output for Headphones or Earphone. Sound from built-in Speakers will be muted when this jack is used. 2 3 4 Connect to composite video output of DVD player, VCR or other video equipment. Use connections 10 and 11 for audio. DC POWER IN 10 AUDIO IN - LEFT (AV1) 9 Volts DC from Built-In AC Adapter. Left channel Audio In for use with Composite Video Input (AV1). S-VIDEO IN (AV3) Connect to S-Video output of DVD Player, VCR or other video equipment. Use connections 7 and 8 for audio. 11 AUDIO IN - RIGHT (AV1) Right channel Audio In for use with Composite Video Input (AV1). VHF/UHF ANTENNA / CABLE TV IN 12 COMPOSITE VIDEO IN (AV2) RF Input connects to Television Antenna, Cable or VCR. 5 FM ANTENNA IN 6 VGA IN Connect to composite video output of DVD player, VCR or other video equipment. Use connections 13 and 14 for audio. Input for FM Radio Antenna. 13 AUDIO IN - LEFT (AV2/AV4) Left channel Audio In for use with Video Inputs AV2 and AV4. Connect to PC’s Video Card. 7 AUDIO IN - LEFT (AV3/VGA) 14 AUDIO IN - RIGHT (AV2/AV4) Left channel Audio In for use with S-Video (AV3) and VGA Inputs. 8 COMPOSITE VIDEO IN (AV1) Right channel Audio In for use with Video Inputs AV2 and AV4. AUDIO IN - RIGHT (AV3/VGA) 15 COMPONENT VIDEO IN - (AV4) Right channel Audio In for use with S-Video (AV3) and VGA Inputs. Use a special Component Video to D1 Cable to connect video equipment with component video out, such as DVD Players. 5 Preparing and Using the Remote Control Installing the Batteries If the Remote Control only operates when you get closer to the LCD TV, it may mean the batteries are weak. Please replace the two batteries simultaneously with two new batteries (Size AAA, R03, 1.5V) of the same type. Please note the positive (+) and negative (-) polarity shown inside the battery compartment on the remote. 1. Push down and then outwards to remove the battery compartment cover. 2. Insert Batteries following polarity marked inside compartment. 3. Slide Cover back into place. R03 1.5V Important Note about Batteries q When changing batteries, it is not recommended to use a mix of old and new batteries or batteries of different brands simultaneously. q If the unit will not be used for an extended length of time, it’s wise to remove the batteries before storage. q The life of the batteries depends on the amount of usage. With typical use, a battery life of approximately 6 months can be expected. Operation of Remote Control When using the control, please aim at the device's remote control sensor, located inside the blue triangle on the front of the LCD TV. A 30 degree angle is recommended for best operation. Quick Tips Make sure no objects are between the remote and the LCD TV. Similar remote controls could interfere with the function of the unit. Make sure not to store the remote upside down or with any objects pressing on the buttons - this could drain the battery. 6 Remote Control Functions Understanding the Buttons on the Remote The Remote Control provides convenient access to the LCD TV’s Input Selections, Channel Switching and Advanced Functions, such as Auto-Scanning and using the On-Screen Setup Menu. POWER STEREO Press to power the unit On/Off. Toggles Stereo/Mono Audio Setting. MUTE Press to temporarily silence audio. DISPLAY POWER Turns the On-Screen Display On/Off. SAP Selects Secondary Audio Program. AUDIO MUTE DISPLAY STEREO SAP ON/OFF INPUT SELECT TV/CATV TV/CATV AV3/4/FM AV1/2 PC-VGA Selects TV or CATV video inputs. PC-VGA Selects the PC-VGA or PC-VGA w/FM Radio inputs. AV3/4/FM VOL. Selects AV3, AV4 or FM Radio inputs. AV1/2 ENTER CH CH VOLUME UP Selects AV1 or AV2 video inputs. VOL. Increases audio output. CHANNEL DOWN Previous FM / TV channel. VOLUME DOWN Decreases audio output. JUMP AUTO SCAN CHANNEL DEL ADD 1 2 3 TIMER 4 5 6 CLOCK 8 9 JUMP Flashback to last FM / TV channel. 7 OSD MENU AUTO SCAN SEL - 0 SLEEP CHANNEL NEXT Move to the Next FM / TV channel. ENTER Confirms channel selection. CHANNEL DEL/ADD Delete and Add channels to memory. + TIMER Begins channel Auto-Scan. Press to display Timer status. NUMBER KEYS CLOCK Use to select a TV or FM channel. Displays the Clock on-screen. SEL SLEEP Press to bring up the On-Screen Menu, then to select an option. Press to setup the Sleep Timer. + - Press to move Up in the OSD Menu or Increase FM fine tuning. Press to move Down in the OSD Menu or Decrease FM fine tuning. 7 Television Setup and Functions Connecting the Antenna or Cable TV Hookup (TV/CATV) Connect a 75-ohm coaxial TV cable or 300-ohm television antenna to the TV’s input connector. Antenna & Cable TV In Cable TV Connection VHF/UHF Antenna Wall Jack Select TV or CATV as the Input Source A B Press the TV/CATV button on the remote to toggle between TV or Cable TV as the current Input Source. TV/CATV POWER q TV - You are using an Antenna for Input q CATV - You are using a Cable TV Hookup A Auto Scan Channels AUTO SCAN AUDIO MUTE To automatically scan through and add available channels, press the AUTO SCAN button. The screen will display a preview of the channels added to memory. When the scan is finished, press ENTER to save the selected channels in memory. Note: When using the UHF/VHF Antenna (TV), 70 channels will be scanned, with those received being added. With Cable TV (CATV) selected, 125 channels will be scanned. DISPLAY STEREO SAP TV/CATV AV3/4/FM AV1/2 C DEL ADD Adding and Deleting Channels To Delete a channel, select the channel and press the DEL button. You will see the message “DELETE?” on the screen. Press the DEL button again to confirm the deletion of the channel. To Add a channel, select the channel and press ADD. You will be prompted with a confirmation message: “Add?”. Press ADD again to add the channel to memory. 8 PC-VGA VOL. ENTER CH CH VOL. JUMP B AUTO SCAN CHANNEL DEL ADD 1 2 3 TIMER 4 5 6 CLOCK 8 9 7 OSD MENU CHANNEL ON/OFF INPUT SELECT SEL - 0 SLEEP + C Television Setup and Functions (Cont’d) Manually Selecting a Channel A 10 4 0 0 7 0 2 0 5 8 0 You can use the NUMBER keys to manually select a channel to view. After the number appears on-screen, press ENTER to jump to the channel. 30 0 6 0 9 0 D C POWER AUDIO MUTE DISPLAY STEREO SAP ON/OFF INPUT SELECT TV/CATV AV3/4/FM AV1/2 PC-VGA VOL. ENTER CH CH VOL. B C JUMP Flash-Back to Previous Channel To quickly return to the last channel viewed, press the JUMP button. Press JUMP again to Flash-Back to the channel you started at. AUTO SCAN CHANNEL DEL ADD 1 2 3 TIMER 4 5 6 CLOCK 8 9 7 OSD MENU Muting the Audio MUTE B A JUMP SEL - 0 SLEEP + To temporarily silence the audio output, press the MUTE button. The Mute Icon will be displayed onscreen for about 3 seconds. Using SAP (Secondary Audio Program) D E SAP Selecting Stereo or Mono Audio STEREO DISPLAY F SAP is an additional audio channel that is transmitted with some television programs. In the USA, SAP is commonly used to offer a second language such as Spanish to viewers. Press the SAP button to switch to the Secondary Audio Program. ON/OFF You can select between Stereo and Mono Audio with the STEREO button. Use the Mono setting to produce sound from both speakers for channels or audio sources that do not support Stereo. Displaying Current Channel & Mute Status Press the DISPLAY button to show the currently selected channel and the status of the MUTE button. Press DISPLAY again to clear the screen. 9 E F FM Radio Setup and Functions Connecting the FM Radio Antenna Connect a 300-ohm FM antenna to the TV’s FM input connector. FM Radio Antenna In FM Radio Antenna Select the FM Tuner as the Input Source A Press the AV3/4/FM button on the remote repeatedly to select the FM Tuner. The FM Preset Location List will be displayed on-screen: AV3/4/FM POWER AUDIO FM 1 2 3 4 5 6 7 8 9 10 MUTE 5 B CH ON/OFF INPUT SELECT TV/CATV 97.70 105.70 104.90 98.10 101.30 102.40 107.10 94.30 106.40 95.70 AV3/4/FM AV1/2 PC-VGA VOL. B Note: Pressing the CHANNEL UP key on location 10 will move to the next page. 10 CH VOL. AUTO SCAN CHANNEL DEL ADD 1 2 3 TIMER 4 5 6 CLOCK 8 9 7 The On-Screen FM Preset List features locations for 20 preset channels over 2 pages. Use the CHANNEL UP/DOWN buttons to select a preset location to listen to, edit or store a new FM frequency at. You can also directly select locations by using the NUMBER keys to input the location number and pressing ENTER. ENTER CH JUMP Selecting FM Channels CH DISPLAY STEREO SAP OSD MENU SEL - 0 SLEEP + A FM Radio Setup and Functions (Cont’d) A - + FM Preset Programming To Add or Edit Preset Locations, select a location number and use the - and + keys to tune to the desired frequency. Press ENTER to save the FM frequency as a preset at the selected location. POWER AUDIO MUTE DISPLAY STEREO SAP ON/OFF INPUT SELECT TV/CATV B JUMP C 11 CH VOL. Turning Off the On-Screen Display To clear the FM Preset List from the screen, press the DISPLAY button. Press DISPLAY again to bring the list back up. ENTER CH B ON/OFF PC-VGA VOL. Flash-Back to Previous Channel To quickly return to the last channel listened to, press the JUMP button. Press JUMP again to Flash-Back to the channel you started at. DISPLAY AV3/4/FM AV1/2 JUMP AUTO SCAN CHANNEL DEL ADD 1 2 3 TIMER 4 5 6 CLOCK 8 9 7 OSD MENU A SEL - 0 SLEEP + C Composite Video Inputs Connecting Video Equipment with Composite Video Out (AV1 and AV2 Inputs) Use the AV1 and AV2 Inputs for video equipment with Composite Video output, such as VCRs, DVD Players, Camcorders, etc. The AV1 and AV2 Inputs each consist of one phono jack for Composite Video, as well as Left and Right Stereo Audio jacks. q Connect the Composite Video from the video equipment’s output to the AV1 Input with a standard video cable. q Connect the Left and Right Stereo Audio cables. q Use the AV1/2 button on the remote to select these input channels for display on screen. Composite Video Out Audio Output (Left) Audio Output (Right) DVD Player (AV1) Y W R POWER ON OFF CH-DVD 402 AV1 AV1 Composite Video In Audio Input (Left) Audio Input (Right) POWER Y W AUDIO R MUTE SAP TV/CATV AV1/2 DISPLAY STEREO ON/OFF INPUT SELECT AV3/4/FM PC-VGA VOL. CH Y W ENTER R VOL. AV2 Composite Video In Audio Input (Left) Audio Input (Right) Camcorder (AV2) AV2 Y W Composite Video Out R Audio Output (Left) Audio Output (Right) 12 CH S-Video & Component Video Inputs S-Video Input (AV3) If the video equipment you are using supports S-Video, use a special S-Video cable to connect to the AV3 Input of the TV for improved video quality. q Connect the S-Video output from the DVD Player, Camcorder, etc. to the AV3 Input with an S-Video cable. q Connect the Left and Right Stereo Audio cables to the L3/R3 audio inputs. q Use the AV3/4/FM button on the remote to select between the AV3, AV4 and FM inputs for display on screen. Audio Input (Left) AV3 AV3 Audio In Audio Input (Right) S-Video In POWER AUDIO MUTE DISPLAY STEREO SAP R ON/OFF INPUT SELECT TV/CATV AV3/4/FM AV1/2 PC-VGA W VOL. S-Video Output CH ENTER DVD Player (AV3) CH VOL. Audio Output (Left) W Audio Output (Right) R POWER ON OFF CH-DVD 402 Component Video Input (AV4) This connection requires a special Component Video to D1 Cable. Using this cable, video equipment that supports Component Video can be connected to the AV4 input of the LCD TV. q Using the special Component Video to D1 Cable, connect the YPbPr Component Video Outputs of the DVD Player, or other video equipment, to the AV4 D1 input connector. q Connect the Left and Right Stereo Audio cables to the L3/R3 audio inputs. q Use the AV3/4/FM button on the remote to select between the AV3, AV4 and FM inputs for display on screen. AV4 Component Video In W DVD Player (AV3) R AV4 POWER Audio In POWER Audio Input (Left) ON OFF CH-DVD 402 Audio Input (Right) AUDIO MUTE SAP DISPLAY STEREO ON/OFF INPUT SELECT TV/CATV Component Video Out Y Pb Pr AV1/2 Audio Output (Left) Y B Audio Output (Right) AV3/4/FM PC-VGA VOL. W CH R ENTER VOL. R 13 CH VGA Monitor Input VGA Monitor Input from PC (PC-VGA) Your LCD TV/Monitor can accept a VGA connection from a PC to function as a full-featured computer display, complete with built-in Stereo Speakers. Adjust your PC’s screen resolution to 1024x768 for the best picture. q Connect the monitor’s VGA input to the PC’s VGA video card output with a standard VGA cable. q Connect the Audio output from the PC’s Sound Card to the AV3 audio inputs. For PC’s without stereo phono jack outputs, this connection will require a special 1/8” to Stereo Phono Jack cable. q Use the PC-VGA button on the remote to select the VGA input. You can also listen to FM Radio while using the VGA function by pressing the PC-VGA button a second time to select VGA/FM. VGA Audio In Audio Input (Left) Audio Input (Right) VGA Video In POWER AUDIO W MUTE SAP R DISPLAY STEREO TV/CATV AV1/2 AV3/4/FM CH ENTER VOL. VGA Output ON OFF PC-VGA VOL. Computer System (PC-VGA) POWER ON/OFF INPUT SELECT Audio Output 14 CH Using the Clock and Timer Functions Program the LCD TV to Turn Itself On or Off Automatically Your LCD TV is designed with many flexible options for automatic Power-On and Power-Off, including specific time programming, as well as traditional “Sleep Timer” functionality. Displaying the Time / Setting the Clock A CLOCK Press the CLOCK button to display the current Time onscreen. *Select the clock’s display format as 12H or 24H in the On-Screen Setup (See Page 17). To set the clock, press and hold the CLOCK button for a full second. Then, use the NUMBER keys to enter the current time in 24H format. As an example, to set the time to 6:00AM, enter 06-00. To set the time for 6:00PM, enter 18-00. POWER AUDIO MUTE DISPLAY STEREO SAP ON/OFF INPUT SELECT TV/CATV AV3/4/FM AV1/2 PC-VGA VOL. The Timer Function B TIMER To set the Timer, press and hold the TIMER button for a full second on the desired mode. Then, use the NUMBER Keys to enter the desired On or Off time in 24H format. Note: Once a time value has been entered, it will be saved in memory. To quickly enable the timer at the previously entered time value, simply press the TIMER button at the Timer set screen. SLEEP C ENTER CH You can program the LCD TV to automatically turn itself On or Off by using the Timer function. Press the TIMER button repeatedly to display the current Timer Settings for On-Time and Off-Time modes. Using the Sleep Timer The Sleep Timer provides an easy way to make sure the unit will turn itself off after a specified period of time. To set the Sleep Timer, simply press the SLEEP button repeatedly to select a time period from 10 to 90 minutes. To disable the Sleep Timer, press the SLEEP button repeatedly until “Disabled” appears on-screen. 15 CH VOL. JUMP AUTO SCAN CHANNEL DEL ADD 1 2 3 TIMER 4 5 6 CLOCK 8 9 7 OSD MENU SEL - 0 SLEEP + B A C Using the On-Screen Setup Menu Adjusting Video Settings and Accessing Advanced Functions Your LCD TV features an On-Screen Setup Menu that allows you to adjust settings for Video and Language preferences, and gives you access to advanced features such as Parental Channel Blocking. When you change settings in the Setup Menu, they are stored even when power is turned off. If you wish to return to the factory defaults, they can be easily reset with the Memory Recall function. Accessing the On-Screen Setup Menu 1 To bring up the On-Screen Setup Menu, press the SEL key. Varying options will be accessible depending on which video source is selected. For access to all options, make sure TV/CATV is selected as the video input. SEL POWER AUDIO MUTE Video Menu DISPLAY STEREO SAP ON/OFF INPUT SELECT Contrast Brightness Hue Color Sharpness System Language Input Select Clock Mode Select Program Preview TV Parental Setting Memory Recall Exit TV/CATV 2 + PC-VGA VOL. ENTER CH CH VOL. JUMP Navigate Using the + and - Keys - AV3/4/FM AV1/2 Press the + and - keys to move up and down in the On-Screen Setup Menu and all sub menus. Press the SEL key to choose an option. In this example, we’ll press the - key 6 times and press SEL to select the Language Menu. 1 3 AUTO SCAN CHANNEL DEL ADD 1 2 3 TIMER 4 5 6 CLOCK 8 9 7 OSD MENU SEL - 0 SLEEP + Video Menu Contrast Brightness Hue Color Sharpness System Language Input Select Clock Mode Select Program Preview TV Parental Setting Memory Recall Exit Select an Option with the SEL Key 3 SEL To select an option and save the changes, press the SEL button. In this example, we choose Spanish for the On-Screen Setup Menu language and press SEL to confirm. Language English France German Italian Spanish Return 16 2 On-Screen Menu Options Changing the Appearance of the Display Clock Mode Select You can adjust the LCD properties with the On-Screen Setup Menu. Use the - and + keys to move the slider bar to the left and right. Press the SEL button to save changes. Use this option to change the format of the time shown on screen when the DISPLAY button is pressed. Clock Select 24-hour mode 12-hour mode Return Video Menu Contrast Brightness Hue Color Sharpness Program Preview You can view multiple channels on-screen with the Program Preview feature. Select 2 x 2 to view 4 simultaneous windows, or 3 x 3 to view 9 windows. Only one window will be active at a time. Contrast 0 100 Use the - and + keys to select a window to activate. Press ENTER to select a window for full-screen viewing. 75 Preview 2 x 2 Windows 3 x x Windows Return System Information The System option displays the System Type: NTSC or PAL, as well as the unit’s Firmware version, which may be needed for certain support requests. System System : NTSC Version : 20658-20673 24 36 45 60 Language Options You can adjust the Language of the On-Screen Setup Menu. The following choices are available: Memory Recall Selecting the Memory Recall function will reset the Video and Language options to factory defaults. Other options such as the Parental Settings, Input Select and Clock Mode will not be effected. Language English France German Italian Spanish Return 17 Using Parental Control You Can Block Programs Based on Their Rating with Parental Settings The Parental Settings menu lets you control what programs can be viewed on your TV. You can accept or block rating levels from TV-Y (All Children) to TV-MA (Mature Audience). To access the Parental Settings menu, or to watch a program that is blocked due to its rating, you must enter a password when prompted. The TV is programmed with (2) Default Passwords: q User Password: 1111 - This password can be changed using the Change Password option. q Master Password: 3256 - This password cannot be changed. If the User Password is forgotten, use the Master password to change it, thereby creating a new User Password. TV Parental Guideline Status TV-Y: All Children TV-Y7: Age 7 and above TV-G: General Audience TV-PG: Parental Guidance TV-14: Age 14 and above TV-MA: Mature Audience Change Password Return Unblocked Unblocked Unblocked Unblocked Unblocked Unblocked Unblocked Unblocked 18 Specifications LCD Panel Panel Type . . . . . . . . . . . . . . . . . . . . . . . . . . . . . . . . . . . . . . . . . . . . . . . . . . . NEC NL 10276AC30-04W Driver Element . . . . . . . . . . . . . . . . . . . . . . . . . . . . . . . . . . . . . . . . . . . . . . . . . . . a-Si TFT Active Matrix Display Colors . . . . . . . . . . . . . . . . . . . . . . . . . . . . . . . . . . . . . . . . . . . . . . . . . . . . . . . . . . . . . . . 262144 Number of Pixels . . . . . . . . . . . . . . . . . . . . . . . . . . . . . . . . . . . . . . . . . . . . . . . . . . . . . . . . . . . 1024x768 Pixel Pitch . . . . . . . . . . . . . . . . . . . . . . . . . . . . . . . . . . . . . . . . . . . . . . . . . . . 0.297 (H) x 0.297 (W) mm Response Time . . . . . . . . . . . . . . . . . . . . . . . . . . . . . . . . . . . . . . . . . . . . . . . . . . . . . . . . . . . . . . . 55mS Luminance of White . . . . . . . . . . . . . . . . . . . . . . . . . . . . . . . . . . . . . . . . . . . . . . . . . . 330 cd/m (Typical) Viewing Angle . . . . . . . . . . . . . . . . . . . . . . . . . . . . . . . . . . . . . . . . +/- 65 (Hor.) +45, -50 (Vert.) Degrees Audio Speakers . . . . . . . . . . . . . . . . . . . . . . . . . . . . . . . . . . . . . . . . . . . . . . . . . . . . . . . . . . . . . 5W/6Ohms x 2 Connectors VGA Input . . . . . . . . . . . . . . . . . . . . . . . . . . . . . . . . . . . . . . . . . . . . . . . . . . . . . . . . . . . . . . . . . . . . . . x1 S-Video . . . . . . . . . . . . . . . . . . . . . . . . . . . . . . . . . . . . . . . . . . . . . . . . . . . . . . . . . . . . . . . . . . . . . . . . x1 Composite Video . . . . . . . . . . . . . . . . . . . . . . . . . . . . . . . . . . . . . . . . . . . . . . . . . . . . . . . . . . . . . . . . . x2 Component to D1. . . . . . . . . . . . . . . . . . . . . . . . . . . . . . . . . . . . . . . . . . . . . . . . . . . . . . . . . . . . . . . . . x1 Coaxial TV Antenna . . . . . . . . . . . . . . . . . . . . . . . . . . . . . . . . . . . . . . . . . . . . . . . . . . . . . . . . . . . . . . . x1 Coaxial FM Antenna . . . . . . . . . . . . . . . . . . . . . . . . . . . . . . . . . . . . . . . . . . . . . . . . . . . . . . . . . . . . . . x1 Audio Input. . . . . . . . . . . . . . . . . . . . . . . . . . . . . . . . . . . . . . . . . . . . . . . . . . . . . . . . . . . . . . . . . . . . . . x6 Power Input . . . . . . . . . . . . . . . . . . . . . . . . . . . . . . . . . . . . . . . . . . . . . . . . . . . . . . . . . . . . . . . . . . . . . x1 Headphones Jack . . . . . . . . . . . . . . . . . . . . . . . . . . . . . . . . . . . . . . . . . . . . . . . . . . . . . . . . . . . . . . . . x1 Power DC Input . . . . . . . . . . . . . . . . . . . . . . . . . . . . . . . . . . . . . . . . . . . . . . . . . . . . . . . . . . . . . . . . . . +12V, 3A Power Consumption . . . . . . . . . . . . . . . . . . . . . . . . . . . . . . . . . . . . . . . . . . . . . . . . . . . . . . . . . . . . . 36W Physical Dimensions (W x D x H). . . . . . . . . . . . . . . . . . . . . . . . . . . . . . . . . . . . . . . . 495mm x 180mm x 355mm Weight. . . . . . . . . . . . . . . . . . . . . . . . . . . . . . . . . . . . . . . . . . . . . . . . . . . . . . . . . . . . . . . . . . . . . . . 5.5kg Accessories User’s Manual . . . . . . . . . . . . . . . . . . . . . . . . . . . . . . . . . . . . . . . . . . . . . . . . . . . . . . . . . . . . . . . . . . . x1 Remote Control . . . . . . . . . . . . . . . . . . . . . . . . . . . . . . . . . . . . . . . . . . . . . . . . . . . . . . . . . . . . . . . . . . x1 Batteries R03 1.5V (AAA) . . . . . . . . . . . . . . . . . . . . . . . . . . . . . . . . . . . . . . . . . . . . . . . . . . . . . . . . . . x2 Power Adapter . . . . . . . . . . . . . . . . . . . . . . . . . . . . . . . . . . . . . . . . . . . . . . . . . . . . . DC 12V/3A 36W x1 Power Cord . . . . . . . . . . . . . . . . . . . . . . . . . . . . . . . . . . . . . . . . . . . . . . . . . . . . . . . . . . . . . . . . . . . . . x1 FM Antenna . . . . . . . . . . . . . . . . . . . . . . . . . . . . . . . . . . . . . . . . . . . . . . . . . . . . . . . . . . . . . . . . . . . . . x1 19 Index antenna ................................................................8,10 arrow buttons ............................................................7 audio buttons.............................................................7 audio outputs......................................................12-14 auto scan...................................................................8 batteries ...............................................................6,19 brightness................................................................17 cable tv......................................................................8 clock ........................................................................17 coaxial inputs........................................................8,10 color ........................................................................17 component video input ............................................13 composite video input .............................................12 connectors .................................................8,10,12-14 contrast ...................................................................17 safety precautions ......................................................2 sap .............................................................................9 setup menu .........................................................16-19 sharpness.................................................................17 sleep.........................................................................15 specifications............................................................19 s-video input.............................................................13 table of contents.........................................................3 timer .........................................................................15 top controls.................................................................4 tv ................................................................................8 vga input...................................................................14 video inputs.........................................................12-14 video settings ...........................................................17 display button .........................................................7,9 enter button ...............................................................7 fm radio ...................................................................10 hue ..........................................................................17 index........................................................................20 jump button ...............................................................9 language settings ....................................................17 mute button ............................................................7,9 next channel button................................................4,7 number buttons ......................................................7,9 parental control........................................................18 password.................................................................18 power button ..........................................................4,7 preview....................................................................17 previous channel button .........................................4,7 remote control preparing ................................................................6 buttons ...................................................................7 20