1
®
MAX+PLUS®
II
GETTING
STARTED
81_GSBOOK.fm5 Page i Tuesday, October 14, 1997 4:04 PM
MAX+PLUS II
Programmable Logic Development System
Getting Started
®
Altera Corporation
101 Innovation Drive
San Jose, CA 95134
(408) 544-7000
81_GSBOOK.fm5 Page ii Tuesday, October 14, 1997 4:04 PM
MAX+PLUS II Getting Started
Version 8.1
September 1997
P25-04803-03
Altera, MAX, MAX+PLUS, FLEX, and FLEX Ability are registered trademarks of Altera Corporation. The following are
trademarks of Altera Corporation: Classic, MAX 5000, MAX 5000A, FLEX 6000, MAX 7000, MAX 7000E, MAX 7000S, FLEX 8000,
FLEX 8000A, MAX 9000, MAX 9000A, FLEX 10K, FLEX 10KA, MAX+PLUS II, PLDshell Plus, FastTrack, AHDL, MPLD, Turbo
Bit, BitBlaster, ByteBlaster, MegaCore, OpenCore, PLS-ES, EP610, EP610I, EP600I, EP910, EP910I, EP900I, EP1810, EP1800I,
EPM5032, EPM5064, EPM5128, EPM5128A, EPM5130, EPM5192, EPF6016, EPM7032, EPM7032V, EPM7064, EPM7064S,
EPM7096, EPM7128E, EPM7128S, EPM7160E, EPM7192E, EPM7192S, EPM7256E, EPM7256S, EPC1, EPC1064, EPC1064V,
EPC1213, EPC1441, EPF8282A, EPF8282AV, EPF8452A, EPF8636A, EPF8820A, EPF81188A, EPF81500A, EPM9320, EPM9320A,
EPM9400, EPM9480, EPM9560, EPM9560A, EPF10K10, EPF10K20, EPF10K30, EPF10K40, EPF10K50, EPF10K50V, EPF10K70,
EPF10K100, EPF10K100A, EPF10K130V, EPF10K250A. Product design elements and mnemonics are Altera Corporation
copyright. Altera Corporation acknowledges the trademarks of other organizations for their respective products or services
mentioned in this document, specifically: UNIX is a trademark of AT&T Bell Laboratories. Verilog is a registered trademark of
Cadence Design Systems, Incorporated. Data I/O is a registered trademark of Data I/O Corporation. FLEXlm is a registered
trademark of Globetrotter Software, Inc. HP is a registered trademark of Hewlett-Packard Company. IBM is a registered
trademark and IBM PC and IBM RISC System/6000 are trademarks of International Business Machines Corporation. Intel is a
registered trademark, and Pentium is a trademark of Intel Corporation. Mentor Graphics is a registered trademark of Mentor
Graphics Corporation. Microsoft, MS-DOS, and Windows are registered trademarks and Windows NT and Windows 95 are
trademarks of Microsoft Corporation. Adobe and Acrobat are registered trademarks of Adobe Systems Incorporated. OrCAD is
a trademark of OrCAD Systems Corporation. SPARCstation is a trademark of SPARC International, Inc. and is licensed
exclusively to Sun Microsystems, Inc. Sun Workstation and Solaris are registered trademarks, and Sun, SunOS, and
OpenWindows are trademarks of Sun Microsystems, Incorporated. Synopsys is a registered trademark of Synopsys, Inc.
Viewlogic Powerview is a registered trademark of Viewlogic Systems, Incorporated. Xilinx is a registered trademark of Xilinx,
Inc. Altera acknowledges the trademarks of other organizations for their respective products or services mentioned in this
document.
Altera reserves the right to make changes, without notice, in the devices or the device specifications identified in this document.
Altera advises its customers to obtain the latest version of device specifications to verify, before placing orders, that the
information being relied upon by the customer is current. Altera warrants performance of its semiconductor products to current
specifications in accordance with AlteraÕs standard warranty. Testing and other quality control techniques are used to the extent
Altera deems such testing necessary to support this warranty. Unless mandated by government requirements, specific testing of
all parameters of each device is not necessarily performed. In the absence of written agreement to the contrary, Altera assumes
no liability for Altera applications assistance, customerÕs product design, or infringement of patents or copyrights of third parties
by or arising from use of semiconductor devices described herein. Nor does Altera warrant or represent any patent right,
copyright, or other intellectual property right of Altera covering or relating to any combination, machine, or process in which such
semiconductor devices might be or are used.
AlteraÕs products are not authorized for use as critical components in life support devices or systems without the express written
approval of the president of Altera Corporation. As used herein:
1. Life support devices or systems are devices or systems that (a) are intended for surgical implant into the body or (b) support or
sustain life, and whose failure to perform, when properly used in accordance with instructions for use provided in the labeling,
can be reasonably expected to result in a significant injury to the user.
2. A critical component is any component of a life support device or system whose failure to perform can be reasonably expected
to cause the failure of the life support device or system, or to affect its safety or effectiveness.
Products mentioned in this document are covered by one or more of the following U.S. patents: 5,650,734; 5,642,262; 5,642,082;
5,633,830; 5,631,576; 5,621,312; 5,614,840; 5,612,642; 5,608,337; 5,606,276; 5,606,266; 5,604,453; 5,598,109; 5,598,108; 5,592,106;
5,592,102; 5,590,305; 5,583,749; 5,581,501; 5,574,893; 5,572,717; 5,572,148; 5,572,067; 5,570,040; 5,567,177; 5,565,793; 5,563,592;
5,561,757; 5,557,217; 5,555,214; 5,550,842; 5,550,782; 5,548,552; 5,548,228; 5,543,732; 5,543,730; 5,541,530; 5,537,295; 5,537,057;
5,525,917; 5,525,827; 5,523,706; 5,523,247; 5,517,186; 5,498,975; 5,495,182; 5,493,526; 5,493,519; 5,490,266; 5,488,586; 5,487,143;
5,486,775; 5,485,103; 5,485,102; 5,483,178; 5,481,486; 5,477,474; 5,473,266; 5,463,328; 5,444,394; 5,438,295; 5,436,575; 5,436,574;
5,434,514; 5,432,467; 5,414,312; 5,399,922; 5,384,499; 5,376,844; 5,375,086; 5,371,422; 5,369,314; 5,359,243; 5,359,242; 5,353,248;
5,352,940; 5,350,954; 5,349,255; 5,341,308; 5,341,048; 5,341,044; 5,329,487; 5,317,212; 5,317,210; 5,315,172; 5,309,046; 5,301,416;
5,294,975; 5,285,153; 5,280,203; 5,274,581; 5,272,368; 5,268,598; 5,266,037; 5,260,611; 5,260,610; 5,258,668; 5,247,478; 5,247,477;
5,243,233; 5,241,224; 5,237,219; 5,220,533; 5,220,214; 5,200,920; 5,187,392; 5,166,604; 5,162,680; 5,144,167; 5,138,576; 5,128,565;
5,121,006; 5,111,423; 5,097,208; 5,091,661; 5,066,873; 5,045,772; 4,969,121; 4,930,107; 4,930,098; 4,930,097; 4,912,342; 4,903,223;
4,899,070; 4,899,067; 4,871,930; 4,864,161; 4,831,573; 4,785,423; 4,774,421; 4,713,792; 4,677,318; 4,617,479; 4,609,986; 4,020,469 and
certain foreign patents.
U.S. and European patents pending
Copyright © 1997 Altera Corporation. All rights reserved.
Printed on Recycled Paper
81_GSBOOK.fm5 Page iii Tuesday, October 14, 1997 4:04 PM
Contents
Preface
MAX+PLUS II Documentation.......................................................................xxiv
MAX+PLUS II Documents ......................................................................xxiv
MAX+PLUS II Help...................................................................................xxv
How to Use MAX+PLUS II Documentation ..........................................xxv
Documentation Conventions ........................................................................ xxvii
Terminology ............................................................................................ xxvii
Typographic Conventions .................................................................... xxviii
Key Combinations ..................................................................................... xxx
Backus-Naur Form..................................................................................... xxx
MAX+PLUS II Help Updates..........................................................................xxxi
Sample Files......................................................................................................xxxii
About MAX+PLUS II Getting Started ........................................................ xxxiii
Section 1
MAX+PLUS II Installation
The read.me File .................................................................................................... 3
Registering MAX+PLUS II Software .................................................................. 4
Installing MAX+PLUS II on a PC........................................................................ 6
System Requirements for PCs ...................................................................... 6
Installing MAX+PLUS II Software .............................................................. 7
Determining Free Disk Space ................................................................ 7
Installing the Software............................................................................ 7
Altera Corporation
iii
81_GSBOOK.fm5 Page iv Tuesday, October 14, 1997 4:04 PM
MAX+PLUS II Getting Started
Additional Windows NT Installation Steps .............................................10
Installing Windows NT Drivers ..........................................................10
Disabling Floating-Point Emulation ...................................................13
Using MAX+PLUS II with NTFS ........................................................13
Additional NEC 9801 Installation Steps ...................................................13
Installing MAX+PLUS II on a UNIX Workstation ..........................................14
System Requirements for UNIX Workstations ........................................14
Hardware Requirements for UNIX Workstations............................14
Software Requirements for UNIX Workstations ..............................15
Installing the Software & Third-Party Interfaces.....................................15
Mounting the CD-ROM........................................................................16
Running the Installation Program ......................................................17
Starting the Installation Program.................................................17
Installing the Network Licensing File .........................................21
Installing the Third-Party Interface Files ....................................24
Unmounting the CD-ROM...................................................................25
Configuring the File Server & User Environment...................................25
Configuring a SPARCstation Running SunOS 4.1.3+ ......................26
Configuring the File Server...........................................................26
Configuring the User Workstation ..............................................26
Configuring a SPARCstation Running Solaris 2.5+ .........................27
Configuring the File Server...........................................................27
Configuring the User Workstation ..............................................28
Configuring an HP 9000 Series 700/800 Workstation .....................29
Configuring the File Server...........................................................29
Configuring the User Workstation ..............................................30
Configuring an IBM RISC System/6000 Workstation .....................31
Configuring the File Server...........................................................31
Configuring the User Workstation ..............................................31
Configuring Network Licensing........................................................................33
Configuring the License Server..................................................................33
Troubleshooting License Installation ........................................................34
License Administration Options File ........................................................38
License Administration FLEXlm Utilities.................................................40
lmgrd .......................................................................................................40
lmstat.......................................................................................................41
lmdown...................................................................................................42
lmremove ...............................................................................................43
lmreread .................................................................................................44
lmver .......................................................................................................45
lmhostid .................................................................................................45
Installing the PC Software Guard......................................................................46
Specifying the Authorization Code or License File ........................................48
Specifying the Authorization Code for a Software Guard
Installation....................................................................................................48
iv
Altera Corporation
81_GSBOOK.fm5 Page v Tuesday, October 14, 1997 4:04 PM
Contents
Specifying the License File for a License File Installation...................... 49
MAX+PLUS II Site License Information................................................... 49
Specifying Authorization Codes for MegaCore & AMPP Licenses ..... 49
Installing the Adobe Acrobat Reader ............................................................... 51
Installing the Programming Hardware ............................................................ 53
Installing PC-Based Programming Hardware......................................... 53
Installing the LP6 Logic Programmer Card ............................................. 54
Changing the LP6 Card Address Location........................................ 56
Installing the Master Programming Unit ................................................. 57
Installing the FLEX Download Cable on a PC......................................... 60
Installing the BitBlaster on a PC or UNIX Workstation ......................... 61
Configuring an IBM RISC System/6000 Workstation
Serial Port for Programming ............................................................... 64
Installing the ByteBlaster on a PC ............................................................. 65
Creating & Using a Local Copy of the maxplus2.ini File.............................. 67
MAX+PLUS II File Organization ...................................................................... 69
Section 2
MAX+PLUS II—A Perspective
MAX+PLUS II Logic Design .............................................................................. 74
The Design Flow .................................................................................................. 78
Starting MAX+PLUS II ....................................................................................... 79
The MAX+PLUS II Manager.............................................................................. 81
MAX+PLUS II Applications............................................................................... 83
Design Files, Ancillary Files & Projects ............................................................ 86
Design Files................................................................................................... 86
Ancillary Files............................................................................................... 86
Projects........................................................................................................... 87
MAX+PLUS II Help............................................................................................. 88
The Help Menu............................................................................................. 88
The Help Window Button Bar ................................................................... 92
Where to Start in Help................................................................................. 93
How to Request Help on a Specific Topic ................................................ 94
Design Entry......................................................................................................... 95
Global MAX+PLUS II Design Entry Features.......................................... 97
Device, Resource & Probe Assignments ............................................ 98
Back-Annotation.................................................................................... 99
Global Project Device Options .......................................................... 100
Global Project Parameters.................................................................. 100
Global Project Timing Requirements ............................................... 100
Global Project Logic Synthesis .......................................................... 100
Common Editor Functions ....................................................................... 101
Symbol & Include File Generation.................................................... 101
Node Location ..................................................................................... 101
Hierarchy Traversal ............................................................................ 102
Altera Corporation
v
81_GSBOOK.fm5 Page vi Tuesday, October 14, 1997 4:04 PM
MAX+PLUS II Getting Started
Context-Sensitive Menu Commands................................................102
Timing Analysis...................................................................................102
Find & Replace Text ............................................................................102
Undo, Cut, Copy, Paste & Delete......................................................102
Print .......................................................................................................102
MAX+PLUS II Graphic Editor .................................................................103
MAX+PLUS II Symbol Editor ..................................................................106
MAX+PLUS II Text Editor ........................................................................108
MAX+PLUS II Waveform Editor .............................................................111
MAX+PLUS II Floorplan Editor...............................................................114
Altera Hardware Description Language ................................................117
VHDL...........................................................................................................119
Verilog HDL................................................................................................121
Primitives, Megafunctions, & Macrofunctions ......................................123
Primitives..............................................................................................123
Megafunctions .....................................................................................123
Old-Style Macrofunctions ..................................................................124
Project Hierarchy ...............................................................................................125
Project Processing ..............................................................................................127
MAX+PLUS II Compiler ...........................................................................128
Compiler Input Files ...........................................................................129
Compilation Process ...........................................................................130
Running the Compilation...................................................................131
Compiler Modules & Output Files ...................................................132
Compiler Netlist Extractor (Including Built-In EDIF Netlist
Reader, VHDL Netlist Reader, Verilog Netlist Reader
& XNF Netlist Reader).................................................................132
Database Builder ..........................................................................133
Logic Synthesizer .........................................................................134
Partitioner......................................................................................134
Fitter ...............................................................................................135
Functional SNF Extractor ............................................................136
Timing SNF Extractor ..................................................................136
Linked SNF Extractor ..................................................................136
EDIF Netlist Writer ......................................................................137
Verilog Netlist Writer ..................................................................137
VHDL Netlist Writer....................................................................137
Assembler ......................................................................................137
Design Doctor Utility...................................................................138
Error Detection & Location ..............................................................................139
Project Verification ............................................................................................141
MAX+PLUS II Simulator ..........................................................................142
Functional Simulation.........................................................................143
Timing Simulation...............................................................................143
Linked Multi-Project Simulation.......................................................144
vi
Altera Corporation
81_GSBOOK.fm5 Page vii Tuesday, October 14, 1997 4:04 PM
Contents
Simulator Highlights .......................................................................... 144
MAX+PLUS II Waveform Editor............................................................. 146
MAX+PLUS II Timing Analyzer.............................................................. 148
Device Programming ........................................................................................ 150
MAX+PLUS II Programmer ..................................................................... 152
Section 3
MAX+PLUS II Tutorial
Introduction........................................................................................................ 156
Project Description..................................................................................... 157
Design Entry & Project Processing ................................................... 157
Project Verification & Device Programming................................... 159
Tutorial Overview...................................................................................... 160
Tutorial Files ........................................................................................ 160
Command Shortcuts ........................................................................... 160
Getting Help ............................................................................................... 162
Context-Sensitive Help....................................................................... 162
Search Index......................................................................................... 163
Session 1: Start a MAX+PLUS II Session ........................................................ 165
Session 2: Create a Graphic Design File ......................................................... 168
1. Create a New File................................................................................... 168
2. Specify the Project Name ...................................................................... 170
3. Select a Palette Tool ............................................................................... 171
4. Enter Logic Function Symbols ............................................................. 172
5. Set & Show Guidelines.......................................................................... 174
6. Move a Symbol....................................................................................... 176
7. Enter Input & Output Pins ................................................................... 176
8. Name the Pins......................................................................................... 177
9. Connect the Symbols ............................................................................. 179
10. Connect Nodes & Buses by Name..................................................... 182
11. Save the File & Check for Basic Errors.............................................. 183
12. Create a Default Symbol ..................................................................... 184
13. Close the File......................................................................................... 184
Session 3: Create Two Text Design Files ........................................................ 185
1. Create a New File & Specify the Project Name ................................. 186
2. Turn on Syntax Coloring ...................................................................... 186
3. Enter the Design Name, Inputs & Outputs........................................ 187
4. Declare a Register................................................................................... 189
5. Enter Boolean Equations....................................................................... 190
6. Enter an If Then Statement ................................................................... 192
7. Check for Syntax Errors & Create a Default Symbol........................ 193
8. Copy auto_max.tdf & Create a Default Symbol................................ 193
Session 4: Create a Waveform Design File..................................................... 196
1. Create a New File & Specify the Project Name ................................. 197
2. Create Input, Output & Buried Nodes ............................................... 198
Altera Corporation
vii
81_GSBOOK.fm5 Page viii Tuesday, October 14, 1997 4:04 PM
MAX+PLUS II Getting Started
3. Set the Grid Size & Show the Grid.......................................................201
4. Edit the Buried State Machine Node Waveform ...............................201
5. Edit the Input & Output Node Waveforms .......................................204
6. Confirm the Edits ...................................................................................208
7. Check for Basic Errors & Create a Default Symbol ...........................209
Session 5: Create the Top-Level Graphic Design File...................................210
Session 6: Compile the Project .........................................................................216
1. Open the Compiler Window ................................................................217
2. Select a Device Family ...........................................................................217
3. Turn on the Smart Recompile Command...........................................218
4. Turn on the Design Doctor Utility.......................................................219
5. Turn on the Security Bit ........................................................................220
6. Select a Global Project Logic Synthesis Style .....................................220
7. Turn on the Timing SNF Extractor ......................................................222
8. Specify Report File Sections to Generate ............................................222
9. Run the Compiler ...................................................................................223
10. Locate the Source of a Message..........................................................226
11. Get Help on a Message........................................................................227
12. View the Report File ............................................................................228
Session 7: View the Project in the Hierarchy Display...................................229
1. Open the Hierarchy Display Window ................................................229
2. Bring chiptrip.gdf to the Front ............................................................230
3. Close any Open File(s)...........................................................................230
Session 8: View the Fit in the Floorplan Editor .............................................231
1. Open the Floorplan Editor Window....................................................232
2. Back-Annotate the Project & Edit Assignments ................................234
3. Recompile the Project ............................................................................236
4. Display Routing Information in the Floorplan Editor Window......237
5. Display Equation & Routing Information with the Report File
Equation Viewer.........................................................................................240
Simulation Overview ........................................................................................242
What is Simulation? ...................................................................................242
How Does the Chiptrip Simulation Work? ............................................243
You & Your Vehicle.............................................................................243
The Roads .............................................................................................244
Simulation Goals ........................................................................................244
Session 9: Create a Simulator Channel File....................................................245
1. Create a Simulator Channel File ..........................................................246
2. Add Additional Node(s) or Group(s) to the SCF ..............................250
3. Rearrange the Order of the Nodes & Groups ....................................251
4. Edit the Input Node Waveforms..........................................................252
5. Save & Close the File .............................................................................254
Session 10: Simulate the Project .......................................................................255
1. Open the Simulator Window ...............................................................256
2. Specify Additional Output Files ..........................................................257
viii
Altera Corporation
81_GSBOOK.fm5 Page ix Tuesday, October 14, 1997 4:04 PM
Contents
3. Turn On Setup & Hold Time Monitoring........................................... 258
4. Run the Simulation ................................................................................ 258
5. Create a Table File.................................................................................. 260
Session 11: Analyze Simulation Outputs ....................................................... 261
1. View the Simulator Channel File......................................................... 261
2. View the History, Log & Table Files ................................................... 263
3. Re-Edit Your SCF if Necessary............................................................. 264
4. Create, Simulate & Analyze finish.scf................................................. 265
Session 12: Analyze Timing ............................................................................. 266
1. Open the Timing Analyzer Window .................................................. 267
2. Run the Timing Analyzer ..................................................................... 268
3. List a Propagation Delay Message ...................................................... 270
4. Locate the Delay Path in the Floorplan Editor .................................. 271
5. Locate the Delay Path in the ProjectÕs Design Files .......................... 272
6. Run a Timing Analysis in Another Mode .......................................... 272
Session 13: Program an Altera Device ............................................................ 273
1. Open the Programmer Window .......................................................... 273
2. Create an Output Programmer Log File............................................. 274
3. Program the Device ............................................................................... 275
Are We There Yet?............................................................................................. 276
Appendix A
MAX+PLUS II Command-Line Mode .......................................... 277
Appendix B
Altera Support Services ............................................................. 281
Appendix C
Additional Workstation Configuration Information
Customizing MAX+PLUS II Colors................................................................ 286
Using the mwcolormanager Utility ............................................................... 288
Environment Variables .................................................................................... 288
MAX2_HOME ................................................................................................. 289
MAX2_PLATFORM ....................................................................................... 289
MWCOM1, MWCOM2, MWCOM3 & MWCOM4 .................................................... 289
MWFONT_CACHE_DIR ................................................................................ 290
MWLOOK ........................................................................................................ 290
MWRGB_DB ................................................................................................... 291
MWSCREEN_HEIGHT & MWSCREEN_WIDTH ............................................ 291
MWSYSTEM_FONT ....................................................................................... 291
MWUNIX_SHARED_MEMORY ...................................................................... 291
MWWM ............................................................................................................. 292
Fonts .................................................................................................................... 292
Adding New Fonts .................................................................................... 292
Font Aliases................................................................................................. 294
Printers ............................................................................................................... 294
Installing a New Printer............................................................................ 294
Altera Corporation
ix
81_GSBOOK.fm5 Page x Tuesday, October 14, 1997 4:04 PM
MAX+PLUS II Getting Started
Printer Fonts................................................................................................295
Glossary ................................................................................................................297
Index .....................................................................................................................343
x
Altera Corporation
Contents
Illustrations
Figure
1-1
1-2
1-3
1-4
1-5
1-6
1-7
1-8
1-9
1-10
1-11
1-12
1-13
2-1
2-2
2-3
2-4
2-5
2-6
2-7
2-8
2-9
Altera Corporation
Page
Sample License File............................................................................... 21
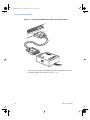
Attaching the Software Guard to a PC............................................... 47
MAX+PLUS II Authorization Code Dialog Box ............................... 48
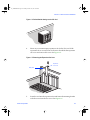
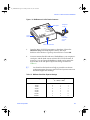
Default Switch Settings on the LP6 Card........................................... 55
Removing the Expansion Slot Cover.................................................. 55
Locking the Board in Place .................................................................. 56
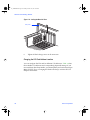
Master Programming Unit................................................................... 58
Installing the Adapter........................................................................... 59
Releasing the Adapter .......................................................................... 60
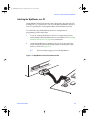
Connecting the FLEX Download Cable ............................................. 61
Connecting the BitBlaster to the Serial Port on the Computer ....... 62
BitBlaster and 10-Pin Female Connector............................................ 63
ByteBlaster Parallel Port Download Cable ........................................ 65
MAX+PLUS II Design Environment .................................................. 75
MAX+PLUS II Applications ................................................................ 76
MAX+PLUS II Manager Window....................................................... 79
MAX+PLUS II Menu in the MAX+PLUS II Manager Window ..... 81
Display of Multiple MAX+PLUS II Applications & Help............... 85
MAX+PLUS II Help Menu................................................................... 89
MAX+PLUS II Design Entry Methods ............................................... 96
MAX+PLUS II Assign Menu ............................................................... 97
MAX+PLUS II Graphic Editor........................................................... 103
xi
MAX+PLUS II Getting Started
2-10
2-11
2-12
2-13
2-14
2-15
2-16
2-17
2-18
2-19
2-20
2-21
2-22
2-23
2-24
2-25
2-26
3-1
3-2
3-3
3-4
3-5
3-6
xii
MAX+PLUS II Symbol Editor............................................................106
MAX+PLUS II Text Editor .................................................................108
MAX+PLUS II Waveform Editor ......................................................111
MAX+PLUS II Floorplan Editor........................................................114
AHDL Text Design File ......................................................................117
VHDL Design File ...............................................................................119
Verilog Design File..............................................................................121
MAX+PLUS II Hierarchy Display.....................................................125
Project Processing................................................................................127
MAX+PLUS II Compiler ....................................................................128
MAX+PLUS II Message Processor....................................................139
MAX+PLUS II Project Verification ...................................................141
MAX+PLUS II Simulator....................................................................142
MAX+PLUS II Waveform Editor ......................................................146
MAX+PLUS II Timing Analyzer .......................................................148
MAX+PLUS II Device Programming ...............................................151
MAX+PLUS II Programmer...............................................................152
Block Diagram of chiptrip..................................................................158
Map to Altera .......................................................................................159
auto_max.tdf ........................................................................................194
chiptrip.gdf ..........................................................................................210
Map to Altera .......................................................................................243
chiptrip.scf Driving Route.................................................................245
Altera Corporation
Contents
Tables
Table
1-1
1-2
1-3
1-4
1-5
1-6
1-7
2-1
2-2
2-3
2-4
B-1
C-1
Altera Corporation
Page
UNIX Workstation Software Requirements...................................... 15
Commands for Mounting the CD-ROM............................................ 16
MAX+PLUS II Programming Hardware Configurations ............... 53
LP6 Card I/O Addresses ..................................................................... 57
BitBlaster Baud Rate Dipswitch Settings ........................................... 63
MAX+PLUS II System Directory Structure....................................... 69
MAX+PLUS II Working Directory Structure.................................... 70
MAX+PLUS II Applications ................................................................ 83
MAX+PLUS II Help Menu Items........................................................ 89
MAX+PLUS II Help Window Buttons............................................... 92
Altera Programming Hardware ....................................................... 150
Altera Support Services...................................................................... 282
Serial Ports ........................................................................................... 290
xiii
MAX+PLUS II Getting Started
xiv
Altera Corporation
Preface
MAX+PLUS II
Fundamentals
This section describes the MAX+PLUS II manual and on-line help
documentation and conventions. You should be familiar with this
information before using MAX+PLUS II documentation.
■
■
■
■
■
Altera Corporation
MAX+PLUS II Documentation ..............................................................xvi
Documentation Conventions .................................................................xix
MAX+PLUS II Help Updates.............................................................. xxiii
Sample Files ............................................................................................xxiv
About MAX+PLUS II Getting Started ................................................xxv
xv
MAX+PLUS II Getting Started
MAX+PLUS II Documentation
MAX+PLUS¨ II documentation is designed for the novice as well as for the
experienced user. It includes manuals and extensive, illustrated Help.
MAX+PLUS II Documents
MAX+PLUS II systems include the following documents:
xvi
MAX+PLUS II
Getting Started
Contains step-by-step instructions on how to
install MAX+PLUS II hardware, software, and
licenses on PCs and UNIX workstations. It also
provides an overview of the entire MAX+PLUS II
system, and a tutorial that takes you from design
entry to device programming. In addition, it
contains information about MAX+PLUS II
command-line operation and AlteraÕs support
services. Free electronic copies of this manual are
also available from AlteraÕs world-wide web site at
http://www.altera.com.
MAX+PLUS II
AHDL
Contains complete information on the Altera
Hardware Description Language (AHDLª),
including a detailed How to Use AHDL section with
many examples.
MAX+PLUS II
VHDL
Provides information on how to use the Very High
Speed Integrated Circuit (VHSIC) Hardware
Description Language (VHDL) with
MAX+PLUS II, including a How to Use
MAX+PLUS II VHDL section with many examples.
MAX+PLUS II
Verilog HDL
Provides information on how to use the Verilog
Hardware Description Language (HDL) with
MAX+PLUS II, including a How to Use
MAX+PLUS II Verilog HDL section with many
examples.
MAX+PLUS II
Help Poster
Provides handy and colorful descriptions of how
to use on-line help in MAX+PLUS II.
Altera Corporation
Preface: MAX+PLUS II Fundamentals
MAX+PLUS II also includes the following Software Interface Guides, which
are available in the \lit directory of the MAX+PLUS II CD-ROM as Adobe
Portable Document Format (PDF) files. These guides provide detailed stepby-step examples and important guidelines:
■
■
■
■
Cadence & MAX+PLUS II Software Interface Guide
Mentor Graphics & MAX+PLUS II Software Interface Guide
Synopsys & MAX+PLUS II Software Interface Guide
Viewlogic Powerview & MAX+PLUS II Software Interface Guide
These Software Interface Guides are also available from AlteraÕs world-wide
web site at http://www.altera.com.
1
The MAX+PLUS II CD-ROM also includes the Adobe Acrobat
Reader 3.0, which you can install on your hard drive in order to
read the PDF files. Go to ÒInstalling the Adobe Acrobat ReaderÓ
on page 51 for more information.
MAX+PLUS II Help
Your primary source of information on MAX+PLUS II is the complete online help. All of the information necessary to enter, compile, and verify a
design and to program an Altera device is available in MAX+PLUS II Help.
Help also provides introductions to all MAX+PLUS II applications,
guidelines for designing circuits with MAX+PLUS II, pin and logic cell
numbers for each Altera device package, and summaries of other Altera
documents, such as application notes, that can assist you with logic design.
How to Use MAX+PLUS II Documentation
How you use MAX+PLUS II documentation depends on your level of
expertise and your approach to learning how to use a new tool.
If you are a novice user, you should take time to read the MAX+PLUS II
Getting Started manual and complete the MAX+PLUS II Tutorial on page
155. Once you begin using MAX+PLUS II applications, you will find that the
easy-to-use, extensive on-line help can quickly turn you into an expert
MAX+PLUS II user. For basic information on using on-line help, refer to the
MAX+PLUS II Help Poster. More detailed information on using Help is
available in MAX+PLUS II Ñ A Perspective on page 73.
Altera Corporation
xvii
MAX+PLUS II Getting Started
If you are an experienced circuit designer or one who prefers to learn by
experimenting, you will find the on-line help invaluable. Context-sensitive
and menu-driven help give instant access to all MAX+PLUS II information.
Regardless of your level of expertise, you must follow the installation
instructions provided in MAX+PLUS II Installation on page 1. Before you
install the MAX+PLUS II hardware and software, you should also read the
read.me file, located in the top-level directory of the MAX+PLUS II
CD-ROM. Once you have installed MAX+PLUS II, you can open the
read.me file through the Help menu in MAX+PLUS II.
If you are using EDA tools from Cadence, Mentor Graphics, Synopsys, or
Viewlogic (Powerview), you should read the Software Interface Guide
provided in the \lit directory of the MAX+PLUS II CD-ROM.
Altera Applications Engineers are also available to answer your questions.
For more information about AlteraÕs technical support services, see
Appendix A: Altera Support Services on page 281.
xviii
Altera Corporation
Preface: MAX+PLUS II Fundamentals
Documentation Conventions
MAX+PLUS II manuals and MAX+PLUS II Help use the following
conventions to make it easy for you to find and interpret information.
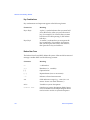
Terminology
The following terminology is used throughout MAX+PLUS II Help and
manuals:
Term:
Meaning:
Button 1
Left mouse button.
Button 2
Right button on a two-button mouse, or middle
and right buttons on a three-button mouse.
Òpoint toÓ
Indicates that you should move the mouse so that
the pointer is over the specified item.
ÒpressÓ
Indicates that you must hold down a mouse
button or key.
ÒclickÓ
Indicates a quick press and release of a mouse
button.
Òdouble-clickÓ
Indicates two clicks in rapid succession.
ÒchooseÓ
Indicates that you need to use a mouse or key
combination to start an action. For example, when
you use the mouse to choose a button, you point
to the button and click Button 1. When you use the
keyboard to choose a command, you press Alt
and then type letters that are underlined in the
menu bar and menu.
ÒselectÓ
Indicates that you need to highlight text and/or
objects or an option in a dialog box with a key
combination or the mouse. A selection does not
start an action. For example: Select the AND2
primitive, then choose Delete from the Edit menu.
Òturn onÓ/Òturn offÓ
Indicates that you must click Button 1 on a
checkbox or choose a menu command to turn a
function on or off.
Altera Corporation
xix
MAX+PLUS II Getting Started
Typographic Conventions
MAX+PLUS II documentation uses the following typographic conventions:
xx
Visual Cue:
Meaning:
Bold Initial Capitals
Command names, dialog box titles, and button
names are shown in bold, with initial capital
letters. For example: Find Text command, Save
As dialog box, and Start button.
bold
Directory names, project names, disk drive
names, filenames, filename extensions, and
software utility names are shown in bold.
Examples: \maxplus2 directory, d: drive,
chiptrip.gdf file. These items are not casesensitive in the Windows environment;
however, they are case-sensitive in the UNIX
workstation environment. MAX+PLUS II Help
shows these items in the case appropriate to the
workstation environment.
Initial Capitals
Keyboard keys, user-editable application
window fields, and menu names are shown with
initial capital letters. For example: Delete key,
the Start Time field, the Options menu.
ÒSubheading TitleÓ
Subheadings within a manual section are
enclosed in quotation marks. In manuals, titles of
help topics are also shown in quotation marks.
Italic Initial Capitals
Help categories, section titles in manuals,
application note and brief names, checkbox
options, and options in dialog boxes are shown
in italics with initial capital letters. For example:
Text Editor Procedures, the Check Outputs option,
the Directories box in the Open dialog box.
italics
Variables are enclosed in angle brackets (< >)
and shown in italics. For example: <filename>,
<project name>.acf file.
Bold Italics
Manual titles are shown in bold italics with
initial capital letters. For example:
MAX+PLUS II Getting Started.
Altera Corporation
Preface: MAX+PLUS II Fundamentals
Visual Cue:
Meaning:
Courier font
Anything that must be typed exactly as it
appears is shown in Courier. For example:
c:\max2work\tutorial\chiptrip.gdf.
Also, sections of an actual file, such as a Report
File, references to parts of files (e.g., the AHDL
keyword SUBDESIGN), and logic function names
(e.g., DFF and 16cudslr) are shown in Courier.
Bold Courier font In syntax descriptions, bold Courier may be used
to help distinguish literal text from variables.
1., 2., 3.,É, a., b., c.,É,
and i., ii., iii.,É
Numbered steps are used in a list of items when
the sequence of the items is important, such as
the steps listed in a procedure.
■
Bullets are used in a list of items when the
sequence of the items is not important.
v
The checkmark indicates a procedure that
consists of one step only.
1
The hand points to information that requires
special attention.
f
In MAX+PLUS II manuals, the feet show you
where to go for more information on a particular
topic.
In MAX+PLUS II Help, the upward-pointing
hand indicates that you can click Button 1 (the
left mouse button) on any portion of the
illustration that follows it to get help on that
item. The mouse pointer changes to an upwardpointing hand when it is over a picture or word
for which help is available.
Special symbols
Special symbols are used for these items:
9
6
7
Altera Corporation
Enter key
Low-to-high transition
High-to-low transition
xxi
MAX+PLUS II Getting Started
Key Combinations
Key combinations and sequences appear in the following format:
Format Cue:
Meaning:
Key1+Key2
A plus (+) symbol indicates that you must hold
down the first key when you press the second
key. For example: Ctrl+L means that you must
hold down Ctrl while pressing L, then release
both keys.
A comma (,) indicates that you must press the
keys sequentially. For example: Alt,F1 means
that you must press the Alt key and release it,
then press the F1 key and release it.
Key1,Key2
Backus-Naur Form
The Backus-Naur Form (BNF) defines the syntax of the text file formats and
message variables. BNF uses the following notation:
xxii
Characters:
Meaning:
::=
Òis defined asÓ
<...>
Identifiers (i.e., variables)
[...]
Optional items
{ ... }
Repeated items (zero or more times)
...|...
Indicates a choice between items
:n:n
Suffix indicates a range (e.g., <name char>:1:8
means Òfrom 1 to 8 name charactersÓ)
italics
Variables in syntax descriptions
Courier font
Literal text in syntax descriptions. Bold Courier
font is sometimes used to help distinguish literal
text from italic variables in syntax descriptions.
Altera Corporation
Preface: MAX+PLUS II Fundamentals
MAX+PLUS II Help Updates
MAX+PLUS II Help is updated whenever the MAX+PLUS II software is
updated; therefore, the on-line information is always current.
1
If you find a discrepancy between a MAX+PLUS II manual and
the MAX+PLUS II on-line Help, you should rely on the
MAX+PLUS II Help information.
You can get information on changes to MAX+PLUS II software and Help by
choosing New Features in this Release (Help Menu) in MAX+PLUS II. Latebreaking news on Help and software is also available with the READ.ME
command (Help menu).
1
Altera Corporation
Between MAX+PLUS II software releases, check the Altera worldwide web page for additional news and information, including
help from the Atlas solutions database. Go to
http://www.altera.com.
xxiii
MAX+PLUS II Getting Started
Sample Files
A variety of sample design files are copied to your hard disk when you
install MAX+PLUS II. The installation procedure automatically creates
subdirectories for these files.
1
f
The pathnames below are shown using the PC pathname
convention of backslash (\) characters, but UNIX pathnames use
forward slash (/) characters. On a UNIX workstation, the
/max2work directory is a subdirectory of the /usr directory.
Otherwise, the file and directory organization is identical.
■
The \max2work\chiptrip directory contains all files for the chiptrip
tutorial project that is described in MAX+PLUS II Getting Started.
■
The \max2work\ahdl directory contains all sample files used to
illustrate AHDL features in MAX+PLUS II Help and in the
MAX+PLUS II AHDL manual.
■
The \max2work\vhdl directory contains all sample files used to
illustrate VHDL features in MAX+PLUS II Help and in the
MAX+PLUS II VHDL manual.
■
The \max2work\verilog directory contains all sample files used to
illustrate Verilog HDL features in MAX+PLUS II Help and in the
MAX+PLUS II Verilog HDL manual.
■
The \max2work\edif directory contains all sample files used to
illustrate EDIF features in MAX+PLUS II Help.
Go to ÒMAX+PLUS II File OrganizationÓ on page 69 for more information
about MAX+PLUS II directory structure.
Go to the Altera-provided Software Interface Guide for your third-party
environment for information on the directory structure and sample files
installed for third-party interfaces to MAX+PLUS II.
xxiv
Altera Corporation
Preface: MAX+PLUS II Fundamentals
About MAX+PLUS II Getting Started
MAX+PLUS II Getting Started contains the following sections:
Section 1: MAX+PLUS II Installation gives hardware, software, and license
installation instructions for PCs and UNIX workstations.
Section 2: MAX+PLUS IIÑA Perspective is an introduction to MAX+PLUS II
software. It describes the on-line help and all MAX+PLUS II applications.
Section 3: MAX+PLUS II Tutorial takes you step-by-step through all facets of
designing logic with MAX+PLUS II. It demonstrates three design entry
methods and shows how to compile and simulate a project, analyze timing
performance, and program an Altera device.
Appendix A: MAX+PLUS II Command-Line Mode describes how to operate the
MAX+PLUS II Compiler, Timing Analyzer, and Simulator in batch mode
from the command prompt under UNIX, Microsoft Windows NT, and
Microsoft Windows 95.
Appendix B: Altera Support Services explains how to contact AlteraÕs user
support services.
Appendix C: Additional UNIX Workstation Configuration Information describes
how to change additional UNIX workstation configuration items that
control the appearance of MAX+PLUS II windows, serial port configuration,
screen height and width, and printer and screen fonts.
Glossary
Index
Altera Corporation
xxv
MAX+PLUS II Getting Started
xxvi
Altera Corporation
81_GSBOOK.fm5 Page 1 Tuesday, October 14, 1997 4:04 PM
Section
1
MAX+PLUS II
Installation
This section describes how to install MAX+PLUS II software and
programming hardware on PCs and UNIX workstations.
Installing MAX+PLUS II on PCs
If you are installing MAX+PLUS II on one or more PCs, read the instructions
in the following sections:
■
■
■
■
■
■
■
■
■
Altera Corporation
The read.me File.......................................................................................... 3
Registering MAX+PLUS II Software........................................................ 4
Installing MAX+PLUS II on a PC ............................................................. 6
Installing the PC Software Guard........................................................... 46
Specifying the Authorization Code or License File ............................. 48
Installing the Adobe Acrobat Reader .................................................... 51
Installing the Programming Hardware ................................................. 53
Creating & Using a Local Copy of the maxplus2.ini File ................... 67
MAX+PLUS II File Organization............................................................ 69
1
81_GSBOOK.fm5 Page 2 Tuesday, October 14, 1997 4:04 PM
MAX+PLUS II Getting Started
Installing MAX+PLUS II on UNIX Workstations
If you are installing MAX+PLUS II on one or more UNIX workstations, read
the instructions in the following sections:
■
■
■
■
■
■
■
■
■
1
The read.me File..........................................................................................3
Registering MAX+PLUS II Software........................................................5
Installing MAX+PLUS II on a UNIX Workstation ...............................14
Configuring Network Licensing.............................................................33
Specifying the Authorization Code or License File .............................48
Installing the Adobe Acrobat Reader.....................................................51
Installing the BitBlaster on a PC or UNIX Workstation ......................61
Creating & Using a Local Copy of the maxplus2.ini File ...................67
MAX+PLUS II File Organization............................................................69
If you have any unanswered questions about MAX+PLUS II
installation after reading this section or the read.me file, contact
the Altera Applications Department:
Altera Corporation
Applications Department
101 Innovation Drive
San Jose, CA 95134
Telephone: (800) 800-EPLD (6:00 a.m. to 6:00 p.m. Pacific Time)
or (408) 544-7000 (7:30 a.m. to 5:30 p.m. Pacific Time)
Fax:
(408) 544-6401
f
2
Go to Appendix B: Altera Support Services on page 281 for more information
about contacting Altera for technical support, literature, and non-technical
customer service.
Altera Corporation
81_GSBOOK.fm5 Page 3 Tuesday, October 14, 1997 4:04 PM
Section 1: MAX+PLUS II Installation
The read.me File
The MAX+PLUS II read.me file provides up-to-date information on
installation and operating requirements, including disk space and memory.
You should read the read.me file before installing the software or hardware.
The read.me file is available in the top-level directory of the MAX+PLUS II
CD-ROM. After installation, you can open the read.me file from the
MAX+PLUS II Help menu.
Altera Corporation
3
81_GSBOOK.fm5 Page 4 Tuesday, October 14, 1997 4:04 PM
MAX+PLUS II Getting Started
Registering MAX+PLUS II Software
Registering your MAX+PLUS II software is necessary in order to receive
future update information. In addition, for some MAX+PLUS II
development systems, you must register your software in order to receive an
authorization code that allows you to use the software.
You can register your MAX+PLUS II software in one of four ways,
depending on the features included in your system and the hardware
platform:
■
Visit the Altera world-wide web site at http://www.altera.com.
■
Register the first time you run the MAX+PLUS II software: a Fax
Registration Form appears automatically to allow you to register. You
can also access this form at any later time by choosing the Register
button in the Authorization Code dialog box (Options menu) in
MAX+PLUS II.
■
Fill out the registration card attached to the ÒSTOP, PLEASE READ
THIS FIRSTÓ card that is included with your MAX+PLUS II system.
■
Fill out the ÒWorkstation Registration and License File Request FormÓ
included with your software to both register your software and obtain
the license file required to install and run MAX+PLUS II for UNIX
workstations.
This form asks you for the ID of the license server. The license server
is the computer that will run the two Altera license daemons (lmgrd
and alterad).
To determine the ID of the license server, type one of the following
commands:
4
License Server Platform:
Command:
Sun SPARCstation running SunOS 4.1.3+
Sun SPARCstation running Solaris 2.5+
HP 9000 Series 700/800 workstation
running HP-UX 10.20+ (transpose the
resulting value into hexadecimal to
determine your license server ID)
# /usr/bin/hostid 9
# /usr/ucb/hostid 9
# /usr/bin/uname -i 9
Altera Corporation
81_GSBOOK.fm5 Page 5 Tuesday, October 14, 1997 4:04 PM
Section 1: MAX+PLUS II Installation
License Server Platform:
Command:
IBM RISC System/6000 workstation
running AIX 4.1+ (ignore the last two
digits of the ID that is displayed and use
the remaining 8 digits as the license
server ID)
# /usr/bin/uname -m 9
The FLEXlm licensing scheme allows either one or three license
servers on a network. A single PC or UNIX workstation can function
as the file server, license server, and user computer. The file server,
license server, and user computer can also be separate UNIX
workstations or PCs.
f
Go to ÒConfiguring Network LicensingÓ on page 33 for more information
about configuring the license server.
Go to Appendix B: Altera Support Services on page 281 for more information
about contacting Altera technical support services.
Altera Corporation
5
81_GSBOOK.fm5 Page 6 Tuesday, October 14, 1997 4:04 PM
MAX+PLUS II Getting Started
Installing MAX+PLUS II on a PC
The following instructions describe the requirements and procedures for
installing the MAX+PLUS II software on a PC or compatible computer
running Microsoft Windows 95 or Windows NT. This section covers the
following topics:
■
■
■
■
f
System requirements for PCs
Installing MAX+PLUS II software
Additional Windows NT Installation Steps
Additional NEC 9801 Installation Steps
Go to the UserÕs Guide for your version of Microsoft Windows for
information on optimizing your system to run MAX+PLUS II.
Go to the MAX+PLUS II read.me file for information on installing
MAX+PLUS II software on PCs running other versions of the Windows
operating system.
System Requirements for PCs
Your system must meet the following minimum requirements:
■
■
■
■
■
■
■
f
Pentium class or higher- (recommended) or 486-based PC
Microsoft Windows NT version 3.51 or 4.0 (recommended) or
Microsoft Windows 95
Microsoft Windows-compatible graphics card and monitor
CD-ROM drive
Microsoft Windows-compatible 2- or 3-button mouse
Full-length 8-bit slot for the programming card
Parallel port
Go to the read.me file for specific information about disk space and memory
requirements in the current version of MAX+PLUS II.
Go to the UserÕs Guide for your version of Microsoft Windows for more
information about fonts.
6
Altera Corporation
81_GSBOOK.fm5 Page 7 Tuesday, October 14, 1997 4:04 PM
Section 1: MAX+PLUS II Installation
Installing MAX+PLUS II Software
The following instructions guide you through the installation of
MAX+PLUS II on the PC. The following topics are covered:
■
■
■
■
Determining Free Disk Space.................................................................... 7
Installing MAX+PLUS II Software ........................................................... 7
Additional Windows NT Installation Steps.......................................... 10
Additional NEC 9801 Installation Steps ................................................ 13
Determining Free Disk Space
The Install program calculates whether you have enough free disk space for
installation. The actual space required depends on the allocation unit size on
your hard disk, which you can determine by typing chkdsk 9 at a DOS
prompt. Refer to the read.me file for precise information on the amount of
hard disk space required for installation.
Regardless of which drive you select for installing the MAX+PLUS II
software, the Install program requires at least 500 Kbytes of free hard disk
space on your c: drive.
Installing the Software
The following steps describe first-time installation with the Altera Install
program. Once you have completed the following installation procedure,
you can run MAX+PLUS II programs directly from your hard disk.
1
Do not install MAX+PLUS II by copying files directly from the
CD-ROM. The installation files are in compressed format and
must be decompressed by the Install program.
These installation instructions assume the following conditions:
■
■
Altera Corporation
Your hard disk drive is c:.
You have already installed Windows NT 3.51 or 4.0 or Windows 95 in
the \windows directory.
7
81_GSBOOK.fm5 Page 8 Tuesday, October 14, 1997 4:04 PM
MAX+PLUS II Getting Started
1
During installation, an internal error can occur if the portion
of the PATH variable in your autoexec.bat file that specifies
the location of your Windows directory does not include a
disk drive letter. For example, a path of \windows will
cause an internal error. You must edit the PATH variable to
avoid this error.
To install the software, perform the following steps:
1.
If you are using anti-virus software packages such as the vsafe.com
anti-virus software provided with MS-DOS version 6.2 or the Disk
Protect anti-virus software provided with Norton Utilities, Altera
recommends that you disable these and other similar software
packages in your autoexec.bat file before installing MAX+PLUS II.
2.
Boot the computer from the hard disk and start Windows.
3.
Insert the MAX+PLUS II CD-ROM into a caddy if necessary, insert it
into your CD-ROM drive, and perform one of the following:
v
(For Windows NT 3.51) Choose Run from the Windows
Program Manager File menu and type <CD-ROM drive>:\pc\
maxplus2\install 9 in the Command Line box.
or:
v
(For Windows NT 4.0 or Windows 95) Choose Run from the
Windows Start menu and type <CD-ROM drive>:\pc\
maxplus2\install 9 in the Open box.
The MAX+PLUS II Install program starts. This program prompts you
for all information needed to install MAX+PLUS II. You should install
MAX+PLUS II in a separate directory from any previous
MAX+PLUS II version. If your DOS path includes an existing
MAX+PLUS II directory, the Install program will default to installing
in that directory, so be sure to override the default directory during
installation.
1
8
Because improvements and other changes in the latest
version of MAX+PLUS II software may fit projects
differently from other versions, you may wish to finish
existing projects with the earlier version. Altera also
recommends that you archive a project before upgrading
the latest version of MAX+PLUS II so that you can return it
to an earlier version, if necessary.
Altera Corporation
81_GSBOOK.fm5 Page 9 Tuesday, October 14, 1997 4:04 PM
Section 1: MAX+PLUS II Installation
4.
Follow the directions provided on-screen. To get help on any step in
the installation process, choose the Help button.
1
5.
You can abort the installation procedure at any time by
choosing the Exit button.
If you wish, you can choose to leave the MAX+PLUS II Help files on
the CD-ROM and have MAX+PLUS II access them from there. To
have MAX+PLUS II access the Help files from the CD-ROM, follow
these steps during installation:
a.
Choose Custom Installation in the MAX+PLUS II Installation
Options dialog box.
b.
Turn off MAX+PLUS II Help under Optional MAX+PLUS II
Features, and choose Install.
c.
After the Install program has finished, insert the following line
in the [system] section of the maxplus2.ini file in your
MAX+PLUS II system directory:
HELP_FILE_DIR=<CD-ROM drive>:\help 9
6.
During installation of MAX+PLUS II on a PC running Windows 95,
you may receive an error message that states that the file a.azp was not
extracted. To correct this error, disable write caching for SmartDrive
by typing the following command at a DOS prompt, then reinstall
MAX+PLUS II:
smartdrv /x 9
7.
If you receive an application error message while installing
MAX+PLUS II on a Novell network, perform the following steps:
a.
Reboot the computer, but do not log onto the network.
b.
Reinstall MAX+PLUS II according to the installation
instructions.
c.
Reboot the computer and log onto the network.
8.
Once you have successfully installed MAX+PLUS II, the read.me file
appears automatically. You should check the read.me file for
important information on the MAX+PLUS II software. After checking
the read.me file, exit from Windows.
Altera Corporation
9
81_GSBOOK.fm5 Page 10 Tuesday, October 14, 1997 4:04 PM
MAX+PLUS II Getting Started
9.
If you are using Windows 95, edit the setting for the files variable
in your config.sys file, which is usually located in the top-level
directory of your c: drive, as follows:
files=50 9
10.
The Install program may modify your autoexec.bat file, which also is
usually in the top-level directory of your c: drive, to make
MAX+PLUS II run properly. You should examine this file to check
whether it is compatible with other software on your system. The
Install program saves the original file as autoexec.bak.
11.
Remove the CD-ROM from the drive and reboot your computer
before starting MAX+PLUS II.
1
See ÒMAX+PLUS II File OrganizationÓ on page 69 for a
description of the directories and subdirectories created during
installation.
You can uninstall MAX+PLUS II by following these steps, beginning with
step 1 and choosing the Uninstall button instead of the Install button.
f
Go to ÒInstalling the Adobe Acrobat ReaderÓ on page 51 for information on
installing the Adobe Acrobat Reader that is needed to read the Alteraprovided Software Interface Guides for Cadence, Mentor Graphics,
Synopsys, and Viewlogic (Powerview) EDA tools.
Additional Windows NT Installation Steps
The following sections guide you through additional steps for installing
MAX+PLUS II on the PC. The following topics are covered:
■
■
■
Installing Windows NT Drivers
Disabling Floating-Point Emulation
Using MAX+PLUS II with NTFS
Installing Windows NT Drivers
On computers running Windows NT 3.51 or 4.0, you must install Windows
NT drivers to support MAX+PLUS II after you run the Install program. The
Sentinel driver is required for all MAX+PLUS II systems, and is
automatically installed with MAX+PLUS II. The Altera Programmer driver
10
Altera Corporation
81_GSBOOK.fm5 Page 11 Tuesday, October 14, 1997 4:04 PM
Section 1: MAX+PLUS II Installation
is required for systems that include the LP6 Logic Programmer Card; and
the Altera ByteBlaster driver is required for systems that include the
ByteBlaster. Both the Altera Programmer driver and the Altera ByteBlaster
driver must be installed separately from MAX+PLUS II.
1
You do not need to install the Logic Programmer Card or the
ByteBlaster before installing the Altera Programmer or Altera
ByteBlaster drivers.
To install the Altera Programmer driver, follow these steps:
1.
(Windows NT 3.51 only) Double-click Button 1 on the Drivers icon in
the Control Panel, then choose the Add button to open the Add dialog
box.
or:
(Windows 4.0 only) Double-click Button 1 on the Multimedia icon in
the Control Panel, click Button 1 on the Devices tab, and choose the
Add button to open the Add dialog box.
2.
Select Unlisted or Updated Driver from the List of Drivers list box and
choose OK. The Install Driver dialog box opens.
3.
Type or select \<MAX+PLUS II system directory>\drivers in the text
box, and choose OK. The Add Unlisted or Updated Driver dialog box
opens.
4.
Select Altera Programmer from the list box and choose OK. The Altera
Programming Hardware Setup dialog box opens.
5.
Select the appropriate bus type from the Bus Type list box. If you do
not know the correct bus type, select (E)ISA.
6.
Select an unused I/O base address in your PC for your LP6 Logic
Programmer Card from the Physical Address drop-down list box. The
Programmer Card uses 16 contiguous I/O addresses, starting at the
selected base address. Altera Programmer Cards are shipped with the
default address 280 hex. For more information about changing the
I/O address of the Programmer Card, see ÒChanging the LP6 Card
Address LocationÓ on page 56.
7.
To install the driver at the current address, choose OK. The System
Setting Change dialog box is displayed.
Altera Corporation
11
81_GSBOOK.fm5 Page 12 Tuesday, October 14, 1997 4:04 PM
MAX+PLUS II Getting Started
Your Logic Programmer Card will operate only at the specified
address.
If necessary, you can change the driverÕs I/O address.
To change the driverÕs I/O address in Windows NT 3.51, follow these
steps:
a.
Double-click button 1 on the Drivers icon in the Windows NT
Control Panel. The Drivers dialog box opens.
b.
Select Altera Programmer from the Installed Drivers list box, then
choose the Setup button to open the Altera Programmer Driver
Setup dialog box and edit the driverÕs I/O address.
To change the driverÕs I/O address in Windows NT 4.0, follow these
steps:
8.
a.
Double-click Button 1 on the Multimedia icon in the
Windows NT 4.0 Control Panel. The Multimedia Properties
dialog box opens.
b.
Click Button 1 on the Devices tab, select Altera Programmer
under Other Multimedia Devices, and then choose the Properties
button. The Altera Programmer Properties dialog box opens.
c.
Choose Settings to open the Altera Programming Hardware
Setup dialog box and edit the driverÕs I/O address.
If you wish to install another driver (e.g., for the ByteBlaster), choose
the DonÕt Restart Now button in the System Setting Change dialog
box and repeat the steps above to install another driver. Otherwise,
choose the Restart Now button in the System Setting Change dialog
box to reboot your computer.
To install the Altera ByteBlaster driver in Windows NT 3.51 or NT 4.0,
follow these steps:
12
1.
Repeat steps 1 through 3 above.
2.
Select Altera ByteBlaster from the list box and choose OK.
Altera Corporation
81_GSBOOK.fm5 Page 13 Tuesday, October 14, 1997 4:04 PM
Section 1: MAX+PLUS II Installation
3.
To install the driver at the current address, choose OK. The System
Setting Change dialog box is displayed.
4.
Repeat step 8 above.
Disabling Floating-Point Emulation
If you are running MAX+PLUS II under Windows NT 3.51 or 4.0, Altera
recommends that you turn floating-point emulation off to improve timing
Simulator Netlist File (.snf) extraction time. Type the following command at
the command prompt:
pentnt -o 9
If you do not have the pentnt.exe program, contact Microsoft. (In Windows
NT 3.51, the pentnt.exe program is normally located in the system32
subdirectory of your Windows NT directory.)
If you are running MAX+PLUS II under another Windows operating
system, there is no user control over floating-point emulation.
Using MAX+PLUS II with NTFS
If MAX+PLUS II is installed on a PC running Windows NT 3.51 or 4.0 with
NTFS, the maxplus2.ini file should be readable and writable by all users, or
each user should have his or her own copy of the file. Each user must use the
System control available in the Windows NT Control Panel to set the
MAXPLUS2_INI environment variable equal to the drive and directory
containing the appropriate maxplus2.ini file. See ÒCreating & Using a Local
Copy of the maxplus2.ini FileÓ on page 67.
Additional NEC 9801 Installation Steps
On NEC 9801 computers, you must modify the \windows\system.ini file
after you run the Install program for MAX+PLUS II. Add the following lines
to the \windows\system.ini file:
[sentinel] 9
MACHINE=NEC9800 9
Altera Corporation
13
81_GSBOOK.fm5 Page 14 Tuesday, October 14, 1997 4:04 PM
MAX+PLUS II Getting Started
Installing MAX+PLUS II on a UNIX Workstation
The following instructions describe the requirements and procedures for
installing the MAX+PLUS II software on Sun SPARCstations running
SunOS 4.1.3+ or Solaris 2.5.+, HP 9000 Series 700/800 workstations, and IBM
RISC System/6000 workstations. This section covers the following topics:
■
■
■
System Requirements for UNIX Workstations.....................................14
Installing the Software & Third-Party Interfaces .................................15
Configuring the File Server & User Environment................................25
Ð
Configuring a SPARCstation Running SunOS 4.1.3+...............26
Ð
Configuring a SPARCstation Running Solaris 2.5+ ..................27
Ð
Configuring an HP 9000 Series 700/800 Workstation ..............29
Ð
Configuring an IBM RISC System/6000 Workstation ..............31
System Requirements for UNIX Workstations
The hardware and software system requirements listed here and in the
read.me file must be met before you can install MAX+PLUS II on a UNIX
workstation.
Hardware Requirements for UNIX Workstations
MAX+PLUS II for UNIX workstations requires the following minimum
hardware configuration:
■
■
■
14
One of the following workstations:
Ð
Sun Microsystems SPARCstation or compatible workstation
Ð
HP 9000 Series 700/800 workstation
Ð
IBM RISC System/6000 workstation
ISO 9660-compatible CD-ROM drive
Color monitor
Altera Corporation
81_GSBOOK.fm5 Page 15 Tuesday, October 14, 1997 4:04 PM
Section 1: MAX+PLUS II Installation
Software Requirements for UNIX Workstations
MAX+PLUS II for UNIX workstations requires the following minimum
software configuration:
Table 1-1. UNIX Workstation Software Requirements
System Type
Sun SPARCstation
Software Requirements
SunOS 4.1.3 or higher
OpenWindows 3.0 or higher
Solaris 2.5 or higher
HP 9000 Series 700/800
HP-UX 10.20 or higher
IBM RISC System/6000
AIX 4.1 or higher
Installing the Software & Third-Party Interfaces
MAX+PLUS II installation must be performed by a System Administrator
with superuser or ÒrootÓ privileges. The following steps describe first-time
installation with the Altera install.cd program.
The installation procedure consists of two phases:
1.
2.
Installing the software on the file server
a.
Installing the software and third-party interface files
b.
Configuring the file server and user environments
Setting up the licensing software and server
You can complete phase 2 separately, if necessary. When you install an
update to MAX+PLUS II, only the first phase of the installation process is
required.
The installation instructions assume the following conditions:
■
■
Altera Corporation
The UNIX environment is case-sensitive. You must enter directory
names, filenames, and filename extensions exactly as shown.
You are logged in as a superuser and you install MAX+PLUS II from
a local CD-ROM drive. If not, your System Administrator must
provide access to a remote CD-ROM drive.
15
81_GSBOOK.fm5 Page 16 Tuesday, October 14, 1997 4:04 PM
MAX+PLUS II Getting Started
■
■
The default CD-ROM directory is /cdrom.
MAX+PLUS II will be installed in the /usr/maxplus2 directory. The
installation procedure creates the maxplus2 directory if it does not
already exist.
If you use a different CD-ROM directory or MAX+PLUS II system directory
name, substitute the appropriate name in the installation steps.
1
Boldface text represents text that appears on screen; Courier
font indicates text you must type. The % character indicates the
UNIX C-shell prompt; the # character indicates the superuser
prompt. Commands that do not fit on a single line in this manual
are indicated by indentations of subsequent lines.
Mounting the CD-ROM
Before installing the software, you must mount the CD-ROM. The
commands to do so vary depending on the workstation.
1.
Insert the MAX+PLUS II CD-ROM into a caddy if necessary and insert
the caddy into your CD-ROM drive.
2.
Locate your workstation in Table 1-2 and type the corresponding
commands.
Table 1-2. Commands for Mounting the CD-ROM (Part 1 of 2)
Workstation &
Operating System
Commands to type
Sun SPARCstation
SunOS 4.1.3+
# mkdir /cdrom 9
# mount -t hsfs -o ro /dev/sr0 /cdrom 9
# cd /cdrom 9
Sun SPARCstation
Solaris 2.5+
If you are running Volume Manager, the CD-ROM will be mounted
automatically as /cdrom/cdrom0, and only the last command below is
needed. Otherwise, type all three of the following commands:
# mkdir /cdrom/cdrom0 9
# mount -F ufs -r /dev/dsk/c0t6d0s2 /cdrom 9
# cd /cdrom/cdrom0 9
16
Altera Corporation
81_GSBOOK.fm5 Page 17 Tuesday, October 14, 1997 4:04 PM
Section 1: MAX+PLUS II Installation
Table 1-2. Commands for Mounting the CD-ROM (Part 2 of 2)
Workstation &
Operating System
Commands to type
HP 9000 Series 700/800
# mkdir /cdrom 9
# /etc/mount -t cdfs /dev/dsk/<SCSI ID of the CD-ROM
drive>s0 /cdrom 9
# cd /cdrom 9
IBM RISC System/6000
#
#
#
#
mkdir /cdrom 9
crfs -v cdrfs -p ro -dcd0 -m /cdrom -Ano -tn 9
mount -v cdrfs -r /dev/cd0 /cdrom 9
cd /cdrom 9
Running the Installation Program
The installation program has several phases, each of which can be completed
separately. These phases are as follows:
■
■
■
Starting the installation program
Installing the network licensing file
Installing the third-party interface files
You can run the installation program as many times as necessary to
complete your installation.
Starting the Installation Program
To start the MAX+PLUS II installation program, type
./install.cd 9 at the # prompt.
or:
If you mounted the CD-ROM on an HP 9000 Series 700/800 workstation,
type ./INSTALL.CD\;1 9 at the # prompt.
1
Altera Corporation
You can quit the installation procedure at any time by typing
Ctrl+C 9.
17
81_GSBOOK.fm5 Page 18 Tuesday, October 14, 1997 4:04 PM
MAX+PLUS II Getting Started
The following text is displayed:
MAX+PLUS II Workstation Installation
Copyright (c) Altera Corporation 1997
Type Ctrl+C <Return> to quit installation at any time.
Type the full pathname of the directory where the MAX+PLUS II
CD-ROM is mounted (default: /cdrom):
Press 9 if the MAX+PLUS II CD-ROM is mounted in the default
directory. Otherwise, type the correct directory name, then press 9.
Would you like to install the MAX+PLUS II system files (y/n):
Type n 9 to skip installation of the system files. Type y 9 to install the
MAX+PLUS II system files. The following prompt is displayed:
Type the full pathname of the system directory where MAX+PLUS II will
be installed (default: /usr/maxplus2):
Press 9 to accept the default directory. Otherwise, type the name of
the desired directory and press 9.
You may install MAX+PLUS II on one or more of the following platforms:
Platform
-----------sunos
solaris
hp
rs6000
System Type
-----------------Sun SPARCstation
Sun SPARCstation
HP 9000 Series 700/800
IBM RISC System/6000
Operating System
------------------------SunOS 4.1.3+ (Solaris 1.x)
Solaris 2.5+ (SunOS 5.5+)
HP-UX 10.20+
AIX 4.1+
Enter one or more of the platform names listed above
(choices are: sunos, solaris, hp, rs6000)
(default: solaris):
Press 9 to accept the default platform. Otherwise, type the name(s) of
the desired platform(s), then press 9. To install MAX+PLUS II for
multiple platforms simultaneously, type multiple platform names
separated by spaces, e.g., solaris hp 9.
If you type multiple platform names at the prompt, the following
prompt appears:
18
Altera Corporation
81_GSBOOK.fm5 Page 19 Tuesday, October 14, 1997 4:04 PM
Section 1: MAX+PLUS II Installation
Enter license server platform type
(choose one of: solaris sunos)
(default: solaris):
Press 9 to accept the default platform. Otherwise, type the name of the
desired license server platform, then press 9.
The MAX+PLUS II Help files are available on the installation CD-ROM
in the /cdrom/help directory, although Altera recommends installing the
Help files in your MAX+PLUS II system directory.
Would you like to install the MAX+PLUS II Help files? (y/n):
Type y 9 to install the Help files. If you want to leave the Help files on
the CD-ROM and run them from there, type n 9.
1
If you type n 9, the installation program inserts the
following line in the [system] section of your /usr/
maxplus2/maxplus2.ini file to allow MAX+PLUS II to
access the Help files from the CD-ROM:
HELP_FILE_DIR=<CD-ROM path>:/help 9
Would you like to install or modify your network license file? (y/n)
If you type y 9, you will be prompted for license file information
during the installation phase. If you type n 9, the installation program
skips the license file installation. You can also install a network license
file manually, as described in ÒInstalling the Network Licensing FileÓ
on page 21.
Would you like to install the MAX+PLUS II Sample/Tutorial files? (y/n)
Type n 9 to skip installation of the MAX+PLUS II Sample/Tutorial
files.
Type y 9 to install the sample files and the files for the chiptrip
tutorial described in Section 3: MAX+PLUS II Tutorial.
If you type y 9, the following prompt is displayed:
Altera Corporation
19
81_GSBOOK.fm5 Page 20 Tuesday, October 14, 1997 4:04 PM
MAX+PLUS II Getting Started
Type the full pathname of the working directory where the MAX+PLUS II
Sample/Tutorial files will be installed (default: /usr/max2work):
Press 9 to accept the default directory. Otherwise, type the name of
the desired directory and press 9.
Would you like to install third-party interfaces? (y/n)
If you selected multiple platforms at the earlier prompt and type y 9,
the following prompt is displayed:
Enter third-party installation platform type
(choose one of: solaris sunos)
(default: solaris):
Press 9 to accept the default platform. Otherwise, type the name of the
desired third-party installation platform, then press 9.
Some or all of the following information is displayed:
CD-ROM directory:
Install system files:
MAX+PLUS II system directory:
Platforms to install:
License server platform:
Install Help:
Install/modify license file:
Install sample/tutorial files:
MAX+PLUS II working directory:
Install third-party interfaces:
Third-party interface platform:
<CD-ROM directory name>
<yes or no>
<system directory name>
<selected platform(s)>
<selected platform>
<yes or no>
<yes or no>
<yes or no>
<working directory name>
<yes or no>
<selected platform>
Is this information correct? (y/n):
Type y 9 if the information is correct. Type n 9 to change any
incorrect item(s). You will be given the option to restart the
installation program.
If you type y 9, the installation program deletes any existing files from
the specified MAX+PLUS II system and working directories, checks to
see that disk requirements are met, and then installs the items you
selected.
20
Altera Corporation
81_GSBOOK.fm5 Page 21 Tuesday, October 14, 1997 4:04 PM
Section 1: MAX+PLUS II Installation
f
If you chose to install the network licensing file, go to ÒInstalling the
Network Licensing File,Ó next. If you chose to install the third-party
interfaces, go to ÒInstalling the Third-Party Interface FilesÓ on page 24 and
ÒInstalling the Adobe Acrobat ReaderÓ on page 51 for information on
installing the Adobe Acrobat Reader that is needed to read the Alteraprovided Software Interface Guides for Cadence, Mentor Graphics,
Synopsys, and Viewlogic (Powerview) EDA tools. Otherwise, go to
ÒUnmounting the CD-ROMÓ on page 25.
Go to ÒMAX+PLUS II File OrganizationÓ on page 69 for information about
the directory structure of the files installed for MAX+PLUS II.
Installing the Network Licensing File
You can install the license.dat file needed for network licensing in one of
two ways:
Manually create a copy of the license.dat file
Run the install.cd program
■
■
When you register your MAX+PLUS II system, Altera provides you with a
ÒNode AuthorizationÓ form that includes the license file required to run
MAX+PLUS II on your workstation. Go to ÒRegistering MAX+PLUS II
SoftwareÓ on page 4 for instructions.
Figure 1-1 shows a sample license file.
Figure 1-1. Sample License File
Server
name
SERVER
SERVER
SERVER
DAEMON
FUTURE
Server ID
number
Optional port
number
alice 08000917ae82 1800
king 08000926ab6f 1800
queen 08000913b4c2 1800
alterad /usr/maxplus2/adm/alterad
maxplus2 alterad 0.000 01-dec-97 1 3B2A134641C57735B618 "ALTERA"
Feature
name
Altera Corporation
Daemon
name
Expiration
date
Number of
licenses
requested
Authorization
code
21
81_GSBOOK.fm5 Page 22 Tuesday, October 14, 1997 4:04 PM
MAX+PLUS II Getting Started
If you receive a license.dat file from Altera, go through the following steps:
v
Type or save the Þle as /<MAX+PLUS II system directory>/adm/
license.dat. If you already have a license.dat Þle, edit the existing Þle
to add the new Altera-provided information.
or:
v
When the installation program displays the following prompt,
type y 9.
Would you like to install or modify your network license file? (y/n)
The installation program displays the following prompt:
MAX+PLUS II License File Installation
Copyright (c) Altera Corporation 1997
Type the full pathname of the system directory where MAX+PLUS II has
been installed (default:/usr/maxplus2)
Press 9 to accept the default directory. Otherwise, type the name of
the desired directory and press 9.
Choose one of the following options:
1.
2.
Create a new license
Update an existing license
If you type 1 9, the following prompt is displayed (if you type 2 9, a
shortened version of the same prompt is displayed):
The following information is required to install the network licensing
file:
1.
2.
3.
4.
5.
6.
22
The number of license servers at your site
The host name and host ID for each license server
The MAX+PLUS II product being licensed
The maximum number of users that MAX+PLUS II will support
concurrently
The license expiration date
The authorization code from Altera Customer Service
Altera Corporation
81_GSBOOK.fm5 Page 23 Tuesday, October 14, 1997 4:04 PM
Section 1: MAX+PLUS II Installation
Do you want to continue? (y/n)
If you type y 9, you are prompted to enter the licensing information
provided by Altera. To quit license installation, type n 9.
You can read the information from the Altera-provided license.dat
file to obtain the information needed to respond to the installation
program prompts on the features, expiration date, number of licenses,
and authorization code.
Enter the number of license servers: (1/3) <number of license servers> 9
You are asked for the host name and ID for each license server:
Enter the host name for the license server: <host name for license server> 9
Enter the host ID for the license server: <host ID number> 9
Which feature do you wish to install? Choose one:
1.
2.
Q.
maxplus2
maxplus2vhdl
Quit
(MAX+PLUS II Base System)
(VHDL Synthesis)
(Choose 1, 2, or Q):
<feature number> 9
Enter the software expiration date [<default expiration date>]:
<expiration date> 9
Enter the maximum number of users: <number of users> 9
Enter the authorization code: <authorization code> 9
Is the information correct? (y/n/q)
If you think the information you entered may not be correct, type n 9.
The license file installation starts again from the beginning, to allow
you to accept or change each of your original responses.
To quit the license installation, type q 9.
Altera Corporation
23
81_GSBOOK.fm5 Page 24 Tuesday, October 14, 1997 4:04 PM
MAX+PLUS II Getting Started
To accept the information as correct, type y 9. The following messages
are displayed:
Your license file has been created. It is located in
/<MAX+PLUS II system directory>/adm/license.dat.
The MAX+PLUS II license installation is complete.
f
If you chose to install the third-party interfaces, go to ÒInstalling the ThirdParty Interface Files,Ó next. Otherwise, go to ÒUnmounting the CD-ROMÓ
on page 25.
Installing the Third-Party Interface Files
If you chose to install the third-party interface files, the installation program
displays the following prompt:
Third-Party Interfaces Installation:
1.
2.
3.
4.
5.
6.
7.
Cadence-Composer
Cadence-Concept
Mentor Graphics
Synopsys
Viewlogic
All
Quit
x
x
x
x
x
Mbytes
Mbytes
Mbytes
Mbytes
Mbytes
Enter one or more numbers:
For example, to install both Synopsys and Viewlogic files, you must
type 4, 5 9 or 4 5 9. To quit installation, type 7 9.
Once the installation of the third-party interface files is complete, the
following message is displayed:
Third-party interface installation is complete.
f
24
Go to ÒInstalling the Adobe Acrobat ReaderÓ on page 51 for information on
installing the Adobe Acrobat Reader that is needed to read the Alteraprovided Software Interface Guides for Cadence, Mentor Graphics,
Synopsys, and Viewlogic (Powerview) EDA tools. Otherwise, if you have
finished installing MAX+PLUS II software, go to ÒUnmounting the
CD-ROM,Ó next.
Altera Corporation
81_GSBOOK.fm5 Page 25 Tuesday, October 14, 1997 4:04 PM
Section 1: MAX+PLUS II Installation
Go to the Altera-provided Software Interface Guide for your third-party
environment for information on the directory structure of the files installed
for third-party interfaces to MAX+PLUS II.
Unmounting the CD-ROM
To unmount the CD-ROM, type umount /cdrom 9 at the # prompt.
f
Go to ÒConfiguring the File Server & User Environment,Ó next, to continue
the installation process.
Configuring the File Server & User Environment
You now must set up the file server and user environment to run
MAX+PLUS II. The installation steps vary depending upon the computer
platform.
For each platform you are configuring, follow these steps:
1.
Configure the file server environment so that the MAX+PLUS II
software installed on the file server is available to other computers on
the network.
2.
Configure the user (client) environment so that users can find the
MAX+PLUS II software installed on the file server, and the
MAX+PLUS II software can find the license server.
Continue to one of the following sections for instructions:
■
■
■
■
Altera Corporation
Configuring a SPARCstation Running SunOS 4.1.3+ ......................... 26
Configuring a SPARCstation Running Solaris 2.5+............................. 27
Configuring an HP 9000 Series 700/800 Workstation......................... 29
Configuring an IBM RISC System/6000 Workstation......................... 31
25
81_GSBOOK.fm5 Page 26 Tuesday, October 14, 1997 4:04 PM
MAX+PLUS II Getting Started
Configuring a SPARCstation Running SunOS 4.1.3+
This section describes the steps necessary to configure a Sun SPARCstation
running SunOS 4.1.3 or higher.
Configuring the File Server
If a single workstation functions as the file server, license server, and user
workstation, skip this section and go to ÒConfiguring the User
Workstation,Ó next.
If the file server, license server, and user workstations are separate
workstations, use the Network File System (NFS) to export the directory that
contains MAX+PLUS II. To export the directory, follow these steps:
1.
If a higher-level directory in the partition is not already exported, add
the line /usr/maxplus2 9 to the /etc/exports file on the file server.
2.
Save the changes.
3.
Export the file by typing /etc/exportfs -a 9 at the # prompt.
Configuring the User Workstation
To configure the user workstation, follow these steps:
1.
If the file server and user workstations are separate workstations,
mount the /usr/maxplus2 directory on the user workstation with NFS
by typing the following commands:
# mkdir /usr/maxplus2 9
# /etc/mount <file server name>:/usr/maxplus2 /usr/
maxplus2 9
2.
Update the PATH and LM_LICENSE_FILE variables that are specified
in the .cshrc file located in each userÕs home directory. You must edit
this file for each user, or provide clear instructions that describe which
lines need to be entered or edited.
a.
Update each userÕs PATH environment variables to include
/usr/maxplus2/bin:
set path = (/usr/local/bin /usr/maxplus2/bin) 9
26
Altera Corporation
81_GSBOOK.fm5 Page 27 Tuesday, October 14, 1997 4:04 PM
Section 1: MAX+PLUS II Installation
b.
Each user must have an LM_LICENSE_FILE variable that is set
to the full directory pathname of the license file. To update this
variable, add the following line to the .cshrc file for each user:
setenv LM_LICENSE_FILE /usr/maxplus2/adm/
license.dat 9
If more than one application uses this environment variable,
separate the different paths with a colon (:). For example:
setenv LM_LICENSE_FILE /usr/maxplus2/adm/
license.dat:/tmp/license.xyz 9
3.
After saving the changes to each userÕs .cshrc file, type the following
commands:
# cd 9
# source .cshrc 9
f
Go to ÒConfiguring Network LicensingÓ on page 33 for information about
configuring the license server.
Configuring a SPARCstation Running Solaris 2.5+
This section describes the steps necessary to configure a Sun SPARCstation
running Solaris 2.5 or higher.
Configuring the File Server
If a single workstation functions as the file server, license server, and user
workstation, skip this section and go to ÒConfiguring the User
Workstation,Ó next.
If the file server, license server, and user workstations are separate
workstations, use the Network File System (NFS) to export the directory that
contains MAX+PLUS II.
To export the directory, follow these steps:
1.
If a higher-level directory in the partition is not already exported, add
the following line to the /etc/dfs/sharetab file on the file server:
/usr/maxplus2 "MAX+PLUS II" nfs rw "MAX+PLUS II
System Directory" 9
Altera Corporation
27
81_GSBOOK.fm5 Page 28 Tuesday, October 14, 1997 4:04 PM
MAX+PLUS II Getting Started
2.
Save the changes.
3.
Export the file by typing shareall 9 at the # prompt.
Configuring the User Workstation
To configure the user workstation, follow these steps:
1.
If the file server and user workstations are separate workstations,
mount the /usr/maxplus2 directory on the user workstation with NFS
by typing the following commands:
# mkdir /usr/maxplus2 9
# /etc/mount <file server name>:/usr/maxplus2 /usr/
maxplus2 9
2.
Update the PATH and LM_LICENSE_FILE variables that are specified
in the .cshrc file located in each userÕs home directory. You must edit
this file for each user, or provide clear instructions that describe which
lines need to be entered or edited.
a.
Update each userÕs PATH environment variables to include /usr/
maxplus2/bin:
set path = (/usr/local/bin /usr/maxplus2/bin) 9
b.
Each user must have an LM_LICENSE_FILE variable that is set
to the full directory pathname of the license file. To update this
variable, add the following line to the .cshrc file for each user:
setenv LM_LICENSE_FILE /usr/maxplus2/adm/
license.dat 9
If more than one application uses this environment variable,
separate the different paths with a colon (:). For example:
setenv LM_LICENSE_FILE /usr/maxplus2/adm/
license.dat:/tmp/license.xyz 9
3.
After saving the changes to each userÕs .cshrc file, type the following
commands:
# cd 9
# source .cshrc 9
28
Altera Corporation
81_GSBOOK.fm5 Page 29 Tuesday, October 14, 1997 4:04 PM
Section 1: MAX+PLUS II Installation
f
Go to ÒConfiguring Network LicensingÓ on page 33 for information about
configuring the license server.
Configuring an HP 9000 Series 700/800 Workstation
This section describes the steps necessary to configure an HP 9000
Series 700/800 workstation.
Configuring the File Server
If a single workstation functions as the file server and user workstation, skip
this section and go to ÒConfiguring the User Workstation.Ó
If the file server and user workstations are separate workstations, use the
Network File System (NFS) to export the directory that contains
MAX+PLUS II. To export the directory, follow these steps:
1.
Type sam 9 at the # prompt to bring up the System Administration
Manager (SAM).
2.
Choose NFS (Network File Systems) Configuration from the File
Systems Management menu.
3.
Set options to allow remote (NFS) file systems access to the local file
systemÕs /usr/maxplus2 directory.
4.
In order to process large projects, Altera recommends configuring the
file server to allow processes to use more than 64 Mbytes of memory.
v
Altera Corporation
If you are using SAM, follow these steps:
a.
Double click Button 1 on the Kernel Configuration icon.
The Kernel Configuration window opens.
b.
Double-click Button 1 on the Configurable Parameters
icon. The Configurable Parameters list box appears.
c.
Double-click Button 1 on maxdsize to select it from the
list. The Modify Configuration Parameter <machine
name> dialog box opens.
d.
Specify a value in the Formula/Value box and choose OK.
29
81_GSBOOK.fm5 Page 30 Tuesday, October 14, 1997 4:04 PM
MAX+PLUS II Getting Started
e.
In the Kernel Configuration window, choose Create a
New Kernel (Actions menu) and choose Yes or No in the
Confirmation dialog box.
If you choose Yes, SAM creates the new kernel based on
the specified project size and then prompts you to reboot
your workstation.
or:
v
Refer to the documentation on maxdsize under System
Parameters in the HP System Administration Tasks Manual for
information on configuring the file server.
Configuring the User Workstation
To configure the user workstation, follow these steps:
1.
If the file server and user workstations are separate workstations,
mount the /usr/maxplus2 directory on the user workstation with NFS
by typing the following commands:
# mkdir /usr/maxplus2 9
# /etc/mount <file server name>:/usr/maxplus2 /usr/
maxplus2 9
2.
Update the PATH and LM_LICENSE_FILE variables that are specified
in the .cshrc file located in each userÕs home directory. You must edit
this file for each user, or provide clear instructions that describe which
lines need to be entered or edited.
a.
Update each userÕs PATH environment variables to include
/usr/maxplus2/bin:
set path = (/usr/local/bin /usr/maxplus2/
bin...) 9
b.
Each user must have an LM_LICENSE_FILE variable that is set
to the full directory pathname of the license file. To update this
variable, add the following line to the .cshrc file for each user:
setenv LM_LICENSE_FILE /usr/maxplus2/adm/
license.dat 9
30
Altera Corporation
81_GSBOOK.fm5 Page 31 Tuesday, October 14, 1997 4:04 PM
Section 1: MAX+PLUS II Installation
If more than one application uses this environment variable,
separate the different paths with a colon (:). For example:
setenv LM_LICENSE_FILE /usr/maxplus2/adm/
license.dat:/tmp/license.xyz 9
3.
After saving the changes to each userÕs .cshrc file, type the following
commands:
# cd 9
# source .cshrc 9
f
Go to ÒConfiguring Network LicensingÓ on page 33 for information about
configuring the license server.
Configuring an IBM RISC System/6000 Workstation
This section describes the steps necessary to configure an IBM
RISC System/6000 workstation.
Configuring the File Server
If a single workstation functions as the file server and user workstation, skip
this section and go to ÒConfiguring the User Workstation,Ó next.
If the file server and user workstations are separate workstations, use the
Network File System (NFS) to export the directory that contains
MAX+PLUS II. To export the directory, follow these steps:
1.
If a higher-level directory in the partition is not already exported, add
the line /usr/maxplus2 9 to the /etc/exports file on the file server.
2.
Save the changes. The directory will be exported automatically.
Configuring the User Workstation
To configure the user workstation, follow these steps:
1.
Altera Corporation
If the file server, license server, and user workstations are separate
workstations, mount the /usr/maxplus2 directory on the user
workstation with NFS by typing the following commands:
31
81_GSBOOK.fm5 Page 32 Tuesday, October 14, 1997 4:04 PM
MAX+PLUS II Getting Started
# mkdir /usr/maxplus2 9
# /etc/mount <file server name>:/usr/maxplus2 /usr/
maxplus2 9
2.
Update the PATH and LM_LICENSE_FILE variables that are specified
in the .cshrc file located in each userÕs home directory. You must edit
this file for each user, or provide clear instructions that describe which
lines need to be entered or edited.
a.
Update each userÕs PATH environment variables to include
/usr/maxplus2/bin:
set path = (/usr/local/bin /usr/maxplus2/
bin...) 9
b.
Each MAX+PLUS II user must have an LM_LICENSE_FILE
variable that is set to the full directory pathname of the license
file. To update this variable, add the following line to the .cshrc
file for each user:
setenv LM_LICENSE_FILE /usr/maxplus2/adm/
license.dat 9
If more than one application uses this environment variable,
separate the different paths with a colon (:). For example:
setenv LM_LICENSE_FILE /usr/maxplus2/adm/
license.dat:/tmp/license.xyz 9
3.
After saving the changes to each userÕs .cshrc file, type the following
commands:
# cd 9
# source .cshrc 9
f
Go to ÒConfiguring Network LicensingÓ on page 33 for information about
configuring the license server.
Refer to ÒConfiguring an IBM RISC System/6000 Workstation Serial Port for
ProgrammingÓ on page 64 for information on the special steps needed to
configure an IBM RISC System/6000 workstation to use the BitBlaster.
32
Altera Corporation
81_GSBOOK.fm5 Page 33 Tuesday, October 14, 1997 4:04 PM
Section 1: MAX+PLUS II Installation
Configuring Network Licensing
This section provides instructions for configuring network licensing for
MAX+PLUS II. This section discusses the following topics:
■
■
■
■
Configuring the License Server .............................................................. 33
Troubleshooting License Installation..................................................... 34
License Administration Options File ..................................................... 38
License Administration FLEXlm Utilities ............................................. 40
Configuring the License Server
The FLEXlm licensing scheme allows either one or three license servers on a
network. A single UNIX workstation can function as the file server, license
server, and user workstation. The file server, license server, and user
workstations (or user PCs) can also be separate computers.
To configure the license server, follow these steps:
1.
If a single workstation functions as the file server and license server,
skip this step and go to step 2.
If the file server and license server are separate computers, mount the
/usr/maxplus2 directory on the license server with NFS by typing the
following commands:
# mkdir /usr/maxplus 9
# /etc/mount <file server name>:/usr/maxplus2 /usr/
maxplus2 9
2.
Start the license manager daemon on all license servers before starting
MAX+PLUS II. Type the following command on each license server:
# /usr/maxplus2/adm/max2protd /usr/maxplus2 9
To invoke the license manager daemon automatically during start-up,
add the following lines to the /etc/rc.local file on each license server:
Altera Corporation
33
81_GSBOOK.fm5 Page 34 Tuesday, October 14, 1997 4:04 PM
MAX+PLUS II Getting Started
if [-f /usr/maxplus2/adm/max2protd]; then 9
su <username> -c “umask 022 ; /usr/maxplus2/adm
/max2protd /usr/maxplus2” 9
echo -n max2protd 9
fi 9
3.
Type the following command to make the file executable:
# chmod +x /etc/rc.local 9
4.
If you are configuring an IBM RISC System/6000 as the license server,
add the following command to the /etc/inittab file after the lines that
invoke networking:
rclocal:2:wait:/etc/rc.local > /dev/console 2>&1 9
Troubleshooting License Installation
Most installation errors are caused by improperly installed license daemons
(lmgrd and alterad). If you have completed the procedures described for the
software and license installation but the daemons have not started, you must
verify that the daemons can be located and have the correct permissions.
This section lists the most common error messages that can occur during
installation, provides information on possible causes, and suggests
corrective actions.
For help with error messages not described here and further assistance with
troubleshooting license administration, contact the Altera Applications
Department. Go to Appendix B: Altera Support Services for more information
about technical support.
Message:/usr/maxplus2/max2protd: Command not found
34
Cause:
The max2protd script or the lmgrd or alterad daemons cannot be
located when you try to start them manually or at system start-up.
The /usr/maxplus2 directory has not been properly mounted with
NFS.
Action:
Verify that the /usr/maxplus2 directory, which is exported by the
file server with NFS, has been successfully mounted by the license
server. This directory should have been mounted when you set up
the file server environment, as described in the ÒConfiguring the
File Server & User EnvironmentÓ section for your computer. To
Altera Corporation
81_GSBOOK.fm5 Page 35 Tuesday, October 14, 1997 4:04 PM
Section 1: MAX+PLUS II Installation
verify that the directory has been mounted correctly, type the
following commands on the license server:
# cd /usr/maxplus2/adm 9
# ls -l 9
The ls command output must include the following lines, which
list the max2protd, lmgrd, and alterad daemons:
-rwxr-xr-x 1 root 278528 jun 01 13:03 alterad
-rwxr-xr-x 1 root 81920 jun 01 13:04 lmgrd
-rwxr-xr-x 1 root
568 jun 01 11:02 max2protd
The dates and file sizes may be different, but the three named files
must be present. If the named files are not displayed, the directory
has not been mounted correctly. Refer to the ÒConfiguring the File
Server & User EnvironmentÓ section for your computer for
instructions on how to mount the /usr/maxplus2 directory.
Message: license daemon: execl failed
Cause:
The alterad daemon does not exist or cannot be executed.
Action:
Verify the existence of the alterad daemon by typing the following
commands:
# cd /usr/maxplus2/adm 9
# ls -l 9
The output of the ls command must include the following lines,
which list the max2protd, lmgrd, and alterad daemons:
-rwxr-xr-x 1 root 278528 Jun 01 13:03 alterad
-rwxr-xr-x 1 root 81920 Jun 01 13:04 lmgrd
-rwxr-xr-x 1 root
568 Jun 01 11:02 max2protd
If the MAX+PLUS II software cannot find the alterad daemon in
this directory, reinstall the MAX+PLUS II software as described in
ÒInstalling the Software & Third-Party InterfacesÓ on page 15.
If the alterad daemon exists, verify that it can be executed by
typing chmod 755 alterad 9.
Altera Corporation
35
81_GSBOOK.fm5 Page 36 Tuesday, October 14, 1997 4:04 PM
MAX+PLUS II Getting Started
Message: Retrying socket bind (address in use)
Cause:
The license daemons are not running because another lmgrd
license manager daemon is running and using the same TCP/IP
port address.
Action:
Terminate the daemon processes:
1.
Ask all users who use lmgrd-based applications to log off.
2.
If MAX+PLUS II is installed on a Sun SPARCstation (SunOS
4.1.3 or higher) or an IBM RISC System/6000 workstation,
type the following command to determine the license
daemon process IDs:
# ps waux | grep lmgrd | grep -v grep 9
The response includes the entries for active license manager
daemons. For example:
root
14803 0 0 0 2 60 76 ? S Jun 01 0:03
/usr/maxplus2/adm/lmgrd -c /usr/maxplus2
/adm/license.dat
or:
If MAX+PLUS II is installed on an HP 9000 Series 700/800
workstation or a Sun SPARCstation running Solaris 2.5 or
higher, type the following command to determine the
license daemon process IDs:
# ps -e | grep lmgrd | grep -v grep 9
The response includes the entries for active license manager
daemons. For example:
11478 ttyp2 0:00 lmgrd
3.
Terminate the license daemons with the following
command:
kill <pid> 9
36
Altera Corporation
81_GSBOOK.fm5 Page 37 Tuesday, October 14, 1997 4:04 PM
Section 1: MAX+PLUS II Installation
The <pid> variable is the process ID number that
corresponds to the license daemon. In the example shown
in step 2, <pid> would be 14803.
1 Do not use the -9 option with the kill command.
4.
Edit the /usr/maxplus2/adm/license.dat file and replace
1800 with a unique four-digit port address that is not used
elsewhere on your system and does not conflict with other
applications that use lmgrd. To replace the port address,
change the third field in the SERVER line in the license.dat
file.
In the following example, you would replace 1800 with a
unique four-digit number:
SERVER artoo 54321234 1800 9
5.
Save the changes to /usr/maxplus2/adm/license.dat, then
restart the Altera daemon by typing /usr/maxplus2/
adm/max2protd 9 at the # prompt.
You should also restart the daemons for other applications.
Message: Starting Altera License daemons
Cannot locate the license manager daemon (lmgrd)
Cause:
The max2protd script or the lmgrd or alterad daemons cannot be
executed from the UNIX prompt or at start-up with the
/etc/rc.local start-up command on a Sun SPARCstation or
IBM RISC System/6000 workstation or with the /etc/rc command
on an HP 9000 Series 700/800 workstation.
Action:
Verify that the /usr/maxplus2 directory, which is exported by the
file server with NFS, has been successfully mounted by the license
server. This directory should have been mounted when you set up
the file server and the license server environments, as described in
the ÒConfiguring the File Server & User EnvironmentÓ section for
your computer. To verify that the directory has been mounted
correctly, type the following commands on the license server:
# cd /usr/maxplus2/adm 9
# ls -l 9
Altera Corporation
37
81_GSBOOK.fm5 Page 38 Tuesday, October 14, 1997 4:04 PM
MAX+PLUS II Getting Started
The ls command output must include the following lines, which
list the max2protd, lmgrd, and alterad daemons:
-rwxr-xr-x 1 root 278528 Jun 01 13:03 alterad
-rwxr-xr-x 1 root 81920 Jun 01 13:04 lmgrd
-rwxr-xr-x 1 root
568 Jun 01 11:02 max2protd
The dates and file sizes may be different, but the three named files
must be present. If the named files are not displayed, the directory
has not been mounted correctly. Refer to the ÒConfiguring the File
Server & User EnvironmentÓ section for your computer for
instructions on how to mount the /usr/maxplus2 directory.
If the files exist, you must verify that they have the permissions
-rwxr-xr-x. If the executable bit is not set for lmgrd and alterad,
type the following commands:
# cd /usr/maxplus2/adm 9
# chmod 755 max2protd lmgrd alterad 9
License Administration Options File
The entries in the options file control the operating parameters of the
FLEXlm utility. The System Administrator can use these options to reserve
licenses, restrict the use of licenses, and define user groups for use with
license reservations. The options file can be edited with any text editor. The
following options are available:
38
Option:
Action:
RESERVE
Reserves licenses for a user, host, display, or group of
users.
INCLUDE
Includes a user, host, display, or group of users in a list
of users who are allowed to use a software feature.
EXCLUDE
Excludes a user, host, display, or group of users from a
list of users who are allowed to use a software feature.
GROUP
Defines a user group for use with the RESERVE,
INCLUDE, and EXCLUDE options.
Altera Corporation
81_GSBOOK.fm5 Page 39 Tuesday, October 14, 1997 4:04 PM
Section 1: MAX+PLUS II Installation
Option:
Action:
TIMEOUT
Specifies the time after which an inactive license is
returned to the free pool, for use by someone else.
NOLOG
Causes messages of the specified type to be filtered out
of the log output for lmgrd.
To set any number of options, you must create an options file and list its
pathname as the fourth field on the DAEMON line for alterad.
An options file consists of lines in the following format:
RESERVE <number> <feature> {USER | HOST | DISPLAY | GROUP}
<name>
INCLUDE <feature> {USER | HOST | DISPLAY | GROUP} <name>
EXCLUDE <feature> {USER | HOST | DISPLAY | GROUP} <name>
GROUP <name> <list of users>
TIMEOUT <feature> <timeout in seconds>
NOLOG {IN | OUT | DENIED | QUEUED}
Lines in an options file that begin with the pound character (#) are ignored
and can be used as comments.
In the following example, the options file, called local.options, reserves a
copy of the compile feature for user robert, three copies for user dalia,
and a copy for anyone on a computer with the hostname mainline. The file
also causes QUEUED messages to be omitted from the logfile and prevents
user lori from using the compile feature.
RESERVE 1 compile USER robert
RESERVE 3 compile USER dalia
RESERVE 1 compile HOST mainline
EXCLUDE compile USER lori
NOLOG QUEUED
If these options are included in the file /usr/local/flexlm/options/
local.options, the license file DAEMON line must be specified as follows:
DAEMON alterad /usr/maxplus2/adm/alterad
/usr.local.flexlm/options/local.options 9
Altera Corporation
39
81_GSBOOK.fm5 Page 40 Tuesday, October 14, 1997 4:04 PM
MAX+PLUS II Getting Started
License Administration FLEXlm Utilities
The following FLEXlm utilities help the System Administrator manage the
licensing activities on the network:
■
■
■
■
■
■
■
lmgrd
lmstat
lmdown
lmremove
lmreread
lmver
lmhostid
lmgrd
The lmgrd utility is the main daemon program for FLEXlm. When it is
active, it looks for a license file containing all required feature information.
Usage:
lmgrd [-2] [-b] [-c <license file>] [-d] [-l <log file>] [-p]
[-s <interval>] [-t <timeout value>] [-i <feature>]
40
Option:
Action:
-2
Specifies V2 start-up arguments. The -2 option is
the opposite of the -b option and is required if you
intend to use the -p option.
-b
Specifies backward compatibility mode. The -b
option is the default.
-c <license file>
Uses the specified license file. If this option is not
specified, lmgrd looks for the environment variable
LM_LICENSE_FILE. If the environment variable is
not set, lmgrd looks for /usr/local/flexlm/
licenses/license.dat.
-d
Specifies that hostnames that are read from the
license file should have the local domain name
appended to them before sending to a client. This
option is useful when clients are accessing licenses
from another domain.
Altera Corporation
81_GSBOOK.fm5 Page 41 Tuesday, October 14, 1997 4:04 PM
Section 1: MAX+PLUS II Installation
Option:
Action:
-l <log file>
Specifies the output log file.
-p
Specifies that the lmdown and lmremove utilities
can only be run by a Òlicense administrator.Ó A
Òlicense administratorÓ is a member of the
lmadmin group, or if the lmadmin group does not
exist, Òlicense administratorÓ is a member of
group 0.
-s <interval>
Specifies the log file time-stamp interval, in
minutes. The default is 360 minutes.
-t <timeout value>
Specifies the timeout interval during which
daemons must complete their connections to each
other. The default is 10 seconds. You can use a
larger value if the daemons are running on busy
systems or networks.
-i <feature>
Displays information about the named feature, or,
if no feature name is given, displays information
about all features.
1
f
Altera recommends that you use the -p option when starting the
lmgrd utility to provide security.
See also ÒlmdownÓ on page 42 and ÒlmstatÓ on page 41.
lmstat
The lmstat utility helps monitor the status of all network licensing activities,
including:
■
■
■
Active daemons
Users of individual features
Users of features served by a specific daemon
Usage:
lmstat [-a] [-S <daemon>] [-f <feature>] [-s <server>]
[-t <timeout value>] [-c <license file>] [-A]
[-l <regular expression>]
Altera Corporation
41
81_GSBOOK.fm5 Page 42 Tuesday, October 14, 1997 4:04 PM
MAX+PLUS II Getting Started
f
Option:
Action:
-a
Displays information about all features.
-S <daemon>
Lists all users of the specified daemonÕs features.
-f <feature>
Lists all users of the specified feature(s).
-s <server>
Displays the status of the specified server node(s).
-t <timeout value>
Specifies the timeout interval during which
daemons must complete their connections to each
other. The default is 10 seconds. You can use a
larger value if the daemons are running on busy
systems or networks.
-c <license file>
Uses the specified license file. If this option is not
specified, lmstat looks for the environment
variable LM_LICENSE_FILE. If the environment
variable is not set, lmstat looks for
/usr/local/flexlm/licenses/license.dat.
-A
Lists all active licenses.
-l <reg. expression>
Lists all users of the features matching the given
regular expression.
See also ÒlmgrdÓ on page 40.
lmdown
The lmdown utility instructs lmgrd and alterad to shut down. The license
daemons write out their last messages to the log file, close the file, and exit.
All licenses that have been given out by those daemons are rescinded, so that
the next time a program verifies the license, the license is not valid.
Usage:
lmdown [-c <license file>]
42
Altera Corporation
81_GSBOOK.fm5 Page 43 Tuesday, October 14, 1997 4:04 PM
Section 1: MAX+PLUS II Installation
The correct license file is in /usr/maxplus2/adm/license.dat. The System
Administrator should protect the execution of lmdown, since shutting down
the servers will cause loss of licenses.
f
Option:
Action:
-c <license file>
Uses the specified license file. If this option is not
specified, lmdown looks for the environment
variable LM_LICENSE_FILE. If the environment
variable is not set, lmdown looks for
/usr/local/flexlm/licenses/license.dat. In addition,
lmdown accepts the -c <license file> argument that
specifies the license file location.
See also ÒlmgrdÓ on page 40, ÒlmstatÓ on page 41, and ÒlmrereadÓ on
page 44.
lmremove
The lmremove utility allows the System Administrator to remove a single
userÕs license for a specified feature. This utility is required if the licensed
user was running the software on a node that subsequently crashed, causing
the license to become unusable. The lmremove utility allows the license to
return to the pool of available licenses.
Usage:
lmremove [-c <license file>] <feature> <user> <host> [<display>]
f
Option:
Action:
-c <license file>
Uses the specified license file. If a license file is not
specified, lmremove looks for the environment
variable LM_LICENSE_FILE. If no -c option is
specified, lmreread looks for the environment
variable LM_LICENSE_FILE to find the license file.
If the environment variable is not set, lmremove
looks for /usr/local/flexlm/licenses/license.dat.
See also ÒlmstatÓ on page 41 and ÒlmremoveÓ on page 43.
Altera Corporation
43
81_GSBOOK.fm5 Page 44 Tuesday, October 14, 1997 4:04 PM
MAX+PLUS II Getting Started
lmreread
The lmreread utility allows the System Administrator to tell the license
daemon to reread the license file and start any new daemons that have been
added. This utility is useful if the data in the license file has changed. The
new data can be loaded into the license daemon without shutting it down
and restarting it. In addition, all pre-existing daemons will be signaled to
reread the license file for changes in licensing information.
The lmreread utility uses the license filename from the command line (or the
default filename, if no license filename is specified) to find the alterad
daemon. The lmreread utility then gives alterad the command to reread the
license file because the data in the file has changed. The alterad daemon
always rereads the original file that it loaded. If the path to the license file
read by alterad must be changed, the System Administrator must shut down
alterad and restart with the new license file path.
The System Administrator cannot use lmreread if the SERVER node names
or port numbers have been changed in the license file. In this case, the
daemon must be shut down and restarted for the changes to take effect.
The lmreread utility does not change any option information specified in an
options file. If the new license file specifies a different options file, the
information is ignored. If the options file needs to be reread, the System
Administrator must shut down the daemon and restart it.
Usage:
lmreread [-c <license file>]
f
44
Option:
Action:
-c <license file>
Uses the specified license file. If a license file is not
specified, lmreread looks for the environment
variable, LM_LICENSE_FILE. If no -c option is
specified, lmreread looks for the environment
variable LM_LICENSE_FILE to find the license file.
If the environment variable is not set, lmreread
looks for /usr/local/flexlm/licenses/license.dat.
See also ÒlmdownÓ on page 42.
Altera Corporation
81_GSBOOK.fm5 Page 45 Tuesday, October 14, 1997 4:04 PM
Section 1: MAX+PLUS II Installation
lmver
The lmver utility reports the FLEXlm version of a library or binary file.
Usage:
lmver <filename>
lmhostid
The lmhostid utility reports the host ID of a system.
Usage:
lmhostid
The following lines show sample output of lmhostid:
lmhostid-Copyright(C)1989,1990 Highland Software, Inc.
The FLEXlm host ID of this machine is "69021c89"
Altera Corporation
45
81_GSBOOK.fm5 Page 46 Tuesday, October 14, 1997 4:04 PM
MAX+PLUS II Getting Started
Installing the PC Software Guard
To run MAX+PLUS II software on a PC, you must install the MAX+PLUS II
Software Guard and/or the authorization code provided with your
development system. If your development system includes a Software
Guard, you must install the guard before you can enter the authorization
code successfully.
1
If you are installing MAX+PLUS II software using an ES Site
License, you do not need a Software Guard. Go to ÒSpecifying the
Authorization Code for a Software Guard InstallationÓ on page 48
for more information.
To install the Software Guard on a PC or compatible computer, follow these
steps:
1.
Locate a parallel printer port (i.e., an LPT port) on the computer. If you
have a printer connected to this port, disconnect it temporarily.
2.
Insert the 25-pin male connector end of the Software Guard into the
25-pin female connector of the parallel printer port, as shown in
Figure 1-2.
1
46
1.
Do not connect the MAX+PLUS II Software Guard to
either end of an Iomega Zip or Ditto drive. Iomega
Zip and Ditto drives can destroy a Software Guard by
drawing more power than the guard is capable of
handling.
2.
Disconnect the Software Guard before using the
parallel port with the Interlink file transfer program.
Failure to do so can cause damage to the Software
Guard.
Altera Corporation
81_GSBOOK.fm5 Page 47 Tuesday, October 14, 1997 4:04 PM
Section 1: MAX+PLUS II Installation
Figure 1-2. Attaching the Software Guard to a PC
Parallel printer port
25-pin female connector
s rIdI
plu
Gua
Xt+
are
A
w
M of
S
Software Guard
25-pin female
connector
3.
If necessary, re-insert the printer cable connector into the female
connector of the Software Guard.
4.
If you move the MAX+PLUS II Software Guard to a different port, you
may need to update the maxplus2.ini file to include the name and
location of the new port if MAX+PLUS II cannot locate the guard. For
example, if you change the Software Guard port to LPT2, ensure that
your maxplus2.ini file contains the following line:
GUARD_PORT=2
If you suspect that your Software Guard is faulty or damaged, contact the
Altera Applications Department. Go to Appendix B: Altera Support Services for
more information about technical support.
Altera Corporation
47
81_GSBOOK.fm5 Page 48 Tuesday, October 14, 1997 4:04 PM
MAX+PLUS II Getting Started
Specifying the Authorization Code or License File
Most development system configurations require you to enter an
authorization code when you run MAX+PLUS II for the first time. When
you start MAX+PLUS II for the first time, the Authorization Code dialog
box (Options menu) appears automatically. See Figure 1-3.
Figure 1-3. MAX+PLUS II Authorization Code Dialog Box
The steps required to specify the authorization code depend on whether you
have a Software Guard or license file-based MAX+PLUS II system
installation.
Specifying the Authorization Code for a Software Guard Installation
To specify the authorization code for an installation that includes a Software
Guard, follow these steps:
48
1.
In the Authorization Code dialog box, select Software Guard ID under
Method, and verify that the ID number displayed matches the number
printed on your Software Guard.
2.
Type your authorization code, using upper- and lower-case letters
exactly as provided by Altera.
Altera Corporation
81_GSBOOK.fm5 Page 49 Tuesday, October 14, 1997 4:04 PM
Section 1: MAX+PLUS II Installation
3.
Choose Validate to confirm your authorization code. Available
features will be listed in the Available Features box.
4.
Choose OK.
Specifying the License File for a License File Installation
To specify the license file that contains your authorization code, follow these
steps:
v
In the Authorization Code dialog box, select Network License File
under Method. Available features will be listed in the Available Features
box.
If the dialog box indicates that MAX+PLUS II cannot locate the license.dat
file, choose Browse to open the License File dialog box and locate a suitable
license.dat file.
MAX+PLUS II Site License Information
When you purchase a MAX+PLUS II development system for a single-user
PC, it includes a site license to install an unlimited number of copies of the
PLS-ES feature set. Feel free to pass MAX+PLUS II software along to your
colleagues. The additional MAX+PLUS II systems on the site license have
only one requirement: after installation, each individual user must contact
Altera for an authorization code (at no cost). For details on getting an
authorization code, go to ÒRegistering MAX+PLUS II SoftwareÓ on page 4.
Specifying Authorization Codes for MegaCore & AMPP Licenses
To specify authorization codes for Altera-provided MegaCore
megafunctions or AMPP-provided megafunctions, follow these steps:
1.
In the Authorization Code dialog box, choose MegaCore/AMPP
Licenses. The MegaCore/AMPP Licenses dialog box is displayed.
2.
Type the megafunction ID number provided by Altera or an AMPP
vendor in the Megafunction ID box.
Altera Corporation
49
81_GSBOOK.fm5 Page 50 Tuesday, October 14, 1997 4:04 PM
MAX+PLUS II Getting Started
3.
Type the authorization code for your megafunction using upper- and
lower-case letters, exactly as provided by Altera or the AMPP vendor,
in the License Authorization Code box.
4.
Choose Add to add the megafunction ID number and authorization
code to the list of Existing IDs/Authorization Codes without closing the
dialog box.
or:
Choose OK.
Once you enter the appropriate information and choose OK, you can fully
compile the megafunction in MAX+PLUS II to generate output netlist files
and programming files.
50
Altera Corporation
81_GSBOOK.fm5 Page 51 Tuesday, October 14, 1997 4:04 PM
Section 1: MAX+PLUS II Installation
Installing the Adobe Acrobat Reader
The Altera-provided Software Interface Guides for EDA tools from
Cadence, Mentor Graphics, Synopsys, and Viewlogic (Powerview) are
provided in the \lit directory on the MAX+PLUS II CD-ROM in the Adobe
Portable Document File (PDF) format. These files are readable with the
Adobe Acrobat Reader 3.0, which requires 4 Mbytes of application RAM. If
you do not already have a copy of the Adobe Acrobat Reader, you can install
it from the MAX+PLUS II CD-ROM.
To install the Adobe Acrobat Reader on a PC running Windows NT or
Windows 95, follow these steps:
1.
Insert the MAX+PLUS II CD-ROM into your CD-ROM drive.
2.
Choose Run (Start menu) and type <CD-ROM drive>:\acroread\
win\32bit\setup.exe 9.
3.
Follow the instructions in the setup program.
To install the Adobe Acrobat Reader on a UNIX workstation, follow these
steps:
1.
Refer to the /acroread/instguid.txt file on the MAX+PLUS II CD-ROM
for information on system requirements and compatibility.
2.
Ensure that you are logged on as a superuser.
3.
Mount the MAX+PLUS II CD-ROM as described in Table 1-2 on
page 16.
4.
If you have an HP 9000 Series 700/800 workstation, type the following
commands:
# cd /cdrom/cdrom0/ACROREAD/UNIX 9
# ./INSTALL\;1 9
On other supported UNIX workstation platforms, type the following
commands:
# cd /cdrom/cdrom0/acroread/unix 9
# ./install 9
5.
Altera Corporation
Follow the instructions in the install program.
51
81_GSBOOK.fm5 Page 52 Tuesday, October 14, 1997 4:04 PM
MAX+PLUS II Getting Started
6.
To run the Adobe Acrobat Reader, type the following command:
# /<installation directory>/bin/acroread 9
Once you have installed the Adobe Acrobat Reader, you can read the
following Software Interface Guide files in the \lit directory:
Document:
Filename:
Cadence & MAX+PLUS II Software Interface Guide
Mentor Graphics & MAX+PLUS II Software Interface Guide
Viewlogic Powerview & MAX+PLUS II Software Interface Guide
Synopsys & MAX+PLUS II Software Interface Guide
ac_sig.pdf
am_sig.pdf
av_sig.pdf
as_sig.pdf
f
52
Go to the MAX+PLUS II read.me file for information on other supported
platforms for the Adobe Acrobat Reader.
Altera Corporation
81_GSBOOK.fm5 Page 53 Tuesday, October 14, 1997 4:04 PM
Section 1: MAX+PLUS II Installation
Installing the Programming Hardware
Table 1-3 shows the programming hardware configurations that are
available for use with MAX+PLUS II.
Table 1-3. MAX+PLUS II Programming Hardware Configurations
Platform
Hardware/Application
PC
The LP6 Programmer Card and the Master Programming Unit (MPU) base
unit and its adapters.
PC
The FLEX Download Cable, which is used in conjunction with the LP6 Logic
Programmer Card, MPU, and a Configuration EPROM programming
adapter to download configuration data to FLEX 10K, FLEX 8000,
FLEX 6000, and MAX 7000S devices in-system.
PC or UNIX
workstation
The BitBlaster Serial Download Cable, which is connected to a serial port to
download configuration data to FLEX 10K, FLEX 8000, and FLEX 6000
devices or to program MAX 9000 and MAX 7000S devices in-system.
PC
The ByteBlaster Parallel Download Cable, which is connected to a parallel
port to download configuration data to FLEX 10K, FLEX 8000, and
FLEX 6000 devices or to program MAX 9000 and MAX 7000S devices
in-system.
This section covers the following topics:
■
■
■
■
■
■
Installing PC-Based Programming Hardware...................................... 53
Installing the LP6 Logic Programmer Card .......................................... 54
Installing the Master Programming Unit .............................................. 57
Installing the FLEX Download Cable on a PC...................................... 60
Installing the BitBlaster on a PC or UNIX Workstation ...................... 61
Installing the ByteBlaster on a PC .......................................................... 65
Installing PC-Based Programming Hardware
If you have purchased a system with an LP6 Logic Programmer card, you
should follow the installation instructions in the order described here.
1.
Altera Corporation
Install the LP6 card by following the instructions that begin on
page 54.
53
81_GSBOOK.fm5 Page 54 Tuesday, October 14, 1997 4:04 PM
MAX+PLUS II Getting Started
2.
Assemble the Master Programming Unit (MPU) and connect it to the
Logic Programmer Card in your PC by following the instructions
below.
3.
Optionally connect the FLEX Download Cable to your PC by
following the instructions that begin on page 60.
If your MAX+PLUS II system does not include an LP6 card, depending on
which programming or configuration technique you plan to use, go through
one of the following steps:
■
■
Connect the BitBlaster Serial Download Cable to your PC by following
the instructions that begin on page 61.
Connect the ByteBlaster Parallel Download Cable to your PC by
following the instructions that begin on page 65.
Installing the LP6 Logic Programmer Card
Follow these steps to install the LP6 card in Pentium- and 486-based PCs:
1.
Be sure the computerÕs power is turned off.
2.
Remove the cover of your computer. Refer to the documentation
accompanying the computer for instructions.
3.
Ensure that all four dipswitches on the LP6 card are turned on, as
shown in Figure 1-4.
1
54
The default I/O address of the LP6 card is 280 hex. If you
must change this address because of an addressing conflict,
refer to ÒChanging the LP6 Card Address LocationÓ on
page 56 for dipswitch settings for other I/O addresses.
Altera Corporation
81_GSBOOK.fm5 Page 55 Tuesday, October 14, 1997 4:04 PM
Section 1: MAX+PLUS II Installation
Figure 1-4. Default Switch Settings on the LP6 Card
1
2
3
4
OFF
4.
Select any convenient empty expansion slot for the LP6 card. If the
expansion slot is covered, remove the screw that holds the expansion
slot cover and remove the cover. See Figure 1-5.
Figure 1-5. Removing the Expansion Slot Cover
.
Expansion
slot cover
Rear panel
5.
Insert the card into the expansion slot and fasten the retaining bracket
with the screw from the slot cover. See Figure 1-6.
Altera Corporation
55
81_GSBOOK.fm5 Page 56 Tuesday, October 14, 1997 4:04 PM
MAX+PLUS II Getting Started
Figure 1-6. Locking the Board in Place
Rear panel
6.
Tighten all the locking screws on all connectors.
Changing the LP6 Card Address Location
You can configure the LP6 card for different I/O addresses. Table 1-4 lists
the available I/O addresses and corresponding dipswitch settings. If you
use an address other than 280 hex, you must update your hardware setup in
MAX+PLUS II. Go to ÒChanging the Hardware SetupÓ in MAX+PLUS II
Help for instructions.
56
Altera Corporation
81_GSBOOK.fm5 Page 57 Tuesday, October 14, 1997 4:04 PM
Section 1: MAX+PLUS II Installation
Table 1-4. LP6 Card I/O Addresses
Base I/O Address (hex)
Required Address Space
16 locations
270
260
250
240
230
220
210
200
2F0
2E0
2D0
2C0
2B0
2A0
290
280 (default)
Dipswitch Setting
1
0
1
0
1
0
1
0
1
0
1
0
1
0
1
0
1
(1=ON; 0=OFF)
2
3
0
0
1
1
0
0
1
1
0
0
1
1
0
0
1
1
0
0
0
0
1
1
1
1
0
0
0
0
1
1
1
1
4
0
0
0
0
0
0
0
0
1
1
1
1
1
1
1
1
Installing the Master Programming Unit
The Master Programming Unit (MPU) consists of a base unit and one or
more adapters that program MAX+PLUS II-supported Altera devices. The
PL-MPU programming unit is shipped with all PC-based development
systems that include programming hardware.
1
MAX+PLUS II also supports an older programming unit, the
PLE3-12A. The PLE3-12A programs some devices from the
Classic and MAX 5000 device families.
Figure 1-7 shows an assembled PL-MPU Master Programming Unit.
Altera Corporation
57
81_GSBOOK.fm5 Page 58 Tuesday, October 14, 1997 4:04 PM
MAX+PLUS II Getting Started
Figure 1-7. Master Programming Unit
START
PRES
S TO R
ELEA
SE AD
APTE
R
To install the MPU, follow these steps:
1.
On the rear panel of your PC, connect the 25-pin flat ribbon cable of
the PL-MPU base unit to the Logic Programmer card.
1
58
Do not plug the PL-MPU ribbon cable into the parallel
printer port.
2.
Install the adapter by sliding the two tabs at the top of the adapter into
the slots provided on the base unit. Be sure to use the appropriate
adapter for the device you want to program. See Figure 1-8.
3.
Carefully lower and align the other end of the adapter, so that the
connector in the adapter is inserted into the socket on the base unit.
Press down firmly.
4.
Open the MAX+PLUS II Programmer or Simulator. Choose the
Hardware Setup command (Options menu), and select
LP6 + PL-MPU in the Hardware Type drop-down list box. Choose OK.
Altera Corporation
81_GSBOOK.fm5 Page 59 Tuesday, October 14, 1997 4:04 PM
Section 1: MAX+PLUS II Installation
Figure 1-8. Installing the Adapter
START
To release an adapter from the base unit:
1.
Press down on the front of the unit, while holding down the other end.
See Figure 1-9.
2.
Lift out the adapter.
Altera Corporation
59
81_GSBOOK.fm5 Page 60 Tuesday, October 14, 1997 4:04 PM
MAX+PLUS II Getting Started
Figure 1-9. Releasing the Adapter
START
PRES
S TO R
ELEA
SE AD
APTE
R
Installing the FLEX Download Cable on a PC
You can install an optional cable that allows you to download configuration
data to configure FLEX 6000, FLEX 8000, and FLEX 10K devices in-system.
To set up the FLEX Download Cable for configuration:
60
1.
Insert a Configuration EPROM programming adapter (e.g., PLMJ1213
or PLMT1064) into the PL-MPU base unit.
2.
Connect the FLEX Download Cable to the 9-pin D-type connector on
the Configuration EPROM programming adapter, as shown in
Figure 1-10.
Altera Corporation
81_GSBOOK.fm5 Page 61 Tuesday, October 14, 1997 4:04 PM
Section 1: MAX+PLUS II Installation
Figure 1-10. Connecting the FLEX Download Cable
9-Pin Connector
3.
f
Connect the other end of the FLEX Download Cable to the 10-pin male
header on the target printed circuit board.
Go to Application Note 87 (Configuring FLEX 6000 Devices), Application Note 33
(Configuring FLEX 8000 Devices), Application Note 38 (Configuring Multiple
FLEX 8000 Devices), and Application Note 59 (Configuring FLEX 10K Devices)
for instructions on how to configure FLEX 6000, FLEX 8000, and FLEX 10K
devices.
Installing the BitBlaster on a PC or UNIX Workstation
The BitBlaster can be used with a PC or UNIX workstation RS-232 serial port
(called a ÒCOM portÓ on a PC). To set up the BitBlaster for device
configuration or programming follow these steps:
1.
Altera Corporation
Connect the BitBlaster to the serial port on the computer. Figure 1-11
shows a typical serial port on a PC.
61
81_GSBOOK.fm5 Page 62 Tuesday, October 14, 1997 4:04 PM
MAX+PLUS II Getting Started
Figure 1-11. Connecting the BitBlaster to the Serial Port on the Computer
BITBLA
STER
2.
62
Connect the other end of the BitBlaster to the 10-pin male header on
the target printed circuit board. See Figure 1-12.
Altera Corporation
81_GSBOOK.fm5 Page 63 Tuesday, October 14, 1997 4:04 PM
Section 1: MAX+PLUS II Installation
Figure 1-12. BitBlaster and 10-Pin Female Connector
Receptacle
for pin 1
Status lights
R
ERRO
BUSY
DONE
ER
POW
ER
LAST
BITB
25-pin
female port
to 10-pin
male header
on circuit
board
Baud rate dipswitches
3.
Open the MAX+PLUS II Programmer or Simulator. Choose the
Hardware Setup command (Options menu), and select
BitBlaster in the Hardware Type drop-down list box. Choose OK.
4.
You must ensure that the baud rate of the BitBlaster, your computerÕs
serial port, and the baud rate set in MAX+PLUS II are the same. If
necessary, you can change the BitBlasterÕs baud rate by setting the
dipswitches on the side panel. Dipswitch settings are listed in
Table 1-5.
1
You should set the baud rate as high as possible to accelerate
configuration time. However, some PC-based systems cannot use
baud rates higher than 9600 bps.
Table 1-5. BitBlaster Baud Rate Dipswitch Settings
Baud Rate (bps)
9,600
14,400
19,200
38,400
57,600
76,800
115,200
230,400
Altera Corporation
Dipswitches 1 through 3
(1 = ON; 0 = OFF)
1
0
1
0
1
0
1
0
1
1
0
0
1
1
0
0
1
1
1
1
0
0
0
0
63
81_GSBOOK.fm5 Page 64 Tuesday, October 14, 1997 4:04 PM
MAX+PLUS II Getting Started
f
Go to ÒChanging the Hardware SetupÓ in MAX+PLUS II Help for more
information on setting baud rates.
Configuring an IBM RISC System/6000 Workstation Serial Port for
Programming
You can use the MAX+PLUS II Programmer and the BitBlaster to program
and configure devices with an IBM RISC System/6000 workstation. In order
to use the Programmer, you must turn off the Carrier Detect feature on the
workstationÕs serial port to ensure that it will not block the programming
signals.
To turn off the Carrier Detect feature:
64
1.
Become root.
2.
Start the smit system management tool.
3.
Choose the following options in order:
a.
Devices
b.
TTY
c.
Change/Show Characteristics of a TTY
d.
tty0 or tty1 (the name of the serial port you are currently using)
e.
Change/Show TTY Program
4.
Select the Entry Field for STTY attributes for RUN TIME.
5.
Append ,clocal to the end of the text string in the Entry Field.
6.
Select the Entry Field for STTY attributes for LOGIN.
7.
Append ,clocal to the end of the text string in the Entry Field.
8.
Press 9.
Altera Corporation
81_GSBOOK.fm5 Page 65 Tuesday, October 14, 1997 4:04 PM
Section 1: MAX+PLUS II Installation
Installing the ByteBlaster on a PC
The ByteBlaster Parallel Download Cable is designed to be used with a PC
parallel port (i.e., a printer port). You can connect the ByteBlaster directly to
your PCÕs parallel port, or through the MAX+PLUS II Software Guard.
To install and set up the ByteBlaster for device configuration or
programming, follow these steps:
1.
If you are running the Windows NT 3.51 or 4.0 operating system,
ensure that the Altera ByteBlaster driver is installed. Go to ÒInstalling
Windows NT DriversÓ on page 10 for instructions.
2.
Attach the ByteBlaster to a parallel port on your PC and insert the
10-pin female plug into the prototype system containing the target
device, as shown in Figure 1-13.
1
The board must supply power to the ByteBlaster.
Figure 1-13. ByteBlaster Parallel Port Download Cable
B Y T EB
Altera Corporation
LAST
ER
65
81_GSBOOK.fm5 Page 66 Tuesday, October 14, 1997 4:04 PM
MAX+PLUS II Getting Started
3.
f
66
Open the MAX+PLUS II Programmer or Simulator. Choose the
Hardware Setup command (Options menu), select ByteBlaster in the
Hardware Type drop-down list box, and select the appropriate LPT
port in the Parallel Port drop-down list box. Choose OK.
Go to ÒChanging the Hardware SetupÓ in MAX+PLUS II Help for more
information on setting up the ByteBlaster.
Altera Corporation
81_GSBOOK.fm5 Page 67 Tuesday, October 14, 1997 4:04 PM
Section 1: MAX+PLUS II Installation
Creating & Using a Local Copy of the maxplus2.ini File
The maxplus2.ini file is a software initialization file created during
installation. It contains both Altera- and user-specified parameters that
control the way MAX+PLUS II applications operate.
The maxplus2.ini file stores essential information for running
MAX+PLUS II. For example, this file stores the pathnames of the Alteraprovided primitive, megafunction, and macrofunction libraries and the
default colors for your application windows.
1
If you delete this file, you must reinstall MAX+PLUS II.
The maxplus2.ini file can be stored in one of several locations: for a singleuser PC installation, it is stored in the MAX+PLUS II system directory
(\maxplus2); on a UNIX workstation, it is stored in your home directory. If
you use a network copy of MAX+PLUS II, or if a single computer is used by
several engineers, you must create a local copy of the maxplus2.ini file. You
must then set up an environment variable that specifies the location of the
file.
To set up a local copy of the maxplus2.ini file on a PC:
1.
Copy the existing maxplus2.ini file to the desired drive and directory.
You can also open the file in MAX+PLUS II with the Open command
(File menu) and save it to the desired drive and directory with the
Save As command (File menu).
2.
Specify the drive and directory of your maxplus2.ini file in your
Windows environment:
v
If you are using Windows NT 3.51 or 4.0, go through the
following steps:
a.
Double-click Button 1 on the System icon in the Windows
Control Panel. If you are using Windows NT 4.0, select
the Environment tab.
b.
In the Variable box, type the following text:
MAXPLUS2_INI
Altera Corporation
67
81_GSBOOK.fm5 Page 68 Tuesday, October 14, 1997 4:04 PM
MAX+PLUS II Getting Started
c.
In the Value box, type the drive and directory name,
e.g., d:\maxplus2.
d.
Choose Set, then OK.
or:
v
If you are using Windows 95, go through the following steps:
a.
Edit the autoexec.bat file that is used to boot up your
computer to include the following line:
set MAXPLUS2_INI=<drive and directory name> 9
b.
Save the changes to autoexec.bat and reboot your
computer.
To set up a local copy of the maxplus2.ini file on a UNIX workstation:
v
Copy the existing /usr/maxplus2/maxplus2.ini Þle to your home
directory with UNIX workstation commands. If you need to store the
maxplus2.ini Þle in a different location, perform the following
additional steps:
v
If you are running a C shell, add the line
setenv MAXPLUS2_INI <directory name> 9 to the .cshrc file
in your /usr/maxplus2 directory, then type the command
source .cshrc 9 at the C shell prompt.
or:
v
68
If you are running a Bourne shell, add the line
set MAXPLUS2_INI=<directory name> 9 to the .profile file in
your home directory, then type the command
source .profile 9 at the Bourne shell prompt.
Altera Corporation
81_GSBOOK.fm5 Page 69 Tuesday, October 14, 1997 4:04 PM
Section 1: MAX+PLUS II Installation
MAX+PLUS II File Organization
During MAX+PLUS II installation, two directories are created: \maxplus2
and \max2work. The \maxplus2 directory contains system software and
data files and includes the subdirectories described in Table 1-6:
1
The pathnames below are shown using the PC pathname
convention of backslash (\) characters, but UNIX pathnames use
forward slash (/) characters. On a UNIX workstation, the
max2work and maxplus2 directories are subdirectories of the /usr
directory. Otherwise the file and directory organization is
identical on PCs and UNIX workstations, except where noted.
Table 1-6. MAX+PLUS II System Directory Structure (Part 1 of 2)
Directory
Description
.\adm
Contains FLEXlm license manager daemon, license files, and license
manager executable files (UNIX workstation and network
installations only).
.\bin
Contains the executable software program files (UNIX workstation
installations only).
.\common
Contains common UNIX files (UNIX workstation installations only).
.\drivers
Contains Windows NT device drivers (PC installations for Windows
NT only).
.\edc
Contains Altera-provided EDIF Command Files (.edc) that customize
EDIF Output Files (.edo) for specific third-party simulation
environments.
.\fonts
Contains Altera, Arial, and MS Sans Serif fonts (UNIX workstation
installations only).
.\hp
Contains platform-specific files for HP 9000 Series 700/800 UNIX
workstation installations.
.\lmf
Contains Altera-provided Library Mapping Files (.lmf) that map
third-party logic functions to equivalent MAX+PLUS II logic
functions.
.\max2inc
Contains Include Files (.inc) with Function Prototypes for Alteraprovided macrofunctions. Function Prototypes list the ports
(pinstubs) for macrofunctions that can be implemented in Altera
Hardware Description Language (AHDL) Text Design Files (.tdf).
.\max2lib\edif
Contains primitives and macrofunctions used for third-party EDIF
interfaces.
Altera Corporation
69
81_GSBOOK.fm5 Page 70 Tuesday, October 14, 1997 4:04 PM
MAX+PLUS II Getting Started
Table 1-6. MAX+PLUS II System Directory Structure (Part 2 of 2)
Directory
Description
.\max2lib\mega_lpm
Contains megafunctions, including Library of Parameterized
Modules (LPM) functions, and the corresponding Include Files that
contain their AHDL Function Prototypes.
.\max2lib\mf
Contains old-style 74-series and custom macrofunctions.
.\max2lib\prim
Contains Altera-provided primitives.
.\rs6000
Contains platform-specific files for IBM RISC System/6000 UNIX
workstation installations.
.\solaris
Contains platform-specific files for Solaris UNIX workstation
installations.
.\sunos
Contains platform-specific files for SunOS UNIX workstation
installations.
.\vhdlnn\altera Note (1)
Contains the altera library with the maxplus2 package. This package
includes all MAX+PLUS II primitives, megafunctions, and
macrofunctions supported by VHDL.
.\vhdlnn\ieee Note (1)
Contains the ieee library of VHDL packages, including
std_logic_1164, std_logic_arith, std_logic_signed, and
std_logic_unsigned.
.\vhdlnn\std Note (1)
Contains the std library with the standard and textio packages
defined in the IEEE Standard VHDL Language Reference Manual.
Note:
(1) nn represents Ò87Ó or Ò93,Ó indicating VHDL 1987 or 1993 support.
The \max2work directory contains tutorial and sample files and includes
the subdirectories described in Table 1-7:
Table 1-7. MAX+PLUS II Working Directory Structure
Directory
Description
.\ahdl
Contains the sample files used to illustrate ÒHow to Use AHDLÓ topics in
MAX+PLUS II Help and in the MAX+PLUS II AHDL manual.
.\chiptrip
Contains all files for the chiptrip tutorial project described in this manual.
.\edif
Contains all sample files used to illustrate EDIF features in MAX+PLUS II Help.
.\tutorial
Contains the read.me file for the chiptrip tutorial. You should create the files for the
chiptrip project in this subdirectory.
70
Altera Corporation
81_GSBOOK.fm5 Page 71 Tuesday, October 14, 1997 4:04 PM
Section 1: MAX+PLUS II Installation
Table 1-7. MAX+PLUS II Working Directory Structure
Directory
Description
.\vhdl
Contains the sample files used to illustrate ÒHow to Use VHDLÓ topics in
MAX+PLUS II Help and in the MAX+PLUS II VHDL manual.
.\verilog
Contains the sample files used to illustrate ÒHow to Use Verilog HDLÓ topics in
MAX+PLUS II Help and in the MAX+PLUS II Verilog HDL manual.
f
Go to the Altera-provided Software Interface Guide for your third-party
environment for information on the directory structure of the files installed
for third-party interfaces to MAX+PLUS II.
Altera Corporation
71