1
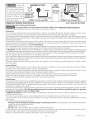
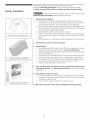
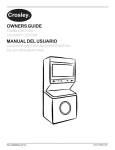
DRYER
:CHEU
P/N 134874900A
(0712)
Table of Contents
Important Safety Instructions ..............................................................
Drying Procedures ...............................................................................
Features ............................................................................................
Care and Cleaning ............................................................................
Common Drying Problems ...................................................................
Avoid Service Checklist .......................................................................
Warranty ...........................................................................................
Franc ais..........................................................................................
Assistance
If you need assistance or service, first see the "Avoid Service
Checklist" section. Additional help is available by calling
1-800-944-9044 from anywhere in the U.S.A., or write:
Crosley Corpora tien
111 Cloverleaf Dr.
Suite 200
Winston Salem, NC27103
Information may also be obtained by vising our website at
www.crosley.com.
In Canada, for assistance, installation or service call:
1-800-668-4606, orwrite:
Crosley Corporation
111 Cloverleaf Dr.
Suite 200
Wins ton Salem, NC 27103
2-3
4
5
5-6
6
7
8
9-15
Pedestal
A pedestal accessory, Model No, NLPWD15
(White),
NLPWD15GB
(Glacier
Blue),
NLPWD15P (Platinum)
and NLPWD15E
(Black), specifically designed for this dryer may
be used when elevating the dryer for ease of
use. Failure to use accessories certified by the
manufacturer could result in personal injury,
property damage or damage to the dryer.
or Service
Read and Save These Instructions
Product Registration
Thank you for choosing this dryer. This owner's guide will
explain proper operation and care.
Register Your Product
The self-add tossed PRODUCTREGISTRA TION CARD shou Id
be filled in completely, signed and returned.
Record Your Model and Serial Numbers
The model and serial numbers of your dryer are found on the
dryer serial plate located on the left side of the door opening.
Record and retain these numbers.
Model
Number:
Serial Number:
Purchase Date:
Note:The instructions appearing in this Owner's Guide are not meant to cover every possible condition and situation that may occur.
Common sense and caution must be practiced when installing, operating and maintaining any appliance.
This Owner's Guide provides general operating instructions for your dryer. It also contains information about features for several
other models. Your dryer may not have every feature included.
Use the dryer only as instructed in this Owner's Guide and the Operating
Instructions
card included with your dryer.
The symbol
on the product or on its packaging indicates that this product may not be treated as household waste.
Instead it shall be handed over to the applicable collection point for the recycling of electrical and electronic equipment. By
ensuring this product is disposed of correctly, you will help prevent potential negative consequences for the environment and
human health, which could otherwise be caused by inappropriate waste handling of this product. For more detailed information
about recycling of this product, please contact your local city office, your household waste disposal service or the shop where
you purchased the product.
DRYER
SAFETY
Your safety and the safety of others is very important.
We have provided many important safety messages in the Use and Care Guide, Operating Instructions, Installation Instructions
and on your appliance. Always read and obey all safety messages.
This is the safety alert symbol. This symbol alerts you to hazards that can kill or hurt you or others. All safety messages
will be preceded by the safety alert symbol and the word "DANGER" or "WARNING" These words mean:
_
You can be killed or seriously injured if you don't immediately_follow
You can be killed or seriously injured if you don't foflow
instructions.
instructions.
All safety messages will identify the hazard, tell you how to reduce the chance of injury, and tell you what can happen if the
instructions are not followed.
Foryour safety, the information in this manual must be followed to minimize the risk of fire or explosion or to prevent
property damage, personal injury or loss of life.
Do not store or use gasoline or other flammable vapors and liquids in the vicinity of this or any other appliance.
WHAT TO DO IF YOU SMELL GAS:
•
Do not try to light any appliance.
Do not touch any electrical switch; do not use any phone in your building.
Clear the room, building or area of all occupants.
Immediately call your gas supplier from a neighbor's phone. Follow the gas supplier's instructions.
If you cannot reach your gas supplier, call the fire department.
Installation and service must be performed by a qualified installer, service agency or the gas supplier.
2
ELECTR/C DRYERS:
GAS
Avoidfire
14-30R
DRYERS:
hazardorelectrical
shock.
Donotuseanadaptor
plug
DRYER
or extension cord or
type wall
removegroundingprong FUSED30 AMP
receptacle
fromelectrical
powercord. 120/240V OR
Failure to follow this 120/208V WALL
DRYERSERVICECORD
warningcancause
serious RECEPTACLE
injury,fireordeath.
CORRECTUse this way ONL Y
©
Importan
t Safety Instructions
Read all instructions
Power
supply
cord
with
3-prong
grounding
plug
v_ay ONLY
SAVETHESE
INSTRUCTIONS
before using this dryer.
You can be killed or seriously injured if you don't follow these Important Safety Instructions:
• Failure to comply with these warnings could result in serious personal injuries.
Prevent Fire
Do not dry items that have been previously cleaned in, soaked in, or spotted with gasoline, cleaning solvents, kerosene, waxes,
etc. Do not store these items on or near the dryer. These substances give off vapors that could ignite or explode.
Do not dry articles containing rubber, plastic or similar materials such as bras, galoshes, bath mats, rugs, bibs, baby pants, plastic
bags and pillows that may melt or burn. Some rubber materials, when heated, can under certain circumstances produce fire by
spontaneous combustion.
Clean the lint screen before or after each load. The interior of the dryer, lint screen housing and exhaust duct should be cleaned
approximately every 18 months by qualified service personnel. An excessiveamount of lint build-up in these areas could result in
inefficient drying and possible fire. See Care and Cleaning.
Do not operate the dryer if the lint screen is blocked, damaged or missing. Fire hazard, overheating and damage to fabrics can
occur. If your dryer has a drying rack, always replace the lint screen when finished using the drying rack.
- Risk ofFire- A clothes dryer produces combustible lint. The dryer must be connected to an exhaust outdoors. Regularly inspect
the outdoor exhaust opening and remove any accumulation of lint around the outdoor exhaust opening and in the surrounding area.
Do not obstruct the flow of ventilating air. Do not stack or place laundry or throw rugs against the front or back of the dryer.
Do not spray any type of aerosol into, on or near dryer at any time.
Do not usefabric softeners or products to eliminate static unless recommended bythe manufacturer of the fabric softener or product.
Do not place items exposed to cooking oils in you r dryer. Items contaminated with cooking oils may contribute to a chemical reaction
that could cause a load to catch fire.
Failure to comply with these warnings could result in fire, explosion, serious bodily injury and/or damage to the rubber or plastic
parts of the dryer.
Pro tect Children
Do not allow children to play on or in the dryer. Close supervision of children is necessary when the dryer is used near children.
As children grow, teach them the proper, safe use of all appliances.
Destroy the carton, plastic bag and other packing materials after the dryer is unpacked. Children might use them for play. Cartons
covered with rugs, bedspreads or plastic sheets can become airtight chambers.
Keep laundry products out of children's reach. To prevent personal injury, observe all warnings on product labels.
Before the dryer is removed from service or discarded, remove the dryer door to prevent accidental entrapment.
Failure to comply with these warnings could result in serious personal injuries.
Pro yen t Injury
To prevent shock hazard and assure stability during operation, the dryer must be installed and electrically grounded by a qualified
service person in accordance with local codes. Installation instructions are packed in the dryer for the installer's reference. Refer to
INSTALLATION INSTRUCTIONSfor detailed grounding procedures. If the dryer is moved to a new location, have it checked and
reinstalled by a qualified service person.
To prevent personal injury or damage to the dryer, the electrical power cord of a gas dryer must be plugged into a properly grounded
and polarized 3-prong outlet The third grounding prong must never be removed. Never ground the dryer to a gas pipe.
Do not use an extension cord or an adaptor plug.
ALWAYS disconnect the dryer from the electrical supply before attempting any service or cleaning. Failure to do so can result
in electrical shock or injury.
Do not use any type spray cleanser when cleaning dryer interior. Hazardous fumes or electrical shock could occur.
To prevent injury, do not reach into the dryer if the drum is moving. Wait until the dryer has stopped completely before reaching
into the drum.
To prevent injury and damage to the dryer:
AIIrepairs and servicing must be performed by an authorized servicer unless specifically recommended in this Owner's
Guide. Use only authorized factory parts.
Do nottamper with controls.
Do not install or store the dryer where it will be exposed to the weather.
A thermal limiter switch automatically turns off the motor in the unlikely event of an overheated situation (electric dryers only). A
service technician must replace the thermal limiter switch after correcting the fault.
Failure to comply with these warnings could result in serious personal injuries.
3
Printed in U.S.A.
Follow the guidelines below for preparing the load for drying.
Read the Operating Instructions card for operating your specific model.
Always read and fellow fabric care labels and laundry preduct labels.
Drying
Procedures
To reduce the risk of fire, electrical shock, or injury to persons, read
Important Safety Instructions before operating this dryer.
.
Follow fabric care label instructions.
Prepare items for drying.
Dry items of similar fabric, weight and construction in the same load.
Separate dark items from light-colored items. Separate items that shed lint
from those that attract lint. If an item sheds lint, turn it inside out.
Besure buckles, buttons and trim are heatproof and won't damagethe drum
finish. Close zippers, fasten hooks and Velcro®-Iike fasteners. Tiestrings and
sashesto prevent snagging and tangling.
If possible, turn pockets inside out for even drying.
Check for stains which may not have been removed in washing. Dryer heat
may permanently set some stains. Repeat stain removal process before
drying.
Place small items in a mesh bag to prevent tangling and for easy removal.
2.
Check that lint screen is clean and in place.
3.
Load the dryer.
The average load will fill the drum 1/3 to 1/2 full. Items need room totumble
freely for even drying and less wrinkling. De net overload dryer.
When drying large items, dry only 2 or 3 at a time. Fillout the load with small
and medium sized items.
For delicate or very small loads, add 2 lint-free towels for better drying, less
wrinkling, and to prevent grease stains caused by fabric softener sheets.
Do not overdry items. Overdrying can causewrinkling, shrinkage, harshness,
and a build-up of static electricity, which can produce more lint.
If desired, add a dryer fabric softener sheet.
Placesmall items in a mesh bag.
4.
Close the dryer door and select the cycle, temperature, dryness level
and options desired. See Operating Instructions for your specific model
information.
5. Press START to begin the cycle.
To add or remove itemswhen the dryer is running open the door. The dryer
will stop when the door isopened. Allow the drum to come to a complete
stop before reaching inside.
Close the door and press START to resume the cycle.
Fill dryer drum 1/3 to 1/2 full.
6. When the cycle ends, remove items immediately
and hang or fold.
End of Cycle Signal
A signal will sound at the end of the cycle and periodically during Press Saver at
the volume level selected. (some models)
Features
Drum Light (some models)
A drum light will come on whenever the door isopened to illuminate the dryer drum
during loading and unloading. Closing the door turns off the light.
Reversible Dryer Door
Your dryer is equipped with a reversible door. The door can be hinged on the right
or left side. Refer to the INSTALLATION INSTRUCTIONS for directions on
changing the door.
Drying Rack (some models)
Use the drying rack to dry items which should not be tumble dried.
1. Open the dryer door and remove the lint screen.
2. Insert drying rack into the dryer drum. Place the front bar under the lip of the
lint screen opening.
3. Place items to be dried on top of the rack. Weight should not exceed 10 Ibs.
Leavespace between items, but do not let items hang over the sides or through
the grids. Do not tumble other items when using the drying rack.
4. Select Timed Dry. Use only the Air Fluff/No Heat option for items containing
plastic, foam rubber, rubber-like materials, feathers or down.
5. When items are dry, remove the rack and replace the lint screen. If lint screen
is not in place, tumbling items could enter the exhaust system and cause
damage to the dryer.
Place the front bar under
the lip of the lint screen opening.
Care
and
Cleaning
To reduce risk of fire or serious injury to persons or property, comply
with the basic warnings listed in important Safety instructions
and those listed
below.
•
Before cleaning the dryer interior, unplug the electrical power cord to avoid
electrical shock hazards.
Do not use any type spray cleanser when cleaning dryer interior. Hazardous
fumes or electrical shock could occur.
inside
Clean the lint screen after every load. Lint build-up in the screen restricts air flow,
which causeslonger drying times. The screen islocated at the bottom of the door
opening. Remove by pulling straight up. Remove the lint and replace the screen.
CAUTION - Risk of Fire - A clothes dryer produces combustible lint, The
dryer must be connected to an exhaust outdoors, Regularly inspect the
outdoor exhaust opening and remove any accumulation of lint around the
outdoor exhaust opening and in the surrounding area,
Clean lint screen after every load.
Occasionally a waxy build-up may form on the lint screen from using dryer-added
fabric softener sheets. To remove this build-up, wash the lint screen in warm,
soapy water. Dry thoroughly and replace. Do not operate the dryer without the
lint screen in place.
If the dryer drum becomes stained from noncolorfast fabrics, clean the drum with
a damp cloth and a mild liquid household cleanser. Remove cleanser residue
before drying the next load.
Every 18 months an authorized servicer should clean the dryer cabinet interior
and exhaust duct. These areas can collect lint and dust over time. An excessive
amount of lint build-up could result in inefficient drying and possible fire hazard.
5
Care and
Cleaning
(continued)
Outside
•
Clean the cabinet with mild soap and water. Never use harsh, gritty
abrasive cleansers.
or
•
If the cabinet becomes stained, clean with diluted chlorine bleach [1/2 cup (120
ml) in 1 quart (.95 liter) water]. Rinse several times with clear water.
•
Remove ghe residue from tape or labelswith a mixture of warm water and mild
detergent. Or, touch residue with the sticky side of the tape or label.
•
Beforemovingthedryer,
placeastripofcardboardorthinfiberboardunder
the front leveling legs to prevent damage to floor.
Do not store or place laundry products
on top of dryer at any time. They can
damage the finish or controls.
Common
Drying
Problems
Many drying problems involve poor cleaning results, poor soil and stain removal, residues of lint and scum, and fabric damage.
For satisfactory drying results, follow these suggestions provided by The Soap and Detergent Association.
PROBLEM
POSSIBLECAUSES
SOLUTIONS
PREVENTIVEMEASURES
Greasy, oily • Fabric softener sheet.
stains
• Rub fabric softener stainswith bar soap. • Add a few bath towels to small loads fo
Rinse and rewash.
propertumbling.
• Some "silk-like" fabrics should be ai
dried.
• Use proper drying temperature.
• Placefabric softener sheet on top of Ioac
before starting the dryer.
Lint
• Overloading.
• Overdrying causes static
electricity.
• Lint screen not clean
when cycle began.
• Lint is attached to "pills."
• Reduce load size and rewash using liquid • Do not overload dryer.
fabric softener in the final rinse.
• Use fabric softener in washer or dryer tc
reduce static electricity.
• Or, add a fabric softener sheet and
tumble without heat.
• Remove items when they are slightl}
• Use lint brush or roller to remove lint.
damp to avoid overdrying.
• Check that lint screen is clean and ir
place.
Pilling
• Pilling is normal with
(Fibers break
synthetic and permanent
off, ball up
press fabrics. This is due
to abrasion from normal
and cling to
fabric.)
wear.
• Use a lint brush or shaver to remove pills. • Use fabric softener to lubricate fibers.
• When ironing, use spray starch or fabric
finish on collars and cuffs.
• Turn items inside outto reduce abrasion
Shrinking
• Overdrying.
• Irreversible condition.
• Follow fabric care label directions.
• If shrinking isa concern, check load often
• Remove items while slightly damp anc
hang or lay flat to complete drying.
• Block knits into shape.
Wrinkling
• Overloading.
• Leaving items in dryer
after cycle ends.
• Reduce load size and tumble at medium
or low heat for 5-10 minutes.
• Remove items immediately. Hang or
fold.
• Do not overload dryer.
• Remove items as soon as cycle ends.
Avoid Service
ChecMist
Before calling for service, review this list. It may save both time and expense. The list includes
common occurrences that are not the result of defective workmanship or materials in this dryer.
OCCURRENCE
POSSIBLE CAUSE
SOLUTION
Dryer does not start.
Electrical power cord is not securely plugged
in or plug may be loose.
Make sure the plug fits tightly in wall outlet.
House fuse blown or circuit breaker tripped.
Reset circuit breaker or replace fuse.
Make sure electrical line is not overloaded and the dryer ison
a separate circuit.
Dryer runs but won't heat.
Drying cyde takes too long,
outside of the dryerfeels too
hot or smells hot.
Thermal limiter tripped.
Call authorized service person for replacement.
There are 2 house fuses in the dryer circuit. If
1 of the 2 fuses is blown, the drum may turn
but the heater will not operate.
Replace fuse.
Gas supply valve is not open (gas models).
Check to make sure supply valve is open. See INSTALLATION
INSTRUCTIONSfor procedure.
Dryer does not have anough air supply to
support the burner flame (gas models).
See INSTALLATION INSTRUCTIONS.
LPgas supplytank isemptyor there has been
a utility interruption of natural gas (gas
models).
Refill or replace tank.
Dryer should heat when utility service is restored.
Lint screen is clogged with lint.
Makesurealllinthasbeenremovedfromthedryerlintscreen
before starting each cycle.
Exhaust duct requirements have not been
met.
Exhaustductmustbeatleast4inchesindiameterandmade
of rigid or flexible metal.
When in place, the duct must have no more than two 90 °
bends and must not exceed length listed in INSTALLATION
INSTRUCTIONS.
Excessive wrinkling.
Scratching or chipping of the
drum finish.
Electricdryerisconnectedtoa208voltcircuit.
Drying time will be 20% longer than drying on a 240 volt
circuit.
Drying procedures have not been followed.
See Drying Procedures.
Outside exhaust hood or exhaust duct may
be clogged or restricted.
Clean out any obstruction.
High humidity.
Use a dehumidifier near the dryer.
Dryer is overloaded.
Do not overload. See Drying Procedures.
Items left in dryer too long.
Remove items as soon as cycle ends.
Insufficient sorting of items.
See Drying Procedures.
Drying temperature too high.
Follow fabric care label instructions.
Foreign objects such as coins, pins, clips or
buttons are inside the dryer.
Always remove foreign objects from pockets before
laundering. Remove objects from drum and restart dryer.
Permanently attached items such as belt
buckles, zippers and fasteners may be hitting
the inside of the drum.
It may be necessary to baste a scrap of material securely
around ornaments before drying to prevent scratching and
damage to the dryer.
Drum damage caused by foreign objects or permanen tly
attached items is not covered by the warranty.
CROSLEY
WARRANTY
Your appliance is covered by a one year limited warranty. For one year from your original date of purchase, Electrolux will pay
all costs for repairing or replacing any parts of this appliance that prove to be defective in materials or workmanship when such
appliance is installed, used and maintained inaccordance with the provided instructions.
Exclusions
This warranty
does not cover the following:
1. Products with original serial numbers that have been removed, altered or cannot be readily determined.
2. Product that has been transferred from its original owner to another party or removed outside the USA or
Canada.
3. Rust on the interior or exterior of the unit.
4. Products purchased "as-is" are not covered by this warranty.
5. Food loss due to any refrigerator or freezer failures.
6. Products used in a commercial setting.
7. Service calls which do not involve malfunction or defects in materials or workmanship, orfor appliances not
in ordinary household use or used other than in accordance with the provided instructions.
8. Service calls to correct the installation of your appliance or to instruct you how to use your appliance.
9. Expenses for making the appliance accessible for servicing, such as removal of trim, cupboards, shelves,
etc.,which are not a part of the appliance when it is shipped from the factory.
10. Service calls to repair or replace appliance light bulbs, air filters, water filters, other consumables, or knobs,
handles, or other cosmetic parts.
11. Surcharges including, but not limited to, any after hour, weekend, or holiday service calls, tolls, ferry trip
charges, or mileage expense for service calls to remote areas, including the state of Alaska.
12. Damages to the finish of appliance or home incurred during installation, including but not limited to
floors,cabinets, walls, etc.
13. Damages caused by: services performed by unauthorized service companies; use of parts other
than genuine Electrolux parts or parts obtained from persons other than authorized service companies;
or external causes such as abuse, misuse, inadequate power supply, accidents, fires, or acts of God.
DISCLAIMER OF IMPLIED WARRANTIES;
LIMITATION OF REMEDIES
CUSTOMER'S SOLE AND EXCLUSIVE REMEDY UNDER THIS LIMITED WARRANTY SHALL BE
PRODUCTREPAIR OR REPLACEMENTAS PROVIDED HEREIN. CLAIMS BASED ON IMPLIED
WARRANTIES,INCLUDING WARRANTIES OF MERCHANTABILITY OR FITNESS FORA PARTICULAR
PURPOSE, ARELIMITED TO ONE YEAR OR THE SHORTEST PERIOD ALLOWED BY LAW, BUT NOT
LESS THAN ONE YEAR.ELECTROLUX SHALL NOT BE LIABLE FOR CONSEQUENTIAL OR INCIDENTAL
DAMAGES SUCH ASPROPERTY DAMAGE AND INCIDENTAL EXPENSES RESULTING FROM ANY
BREACH OF THIS WRITTENLIMITED WARRANTY ORANY IMPLIED WARRANTY. SOME STATES AND
PROVINCES DO NOTALLOWTH EEXCLUSION OR LIMITATION OF INCIDENTAL OR CONSEQUENTIAL
DAMAGES, OR LIMITATIONS ON TH EDURATION OF IMPLIED WARRANTIES, SOTHESE LIMITATIONS
OR EXCLUSIONS MAY NOTAPPLY TO YOU. THIS WRITTEN WARRANTY GIVES YOU SPECIFIC LEGAL
RIGHTS. YOU MAY ALSO HAVE OTHER RIGHTS THAT VARY FROM STATE TO STATE.
if You Need
Service
Keep your receipt, delivery slip, or some other appropriate payment record to establish the warranty
periodshould service be required. If service is performed, it is in your best interest to obtain and keep all
receipts.Service under this warranty must be obtained by contacting Electrolux at the addresses or
phone numbers below.
This warranty only applies in the USA and Canada. In the USA, your appliance is warranted by Electrolux Major Appliances
North America, a division of Electrolux Home Products, Inc. In Canada, your appliance is warranted by Electrolux Canada Corp.
Electrolux authorizes no person to change or add to any obligations under this warranty. Obligations for service and parts under
this warranty must be performed by Electrolux or an authorized service company. Product features or specifications as described
or illustrated are subject to change without notice.
Replacement parts
If you need to order replacement parts, we recommend that you only use the factory specified parts. These parts will fit right
and work right because they are made with the same precision used to build every new Crosley _,Pappliance.
To locate factory specified
replacement
parts in you area call:
USA, 1-800-944-9044, or your nearest designated service center. In Canada call 1-800-668-4606.
For information on how to contact Crosley Corporation, please see page 2 of this document.
8