1
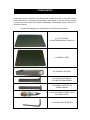
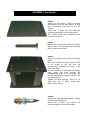
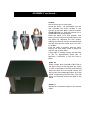
AN-E Stands
LOUDSPEAKER
SUPPORTS
OWNERʼS INFORMATION
CONTENTS
1)
CE DECLARATION OF CONFORMITY
DISPOSAL
2)
INTRODUCTION
3)
OVERVIEW
UNPACKING
4)
COMPONENTS
5) ASSEMBLY
8)
WARRANTY INFORMATION
9)
CONTACT INFORMATION
CE DECLARATION OF CONFORMITY
We declare under our sole responsibility that this product is in conformity
with the following standards or standardized documents:
BS EN 60065 in accordance with the regulations 73/23/EEC, 89/336/EEC
(from 1 January 1997)
CE 94
Peter Qvortrup,
Director
Audio Note (UK) Limited
25 Montefiore Road
Hove
East Sussex
BN3 1RD
United Kingdom
Tel:
Fax:
+44 (0)1273 220 511
+44 (0)1273 731 498
DISPOSAL
This product must not be disposed of as normal household waste. To
prevent possible harm to the environment please separate the product
from other waste to ensure that it can be recycled in an environmentally
safe manner. Please contact your retailer or the appropriate local
government office for collection facilities.
INTRODUCTION
Thank you for purchasing this Audio Note (UK) product. With the correct care it
should give you many years of pleasure and enjoyment.
Please take the time to read all of the information in this manual before connecting
your new component to an electrical supply or your system, to ensure both your
safety and satisfaction.
Please note that due to our desire to continually improve products, specifications are
subject to change without notice. Therefore it is important to refer to the manual that
is supplied with your product for the most accurate information; manuals downloaded
from our website or obtained from other sources may no longer fully apply to your
product.
If you have any questions regarding the information contained within this document
or your new component, please feel free to contact us: -
Audio Note (UK) Limited
25 Montefiore Road
Hove
East Sussex
BN3 1RD
United Kingdom
Tel:
+44 (0)1273 220 511
Fax:
+44 (0)1273 731 498
e-mail: [email protected]
AN-E LOUDSPEAKER STANDS
Congratulations on your purchase of the Audio Note (UK) AN-E loudspeaker stands.
They are a high mass design specifically intended to partner the AN/E range of Audio
Note (UK) loudspeakers.
The stands are supplied in kit form and require assembly as per the enclosed
instructions before use.
The cavities inside the upright pillars should be filled with a suitable high-density
material such as metal shot / particles or sand. If sand is used, please ensure that it
is a pre-dried (often referred to as ʻkiln driedʼ) type, and not moist. The sand supplied
for fish tanks or childrenʼs sandpits is ideal, as this has usually been cleaned and is
dry; construction grade ʻsharpʼ sand is not suitable in standard form, due to the water
content. It may also be necessary to ʻsealʼ the junctions between the base plate and
the bottoms of the box section legs, to prevent sand escaping. Any pliable, slightly
adhesive material such as Plasticine or Blu-Tack is ideal for this.
Fully adjustable and lockable spikes are supplied for the bottom plates of the stands.
We recommend using four small, peas sized balls of Blu-Tack, placed in each corner
of the upper surface of the top plate for securing the AN-E to the stand. This is, in our
experience, by far the best method to use.
UNPACKING
Please take care when unpacking your AN-E loudspeaker stands. Choose a clean,
clear location to unpack them, and be aware that they are heavy; before attempting
to unpack or lift the stands, check the weight and if necessary use more than one
person so that they can be moved safely and easily.
We recommend that you retain and carefully store all of the original packing
materials, in case transportation / shipping is required at a later date.
Select a suitable location for the stands. This should be a dry, dust free and level
area, preferably shielded from direct sunlight and free from vibration. Also ensure
that the location is stable and capable of carrying the weight of the stands AND
loudspeakers.
COMPONENTS
Please take time to familiarize yourself with the component parts of the AN-E stands.
Check that all of the components listed below are present; if any are missing, please
contact your Audio Note (UK) Dealer immediately. Alternatively, please feel free to
contact us directly.
Inside the packaging, you should find the following components: -
2 X TOP PLATES
(COUNTERSUNK BOLT HOLES)
2 X BASE PLATES
8 X UPRIGHT PILLARS
16 X TOP PLATE BOLTS
(COUNTERSUNK HEADS)
16 X BASE PLATE BOLTS
(DOME HEADS)
8 X ADJUSTABLE SPIKES, WITH
SECURING NUTS
1 X ALLEN / HEX HEAD KEY
ASSEMBLY
STEP 1:
Identify the base plates. These are easily
distinguished from the top plates, as they
DO NOT have countersunk bolt holes.
Select one of them, and set aside the
remaining base plate for the second stand.
Identify the eight bolt holes that will be used
for attaching the four upright pillars (circled
in RED in the image to the left).
STEP 2:
Identify the dome head bolts. Select eight of
them, and set aside the remaining eight for
the second stand.
STEP 3:
Identify the upright pillars. Select four of
them, and set aside the remaining four for
the second stand.
If you are intending to fill the pillars with
sand, place some adhesive material (such
as Blu-Tack) over the central hole in the
base of each pillar, to prevent the sand from
escaping.
You may also run a small bead of the same
material along the four edges that will
connect with the base plate. Once the
pillars are firmly bolted in place, any excess
material can be carefully removed.
STEP 4:
Use two dome head bolts per upright pillar.
Insert the bolts through the corresponding
holes in the base plate, and into the
appropriate threaded holes in the base of
each pillar.
Tighten the bolts securely, and once all four
pillars are in place, check the tightness of
the bolts once more.
If you intend to fill the pillars, now is the
time to do it.
We recommend using a funnel, and only
use the large centre hole for filling; DO NOT
use the two bolt holes, or allow any sand to
enter them.
ASSEMBLY continued…
STEP 5:
Identify the top plates. These are easily
distinguished from the base plates, as they
have countersunk bolt holes in the top
surface.
Select one of them, and set aside the
remaining top plate for the second stand.
The surface WITH the countersunk bolt
holes must face UP.
STEP 6:
Identify the countersunk head bolts. Select
eight of them, and set aside the remaining
eight for the second stand.
STEP 7:
Place the top plate on top of the four upright
pillars.
Align the countersunk holes (circled in RED
in the image to the left) with the
corresponding threaded bolt holes in the
tops of the pillars.
Use two countersunk head bolts per upright
pillar. Insert the bolts through the
corresponding holes in the top plate, and
into the appropriate threaded holes in the
top of each pillar.
Tighten the bolts securely, and once all
eight bolts are in place, check their
tightness once more.
STEP 8:
Identify the eight adjustable spikes, locking
nuts and dome head nuts.
Select four of each, and reserve the
remaining parts for the second stand.
ASSEMBLY continued…
STEP 9:
Add a locking nut to each spike.
Screw the spike / nut assemblies into the
four threaded bolt holes located in the
corners of the base plate. Insert the spikes
FROM BELOW, so that the locking nut is
UNDERNEATH the base plate.
Place the stand in its final position, and
level it (using a spirit level positioned on the
top plate) by adjusting the four spikes,
making sure that all four are contacting with
the floor and that the stand does not ʻrockʼ
or ʻwobbleʼ.
Lock the spike in position with the lower
locking nut, and finally screw a dome nut
onto the top of each spike.
ʻFinger tightʼ is usually enough, but feel free
to use an appropriately sized pair of
spanners / wrenches to lock the nuts in
place.
STEP 10:
Place a small ʻpeaʼ sized ball of Blu-Tack in
the four corners of the top plate (as shown
in RED in the image to the left) and carefully
lower the AN-E on to the stand. Gently and
firmly press the loudspeaker down on to the
stand, compressing the Blu-Tack. This will
firmly and securely anchor the AN-E to the
stand.
STEP 11:
Repeat all of the above steps for the second
stand.
WARRANTY INFORMATION
Audio Note (UK) warrants this product to be free from defects in materials and
workmanship for two years from the original date of purchase from an appointed
Audio Note (UK) dealer, and agrees to covers the cost of parts and associated labour
required to correct such defects, subject to terms & conditions.
This Warranty is offered to the first purchaser only.
If the product fails in normal domestic use and during the Warranty period due to the
above described faults or defects, Audio Note (UK) will, at its discretion, repair or
replace the item free of charge within a reasonable time once it has been returned to
Audio Note (UK) or an appointed Audio Note (UK) dealer or service engineer.
Audio Note (UK) is not liable for any shipping charges incurred whilst transporting the
product to or from Audio Note (UK) or an appointed Audio Note (UK) dealer or
service engineer, should the item require service or repair during or after the
Warranty period.
If the product must be shipped, please use the original packaging materials and
include a copy of the original sales receipt along with a note explaining, in as much
detail as possible, the problems you are experiencing with the unit.
Only use a reputable Courier Service or Shipping Agent, and ensure that your
product is insured during transit.
Any servicing, repairs or modifications not authorized by Audio Note (UK), or
carried out by persons other than appointed Audio Note (UK) service
engineers will invalidate any warranty.
This Warranty does NOT cover: Damage sustained whilst in the possession of a shipping agent, retailer or consumer
and not caused as a direct result of defects in materials or workmanship.
Damage caused by normal wear and tear.
Damage or defects caused by abnormal or unreasonable use.
Damage caused by accident, acts of nature, misuse or neglect.
Damage caused by a failure to follow the operating and installation instructions
supplied with the product.
Damage caused by improper or careless cleaning.
Audio Note (UK) reserves the right to refuse warranty for any component of which
the serial number has been removed, defaced or tampered with.
CONTACT INFORMATION
If in the future your Audio Note (UK) product
requires servicing, or if you require technical support
or have any questions regarding this or any of our
other products, please contact your local Audio Note
(UK) dealer.
Alternatively, please feel free to contact us directly: - Audio Note (UK) Limited
25 Montefiore Road
Hove
East Sussex
BN3 1RD
United Kingdom
Tel:
+44 (0)1273 220 511
Fax:
+44 (0)1273 731 498
e-mail: [email protected]