1
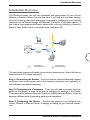
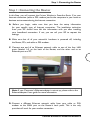
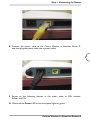
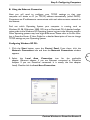
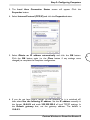
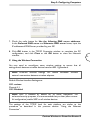
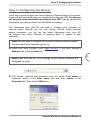
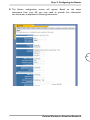
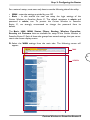
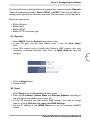
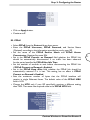
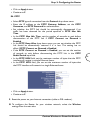
Corinex
Wireless to Powerline
Router G
Quick Start Guide
Corinex Wireless to Powerline Router G
Corinex Communications Corp.
# 670-789 West Pender Street
Vancouver, BC
Canada V6C 1H2
Vancouver / Sept.27.2004
Corinex Wireless to Powerline Router G
Corinex Communications Corp.
# 670-789 West Pender Street
Vancouver, BC
Canada V6C 1H2
Vancouver / Sept.27.2004
Copyright
This document, as well as the software described in it, is furnished under license and may be
used or copied only in accordance with the terms of the license. The content of this document is
furnished for informational use only, it is subject to change without notice, and it does not represent
a commitment on the part of Corinex Communications Corp.
Corinex Communications Corp. assumes no responsibility or liability for any errors or inaccuracies
that may appear in this document.
It is our policy to enhance our products as new technologies, hardware components, software and
firmware become available; therefore, the information contained in this document is subject to
change without notice.
Some features, functions, and operations described in this document may not be included and sold
in certain countries due to government regulations or marketing policies.
The use of the product or its features described in this document may be restricted or regulated by
law in some countries. If you are unsure which restrictions or regulations apply, you should consult
your regional Corinex office or the authorized reseller.
Published by:
Corinex Communications Corp.
#670-789 West Pender Street
Vancouver, B.C.
Canada V6C 1H2
1
Tel.: +1 604 692 0520
Fax: +1 604 694 0061
Corinex is a registered trademark of Corinex Communications Corp.
Apple, MAC OS X are either registered trademarks or trademarks of Apple Computer, Inc. in the
U.S.A. and/or other countries.
Microsoft, MS-DOS, MS, Windows are either registered trademarks or trademarks of Microsoft
Corporation in the U.S.A. and/or other countries.
All products or company names mentioned herein may be the trademarks of their respective
owners.
Copyright (c) 2001-2004 by Corinex Communications Corp.
NOTE: This equipment has been tested and found to comply with the limits for a Class
B information technology equipment. These limits are designed to provide reasonable
protection against harmful interference in a residential installation. This equipment generates,
uses and can radiate radio frequency energy and, if not installed and used in accordance with
the instructions, may cause harmful interference to radio communications. However, there
is no guarantee that interference will not occur in a particular installation. If this equipment
does cause harmful interference, the end user is advised to take adequate measures.
2004-09-24 ver 1.0
Corinex Wireless to Powerline Router G
End User License Agreement
CORINEX COMMUNICATIONS CORPORATION
This End User License Agreement (“EULA”) is a legal agreement between you and CORINEX
COMMUNICATIONS CORPORATION (“CORINEX”) with regard to the copyrighted Software
provided with this EULA.
Use of any software and related documentation (“Software”) provided with a CORINEX hardware
product, or made available by downloading or otherwise to you by CORINEX in whatever form or
media, will constitute your acceptance of these terms, unless separate terms are provided by the software
supplier, in which case certain additional or different terms may apply. If you do not agree with the terms
of this EULA, do not download, install, copy or use the Software.
1. Licence Grant. CORINEX grants to you a personal, non-transferable and non-exclusive right to use
the copy of the Software provided with this EULA. You agree you will not copy the Software except
as necessary to use it on a single hardware product system. You agree that you may not copy the
written materials accompanying the Software. Modifying, translating, renting, copying, transferring
or assigning all or part of the Software, or any rights granted hereunder, to any other persons, and
removing any proprietary notices, labels or marks from the Software is strictly prohibited. Furthermore,
you hereby agree not to create derivative works based on the Software. You may permanently transfer
all of your rights under this EULA, provided you retain no copies, you transfer all of the Software, and
the recipient agrees to the terms of this EULA. If the Software is an upgrade, any transfer must include
all prior versions of the Software.
2. Copyright. The Software is licensed, not sold. You acknowledge that no title to the intellectual property
in the Software is transferred to you. You further acknowledge that title and full ownership rights to
the Software will remain the exclusive property of Corinex Communications Corporation and/or its
suppliers, and you will not acquire any rights to the Software, except as expressly set forth above. All
copies of the Software will contain the same proprietary notices as contained in or on the Software.
3. Reverse Engineering. You agree that you will not attempt, and if you are a corporation, you will use
your best efforts to prevent your employees and contractors from attempting to reverse compile,
modify, translate or disassemble the Software in whole or in part. Any failure to comply with the above
or any other terms and conditions contained herein will result in the automatic termination of this
license and the reversion of the rights granted hereunder to CORINEX.
4. Disclaimer of Warranty. The Software is provided “AS IS“ without warranty of any kind. CORINEX
and its suppliers disclaim and make no express or implied warranties and specifically disclaim warranties
of merchantability, fitness for a particular purpose and non-infringement of third-party rights. The
entire risk as to the quality and performance of the Software is with you. Neither CORINEX nor its
suppliers warrant that the functions contained in the Software will meet your requirements or that the
operation of the Software will be uninterrupted or error-free.
5. Limitation of Liability. Corinex’s entire liability and your exclusive remedy under this EULA shall not
exceed the price paid for the Software, if any. In no event shall CORINEX or its suppliers be liable to
you for any consequential, special, incidental or indirect damages of any kind arising out of the use or
inability to use the software, even if CORINEX or its supplier has been advised of the possibility of such
damages, or any claim by a third party.
6. Applicable Laws. This EULA will be governed by the laws of Canada, excluding its conflict of law
provisions.
Corinex Wireless to Powerline Router G
2
End User License Agreement
7. Export Laws. This EULA involves products and/or technical data that may be controlled under any
applicable export control laws, and regulation, and may be subject to any approval required under such
laws and regulations.
8. Precedence. Except as set out above, where separate terms are provided by the software supplier,
then, subject to this EULA, those terms also apply and prevail, to the extent of any inconsistency with
this EULA.
3
Corinex Wireless to Powerline Router G
Content
Content
Copyright ......................................................................................... 1
End User License Agreement ........................................................ 2
Content ............................................................................................ 4
Package Content ............................................................................. 5
Requirements ................................................................................... 5
Installation Overview ....................................................................... 6
Step 1: Connecting the Router ...................................................... 7
Step 2: Configuring Computers ....................................................... 9
Step 3: Configuring the Router ........................................................ 13
4
Corinex Wireless to Powerline Router G
Product details
Congratulations to your choice of Corinex Wireless to Powerline Router G.
The Router allows you to set up a home or small business network to share your
high-speed Internet connection using either Ethernet cabling, Powerline and Wireless
connection or combine these media in any possible way.
Package Content
Package Includes:
• Corinex Wireless to Powerline Router G
• Installation CD-ROM (including Corinex Wireless to Powerline Router G
User Guide)
• Wireless antenna
• Power Cord with the proper AC plug for your region
• Ethernet cable (RJ-45) 2x
• Printed Quick Start Guide
5
Requirements
• IBM Compatible PC or Macintosh computer (needed for initial
configuration of the Router)
• AC 220/110 V power outlet
• Broadband Connection (DSL, Cable) or Internet device with 10/100
Ethernet connection
• Ethernet, Powerline and/or Wireless connection for each computer
• Windows 98/ME/2000/NT/XP, Mac OS X or Linux operating system for
computers sharing the Internet connection
• Web browser supporting JavaScript for the Router management
Corinex Wireless to Powerline Router G
Installation Overview
Installation Overview
powerline
110V / 220V
This Guide will assist you with the installation and configuration of your Corinex
Wireless to Powerline Router G for the first time. It will help you with basic settings,
which are covering most of the settings you may need to configure for your Internet
connection to be shared through the Ethernet, Powerline or Wireless medium. If
you require more sophisticated setup, please refer to Corinex Wireless to Powerline
Router G User Guide, which is enclosed on the Installation CD.
E
Laptop
Wireless adapter
Computer
Internet
RG
ADSL/Cable
modem
6
Computer
Corinex Wireless
to Powerline Router G
Corinex Powerline
Ethernet Wall Mount
The next three chapters will explain to you how to connect your Corinex Wireless to
Powerline Router G in three easy steps.
Step 1: Connecting the Router – First you need to connect cables and connect
the Router both to the power and to the Internet connection; and, optionally to
your Ethernet connected computers.
Step 2: Connecting the Computers – Then you will need to connect the computers to the Router, in order to be able to configure the settings of the Router.
These steps differ between Ethernet, Powerline and Wireless connection, as well as
between different sorts of operating systems and computers.
Step 3: Configuring the Router – The last step required is to configure your
Corinex Wireless to Powerline Router G settings according to your Internet connection.
Corinex Wireless to Powerline Router G
Step 1: Connecting the Router
Step 1: Connecting the Router
In this Step, you will connect the Corinex Wireless to Powerline Router G to your
Internet connection (cable or DSL modem) and to the computers in your home or
business environment sharing the Internet connection.
A. Before you begin, make sure that you have the setup information
for your specific type of Internet connection. The installation technician
from your ISP should have left this information with you after installing
your broadband connection. If not, you can call your ISP to request the
settings.
B. Make sure that all of your network’s hardware is powered off, including
the Router, PCs, and cable or DSL modem.
C. Connect one end of an Ethernet network cable to one of the four LAN
ports (labeled 1-4) on the back of the Router, and the other end to an
Ethernet port on a PC.
7
Note: If your Computer’s Ethernet adapter is not set up, please refer to the
Ethernet adapter’s user guide for more information.
D. Connect a different Ethernet network cable from your cable or DSL
modem to the WAN port on the Router’s back panel. This is the only
port that will work for your modem connection.
Corinex Wireless to Powerline Router G
Step 1: Connecting the Router
E. Connect the power cable to the Corinex Wireless to Powerline Router G,
and then plug the power cable into a power outlet.
8
F. Power on the following devices in this order: cable or DSL modem,
Router, and PCs.
G. Make sure the Power LED on the front panel lights up green.
Corinex Wireless to Powerline Router G
Step 2: Configuring Computers
Step 2: Configuring Computers
The instructions in this chapter will help you to configure each of your computers to
be able to communicate with the Corinex Wireless to Powerline Router G.
This process differs between Ethernet, Powerline and Wireless connected
computers, and also differs between various operating systems.
If you have an Ethernet connected computer, proceed to B, if you have a Powerline
connected computer proceed to A and if you have Wireless connected computer
proceed to C.
A. Using the Powerline Connection
Please refer to the Manual of your Powerline Adapter to establish a Powerline
connection between the Corinex Wireless to Powerline Router G and the other
Powerline Adapters. Use the default Powerline (NEK) password “HomePlug”,
as this is the factory default password setting for the Corinex Wireless to Powerline
Router G. When you are using the Corinex Setup Tool to configure your Powerline
Adapter, you can check, whether your Adapter has a Powerline connection to the
Corinex Wireless to Powerline Router G by searching in the last window of the Corinex
Setup Tool for the MAC address of the Router. You will find the MAC address of
your Router device on the label on the bottom of the Router’s plastic cover (MAC
LAN). Proceed to B.
Corinex Wireless to Powerline Router G
9
Step 2: Configuring Computers
B. Using the Ethernet Connection
Next you will need to configure your TCP/IP settings so that your
computer will obtain an IP (or TCP/IP) address automatically (called DHCP).
Computers use IP addresses to communicate with each other across a network or
the Internet.
Find out which Operating System your computer is running, such as
Windows 95, 98, Millennium, 2000, XP, Linux or Macintosh OS. A detailed configuration guide to the Windows XP Operating System is given in the following section.
Other operating systems may have slight differences. Please refer to Corinex Wireless to Powerline Router G User Guide for a detailed description of how to change
TCP/IP settings on your Operating System.
Configuring Windows XP PCs
1. Click the Start button, open the Control Panel. From there, click the
Network Connections icon and then the Network Connections window
appears.
2. Select the Local Area Connection icon for the applicable
adapter (Ethernet adapter, if you are Ethernet connected or Powerline
Adapter if you are Powerline connected. It is usually the first adapter
listed). Double-click the Local Area Connection.
Corinex Wireless to Powerline Router G
10
Step 2: Configuring Computers
3. The Local Area Connection Status screen will appear. Click the
Properties button.
4. Select Internet Protocol (TCP/IP) and click the Properties button.
5. Select Obtain an IP address automatically and click the OK button.
Click the OK button again (or the Close button if any settings were
changed) to complete the computer configuration.
6. If you do not have DHCP server on the network or it is switched off,
then select Use the following IP address. Set the IP address manually in
the format 10.0.0.X and mask 255.255.255.0 of local TCP/IP settings. In
the Default gateway box, set the gateway address. The default is
10.0.0.2.
Corinex Wireless to Powerline Router G
11
Step 2: Configuring Computers
7. Check the radio button for Use the following DNS server addresses.
In the Preferred DNS server and Alternate DNS server boxes, input the
IP addresses of DNS Server provided by your ISP.
8. Click OK button in the TCP/IP Properties window to complete the PC
configuration, and click Close or the OK button to close the Network
window.
C. Using the Wireless Connection
You may need to reconfigure some wireless settings to ensure that all
settings match between wireless devices based on 802.11g standard.
Note: Different wireless settings will disable successful wireless
network connections between wireless adapters.
Default Wireless Interface Settings are:
SSID: corinex
Channel: 11
WEP: Disabled
Note: WEP is disabled by default for an easier installation. For
enhanced security purposes, it is recommended that you later (after successful configuration) enable WEP on all wireless devices.
The settings of the TCP/IP level for each platform are similar to the
procedure as described in the previous section “Using the Ethernet
Connection”.
Corinex Wireless to Powerline Router G
12
Step 3: Configuring the Router
Step 3: Configuring the Router
In this step, you will configure the Corinex Wireless to Powerline Router G to communicate with the Internet through your Internet Service Provider (ISP). For this you
will need the setup information provided by your ISP. If you do not have this
information, you have to contact your ISP before proceeding.
This information from your ISP was used to configure your computer for
Internet access. Because you are now sharing Internet access between
several computers, you will use this setup information from your ISP
to configure the Corinex Wireless to Powerline Router G instead of your
computer.
Note: You only need to configure the Corinex Wireless to Powerline Router
G once using the first computer you set up.
A. Open your WEB browser. Enter http://10.0.0.2 in the WEB browser’s
Address field. Press the Enter key.
13
Note: Make sure that the TCP/IP settings of your network interface are
configured correctly!
B. The window requiring your password entry will appear. Enter admin in
lowercase letters in the User name field and enter admin in the
Password field. Then click the OK button.
Corinex Wireless to Powerline Router G
Step 3: Configuring the Router
C. The Router configuration screen will appear. Based on the setup
instructions from your ISP, you may need to provide this information
into the router, as explained in following instructions.
14
Corinex Wireless to Powerline Router G
Step 3: Configuring the Router
For a network setup, most users only have to use the following tabs of the utility:
• WAN - enter the settings provided by your ISP.
• Basic – In this section the user can setup the login settings of the
Corinex Wireless to Powerline Router G. The default username is admin and
password is admin, too. To protect the Corinex Wireless to Powerline
Router G, we strongly recommend to change the password from its
default.
The Basic, LAN, WAN, Status, Filters, Routing, Wireless, Powerline,
Security and Firmware tabs are available for setup of the Corinex Wireless to
Powerline Router G. Each of these tabs groups have several settings, that you can access in the chosen display screen.
D. Select the WAN settings from the main tabs. The following screen will
appear:
TABS
15
SCREEN
Corinex Wireless to Powerline Router G
Step 3: Configuring the Router
The Corinex Wireless to Powerline Router G supports four connection types: Dynamic
(Obtain IP address dynamically), Static, PPPoE, and PPTP. The setup will differ according to the type of your Internet connection, the instructions are included here.
Follow the instructions:
•
•
•
•
E1 for Dynamic
E2 for Static
E3 for PPPoE
E4 for PPTP connection type
E1. Dynamic
• Select DHCP from the Protocol drop down menu.
• If your ISP gave you the Host Name, enter it into the Host Name
field.
• Some ISPs require you to change your Router’s MAC address into your
previously connected Ethernet card. Click on MAC Address field and
change it.
16
• Click on Apply button.
• Continue to F.
E2. Static
• Select Static from the Protocol drop down menu.
• Enter the IP address, Subnet Mask and Gateway Address according to
the information provided to you by your ISP.
• If your ISP provided you with specific DNS settings, you need to change
them by clicking Click here to enter your DNS Settings.
• Set the IP address of the WINS Servers to use for resolving NetBIOS
names.
Corinex Wireless to Powerline Router G
Step 3: Configuring the Router
• Click on Apply button.
• Continue to F.
E3. PPPoE
• Select PPPoE from the Protocol drop down menu.
• Enter the PPPoE Username, PPPoE Password, and Service Name
(Optional) according to the information provided to you by your ISP.
• Set the name of the PPPoE Service Name and PPPoE Access
Concentrator. Required by some ISPs.
• Set in the PPPoE Connect on Demand field whether the PPPoE link
should be automatically disconnected if no traffic has been observed
for the period specified by PPPoE Max Idle Time.
• Set the number of seconds to wait before disconnecting the PPPoE link
if PPPoE Connect on Demand is Enabled.
• Set in the PPPoE Keep Alive field whether the PPPoE link should be
automatically restored if it is lost. This setting has no effect it PPPoE
Connect on Demand is Enabled.
• Sets the maximum number of bytes that the PPPoE interface will
receive in single Ethernet frame. The default value of the PPPoE MRU
field is 1492.
• Change the MTU only if your ISP specifically requires a different setting
than 1492. Then enter the required value in the PPPoE MTU field.
Corinex Wireless to Powerline Router G
17
Step 3: Configuring the Router
• Click on Apply button.
• Continue to F.
E4. PPTP
• Select PPTP type of connection from the Protocol drop down menu.
• Enter the IP address to the PPTP Gateway Address, set the PPTP
Username, and PPTP Password for authentication.
• Set whether the PPTP link should be automatically disconnected if no
traffic has been observed for the period specified in PPTP Max Idle
Time.
• In the PPTP Max Idle Time, set the number of seconds to wait before
disconnection of the PPTP link if PPTP Connect on Demand is
Enabled.
• In the PPTP Keep Alive drop down menu you can set whether the PPTP
link should be automatically restored if it is lost. This setting has no
effect if PPTP Connect on Demand is Enabled.
• If the PPTP Connect on Demand is Enabled, you can set the number
of seconds to wait before disconnecting the PPTP link in the PPTP
Redial Period input field.
• In the PPTP MRU field, set the maximum number of bytes that the PPTP
interface will receive in a single Ethernet frame.
• In the PPTP MTU field, you can set the maximum number of bytes that
the PPTP interface will transmit in a single Ethernet frame.
• Click on Apply button.
• Continue to F.
F. Reset the power on your Internet connection (cable or DSL modem).
G. To configure the Router for your wireless network, select the Wireless
settings from the main tabs.
Corinex Wireless to Powerline Router G
18
Step 3: Configuring the Router
H. Select the Wireless Network Mode:
19
54g Auto: If you have Wireless-G and 802.11b devices in your network,
then keep the default setting, 54g Auto.
54g Performance: If you have only Wireless-G devices, select G-Only.
This will exclude all 802.11b clients from connecting to the access
point.
54g LRS: The third option (Limited Rate Support) can be used in case
you experience any problems with connecting to the access point.
802.11b Only: If you have only Wireless-B devices, select B-Only.
I. Wireless Network Name (SSID).
The SSID is the network name shared among all points in a wireless
network. The SSID must be identical for all points in the wireless
network. It is case-sensitive and must not exceed 32 characters (use any
of the characters on the keyboard). Make sure this setting is the same for
all points in your wireless network. For added security, you should
change the default SSID (corinex) to a unique name.
Corinex Wireless to Powerline Router G
Step 3: Configuring the Router
J. Wireless Channel.
Select the appropriate channel from the list provided to correspond
with your network settings. All devices in your wireless network must be
broadcast on the same channel in order to function correctly.
K. Change these settings as described here and click the Apply button to
apply your changes.
L. Restart your computers so that they can obtain the Router’s new
settings.
M. Test the setup by opening your web browser from any computer and
entering http://www.corinex.com
The installation
complete!
of
Corinex
Wireless
to
Powerline
Router
G
is
NOTE: For more advanced settings and security options, please refer to the
User Guide on the Installation CD-ROM.
Corinex Wireless to Powerline Router G
20