1
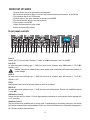
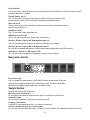
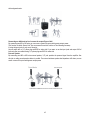
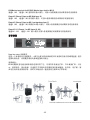
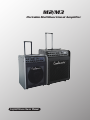
M2/M3
Portable Multifunctional Amplifier
English/Chinese Owner Manual
Intended to alert the user to the presence of uninsulated “dangerous voltage” within the product’s
enclosure that may be of sufficient magnitude to constitute a risk of electric shock to persons.
Intended to alert the user of the presence of important operating and maintenance (servicing)
instructions in the literature accompanying the product.
CAUTION: Risk of electrical shock ---- Do NOT OPEN!
CAUTION: To reduce the risk of electric shock, do not remove cover. No user serviceable parts inside.
Refer servicing to qualified service personnel.
WARNING: To prevent electrical shock or fire hazard, do not expose this appliance to rain or moisture.
Before using this appliance, read the operating guide for further warnings.
ENGLISH
M2/M3 Portable Multifunctional Amplifier
Thank you for selecting the M2/M3 Portable Multifunctional Amplifier Once again‚ our engineers have listened to input
from keyboard players; electronic drum players; singers; acoustic guitar players and put together an amplifier that
combines excellent features and sound in one portable package.The new M2/M3 Portable Multifunctional Amplifier
deliver awesome sound reproduction for all of your all music instrument sounds—from thundering bass to crystal highsit’s all there!
In addition, an external speaker jack is provided for the additional use of an external speaker enclosure. This feature is located on the top panel as well
and is also explained in this section. Each product feature is numbered. Refer to the front and rear panel diagrams in this manual to locate the particular
features next to their number. Please read this guide carefully to ensure your personal safety as well as the safety of your amplifier.
Before you begin playing through your amplifier, it is very important to ensure that the product has the proper AC line voltage supplied.
You can find the proper voltage for your amp printed next to the IEC line (power) cord on the rear panel of the unit. Each product feature is
numbered. Refer to the front panel diagram in this manual to locate the particular features next to their number.
Please read this guide carefully to ensure your personal safety as well as the safety of your amplifier.
FEATURES:
l
l
l
l
l
l
l
l
l
l
3 channel (M2) or 4channel (M3)
60 watts /8Ω;80 watts/4Ω(M2) or 80 watts/8Ω;120watts/4Ω (M3)—plenty of power!
1x10"/8 (M2);1x12"/8Ω(M3) high quality professional coaxial speaker
balanced‚ stereo line outs and monitor input
extension speaker capability
24bits,48KHz ADC/DAC Digital Effects Module With MP3 Decoder, USB Host Interface
99 effects ,include Reverb ,Delay, Flanger Pitch shift....for each channel.
MP3 processor, with play/pause and volume.
Two line LCD display, three key operate.
Two heavy wheels with aluminium carry bar.
l ultra-strength‚ retractable‚ locking handle for easy transport—just lock it‚ lean it back and go!
--
QUICK SET-UP GUIDE
1. Connect the line cord to the appropriately rated receptacle.
2. Be certain that all levels are down or set to the fully counter-clockwise position and set all the EQs flat
3. Set the master level to the 12:00 position
4. Connect output of your music instrument to the input of the M2/M3
5. Set the main/monitor switch to the monitor position
6. Turn on power to the M2/M3
7. Adjust the channel level for proper volume
8. Adjust the channel EQ as needed.
Front panel controls
1
2
4
3
1
2
4
3
1
2
5
3
4
6
7
8
9
11 10
12 13
Level (1)
Controls the 1/4" jack input level. (Channels 1‚ 2 and 3 on the M3 and channels 1 and 2 on the M2.)
Low EQ (2)
An active tone control (shelving type: +/-15dB) that varies the low frequency range. (M3:channels 1‚ 2 & 3; M2:
channels 1 & 2.)
Caution: Excessive low frequency boost causes greater power consumption and increases the possibility of
speaker damage.
Hi EQ (3)
An active tone control (shelving type: +/-15dB) that varies the hi frequency range. (M3:channels 1‚ 2 & 3; M2:
channels 1 & 2.)
EFX(4)
knobThis knob selects the effect type and adjusts its depth for the channel.
Mid EQ (5)
An active tone control (peak/notch type: +/-15dB) that varies the mid frequencies. (Channel 3 on the M3 and channel
2 on the M2.)
CH4/Monitor Level (6)
Controls the input level for channel 4. Controls high-impedance microphones or other high-level sources equipped with
a 1/4" phone plug.
Headphone Level (7)
This sets the level to the headphone jack on the rear panel. To avoid damage to your hearing‚ make sure to turn the dial
fully counter-clockwise before using headphones. Slowly turn the knob clockwise until a comfortable listening level is
set. This does not affect the master level.
--
Master Level (8)
This knob sets the overall level for the unit. Make sure the Master level is completely down (fullcounterclockwise)
before powering up the unit. This does not affect the headphone level.
MP3 Level(9)
This knob sets the overall level for the MP3 player.
EFX Level(10)
knobThis knob selects the effect type and adjusts its depth for channels.
LED Display(11)
Two line LCD display, three keys operate.
USB host(12)
USB host slot provide user can store songs in U-disk
Up/center/down key control(13)
Effect control mode and Mp3 Play mode use three key operate Long Push ENTER key to switch between this two
mode In effect control mode, use UP, DOWN key to select one of the 99 popular effects. Long push UP DOWN key can
change the WET/DRY ratio at this state.In MP3 mode, use UP, DOWN key to select songs store in the USB disk. Long
push UP DOWN key can change the volume of songs at this state. System can detect a U-DSIK plug-in automatically.
Effects list
Effect No.# Effect Name
00~02 ROOM1
03~05 ROOM2
06~08 ROOM3
09
CHORUS
10~12 HALL1
13~15 HALL2
16~18 ALL3
19
FLANGER
20~26 PHASER
27~29 PITCH SHIFT
30~35 GATE REV
36~39 REVERSE
40~43 EARLY REFL
44~47 AMBIENCE
48
STADIUM
49
ELAY 1
Effect No.# Effect Name
50~58 DELAY 2
59 ECHO
65 CHURCH
69 CHAPEL
70~73 PLATE
74~79 SPRING
81 CHORUS& REVERB
82~83 FLANGER&REVERB
84~85 PHASER & REVERB
86~87 PITCH & REVERB
89
DELAY & REVERB
90
DELAY & GATED
91 DELAY & REVERSE
92~93 DELAY & CHORUS
94~95 DELAY & FLANGER
96~97 DELAY & PHASER
98~99 DELAY & PITCH
Top panel controls
9
8
7
6
5
4
--
3
2
1
Power Switch(1)
This two-way rocker switch applies power to the unit when placed in the ON position. A blue LED on the front panel
illuminates when power is supplied.
External Speaker Jack (2)
This 1/4" jack provides the powered signal from the amplifier. Use this jack to add a second
speaker cabinet in parallel. The external minimum speaker load impedance is 8 ohms.
Main Line Out (3)
These low-noise‚ electronically balanced XLR connectors can be used to route signals to a mixing
console‚ recording device‚ etc.
Headphone Jack (4)
This 1/4" jack accepts stereo headphones only.
CH4/Monitor Input Jack (5)
Use this 1/4" jack to connect to the output of any line-level device.
Channel 3 (Channel 2 input on M2) High-Impedance Input (6)
This 1/4" jacks accepts high-impedance microphones or line-level sources equipped.
Channel 3 (Channel 2 input on M2) Low-Impedance Input (7)
For use with low-impedance microphones or other line-level sources equipped with a male XLR connector.
Channel 2 & 1 (Channel 1 on M2) Inputs (8‚ & 9)
This 1/4" jack accepts high-impedance microphones or line-level sources equipped.
Rear panel controls
Power inlet socket
This is a standard IEC power connector. An AC mains cord having the appropriate AC plug and
ratings for the intended operating voltage is included in the carton. The mains cord should be
connected to the amplifier before connecting to a suitable AC outlet.
Sample System
The wide range of inputs also allows input.
Mini-concert with two guitarists
You can connect microphone and telectric acoustic guitar for a mini-concert with guitarist.
Keyboardist-singer
You can connect a keyboard in along with a microphone for vocals.
Lectures or presentations
The M2/M3 is a good amplification choice for a lecture or presentation.
Karaoke or background music for an event or dance
You can connect your portable audio player or CD player for stereo playback, and independently adjust the volume of
--
the background music.
Connecting an additional unit to increase the output (Stereo Link)
By connecting two M3 or M2 units you can create a stereo PA system with greater output power.
This function is called “Stereo Link.”You can connect Stereo Link in either of the following two ways.
If using the input jacks of only one of the units
Use one cable with a 1/4” phone plug and RCR for ather side. If you want to use the input jacks and output XLR of
both units Use two cables having 1/4” phone plugs and RCR for ather side
External Speaker
By connecting two M3 or M2 units external speaker, 1/4" jack provides the powered signal from the amplifier. Use
this jack to add a second speaker cabinet in parallel. The external minimum speaker load impedance is 8 ohms. you can
create a stereo PA system with greater output power
--
M3 SPECIFICATIONS
M2 SPECIFICATIONS
PREAMP SECTION
PREAMP SECTION
The following preamp specs are measured @ 1 kHz‚nominal
signal levels are with channel level controls set at 5‚ minimum
levels are with channel level controls set at 10.
Channel 1 and 2 inputs:
Input Impedance: 100K‚ Nominal Input
Level: -22 dBV‚ 79 mV RMS
Minimum Input Level: -40 dBV‚ 10 mV RMS
Nominal Input Level: -15 dBV‚ 178 mV RMS
Minimum Input Level: -33 dBV‚ 22 mV RMS
Channel 3 input:
Low Z Input Impedance: 5 k Ohms
Nominal Input Level: -28 dBV‚ 40 mV RMS
Minimum Input Level: -48 dBV‚ 4 mV RMS
High Z Input Impedance: 100k
Nominal Input Level: -5 dBV‚ 560 mV RMS
Minimum Input Level: -22 dBV‚ 79 mV RMS
Headphone output
Load Impedance: 8 Ohms or greater
Nominal Output: 100 mW RMS
Main line out
Output Impedance: <100
Output Level: 18 dBV
The following preamp specs are measured @ 1 kHz‚ nominal
signal levels are with channel level controls set at 5‚ minimum
levels are with channel level controls set at 10.
Channel 1 Inputs:
Input Impedance: 100 k‚ Nominal Input
Nominal Input Level: -22 dBV‚ 79 mV RMS
Minimum Input Level: -40 dBV‚ 10 mV RMS
Channel 2 Input:
Low Z Input Impedance: 5K Ohms
Nominal Input Level: -28 dBV‚ 40 mV RMS
Minimum Input Level: -48 dBV‚ 4 mV RMS
High Z Input Impedance: 100 k‚
Nominal Input Level: -5 dBV‚ 560 mV RMS
Minimum Input Level: -22 dBV‚ 79 mV RMS
Headphone Output
Load Impedance: 8 Ohms or greater
Nominal Output: 100 mW RMS
Main Line Out
Output Impedance: <100
Output Level: 18 dBV
POWER AMPLIFIER SECTION
POWER AMPLIFIER SECTION
Rated power and load:
120Watts RMS/4 Ohms or 80 WattsRMS/8
(1 kHz, 1% THD @ 120 VAC line)
Frequency response:
+0, -1dB, 20Hz–20kHz @ 100 Watts
RMS/8 Ohms
Total harmonic distortion:
Less than 0.01% @ 1 kHz/8 Ohms
Typically less than 0.08%‚ 20 Hz–20kHz
Hum and noise:
Greater than 100 dB below rated power
Power consumption:
200 Watts @ 115V AC‚ 50/60 Hz‚ Domestic
200 Watts @ 230V AC‚ 50/60 Hz‚ export
Rated Power and Load:
80Watts RMS/4 Ohms or 60WRMS/8 Ohms
(1 kHz, 1% THD @ 120 VAC line)
Frequency Response:
+0, -1dB, 20 Hz–20 kHz @ 60 Watts RMS/8 Ohms
Total Harmonic Distortion:
Less than 0.01% @ 1 kHz/8 Ohms
Typically less than 0.08%‚ 20 Hz–20kHz
Hum and Noise:
Greater than 100 dB below rated power
Power Consumption:
150 Watts @ 115V AC‚ 50/60 Hz‚ Domestic
150 Watts @ 230V AC‚ 50/60 Hz‚ Export
Size:
Unpacking size(mm): 430X390X340 (HxWxD)
Packing size:
Unit weight: 15kg
Size:
Unpacking size(mm): 430X390X340 (HxWxD)
Packing size:
Unit weight: 26kg
Packing weight:30kg
Packing weight:22kg
--
IMPORTANT SAFETY INSTRUCTIONS
WARNING:
When using electric products, basic cautions should always be followed, including the following:
1. Read these instructions.
2. Keep these instructions.
3. Heed all warnings.
4. Follow all instructions.
5. Do not use this apparatus near water. For example, near or in a bathtub, swimming pool, sink, wet basement, etc.
6. Clean only with a damp cloth.
7. Do not block any of the ventilation openings. Install in accordance with manufacturer’s instructions. It should not
be placed flat against a wall or placed in a built-in enclosure that will impede the flow of cooling air.
8. Do not install near any heat sources such as radiators, heat registers, stoves or other apparatus (including
amplifiers) that produce heat.
9. Do not defeat the safety purpose of the polarized or grounding-type plug. A polarized plug has two blades with one
wider than the other. A grounding type plug has two blades and a third grounding plug. The wide blade or third prong is
provided for your safety. When the provided plug does not fit into your inlet, consult an electrician for replacement of
the obsolete outlet. Never break off the grounding. Write for our free booklet “Shock Hazard and Grounding”. Connect
only to a power supply of the type marked on the unit adjacent to the power supply cord.
10. Protect the power cord from being walked on or pinched, particularly at plugs, convenience receptacles, and the
point they exit from the apparatus.
11. Only use attachments/accessories provided by the manufacturer.
12. Use only with a cart, stand, tripod, bracket, or table specified by the manufacturer, or sold with the apparatus.
When a Carl is used, use caution when moving the cart/apparatus combination to avoid injury from tip-over.
13. Unplug this apparatus during lightning storms or when unused for long periods of time.
14. Refer all servicing to qualified service personnel. Servicing is required when the apparatus has been damaged
in any way, such as power- supply cord or plug is damaged, liquid has been spilled or objects have fallen into the
apparatus, the apparatus has been exposed to rain or moisture. Does not operate normally, or has been dropped.
15. If this product is to be mounted in an equipment rack, rear support should be provided.
--
中
文
M3/M2便携式多功能音响系统使用说明
感谢你选择使用我们的M3/M2便携式多功能音响系统,我们的工程师和艺术家经过多年对各种键盘乐
器;电子鼓乐器;原声电吉他;人声话筒发声的测试和研究,最后终于可以将其发声诸多特性和优点融入
到M3/M2便携式多功能音响系统之中,所以我们可以保证我们最新的M3/M2便携式多功能音响系统能够发出
最优美的声音为各种键盘乐器;电子鼓乐器;原声电吉他;人声话筒—无论是低音或是高音,我们的M3/M2
便携式多功能音响系统都能够对他们进行完美的处理,并还原给你最美妙的声音.
在开始使用你的功放之前,请确定你的电源输出电压是与你的功放完全匹配的,你可以在产品的背面看
到适合你功放使用的输出电压,另外在功放的背面,你还可以发现一个额外的音箱接口,如有需要,你可以在此
接口接入多一只合适的音箱以求获取更大的扩声效果.
在使用之前请仔细的阅读这本产品说明书以确保你个人和产品的安全.
特性:
3通道(M2)和4通道(M3)
*60瓦/8Ω;80瓦/4Ω(M2)或80瓦/8Ω;120瓦/4Ω(M3)。
*1x10"/8Ω (M2);1x12"/8Ω(M3) 专业同轴喇叭。
*平衡式,立体声线路输出和监听输入。
*外接8Ω阻抗的扬声器音箱。
*24bits/99种数字效果模块;MP3播放解码器和USB接口。
*3层界面LED显示屏。
*及其坚固的,并可收回和锁定的拉杆大大方便了功放的移动。
快速的使用说明
1.连接电源线到合适的电源插座。
2.确定所有的音量调节旋钮已经被打到零,并且所有的EQ调节在起始点的位置。
3.请将Master Level设定在12:00 钟方位。
4.连接键盘的左边输出到功放的左边输入,连接键盘的右边输出到功放的右边输入。
5.设定main/monitor转换开关到monitor的位置。
6.打开M2或M3的电源开关。
7.调节频道音量到合适的级别。
8.如果需要请合适的调节EQ各个频段。
--
前控制面板说明
1
2
4
3
1
2
4
3
1
2
5
3
4
6
7
8
9
11 10
12 13
Level (1)
1/4"插孔的信号输入音量增益控制旋钮(Channels 1‚ 2 and 3 on the M3 and channels 1 and 2 on the M2.)
Low EQ (2)
主动式低音音色控制旋钮(shelving type: +/-15dB)用于调整低频频响范围(M3:channels 1‚ 2 & 3; M2:
channels 1 & 2.)
注意:过多的增加低音频响会导致对喇叭的损坏.
Hi EQ (3)
主动式高音音色控制旋钮(shelving type: +/-15dB) 用于调整高频频响范围 (M3:channels 1‚ 2 & 3; M2:
channels 1 & 2.)
EFX(4)
数字效果选择旋钮
Mid EQ (5)
主动式中音音色控制旋钮(shelving type: +/-15dB)用于调整中频频响范围 (Channel 3 on the M3 and
channel 2 on the M2.)
CH4 (M3)/Monitor Level (6)/Ch3 (M2)
第4通道1/4"插孔的监听信号输入音量增益控制旋钮(M2为第3通道)用于控制高阻抗的话筒
信号或是高音量的信号源的音量增益控制
Headphone Level (7)
耳机输出信号音量控制旋钮以控制耳机输出信号的强弱来避免损坏您的听力。在使用耳机前
一定要先确认旋钮的刻度是否处在5点处,然后根据所需的音量强弱逐步增减。该旋钮不影
响总输出音量。
Master Level (8)
总输出音量控制旋钮,控制整个便携式多功能音响系统总音量旋钮,在打开电源前一定要先
确认你的总音量控制旋钮的刻度处于0位置。该旋钮不影响耳机的输出音量。
-10-
MP3 Level(9)
MP3播放器输出音量控制旋钮,控制MP3播放器输入信号的音量
EFX Level(10)
效果选择控制旋钮,在使用便携式多功能音响系统时如你不需要增加各种效果,可通过该旋
钮关掉或打开效果功能。
LED Display(11)
LED显示 99种效果目录,MP3播放曲目
USB host(12)
为U盘提供的USB接槽。
Up/center/down key control(13)
UP/center/down控制键的使用.99种效果器的选择和MP3播放器的播放都是通过调节这3个控
件来完成的。长按ENTER键可选择效果器和MP3模式。当你选择效果器模式时,使用UP或DOWN
键,你可以随意选择99种不同的音色效果。长按UP或DOWN键时可以改变音色效果。当你选择
MP3模式时,使用UP或DOWN键,你可以随意选择储存在你U盘里的任何歌曲曲目。长按UP或
DOWN键时可以改变歌曲信号的音量大小,U盘插入时系统能自动识别。
顶面控制板
9
8
7
6
5
4
3
2
1
Power Switch(1)
便携式多功能音响系统总电源开关,在打开该开关前请一定要确认你当地的电源电压,否则
将会损坏你的设备,当开关打到ON的位置时,前面板的蓝色电源指示灯会亮。说明电源已接
通。
External Speaker Jack (2)
外接无源音箱插孔,当你在使用M2/M3便携式多功能音响系统时需要增加扩声音量而又无需
再添加功率放大器时,你可以使用这个插孔直接接入一只8Ω阻抗的全音域音箱以达到你所
需要的声压级。
Main Line Out (3)
主线路输出使用低噪音;平衡式XLR接口,通过这个接口可将便携式多功能音响系统所有的
信号源输出到外部扩声设备如调音台;录音设备,同时还可以将信号直接输送到另一套便携
式多功能音响系统构成立体声PA扩声系统。
Headphone Jack (4)
立体声耳机插孔
-11-
CH4/Monitor Input Jack for M3 (CH3) Monitor Input Jack for M2 (5)
通道4(M3);通道3(M2)监听信号输入插孔,可接入各类高阻抗的话筒信号或音频信号
Channel 3 (Channel 2 input on M2) High Input (6)
通道3(M3);通道2(M2)信号输入插孔,可接入各类高阻抗的话筒信号或音频信号
Channel 3 (Channel 2 input on M2) Low-Impedance Input (7)
通道3(M3);通道2(M2)低阻抗XLR输入插孔,可接入各类低阻抗的话筒信号或音频信号
Channel 2 & 1 (Channel 1 on M2) Inputs (8‚ & 9)
通道2&1(M3);通道1(M2)输入插孔可接入各类高阻抗的话筒信号或音频信号
后背控板
Power inlet socket 电源插孔
这是一个标准的IEC电源插孔,一根与之配对的电源线是可以发现的在我们的纸箱盒里,在你
连接电源之前,你需要先将此电源线连接到功放上.
适用场合:
M2/M3便携式多功能音响系统的应用非常广泛,可用作乐队演出扩声,户外表演扩声,卡拉
ok,背景音乐,街头演绎,可适用于不同的电声乐器的信号源如键盘,电贝司,电子鼓,原
声电吉他以及话筒信号等。同时可以组合成一套完美的立体声PA扩声系统。
-12-
需要注意的安全事项
特别注意:在你要连接功放的电源时,根据当地的电压在115V或230V(50-60Hz)的电源转换
开关上选择你的供电电压.否则将会烧坏你的设备。
在使用我们的产品时,请你认真地阅读注意的安全事项:
1.在使用本产品前仔细的阅读操作指南
2.请好好的保存这本操作指南
3.请注意所有的警示指南
4.请按照操作指南去使用本产品
5.不要在近水的地方操作本产品,例如浴盆,游泳池,潮湿的地下室
6.请用微湿的抹布进行清洁
7.请保持本产品通风口和散热口的畅通,不要将本产品放置在靠墙的地方,(最好保持超过
16cm的空间)或箱子里,因为这样会影响到本产品的通风和散热.
8.不要将本产品放置在靠近发热体的附近,例如,电热炉,烤箱等
9.如果发现插座和本产品的电源线插头不匹配,请不要将本产品插头的地线端拆掉以插入
这个本来不匹配的插座里,这样将导致严重的后果,并大大增加了你和本产品受到伤害的
机率, 我们建议你最好去更换一个匹配本产品插头的插座.
10.请不要使用任何不是由原厂提供的附件和配件.
11.当在雷电或你可能长时间不使用本产品的情况下,请将插头拔掉.
12.考虑到本产品的重量,在搬运本产品时请注意安全操作,不要被压到手指头.
13.一旦本产品发生故障,请找专业的维修人员进行维修,或将本产品发回购买地,由我们
的维修部门处理.
14.请妥善的保管好电源线,不要将其折叠或刮花.
15.本产品能够产生极大的声压,所以在使用时一定要注意将音量打到合适的位置,以免给
你的听力造成临时,或永久性的伤害.