1
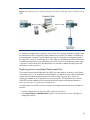
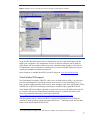
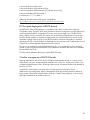
Best practices for Remote Insight Lights-Out Edition – RILOE
and RILOE II
best practice
Abstract.............................................................................................................................................. 3
Introduction......................................................................................................................................... 3
Planning ............................................................................................................................................. 4
Planning tool ................................................................................................................................... 4
NetServer usage .............................................................................................................................. 4
Deployment......................................................................................................................................... 5
Management network....................................................................................................................... 5
Out-of-band management.................................................................................................................. 6
Configuring multiple boards .............................................................................................................. 6
Automated configuration ............................................................................................................... 7
Naming conventions for multiple boards ......................................................................................... 7
Enhancing security ........................................................................................................................... 7
Change the default password for the administrator account ............................................................... 7
Enable invalid login alerts ............................................................................................................. 8
Disable the ROM-Based Setup Utility F8 .......................................................................................... 8
Restrict the remote console port ...................................................................................................... 8
Networks with proxy servers.............................................................................................................. 8
Browser configuration ................................................................................................................... 9
Configuring IP port assignments ..................................................................................................... 9
Optimizing the graphical remote console ...................................................................................... 10
Browser settings for RILOE II......................................................................................................... 10
Mouse settings for RILOE II .......................................................................................................... 11
Settings for RILOE ....................................................................................................................... 11
Operation......................................................................................................................................... 12
Integration with Insight Manager 7 and management agents............................................................... 12
Group administration ..................................................................................................................... 13
Insight Manager 7...................................................................................................................... 13
Example process ........................................................................................................................ 14
Deploying headless servers ............................................................................................................. 15
Unattended server deployment......................................................................................................... 15
Deploying servers using Rapid Deployment Pack ............................................................................... 16
Virtual Media/USB support ............................................................................................................. 17
DOS-scripted deployment of RILOE boards........................................................................................ 18
Wireless management of RILOE II boards.......................................................................................... 18
Call to action .................................................................................................................................... 19
Abstract
This document provides customers with specific practices for using the Remote Insight Lights-Out
Edition boards, RILOE and RILOE II generations, to reduce complexity and simplify management of
the datacenter and remote sites. These recommendations are based upon solutions by systems
engineers who have extensive experience using the Remote Insight Lights-Out Edition board. These
practices may not be applicable in all situations, depending on the unique environment of the
customer. Where implementations differ between the two generations of boards, the paper discusses
differences between the Remote Insight Lights-Out Edition board and Remote Insight Lights-Out Edition
II.
Introduction
Compaq introduced its first lights-out technology in 2000 with Remote Insight Lights-Out Edition
(RILOE). The HP Remote Insight Lights-Out Edition II (RILOE II) is the follow-on to the Remote Insight
Lights-Out Edition board. Using either RILOE II or RILOE, IT administrators can manage a ProLiant
server remotely through its entire life cycle: initial deployment, operation, and redeployment. Because
each board has its own integrated hardware components (processor, memory, and network
interface), the administrator has full access and control of the server at all times. Unlike other
solutions, the lights-out management boards 1 are entirely independent of the state of the operating
system or server hardware, and provide seamless control of remote servers in full graphics mode. The
virtual media feature of the lights-out boards allows IT administrators to perform remote ROM
upgrades and server deployments. All these capabilities combine to provide administrators the ability
to respond quickly to downtime events, diagnose OS or server problems remotely, increase uptime,
and reduce the loss of business revenue. Furthermore, the lights-out management boards allow servers
to be seamlessly controlled without local keyboards, mice, monitors, or KVM switches. 2 Eliminating
these I/O devices can simplify the data center by reducing cabling complexity and increasing data
center density.
This paper discusses best practices in system planning, deployment, and operation of lights-out
management boards. The paper focuses on RILOE II, the more recent product, but includes
information that is specific and helpful to RILOE users. Where there are specific differences between
the two boards, the applicable information is provided for each board. It is assumed that the reader is
familiar with the general features of the lights-out management boards.
More information about RILOE and RILOE II is available from the website at:
www.hp.com/servers/lights-out .
1
2
In this paper, the term “lights-out management boards” refers to both RILOE and RILOE II.
KVM switch: Keyboard, video, and mouse switch.
3
Planning
Before installing lights-out management boards, it is helpful to assess the IT environment. Table 1
outlines areas to consider when planning the use of lights-out technology.
Table 1. Assessing the IT environment
Environment
factor
Assessment criteria
Potential for improvement
asset
management
Where are servers located (in
datacenters or at remote sites)?
Installing lights-out management
boards can eliminate the need
for keyboards, video monitors,
and mice, reducing cabling
complexity and increasing server
density in the datacenter.
Where would lights-out
management products be
helpful?
How many servers exist in the
computing environment?
systems
management
How are remote sites and data
center servers currently
managed?
Can the servers be managed
remotely through lights-out
technology?
security
Is the network as secure as
possible?
Does the datacenter use virtual
private networks or include
firewalls?
Lights-out management boards
provide seamless access to the
server without any need for an
administrator to be present.
Lights-out management boards
provide multiple levels of
security, including Secure
Sockets Layer (SSL) encryption,
event generation for failed login
attempts, lockout of configuration
utilities, enforced delay after
unsuccessful login attempts, and
configurable internet protocol (IP)
port assignments.
Planning tool
Administrators can quantify the benefits of using the lights-out management boards. HP has developed
the Remote Insight Back of the Envelope Savings Calculator as an aid to determining the benefits of
using lights-out management boards.
To download the Back of the Envelope Savings Calculator, register at the following link:
http://h18000.www1.hp.com/products/servers/management/riloe2/boe.html.
NetServer usage
HP customers can now standardize their management practices by using RILOE II in both HP
Netservers and ProLiant servers. This allows customers to use a single, consistent tool to remotely
manage their installed HP Netservers and ProLiant servers. RILOE II can be installed on the following
HP Netservers:
• HP Netserver LC 2000
• HP Netserver LH 3000/3000r
• HP Tower Server tc3100
4
• HP Tower Server tc4100
For more information, see http://h18000.www1.hp.com/products/servers/management/riloe2/netserversupport.html.
Deployment
To ensure server compatibility before installing a lights-out management board, visit the HP website at
http://h18013.www1.hp.com/manage/supported-servers.html.
An administrator must consider not only installation and deployment of the lights-out management
boards, but also the setup and design of the network on which the lights out boards reside. HP
recommends deploying a separate management network for the lights-out management boards. This
section describes methods for securing the network, accessing the network in various ways, and
optimizing the remote console feature for best performance.
Management network
The lights-out management boards allow browser access to ProLiant servers through a seamless,
hardware-based, OS-independent, graphical remote console. However, for security reasons, HP
recommends that customers establish a private management network that is separate from their data
network and that only administrators be granted access to that management network.
Customers can set up the private network using open ports and a virtual private network (VPN). If the
host servers are accessible to the Internet or other uncontrolled general access networks, an
administrator should use VPN access to get to the local area network (LAN) in which the lights-out
management boards are connected (Figure 1).
Figure 1. Example of access to a virtual private network using a lights-out management board on the corporate
network
5
Out-of-band management
Lights-out management boards can be used for remote management even if there is no Ethernet LAN
connection to a host server located at a remote site. IT administrators can use a modem gateway or a
remote access server (RAS) login into the local LAN to enable out-of-band (dial-up) access to the host
server. If there were multiple servers at the remote site, this solution would require only one telephone
line to access all lights-out management boards installed at that site.
As an example, a customer can use the RM356 router from NetGear for out-of-band access to lightsout management boards (Figure 2). Information about the RM356 router is available on the NetGear
website at: www.netgear.com/.
Figure 2. Example of out-of-band access configuration.
Configuring multiple boards
Each RILOE II board can be configured individually in one of three ways: through the web browser
interface, through the ROM-Based Setup Utility F8, or through the SmartStart Scripting Toolkit. The
RILOE board can be configured in a fourth way by using the System Configuration Utility. See the
appropriate User Guide for more information (www.hp.com/servers/lights-out).
The network settings tag on each RILOE II board includes the bar codes for the password and domain
name system (DNS) name. When configuring multiple RILOE II boards, the administrator can scan all
the passwords and DNS names using a bar code scanner and then import the data into a
spreadsheet or database to facilitate rapid deployment. RILOE does not have bar code values on the
network settings tag.
6
Automated configuration
Administrators can configure multiple lights-out management boards in a completely automated
fashion by using the Lights-Out Configuration Utility and the Remote Insight Board Command
Language 3 (RIBCL). The Lights-Out Configuration Utility requires the username, password, and IP
address for each lights-out management board.
The default username for each board is “Administrator,” so there is no need for programming to
identify the username.
The administrator can extract the default administrator password by accessing the board's XML
interface 4 to Insight Manager 7, located at http://riloe2/xmldata?item=All . From this interface, the
board's serial number is returned. For RILOE II, the default administrator password is set as the last
eight characters of the serial number. (For RILOE, the default administrator password is set to the last
four characters of the serial number.) This only works if the XML reply is set to MEDIUM or HIGH and
the default account has not been changed.
NOTE:
Since it is possible to extract the default administrator password, it
is critical that this default password be changed before the board
is put into production.
To automatically discover the network addresses of lights-out management boards, the administrator
can use Insight Manager 7. The administrator can perform an Application Launch for each new lightsout management board that Insight Manager 7 discovers. The associated RIBCL script would initiate a
process such as:
• Ping everything on a given subnet.
• For those IP addresses that reply, try to connect to port 80.
• For those that succeed, read the Insight Manager 7 XML reply. The reply will include the serial
number and the management processor type tag.
Naming conventions for multiple boards
Especially for customers that are deploying many lights-out management boards, it is helpful to name
lights-out management boards according to the following convention: ServerName_RILOE. This clearly
identifies which server is hosting the lights-out management board.
Enhancing security
Because they are completely autonomous and can be used to control the server, lights-out
management boards should be treated is if they were servers. For example, the administrator should
include the lights-out management boards in the security and network audits, and review the access
logs daily.
Change the default password for the administrator account
The last eight digits of the RILOE II serial number are the default password 5 for the administrator
account that comes with each RILOE II board. This serial number should be recorded for each lightsout management board. Then, if the administrator password is lost, resetting the board will make the
last eight digits of the serial number the default password. The lights-out management passwords
should be changed with the same frequency as the server’s administrative passwords.
3
4
5
See the Group Administration section of this document for more information about these utilities.
XML: extensible markup language
For the RILOE board, only the last four digits are the default password.
7
Enable invalid login alerts
Login attempts are tracked and login failures are logged in the Remote Insight Event Log. To further
improve security, the administrator has the option of having a failed login attempt generate an alert
on a remote management PC running Insight Manager 7.
Disable the ROM-Based Setup Utility F8
By default, a lights-out management board will configure itself automatically from the Dynamic Host
Configuration Protocol (DHCP) server on power up. For servers that do not use DHCP, the
administrator can configure the lights-out management board using the ROM-Based Setup Utility
(RBSU). RBSU is available locally at the host server every time the host server is booted, if the F8 key
is pressed when the cursor flashes and the RILOE or RILOE II prompt displays on the screen. Disabling
this method of accessing RBSU prevents unauthorized personnel from walking up to the host server
and configuring a new administrator account on the lights-out management board.
The F8 RBSU access can be disabled through the security settings in the lights-out management
boards. To change these settings, complete these steps:
1. Log on to the lights-out management board using an account that has supervisor status.
2. Click Global Settings on the Administration tab.
3. Change the settings in the Security Settings section.
4. Click Apply Settings.
Restrict the remote console port
By default, the remote console port is always enabled. When this port is available, an authorized user
can establish a Remote Console session with the host server. To provide tighter security, a user with
supervisor rights can restrict access to the remote console port. Two options are available for
restricting access to the remote console port:
• The remote console port is always disabled. A user trying to access the remote console will always
be denied access when this setting is in place.
• The remote console port is automatically enabled when an authorized user initiates a Remote
Console session. The remote console port is automatically disabled when the user terminates the
Remote Console session
To configure the availability of the remote console port, complete the following steps:
1. Log on to the lights-out management board using an account that has supervisor status
2. Click Global Settings in the Administration section.
3. Click the appropriate option in the Remote Console Port Configuration section.
Networks with proxy servers
If the client web browser software is configured to use a proxy server, the administrator will be
prompted for username and password before a Remote Console session begins. Each lights-out
management board can be accessed by its short name (for example, remote21), fully qualified name
(for example, remote21.domain.com), or IP address. The browser needs to be configured to bypass
the proxy server for each method used to access the lights-out management board.
8
Browser configuration
To configure Microsoft® Internet Explorer 5.5 (SP2) or above:
1. Click Tools, Internet Options, then Connections.
2. Click LAN Settings (or the appropriate dial-up or VPN connection) and click Settings. Make sure
that the Bypass proxy server for local addresses box is checked. This will ensure that short names
will not use a proxy server.
3. Click Advanced. The Proxy Setting window will appear.
4. Under Exceptions, enter the IP address and/or the fully qualified name of the lights-out
management board.
Wildcards can be used to indicate all addresses within a certain domain, (for example,
*.domain.com or 199.199.199.*). When an attempt to access a website is made, Internet Explorer
crosschecks that address with a list to determine if a proxy server should be used. If a proxy server is
not required to access external Internet sites, uncheck the "Use a proxy server" box. The Advanced
settings can then be skipped.
To configure Netscape Navigator 6.2 or above:
1. Click Edit then Preferences.
2. Click the + next to Advanced then Proxies.
3. Click the radio button next to Manual proxy configuration.
4. Click View.
5. In the Exceptions list, add the names, domain names, or IP addresses of the lights-out management
board. Netscape Navigator does not support the use of wildcards.
6. If a proxy server is not required to access external Internet sites, click the radio button next to
Direct connection to the internet. The Exceptions list can then be skipped.
To configure Mozilla1.0 or 1.1, follow the same steps used for Netscape Navigator.
Configuring IP port assignments
Administrators can manually configure the HTTP 6 and remote console ports used by the lights-out
management board. Normally, a web browser automatically attempts to connect with port 80 when
given an IP address. Using the port configuration capability, the administrator can redirect the HTTP
and remote console ports to arbitrary, administrator-defined ports, so that others cannot access the
HTTP and remote console ports without specific knowledge of the port numbers. Once the HTTP port is
re-directed, a user would need to specify that port along with the IP address to access the login
screen. This feature may be particularly useful for customers who wish to access the board through a
firewall and use Insight Manager 7 as the data collection vehicle for port changes.
6
HTTP: Hyper Text Transfer Protocol
9
Troubleshooting Tip:
For a lights-out management board to work properly when going
across routers using port blocking and/or firewalls, ports 23, 80,
and 443 must be open. Port 23 is for the telnet ports where the
remote and graphical remote console is used, port 80 is for HTTP
communications, and port 443 is required for the SSL connection.
The inability to access the lights-out management ports is often
confused with incorrect proxy settings. When in doubt, disable
proxy in Internet Explorer or Netscape. Table 2 identifies default
port locations and information about resetting ports to allow
access.
Table 2. Default port locations for lights-out management boards
Port number
Protocol
Can be changed
Supports
Enabled
161
SNMP get/set
No
Insight Manager 7 polls
No
162
SNMP trap
No
Insight Manager 7 agent
events
No
80
Remote Insight
port
Yes
HTTP interface to lightsout management board
Yes
443
Remote Insight
encrypted port
Yes
SSL access to lights-out
management board
Yes
23
Telnet
Yes
Remote Console
Yes
Optimizing the graphical remote console
Firmware and hardware updates to the RILOE II board have enhanced the performance of the remote
console feature. Therefore, there are some differences when optimizing the remote console,
depending on whether a RILOE or a RILOE II board is installed. This section identifies the best
practices that apply to both boards, those that apply to the RILOE II board specifically, and those that
apply to the RILOE board specifically.
Browser settings for RILOE II
To optimize performance, set the text size to medium. For use with RILOE II, HP recommends Microsoft
Internet Explorer, version 6.0 or above. Netscape Navigator 6.2.2 is also supported. Additional
browsers may or may not work correctly, depending on the operating system and specific
implementations.
Default encryption protocols in Netscape 6.2.2 are not compatible with RILOE II. To turn on the
compatible protocols, complete the following steps:
1. Click Edit, Preferences, Privacy & Security, SSL.
2. Deselect both Enable SSL version 3 and Enable TLS. The only SSL version that should be selected is
Enable SSL version 2.
10
Mouse settings for RILOE II
RILOE II enables the single cursor mode by default, making it easier for the administrator to navigate
in the remote console window. The dual cursor mode, which uses two mouse cursors in the remote
console window, can also be used. The dual cursors represent the host server’s mouse cursor (seen as
the standard cursor) and the local client’s mouse cursor (seen as a crosshair in the remote console
window).
To switch to dual cursor mode, click OFF, next to Local Cursor (see Figure 3).
To return to single cursor mode, click ON next to Local Cursor.
Figure 3. Screen shot of the remote console session showing the local cursor button (upper left-hand corner of the
Administration Remote Console)
If the two cursors drift apart, they can be synchronized and brought back together. Use any of the
following techniques to synchronize the remote and local cursors:
• Right-click-drag and move the local crosshair cursor to align with the remote server's mouse cursor.
• Holding the Ctrl key, move the local crosshair cursor to align with the remote server's mouse cursor.
• Set the speed of the mouse cursor to the middle setting. Set the mouse cursor Acceleration to "low"
or disable acceleration entirely.
A future firmware release for RILOE II, expected in early 2003, will eliminate the need to adjust the
mouse speed and acceleration settings.
Settings for RILOE
Optimizing the performance of the remote console using the RILOE board is dependent on the host
server operating system. The appendix gives a detailed list of optimized settings for the client
browser, mouse, and host server when using a RILOE board.
11
To enable the single mouse cursor in the remote console window, the administrator must install the
Sun Java Plug-in Version 1.3.1 or greater. The Java Virtual Machine applet must be downloaded and
installed on the client machine and is available at www.hp.com/servers/manage/jvm. When a browser
running on a client machine is connected to the Internet and used to access RILOE (upgraded to
firmware version 2.31) 7 , the browser will automatically try to download the Java 1.3.1 VM software.
If Insight Manager 7 is also running, the Java Virtual Machine will be installed automatically to the
client when browsing into Insight Manager 7.
If using dual cursors, the two cursors can be synchronized by using any of the following techniques:
• Right-click-drag and move the local crosshair cursor to align with the remote server's mouse cursor.
• Holding the Ctrl key, move the local crosshair cursor to align with the remote server's mouse cursor.
• Use the "Sync Mouse" button above the remote console frame. (This applies only to RILOE. RILOE II
does not have a Sync mouse button.)
The speed of the remote console is dependent on the processing power of the client machine. HP
recommends using a client system with a minimum of 256 MB of memory and a 400 MHz processor
to provide good interaction between the user and RILOE.
Operation
Following server deployment there is an ongoing need to streamline, change, and manage the server
during its lifecycle. This section discusses tools and techniques that greatly assist administrators with
the task of remotely maintaining servers deployed in hosting facilities around the world.
Integration with Insight Manager 7 and management agents
The lights-out management boards are tightly integrated with the Insight Management Suite and
Management Agents, allowing administrators to view subsystem and status information from a web
browser. Furthermore, an administrator can use the query mechanism of Insight Manager 7 to
discover each lights-out management board and store it on a device list. The device list provides
direct hyperlink access to each board, giving the administrator the benefit of having a single location
for accessing all the lights-out management boards, as shown in Figure 4.
To download the current firmware versions for the Remote Insight Lights-Out Edition board, visit
www.hp.com/servers/lights-out.
7
12
Figure 4. Insight Manager 7 provides a single access point for every lights-out management board.
The administrator can configure the lights-out management board for proactive management by
allowing SNMP trap delivery to Insight Manager 7. To support more than one SNMP trap address on
RILOE, administrators should define two users with different trap addresses. On RILOE-II,
administrators can configure up to three SNMP trap destinations.
If the administrator has changed the ports that the lights-out management board uses, some
modifications must be made to Insight Manager 7 to be able to discover these new ports. To
customize the port scans used by Insight Manager 7, follow these steps:
1. Open Windows Explorer on the server running Insight Manager 7.
2. Navigate to the installed directory for Insight Manager 7 (typically, this is located at c:\Program
Files\Compaq\ Insight Manager 7\).
3. Navigate to the \config\additionalWsDisc.props file and open the file with Notepad or another
text editor.
4. Follow the directions in the .props file to change the ports discovered by Insight Manager 7.
Group administration
Lights-out management boards can be managed as a group rather than one board at a time. For
example, an administrator can change the user access rights and privileges, add or delete users, and
update passwords for an entire group of lights-out management boards. In addition, an administrator
can update firmware for a group of lights-out management boards. Bulk configuration of groups can
be done by using components of Insight Manager 7 or by using batch or PERL scripts via TCP/IP.
Insight Manager 7
Group administration can be done through Insight Manager 7 by using the following components:
13
• Remote Insight board Command Language (RIBCL) – an XML-based scripting language
• Lights-Out Configuration Utility (CPQLOCFG.EXE). This utility must reside on the same server as
Insight Manager 7 does. Version 1.2 can be used for group configuration of RILOE boards. The
RILOE board must be upgraded to firmware version 2.4 (or higher) before using this utility.
CPQLOCFG.EXE version 2.10 is used for group configuration of RILOE II boards.
• Query Definition in Insight Manager 7
• Application Launch in Insight Manager 7
Example process
These components not only allow an administrator to perform group management of lights-out boards,
an administrator can also use RIBCL to write scripts that remotely perform a multitude of operations on
many servers. For example, an administrator might remotely upgrade the system BIOS for every server
in a rack. A script might instruct the lights-out management board in each server to do the following:
power down the server, download the new BIOS, and then power up the server. With XML-based
remote scripting capabilities, every function or task an administrator can do using Lights-Out
technology and a web browser can also be done in a secure environment through an XML script
running at a remote site.
14
The administrator would perform the following steps to perform a group administration task:
1. Write a RIBCL script file to perform the desired management tasks (such as add a user, delete a
user, or change a user profile). A sample file is provided in the Group Administration chapter of
the appropriate User Guide.
2. Perform a device query on management processor devices in Insight Manager 7 and save the
query list.
3. Set up an Application Launch Task to start the Lights-Out Configuration Utility on all lights-out
management boards listed in an Insight Manager 7 Management Processor query. The
Application Launch can be executed on demand or can be scheduled to run automatically at a
specific date and time.
4. Specify the script file, query list, and log file destination as parameters to the launch task. Through
Insight Manager 7, the Lights-Out Configuration Utility sends a RIBCL file to a group of lights-out
management boards to manage their user accounts.
5. The boards then perform the action designated by the RIBCL file and send a response to the log
file.
6. After the Application Launch has executed, open up the log file to see the results of the operation.
Deploying headless servers
Lights-out management boards are designed to enable headless server operation. The term headless
refers to running a server without legacy input/output devices such as a keyboard, mouse, or monitor.
Headless servers must be accessed through alternative means, such as network or serial ports. By
using the lights-out management boards rather than local KVM devices, the administrator increases
the amount of computing space, reduces cabling, reduces complexity, and increases the security of
the computing environment.
To have remote keyboard and mouse capabilities in a headless environment, the administrator must
use either the keyboard/mouse adapter cable provided with the RILOE II board or the 16-pin or 30pin Remote Insight internal cable.
To prevent POST errors when booting a headless server without a local keyboard, the administrator
should do the following: in the Global Settings for the lights-out board, set 'Host Keyboard' to
DISABLED. If a local keyboard is needed later, the Host Keyboard setting must be enabled.
Unattended server deployment
Using the capabilities of the lights-out board with its virtual media, the SmartStart Scripting Toolkit,
and a network share drive, administrators can deploy a server in a completely unattended fashion
(Figure 5).
15
Figure 5. Server deployment with a lights-out management board, the virtual floppy, and the SmartStart Scripting
Toolkit
For example, the administrator configures a source server. Then using the SmartStart Scripting Toolkit,
the administrator builds a configuration (boot) diskette with script files. This diskette is inserted into a
local management workstation, and the administrator logs in to the lights-out management board in
the target server. Using the virtual floppy drive on the lights-out management board, the administrator
can reboot the target server to the virtual floppy and run the script file. If the operating system image
is stored on a network share drive, the administrator can install the complete operating system and
applications from the share drive.
Deploying servers using Rapid Deployment Pack
The ProLiant Essentials Rapid Deployment Pack (RDP) gives administrators the ability to easily deploy
one or many servers in an unattended, automated fashion. It combines the Altiris eXpress Deployment
solution with the ProLiant Integration Module to provide an easy “drag and drop” solution for
deploying a standard server configuration from a remote console. The Deployment Server function
within RDP provides capabilities that incorporate the powerful lights-out management features to
power on, power off, or cycle power on a target server.
An administrator can use RDP to browse to a lights-out management board and access the lights-out
interface:
1. From the Deployment Server Console in RDP, right-click on the server.
2. Select Power Control then RILOE-Interface (Figure 6). This provides easy access to the lights-out
management features.
16
Figure 6. Example of how to use RDP to browse to the lights-out management interface.
Using the Altiris Boot Disk Creator Utility, an administrator can also create boot floppies with the
target server configuration. The administrator can then use these boot floppies with the lights-out
Virtual Floppy and Virtual Media/USB tools to create a bootable image anywhere on the network.
The administrator can boot from these virtual floppies and connect to the RDP Deployment Server to
complete the installation and deployment process.
More information is available about RDP from the HP website at: www.hp.com/servers/rdp.
Virtual Media/USB support
The Virtual Media functionality of RILOE II, which uses a universal serial bus (USB), is an innovative
and robust implementation for providing a remote server access to a local client floppy/CD or a
floppy image available anywhere on the network, at the operating system level. Virtual Media/USB is
available only on RILOE II; Virtual Floppy functionality is available on the original RILOE board.
Virtual Media/USB functionality is supported on specific ProLiant servers with the Remote Insight 30pin connector and running a USB-supported operating system. For up-to-date information on the
servers that support this functionality, see the matrix at this URL:
http://h18000.www1.hp.com/products/servers/management/riloe2/server-slot-matrix.html.
After the operating system is booted, the RILOE II virtual Media USB diskette and CD ROM are
available for those operating systems that support USB devices. 8 Operating systems that have been
tested with the USB diskette and USB CD are:
8
Operating systems that support other USB devices in addition to the USB mouse and keyboard.
17
• Microsoft Windows 2000 Server
• Microsoft Windows 2000 Advanced Serve
• Microsoft Windows 2000 Datacenter (HP certified versions only)
• Microsoft Windows.NET Server Beta 3
• Red Hat Linux 7.2, 7.3, and 8.0
Additional information about USB support is available at
http://h18004.www1.hp.com/products/servers/platforms/usb-support.html .
DOS-scripted deployment of RILOE boards
The RILOE DOS Utility (CPQLODOS) is a command-line utility that is a subset of the Lights-Out
Configuration Utility. The RILOE DOS Utility generates a hardware configuration script file that can be
used to duplicate the RILOE configuration of a source server onto a target server. The RILOE DOS
Utility is required only for customers who want to use the SmartStart ScriptingToolkit on servers with
the RILOE board installed. For example, an administrator at a central location may want to use the
SmartStart Scripting Toolkit to bring a set of RILOE boards to a baseline configuration of username
and password. Then, when the boards are deployed at remote sites, the local IT administrator can use
CPQLOCFG to perform detailed configuration over the network.
This utility is not intended for continued administration; also, it is not supported on Linux operating
systems or when using the Novell NetWare Client. Additional information about this tool is available
from the RILOE User Guide.
The utility will be updated in the future to support RILOE II boards.
Wireless management of RILOE II boards
Roaming administrators can access servers with lights-out management boards in a variety of ways.
Administrators can use a wireless-equipped notebook in the vicinity of a wireless access point or use
a modem-equipped laptop to dial in to through a RAS account, an external modem router attached to
the LAN, or a VPN.
Using RILOE II, administrators can access their IT infrastructure from a Pocket PC device.
Administrators can perform basic lights-out management while they are away from their desktop or
laptop system. When RILOE II detects that the client uses PocketPC Internet Explorer, it serves up the
web pages formatted for the smaller screen size.
18
Call to action
To help us better understand and meet your needs for ISS technology information, please send
comments about this paper to: [email protected].
© 2003 Hewlett-Packard Development Company, L.P. The information contained
herein is subject to change without notice. The only warranties for HP products and
services are set forth in the express warranty statements accompanying such
products and services. Nothing herein should be construed as constituting an
additional warranty. HP shall not be liable for technical or editorial errors or
omissions contained herein.
Microsoft, Windows, and Windows NT are U.S. registered trademarks of Microsoft
Corp.
Netscape Navigator is a trademark of Netscape Communications Corporation.
TC030103WP, 01/2003