1
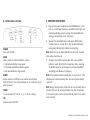
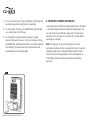
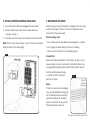
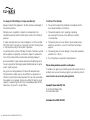
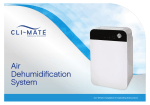
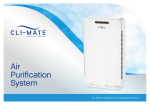
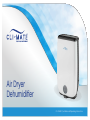
Air Dryer
Dehumidifier
CLI-DH8D | Installation & Operating Instructions
Congratulations on your purchase of a Cli~Mate
Air Dryer Dehumidifier.
This rotary desiccant dehumidifier is economical, light weight, mobile and easy to operate. Great for use in homes and
low temperature rooms which are high in dampness.
Note: Please read through the instructions carefully before using or installing the product and ensure that the
manual is kept in a safe place for future reference.
The system must be properly installed and located in accordance with the installation instructions before it is used.
During the set up of this product if you have any questions / comments / issues DO NOT RETURN TO STORE.
For service and technical advice on this product, free call 1300 764 325.
CUSTOMER HOTLINE: 1300 764 325
Aquaport Corporation Pty Ltd
PO Box 81 Findon SA 5023 Australia
Telephone: 08 8354 0711
Facsimile: 08 8354 0722
Email: [email protected]
Web: www.cli-mate.com.au
/climatebrand
@ClimateBrand
Electrical Requirements:
Australia / New Zealand 240V / 230V 50Hz
Due to manufacturing alterations product may
vary slightly from that pictured.
SPECIAL PRODUCT INSTRUCTIONS
PRODUCT SPECIFICATIONS
This appliance is designed for household use only. Do not use
this unit outdoors or on wet surfaces.
Air Dryer Dehumidifier
To achieve highest efficiency, please close all windows
and or doors.
The appliance air vents and air grilles must not be obstructed at
anytime. Air flow is required for the unit to operate effectively.
Place unit in a flat well-ventilated location at least 30cm from wall
or other appliances.
Units must be placed on a flat stable surface to reduce possible
excessive vibration and noise.
System Specifications
CLI-DH8D
Air Dryer Dehumidifier
Dehumidification
8 Litres/day
Dehumidifying Capacity
0.33 kg/hour
Air Circulation
120 cbm/hour
Power Consumption
Capacity of Water Tank
650 watts
2.0 L
Noise Level
≤50dB
N.W
6.3 kgs
Empty the water when water reservoir is full or not in use for a
prolonged period.
G.W
7.0 kgs
Suitable Room Size
30 m²
Recommended operating temperature range is minimum 5 degrees
Celsius (RH 41%) and maximum 37 degrees Celsius (RH 98%).
Product Dimensions
351 x 180 x 500 mm
Units must never be placed and operated on an angle as water
spillage from reservoir can occur.
Any servicing other than cleaning and user maintenance will violate
the terms of this WARRANTY and warranty will be null and void.
Note: RH = Relative Humidity
INSTALLATION AND OPERATING INSTRUCTIONS 1
OPERATION CONDITIONS AND SAFETY PRECAUTIONS
Read all instructions carefully.
•All components need to be installed in accordance with the user
manual instructions for correct performance of unit.
•This appliance is not intended for use by persons (including
children) with reduced physical, sensory or mental capabilities, or
lack of experience and knowledge, unless they have been given
supervision or instruction concerning use of the appliance by a
person responsible for their safety.
•Children should be supervised to ensure that they do not play
with the appliance.
•Return appliance to the nearest authorized service facility for
examination, repair or adjustment.
•The use of accessory attachments not recommended by the
appliance manufacturer may result in fire, electric shock or
personal injury.
•Ventilation – The appliance air vents and exhaust grilles must
not be obstructed at anytime. Air flow is required for the unit to
operate effectively. Place unit in a flat well-ventilated location at
least 30cm from wall or other appliances.
•Do not use outdoors.
•Do not use in wet environments e.g. Bathrooms or Showers.
•A power outlet is required to operate the appliance. Electrical
supply required 220~240V/50Hz.
•Do not let cord hang over edge of table or counter,
or touch hot surfaces.
•Ensure unit is properly grounded.
•Do not use appliance for other than intended use.
•To protect against fire, electric shock and personal injury, do
not spray water onto the unit, do not immerse cord, plugs, or
appliance in water or other liquid. Do not push any objects in the
unit air inlet and air outlet exhaust grilles.
•This appliance should always be used in conjunction
with a safety switch.
•Unplug from outlet when not in use and before cleaning. Never
unplug unit with wet hands.
•Do not use unit near flammables or fire.
•Do not operate any appliance with a damaged cord or plug or after
the appliance malfunctions, or has been damaged in any manner.
2 INSTALLATION AND OPERATING INSTRUCTIONS
•Do not place the unit near an oven, heater, radiator, direct
sunlight or any other heat source.
•Ensure unit is on a stable and even flat surface to prevent unit
from falling or tipping over and to reduce possible excessive
vibration and noise.
•If unit ever falls or tips over when water reservoir is full,
immediately unplug the power cord. Ensure unit is dried
thoroughly before operation of the unit.
•Do not put fingers or other objects in any openings of the unit.
During the set up of this product if you have any questions/
comments/ issues DO NOT RETURN TO STORE
FOR SERVICE AND TECHNICAL ADVICE ON THIS PRODUCT FREE
CALL 1300 764 325
PRODUCT FEATURES
The Cli~Mate Air Dryer Dehumidifier is different to Cli~Mate’s
compressor range of dehumidifiers. Classified as a desiccant
dehumidifier, there are key functions and benefits that set it apart
from traditional dehumidifiers.
Traditional dehumidifiers lose their moisture absorbing
effectiveness as the temperature drops. They work well at higher
temperatures above 20oC.
The Cli~Mate Air Dryer Dehumidifier on the other hand, is not
affected by temperature and is able to extract the same amount of
moisture at any temperature above 5oC.
The Cli~Mate Air Dryer Dehumidifier does not contain a
compressor therefore it is lighter, smaller, quieter easier to handle
as well as more environmentally friendly.
Unit safety features include:
1. Automatically switches off when water reservoir is full.
2. System alarm when unit malfunctions.
3. Temperature sensor which automatically switches unit off, in
the event the unit malfunctions or is faulty and overheats.
4. Unit fan will continue to run for 4 minutes after unit is switched
off to expel heat created during the operation of the unit.
Unit functions include dehumidification and ionization which is
suitable for use in cool to cold, damp environments which are
susceptible to high dampness, including cellar, laundry and marine
environments. During dehumidification, Ionization eliminates indoor
odours, creating a fresh and clean living environment.
Units relative humidity setting turns unit automatically off when
the moisture in the air reaches the set position and purification
setting.
INSTALLATION AND OPERATING INSTRUCTIONS 3
A. PARTS IDENTIFICATION DIAGRAM
A. Dry Air Outlet
A
B. Handle
G
C. Humid Air Inlet Grille
H
D. Continuous Drainage Outlet
(For hose connection)*
B
E. Water Reservoir
F. Power Cord
G. LED Monitor
H. Control Panel
I. Water Pane
C
D
* Continuous drainage hose is an extra drainage
option; hose does not need to be connected if
using the water reservoir to catch condensed
water.
4 INSTALLATION AND OPERATING INSTRUCTIONS
E
F
I
B. CONTROL PANEL & KEY PADS
C. OPERATION INSTRUCTIONS
1. Plug unit into power socket and press POWER button to turn
unit on, unit will beep three times and LED monitor lights will
illuminate indicating current settings. The dehumidification
setting is automatically set at continuous.
POWER
Turns unit ON/OFF.
MODE
Allows selection of dehumidification speed
• Quiet dehumidification (Low speed)
• Normal dehumidification (Medium speed)
• Fast dehumidification (High speed)
HUMID
Allows selection of different room relative humidity ratios
(40%/50%/60%). Unit is automatically set on continuous mode
when turned on.
TIMER
To set automatic off timer at 1 /2 / 4 /8 hour settings.
ION
Switches ionizer ON/OFF.
2. To select the dehumidification mode, press MODE button
to select Quiet (L), normal (M), or fast (H) dehumidification
respectively. LED light will indicate current setting.
Note: When fast dry (H) dehumidification mode is set, humidity
ratio setting cannot be set.
3. To select room relative humidity (RH) ratio, press HUMID
button to select 40%-50%-60% respectively. When selecting
the HUMID ratios this will change the unit operating MODE
accordingly (Low/Medium/Continuous).
Note: If the ambient relative humidity (RH) is less than 2% of the
selected room relative humidity ratio, the unit will automatically
switch off.
Note: Energy Saving function: When the set room humidity ratio is
reached, the units fan will automatically stop after five minutes.
In 30 minute cycles, the fan will automatically switch on to detect
room humidity.
INSTALLATION AND OPERATING INSTRUCTIONS 5
4. To turn on ioniser function, press ION button. ION LED light will
remain blinking when ionizing function is operating.
5. To set automatic off timer, press TIMER button until LED light
is on desired time 1/2/4/8 hours.
6. As unit operates, condensed water will drain into water
reservoir. When water reservoir is full, unit will beep 10 times
and WATER FULL indicator light will blink. Unit will automatically
stop operating. The water reservoir must be removed and
emptied before unit will operate again.
Fig 1
6 INSTALLATION AND OPERATING INSTRUCTIONS
D. PROTECTION OF INTERNAL OVER HEATING
In the event the unit malfunctions and overheats due to air intake
or air outlet being obstructed or blocked by foreign objects, the
unit will shut down automatically. Unplug unit from wall socket
and allow unit to cool down for a minimum of 5 minutes before
operating the unit again.
Note: The appliance air vents and air grilles must not be
obstructed at anytime. Air flow is required for the unit to operate
effectively. Place unit in a flat well-ventilated location at least
30cm from wall or other appliances. Units must be placed on
a flat stable surface to reduce possible excessive vibration
and noise.
F. OPTIONAL CONTINUOUS DRAINAGE INSTALLATION
G. MAINTENANCE AND REPAIR
1. Ensure that unit is OFF and unplugged from wall socket.
2. Remove water reservoir and connect water drain hose
to spigot, see Fig. 2.
Before carrying out any maintenance or cleaning of the unit, make
sure that the power to the unit is turned off and power cord is
removed from the power socket.
3. The other end of this hose must be placed over a water drain.
External cleaning of unit:
Note: For the unit to drain correctly, no part of the hose should be
• Do not clean unit with any abrasive cleaning agents or solvents.
above the level of the water spigot.
• Do not apply any water directly to the unit of cleaning.
• Only use a soft clean cloth for all cleaning purpose
Fig 2
Cleaning Filter:
Remove Air Intake Grille below to access filter, see Fig. 3. Use a
vacuum cleaner or wash in cool water to clean filter. Allow to dry
thoroughly before replacing filter and Air Intake Grille in the unit.
Air filter should be cleaned every
3 months for unit to continue to
perform as stated.
Fig 3
Pull out
the filter
as shown
Repair:
If the unit or power cord is damaged,
stop using immediately and bring the
unit to authorised service centre for
repair,never attempt to dismantle,
repair or modify the unit by yourself.
Warranty will be null and void.
INSTALLATION AND OPERATING INSTRUCTIONS 7
H. TROUBLE SHOOTING
BEFORE YOU CALL FOR SERVICE PLEASE REVIEW THE TROUBLE SHOOTING TIPS FIRST.
Problem
Possible Causes
What To Do
No Power
1. Unit is not plugged into wall socket
Check connection to wall socket.
1. Unit is not plugged into wall socket
1. Check connection to wall socket
2. Humidity ratio (if set) has
been reached.
2. Wait 30 minutes, turn unit back on.
No Air
3. Air guide panel not open
3. Ensure there are no objects obstructing air guide panel from
opening.
4. Water Reservoir is full
4. Empty water reservoir
1. Air ventilation around unit
not sufficient
Unit Overheating
8 INSTALLATION AND OPERATING INSTRUCTIONS
2. Air intake grille or air outlet is
being obstructed or blocked by
foreign objects
1. There must be at least 30cm between unit and wall or other
appliances
2. Ensure there are no object obstructing the air intake grille
or air outlet
Problem
Loud Noise
Possible Causes
What To Do
1. Unit not on a level flat surface
1. Reposition or relocate unit onto a flat surface.
2. Faulty internals
2. Call customer care.
1. Water reservoir no installed correctly
Water at base of unit
Beeping Alarm noise
2. Continuous drainage hose not
connected to spigot properly.
1. Reinstall water reservoir
3. Continuous drainage hose outlet
not over water drain
3. Check hose outlet is flowing into water drain.
1. Water Reservoir is Full
1. Remove and empty water reservoir
2. Check hose connection
Customer care 1300 764 325
Your Aquaport 12 Month Repair or Replacement Warranty
Conditions Of This Warranty:
quaport warrants this appliance to the first purchaser and subject to
A
the stated conditions:
1. This product has been fully installed in accordance with the user manual installation instructions.
Warranty covers any defects in material or workmanship in the
manufactured product within the first twelve months from the date of
purchase.
2. The warranty extends only to repairing or replacing any component that proves to be defective in material
or workmanship.
To make a warranty claim you must call Aquaport on toll free number
1300 764 325 for instructions. If a product is found to be faulty there
is a 90 day return policy from the date of purchase.
3. The warranty does not cover defects occasioned by misuse,
alterations, accidents, or used for other than the intended
purpose.
For warranty claims outside of 90 days from date of purchase, product
will be repaired or replaced at our discretion. Repair or replacement
costs of the product will be covered under warranty by Aquaport.
4. The warranty does not cover damage to the product caused by
accident, fire, or floods.
Goods presented for repair may be replaced by refurbished goods of
the same type rather than being repaired. Refurbished parts may be
used to repair the goods.
Our goods come with guarantees that cannot be excluded under
the Australian Consumer Law. You are entitled to a replacement or
refund for a major failure and compensation for any other reasonably
foreseeable loss or damage. You are also entitled to have the goods
repaired or replaced if goods fail to be of acceptable quality and the
failure does not amount to a major failure.
5. Proof of purchase is required for warranty claims.
Please keep purchase receipt in a safe place.
To enable us to register your warranty and provide service should a
problem occur, we recommend you register your warranty online at:
www.cli-mate.com.au/warranty-and-registration
Aquaport Corporation Pty Ltd
5 John Street Flinders Park,
South Australia 5025
Customer Care 1300 764 325
10 INSTALLATION AND OPERATING INSTRUCTIONS
INSTALLATION AND OPERATING INSTRUCTIONS 11
CUSTOMER HOTLINE: 1300 764 325
Aquaport Corporation Pty Ltd
PO Box 81 Findon SA 5023 Australia
Telephone: 08 8354 0711
Facsimile: 08 8354 0722
/climatebrand
@ClimateBrand
Email: [email protected]
Web: www.cli-mate.com.au