1
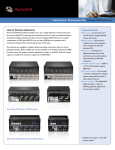
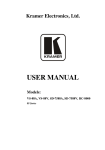
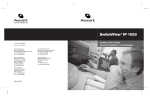
The Power of Being There®
Quick Installation Guide
®
SwitchView MM2
2 or 4-Port USB PS/2 Switch with USB hub (2.0)
The following instructions will help you
install and use your SwitchView MM2
To install the switch
KVM switch.
1
Should you require further assistance, please
Connect your
peripherals to the
SwitchView MM2.
contact Avocent Technical Support.
PC1
PC2
PC3
PC4
NOTE: The following instructions will help
CONSOLE
you install and use your SwitchView MM2
PC
3
HUB
2 or 4 port USB PS/2 KVM switch.
1 Connecting your peripherals
Power up the
SwitchView MM2
switch and then
the connected
computers.
USB HUB
Connect the shared USB or PS/2 keyboard
and mouse, monitor, speaker set and microphone, as well as other USB devices to the
3-in-1 cable
connection
SwitchView MM2 switch. If connecting PS/2
computers you will use the 3-in-1 keyboard,
USB connection
monitor and mouse cable. If connecting USB
computers you will use the USB cable and
2
seperate VGA cable.
Connect your
computers using the
cables provided.
NOTE: If you do not use a USB device on
any of the USB 2.0 hub ports or hub ports
connected to the USB keyboard, the switch
3 Powering up your system
4 Operating the SwitchView MM2 Switch
will function via the USB self-power. The
Power up the connected computers, ensuring that
There are two ways to control the SwitchView
SwitchView MM2 switch receives power from
the keyboard and mouse are enabled. The green
MM2 for PC and hub port control switching: front
the USB interface and is instantly powered
LED indicates PC port status (solid green = active
panel push-buttons or a hotkey sequence.
up when you connect the switch to a PC. If
port, flashing green = PC not connected. The red
using a USB device other than a keyboard or
LED indicates the hub port control status (solid
mouse, plug in the external power adaptor.
red = PC controlling all hub ports). USB hub port
control status (red LED) indicates which PC port
2 Connecting your computers
Connect each of your computers to the
SwitchView MM2 switch.
To Contact Avocent Technical Support
has control of all hub ports and their connected
devices (if USB LED 1 is red, then PC port 1
has control).
Call (888) 793-8763
Front panel buttons
The front-panel buttons provide direct
control over KVM switch operation and channel
switching by simply pressing the PC button for
PC port switching. If binding is enabled between
PC/USB hub port control and audio/mic
switching, they will be selected.
VISIT www.avocent.com/support
Avocent, the Avocent logo, The Power of Being There and LongView are registered trademarks of Avocent Corporation or its affiliates. ©2005 Avocent Corporation. All rights reserved.
DOWNLOAD www.avocent.com
590-493-501A
The Power of Being There®
Quick Installation Guide
®
SwitchView MM2
2 or 4-Port USB PS/2 KVM Switch with USB hub (2.0)
Safety Notice
Hotkey and front panel button reference sheet
Caution: To ensure safe use of this product,
use only the power adapter provided by
the manufacturer.
COMMAND
USA Notification
Warning: Changes or modifications to this unit
not expressly approved by the party responsible
for compliance could void the user’s authority
to operate the equipment.
Note: This equipment has been tested and
found to comply with the limits for a Class
B digital device, pursuant to Part 15 of the
FCC Rules. These limits are designed to
provide reasonable protection against harmful
interference in a residential installation. This
equipment generates, uses and can radiate
radio frequency energy and, if not installed
and used in accordance with the instructions,
may cause harmful interference to radio communications. However, there is no guarantee
that interference will not occur in a particular
installation. If this equipment does cause
harmful interference to radio or television reception, which can be determined by turning
the equipment off and on, the user is encouraged to try to correct the interference by one
or more of the following measures:
• Reorient or relocate the receiving antenna.
• Increase the separation between the
equipment and receiver.
• Connect the equipment into an outlet on a
circuit different from that to which the receiver
is connected.
• Consult the dealer or an experienced radio/TV
technician for help.
Canadian Notification
This Class B digital apparatus complies with
Canadian ICES-003.
Cet appareil numérique de la classe B est
conforme à la norme NMB-003 du Canada.
To Contact Avocent Technical Support
HOTKEYS
FRONT PANEL BUTTON
DESCRIPTION
Press the corresponding button
Select PC Channel1
ScrLk + ScrLk + X2
(Joint select PC, hub and audio & (x is a top row number key) x = to select the active PC channel
mic port control if binding enabled) 1~ 2 for PC channel number
Select the active PC channel (joint
select PC port/hub port control/audio
& mic if binding is enabled)
Select Hub Port Control2
(Joint select PC port and hub port
control if binding is enabled)
Press the corresponding button
to select the specific PC + USB
hub port control. Works only if
PC port/hub port control
binding enabled.
Select the PC channel for all USB hub
ports control (Joint select PC port and
hub port control if binding is enabled)
Select Audio and Mic Channel3 ScrLk + ScrLk + Fy
(Joint select PC port and audio
Fy = F5 ~ F8
and mic channel, if PC/Audio
Fy is a function key
binding is enabled)
N/A
Select the active audio and mic
channel (joint select PC/Audio and
mic channel if binding is enabled
Bind PC and Hub Port
Control Switching2 (Default)
ScrLk + ScrLk + Z
N/A
Enable the binding of PC port and hub
port control switching (factory default)
Unbind PC and Hub Port
Control Switching2
ScrLk + ScrLk + X
N/A
Disable the binding of PC port and
hub port control switching
Bind PC and Audio/Mic
Switching3
ScrLk + ScrLk + Q
N/A
Enable the binding of PC port and
audio/mic switching (factory default)
Unbind PC and Audio/Mic
Switching3
ScrLk + ScrLk + W
N/A
Disable the binding of PC port and
audio/mic switching
Next lower PC Channel2
(Joint select PC port and hub port
control if binding is enabled)3
ScrLk + ScrLk +
Up Arrow
N/A
Select the next lower PC (joint select
PC port and hub port control if binding
is enabled)
Next higher PC Channel2
(Joint select PC port and hub port
control if binding is enabled)3
ScrLk + ScrLk +
Down Arrow
N/A
Select the next higher PC (joint select
PC port and hub port control if binding
is enabled)
Beep Sound On/Off
ScrLk + ScrLk + B
N/A
Toggle on/off beep sound while
autoscanning
Define Hotkey Preceeding
Sequence
Hold down last button (Button 1
ScrLk + ScrLk + H + (y)
y = Scroll Lock, Cap Lock, Esc, or Button 2) until it beeps twice,
then press (y) key
F12 or Num Lock
Autoscan
ScrLk + ScrLk + S
N/A
Autoscan through every connected
channel for quick screen browsing of
each channel (scan delay = 10 sec.)
Autoscan with Programmable
Delay Time
ScrLk + ScrLk + S + (z)
z=0~9
1 - 10” ; 2 - 20” ; 3 - 3” ;
4 - 40” ; 5 - 50” ; 6 - 60” ;
7 - 70” ; 8 - 80” ; 9 - 90” ;
0 - 100”
N/A
Specify delay time within a range of
10 ~ 100 seconds
Stop Autoscan
Press any key on the keyboard
Press any button
Terminate autoscan activity
ScrLk + ScrLk + Fx
(Fx is a function key)
x = 1 ~ 2 for PC channel # that
control all hub ports
Select the hotkey preceding sequence
from the following: Scroll Lock, Cap
Lock, Esc, F12 or Num Lock
1. If you reconfigured your hotkey preceding sequence, change the sequence in this chart accordingly.
2. When the binding of PC and USB hub port control switching is enabled by the hotkey sequence ScrLk + ScrLk + Z, any
PC and hub port control switching are bound together.
3. When the binding of PC and audio/mic switching is enabled by the hotkey sequence ScrLk + ScrLk + Q, any PC and
audio/mic switching are bound together.
Call (888) 793-8763
VISIT www.avocent.com/support
Avocent, the Avocent logo, The Power of Being There and LongView are registered trademarks of Avocent Corporation or its affiliates. ©2005 Avocent Corporation. All rights reserved.
DOWNLOAD www.avocent.com
590-493-501A