1
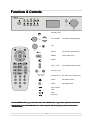
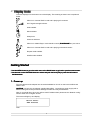
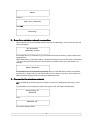
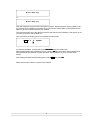
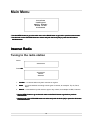
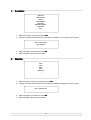
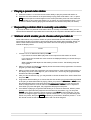
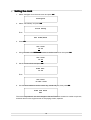
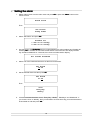
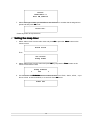
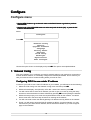
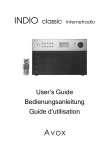
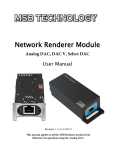
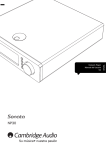
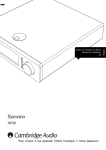
INDIO
classic
internet radio
User’s Guide
Benutzeranleitung
Guide d’utilisation
• COPYRIGHT AND TRADEMARKS
INDIO is a registered trademark of Avox Technology GmbH
• IMPORTANT SAFETY INSTRUCTIONS
•
•
•
•
•
WARNING:
To reduce the risk of fire or electrical shock, do not expose the product to rain or moisture.
The apparatus shall not be exposed to any dripping or splashing. Objects filled with liquids, such
as vases, should not be placed on the apparatus.
No open flame sources, such as lighted candles, should be placed on the apparatus.
Keep the remote control battery away from children. It may cause a fire or chemical bum if
mishandled. Do not recharge, disassemble, heat above 100° C (212° F), or incinerate. Dispose of
used batteries promptly. Replace only with a battery of the correct type and model number.
Danger of explosion if battery is incorrectly replaced. Replace only with appropriate battery.
Caution: please read the important safety instructions carefully to ensure a safe operat
operation.
ion.
1. Read instructions - all the safety and operating instruction should be read before the apparatus is
operated.
2. Retain instructions - the safety and operating instructions should be retained for future reference.
3. Follow instructions –all operating instructions should be followed.
4. Heed warnings - all warnings on the apparatus and in the operating instructions should be
adhered to.
5. Power source - the apparatus should be connected to 0 power supply only of the type specified in
the operating instructions or as marked on the apparatus.
6. Power cord protection - protect the power cord from being walked on or pinched, particularly at
plugs, convenience receptacles, and the point where they exit from the apparatus.
7. Water and moisture - the apparatus should not be used near water (for example, near a bathtub,
washbowl. kitchen sink, laundry tub, in a wet basement. or near a swimming pool. etc,).
8. Ventilation - the apparatus should be situated so that its location or position does not interfere with
its proper ventilation. Do not use the apparatus on a bed, sofa, rug or similar surface that may
block the ventilation openings.
9. Heat - keep the apparatus away from heat sources such as radiators, heat registers, stoves or
other appliances that produce heat.
10. Damage requiring service - the apparatus should be serviced by qualified service personnel when:
a) the power supply cord or the plug has been damaged: or
b) objects have fallen or liquid has been spilled into the apparatus: or
c) the apparatus has been exposed to rain: or
d) the apparatus does not appear to operate normally or exhibits a marked change in
performance: or
e) the apparatus has been dropped, or the enclosure damaged.
11. Servicing - the user should not attempt to service the apparatus beyond that specified in the
operating instructions. All other servicing should be referred to qualified service personnel.
12. Clean only with dry cloth.
13. Do not defeat the safety purpose of the polarized plug. A polarized plug has two blades with one
wider than the other. The wide blade is provided for your safety, if the provided plug does not fit
into your outlet; consult an electrician for replacement of the obsolete outlet.
14. Unplug this apparatus during lightning storms or when unused for long periods of time.
15. The appliance's power cord is the ultimate disconnect device from the electrical source.
Contents
INDIO, AC adapter, remote control, back-support, User’s Guide
Inhalt
INDIO, Netzteil, Fernbedienung, Ständer, Benutzeranleitung
Contenu
INDIO, adaptateur secteur, télécommande, support dorsal, Guide d’utilisation
• What you need before you can use INDIO
Before you can use your Internet radio, you need the following:
•
•
•
•
A broadband Internet connection.
An Ethernet connection from a router or broadband sharing device.
A wireless access point (Wi-Fi) connected to your broadband Internet, preferably via a router.
If your wireless network is configured to use Wired Equivalent Privacy (WEP) or Wi-Fi Protected
Access (WPA) data encryption then you need to know the WEP or WPA code so you can get the
Internet radio to communicate with the network.
The Internet radio should work anywhere within 100 metres of the wireless access point.
Before you continue, make sure that your wireless access point is powered up and connected to your
broadband Internet. To get this part of the system working you must read the instructions supplied
with the wireless access point.
5
Functions & Controls
Standby / ON
UP / DOWN
To select or adjust/change
OK
BACK
To previous menu/screen
MENU
To the main menu
MUTE
VOL+ / VOL-
Increase/Decrease Volume
Preset 1 to 10
…
1-6, 2-7, 3-8
4-9, 5-10
Preset 1 & 6, 2 & 7, 3 & 8, 4 & 9, and 5 & 10
Alarm
Set Alarms Clock
Timer
Set Sleep Timer
Play / Pause
Stop
Next
Previous
* Use the MENU button to go to the main menu or the BACK button to go back to previous menu/screen.
* Use the knob or the UP/
UP/DOWN buttons
buttons to select and push the knob (OK) or press the OK button to
decide/execut
decide/execute
execute.
6
• Display Icons
Icons are displayed on the bottom row of the display. The meaning of these icons is explained
below.
INDIO is in ‘Internet Radio’ mode and is playing a live stream.
Wi-Fi signal-strength indicator.
Shift enabled.
Mute indicator.
Sleep timer.
Alarm-set indicator
INDIO is in ‘Media Player’ mode. Media controls (PLAY/PAUSE
PLAY/PAUSE etc.) are active.
INDIO is in ‘Internet Radio’ mode and is playing on demand content.
Repeat mode enabled.
Shuffle mode enabled.
Getting Started
* Use the MENU button to go to the main menu or the BACK button to go back to previous menu/screen.
* Use the knob or the UP/DOWN buttons to select and push the knob (OK) or press the OK button to
decide/execute.
decide/execute.
1 - Power up
Plug the cable from the adapter into the socket labelled DC IN 12V on the back of INDIO and
switch it ON.
CAUTION:
CAUTION Use only the AC adapter supplied with INDIO. Connecting a power supply with a
different rating will cause permanent damage to INDIO and may be hazardous.
Note: if you would like to give your radio a static IP address then please see the ‘Network config’
section under the ‘Configure’ section.
The screen will light up and display:
Reciva Radio
ARM Powered
Then:
7
INDIO
And then:
Scan for networks
Press OK.
OK.
Scanning
2 - Scan for a wireless network connection
INDIO will now scan for all available wireless networks and will display: If it can’t find one then the
screen will display:
No Wireless
Networks Found
If this happens then you will have to get your wireless access point working - see the instructions
supplied with it.
When INDIO finds your wireless network, it displays the ESS-ID for the access point on the screen
- this is a name that is allocated to the access point by the person who set up the network - for
example:
INDIO Network
It is possible, and in some locations highly likely, that your radio will find more than one wireless
access point, in which case you can choose which one you want to connect to. Turn the knob on
INDIO to see the ESS-ID for each access point INDIO has found.
3 - Connect to the wireless network
When the ESS-ID for the access point you want to connect to is displayed on the screen, press
OK.
OK
If your network is not configured to need an encryption code, the screen should display:
Connecting to
Network
Then:
Network OK
If the screen displays either:
8
Enter WEP key
or:
Enter WPA key
Then the network is using one of the encryption systems: Wired Equivalent Privacy (WEP) or WiFi Protected Access (WPA). You therefore need to enter the correct WEP or WPA password into
INDIO to get it to communicate with your network.
Only the person who set up the network in the first place knows this password; if that person is not
you then you need to find out what it is.
After 3 seconds, the display goes into the password entry mode:
<END ◄ ►
A
█
BCDEF>
To enter the password, use the knob or the UP/DOWN buttons to select each
letter/number/symbol of the password in turn, pressing OK after each letter. Note that WEP and
WPA passwords are sensitive to upper and lower case characters so you must enter them
exactly.
After entering the final letter/number/symbol, select END and press OK.
OK.
INDIO should now be able to connect to the network.
9
Main Menu
Stations
Configure
Media Player
Alarm Clock
Podcasts
* Use the MENU button to go to the main menu or the BACK button to go back to previous menu/screen.
* Use the knob or the UP/DOWN buttons to select and push the knob (OK) or press the OK button to
decide/execute.
decide/execute.
Internet Radio
Tuning to the radio station
Select
Stations
Press OK
Location
Genre
Search
1. Location -- to choose stations by their countries or regions.
2. Genre -- to choose stations according to their types of content, for example: Top 40, Rock,
Sport.
3. Search –- to find stations by their name or type or any criteria, for example: KCRW, Chanson.
* Use the MENU button to go to the main menu or the BACK button to go back to previous
menu/screen.
* Use the knob or the UP/DOWN
UP/DOWN buttons to select and push the knob (OK) or press the OK button
to decide/execute.
decide/execute.
10
1. Location
Africa
Americas
Asia
Caribbean
Europe
Middle East
Oceania
All
1. Select the country you want then press OK.
OK
2. Choose to find the desired station from all stations available in the country or by the genre:
All Stations
By Genre
3. Select the station you want then press OK.
OK
4. Wait until INDIO connects to that station.
2. Genre
60s
70s
80s
90s
Adults
..
....
1. Select the type of content you want then press OK.
OK
2. Choose to find the desired station from all stations available in the genre or by the country:
All Stations
3. Select the station you want then press OK.
OK
4. Wait until INDIO connects to that station.
11
3. Search
<END ◄ ►
A
█
BCDEF>
1. Use the knob on the panel or the UP/DOWN buttons to select the index letters or word for
searching the station(s) or location(s) or type of the station(s) you want to find. Select END
and press OK after entering the whole index.
2. Select the station you want then press OK.
OK
3. Wait until INDIO connects to that station.
* Note that some radio stations do not broadcast 24 hours per day, and some stations are not
always on-line.
* If this station has on-demand content (that is, it gives the option of listening to programmes
which have already been broadcast), see ‘Stations which enable you to choose what you listen
to‘.
•
Changing the station
A. Use the UP/
UP/DOWN buttons to browse other radio stations while playing. Press OK to change.
B. Use the BACK and OK buttons to reach the station list and to change.
•
Changing the volume
A. Press VOL+ / VOLVOL- in ANY state to change the volume.
B. Use the knob to change the volume ONLY when it is in playing mode and displaying the radio
station info.
•
Returning to the menu
A. Press MENU to return to the main menu or
B. Press BACK to return to the previous menu or screen.
•
Storing a radio station in a preset
Whilst a radio station is playing,
A. Press and hold one of the number 1 to 10 on the remote control to store the radio station or
B. Press and hold one of the five buttons on the panel with number 1-6, 2-7, 3-8, 4-9, and 5-10 to
store the radio station to preset 1 to 5, or press Shift button first (the icon should appear on
the screen) and then press and hold one of the five buttons to store it to preset 6 to 10.
Hold until the screen displays:
Assigned to
Preset #
Where # is the number of the button you held down.
12
•
Playing a preset radio station
A. Press the number 1 to 10 on the remote control briefly to play the preset radio station or
B. Press the one of five buttons on the panel briefly to play preset radio station 1 to 5, or press
Shift button first (the icon should appear on the screen) and then press one of the same five
buttons briefly to play preset radio station 6 to 10. (Note, do not hold the button down - if you
do then the station currently playing will overwrite the one stored in the preset; be careful).
•
Requesting a station that is currently unavailable
If you want to listen to a particular radio station which is currently not available online, you can
visit the Reciva website at http://www.reciva.com/ and put in a request to add the station to the list.
• Stations which enable you to choose what you listen to
Some radio stations can provide a number of options associated with their station; for example,
some stations enable you to listen to programmes that have already been broadcast. When you
select a radio station that has this facility, the station does not start playing immediately, but
instead the display shows:
Live
1. Choose Live or On Demand and then press OK.
OK
If you choose Live then INDIO plays the current output from this station as normal.
If you choose On Demand then more screens are displayed where you choose what you
want to listen to.
What is displayed will depend on the station you have chosen - the following steps are
only a guide.
2. When you choose On Demand, the display shows the names of the programmes. Choose the
program you want and press OK.
OK
3. When you have chosen the programme you want to listen to, either it will just start playing, or
the display may show a list of days for you to choose from - set the day the programme was
broadcast and then press OK.
OK
4. After you have chosen the day, you may be able to choose the Start Time. Set the Start Time
and press OK.
OK
5. Programmes which enable you to choose the time also enable you to fast-forward and rewind
to the part you want while INDIO is playing. When you press the PREVIOUS
REVIOUS or NEXT button,
the elapsed time that the programme has been playing is displayed. You can now turn the
knob to change this time. You can also use the PREVIOUS or NEXT buttons to adjust the
time. When you press OK again, the programme will play from that point.
6. Once INDIO is playing a programme that allows you to choose its start time, INDIO’s preset
buttons on the panel become playback-control buttons for the stream; e.g. you can press
PAUSE at any time to pause the stream, and then press PLAY to resume playing. It is only
possible to assign this type of stream to a preset numbered 6 – 10, so if you want assign the
stream to a preset, then press SHIFT followed by a preset button. However presets 1 – 10 on
the remote control are free from this limitation and can all be assigned.
13
Podcasts
Listening to Podcasts
Select
Podcasts
Press OK
BBC Podcasts
BlogTalkRadio
By Category
Use the knob or the UP/DOWN buttons to choose your preferred podcast then press OK.
OK
* Use the MENU button to go to the main menu or the BACK button to go back to previous
menu/screen.
* Use the knob or the UP/DOWN buttons to select and push
push the knob (OK) or press the OK button
to decide/execute.
14
•
Setting the clock
1. Select ‘Configure’ from the main menu and press OK.
OK.
Configure
2. Select ‘Clock Setup’ and press OK.
OK
Clock Setup
Then
Set Time/Date
3. Press OK.
OK
Set Time
14:03
4. Using the knob or the UP/DOWN
UP/DOWN buttons to set the correct hour then press OK.
OK
Set Time
15:03
5. Set the correct minute and press OK.
OK
Time Set:
15:06
Then
Set Date
30 Mar 2008
6. Use the same method to set the correct day, month and year, then press OK.
OK.
Time and Date
Set
The screen stays about 3 sec. then changes to the Set Time/Date screens for another couple sec.,
and then returns to the original screen or the playing screen, depends.
15
•
Setting the alarm
1. Select ‘Alarm Clock’ from the main menu and press OK or press the ‘Alarm
Alarm’
Alarm button on the
remote control..
Alarm Clock
Then
Set Alarms
Sleep Timer
2. Select ‘Set Alarms’ and press OK.
OK.
Disable all
1 OFF 00:00 Sunday
2 OFF 00:00 Sunday
3. Use the knob or the UP/DOWN buttons to swap between the various alarms and ‘Disable All’.
Pressing OK on ‘Disable All’ will cause all the alarms to be turned off. The display will then
say ‘All alarms disabled’ for 3 seconds, then returns to INDIO station display.
All alarms disabled
4. Select one of the numbered alarms to set the time for the alarm.
Set Alarm
15:06
5. Set the desired alarm time then press OK.
OK
Set Alarm
07:06
Then
Once
Everyday
Weekly
..
6. Choose to activate the alarm ‘Once’, ‘Every Day’, ‘Weekly’, ‘Weekdays’ and ‘Weekends’. If
you choose ‘Once’ or ‘Weekly’, then you will need to choose which day you would the alarm to
be activated on and then press OK.
OK
16
Buzzer
KCRW FM101.9
Kool FM Jamaica
..
7. Select which type of alarm you would like to use: the buzzer or a station that is assigned to a
preset and then press OK to set.
Alarm Set:
* Press any button to stop the alarm.
•
Setting the sleep timer
1. Select ‘Alarm Clock’ from the main menu and press OK or press the ‘Alarm
Alarm’
Alarm button on the
remote control.
Alarm Clock
Then
Set Alarms
Sleep Timer
2. Select ‘Sleep Timer’ from this menu and press OK or just press the ‘Timer
Timer’
Timer button on the
remote control from the start.
<
Sleep Timeout
Off
>
3. Use the knob or the UP/DOWN buttons to select the timer from 15min., 30min., 45min, … up to
3hours 15min. to switch off INDIO, or to set it off. Press OK to set.
Timer Set
17
Configure
Configure
Configure menu
* Use the MENU button to go to the main menu or the BACK button to go back to previous
menu/screen.
* Use the knob or the UP/DOWN buttons to select and push the knob
knob (OK) or press the OK
button to decide/execute.
Select
Configure
Press OK
Network Config
Version
Upgrade Firmware
Language
Factory Reset
Register
Clock Setup
Backlight
Equalisation
WiFi Strength
Choose the option shown on the display and press OK.
OK The options are explained below.
1. Network Config
This menu enables you to configure your radio’s network settings, scan again for a connection to
another wireless network, or to manually configure the network parameters. This is useful if you
take your Internet radio to another building where you want to use it.
Configuring INDIO to use a static IP address
In order for your radio to use a static IP address on your network, you will need to do the following:
1. Select the ‘Edit Config’ from the ‘Network Config’ menu and then press OK.
OK
2. INDIO will now display ‘Auto (DHCP)? YES / NO’. Select ‘NO’ and then press OK.
OK
3. You will now be able to enter the IP address you wish to give your radio by using the rotary
encoder to select the desired numbers followed by pressing OK to end inputting the address.
4. INDIO will now prompt you to enter the required network mask for the network. You will be
able to enter this in the same way as before for entering the IP address.
5. You will now need to enter the default gateway’s IP address used by INDIO on the network.
6. Finally, you will need to enter the DNS IP address for INDIO. On some networks, you may
need to enter your ISP’s DNS IP address, which should be available on your ISP’s support
page on their website.
18
7. After entering the above information, INDIO will now connect successfully to your network. In
order to make INDIO use DHCP again (to automatically get its network information when it
attempts to connect to a network), you will need to select ‘Configure’ – ‘Network Config’ – ‘Edit
Config’ and then set ‘Auto (DHCP)? YES / NO’ to ‘YES’.
Configuring INDIO to only use a wired Ethernet connection
Select ‘Wired/Wireless’ from the ‘Network Config’ menu. This menu will present you with three
options: ‘Wireless Only’, ‘Wired’ and ‘Auto’. Selecting ‘Wired Only’ will cause INDIO to reboot and
then only use its Ethernet connection to communicate with the network. INDIO will also disable its
wireless network capabilities.
Configuring INDIO to only use a WiWi-Fi connection
Selecting the ‘Wireless Only’ option from the ‘Wired/Wireless’ menu will cause INDIO to reboot
and then only use its Wi-Fi connection to communicate with the network. INDIO will also disable
its Ethernet connection.
Configuring INDIO to use either an Ethernet or a wireless connection
connection
Selecting the ‘Auto’ option from the ‘Wired/Wireless’ menu will cause INDIO to reboot and then
attempt to establish an Ethernet connection, if it is available, to communicate with the network.
Otherwise, INDIO will attempt to establish a Wi-Fi connection to the network.
Once INDIO has established a certain type of connection to the network, then this type of
connection will remain in use while INDIO is on.
The ‘Network Config’ menu also allows you to choose whether or not the Internet radio displays a
warning message when its network signal strength is low. You can enable this feature by selecting
‘Signal Warning’ and then selecting ‘YES’.
2. Version
Displays the versions numbers of the various parts of software and hardware on your INDIO.
3. Upgrade Firmware
Use this option to check to see if there is any new firmware available occasionally. If there is new
firmware available, then INDIO will prompt you if you want to download it or not. Select YES to
start the firmware download or NO to leave. Note, at this stage, you can press BACK button to
cancel.
*** A Firmware upgrade may take several minutes, so do NOT switch off the power until the
operation is complete otherwise INDIO may become permanently damaged.
4. Language
Select the display language.
5. Factory Reset
Puts all the settings back to their defaults as they were when they left the factory. If you perform a
factory reset on your radio you will lose all your presets and your wireless network connection.
19
6. Register
This will display a key that can be used to register INDIO on the Reciva Customer portal:
http://www.reciva.com/
7. Clock Setup
To set the time, to set an alarm and to view the current alarm setting, see ‘Setting the clock‘,
‘Setting the alarm‘.
8. Backlight
Adjust the brightness of the display.
1. After selecting the ‘Backlight’ menu item, INDIO will display its list of three menu modes:
‘Inactive’, ‘Active’ and ‘Standby’. These three states are explained below:
•
Inactive -- when there is no user activity for 30 seconds.
•
Active -- when there is user activity.
•
Standby -- when INDIO has been turned off.
2. Choose the desired menu mode and press OK.
OK
3. The screen will now display the current backlight value for this menu mode. Use the knob or
the UP/DOWN buttons to adjust the light.
9. Equalization
Selecting this option to adjust the treble and bass
1. Select ‘Treble’ and press OK.
OK Use the knob or the UP/DOWN buttons to adjust the treble level.
2. Select ‘Bass’ and press OK.
OK Use the knob or the UP/DOWN
UP/DOWN buttons to adjust the bass level.
10. WiFi Strength
Display the signal strength of the wireless network in %.
20
Configuring ‘My Stuff’
1.
Registering an account on Reciva’s website
1. Open the website, http://www.reciva.com from your Internet browser.
2. Click on the ‘Register’ link and follow the on-screen instructions to register an account. Please
note, during the registration process, a validation code will be sent to you via email. Please
enter this code when prompted to do so.
3. After logging into your account, you will be able to edit your information for ‘My Profile’, ‘My
Stations’, ‘My Streams’, ‘My Radios’ and ‘My Podcasts’ from the left-hand side of the website.
4. You can now add your Internet Radio to your account on the website by accessing the ‘My
Radios’ link. From the ‘My Radios’ section, you will need to enter in your radio’s eight digit
serial number, which can be found from the ‘Configure’ – ‘Version’ menu on INDIO, and you
will also need to enter in your radio’s seven digit registration code, which can be found from
the ‘Configure’ – ‘Register’ menu on INDIO.
2.
3.
Configuring ‘My Profile’
Profile’
i.
Once logged into you Reciva account, you can edit your account’s details from your ‘My
Profile’ section.
ii.
Click on the ‘My Profile’ link to view your account’s current information. This information will
include various details such as your address, user name, password etc. Edit your details and
then click on the ‘Update’ button to save them.
Configuring ‘My Stations’
Stations’
1. It is possible to search for radio stations that are available in Reciva’s stations’ database from
Reciva’s website. Whenever stations are searched for on the website, they will be displayed in
a list of search results together with a link to ‘Add to My Stations’.
2. Clicking on the ‘Add to My Stations’ link, will add the station to your account’s ‘My Stations’
list. Clicking on ‘My Stations’ and then selecting the station will allow you to edit this list.
3. Once you have Internet stations available in your ‘My Stations’ list, you may play these
stations from your Internet Radio. These stations will be available on your radio from the
menu item: ‘Stations’ – ‘My Stuff’ – ‘My Stations’. Please note, the stations will only be
available to your radio once your radio has downloaded a new stations’ list. To cause INDIO
to download a new stations’ list immediately, please remove and reconnect the power to your
radio.
4.
Configuring ‘My Streams’
Streams’
1. Once logged into your Reciva website account, you can add your own Internet radio streams
to your ‘My Streams’.
2. Clicking on ‘My Streams’ will prompt you to enter the station’s name and its media stream
URL. The media stream URL should be a link to a website’s actual audio stream. If you have
any doubt about locating the media stream URL from a webpage, then please refer to the
FAQs section on Reciva’s website, http://www.reciva.com.
3. Once you have Internet radio streams available in your ‘My Streams’ list, you may play these
stations from your Internet Radio. These stations will be available on your radio from the
menu item: ‘Stations’ – ‘My Stuff’ – ‘My Streams’. Please note, the streams will only be
available to your radio once your radio has downloaded a new stations’ list. To cause INDIO
to download a new stations’ list immediately, please remove and reconnect the power to your
radio.
21
5.
Configuring ‘My Podcasts’
Podcasts’
1. It is possible to add audio podcasts (RSS feeds) to your Reciva account that can be accessed
on your Internet radio. To add a podcast, simply login to your account and then click on the
‘My Podcasts’ link.
2. From your ‘My Podcasts’ section, you can add your chosen podcast by entering in the
podcast’s name and its URL as prompted by the website. Please note, the podcast URL will
have to be a direct RSS feed which will end with the ‘.xml’ extension e.g.
http://someurl.com/podcast.xml
3.
Once you have podcasts available in your ‘My Podcasts’ list, you may access these feeds from your
Internet Radio. These podcasts will be available on your radio from the menu item: ‘Stations’ – ‘My
Stuff’ – ‘My Podcasts’. Please note, the podcasts will only be available to your radio once your radio
has downloaded a new stations’ list. To cause INDIO to download a new stations’ list immediately,
please remove and reconnect the power to your radio.
22
Media Player
The Media Player allows you to play audio files (AAC, AIFF, AU, MP3, RM, WAV and WMA) and
playlists (M3U) stored on a networked PC. It has been verified to work on Windows 2000,
Windows XP and Windows Vista.
A. Setting up your computer to allow INDIO to access your
audio files via Windows Shares
Windows
Windows XP
1. Please ensure that your PC is available on the network for your Internet radio, then, using
Windows Explorer, locate the folder where your audio files are stored.
2. Right click on the folder.
3. Select ‘Properties’.
4. Click on ‘Sharing’.
5. Select ‘Share this folder on the network’ and ‘Allow network users to change my files’. Please
note, do not try to make your ‘My Documents’ or any of its sub-folders (e.g. ‘My Music’) shareable.
Windows Vista
1. Please ensure that your PC is available on the network for your Internet radio.
2. Open the ‘Network and Sharing Center’ windows from ‘Start Menu Control Panel Network and
Sharing Center’.
3. From the ‘Network and Sharing Center’, under the ‘Sharing and Discovery’ heading, ensure that
the following parameters are set:
Network discovery
On
File sharing
On
Public folder sharing
On
Password protected sharing
Off
4. Open ‘Windows Explorer’ by right clicking on the Start menu and selecting ‘Explore’. Create a new
directory in the ‘Public’ directory and move your media files into this new directory.
5. Right click on the directory just created and select ‘Share …’. Ensure that the directory is listed as
being shared, if not, click on the ‘Share’ button.
6. Right click on the directory just created and select ‘Properties’. From the ‘Properties’ window, click
the ‘Sharing’ tab and then click the ‘Advanced Sharing …’ button. From the ‘Advanced Sharing …’
window, click to check the ‘Share this folder’ option.
MAC
1. The MAC will require Windows File Sharing. MAC OS 9 and earlier versions of the OS will need
extra software to use Windows File Sharing. MAC OS X 10.2 and later versions have Windows
File Sharing built into the OS. Please ensure that your PC is available on the network for your
Internet radio. Your radio will also need to be able to access directories that require a user name
and password.
2. Setup Windows File Sharing on the MAC:
23
From the ‘Dock’, click ‘System Preferences’. From the ‘System Preferences’ window,
under the ‘Internet & Network’ section, click ‘Sharing’.
From the ‘Sharing’ window, do the following:
o
Under the ‘Services’ section, enable ‘Personal File Sharing’ and ‘Windows
Sharing’. Also, click ‘Start’ for each of these services.
o
Under the ‘Firewall’ section, keep the firewall off.
o
Under the ‘Internet’ section, keep ‘Internet Sharing’ off.
3. Setup Account:
From the ‘System Preferences’ window, under the ‘System’ section, click ‘Accounts’.
Select an account and remember its ‘Short Name’ and password. This will be used for
INDIO to connect to the MAC.
4. Directory Setup:
From the ‘Dock’, click ‘Finder’. From ‘Finder’, click ‘Applications Utilities’. Click on ‘More
Info’ for ‘Directory Access’ and ensure that it is ‘Read/Write’ enabled. Double-click on
‘Directory Access’ and enable the following:
o
AppleTalk
o
LDAPv3
o
SLP
o
SMB/CIFS
Also, for ‘SMB/CIFS’, click ‘Configure’ and select an appropriate workgroup.
Copy and paste the mp3 media files to ‘Documents’ in the ‘Finder’ window.
Turn on ‘AirPort’ (or wireless sharing).
Wait for a few minutes for the changes to take place.
5. INDIO should now be able to access the MAC from its ‘Media Player Windows Shares’ menu
after entering in the MAC account’s short name and password on INDIO.
1.
Locate the shared audio files using INDIO
1. Press MENU to go to the main menu, select ‘Media Player’ and press OK.
OK
2. Select ‘Windows Shares’ and press OK.
OK
3. Select ‘Scan for PCs’ and press OK.
OK
4. INDIO will now display ‘Finding PCs’. Select the correct PC and press OK.
OK
5. INDIO will search for shared folders.
6. Select the correct shared folder and press OK.
OK
7. INDIO will display ‘File Scan…’ as it scans through the media files in the shared folder. Text on the
bottom row of the display will change to indicate that the file scan is in progress. If you have a
large number of audio files this could take several minutes to complete.
8. Once INDIO has finished scanning, it will display ‘By Album’. You can now browse through the
scanned media files, which will now be organized ‘By Album’, ‘By Artist’ and ‘Playlists’ – if
available.
Note that the first time the file scan is done a file called ‘.reciva_media_cache’ is written to the folder
where the audio files are stored. This is in order to speed up subsequent file scans.
24
2.
Listening to a single shared track
1. Select ‘By Artist’ and press OK.
OK
2. Select the required artist and press OK.
OK
3. Select the required album name and press OK.
OK ‘[Add to Queue]’ will be displayed.
4. Select the required track and press OK.
OK The track will begin playing.
3.
Listening to a complete shared album
1. Select ‘By Artist’ and press OK.
OK
2. Select the required artist and press OK.
OK
3. Select the required album name and press OK.
OK ‘[Add to Queue]’ will be displayed.
4. Press OK again. The album will begin playing.
4.
Queuing up tracks for playback later
1. Select the required track and press OK.
OK ‘Track Added to Queue’ will be displayed.
5.
Queuing up albums for playback
playback later
1. Select the required album and press OK.
OK
2. Turn the knob or press the UP/DWON buttons until ‘[Add to Queue]’ is displayed.
3. Press OK.
OK ‘Tracks Added to Queue’ will be displayed.
6.
Controlling playback
1. Use the STOP button to stop playback.
2. Use the PLAY/PAUSE
PLAY/PAUSE button to either pause a currently playing track or to restart a currently
paused track or to restart a stopped track.
3. Use the PREVIOUS button to start playback of the previous track in the queue.
4. Use the NEXT button to start playback of the next track in the queue.
7.
Browsing the list of tracks currently queued up for playback
1. Press the BROWSE button. The currently playing track name will be displayed.
2. Turn the knob or press the UP/DOWN buttons to see which tracks are queued up for playback.
3. If you want to jump to a particular place in the queue then press OK when the required track is
displayed.
8.
Removing tracks from the queue
1. Press the BROWSE button. The currently playing track name will be displayed.
2. Select the track you want to remove from the queue.
3. Press and hold the STOP button for 2 seconds and the screen will display: ‘Delete Track?’
4. Select ‘Yes’ or ‘No’ and press OK to delete the track from the queue.
5. If ‘Yes’ was selected then ‘Removed from Queue’ will be displayed.
25
6. To remove all tracks from the queue, keep pressing BACK until the ‘Media Player’ menu item is
selected, press OK and then select ‘Clear Queue’ and press OK again.
9.
Playing tracks in random order
1. Select the individual tracks as described previously.
2. Press MENU to go to the main menu and select ‘Media Player’, then press OK.
OK
3. Turn the knob or press the UP/DWON buttons until ‘Playback Mode’ is displayed then press OK.
OK
4. Turn the knob or press the UP/DWON buttons until ‘Shuffle’ is displayed then press OK.
OK
5. Select YES/NO to confirm that shuffle mode should be enabled.
10. Playing tracks in the queue repeatedly
1. Select the individual tracks as described previously.
2. Press MENU to go to the main menu and select ‘Media Player’, then press OK.
OK
3. Turn the knob or press the UP/DWON buttons until ‘Playback Mode’ is displayed then press OK.
OK
4. Turn the knob or press the UP/DWON buttons until ‘Repeat’ is displayed then press OK.
OK
5. Select YES/NO to confirm that repeat mode should be enabled.
B. Set up a Windows PC to allow INDIO to access your
audio files via a UPnP server
1. If your PC is running Microsoft Windows XP or Windows Vista, then you can use Windows Media
Player 11 (WMP11) to act as your UPnP (Universal Plug and Play) media server 1.0. Windows
Media Player 11 may be downloaded from Microsoft’s website and installed by following the
instructions detailed in its installation wizard.
2. Once installed, Windows Media Player 11 will create a library from all the media files available to it
on your PC. To add new media files to the library, select ‘File Add to Library… Advanced Options’,
click ‘Add’ and choose the files you wish to add and click ‘OK’.
3. You will now need to connect your Internet radio to Windows Media Player 11 and configure it to
allow INDIO to access your media library. In order to this, you will need to do the following:
a. Press MENU to go to the main menu and select ‘Media Player’.’.
b. Press OK and then select ‘UPNP Servers’.
c.
Press OK and INDIO will scan for all available UPnP servers. Note, this may take a few
seconds for INDIO to complete its scan and before the scan has completed, INDIO will
display ‘[Empty]’. INDIO will continue to display ‘[Empty]’ if no UPnP servers are found.
d. After a successful scan, select your UPnP server if there is more than one UPnP server,
and then press OK (note, your radio will display ‘Access Denied’ at this stage).
4. Your PC will now prompt you that a device has attempted to connect to your UPnP server. In
order to allow INDIO to have access to the media files, you will need to click the ‘Library’ tab from
Windows Media Player 11 and select the ‘Media Sharing …’ item to open the ‘Media Sharing’
window.
26
Selecting ‘Media Sharing…’
Sharing…’ for Windows Media Player 11:
5. From the ‘Media Sharing’ window, INDIO will be listed as an unknown device. Click on the
unknown device listed then click the ‘Allow’ button and then click ‘OK’.
Allowing INDIO to Connect:
27
1.
Locating and playing media files using INDIO and UPnP
1. Once the UPnP server is configured to share media files with the Internet radio, you can play the
files by doing the following on INDIO.
2. Press MENU to go to the main menu, select ‘Media Player’ and press OK.
OK
3. Select ‘UPNP Servers’ and press OK.
OK
4. INDIO will scan for all available UPnP servers. Note, this may take a few seconds for INDIO to
complete its scan and before the scan has completed, INDIO will display ‘[Empty]’. INDIO will
continue to display ‘[Empty]’ if no UPnP servers are found.
5. After a successful scan, select your UPnP server and press OK.
OK
6. INDIO will now list the media categories available from the UPnP server, e.g. ‘Music’, ‘Playlists’
etc. Select the category you wish to browse, press OK and select a sub-category and press OK
again. For example, you could select ‘Music’ and then ‘Album’.
7. Select the media files that you wish to play and press OK.
OK
8. INDIO will display ‘[Add to Queue]’, press OK and INDIO will add the tracks to its queue and begin
playing them automatically.
2.
Browsing the list of tracks currently queued up for playback
1. Press the BROWSE button. The currently playing track name will be displayed.
2. Turn the knob or press the UP/DOWN buttons to see which tracks are queued up for playback.
3. If you want to jump to a particular place in the queue then press OK when the required track is
displayed.
4. It is important to note here that media files scanned from INDIO’s ‘Windows Shares’ function can
also be added to INDIO’s queue.
3.
Queuing up UPnP tracks for playback later
1. Select the required track and press OK.
OK ‘Track Added to Queue’ will be displayed.
4.
Queuing up albums for playback later
1. Select the required album and press OK.
OK
2. Turn the knob or press the UP/DWON buttons until ‘[Add to Queue]’ is displayed.
3. Press OK.
OK ‘Tracks Added to Queue’ will be displayed.
5.
Controlling playback
1. Use the STOP button to stop playback.
2. Use the PLAY/PAUSE button to either pause a currently playing track or to restart a currently
paused track or to restart a stopped track.
3. Use the PREVIOUS button to start playback of the previous track in the queue.
4. Use the NEXT button to start playback of the next track in the queue.
6.
Removing tracks from the queue
1. Press the BROWSE button. The currently playing track name will be displayed.
2. Select the track you want to remove from the queue then press and hold the STOP button for 2
seconds.
28
3. Select ‘Yes’ or ‘No’ then press OK to delete the track from the queue.
4. If ‘Yes’ was selected then ‘Removed from Queue’ will be displayed.
5. To remove all tracks from the queue, press MENU to go to the ‘Media Player’ menu, press OK
and then turn the knob to select ‘Clear Queue’ and press OK again.
7.
Playing tracks in random order
1. Select the individual tracks as described previously.
2. Press MENU to go to the main menu and select ‘Media Player’, then press OK.
OK
3. Turn the knob or press the UP/DWON buttons until ‘Playback Mode’ is displayed then press OK.
OK
4. Turn the knob or press the UP/DWON buttons until ‘Shuffle’ is displayed then press OK.
OK
5. Select YES/NO to confirm that shuffle mode should be enabled.
8.
Playing tracks in the queue repeatedly
1. Select the individual tracks as described previously.
2. Press MENU to go to the main menu and select ‘Media Player’, then press OK.
OK
3. Turn the knob or press the UP/DWON buttons until ‘Playback Mode’ is displayed then press OK.
OK
4. Turn the knob or press the UP/DWON buttons until ‘Repeat’ is displayed then press OK.
OK
5. Select YES/NO to confirm that repeat mode should be enabled.
29
Troubleshooting
If you experience any trouble with your wireless Internet radio, then you may find it useful to visit the help
section on our webpage: http://www.reciva.com
If you have trouble connecting INDIO to your wireless network, these steps may help to resolve the
problem:
1. Confirm that a Wi-Fi connected PC can access the Internet (i.e. can browse the web) using the same
network.
2. Check that a DHCP server is available, or that you have configured a static IP address on INDIO. You
can configure a static IP address on INDIO using the menu item ‘Configure - Network Config - Edit
Config’, and then select ‘No’ for ‘Auto (DHCP)’.
3. Check that your network’s firewall is not blocking any outgoing ports. As a minimum, INDIO needs
access to UDP and TCP ports 80, 554, 1755, 5000, 6000 and 7070.
4. Check your access point does not restrict connections to particular MAC addresses. You can view
INDIO’s MAC address using the menu item ‘Configure - Network Config - View Config - MAC address’.
5. If you have an encrypted network, check that you have entered the correct key or passphrase into
INDIO. Remember that text-format keys are case sensitive. If, when attempting to connect to an
encrypted network, your radio displays: ‘Wireless error’ followed by a 5-digit number, then please
ensure that you enter the correct passphrase for the network. If the problem persists, then you may
need to consult your network configuration.
If your radio can connect to the network successfully, but is unable to play particular stations, it may be
due to one of the following causes:
1. The station is not broadcasting at this time of the day (remember it may be located in a different time
zone).
2. The station has reached the maximum allowed number of simultaneous listeners.
3. The station is not broadcasting anymore.
4. The link on INDIO is out of date.
5. The Internet connection between the server (often located in a different country) and you is slow.
Try using a PC to play back the stream via the broadcaster’s web site.
If you can play back the station with a PC, use the form at http://www.reciva.com/ to notify us so that we
can change the station data that is used by INDIO.
30
Specifications
•
802.11b/g Wi-Fi and 802.3 Ethernet connection
•
32 Watts 2.1 Channel Class-D digital amplifier
•
93dB high S/N ratio
•
3-Way speaker system
−
11cm, 4ohm subwoofer
−
5cm, 8ohm mid-range driver
−
2,5cm, 8ohm tweeter
•
Frequency response: 50Hz – 20KHz ± 3dB
•
128 x 64 dots black and white display
•
Stylish 28-Key remote control
•
100 - 240V switching power adapter
•
Dimensions: 35 x 23,5 x 10cm / 44 x 27,5 x 16,5cm
•
Weight: 3,8kg / 4,8kg
Spezifikationen
Spezifikationen
•
802.11b/g WLAN und 802.3 Ethernet Anschluss
•
32 Watt 2.1 Kanal Klasse-D Digitalverstärker
•
93 dB Signal-Rauschverhältnis
•
3-Wege Lautsprechersystem
−
11cm, 4 Ohm Subwoofer
−
5cm, 8 Ohm Mitteltöner
−
2,5cm, 8 Ohm Hochtöner
•
128 x 64 Punkt schwarzweiß Display
•
Elegante 28-Tasten Fernbedienung
•
100 - 240V Schaltnetzteil
•
Abmessung: 35 x 23,5 x 10cm / 44 x 27,5 x 16,5cm
•
Gewicht: 3,8kg / 4,8kg
Spécifications
•
Connexion sans fil WiFi802.11b/g ou Ethernet 802.3
•
Amplificateur numérique de classe «D» 32 Watts 2.1
•
Rapport signal/bruit : 93dB
•
3 haut-parleurs :
− Subwoofer de 11cm de diamètre, 4 Ohms
− Médium de 5cm de diamètre, 8 Ohms
− Tweeter de 2,5cm de diamètre, 8 Ohms
•
Fréquences restituées : 50Hz – 20KHz ± 3dB
•
Écran noir et blanc d’une définition de 128 x 64 points
•
Télécommande élégante à 28 touches
•
Alimentation 100 - 240V
•
Dimensions: 35 x 23,5 x 10cm / 44 x 27,5 x 16,5cm
•
Poids : 3,8kg / 4,8kg
31
Please read this User’s Guide
Please read this User’s Guide carefully to ensure proper use of your system and enjoy all of its
advanced features. Please keep this User’s Guide for future reference.
Svp, Veuillez lire ce Guide d’utilisateur.
Svp, lisez ce Guide d’utilisateur soigneusement pour assurer l’utilisation appropriée de votre
système pour apprécier tous les dispositifs avancés. Veuillez conserver ce Guide d’utilisateur
pour une future référence.
Bitte lesen Sie die Benutzeranweisung
Lesen Sie bitte die Bedienungsanleitung sorgfältig durch um einen
reibungslosen Gebrauch des Systems zu ermöglichen und alle
Eigenschaften zu genießen. Bewahren SIe diese Anleitung für
spätere Fragen auf.
©2008 Avox Technology GmbH