1
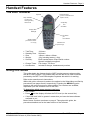
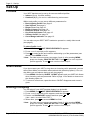
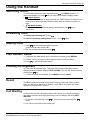
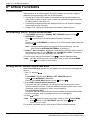
IP Office
20DT Handset User's Guide
40DHB0002UKCH Issue 4 (27th October 2003)
Page 2 - Contents
Contents
Handset Features ....................................................................................................................... 3
The 20DT Handset ................................................................................................................................. 3
Using this Guide ..................................................................................................................................... 3
20DT Menu Structures............................................................................................................................ 4
Notes and Warnings ............................................................................................................................... 5
Batteries and Charging ........................................................................................................................... 5
Subscribing ................................................................................................................................ 6
Introduction ............................................................................................................................................. 6
Subscribing to a System ......................................................................................................................... 6
Auto Subscribing Handsets ............................................................................................................................ 7
Removing a Subscription........................................................................................................................ 7
Hot Desk Log-on..................................................................................................................................... 7
Set-Up ......................................................................................................................................... 8
Profiles.................................................................................................................................................... 8
Silent Mode............................................................................................................................................. 8
Backlight Display .................................................................................................................................... 8
Volume Control .......................................................................................................................... 9
Mute........................................................................................................................................................ 9
Caller Volume ......................................................................................................................................... 9
Headset Operation.................................................................................................................................. 9
Default Speech Volume .......................................................................................................................... 9
Ringer Controls........................................................................................................................ 10
Ringer Tone .......................................................................................................................................... 10
Ringer Volume, On/Off ......................................................................................................................... 10
B-Answer On/Off (Auto-Answer)........................................................................................................... 10
Handset Phone Book ............................................................................................................... 11
Handset Phone Book ............................................................................................................... 11
Storing Handset Phone Book Numbers................................................................................................ 11
Using Handset Phone Book.................................................................................................................. 11
Key Clicks, Out of Range & Vibrator ...................................................................................... 12
Key Click Sounds.................................................................................................................................. 12
Out of Range Tone ............................................................................................................................... 12
Vibrator ................................................................................................................................................. 12
Using the Handset.................................................................................................................... 13
Switching On/Off................................................................................................................................... 13
Answering Calls .................................................................................................................................... 13
Making Calls ......................................................................................................................................... 13
Last Number Redial .............................................................................................................................. 13
Locking the Keyboard ........................................................................................................................... 13
Recall.................................................................................................................................................... 13
IP Office Functions .................................................................................................................. 14
Introduction ........................................................................................................................................... 14
Accessing the IP Office Directories ...................................................................................................... 14
Using the IP Office Voice Service......................................................................................................... 14
Selecting Language (s)......................................................................................................................... 15
Customising Your Mailbox .................................................................................................................... 15
Glossary of Terms.................................................................................................................... 16
CLIP...................................................................................................................................................... 16
DECT .................................................................................................................................................... 16
GAP ...................................................................................................................................................... 16
PBX....................................................................................................................................................... 16
Index.......................................................................................................................................... 17
Page 2 - Contents
IP Office - 20DT Handset User's Guide
40DHB0002UKCH Issue 4 (27th October 2003)
Handset Features - Page 3
Handset Features
The 20DT Handset
Speaker
Lamp Indicates:
- Incoming Call
- Message Waiting
- Missed Calls
Volume Controls
(used to increase/decrease
earpiece volume)
Accept Key
and
Off Switch
Display With
Backlight
On Switch
plus
Hook Switch
Signal Indicator
(on when base station
is in range)
Headset Jack
(bottom edge)
•
•
•
•
•
Talk Time:
Standby Time:
Size:
Weight:
Security:
• Charge Times:
• Accessories:
10 Hours.
90 Hours.
143mm x 48mm x 26mm.
121g including battery (±10g).
Each handset has a unique serial number.
Speech is digitally encrypted.
Full charge, 3.5 hours.
Includes a charger, headsets and pouches.
Using this Guide
This guide details the features that the 20DT handset supports when working
with an IP Office system. The handset may also be able to use other functions
provided by the DECT and PBX telephone systems with which it is working.
Refer to the manufacturer's instructions.
Within this guide, reference is made to the options in the Subscribing and Set-Up
procedures (see pages 6 and 8 respectively). Pressing the MENU key gains
access to the menu structure for these options. Two versions are available,
dependant upon the software issue of the 20DT.
To determine which menu structure you have:
• Dial *99982*.
and the display will show the PCS level (on the second line).
• Press
• If the PCS level is 4K or greater it means that you have the latest software
available to you.
Both of these versions are shown on page 4. Throughout this guide, the
procedures detailed are for the latest version of the software.
IP Office - 20DT Handset User's Guide
40DHB0002UKCH Issue 4 (27th October 2003)
The 20DT Handset - Page 3
Page 4 - Handset Features
20DT Menu Structures
Key: < > Step forwards or backwards through facilities menus
Access and change facilities, e.g. select Ringer Tones
*
When Internal/External Directory or Setting (language) accessed, use to return to previous menu.
Latest Menu Structure
Previous Menu Structure
Page 4 - 20DT Menu Structures
IP Office - 20DT Handset User's Guide
40DHB0002UKCH Issue 4 (27th October 2003)
Handset Features - Page 5
Notes and Warnings
Equipment in some areas may cause interference with cordless handsets. Other
areas may have atmospheres that require the use of special "intrinsically safe"
equipment only. The 20DT handset is not classified as intrinsically safe and
must not be taken into these areas.
Unfortunately all types of cordless handset may cause background sound on
some hearing aids.
Batteries and Charging
The handset batteries* are non-removable. Charging takes approximately 3.5hrs.
The charger also acts as a desk stand. Whilst charging the handset can still
make/receive calls.
To check battery charge:
1. Press MENU
2. Press > until BATTERY appears.
3. Press . The battery charge is shown as a row of blocks.
(Recharge the battery if 3 or less solid blocks are shown).
4. Press MENU to finish.
* Note: When you first receive your 20DT handset, slide the back cover off and
check that the battery pack lead is inserted into it's socket.
IP Office - 20DT Handset User's Guide
40DHB0002UKCH Issue 4 (27th October 2003)
Notes and Warnings - Page 5
Page 6 - Subscribing
Subscribing
Introduction
For 20DT handsets to be connected to a DECT system they have to go through a
process called ‘subscription’. In addition, each 20DT must be both registered on
each system and the subscription allowed. Your system manager will do this and
also allocate an extension number to you. To do this they need to known the
handset's serial number. This is shown on a label covered by the handset
battery. Remove handset back cover and lift out battery unit to show label. The
serial number follows the characters SN:. Alternatively, on latter models, you do
not have to remove the back cover. Simply key *999*84* and press 9.
Logging On:
The 20DT can subscribe to a maximum of ten DECT systems (four on older
systems). However, the 20DT can only be logged onto one of these systems at
any one time. If these systems are out-of-range of each other, e.g. in another
building, you can set the 20D to automatically log on to the other system when
you get in range (see page 7).
Subscribing to a System
To subscribe to a system the following information (provided by your system
manager) is required:
• The ID number of the DECT system
• An account code if necessary.
To subscribe to a system:
1. Press MENU and then > until LOGIN appears, then press 9. SELECT LOGIN
appears
2. Press > until SUBSCRIPTION CREATE appears, then press 9.
3. SEARCH ID appears. Press > until required system ID number appears.
(The system ID is printed on the back of the Compact DECT Base Station).
The handset displays the ID's of any systems in range. If there are several
systems locally, use < and > to display the different ID numbers found.
4 When the required system ID is displayed, press 9.
5. Press > until CREATE SYSTEM 1 appears, press > until required SYSTEM
number appears.
6. When the required SYSTEM number appears.
7. AC: _ _ _ _ _ _ also appears.
If required enter an Account Code and/or press 9.
8. SUBSCRIPTION WAIT appears. If for some reason your handset cannot
subscribe it displays FAILED. Press to try again from step 2 above or press
MENU to stop.
9. When successfully subscribed, your handset bleeps and your extension
number is displayed.
Switching Between Systems
If your 20DT has been registered on several local systems, you can select which
system to currently use. Simply repeat Subscribing to a System on page 6,
selecting the required system to log on to. Alternatively, if your 20DT has been
registered on other remote (at other locations) systems, you can select the Auto
Subscribe option (see page 7) on your 20DT. Hence, when you move between
the two locations your 20DT will automatically subscribe itself to the new system.
Page 6 - Introduction
IP Office - 20DT Handset User's Guide
40DHB0002UKCH Issue 4 (27th October 2003)
Subscribing - Page 7
Auto Subscribing Handsets
When moving between two locations, both equipped with IP Office and Compact
DECT systems, you can set a handset to automatically subscribe to the other
DECT system provided that the handset at been registered on both systems
(consult your system manager for details).
To set auto subscription on a 20DT Handset
1. Press MENU and then > until LOGIN appears, then press 9. SELECT LOGIN
appears
2. Press 9 CURRENT SYSTEM and the ID of that system appears.
3. Press > until AUTO LOGIN and then press 9 to finish.
Removing a Subscription
If necessary, you can remove a subscription from the handset.
DO NOT DO THIS LIGHTLY as you may not be able to re-subscribe without
assistance from your System Maintainer.
1. Press MENU and then > until LOGIN appears, then press .
2. SELECT LOGIN appears.
3. Press > until required SUBSCRIPTION REMOVE appears,
then press .
4. Enter your password and press .
5. SUBSCRIPTION REMOVE appears, press and then press > until the
system you wish to remove appears
6. Press again to remove the system.
7. If the system removed was the one currently in use, you need to LOGIN to
another system (see page 6).
8. Press MENU to finish.
Hot Desk Log-on
To log on as a Hot Desk user you need to know the extension number and the
passcode for that extension number.
To Log on enter the following shortcode:
.
1. *35*Extension Number*Passcode# then press
2. When you will hear a double beep press
again.
E.g. if your extension number is 401 and the passcode is 1234 you would enter:
*35*404*1234#
To log off you need to enter:
*36 then press
.
When you will hear a double beep press
IP Office - 20DT Handset User's Guide
40DHB0002UKCH Issue 4 (27th October 2003)
again
Auto Subscribing Handsets - Page 7
Page 8 - Set-Up
Set-Up
Profiles
Your 20DT handset can be set-up for two user-defined profiles.
• Indoors (1) e.g. for office working
• Outdoors (2) e.g. for use in a manufacturing environment.
Within each profile you can set-up different parameters for:
• Back Lighting On/Off: See page 8.
• Start Volume: See page 9.
• Ringer Tone: See page 10.
• Ringer Volume: See page 10.
• B-Answer On/Off: See page 10.
• Key Click On/Volume: See page 12.
• Vibrator On/Off: See page 12.
• Out of Range Indicator: See page 12.
You can also set your DECT 20DT handset to operate in a totally silent mode
(see page 8).
To select Profile 1 or 2:
1. Press MENU* and . SET PROFILE/PROFILE 1 appears.
2. Press > until required profile appears.
3. Press to select profile and continue with setting up of the parameters (see
above). Press MENU to finish.
* Note: On older menu structures (see pages 3 and 4), after pressing MENU,
press >to display PROFILE SET UP. Press
and > until required
profile appears. Press
and continue from step 3.
Silent Mode
If you do not want your 20DT to ring when an incoming call is presented, you can
select Silent Mode (not available when twinned with a desk top phone). You can
also Mute your microphone during a call (see page 9).
1. Press MENU followed by SILENT. SILENT appears and your 20DT will vibrate
when incoming calls are presented. Refer to page 12 for details on how to turn
the vibrating option on.
2. To return to normal use, repeat the above. SILENT disappears and a tone is
given.
Backlight Display
You can select if your 20DT handset display is to be backlit.
1. Press MENU* and . SET PROFILE/PROFILE 1 appears.
2. Press > until required profile appears and then press .
3. Press > until BACKLIGHT appears and then press .
(Use < and > to select ON or OFF.)
4. When done, press to save and MENU to finish.
* Note: On older menu structures (see pages 3 and 4), after pressing MENU,
press >to display PROFILE SET UP. Press
and > until required
profile appears. Press
and continue from step 2.
Page 8 - Profiles
IP Office - 20DT Handset User's Guide
40DHB0002UKCH Issue 4 (27th October 2003)
Volume Control - Page 9
Volume Control
Mute
During a call you can mute the microphone.
1. During the call, press .
The handset displays Mic. Mute. To cancel press
again.
Caller Volume
The Volume Control keys (mounted on side of handset) are used to increase and
decrease caller volume during a call. The volume is shown as a bar across the
display. After the call the handset returns to its default volume setting (see
below).
For systems where handsets are used in noisy environments, the maintainer can
adjust the volume settings for some phones. Contact your maintainer for further
details.
Headset Operation
You can use a telephone headset (earphone and microphone) with the handset.
This plugs into a 2.5 mm stereo jack socket located on the base of the 20DT.
Using a headset disconnects the microphone and speaker. For total handsfree
operation also use Auto-Answer (see page 10).
Default Speech Volume
You can alter the default volume of calls.
1. Press MENU* and . SET PROFILE/PROFILE 1 appears.
2. Press > until required profile appears and then press .
3. Press > until START VOLUME appears, then press .
4. Use < and > to alter the volume display.
5. When done, press to save and MENU to finish.
* Note: On older menu structures (see pages 3 and 4), after pressing MENU,
press >to display PROFILE SET UP. Press
and > until required
profile appears. Press
and continue from step 3.
IP Office - 20DT Handset User's Guide
40DHB0002UKCH Issue 4 (27th October 2003)
Mute - Page 9
Page 10 - Ringer Controls
Ringer Controls
Ringer Tone
You can select between 9 ringer tones (not available when twinned with a desk
top phone).
1. Press MENU* and . SET PROFILE/PROFILE 1 appears.
2. Press > until required profile appears and then press .
3. Press > until RINGER TONE appears, then press . Use < and > to select the
tone required. To help the tones are played during selection.
4. When the required tone is found, press to save it and MENU to finish.
* Note: On older menu structures (see pages 3 and 4), after pressing MENU,
and > until required
press >to display PROFILE SET UP. Press
profile appears. Press
and continue from step 3.
Ringer Volume, On/Off
You can adjust the volume of your ringer (five levels) or you can switch the ringer
off (not available when twinned with a desk top phone). This is useful when going
into meetings. With the ringer off, incoming calls make the handset vibrate. The
ringer volume must be reset manually.
To switch the handset ringer on/off:
1. Press MENU* and . SET PROFILE/PROFILE 1 appears.
2. Press > until required profile appears and then press .
3. Press > until RINGER VOL appears, then press . Use < and > to select the
volume required or select OFF. To help the volume is played during selection.
4. When the required volume has been selected, press to save it and MENU
to finish.
* Note: On older menu structures (see pages 3 and 4), after pressing MENU,
press >to display PROFILE SET UP. Press
and > until required
profile appears. Press
and continue from step 3.
B-Answer On/Off (Auto-Answer)
You can set the handset to automatically connect to calls after a single ring (not
available when twinned with a desk top phone). This is useful for headset
operation. When selected, B-ANSWER appears on the display.
1. Press MENU* and . SET PROFILE/PROFILE 1 appears.
2. Press > until required profile appears and then press .
3. Press > until B-ANSWER appears and then press .
4. Use < and > to switch ON or OFF.
5. When set as required press and MENU to finish.
* Note: On older menu structures (see pages 3 and 4), after pressing MENU,
press >to display PROFILE SET UP. Press
and > until required
profile appears. Press
and continue from step 3.
Page 10 - Ringer Tone
IP Office - 20DT Handset User's Guide
40DHB0002UKCH Issue 4 (27th October 2003)
Handset Phone Book - Page 11
Handset Phone Book
Storing Handset Phone Book Numbers
Handset phone book numbers can be either external or internal numbers. They
can also be codes for the telephone system to which your 20DT connects.
1. Dial the required number and press BOOK.
2. STORE NO.? appears. If yes, press otherwise press MENU.
3. NAME appears. Enter the required name from key pad by tapping keypad
digits until required letter appears. Press # to switch between capitols and
lower case.
4. When flashing cursor moves to next space, select next letter.
To delete letters use < to back space and then hold down.
5. When the name has been entered, press to store both name and number.
6. Press BOOK and use < and > to view the number.
Using Handset Phone Book
The handset phone book can store up to 80 numbers. Each number can be up to
24 digits with 24 letter names. These numbers are stored on the handset in the
sequence in which they are entered.
There are two methods of accessing stored handset phone book numbers:
• By Scrolling
or
Press BOOK. The first number in the stored list appears. To dial, press
press > to scroll through the list and then press
.
• By Reviewing
Press BOOK. The first number in the stored list appears. Key the 1st letter of
the required stored name. When name and number appear press
to call.
To delete a handset phone book number:
1. Press BOOK. Select the number to be deleted by either of the two methods
above.
2. Press twice.
IP Office - 20DT Handset User's Guide
40DHB0002UKCH Issue 4 (27th October 2003)
Storing Handset Phone Book Numbers - Page 11
Page 12 - Key Clicks, Out of Range & Vibrator
Key Clicks, Out of Range & Vibrator
Key Click Sounds
You can set if the handset keys should give a click when pressed.
1. Press MENU* and . SET PROFILE/PROFILE 1 appears.
2. Press > until required profile appears and then press .
3. Press > until KEY CLICK appears, then press .
4. Use < and > to either switch OFF or to increase the volume.
5. Press to save the setting and MENU to finish.
* Note: On older menu structures (see pages 3 and 4), after pressing MENU,
press >to display PROFILE SET UP. Press
and > until required
profile appears. Press
and continue from step 3.
Out of Range Tone
An out-of-range warning tone occurs when you are about to go out-of-range of
the current base station and either there is no base station to handover the call to
or the next base station already has its maximum number of calls.
1. Press MENU* and . SET PROFILE/PROFILE 1 appears.
2. Press > until required profile appears and then press .
3. Press > until OUT of RANGE appears, then press .
4. Use < and > to either switch ON or OFF.
5. Press to save the setting and MENU to finish.
* Note: On older menu structures (see pages 3 and 4), after pressing MENU,
and > until required
press >to display PROFILE SET UP. Press
profile appears. Press
and continue from step 3.
It is strongly recommended that the OUT of RANGE option is always ON.
Vibrator
You can set the handset to vibrate and ring or just vibrate or just ring (see page
10) when an incoming call arrives (not available when twinned with a desk top
phone).
1. Press MENU* and . SET PROFILE/PROFILE 1 appears.
2. Press > until required profile appears and then press .
3. Press > until VIBRATOR appears, then press .
4. Use < and > to either switch ON or OFF.
5. Press to save the setting and MENU to finish.
* Note: On older menu structures (see pages 3 and 4), after pressing MENU,
press >to display PROFILE SET UP. Press
and > until required
profile appears. Press
and continue from step 3.
Page 12 - Key Click Sounds
IP Office - 20DT Handset User's Guide
40DHB0002UKCH Issue 4 (27th October 2003)
Using the Handset - Page 13
Using the Handset
Switching On/Off
To switch the handset on press and hold down
until INDeX appears. To
switch the handset off, press until you hear a tone and the display clears.
Signal Symbol
•
Indicates a base station in range and that your 20DT handset is ready for use.
If the symbol flashes the base station is busy with its maximum number of
calls.
•
Off-Hook Symbol
key to
Shown when making calls and during conversations. Use
disconnect.
Answering Calls
To answer an incoming call: Press
.
To cancel a message waiting lamp: Press ∗, 2 and
twice.
Making Calls
1. Press
and then dial the number required
(prefix external calls with 9). Or
.
2. Dial the number required and press
Last Number Redial
1. To access the redial stack (up to 10 different numbers) press REDIAL.
2. Press > until the required number appears (from newest to oldest).
3. Press
to call the desired number.
Locking the Keyboard
You can lock the handset keys. This stops calls being accidentally started.
Whilst locked the handset displays KEY LOCKED. You can still answer calls by
pressing the
key.
1. To lock or unlock the keyboard, press MENU and then LOCK.
Recall
The R key produces a 'recall' signal and is used to Hold calls. When a call is
held, you will hear a dial tone. In addition, some PBX's may need this 'recall'
signal to access specific functions.
Call Waiting
If your phone has the call waiting feature set (consult your system manager),
then when someone else calls you during a call, the display will show CALL
WAITING.
to end your current call and press
,
1. To answer a Call Waiting, press
again.
2. You will be connected to the waiting call.
IP Office - 20DT Handset User's Guide
40DHB0002UKCH Issue 4 (27th October 2003)
Switching On/Off - Page 13
Page 14 - IP Office Functions
IP Office Functions
Introduction
When used on an IP Office system, the 20DT handset can access a range of
additional functions directly from the IP Office system.
• Access the IP Office Directories of extensions and speed dial numbers by
either Alpha or Name search, both of which are selected/configured from the
IP Office platform (see page 14).
• Voicemail messages prompts are displayed and you can access messages
via an intuitive menu structure.
• Display CLIP, Calling and Called party information, Alpha tags, etc.
Accessing the IP Office Directories
1. Press MENU followed by > (BOOK). EXT. SERVICE appears. Press
2. INTERNAL is displayed.
Press to access your IP Office Internal Directory extensions.
or
Press > to select EXTERNAL to access your IP Office system speed dials and
then press .
Note: Having accessed either the internal or external directory, you can
return back to INTERNAL/EXTERNAL by pressing *.
3. Enter 1st letter of Name is displayed. Press the key matching the first letter of
the Name you want. E.g. for SMITH press 7(PRQS) four times. The display
shows the first name in the alphabetic list of the S’s.
4. Use > to step through the Smiths. Press
to call the displayed name.
* Note: On older menu structures (see pages 3 and 4), after pressing MENU,
press and continue from step 2.
Using the IP Office Voice Service
When Voice Message appears on your display, you access your messages as
follows:
1. Dial *17 and then
.
or
Press MENU* followed by > (BOOK). EXT. SERVICE appears.
Press and INTERNAL is displayed.
Press > until VOICE MAIL appears, press and then
.
2. For a 20DT twinned with an extension:
If required, dial your password. You will access the Voicemail box of your
twinned extension number. Follow the audible prompts to either listen to your
messages, send a message or action your message(s).
For an individual 20DT:
If required, dial your password and follow the audible prompts to either listen
to your messages, send a message or action your message(s).
3. Press
to finish.
* Note: On older menu structures (see pages 3 and 4), after pressing MENU,
press . Press > until VOICE MAIL appears, press ,
.and
continue from step 2.
For all other Voicemail service, refer to the IP Office Voicemail manual.
Page 14 - Introduction
IP Office - 20DT Handset User's Guide
40DHB0002UKCH Issue 4 (27th October 2003)
IP Office Functions - Page 15
Selecting Language (s)
You can change either or both the internal language setting used by the 20DT for
Profile Set Ups (see 20DT Menu Structure on page 4 ) or the language sent from
the Compact DECT Base Station (for Internal/External Directories).
To change the Internal/External Directories Language:
1. Press MENU followed by > (BOOK). EXT. SERVICE appears.
2. Press > until SETTINGS appears and then press 9. LANGUAGE appears.
3. Press 9 and > until the required language appears.
Note: Having accessed a language, you can return back to LANGUAGE or
SETTINGS by pressing *.
4. Press 9 to select required language and then MENU to finish.
* Note: On older menu structures (see pages 3 and 4), after pressing MENU,
press and continue from step 2.
To change the 20DT Profile Set Up Language:
1. Press MENU followed by > (BOOK). EXT. SERVICE appears.d
2. Press > until Language appears and then press 9.
2. Press > until the required language appears.
3. Press 9 to select required language and then MENU to finish.
* Note: On older menu structures (see pages 3 and 4), after pressing MENU,
press > and . Press > to select Profile and then press . Continue
from step 2.
Customising Your Mailbox
It is essential that you set a passcode to keep your mailbox private. At default, IP
Office does not password protect your mailbox. If not already done, request your
system administrator to enable the password protection facility. Regularly update
your passcode to maximise security.
To change your mailbox passcode:
and dial the Voice Manager extension number *17.
1. Press
2. When answered, dial *04.
3. Follow the voice prompts to change your password.
To change your mailbox greeting:
1. Press
and dial the Voice Manager extension number *17.
2. When answered, dial 3.
3. Follow the voice prompts to add/change your greeting.
IP Office - 20DT Handset User's Guide
40DHB0002UKCH Issue 4 (27th October 2003)
Selecting Language (s) - Page 15
Page 16 - Glossary of Terms
Glossary of Terms
CLIP
Calling Line ID Presentation:
Information about the caller sent with their call, i.e. their name and number.
DECT
Digital Enhanced Cordless Telecommunications:
A standard for the high density operation of cordless handsets in a small area.
GAP
Generic Access Profile:
A series of standards to allow the inter-operation of DECT equipment from
different DECT suppliers.
PBX
Private Branch Exchange:
A private telephone system.
Page 16 - CLIP
IP Office - 20DT Handset User's Guide
40DHB0002UKCH Issue 4 (27th October 2003)
Index - Page 17
Index
Alert number .................................................................. 15
Allow subscription ............................................................ 7
Auto-Answer .................................................................. 10
Backlight .......................................................................... 8
B-Answer ....................................................................... 10
Battery ............................................................................. 5
Call volume ...................................................................... 9
Capacity ........................................................................... 5
Change ringer ................................................................ 10
Change start volume ........................................................ 9
Change system ................................................................ 6
Chargers .......................................................................... 5
Clicks ............................................................................. 12
Customise mailbox ......................................................... 15
Day alert number ........................................................... 15
Decrease volume ............................................................. 9
Delete subscription .......................................................... 7
Display charge ................................................................. 5
Force feed ...................................................................... 10
Greeting ......................................................................... 15
Handset subscription ....................................................... 7
Handsfree ........................................................................ 9
Headsets .......................................................................... 9
Hearing aids ..................................................................... 5
Increase volume .............................................................. 9
INDeX directory ............................................................. 14
INDeX Phone system ..................................................... 14
Intrinsically safe ............................................................... 5
Jack socket ...................................................................... 9
KBD LOCKED ................................................................ 13
Key click ......................................................................... 12
Keyboard lock ................................................................ 13
Last number redial ......................................................... 13
Lock keyboard ............................................................... 13
Login ................................................................................ 6
Mailbox customise ......................................................... 15
Message light number .................................................... 15
Mic Off ............................................................................. 9
Mute ................................................................................. 9
Name mailbox ................................................................ 15
No ringer ........................................................................ 10
IP Office - 20DT Handset User's Guide
40DHB0002UKCH Issue 4 (27th October 2003)
Off ................................................................................. 13
Off-hook symbol ............................................................ 13
On ................................................................................. 13
Passcode
Mailbox ....................................................................... 15
Permanent greeting ....................................................... 15
Phonebook .................................................................... 11
Quick Charge .................................................................. 5
Redial ............................................................................ 13
Remove subscription ....................................................... 7
Repertory Numbers ....................................................... 11
Ringer on/off .................................................................. 10
Ringer tone .................................................................... 10
Safe usage ...................................................................... 5
Set start volume .............................................................. 9
Setup mailbox ................................................................ 15
Signal symbol ................................................................ 13
Silence ............................................................................. 8
Single ring ..................................................................... 10
Speed dials .................................................................... 11
Start volume .................................................................... 9
Storing speed dials ........................................................ 11
Subscribe ........................................................................ 6
Subscription ..................................................................... 7
Switch on/off .................................................................. 13
Telephone book ............................................................. 11
Temporary greeting ....................................................... 15
Temporary ringer off ...................................................... 10
Tone .............................................................................. 10
Tones ............................................................................ 12
Unsubscribe .................................................................... 7
Vibrator .......................................................................... 12
Voice Manager
Mailbox customise ...................................................... 15
Volume display ................................................................ 9
Warnings ......................................................................... 5
Index - Page 17
Performance figures and data quoted in this document are typical, and
must be specifically confirmed in writing by Avaya before they become
applicable to any particular order or contract. The company reserves the
right to make alterations or amendments to the detailed specifications at
its discretion. The publication of information in this document does not
imply freedom from patent or other protective rights of Avaya, or others.
Intellectual property related to this product (including trademarks) and
registered to Lucent Technologies has been transferred or licensed to
Avaya.
This document contains propriety information of Avaya and is not to be
disclosed or used except in accordan `ce with applicable agreements.
Any comments or suggestions regarding this document should be sent
to "[email protected]".
© Copyright 2003 Avaya
All rights reserved.
Avaya
Sterling Court
15 - 21 Mundells
Welwyn Garden City
Hertfordshire
AL7 1LZ
England
Tel: +44 (0) 1707 392200
Fax: +44 (0) 1707 376933
Email: [email protected]
Web: http://www.avaya.com.
IP Office - 20DT Handset User's Guide
40DHB0002UKCH Issue 4 (27th October 2003)