1
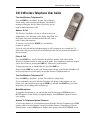
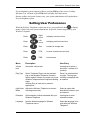
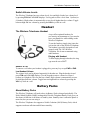
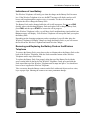
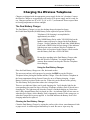
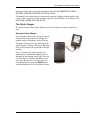
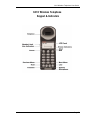
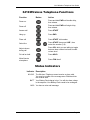
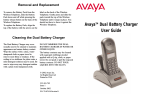
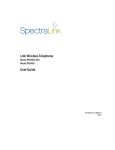
AvayaTM 3410 Wireless Telephone
User Guide
555-301-701
Issue 1
October 2002
3410 Wireless Telephone User Guide
NOTICE
Every effort was made to ensure that the information in this book was complete and accurate at the
time of printing. However, information is subject to change.
FCC INFORMATION:
This device complies with part 15 of the FCC Rules. Operation is subject to the following two conditions:
(1) This device may not cause harmful interference, and (2) this device must accept any interference
received, including interference that may cause undesired operation.
Trademark Information
Avaya is a registered trademark of Avaya, Inc. All other trademarks used herein are the property of their
respective owners.
3410 Wireless Telephone User Guide
© 2002 Avaya Inc.
All Rights Reserved
Printed in the United States of America
P/N:72-0035-21H
Page ii
3410 Wireless Telephone User Guide
3410 Wireless Telephone User Guide
Turn the Wireless Telephone On
Press the PWR key for about 1 second. You will hear a
double chirp. Your extension will display. The NO SVC
message will display briefly. When it goes out, you are
ready to make and receive calls.
Answer A Call
The Wireless Telephone will ring or vibrate to alert you.
Additionally, a line indicator on the display may flash, and
the display may show information about the call, such as
caller’s name and extension.
To answer a call, press the START key and hold the
earpiece to your ear.
If you are on a call and hear subdued ringing, a call is coming in on a second line. To
answer this call, put your first call on hold and press the line key then the line number of
the second call.
Place A Call
Press the START key, wait for dial tone, then dial the number. Dial calls with the
Wireless Telephone exactly as with your desk phone. Your telephone system may require
you to select a line by pressing the LINE key, followed by a line number.
To hang up when you’ve finished the call, press the END key.
Do not use the PWR key to end a call, because that will turn your Wireless Telephone off
and you will not receive calls until you turn the Wireless Telephone back on.
Turn the Wireless Telephone Off
Press the PWR key for about 1 second. You will hear a single chirp.
If you accidentally turn your Wireless Telephone off during a conversation, you can
restore your conversation by pressing the PWR key and then the START key, provided
the person you are talking to has not hung up.
Mute Microphone
To mute the microphone so you can hear but won’t be heard, press FCN then press 1.
MUTED appears on the Wireless Telephone display. Press FCN then 1 again to restore
voice pickup.
Access To Telephone System Features
To access the features of your telephone system from the Wireless Telephone, press FCN
anytime while in a call to display a menu of available features. Press the key(s) for the
desired feature, or press FCN again to display more options. Select EXIT MENUS to exit.
Page 1
3410 Wireless Telephone User Guide
If your telephone system supports softkeys, pressing FCN provides access to softkey
functions. You will need to press FCN twice to display the feature menu.
Because softkey and system features vary, your system administrator will explain them
for your telephone system.
Setting User Preferences
When the Wireless Telephone is on but not in use, press and briefly hold
to display
menus. Check with your system administrator for specific features supported by your
Wireless Telephone.
Press
Right
arrow
to display next menu item.
Press
Left
arrow
to display previous menu item.
Press
Zero
to select or change item.
Press
FCN
to return to previous menu level.
Press
END
to exit menus.
Menu
Description
User Entry
Volume
level
Sets audio volume level.
Use keypad to select a
level from 1 (softest) to 8
(loudest).
Ring Type
Select Telephone Ring to set the standard
ring on the Wireless Telephone. Normal is
factory default. Vibrator ring works only if your
Wireless Telephone has the optional vibrating
ringer.
Press 0 to select desired
ring type. The ring type
currently set displays with
an asterisk.
Auxiliary Ring is used only by external
applications.
High Noise
Mode
Adjusts the Wireless Telephone to account
for background noise.
Select an option that
describes the noise in your
environment.
Extension
Sets extension number associated with your
Wireless Telephone.
Use keypad to enter
extension number.
Language
Sets the default language for Wireless
Telephone menus.
Select the language to be
used with your Wireless
Telephone.
Page 2
3410 Wireless Telephone User Guide
Switch Volume Levels
The Wireless Telephone has two volume levels, low and high. Set the low volume level
by pressing FCN until VOLUME displays. Use keypad to select a level from 1 (softest) to
8 (loudest). High volume is automatically set two levels higher than low volume. Toggle
between high and low volume by pressing the VOL key while in a call.
Headset
The Wireless Telephone Headset
Avaya offers optional headsets for
use in noisy environments or if you need to
have your hands free while talking on the
Wireless Telephone.
To use the headset, simply plug it into the
jack on the side of the Wireless Telephone.
The headset is specially designed to work
properly with The 3410 Wireless
Telephone. We do not recommend using
other headsets.
Ringing with Headset
To hear ringing through a headset, the ring
type must be set to SOFT.
Answer A Call
To answer a call when your headset is plugged in, press any key except PWR or END.
Low Headset Volume
The volume level can be adjusted separately for headset use. Plug the headset in and
press FCN until VOLUME displays. Use the keypad to enter a volume level from 1
(softest) to 8 (highest). This sets the low volume. High volume is automatically set two
levels higher than low volume. Toggle between high and low volume by pressing the
VOL key while in a call.
Battery Packs
About Battery Packs
The Wireless Telephone will need to have its Battery Pack recharged periodically. The
Nickel Metal Hydride (NiMH) rechargeable Wireless Telephone Battery Pack gives you
four hours of talk time or 80 hours of stand-by time. Stand-by time is when the phone is
turned on, but you are not using it.
The Wireless Telephone also supports a Nickel-Cadmium (NiCd) Battery Pack, which
supports two hours talk time and 40 hours stand-by.
Page 3
3410 Wireless Telephone User Guide
Indications of Low Battery
The Wireless Telephone will notify you when the charge on the Battery Pack becomes
low. If the Wireless Telephone is in use, the BATT message will display and you will
hear a soft beep through the earpiece every six seconds. You have two minutes to
complete the call or change the Battery Pack.
The Battery Pack can be changed while the call is still in progress. Do not press END.
Quickly remove the discharged Battery Pack and replace with a charged Battery Pack,
press PWR, and then press START to resume the call in progress.
If the Wireless Telephone is idle, you will hear a brief modulated ring signal and the Low
Battery message will display. Your Wireless Telephone will not operate until you replace
the Battery Pack.
Depending on the charging equipment you have purchased, you will either place the
Wireless Telephone in a Battery Charger to charge the Battery Pack, or you will remove
the Pack from the Wireless Telephone and install it in the Charger.
Removing and Replacing the Battery Pack on the Wireless
Telephone
To remove the Battery Pack, press down on the oval button above the Battery Pack on the
back of the Wireless Telephone. Slide the Pack toward the bottom of the Wireless
Telephone until it stops, then lift up.
To replace the Battery Pack, first properly align the top of the Battery Pack with the
arrows on the label on the back of the Wireless Telephone. Gently press and slide the
Pack toward the top of the Wireless Telephone until it snaps into place. You should not
have to force it against the Wireless Telephone.
Take care not to short the Battery contacts on the Pack with metal objects such as coins,
keys or paper clips. Shorting the contacts can cause permanent damage.
Page 4
3410 Wireless Telephone User Guide
Charging the Wireless Telephone
Chargers are shipped with the appropriate power supply for the site’s location. Connect
the Stand or Charger to an appropriate wall outlet via its power supply and it’s ready for
use. Chargers operate in a 50° to 85° F (10° to 30° C) environment. Do not expose them
to freezing temperatures or direct sunlight.
The Dual Battery Charger
The Dual Battery Charger is a two-slot desktop charger designed to charge
the Nickel Metal Hydride (NiMH) Battery Packs required to operate Wireless
Telephones. Full charging is accomplished in
approximately two hours.
Only NiMH Battery Packs with a YELLOW label on the
handset contact side may be charged in the Dual Battery
Charger. Nickel-Cadmium (NiCd) and older NiMH Battery
Packs with a GREEN label will not charge. If the indicator
light does not come on when a Wireless Telephone or
Battery Pack is first placed in the Charger, check to make
sure the Battery Pack has a YELLOW label.
Do not place anything in the Dual Battery Charger other
than the Wireless Telephone. You might damage the
contacts. Bent contacts can keep the Wireless Telephone
from charging.
Using the Dual Battery Charger
Place the Dual Battery Charger on a flat, horizontal surface.
The user must end any call in progress by pressing the END key on the Wireless
Telephone before placing the handset into the Charger. Place the Wireless Telephone in
the front compartment facing forward. It may be on or off during charging. A spare
Battery Pack may be placed in the rear slot. Either slot can be chosen to take priority.
The first Battery Pack placed into either slot is charged first.
There are two indicator lights, one for each charging slot. Verify that the light for the
corresponding slot comes on when a Wireless Telephone or Battery Pack is placed into a
charging slot. The light turns off when the Charger is finished charging or a short time
after a fully charged Battery Pack is placed in a slot. An indicator light will not come on
when the slot is empty, when a Battery Pack is improperly seated or is the wrong type, or
when the Charger has no power applied. A fast flash indicates the Battery Pack is not
charging and must be replaced.
Cleaning the Dual Battery Charger
Clean the Dual Battery Charger by wiping the surface with a clean, water-dampened cloth
or paper towel. A mild detergent solution may be used. Be sure to wipe away any
Page 5
3410 Wireless Telephone User Guide
detergent residue with a plain water dampened cloth. DO NOT IMMERSE THE DUAL
BATTERY CHARGER IN WATER OR OTHER LIQUID.
The Battery Pack contacts may be cleaned with isopropyl (rubbing) alcohol applied with
a Q-tip, cloth, or paper towel. Do not push or pull the exposed Battery Pack contacts. DO
NOT POUR LIQUIDS INTO THE SLOTS.
The Quick Charger
The Quick Charger holds a single Battery Pack and can charge it in approximately one
hour.
Using the Quick Charger
Place the Battery Pack on the charger by gently
sliding the Pack upward into the charger in a
manner similar to installing it on the Wireless
Telephone. If placed correctly, the light on the
Quick Charger will shine solid green. When the
Pack is fully charged, the green light will begin
to flash.
Every 11th charge the Quick Charger will
automatically recondition the Battery Pack, as
indicated by the flashing amber light. This may
take from three to six hours depending on the
state of the Battery Pack. To enter or exit the
reconditioning mode, press the MODE button
while the Battery Pack is on the Quick Charger.
Page 6
3410 Wireless Telephone User Guide
3410 Wireless Telephone
Keypad & Indicators
Page 7
3410 Wireless Telephone User Guide
3410 Wireless Telephone Functions
Function
Button
Action
Power on
Press and hold PWR until double chirp,
then release
Power off
Press and hold PWR until single chirp,
then release
Answer call
Press START
Hang up
Press END
Place call
Press START, dial number
Select line
Press START then press LINE , then
select line number (1-9)
Adjust volume
during call
Press VOL while you are talking to toggle
between base volume level and a louder
volume level
Put call on hold
Press HOLD
Mute/Unmute
microphone
Press FCN then 1
Status Indicators
Indicator Description
NO SVC The Wireless Telephone cannot receive or place calls.
You may be outside of the coverage area. Walk back into
the covered area.
BATT Your Battery Pack charge is low. You will also hear a beep
in the earpiece. Your Battery Pack needs to be recharged.
MSG You have a voice mail message.
Page 8
3410 Wireless Telephone User Guide
Maintenance
General Care of the Wireless Telephone and Chargers
This section applies to the Wireless Telephone, Dual Battery Charger and the Quick
Charger equally.
The Wireless Telephone and chargers have been designed to withstand the wear and tear
of normal use; however, avoid dropping the Wireless Telephone or knocking it against
hard surfaces. Carrying the Wireless Telephone in a holster or carrying case will help to
protect it.
There are no serviceable parts in the Wireless Telephone or Chargers. You should not
open the Wireless Telephone case nor disassemble the Chargers. Doing so will void your
warranty.
Turn off the Wireless Telephone and unplug the Charger before you clean them. Never
immerse either in water. Clean the exterior surfaces, including the charging contacts, with
a cloth that has been slightly moistened with water. Take care not to exert undue pressure
on the Charger electrical contacts while wiping.
Wiping the handset surface with a water-dampened cloth or paper towel will remove
most films or residues. If the soiling is too stubborn for plain water, a mild detergent
solution may be used. Be sure to wipe away any detergent residue with a clean waterdampened cloth.
The Wireless Telephone may be cleaned with any general-purpose household glass and
surface-type cleaner. DO NOT SPRAY THE HANDSET DIRECTLY! Isopropyl alcohol
may be used occasionally applied by a cloth or paper towel. When using alcohol, do not
rub the keypad characters vigorously. Doing so will significantly degrade legibility.
Do not use any chemical cleaners. They can harm the plastic shell. If necessary, a small
amount of mild surface or window cleaner can be applied to the cloth, but do not spray
the cleaner onto the Wireless Telephone or Charger.
Page 9
3410 Wireless Telephone User Guide
Tips For Use
Before you use the Wireless Telephone, the Battery Pack must be charged. See
Battery Packs.
You can only use the Wireless Telephone with your facility’s telephone system. It is
not a public cellular phone.
The PWR key turns the Wireless Telephone on and off. The START and END keys
begin and end calls. When you finish a call, press the END key, not the PWR key.
Keep the Wireless Telephone away from your ear when it is ringing.
The microphone is in the Wireless Telephone’s lower right corner. This is a sensitive
microphone that works well when the Wireless Telephone is correctly positioned on
your ear. There is no need to speak directly into the microphone, but do not cover it
with your hand or cheek when talking on the Wireless Telephone.
The Wireless Telephone’s LCD panel displays information about the status of your
Wireless Telephone and prompts you about features.
If the Wireless Telephone’s Battery Pack is low, you will hear a soft beep and see the
BATT or Low Battery message in the display.
Improper disposal of Battery Packs can damage the environment. Dispose of batteries
properly.
You can control the Wireless Telephone’s volume level and the type of ring. See
Setting User Preferences.
To protect the Wireless Telephone, use a carrying case.
NOTE:
It is recommended that standard acceptance procedures be followed prior to operating
this equipment in proximity of life-support systems.
To minimize risk of interference, pacemaker users should not carry the Wireless
Telephone next to the pacemaker.
Operation of the Wireless Telephone may produce an audible noise noticeable to hearing
aid users. It is recommended that a SpectraLink headset be used by hearing aid users.
© 2002, Avaya Inc.
Page 10