1
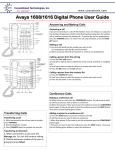
CTI INSIGHT www.consoltech.com 9630/9640 IP Phone User Guide AVAYA 9630 IP Phones AVAYA 9640 IP Phones Making a Call 1. Lift the handset, press [Speaker], or select an available line and press [OK] in the center of the phone. 2. Dial [9] followed by the number. Answering a call 1. Pick up the handset or, 2. Press the Speaker button located on the bottom of the left side of the phone or, 3. Press the black button underneath [Answer]. 4. You may also press the black button underneath [Ignore] to stop the phone from ringing. The caller will still hear ringing and eventually go to voicemail. 5. Additionally, you may press the black button [ToVM] to send the call directly to voicemail. Putting a Call on Hold (Hold will appear on the bottom of the display once you are on an active call). 1. Press the black button underneath [Hold]. (The [Resume] button will replace the [Hold] button on the bottom of the display. 2. Press the black button underneath [Resume] or use the up & down arrows in the center of the phone and press [OK]. 3. To connect to another call while on a call make sure you sure you put the first call on hold first. 4. As soon as you put the first call on hold you can press the black button underneath [Answer] to answer the call. 5. You will then use the up & down arrows in the center of the phone to retrieve the call from hold. You may either press the [OK] or the [Resume] button. Transferring a Call (Transfer will appear on the bottom of the display once you are on an active call). 1. Once you have the caller press the black button underneath [Transfer] and dial the telephone number, call the person from the Contacts list, or call the person from the Call Log list. 2. Press the black button underneath [Complete]. 3. To cancel a transfer, press [Cancel] and use the up & down arrows to return to the caller. Conference Calls (With Conference you can have up to 6 people including yourself). 1. Once you are on active call, press the black button underneath [Conference]. 2. Dial the telephone number, call the person from the Contacts list, or call the person from the Call Log. 3. Press the black button underneath [Join] to add the new person to the existing call. 4. If the person you are trying to contact is unavailable, press [Cancel] and return to the original caller. 5. Press the up & down arrows to return to the caller and press the button underneath [Resume] or press [OK] in the center of the phone. 6. To add additional people to you conference call, repeat steps 1 through 5. Adding a person on hold to a conference call 1. Press the black button underneath [Hold] to put the existing call on hold. 2. As soon as you put the first call on hold you can press the button underneath [Answer] to answer the second call or press the RED flashing button to the right of the display. 3. To join the two calls together press the black button underneath [Conference]. 2. Press the RED flashing button to the right of the display to retrieve the person on hold. Alternatively, you may also use the up & down arrows in the center of the phone. Press the button underneath [Resume] or [OK] in the center of the phone to select the caller on hold. 3. Press the black button underneath [Join] to conference in both callers. Disconnecting the last person from a conference call ► Press the black button underneath [Drop]. Contacts (250 Entries) Calling a person from the Contacts list 1. Press the [Contacts] button located next to the key on the dial pad. 2. Press the white button to select the person you wish to call. Alternatively, you may use the up & down arrows in the center of the phone to find the person you wish to call. 3. Press the black button underneath [Call] or [OK] in the center of the phone or press the White button to select the person you wish to call. . 4. If you have more than one number for a contact press the button underneath [Details] to view additional numbers you may have entered for that contact. 5. Use the up & down arrows in the center of the phone and then press the black button underneath [Call] or [OK] in the center of the phone to select the correct number you want to call. Adding a new contact (using the up & down arrows) 1. Press the [Contacts] button located next to the key on the dial pad. 2. Press the button underneath [New]. 3. Enter the name using the dial pad but pressing the number keys multiple times until you see have the correct letter on the display. ► Pause before entering the next character if the characters are on the same key. ► Enter remaining letters or numbers. ► Press Bksp to delete the last character. ► Press the button underneath [More] --> Abc to change between upper and lower case letters or to enter numbers. ► Press ABC again to cycle through the options (Abc/123/abc/ABC) until the type you want to use is displayed. ► Press button underneath [More] --> Symbols to enter characters that are not on your dial pad. ► Select the symbol you want to use. ► Press [OK] in the center of the phone to select the symbol. ► Press the button underneath [Clear] to delete all text and start over. ► Select the next field. ► Enter the telephone number. 4. By using the up & down arrows in the center of the phone you can enter up to 2 more additional numbers per contact. ► Press the button underneath [Save] or [OK] in the center of the phone. Editing a contact 1. Press the [Contacts] button located next to the key on the dial pad. 2. Press the white button to select the person you wish to edit. Alternatively, you may use the up & down arrows in the center of the phone to find the person you wish to edit. 3. Press the black button underneath [More] --> [Edit]. 4. Choose the field you want to edit use the dial pad and softkeys to make changes to the contact information. 6. Press the black button underneath [Save] or [OK] in the center of the phone. Call Log Calling a person from the call log 1. Press the [Call Log] button. 2. Use the left or right arrows to select the list you wish to view i.e. Missed, Answered, and Outgoing. 3. Select the person or the number you wish to view or call. 4. If you want to view caller information, such as time and date press the black button underneath [Details] otherwise press the black button underneath [Call] or [OK] in the center of the phone. Adding an entry from the call log to your Contacts list 1. 2. 3. 4. 5. Press the [Call Log] button. Use the left or right arrows to select the list you wish to view i.e. Missed, Answered, and Outgoing. Select the number you want to add to your Contacts list then press the black button underneath [+Contact]. Edit the name and telephone number, if necessary. Press the black button underneath [Save]. Setting Redial Options By default the system is set to redial the last number dialed. To change this option to view a list of resent numbers: 1. Press the [Menu] located next to the key on the dial pad. 2. Select Options & Settings by pressing the White button next to it, (You may also use the up & down arrows in the center of the phone or press [OK] in the center of the phone). 3. Select Call Settings, (you may need to use the up & down arrows in the center of the phone or press [OK] in the center of the phone). 4. Press the white button next to [Redial] to change from [One Number] to [List]. (You may also use the up & down arrows in the center of the phone to select [Redial], then press [OK] in the center of the phone. 5. Press the black button underneath [Change] from [One Number] to [List]. 6. Press the black button underneath [Save]. Turning Off Button Clicks 1. Press the [Menu] located next to the key on the dial pad. 2. Press the white button next to option & settings, (You may also use the up & down arrows in the center of the phone) and then press [OK] in the center of the phone. 2. Press the white button next to select Screen & Sound, (You may also use the up & down arrows in the center of the phone) then press [OK] in the center of the phone. 4. Use the up & down arrows in the center of the phone to select [Button Clicks], then press [OK] in the center of the phone. 5. Press the black button underneath [Change] to turn sounds on and off. 6. Press the black button underneath [Save]. Change Ring Pattern 1. Press the [Menu] located next to the key on the dial pad. 2. Press the white button next to Screen & Sound, (You may also use the up & down arrows in the center of the phone) and then press [OK] in the center of the phone. 3. Press the white button next to Personalized Ringing, (You may also use the up & down arrows in the center of the phone) and then press [OK] in the center of the phone. 4. Press the black button underneath [Change] to see a list of available ring patterns. 5. Press the black button underneath [Play] or [OK] to hear it again 5. Press the black button underneath [Save]. Editing Button Labels 1. Press the [Menu] located next to the key on the dial pad. 2. Press the white button next to Options & Settings, (You may use the up & down arrows in the center of the phone) then press [OK] in the center of the phone. 3. Press the white button next to [Application Settings], (you may need to use the up & down arrows in the center of the phone) then press [OK] in the center of the phone. 4. Press the white button next to [Personalized Labels]. Alternatively, you use the up & down arrows in the center of the phone to select [Personalized Labels], then press [OK] in the center of the phone. 5. Select the button you wish to re-label by pressing the white button next to it or you may press the right or left arrow from the navigation wheel. 6. Press the black button underneath [Edit]. 7. Enter the new name in the Label field by using the dial pad but pressing the number keys multiple times until you see have the correct letter on the display. 6. Press the black button underneath [Save]. Logging out your extension 1. Press the [Menu] located next to the key on the dial pad. 2. Press [Log out], then press the button underneath [Enter] or press [OK] in the center of the phone. 3. Press [Log out], to confirm. Logging in with your extension 1. At the Login prompt enter your extension. 2. Press [Enter] or [OK]. 3. Enter your password, 1234. 4. Press [Enter] or [OK]. Note: If the Login prompt is not displayed on the phone follow the steps from “Logging out your extension”. *Selective Features differ per system and per phone. *Send all calls 1. From the Phone (Main) screen, press the button underneath [SendCalls] to send all your calls to voicemail. 2. When the feature is activated the button will be displayed with a check mark i.e. [SendCalls] 3. From the Phone (Main) screen, press the button underneath [SendCalls] to deactivate. *Call Forward 1. Press the [Call Fwd] button. You will hear dial tone. 2. Enter the forwarding number. You will hear a confirmation tone. The light next to the button will turn on. To deactivate Call Forward 1. Press the [Call Fwd] button. You will hear dial tone. *Transfer Direct to Voicemail (This feature bypasses the ringing processes and goes straight to voicemail) 1. Once you have the call, press the black button underneath [Transfer]. 2. Press [DirectVM]. 3. Enter the extension number once you hear the announcement instructing you to do so. 4. Hang-up right away so the caller can hear the beginning of the voicemail greeting. *Using Direct To Voicemail to Call Others 1. Press [DirectVM]. 2. Enter the extension number once you hear the announcement instructing you to do so. 3. Leave your message after the tone. *Call Park (This feature allows you to put a call on hold within the system and retrieve from any other phone within your system) 1. Once on a call press [Call Park]. You will hear a confirmation tone. Note: The call is “Parked” on your extension. 2. Hang-up. You may now make a page to locate the person you wish to transfer the call to or retrieve the call from another extension. 3. To retrieve the call from any other extension, press the [PARK ANS BK] button (button label may vary), followed by the extension number of where the call was “Parked” or enter the Park Access code followed by the extension number of the originating extension. 4. If you want to retrieve the call from the originating extension, press the [PARK] button. *Busy Indicator (This features allows users to see when other users are on an active call). 1. If you are on a call and you wish to transfer it, press the black button underneath [Transfer]. 2. Press the busy button associated with the caller you want to transfer the call to, (This may appear on your side-car) 3. Press the button underneath [Transfer]. (You may transfer a call even if the user is on an active call.) Note: You can also use these buttons to call the user without dialing their extension. They are speed-dials for that user. *Bridge Appearance* (B/A: This feature allows you to have a physical appearance of another phone on your phone.) If you have this feature programmed on your phone you may be covering for someone else. To answer a call you will see the information coming into that “bridged” call you will see it on the top of your display. You can put the call on hold right on that line and the other individual can pick up the call from their phone. You can put the call into voicemail: 1. Press the button underneath [Transfer]. 2. Press [DirectVM]. 3. Enter the extension number once you hear the announcement instructing you to do so. 4. Hang-up right away so the caller can hear the beginning of the voicemail greeting. *EC500 (Your desk phone and mobile device will both ring when this feature is activated). Activate Press the [EC500] button. All calls will ring on both the desktop phone and mobile device. Deactivate Press the [EC500] button. All calls will only ring on your desk phone. Extend Call (Once on a call from your desk phone you can transfer it to your mobile device). 1. While on a call on your the desktop phone press [Extend Call]. 2. Wait for the mobile device to ring then answer the call. 3. Hang-up the desk top call. Continue Call on Desktop Phone If the call came into the office extension and the call is answered on the mobile device you may continue the call on the desktop phone by pressing the call appearance button that has the phone icon or light turned on. *Page You may have a [Page] button programmed that will allow you to either page through the phones or overhead. If you are paging through the phone, the user will only hear it as long as they are not on a call. To activate a [Page], press the [Page] button. Once the page is complete hang up the phone. *Company Directory 1. Press the [Directory] button. 2. Enter the user’s last name, for example for Smith press [7], then [6] to spell out SM. 3. Keep spelling out the name. 4. Press [Next] if there are multiple matches. 5. When you have reached the name, press [Make Call]. *Speed Dial (There are buttons that are labeled as SD on certain buttons. These are known as personal Speed Dials) 1. To programmed this feature press the button that is labeled as [abr-prog]. 2. Select the button you wish to program that is marked as [SD]. 2. Enter the phone number, remember to enter the number beginning with a [9] if it’s an outside call, followed by [#]. 3. Enter the name, which is limited to four digits. *Posted Messages (With these feature you can inform your co-workers of you status throughout the day, i.e. (Out to lunch, In a meeting) 1. Press the ◄or► arrows to navigate to the feature screen to highlight [Post Msg] and press the button underneath [Select] or [OK]. 2. Press it multiple times to find the message you wish to post. 3. Once you have found the posted message, press the [#] sign. 4. To turn this feature off press the ◄or► arrows to navigate to the feature screen to highlight [Post Msg] and press the button underneath [Select] or [OK] again.