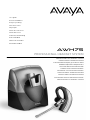
1
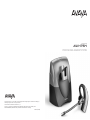
USER GUIDE
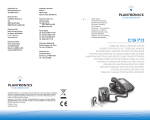
AWH75
PROFESSIONAL HEADSET SYSTEM
© 2006 Plantronics, Inc. All rights reserved. Avaya and the Avaya Logo are trademarks of Avaya, Inc.
and may be registered in certain jurisdictions.
IntelliStand, SupraElite, and the voice tube clear color trade dress are trademarks or registered
trademarks of Plantronics, Inc.
Patents U.S. 5,210,791; 6,735,453; D469,756; D505,413; D512, 984; Australia 147229; France 651,857651,865; Germany 40108524.4; GB Regd.Des.No. 2104923 and Patents Pending
73870-01 (11.06)
Printed in China
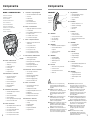
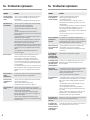
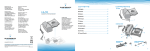
Table of Contents
Components
Components
3
Setup 1–5
6
IntelliStand
10
Charging
11
Positioning
11
Adjusting Fit
12
Multi-shift Pairing
12
Making/Answering/Ending Calls
13
Checking Compatibility
15
Volume
16
Headset Controls
18
Base Indicator Lights
19
Troubleshooting
20
Subscription
22
System Reset
22
Maintenance
22
Voice Tube Replacement
22
Battery Replacement
23
Accessing UCC
24
Technical Assistance
25
Regulatory Notices
25
Headset
Eartips
Spare Voice Tube
Base
AC Charger
25
Base
Telephone Cord
27
29
2
Ring Detector
D + M Filter Cord
30
28
24/46 Hookswitch
Control Cord
8400 Hookswitch
Control Cord
31
9600 Hookswitch
Control Cord
3
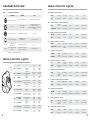
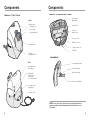
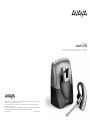
Components
Components
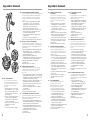
Base - Underside View
Base - Top View
Speak Volume
Major Adjust
Front:
Indicator Lights
Handset Jack
Talking (Green)
Power (Red)
AC Power
Adapter Jack
Charging (Amber)
Accessory Jack
Ring Detector Jack
Charging Cradle
Telephone Base Jack
EU24/ADJ
Telephone
Configuration Dial
Headset
Rear:
Speaking Volume
Minor Adjust
IntelliStand™
On/Off Switch
(to automate
call control button)
Listening Volume/Mute
Call Control Button
Talk Indicator Light
Voice Tube
Listening Volume
Major Adjust
Telephone Cord
NOTE: Please refer to the separate Safety Instructions booklet for
important product safety information prior to installation or use of
the product.
4
5
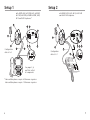
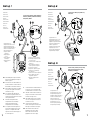
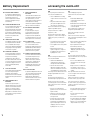
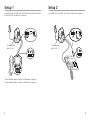
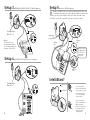
Setup 1
Setup 2
with AVAYA 2420, 4610SW, 4620, 4620SW,
4621SW, 4622SW, 4625SW 4630SW, 5420,
5610 and 5620 telephones*
with AVAYA 2410, 4630, 5410, 6416 D+M
and 6424 D+M telephones
1
1
26
5
7
7
24
24
4
Configuration
dial set to 3
28
28
25
24
25
4
25
27
29
24
27
Configuration
dial set to 1
29
See pages 3, 4,
and 5 for callout
of components
*24xx and 54xx phones require 4.0 firmware or greater.
46xx and 56xx phones require 1.8 firmware or greater.
6
7
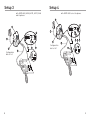
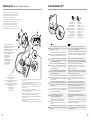
Setup 3
Setup 4
with AVAYA 8403, 8405, 8410D, 8411D, 8434
and telephones
with AVAYA 9600 series telephones
1
7
1
24
7
24
25
27
31
24
4
27
30
4
Configuration
dial set to 3
8
27
24
Configuration
dial set to 1
31
27
9
Setup 5
Charging
with other AVAYA telephones
Caution: It is important for correct and safe operation that the base cord
is installed into the proper jack of your telephone. Follow these instructions
carefully, especially if your telephone has two jacks where the handset was
attached. Be sure to note or mark which jack was used for the handset.
1
1
6
7
1. Slide the headset into the charging
cradle. The earpiece with the microphone goes into the cradle.
2. Gently press down on the the headset to ensure that the headset is in
the correct position. The amber
charge indicator light on the base
will flash while charging and will
change to solid amber when fully
charged.
24
Configuration
Dial
{see page 15}
2
24
4
Optional
Lifter
25
Optional
Lifter
Be sure to connect
this plug into the
jack where the
handset was
connected.
S
ONIC
NT R
PLA
• 20 minutes = minimum charge
to continue setup
• 3 hours = full charge
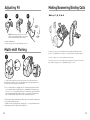
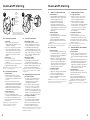
Positioning
NICS
PLANTRO
12
Optional
Lifter
”
6“
IntelliStand™
IntelliStand™
off
IntelliStand
on
10
Set the IntelliStand
switch to IntelliStand off
( –) if you want to control
the handset lifter with
the call control button
on your headset.
Set the IntelliStand
switch to IntelliStand on
( = ) if you want the
handset to automatically
pick up when you take
the headset off the
charging cradle.
The minimum recommended separation distance is shown above.
IMPORTANT: Incorrect positioning can cause noise and interference problems.
11
Adjusting Fit
1
Making/Answering/Ending Calls
2
3
Setup 1, 2, 3 & 4
1
2
NOTE: Depending on your preference, you can
replace the pre-installed leatherette ear cushions
with the included alternative foam cushions.
1. Adjust headband to fit.
2. Rotate voice tube until it is pointed towards your chin.
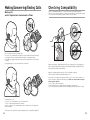
Multi-shift Pairing
To make a call, press call control button. Dial tone should sound through headset
(If not, check compatibility—see Setup 1, 2, 3 & 4). Dial using the telephone keypad.
2
1
To answer a call, press the call control button on the headset.
To end a call, press the call control button on the headset. If either you or the recipient
have trouble hearing, please check compatibility (Setup 1, 2, 3 & 4).
Enable
Disable
OR
OR
1. To pair another headset to the same base, you must first enable the multi-shit
pairing feature. Long press (5 sec.) the speaking volume minor adjust up button on
back of the base until the power indicator flashes.
2. Place a charged headset in charging cradle. The red indicator light on base will flash
for 2 seconds if the multi-shift pairing feature is enabled.Within 10 of doing so, press
either the “+” or”-” listening volume button for 3 seconds until the green talk indicator
lights to indicate pairing mode and goes out after successful pairing. Repeat steps 1
and 2 if headset and base do not link when call control button is pressed.
NOTE: Only the last paired headset will work with the base. You must NOT be in talk mode (on
a call) to enable or disable this feature.
To disable the multi-shift pairing feature, long press (5 sec.) the speaking volume minor
adjust down button until the power indicator light flashes.
12
13
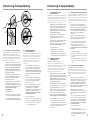
Making/Answering/Ending Calls
Checking Compatibility
NOTE: The compatibility setting of “1” is set at the factory to work with most phones.
However, if you do not hear a dial tone, if either you or the recipient is having trouble hearing,
or if you experience buzzing/hissing, please follow the directions below.
Setup 5
with Optional Handset Lifter
2
2
3
4
1
2
4
1
3
1
First, test proper set up of the handset lifter.
1. Press the call control button on headset to activate handset lifter and lift handset
from phone. Dial tone should sound if the handset is raised high enough.
2. If no dial tone, adjust handset lifter height switch or reposition the lifter under the
handset.
Use mounting tape to secure the handset lifter in position.
Adjust your telephone configuration dial on the base to position 3 for the following telephones: 2420, 4610SW, 4620, 4620SW, 4621SW, 4622SW, 4625SW, 4630SW, 5420, 5610,
5620, 8403, 8405, 8410D, 8411D and 8434.
Adjust the configuration dial to position 1 for the following telephones:
2410, 4630, 5410, 6416D+M, 6424D+M, and 9600 series.
2
1
If you cannot hear a dial tone through your headset, use a coin or small screwdriver to
turn the telephone configuration dial until you can. Make sure that a number is aligned
with the position indicator.
1. Place a call to someone you know.
2. While speaking, turn the configuration dial through the four positions.
3. Select the position that provides the best sound quality for both you and the recipient.
To make/answer a call:
1. Press the call control button to raise the handset lifter.
2. Use the telephone keypad to dial the number.
To end a call, press the call control button to lower the handset lifter. The handset will
return to the base.
If either you or the recipient have trouble hearing, please check compatibility (page 15).
14
15
Listening Volume
Speaking Volume
NOTE: Be sure to set your telephone’s volume at the mid range before adjusting
the AWH75 volume.
Minor Adjust
Major Adjust
Push on the “+” and “–” buttons to adjust
listening volume in minor incremental
adjustments.
NOTE: You must be in talk mode (i.e. on a
call) to adjust.
Use listening volume major adjust
control on the back of the base for
large incremental adjustments.
NOTE: 1 is the loudest setting.
4 is the lowest setting.
Minor Adjust
Major Adjust
Use the speaking volume minor adjust
control on the back of the base for
minor incremental adjustments.
Use the speaking volume major adjust
control on the bottom of the base for
large incremental adjustments.
NOTE: You must be in talk mode (i.e. on a
call) to adjust.
NOTE: A is the lowest setting.
B is the most common setting.
D is the loudest setting.
Headset Mute
To mute headset, long press the volume
down button (3 seconds). Press again to
unmute.
Talk indicator light on base will flash
while muted.
You will hear 3 rapid beeps every 30
seconds to indicate that mute is on.
16
17
Headset Controls
Base Indicator Lights
Indicator Lights
Talking/Muted (Green)
Power (Red)
Charging (Amber)
N/A
N/A
Feature
Action
Tone
Listening volume
minor adjust
Press + to increase
or – to decrease
Ascending/descending
tones, 2 tones at limit
Mute
Long press – key
(3 seconds)
3 mid tones = Mute
3 low tones = Unmute
NOTE: Tones repeat every
30 seconds when muted.
Answering/
ending calls
Short press call
control button
Mid tone
Low battery
warning
Replace headset in
charging cradle
1 tone every 10
seconds
Out of range
warning — when
on active call
Move closer to base
2 tones
Incoming call
notification*
Press call control
button to answer call
3 repetitive tones
Action
Light
Charging
Flashes amber
Fully Charged
Solid amber
Power
Solid red
Talking
Solid green
Muted
Flashes green
* For some phone models, this only works when using
either the optional Headset Lifter or the Ring Detector.
18
19
Troubleshooting
ProblemProblem
SolutionSolution
I pluggedI everything
in but in but
the AC
charger
is connected
to the base
• Check that
plugged everything
• Check
that
the ACjack
charger
jack is connected
to unit.
the base unit.
the lightsthe
won’t
come
on.come on.• Check that
lights
won’t
the AC
charger
securely
connected
to a
• Check
that
the ACischarger
is securely
connected
to a
working wall
outlet.
working
wall outlet.
• Check that
the
AC
charger
is
the
model
supplied
by
Avaya.
• Check that the AC charger is the model supplied by Avaya.
• Check that
the phone
is connected
to the base
phone
• Check
that the
phone is connected
to unit’s
the base
unit’s phone
My headset
not does
worknot work
My does
headset
cord jackcord
and itjack
is pushed
firmly. in
(Setup
5 only)
and it isinpushed
firmly.
with the base
unit.base unit.
with the
• Check that
the phone
handset
connected
to the base’s
• Check
that the
phoneis
handset
is connected
to the base’s
phone handset
and itjack
is pushed
firmly. in firmly.
phonejack
handset
and it isinpushed
• Headset• may
be
out
of
range
of
the
base.
Move
closer
to closer to
Headset may be out range of the base. Move
base unitbase
until unit
headset
within range.
Range
varies
with
untilisheadset
is within
range.
Range
varies with
office environment.
office environment.
• Headset• battery
dead. Recharge
the battery
placingby placing
Headsetisbattery
is dead. Recharge
thebybattery
the headset
the headset
cradle. See
pageSee
11. page 11.
thein
headset
in thecharging
headset charging
cradle.
• Listening
volume too
low. Press
thePress
volume
buttonup
onbutton
the on the
• Listening
volume
too low.
theup
volume
headset. headset.
If the volume
still tooislow,
another
If theisvolume
stillselect
too low,
select another
listening listening
volume major
adjust
switch
setting.
pageSee
16. page 16.
volume
major
adjust
switchSee
setting.
• Incorrect
configuration
dial setting
your phone.
otherTry other
• Incorrect
configuration
dialfor
setting
for yourTry
phone.
phone configuration
dial settings
the base
Ensure
phone configuration
dial on
settings
on unit.
the base
unit. Ensure
the selected
number isnumber
in line with
the position
the selected
is in line
with theindicator.
position indicator.
See pageSee
15. page 15.
• You may• have
to resubscribe
your headset
the base.
You may
have to resubscribe
yourwith
headset
with the base.
See pageSee
22. page 22.
muted.isPress
thePress
mute the
button
onbutton
headset
Callers cannot
me.hear me.• Headset• is
Headset
muted.
mute
onto
headset to
Callershear
cannot
unmute the
microphone.
See pageSee
16. page 16.
unmute
the microphone.
• Speak volume
too low.isIncrease
the speaking
volume byvolume by
• Speakisvolume
too low. Increase
the speaking
adjustingadjusting
the speaking
volume minor
adjust
buttons
the on the
the speaking
volume
minor
adjuston
buttons
base unitbase
as described
on
page
17.
If
the
volume
still toois still too
unit as described on page 17. If theisvolume
low, select
another
volume major
adjust
setting
low,
selectspeaking
another speaking
volume
major
adjust setting
as described
on page 17.
as described
on page 17.
• Incorrect
configuration
dial setting
your phone.
• Incorrect
configuration
dialfor
setting
for yourTry
phone. Try
other phone
configuration
dial settings
the base
other
phone configuration
dial on
settings
on unit.
the base unit.
Ensure the
selected
number isnumber
in line with
Ensure
the selected
is in the
lineposition
with the position
indicator.indicator.
See pageSee
15. page 15.
I can hearI can
a dial
tone
in tone in
hear
a dial
more than
one than one
more
configuration
position. position.
configuration
Phone will
workwill
in more
one than
configuration
dial
Phone
workthan
in more
one configuration
dial
position. position.
Use the position
sounds
to you
andtothe
Use thethat
position
thatbest
sounds
best
you and the
person you
call. you call.
person
I cannot hear
a dial
tone
in tone•inCheck that
the phone
is connected
to the base’s
phone
I cannot
hear
a dial
• Check
that the
phone is connected
to the
base’s phone
Seejack.
pages
6–10.
See
pages 6–10.
any configuration
position. position.cord jack.cord
any configuration
• Check that
the phone
handset
connected
to the base’s
• Check
that the
phoneis
handset
is connected
to the base’s
phone handset
(Setup
5 only)
See page
10.
phonejack.
handset
jack.
See pages
6–10.
I cannot hear
caller/dial
tone. •tone.
Check that
all cords
andcords
jacksand
arejacks
connected
correctly.correctly.
I cannot
hear caller/dial
• Check
that all
are connected
• Check that
the base
power
(red
indicator
light) andlight) and
• Check
that has
the base
has
power
(red indicator
the headset
fully charged.
thebattery
headsetisbattery
is fully charged.
• Try other
phone
configuration
dial settings
the base
• Try
other
phone configuration
dial on
settings
on the base
unit. Ensure
selected
number isnumber
in line with
unit.the
Ensure
the selected
is in the
line with the
position indicator.
See pageSee
15. page 15.
position indicator.
• Ensure•you
are inyou
headset
Press
thePress
talk button
tobutton to
Ensure
are inmode.
headset
mode.
the talk
select correct
The
talk indicator
light on the
base
selectmode.
correct
mode.
The talk indicator
light
on the base
is green. is green.
20
Troubleshooting
ProblemProblem
SolutionSolution
Sound in Sound
handset
volume byvolume
changing
the speaking
volume volume
• Reduce•speaking
in is
handset is
Reduce speaking
by changing
the speaking
switch
setting.
pageSee
17. page 17.
echo in echo in major adjust
distorted/hear
major
adjust
switchSee
setting.
distorted/hear
handset.handset.
towards your
chin.your chin.
• Point microphone
• Point microphone
towards
volume too
high on
your phone
has
a
• Listening
• Listening
volume
toophone.
high onIf phone.
If your
phone
has a
handset volume
thislower
until this
the distortion
handsetcontrol,
volumelower
control,
until the distortion
disappears.
disappears.
• If the distortion
is still present,
thelower
listening
volume volume
• If the distortion
is still lower
present,
the listening
adjust button
onbutton
the headset.
If the distortion
persists, persists,
adjust
on the headset.
If the distortion
select another
volume major
adjust
switch
selectlistening
another listening
volume
major
adjust switch
setting. See
pageSee
16. page 16.
setting.
• Base is•too
close
to computer
or phone.orSee
pageSee
11 for
Base
is too
close to computer
phone.
page 11 for
proper positioning.
proper positioning.
• System•needs
to be
reset.
Perform
system reset
as reset as
System
needs
to be
reset. Perform
system
describeddescribed
on page 22.
on page 22.
SpeakingSpeaking
volume isvolume
too high.
Lower
theLower
speaking
volume byvolume by
I can hearI can
too much
is too
high.
the speaking
hear too much
the speaking
volume minor
adjust
buttons
the on the
background
conversation,
the speaking
volume
minor
adjuston
buttons
background
conversation,adjustingadjusting
base. If the
volume
still tooishigh,
select
another
base.
If theisvolume
still too
high,
selectspeaking
another speaking
noise or sidetone.
noise or sidetone.
volume major
adjust
setting.
pageSee
17. page 17.
volume
major
adjustSee
setting.
People I talk
to can
hear
a hear•aAC charger
plugged
a power
Plug
the AC
People
I talk
to can
• ACischarger
is into
plugged
intostrip.
a power
strip.
Plug the AC
the wall
buzz in the
background.
charger
intodirectly.
the wall directly.
buzz
in the background. charger into
• Picking•up
another
frequency.
Call the Avaya
Headset
Picking
upradio
another
radio frequency.
Call the
Avaya Headset
HelpdeskHelpdesk
for an RFfor
filter.
an RF filter.
Battery talk
timetalk
performance
Battery isBattery
going bad.
Replace
battery
a new
Battery
time performance
is going
bad. the
Replace
thewith
battery
with a new
is significantly
degradeddegraded
even
battery pack.
Seepack.
pageSee
23. page 23.
is significantly
even
battery
after a full
recharge.
after
a full recharge.
The call is
dropped.
(Talk
subscription.
Try to reset
system.
Headset
lost subscription.
Trythe
to reset
theSee
system. See
The
call is dropped.
(Talk Headset lost
page 22. If
this22.
does
not work,
trywork,
the resubscription
indicatorindicator
on the headset
page
If this
does not
try the resubscription
on the and
headset and
procedure
on page 22.
base willbase
not be
illuminated.)
procedure
on page 22.
will
not be illuminated.)
I hear static
that
doesthat
not does not
• Link to •headset
lost. Try
reestablish
a link by pressing
I hear
static
Link toisheadset
is to
lost.
Try to reestablish
a link by pressing
allow meallow
to communicate.
button.
me to communicate.the headset
thetalk
headset
talk button.
• Unplug•the
AC charger
the from
base for
seconds,
then
Unplug
the ACfrom
charger
the 7base
for 7 seconds,
then
plug backplug
in. back in.
• Reset the
wholethe
system
described
on page 22.
• Reset
wholeassystem
as described
on page 22.
• One beep
every
10 seconds
causedisbycaused
a low battery
I hear beeps
in the
headset.
• One
beep
every 10 is
seconds
by a low battery
I hear
beeps
in the headset.
warning. warning.
RechargeRecharge
battery bybattery
returning
it to the base
by returning
it to the base
charge cradle
forcradle
one tofor
three
until
charge
stays
charge
onehours
to three
hours
untillight
charge
light stays
lit or quitslitblinking.
or quits blinking.
• Two beeps
is an
out of
closer
to the
base.
• Two
beeps
isrange
an outwarning.
of range Move
warning.
Move
closer
to the base.
• Three rapid
beeps
every
30 seconds
your muteyour
is mute is
• Three
rapid
beeps
every 30 indicates
seconds indicates
on. Presson.
thePress
mute the
control
once dial
to turn
mute
off.mute off.
mutedial
control
once
to turn
• When an
optional
is connected,
three repetitive
beeps beeps
• When
an lifter
optional
lifter is connected,
three repetitive
indicate aindicate
call is coming
the headset.
Press thePress
talk the talk
a call isinto
coming
into the headset.
button onbutton
the headset
answertothe
call. the call.
on theto
headset
answer
Handset lifter
is installed
power
cord
is firmly
Handset
lifter is installed Be sure the
Be handset
sure thelifter
handset
lifter
power
cord pushed
is firmlyinto
pushed into
but does but
not does
lift handset.
jacklifter
on the
base.
not lift handset. the handset
thelifter
handset
jack
on the base.
My handset
operates
My lifter
handset
lifter operatesIntelliStand
is enabled.
To disableTothe
handset
move
IntelliStand
is enabled.
disable
thelifter,
handset
lifter, move
every time
I remove
every
time Ior
remove or the IntelliStand
switch toswitch
position
.
the IntelliStand
to position
.
replace my
headset
the in the
replace
my in
headset
base unit.base unit.
21
Subscription
Battery Replacement
The headset and base unit are supplied subscribed to each other. However, if you wish
to use a replacement headset with the base unit, then the units must be re-subscribed.
To do so, please follow the instructions on page 12 for Multi-Shift Pairing.
The custom battery supplied should last 2– 3 years. When talk time decreases
significantly, you should replace the battery. Call Plantronics at (800) 544-4660
ext. 5538 for information on sending back to factory to install new battery.
System Reset
1
1
To recover from some fault conditions (refer to the Troubleshooting Section), you may need
to perform a system reset. To perform the system reset, follow this procedure:
2
1
3
4
4
1. Simultaneously press the call control button and both the "+" and "–" volume buttons
for 5 seconds. When the talk indicator light on the headset blinks, release all buttons.
2. Press the call control button again. The talk indicator light will again blink briefly to
indicate the headset is back to normal operation mode.
3. Disconnect the AC charger from the AC charging jack for 5 seconds.
4. Reconnect.
The system reset operation is complete.
Maintenance
1. Replace voice tube every 6–9 months (voice tube models only).
2. Unplug the unit from the telephone and the AC charger from the power source before cleaning.
3. Clean the equipment with a damp (not wet) cloth.
4. Do not use solvents or other cleaning agents.
22
23
Accessing the Avaya Unified
Communication Center (UCC)
from the AWH75
1. Connect the AWH75 to the Avaya telephone. Follow the instructions in
this user guide.
2. Ask your switch administrator to configure your telephone for ringdown to the UCC
in your telephone first call appearance.*
* Notes for switch administrators on configuring ringdown for your AVAYA telephones:
• Some phones allow for direct ringdown configuration, i.e. 2500.
• Other phones do not allow for direct ringdown configurations, i.e. 64XX. In order
to configure the ringdown in these phones, the administrator needs to:
• Create a phantom extension setup as a 2500 type.
(No real port has to be assigned.)
• Create a ringdown to the UCC for the phantom extension.
• Bridge the phantom extension to the telephone call appearance 1
(configure it as an “abrdg-appr” and setup the “Auto Select Any Idle Appearance”
to Yes).
Technical Assistance
The Avaya Headset Helpdesk is ready to assist you! Dial (800) 544-4779, or
visit the support section of our website at www.avayaheadsets.com.
Regulatory Notices
FCC Requirements – Part 15
This device complies with Part 15 of the FCC Rules. Operation is subject to the following two conditions:
1. This device may not cause harmful interference, and
2. This device must accept any interference received, including interference that may cause
undesired operation.
This equipment has been tested and found to comply with the limits for a Class B digital device, pursuant to Part 15 of the FCC Rules. These limits are designed to provide reasonable protection against
harmful interference in a residential installation. This equipment generates, uses, and can radiate
radio frequency energy and, if not installed and used in accordance with the instructions, may cause
harmful interference to radio communications. However, there is no guarantee that interference will
not occur in a particular installation. If this equipment does cause harmful interference to radio or
television reception which can be determined by turning the radio or television off and on, the user is
encouraged to try to correct interference by one or more of the following measures:
1. Reorient or relocate the receiving antenna.
2. Increase the separation between the equipment and receiver.
3. Connect the equipment into an outlet on another circuit.
4. Consult the dealer or an experienced radio/TV technician for help.
FCC Requirements – Part 68
This equipment complies with Part 68 of the FCC rules and the requirements adopted by ACTA. On
the exterior of this equipment is a label that contains a product identifier in the format
US:AAAEQ##TXXXX. If requested, this information must be provided to your telephone company.
A plug and jack used to connect this equipment to the premises wiring and telephone network must
comply with the applicable FCC Part 68 rules and requirements adopted by ACTA. A compliant telephone cord and modular plug is provided with this product. It is designed to be connected to a compatible jack that is also compliant. See installation instructions for details.
The REN is useful to determine the quantity of devices you may connect to your telephone line.
Excessive RENs on a telephone line may result in the devices not ringing in response to an incoming
call. In most, but not all areas, the sum of the RENs should not exceed five (5.0). To be certain of the
number of devices you may connect to your line, as determined by the REN, contact your local telephone company. For product approved after July 23, 2001, the REN for this product is part of the
product identifier that has the format US:AAAEQ##TXXXX. The digits represented by ### are the
REN without the decimal point. (For example, 03 represents a REN of 0.3.) For earlier producers, the
REN is separately shown on the label.
If this telephone equipment causes harm to the telephone network, the telephone company will notify you in advance that temporary discontinuance of service may be required. But if advance notice
isn’t practical, the telephone company will notify the customer as soon as possible. Also, you will be
advised of your right to file a complaint with the FCC if you believe it is necessary.
The telephone company may make changes in its facilities, equipment, operations, or procedures
that could affect the proper functioning of your equipment. If they do, you will be notified in advance
in order for you to make necessary modifications to maintain uninterrupted service.
If trouble is experienced with this unit, for repair or warranty information, please contact customer
service at (800) 544-4779. If the equipment is causing harm to the network, the telephone company
may request that you disconnect the equipment until the problem is resolved.
DO NOT DISASSEMBLE THIS EQUIPMENT: it does not contain any user serviceable components.
We recommend the installation of an AC surge arrester in the AC outlet to which this equipment is
connected. Telephone companies report that electrical surges, typically lighting transients, are very
destructive to customer terminal equipment connected to AC power sources.
Exposure to RF Radiation
24
The internal wireless radio operates within the guidelines found in radio frequency safety standards and
recommendations, which reflect the consensus of the scientific community. Independent studies have
shown that the internal wireless radio is safe for use by consumers. Visit www.avayaheadsets.com for
more information.
NOTE: Modifications not expressly approved by Avaya could void the user's authority to operate the
equipment.
25
User guide
Benutzerhandbuch
Brugervejledning
Guía del usuario
Käyttöopas
Guide de l’utilisateur
Guida dell’utente
Gebruikershandleiding
Brukerhåndbok
Manual do Utilizador
Användarhandbok
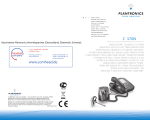
AWH75
PROFESSIONAL HEADSET SYSTEM
PROFESSIONELLES HEADSET-SYSTEM
PROFESSIONELT HEADSETSYSTEM
SISTEMA PROFESIONAL DE AURICULARES
AMMATTIKÄYTTÖÖN TARKOITETTU
KUULOKEJÄRJESTELMÄSYSTEME
D’OREILLETTE PROFESSIONNEL
SISTEMA DI CUFFIE PROFESSIONALE
PROFESSIONEEL HEADSETSYSTEEM
PROFESJONELT HODESETTSYSTEM
SISTEMA DE AURICULAR PROFESSIONAL
PROFESSIONELLT HEADSET-SYSTEM
Table of Contents
GB
Table of contents
DK
Components ..................................................5
Setup 1-5.......................................................10
IntelliStand . .................................................15
Charging........................................................16
Positioning....................................................18
Adjusting Fit..................................................19
Multi-shift Pairing........................................20
Making/Answering/Ending Calls .................23
Checking Compatibility . ..............................29
Volume .........................................................33
Headset controls . ........................................41
Base indicator lights . ..................................46
Troubleshooting............................................48
System reset.................................................70
Subscription .................................................72
Maintenance ................................................73
Voice tube replacement ...............................73
Battery replacement ....................................74
Accessing the Avaya UCC.............................75
DE
INHALTSVERZEICHNIS
Komponenten . ..............................................5
Einrichtung 1–5 . ..........................................10
IntelliStand . .................................................15
Laden der Batterie . .....................................16
Positionierung . ............................................18
Anpassen des Kopfbügels ...........................19
Multi-Shift-Paarung ...................................20
Tätigen/Annehmen/Beenden von Anrufen . 23
Überprüfen der Kompatibilität ....................29
Lautstärke . ..................................................34
Headset-Regler ...........................................41
Leuchtanzeigen an der Basisstation ..........46
Fehlerbehebung . ........................................50
Zurücksetzen des Systems . ........................70
Anmeldung . ................................................72
Pflege ...........................................................73
Austauschen des Sprechröhrchens ............73
Austauschen des Akkus . ............................74
Kontaktieren des Avaya Unified
Communication Center (UCC)......................75
Table of Contents
INDHOLDSFORTEGNELSE
FI
ES
ÍNDICE
Componentes . ...............................................5
Configuración 1–5 ........................................10
IntelliStand . .................................................15
Recarga ........................................................16
Colocación . ..................................................18
Ajuste ...........................................................19
Emparejamiento múltiple ...........................20
Realización, respuesta y fin de llamadas ....23
Comprobación de compatibilidad . ..............30
Volumen .......................................................35
Controles del auricular . ..............................42
Luces indicadoras de la base ......................46
Resolución de problemas ............................54
Reinicio del sistema . ...................................70
Orificio de acceso . .......................................72
Mantenimiento .............................................73
Cambio del tubo de voz . ..............................73
Cambio de la batería . ..................................74
Acceso a Avaya UCC......................................75
SISÄLLYSLUETTELO
IT
Osat ................................................................5
Asentaminen 1–5 .........................................10
IntelliStand . .................................................15
Lataaminen ..................................................16
Sijoittaminen ................................................18
Säätäminen ..................................................19
Usean laitteen pariliitos .............................21
Soittaminen, vastaaminen ja puhelun
lopettaminen ..........................................23
Yhteensopivuuden tarkistaminen ................31
Äänenvoimakkuus .......................................36
Kevytkuulokkeen ohjaimet ..........................43
Tukiaseman merkkivalot .............................46
Vianmääritys ................................................56
Järjestelmän nollaaminen ..........................70
Liittäminen . .................................................72
Huolto . .........................................................73
Ääniputken vaihtaminen ..............................73
Akun vaihtaminen ........................................74
Avaya UCC -ohjelmiston käyttäminen..........76
Komponenter ................................................5
Installation 1–5 ............................................10
IntelliStand . .................................................15
Opladning .....................................................16
Placering . ....................................................18
Ændring af pasform . ...................................19
Multi-shift-parring . .....................................20
Foretage/besvare/afslutte opkald ...............23
Kontrol af kompatibilitet . ............................30
Volumenkontrol ...........................................35
Knapper på headset . ...................................42
Indikatorlamper på baseenheden ...............46
Fejlfinding ....................................................52
Nulstilling af systemet ................................70
Abonnering ..................................................72
Vedligeholdelse . ..........................................73
Udskiftning af stemmerør ...........................73
Udskiftning af batteri ..................................74
Adgang til Avaya UCC...................................75
FR
TABLE DES MATIÈRES
Composants ...................................................5
Configurations 1–5 . .....................................10
IntelliStand . .................................................15
Chargement .................................................16
Positionnement . ..........................................18
Réglage du port de l’appareil ......................19
Couplage ......................................................21
Passer/prendre/terminer des appels .........24
Vérification de la compatibilité ....................31
Volume .........................................................37
Commandes de l’oreillette ..........................43
Indicateurs d’appel sur la base ...................46
Dépannage ...................................................58
Réinitialisation du système .........................71
Connexion ....................................................72
Entretien ......................................................73
Remplacement du tube vocal ......................73
Remplacement de la batterie ......................74
Accès à l’UCC Avaya......................................76
SOMMARIO
Componenti . ..................................................5
Configurazione 1–5 ......................................10
IntelliStand . .................................................15
Ricarica ........................................................17
Posizionamento ...........................................18
Regolazione .................................................19
Associazione multipla . ...............................21
Esecuzione/risposta/
termine delle chiamate ..........................24
Verifica della compatibilità ..........................31
Volume .........................................................37
Comandi della cuffia ....................................44
Indicatori luminosi della base ....................46
Risoluzione dei problemi .............................60
Ripristino del sistema . ................................71
Collegamento . .............................................72
Manutenzione ..............................................73
Sostituzione del tubo vocale ........................73
Sostituzione della batteria . .........................74
Accesso all’UCC Avaya .................................76
NL
INHOUDSOPGAVE
Onderdelen ....................................................5
Installatie 1–5 ..............................................10
IntelliStand . .................................................15
Opladen ........................................................17
Positionering . ..............................................18
Pasvorm afstellen ........................................19
Afstemmen bij verwisselen van headset .....21
Oproepen plaatsen/aannemen/beëindigen 24
Compatibiliteit testen ..................................31
Volume .........................................................38
Headsetbediening ........................................44
Waarschuwingslampjes basisstation ..........46
Problemen oplossen ....................................62
Systeemreset ...............................................71
Koppelen ......................................................72
Onderhoud ...................................................73
Spreekbuisje vervangen ..............................73
Batterijen vervangen ...................................74
Toegang tot de Avaya UCC............................76
Table of Contents
NO
INNHOLDSFORTEGNELSE
Komponenter .................................................5
Oppsett 1–5 ..................................................10
IntelliStand . .................................................15
Lading ..........................................................17
Plassering ....................................................18
Justere tilpasningen ....................................19
Flerskift-sammenkobling . ..........................22
Ringe/svare på samtaler/avslutte samtaler 24
Kontrollere kompatibiliteten .......................32
Volum ...........................................................39
Hodesettkontroller ......................................45
Lampene på baseenheten ...........................46
Feilsøking . ...................................................64
Tilbakestilling av systemet ..........................71
Tilknytning ...................................................72
Vedlikehold . .................................................73
Bytte talerør .................................................73
Bytte batteri .................................................74
Få tilgang til Avaya UCC...............................77
PT
ÍNDICE
Componentes . ...............................................5
Configuração 1–5 .........................................10
IntelliStand . .................................................15
Carregamento . ............................................17
Posicionamento ...........................................18
Ajuste ...........................................................19
Emparelhamento múltiplo ..........................22
Efectuar/atender/terminar chamadas ........24
Verificar compatibilidade .............................32
Volume .........................................................39
Controlo do auricular . .................................45
Luzes indicadoras na base ..........................46
Resolução de problemas .............................66
Reposição do sistema ..................................71
Subscrição ...................................................72
Manutenção .................................................73
Substituição do microfone ...........................73
Substituição da bateria ................................74
Aceder ao Avaya UCC....................................77
SE
Components
INNEHÅLLSFÖRTECKNING
Komponenter .................................................5
Konfiguration 1–5 ........................................10
IntelliStand . .................................................15
Laddning ......................................................17
Placering . ....................................................18
Ställa in passform . ......................................19
Multi-shift-matchning .................................22
Ringa/besvara/avsluta samtal . ...................24
Kontrollera kompatibilitet ...........................32
Volym . ..........................................................40
Headsetkontroller . ......................................46
Basenhetens indikatorlampor . ...................46
Felsökning ...................................................68
Systemåterställning ....................................71
Matchning ....................................................72
Underhåll .....................................................73
Byta ut mikrofonarmen ...............................73
Byte av batteri ..............................................74
Åtkomst till Avaya UCC.................................77
Headset
Auricular
Kevytkuuloke
Oreillette
Auricolari
Ear tips
Ohrhörer
Ørepropper
Extremos del auricular
Korvatyynyt
Embouts
Cuscinetti
Oordopjes
Ørepropper
Almofadas para as orelhas
Öronkuddar
Hodesett
Spare voice tube
Ersatz-Sprechröhrchen
Ekstra stemmerør
Tubo de voz de repuesto
Varaääniputki
Tube vocal de rechange
Tubo vocale di ricambio
Reservespreekbuisje
Reservetalerør
Microfone de substituição
Extra mikrofonarm
base
Basisstation
Baseenhed
Tukiasema
Basisstation
Telephone cord
Telefonkabel
Telefonledning
Cable del teléfono
Puhelinjohto
Cordon téléphonique
Cavo del telefono
Telefoonsnoer
Telefonledning
Fio telefónico
Telefonsladd
Baseenhet
Basenhet
25
Base
Basisstation
Baseenhed
Tukiasema
Basisstation
Baseenhet
Basenhet
27
Ring detector
Ruferkennung
Registreringsenhed
for opringning
Detector de llamada
Puhelun ilmoitin
Détecteur de sonnerie
Rilevatore di chiamata
Oproepdetector
Ringegjenkjenning
Detector de toque
Samtalsindikator
29
D+M Filter cord
D+M-Filterkabel
Ledning til D+M-filter
Cable de filtro D+M
D+M -suodatinjohto
Cordon filtre D+M
Cavo di filtro D+M
D+M Filtersnoer
D+M Filterledning
Cabo de filtro D+M
D+M Filtersladd
28 24/46
AC charger
Ladegerät
Lysnetoplader
Cargador de CA
Laturi
Chargeur secteur
Caricabatteria CA
Wisselstroomoplader
Vekselstrømslader
Carregador de CA
Laddare
30 8400
31
9600
Hookswitch control cord
Kabel zur Hörergabelsteuerung
Ledning til fra/tilkoblingskontrol
Cable de control de conmutador
Ohjausmoduulin johto
Cordon de contrôle du levier décroché du combiné
Cavo del comando di attivazione/disattivazione chiamata
Snoer voor telefoonhoorncontactknop
Ledning for telefonrørkontroll
Cabo de Controlo do Comutador de Gancho
Luromkopplarsladd
Components
Components
base - top view
FI
Baseenhed - Set fra oven
Vista superior de la base
Tukiasema – näkymä ylhäältä
Base - Vue de dessus
Base - vista dall’alto
Basisstation - Bovenaanzicht
1.
2. 3. Base - Vista do topo
Basenhet – ovanifrån
1.
a.
b.
c.
IT
NL
3.
DE
Leuchtanzeigen
a. Gesprächsleuchtanzeige (Grün)
b. Ein/Aus-Anzeige (Rot)
c. Ladeanzeige (Gelb)
Ladestation
Konfigurationsdrehschalter des Telefons
Indikatorer
a. Tale (grøn)
b. Strøm (rød)
c. Opladning (gul)
Opladningsgaffel
Konfigurationsdrejeknap på telefonen
Parte frontal
1.
2. 3. 6.
PT
Luces indicadoras
a. Conversación (verde)
b. Encendido (rojo)
c. Carga (ámbar)
Horquilla de carga
Regulador de configuración del teléfono
IT
Indicatori luminosi
a. Conversazione (verde)
b. Accensione (rosso)
c. Carica (ambra)
Supporto di ricarica
Selettore di configurazione del telefono
Waarschuwingslampjes
a. Spreekstand (Groen)
b. Voeding (Rood)
c. Opladen (Oranje)
Oplader/houder
Configuratieschakelaar voor uw telefoon
Indikatorlamper
a. Tale (grønn)
b. Strøm (rød)
c. Lader (gul)
Ladeholder
Konfigurasjonshjul for telefonen
Luzes indicadoras
a. A conversar (verde)
b. Ligado (vermelho)
c. A carregar (laranja)
Suporte para carregamento
Botão de Configuração do Telefone
NLAchterzijde
GB
DE
Indikatorlampa
a. Samtal (grön)
b. Ström (röd)
c. Laddar (gul)
Laddningsklyka
Konfigurationsväljare
Speaking volume minor adjust
IntelliStandTM on/off switch
(to automate call control button)
Listening volume major adjust
Telephone cord
Anpassen der Sprechlautstärke
(geringfügig)
IntelliStandTM-Ein/Aus-Schalter
(Automatisierung der Gesprächstaste)
Anpassen der Hörlautstärke
(in größeren Schritten)
Telefonkabel
DKBagfra
4.
5. 6.
7. Parte posterior
4.
5. 6.
7. FI
Finindstilling af talevolumen
Til/Fra-kontakt til IntelliStandTM
(automatisering af knappen til
opkaldsstyring)
Overordnet indstilling af lyttevolumen
Telefonledning
Ajuste corto del volumen de conversación
Interruptor de apagado/encendido de
IntelliStandTM (para automatizar el botón
de control de llamada)
Ajuste amplio del volumen de escucha
Cable del teléfono
Fijnafstelling spraakvolume
IntelliStandTM Aan-/uitschakelaar
(voor het automatiseren van de
espreksknop)
Hoofdregeling luistervolume
Telefoonsnoer
NOBaksiden
4.
5. 6.
7. Rückseite
4.
5. 6.
7. ES
4.
5. 6.
7. REAR
4.
5. 6.
7. Framsida
1.
2. 3. Lato posteriore
4. Regolazione secondaria del volume
di conversazione
5. Interruttore di attivazione/disattivazione
IntelliStandTM (per automatizzare il
pulsante di controllo delle chiamate)
6.Regolazione principale del volume di
ascolto
7. Cavo del telefono
7.
Vista frontal
1.
2. 3. SE
Témoins lumineux
a. Appel (vert)
b. Alimentation (rouge)
c. Chargement (orange)
Socle chargeur
Cadran de configuration du téléphone
Forsiden
1.
2. 3. Front
1.
2. 3. ES
NO
Vorderseite
1.
2. 3. DK
Indicator lights
a. Talking (green)
b. Power (red)
c. Charging (amber)
Charging cradle
Telephone configuration dial
4.Réglage secondaire du volume à
l’émission
5. Interrupteur IntelliStandTM ON/OFF (pour
automatiser le bouton de contrôle d’appel)
6. Réglage principal du volume d’écoute
7. Cordon téléphonique
5.
Voorkant
1.
2. 3. Front
FRArrière
Lato anteriore
1.
2. 3. 2.
1.
2. 3. Merkkivalot
a. Puhe (vihreä)
b. Virta (punainen)
c. Lataus (keltainen)
Latausteline
Puhelimen asetussäädin
FRAvant
Baseenhet – sett ovenfra
GB
4.
Näkymä edestä
1.
2. 3. Basisstation – Oberseite
PT
Små justeringer av talevolum
Av/på-bryter for IntelliStandTM
(for automatisk drift av
ringekontrollknappen)
Store justeringer av lyttevolum
Telefonledning
Vista traseira
4.
5. 6.
7. Ajuste do Volume de Conversação
(Intervalos Curtos)
Interruptor IntelliStandTM On/Off
(ligar/desligar - para automatizar o botão
de conversação)
Ajuste do Volume de Audição
(Intervalos Longos)
Fio telefónico
SEBaksida
4. Finjustering av talvolym
5. IntelliStandTM-omkopplare (knapp för
automatisk samtalsstyrning)
6. Grundinställning för lyssningsvolym
7. Telefonsladd
Näkymä takaa
4.
5. 6.
7. Puheäänen voimakkuuden pienet säädöt
IntelliStandTM-tukiaseman virtakytkin
(puhelunhallintapainikkeen
automatisoimista varten)
Kuunteluvoimakkuuden suuret säädöt
Puhelinjohto
Components
Components
base - Underside view
FI
Baseenhed - Set nedefra
Base: vista inferior
Tukiasema – näkymä pohjasta
Base - Vue de dessous
Base - vista parte inferiore
Basisstation - Onderaanzicht
FR
Baseenhet – sett fra undersiden
8.
9.
IT
11.
12.
13.
NL
EU24/ADJ
GB
Base - underside view
8. Speak volume major adjust
9. Handset jack
10. AC power adapter jack
11. Accessory jack
12. Ring detector jack
13. Telephone base jack
NO
8. Sprechlautstärke anpassen
(in größeren Schritten)
9. Telefonhörerbuchse
10. Buchse für das Netzgerät
11. Zusätzliche Buchse
12. Ruferkennungsbuchse
13. Telefonbuchse
DK
ES
PT
Base: vista inferior
8. Ajuste amplio del volumen de conversación
9. Conector del microteléfono
10. Conector del transformador de CA
11. Conector para accesorios
12. Conector del detector de llamadas
13. Conector para la base del teléfono
8. Hoofdregeling spraakvolume
9. Aansluiting voor handset
10. Aansluiting voor wisselstroomadapter
11. Accessoireaansluiting
12. Aansluiting voor oproepdetector
13. Aansluiting voor basisstation
Baseenhet – sett fra undersiden
Base - Vista inferior
8. Ajuste do Volume de Conversação
(Intervalos Longos)
9. Tomada para o auscultador
10. Tomada para o adaptador de corrente CA
11. Tomada extra
12. Tomada para o detector de toques
13. Tomada para a Base do Telefone
Baseenhed - Set nedefra
8. Overordnet indstilling af talevolumen
9. Stik til håndsæt
10. Stik til vekselstrømsadapter
11. Stik til ekstraudstyr
12. Stik til registreringsenhed for opringning
13. Stik til telefonens baseenhed
Basisstation - Onderaanzicht
8. Store justeringer av talevolum
9. Håndsettkontakt
10. Kontakt for vekselstrømsadapter
11. Kontakt til tilleggsutstyr
12. Kontakt for ringegjenkjenning
13. Kontakt for telefonbaseenhet
DE Basisstation – Unterseite
SE
Auricular
Kevytkuuloke
Oreillette
Auricolari
Basenhet – underifrån
8. Grundinställning för talvolym
9. Luruttag
10. Uttag för nätadapter
11. Tillbehörsuttag
12. Uttag för samtalsindikator
13. Uttag för basenhet
FI
Kevytkuuloke
1.
2. 3.
4. 1.
2.
3.
FR
Hodesett
Kuunteluvoimakkuus ja mykistys
Puhelunhallintapainike
Puheen merkkivalo
Ääniputki
Oreillette
1. Volume d’écoute/Touche secret
2. Bouton de contrôle d’appel
3. Témoin d’appel
4. Tube vocal
4.
ITAuricolari
GB
DE
Listening volume/mute
Call control button
Talk indicator light
Voice tube
NL
Hörlautstärke-/Stummschaltungstaste
Annehmen und Beenden von
Gesprächen
Gesprächsleuchtanzeige
Sprechröhrchen
NO
1.
2. 3.
4. Lyttevolumen/Lydløs
Knap til opkaldsstyring
Indikatorlampe for tale
Stemmerør
Volumen de escucha y función Mute
Con varias funciones
Luz indicadora de conversación
Tubo de voz
GBNOTE: Please refer to the separate Safety
Instructions booklet for important product
safety information prior to installation or use of
the product.
DEHINWEIS; Die Broschüre „Wichtige
Sicherheitshinweise“ enthält wichtige Sicherh
eitsinformationen, die Sie vor der Installation
oder Verwendung des Produkts beachten
sollten.
DKBEMÆRK: Læs den separate brochure med
sikkerhedsinstruktioner for at få vigtige
oplysninger om produktsikkerhed, inden du
installerer eller bruger produktet.
ESNOTA: Consulte el folleto de instrucciones sobre
seguridad que se suministra por separado
para obtener información sobre seguridad del
producto antes de su instalación o uso.
FIHUOMAUTUS: Laitteen mukana toimitetussa
Turvallisuusohjeet-kirjasessa on tärkeitä tietoja
laitteen turvallisesta käytöstä. Lue kirjanen
ennen laitteen asentamista tai käyttöönottoa.
Lyttevolum/demping
Ringekontrollknapp
Taleindikatorlampe
Talerør
PTAuricular
1.
2. 3.
4. ESAuricular
1.
2. 3.
4. Luistervolume/Mute
Gespreksknop
Spraakindicatielampje
Spreekbuisje
Hodesett
1.
2. 3.
4. HEADSET
Volume di ascolto/
Esclusione microfono
Pulsante di controllo chiamate
Indicatore luminoso di conversazione
Tubo vocale
HEADSET
1.
2. 3.
4. HEADSET
1.
2. 3.
4. DK
1.
2. 3.
4. HEADSET
1.
2. 3.
4. Base - vista parte inferiore
8. Regolazione principale del volume di
conversazione
9. Presa jack della cornetta
10. Presa jack adattatore CA
11. Presa jack per accessori
12. Presa jack rilevatore di chiamata
13. Presa jack della base del telefono
10.
Headset
Base - Vue de dessous
8. Réglage principal du volume à l’émission
9. Fiche du combiné
10. Fiche de l’adaptateur d’alimentation secteur
11. Fiche pour accessoire
12. Fiche du détecteur de sonnerie
13. Fiche de la base du téléphone
Base - Vista inferior
Basenhet – underifrån
Tukiasema – näkymä pohjasta
8. Puheäänen voimakkuuden suuret säädöt
9. Luurin liitin
10. Verkkolaiteliitin
11. Liitin (lisävaruste)
12. Puhelun ilmoittimen liitin
13. Puhelimen tukiaseman liitin
Basisstation – Unterseite
SE
Botão de Volume de audição/Corte de som
Botão de conversação
Luz indicadora de conversação
Microfone
HEADSET
1.
2. 3.
4. Lyssningsvolym/sekretess
Knapp för samtalskontroll
Indikatorlampa för samtal
Talrör
FRREMARQUE : Reportez-vous au livret
d’instructions relatives à la sécurité pour les
informations importantes relatives à la sécurité
avant d’installer ou d’utiliser l’appareil.
ITNOTA : Per informazioni sulla sicurezza del
prodotto, fare riferimento al documento
“Importanti istruzioni sulla sicurezza”, fornito
separatamente, prima dell’installazione e
dell’uso del prodotto.
NLOPMERKING: Raadpleeg voorafgaand aan de
installatie en het gebruik van het product het
boekje met belangrijke veiligheidsinformatie.
NOMERK: Se viktig produktsikkerhetsinformasjon i
det separate heftet om sikkerhetsinstruksjoner
før du installerer eller bruker produktet.
PTNOTA: Antes da instalação ou utilização do
produto, consulte o folheto de Instruções
de Segurança para obter informações de
segurança.
SEObs! Innan du installerar eller börjar
använda produkten bör du läsa i broschyren
Säkerhetsanvisningar, som innehåller viktig
produktsäkerhetsinformation.
Setup 1
Setup 2
Einrichtung 1
Einrichtung 2
Installation 1
AVAYA 2420, 4610SW, 4620, 4620SW,
4621SW, 4622SW, 4625SW 4630SW,
5420, 5610, 5620*
Configuración 1
Asennus 1
Configuration 1
Configuración 2
Asennus 2
7
Configuration 2
1
Configurazione 1
AVAYA 2410, 4630, 5410, 6416 D+M,
6424 D+M
1
Installation 2
26
Configurazione 2
5
Installatie 1
Installatie 2
Oppsett 1
7
Instalação 1
Konfiguration 1
Oppsett 2
24
Instalação 2
Konfiguration 2
24
25
4
27
29
24
27
4
Configuration dial set to 3
Konfigurationsdrehschalter steht auf 3
Konfigurationsdrejeknap i position 3
Regulador de configuración definido en 3
Puhelimen asetussäädin asennossa 3
Cadran de configuration sur 3
Configuratieschakelaar
ingesteld op 3
Konfigurasjonshjulet
er satt til 3
Botão de configuração
definido para 3
Konfigurationsväljaren
ställd på 3
GB
28
25
24
25
See pages 5-9 for callout of components
Eine Auflistung der Komponenten finden
Sie auf den Seiten 5-9
Der er forklarende tekst til komponenterne
på siderne 5-9
Consulte las páginas 5-9 para obtener
una descripción de los componentes
Lisätietoja osista on sivuilla 5-9
Voir légendes des composants pages 5-9
Zie pagina 5-9 voor een opsomming
van componenten
Se sidene 5-9 for oversikt over komponenter
Consulte as páginas 5-9 para obter o
diagrama dos componentes
Förklaringar av komponenter finns
på sidorna 5-9
*24xx and 54xx phones require 4.0 firmware
or greater. 46xx and 56xx phones require 1.8
firmware or greater.
*Für Telefone der Serie 24xx und 54xx ist 4.0Firmware erforderlich. Für Telefone der Serie
46xx und 56xx ist 1.8-Firmware erforderlich.
DK
*24xx- og 54xx-telefoner kræver 4.0-firmware
eller nyere. 46xx- og 56xx-telefoner kræver
1.8-firmware eller nyere.
IT
ES
*Los teléfonos de 24xx y 54xx requieren
una versión 4.0 o superior de firmware. Los
teléfonos de 46xx y 56xx requieren una versión
1.8 o superior de firmware.
NL
*Voor 24xx- en 54xx-telefoons is firmware 4.0
of hoger vereist. Voor 46xx- en 56xx-telefoons
is firmware 1.8 of hoger vereist.
NO
FI
*Puhelimissa 24xx ja 54xx tarvitaan
laiteohjelmistoversio 4.0 tai uudempi.
Puhelimissa 46xx ja 56xx tarvitaan
laiteohjelmistoversio 1.8 tai uudempi
*24xx- og 54xx-telefoner krever 4.0-fastvare
eller senere. 46xx- og 56xx-telefoner krever
1.8-fastvare eller senere.
PT
*Os telefones 24xx e 54xx requerem o
firmware 4.0 ou superior. Os telefones 46xx e
56xx requerem o firmware 1.8 ou superior.
SE
*24xx- och 54xx-telefoner kräver fast
programvara version 4.0 eller högre.
46xx- och 56xx-telefoner kräver fast
programvara version 1.8 eller högre.
*Les téléphones 24xx et 54xx requièrent la
version 4.0 du micrologiciel ou une version
supérieure. Les téléphones 46xx et 56xx
requièrent la version 1.8 du micrologiciel ou
une version supérieure.
29
Setup 3
AVAYA 7403D, 7405D, 7407D, 7406,
8403, 8405, 8410D, 8411D, 8434,
8510ISDN, 7506ISDN
1
Einrichtung 3
Installation 3
Configuración 3
7
Asennus 3
Configuration 3
Configurazione 3
Installatie 3
24
Oppsett 3
DE
FR
10
28
Configuration dial set to 1
Konfigurationsdrehschalter steht auf 1
Konfigurationsdrejeknap i position 1
Regulador de configuración definido en 1
Puhelimen asetussäädin asennossa 1
Cadran de configuration sur 1
Configuratieschakelaar ingesteld op 1
Konfigurasjonshjulet er satt til 1
Botão de configuração definido para 1
Konfigurationsväljaren ställd på 1
Instalação 3
Konfiguration 3
*I telefoni 24xx e 54xx richiedono firmware 4.0
o versioni successive. I telefoni 46xx e 56xx
richiedono firmware 1.8 o versioni successive.
30
4
Configuration dial set to 3
Konfigurationsdrehschalter steht auf 3
Konfigurationsdrejeknap i position 3
Regulador de configuración definido en 3
Puhelimen asetussäädin asennossa 3
Cadran de configuration sur 3
Configuratieschakelaar ingesteld op 3
Konfigurasjonshjulet er satt til 3
Botão de configuração definido para 3
Konfigurationsväljaren ställd på 3
27
24
27
11
Setup 4
Setup 5 with other AVAYA telephones
GB Caution: It is important for correct and safe
operation that the base cord is installed into
the proper jack of your telephone. Follow
these instructions carefully, especially if your
telephone has two jacks where the handset was
attached. Take care to note or mark which jack
was used for the handset.
AVAYA 9600
Einrichtung 4
Installation 4
Configuración 4
Asennus 4
Configuration 4
Configurazione 4
1
Installatie 4
Oppsett 4
Instalação 4
7
Konfiguration 4
24
25
4
Configuration dial set to 1
Konfigurationsdrehschalter steht auf 1
Konfigurationsdrejeknap i position 1
Regulador de configuración definido en 1
Puhelimen asetussäädin asennossa 1
Cadran de configuration sur 1
Configuratieschakelaar ingesteld op 1
Konfigurasjonshjulet er satt til 1
Botão de configuração definido para 1
Konfigurationsväljaren ställd på 1
27
31
27
31
24
DE Achtung: Für einen ordnungsgemäßen
und sicheren Betrieb muss das Kabel der
Basisstation an die richtige Telefonbuchse
angeschlossen werden. Befolgen Sie diese
Anweisungen sorgfältig, vor allem, wenn Ihr
Telefon über zwei Buchsen verfügt, an denen
das Headset angeschlossen war. Kennzeichnen
Sie, an welcher Buchse das Headset
angeschlossen war.
DK Advarsel: Af hensyn til korrekt og sikker
betjening af enheden er det vigtigt, at ledningen
til baseenheden er tilsluttet det korrekte stik på
telefonen. Du bør følge denne vejledning nøje,
især hvis der er to stik i telefonen på det sted,
hvor håndsættet var tilsluttet. Sørg for at notere
eller markere, hvilket stik der blev brugt til
håndsættet.
ES Precaución: para garantizar un
funcionamiento correcto y sin riesgos, es
importante que el cable de la base se conecte
al conector correcto del teléfono. Siga estas
instrucciones con cuidado, sobre todo si el
teléfono cuenta con dos conectores para el
microteléfono. Asegúrese de marcar el conector
en el que estaba conectado el microteléfono.
FI
Varoitus: Laitteen moitteettoman ja turvallisen
käytön kannalta on tärkeää, että tukiaseman
johto on liitetty oikeaan liitäntään puhelimessa.
Noudata näitä ohjeita huolellisesti etenkin, jos
puhelimessasi on kaksi luuriliitäntää. Paina
mieleesi tai kirjoita muistiin, mihin liitäntään luuri
oli kytketty.
IT
Attenzione: per un funzionamento
corretto e sicuro, inserire il cavo della base
nell’apposita presa jack del telefono. Attenersi
scrupolosamente a queste istruzioni, in
particolar modo se il telefono a cui era
collegata la cornetta dispone di due prese jack.
Assicurarsi di contrassegnare la presa jack
utilizzata per la cornetta o di prenderne nota.
NL Waarschuwing: het is belangrijk dat
het snoer van het basisstation op de juiste
ingang van de telefoon is aangesloten, zodat
het apparaat goed en veilig werkt. Volg deze
aanwijzingen zorgvuldig op, vooral als uw
telefoon twee mogelijke ingangen heeft. Maar
een aantekening van welke ingang voor de
handset is gebruikt, of markeer deze.
NO Forsiktig: Det er viktig for riktig og sikker
bruk at baseenhetens ledning er satt inn i
riktig kontakt på telefonen. Følg instruksjonene
nøye, særlig hvis telefonen har to støpsler der
håndsettet ble festet. Merk hvilken kontakt som
ble brukt til håndsettet.
PT Atenção: Para garantir o funcionamento correcto
e seguro, é importante que o fio da base esteja
ligado à tomada adequada do seu telefone. Siga
estas instruções com cuidado, especialmente se
o seu telefone dispõe de duas tomadas. Anote ou
assinale a tomada utilizada com o auricular.
SE
Obs! Du måste ansluta basenhetssladden till
rätt uttag på telefonen, annars kommer den
eventuellt inte att fungera på rätt sätt. Följ de
här anvisningarna noggrant, särskilt om det
finns två uttag på telefonen för anslutning av
luren. Anteckna eller markera det uttag som
används för luren.
FR Attention : pour un fonctionnement correct
en toute sécurité, il est important que le cordon
de la base soit connecté sur la fiche adéquate
de votre téléphone. Suivez ces instructions avec
attention, surtout si votre téléphone est équipé
de deux fiches sur lesquelles était connecté le
combiné. Assurez-vous de noter ou de marquer
la fiche qui a été effectivement utilisée pour
brancher l’oreillette.
12
13
Setup 5 with other AVAYA telephones
IntelliStand™
Einrichtung 5 Für andere AVAYA-Telefone
Installation 5 Med andre AVAYA-telefoner
Configuración 5 con otros teléfonos AVAYA
Asennus 5 Muut Avaya-puhelimet
A B
Configuration 5 avec les autres téléphones Avaya
Configurazione 5 con altri telefoni AVAYA
IntelliStand™ off
IntelliStand™ aus
IntelliStand™ fra
IntelliStand™ apagado
IntelliStand™ pois käytöstä
IntelliStand™ off (désactivé)
IntelliStand™ disattivato
IntelliStand™ uit
IntelliStand™ av
IntelliStand™ desligado
IntelliStand™ inaktivt läge
Installatie 5 Met andere AVAYA-telefoons
Oppsett 5 med andre Avaya-telefoner
Instalação 5 Com outros telefones AVAYA
Konfiguration 5 med andra Avaya-telefoner
1
6
7
IntelliStand™
IntelliStand™
IntelliStand™
IntelliStand™
IntelliStand™
IntelliStand™
IntelliStand™
IntelliStand™
IntelliStand™
IntelliStand™
IntelliStand™
on
ein
til
encendido
käytössä
on (activé)
attivato
aan
på
ligado
aktivt läge
24
Configuration dial (see page 29)
Konfigurationsdrehschalter [siehe seite 29]
4
Konfigurationsdrejeknap [se side 30]
Regulador de configuración [consulte la página 30]
Asetussäädin [katso sivu 30]
Cadran de configuration [voir page 30]
Selettore di configurazione
[vedere pagina 31]
Configuratieschakelaar
[zie pagina 31]
Konfigurasjonshjul [se side 32]
Botão de configuração
[consulte a página 32]
Konfigurationsväljare
[se sidan 32]
A 24
25
✽
Setzen Sie den IntelliStand-Schalter auf die „Aus“-
DE Position (–), wenn Sie den Telefonhörer-Lifter mit der
Gesprächstaste auf dem Headset steuern möchten.
Indstil IntelliStand-kontakten til IntelliStand Fra
PLA
O
NTR
Indstil IntelliStand-kontakten til IntelliStand Til (=),
hvis du vil have håndsættet til automatisk at modtage
opkaldet, når du fjerner headsettet fra opladningsgaflen.
ES
Si desea controlar el dispositivo para descolgar
el teléfono con el botón de control de llamada del
auricular, coloque el interruptor IntelliStand en la
posición de apagado (–).
Si desea que el microteléfono se descuelgue
automáticamente cuando retire el auricular de la
horquilla de carga, coloque el interruptor IntelliStand en
posición de encendido (=).
FI
Säädä IntelliStand-kytkin asentoon IntelliStand pois
käytöstä (–), jos haluat hallita luuripidikettä luurin
puhelunhallintapainikkeella.
Säädä IntelliStand-kytkin asentoon IntelliStand käytössä
(=), jos haluat, että luuri vastaan automaattisesti puheluun,
kun luuri nostetaan lataustelineestä.
Réglez l’interrupteur IntelliStand en position OFF (–)
si vous souhaitez pouvoir contrôler le levier décroché
du combiné depuis le bouton de contrôle d’appel situé
sur votre oreillette.
Se si desidera controllare il dispositivo di risposta
automatico con il pulsante di controllo delle chiamate
sull’auricolare, impostare l’interruttore di IntelliStand
su disattivato (–).
Réglez l’interrupteur IntelliStand en position ON
(=) si vous souhaitez que le combiné soit décroché
automatiquement lorsque vous retirez l’oreillette du socle
chargeur.
Se si desidera impostare la cornetta in modo che
risponda automaticamente a una chiamata quando si
solleva l’auricolare dal supporto di ricarica, impostare
l’interruttore di IntelliStand su attivato (=).
Zet de IntelliStand-schakelaar op ‘IntelliStand aan’ (=)
indien u wilt dat de telefoonhoorn automatisch opneemt
wanneer u de headset van de oplader/houder neemt.
handset is gebruikt, of markeer deze.
ONICS
PLANTR
FR
Ensure you connect this plug into the jack where the handset was
connected.
Stellen Sie sicher, dass Sie den Stecker mit der Buchse verbinden,
an die das Headset angeschlossen war.
Sørg for, at du tilslutter dette stik der, hvor håndsættet var tilsluttet.
Inserte esta clavija en el conector al que estaba conectado el
microteléfono.
Tarkista, että tämä liitin on kytketty luuriliitäntään.
Assurez-vous de bien connecter cette prise sur la fiche sur laquelle
était connectée votre oreillette.
Collegare lo spinotto alla presa jack in cui era inserita la cornetta.
Sluit deze stekker altijd aan op de ingang van de handset.
Kontroller at du kobler dette støpselet til kontakten der håndsettet
ble koblet til.
Certifique-se de que liga esta ficha à tomada a que o auricular
estava ligado.
Anslut den här kontakten till det uttag som du har anslutit luren till.
IT
NL
Zet de IntelliStand-schakelaar op ‘IntelliStand uit’ (–)
indien u de telefoonhoorn-lifter wilt gebruiken via de
gespreksknop van de headset.
Still IntelliStand-bryteren til av (–) hvis
NO du vil kontrollere håndsettløfteren med
ringekontrollknappen på hodesettet.
PT
Coloque o interruptor IntelliStand na posição de
desligado (–), se desejar utilizar o controlo do
auscultador através do botão de conversação do seu
auricular.
Ställ omkopplaren för IntelliStand i inaktivt läge (–)
SE om du vill styra lurlyftaren med samtalsknappen på
headsetet.
14
Setzen Sie den IntelliStand-Schalter auf die „Ein“-Stellung
(=), wenn der Hörer beim Herausnehmen des Headsets
aus der Ladestation automatisch abgenommen werden
soll.
opkaldsstyring på headsettet.
DK (–), hvis du vil styre håndsætløfteren fra knappen til
NICS
✽
Optional lifter
Optionaler Telefonhörer-Lifter
Løfter (tilbehør)
Dispositivo para descolgar el teléfono optativo
Luurinpidike (lisävaruste)
Levier décroché du combiné en option
Dispositivo automatico di risposta opzionale
Optionele lifter
Løfter (tilleggsutstyr)
Controlador opcional
Lurlyftare (tillval)
B
Set the IntelliStand switch to IntelliStand off (–) if you Set the IntelliStand switch to IntelliStand on (=) if you
GB want to control the handset lifter with the call control want the handset to automatically pick up when you take
button on your headset.
the headset off the charging cradle.
Still IntelliStand-bryteren til på (=) hvis du vil at
håndsettet automatisk skal svare når du tar hodesettet ut
av ladeholderen.
Coloque o interruptor IntelliStand na posição de ligado (=), se
desejar que o auricular atenda automaticamente quando o
retira da base para carregamento.
Ställ omkopplaren för IntelliStand i aktivt läge (=) om du
vill att luren ska lyftas automatiskt när du tar headsetet
från laddningsklykan.
15
Charging
1
GB
Charging
Charging
2
ES
1.Slide the headset into the charging cradle.
The earpiece with the microphone goes into
the cradle.
• El tiempo mínimo de carga para continuar
con la configuración es de 20 minutos.
• El tiempo de carga total es de tres horas
Laden der Batterie
1. .Schieben Sie das Headset in die
Ladestation. Dabei wird das Ohrkissen mit
dem Mikrofon in die Ladestation eingesetzt.
FI
• 2
0 Minuten = Mindestladezeit zum
Fortfahren der Einrichtung
• 3 Stunden = Vollständige Aufladungrge
Opladning
1.Sæt headsettet i opladningsgaflen.
Øreproppen med mikrofonen skal vende ned
i gaflen.
2. Tryk forsigtigt headsettet nedad, for at
sikre at det er korrekt placeret. Den gule
opladningsindikatorlampe på baseenheden
blinker, mens opladningen er i gang og
lyser konstant, når enheden er fuldt
opladet.
16
• 20 minutter = minimal opladningstid for at
kunne fortsætte installationen
• 3 timer = fuld opladning
Lataaminen
1.Aseta kuuloke takaisin lataustelineeseen.
Korvasanka ja sen mikrofoni kiinnittyvät
lataustelineeseen.
2. Drücken Sie das Headset vorsichtig in die
Ladestation, um sicherzustellen, dass das
Headset richtig positioniert ist. Die
Leuchtanzeige blinkt während des
Ladevorgangs gelb auf. Sobald die
Leuchtanzeige nicht mehr blinkt, sondern
gelb aufleuchtet, ist das Headset vollständig
aufgeladen.
DK
IT
2. Presione suavemente el auricular para
asegurarse de que está en la posición
correcta. La luz indicadora ámbar de la
base parpadeará durante la carga y
cambiará a fija cuando ésta finalice.
• 20 minutes = minimum charge to continue setup
• 3 hours = full charge
2. Varmista, että kevytkuuloke on paikallaan
painamalla sitä kevyesti. Tukiaseman
keltainen latauksen merkkivalo vilkkuu, kun
lataus on käynnissä, ja lakkaa vilkkumasta,
kun akku on täynnä.
• 20 minuuttia = minimilatausaika asentamisen
jatkamista varten
• 3 tuntia = täysi lataus
FR
2
RECARGA
1.Coloque el auricular en la horquilla de
carga. Asegúrese de que el auricular con
micrófono quede bien insertado en la
horquilla.
2. Gently press down on the headset to ensure
that the headset is in the correct position.
The amber charge indicator light on the
base will flash while charging and will
change to solid amber when fully charged.
DE
1
Chargement
1.Positionnez l’oreillette sur le socle chargeur.
L’écouteur doté du microphone s’insère
dans le réceptacle.
2. Appuyez doucement sur l’oreillette pour la
positionner correctement. Le témoin
orange du socle clignote pendant que
l’oreillette se recharge. Une fois le
processus terminé, il cesse de clignoter.
• 20 minutes = charge minimum pour
poursuivre l’installation
• 3 heures = chargement complet
NL
Ricarica
PT
Carregamento
1.Far scorrere l’auricolare nel supporto di
ricarica in modo che l’auricolare e il
microfono siano inseriti nel supporto.
1.Coloque o auricular na base para
carregamento. O lado do auricular com o
microfone deverá ser introduzido na base.
2. Premere delicatamente l’auricolare per
assicurarsi che sia nella posizione corretta.
L’indicatore di ricarica color ambra della
base lampeggia durante la ricarica e
rimane acceso quando la ricarica è
completa.
2. Empurre o auricular com cuidado, de modo a
assegurar-se de que se encontra na posição
correcta. A luz indicadora de carregamento
(laranja) na base fica intermitente durante o
carregamento; quando a carga estiver
completa, deixa de tremeluzir
• 20 minuti = ricarica minima per completare
la configurazione
• 3 ore = carica completa
• 20 minutos = carga mínima para continuar a
configuração
• 3 horas = carregamento completo
Opladen
SE
Laddning
1.Plaats de headset in de oplader/houder. Het
oorstuk met de microfoon gaat in de houder.
1.Skjut i headsetet i laddningsklykan.
Hörluren med mikrofonen ska vara i klykan.
2. Druk de headset zachtjes aan om ervoor te
zorgen dat deze zich in de juiste positie
bevindt. Het oranje oplaadindicatielampje
knippert tijdens het opladen en blijft
branden als deze volledig is opgeladen.
2. Tryck headsetet lätt nedåt så att det
hamnar i rätt läge. Den gula
laddningslampan på basenheten blinkar
under laddningen och lyser med fast gult
sken när headsetet är laddat.
• 20 minuten = de minimum oplaadtijd om
door te gaan met de installatie
• 3 uur = volledige oplaadtijd
• 20 minuter = kortaste laddningstid för
fortsatt konfiguration
• 3 timmar = fullständig laddning
NO Lading
1.Skyv hodesettet inn i ladeholderen.
Ørestykket med mikrofonen går inn i
holderen
2. Trykk forsiktig ned på hodesettet for å sikre
at det sitter i riktig posisjon. Den gule
ladeindikatorlampen blinker på
baseenheten under lading. Når ladingen er
ferdig, lyser lampen kontinuerlig gult
• 20 minutter = minste lading for å fortsette
oppsettet
• Tre timer = full lading
17
Positioning
Adjusting Fit
1
30
15
2
3
cm
cm
GB
ADJUSTING FIT
Note: Depending on your preference, you can
replace the pre-installed leatherette ear cushions
with the included alternative foam cushions.
1. Adjust headband to fit.
2. Rotate noise-cancelling microphone until it
is pointed towards your chin.
DE
GB
DE
POSITIONING
IT
Di seguito, viene indicata la distanza minima
consigliata.
IMPORTANT: Incorrect positioning can cause
noise and interference problems.
IMPORTANTE: un posizionamento non corretto
potrebbe provocare disturbi dovuti a rumore e a
interferenze.
Positionierung
Der empfohlene Mindestabstand wird oben
angegeben.
NL
NO
PT
FI
TÄRKEÄÄ: väärä sijoituspaikka voi aiheuttaa
melua ja häiriöitä
Posicionamento
1. Ajuste la diadema de manera que le resulte
cómoda.
2. Gire el micrófono con anulación de ruido
hasta que quede a la altura de la barbilla.
IMPORTANTE: O posicionamento incorrecto
poderá causar ruído e interferências.
FI
SE
IMPORTANT : un positionnement incorrect peut
provoquer des problèmes sonores et des
interférences.
1. Verstel de hoofdbeugel tot deze goed zit.
2. Draai de noise-canceling microfoon naar uw
kin toe.
NO
Det minsta rekommenderade avståndet visas
ovan.
1. Juster hodebøylen.
2. Drei på den støyreduserende mikrofonen
helt til den peker mot haken din.
PT
FR
Réglage du port de
l’appareil
REMARQUE : selon vos préférences, vous pouvez
remplacer les coussinets en similicuir
préinstallés par les coussinets en mousse fournis.
1. Ajustez le serre-tête.
2. Faites pivoter le microphone antibruit
jusqu’à ce qu’il soit dirigé vers votre menton.
Ajuste
NOTA: À sua discrição, poderá substituir as
almofadas para as orelhas pré-instaladas (em
imitação de couro) pelas almofadas de espuma
fornecidas.
Säätäminen
1. Säädä sanka itsellesi sopivaksi.
2. Kierrä melua vaimentavaa mikrofonia,
kunnes se osoittaa poskeasi kohti.
VIKTIGT: Felaktig placering kan orsaka problem
med brus och störningar.
Justere tilpasningen
MERK: Hvis du ønsker det, kan du bytte ut de
påmonterte øreputene i lærimitasjon med
øreputene i skum som følger med.
HUOMAUTUS: voit halutessasi vaihtaa valmiiksi
asennetut tekonahkaiset korvatyynyt laitteen
mukana toimitettuihin vaahtomuovisiin
korvatyynyihin.
Placering
Positionnement
La distance minimum de séparation
recommandée est indiquée ci-dessus.
18
NOTA: si lo desea, puede cambiar las
almohadillas de piel sintética para la oreja ya
instaladas por las de espuma, también incluidas.
Pasvorm afstellen
OPMERKING: U kunt zelf kiezen of u de vooraf
gemonteerde kunstleren oorkussens wilt
vervangen door de bijgeleverde alternatieve
schuimrubberen kussens.
Ajuste
VIKTIG: Feil plassering kan forårsake problemer
med støy og interferens.
Sijoittaminen
Suositeltava vähimmäisetäisyys on edellisessä
kuvassa.
FR
ES
A distância mínima recomendada é
apresentada em cima.
IMPORTANTE: una ubicación incorrecta puede
causar problemas de ruido e interferencias.
NL
Ændring af pasform
1. Ændring af hovedbøjlens pasform.
2. Drej den støjreducerende mikrofon, indtil
den peger mod din hage.
Colocación
Arriba se indica la distancia mínima de
separación recomendada.
1. Regolare l’archetto.
2. Ruotare il microfono a cancellazione di
rumore verso il mento.
Bemærk: Afhængigt af, hvad du foretrækker,
kan du udskifte de forudinstallerede ørepuder i
kunstlæder med de medfølgende ørepuder i
skumplast.
Plassering
Minste anbefalte avstand vises ovenfor.
VIGTIGT: Ved forkert placering kan der opstå
problemer med støj og interferens.
ES
DK
BELANGRIJK: een onjuiste plaatsing kan
ongewenste bijgeluiden en storingen
veroorzaken.
Placering
Den anbefalede minimumafstand mellem
enhederne vises ovenfor.
Positionering
De minimaal aanbevolen tussenruimte is
hierboven weergegeven.
WICHTIG: Eine falsche Positionierung kann zu
Störgeräuschen und Interferenzen führen.
DK
1. Passen Sie den Kopfbügel an.
2. Drehen Sie das Noise Cancelling-Mikrofon
so, dass es zu Ihrem Kinn zeigt.
Regolazione
NOTA: a seconda delle proprie preferenze, è
possibile sostituire i cuscinetti auricolari in
similpelle preinstallati con i cuscinetti in
gommapiuma alternativi inclusi nella confezione.
Hinweis: Beim Kauf des Headsets sind die
Kunstleder-Ohrkissen bereits angebracht. Sie
können diese gegebenenfalls durch die im
Lieferumfang enthaltenen SchaumstoffOhrkissen austauschen.
Posizionamento
The minimum recommended separation
distance is shown above.
IT
Anpassen des Kopfbügels
1. Ajuste a fita.
2. Rode o microfone com neutralização de
ruído para que aponte na direcção do seu
queixo.
SE
Ställa in passform
OBS! Om du vill kan du byta ut de förmonterade
öronkuddarna i konstläder mot de medföljande
alternativa skumgummikuddarna.
1. Ställ in huvudbågens passform.
2. Vrid den bullerdämpande mikrofonen tills
den är riktad mot hakan.
19
Multi-shift Pairing
1
Enable
Aktivieren
Aktiver
Activar
Ota käyttöön
Activer
Attivato
Inschakelen
Activar
Aktivera
Multi-shift pairing
To make a call:
1. Take your handset off-hook. Dial tone
should sound through handset (if not, check
compatibility—see page 29).
2. Press the call control button on the headset.
The talk indicator lights on both the base
and the headset should come on, indicating
a successful link. Dial tone should sound
through headset. Dial using the telephone
keypad.
To answer a call:
1. Take the handset off-hook.
2. Press the call control button on the headset to
answer a call.
To end a call, press the call control button on the
headset, then hang up the handset.
NOTE: If either you or the recipient have trouble hearing,
please check compatibility (page 29).
DE
Multi-Shift-Paarung
So tätigen Sie Anrufe:
1. Nehmen Sie den Hörer ab. Es sollte das
Freizeichen zu hören sein. (Ist dies nicht der
Fall, überprüfen Sie die Kompatibilität. Siehe
Seite 29.)
2. Drücken Sie die Gesprächstaste auf dem
Headset. Die Sprechanzeige an der Basiseinheit
und am Headset blinkt, wenn die Verbindung
erfolgreich hergestellt wurde. Es sollte ein
Wählton zu hören sein. Wählen Sie über das
Tastenfeld des Telefons die Nummer.
So nehmen Sie Anrufe an:
1. Nehmen Sie den Hörer ab.
2. Drücken Sie auf dem Headset auf die
Gesprächstaste und beantworten Sie den Anruf.
Um einen Anruf zu beenden, drücken Sie auf
dem Headset auf die Gesprächstaste und legen
Sie den Hörer auf.
HINWEIS: Wenn Sie oder Ihr Gesprächspartner
Störgeräusche wahrnehmen, überprüfen
Sie die Kompatibilität (siehe Seite 29).
20
FI
2
Disable / Deaktivieren / Deaktiver
Desactivar / Poista käytöstä / Désactiver
Disattivato / Uitschakelen / Avaktivera
GB
Multi-shift Pairing
DK
Or
Oder
Eller
O
Tai
Ou
Oppure
Of
Ou
Multi-shift-parring
Sådan foretages et opkald:
1. Tag håndsættet af gaflen. Der lyder en
klartone i håndsættet (hvis ikke, skal du
kontrollere kompatibiliteten –se side 30).
2. Tryk på knappen til opkaldsstyring på
headsettet. Indikatorlamperne for tale på
baseenheden og headsettet tændes nu for at
angive, at der er oprettet et link. Der lyder en
klartone i headsettet. Ring op ved hjælp af
telefonens tastatur.
Sådan besvares et opkald:
1. Tag håndsættet af gaflen.
2. Tryk på knappen til opkaldsstyring på
headsettet for at besvare et opkald.
Hvis du vil afslutte et opkald, skal du trykke på
knappen til opkaldsstyring på headsettet og
derefter afslutte opkaldet på håndsættet.
BEMÆRK: Hvis du selv eller modtageren har problemer
med at høre samtalen, skal du kontrollere kompatibiliteten (side 30).
ES
Emparejamiento múltiple
Para realizar una llamada:
1. Descuelgue el microteléfono. Debería oír
un tono de llamada en el auricular (en
caso contrario, consulte la sección de
compatibilidad en la página 30).
2. Pulse el botón de control de llamada del
auricular. Si la conexión se ha realizado
correctamente, se encenderán las luces
indicadoras de conversación situadas en la
base y en el auricular. Debería oír un tono de
llamada en el auricular. Marque un número
mediante el teclado numérico del teléfono.
Para responder a una llamada:
1. Descuelgue el microteléfono.
2. Pulse el botón de control de llamada del
auricular para responder a la llamada.
Para poner fin a una llamada, pulse el botón
de control de llamada del auricular y, a
continuación, cuelgue el microteléfono.
NOTA: si tiene problemas para escuchar la conversación,
o los tiene su interlocutor, consulte la sección de compatibilidad en la página 30.
Usean laitteen pariliitos
IT
Associazione multipla
Puhelun soittaminen
1. N
osta luuri pidikkeestä. Valintaäänen pitäisi
kuulua luurista. (Jos ääntä ei kuulu, tarkista
laitteen yhteensopivuus sivulta 30).
2. P
aina kevytkuulokkeen puhelunhall
intapainiketta. Puheen merkkivalon
pitäisi syttyä sekä tukiasemassa että
kevytkuulokkeessa merkkinä onnistuneesta
yhteydenmuodostuksesta. Valintaäänen pitäisi
kuulua kevytkuulokkeesta. Valitse numero
puhelimesta.
Puheluun vastaaminen
1. Nosta luuri pidikkeestä
2. V
astaa puheluun painamalla kevytkuulokkeen
puhelunhallintapainiketta.
Lopeta puhelu painamalla kevytkuulokkeen
puhelunhallintapainiketta ja aseta sitten luuri
pidikkeeseen.
HUOMAUTUS: jos soittaja tai vastaaja kuulee puheäänen
huonosti, tarkista laitteen yhteensopivuus (sivu 30).
Per eseguire una chiamata
1. Sollevare la cornetta. La cornetta emette
il segnale di centrale (in caso contrario,
verificare la compatibilità a pagina 31).
2. Premere il pulsante di controllo delle
chiamate sull’auricolare. L’indicatore
luminoso sulla base e sull’auricolare dovrebbe
accendersi a indicare che il collegamento
è riuscito. L’auricolare emette il segnale di
centrale. Digitare il numero utilizzando la
tastiera del telefono.
Per rispondere a un chiamata
1. Sollevare la cornetta.
2. Premere il pulsante di controllo chiamate
sull’auricolare per rispondere alla chiamata.
Per terminare la chiamata, premere il pulsante
di controllo delle chiamate sull’auricolare, quindi
riagganciare la cornetta.
NOTA: se si riscontrano problemi di comunicazione,
verificare la compatibilità (pagina 31).
FR
NL
Couplage
Pour passer un appel :
1. Décrochez le combiné. La tonalité doit se faire
entendre dans le combiné (si ce n’est pas le cas,
procédez à une vérification de compatibilité en
vous reportant à la page 30).
2. Appuyez sur le bouton de contrôle d’appel de
l’oreillette. Les témoins d’appel s’allument
sur la base et l’oreillette, indiquant que la
connexion est établie. La tonalité doit se faire
entendre dans l’oreillette. Passez l’appel à
l’aide du clavier de votre téléphone.
Pour répondre à un appel :
1. Décrochez le combiné.
2. A
ppuyez sur le bouton de contrôle d’appel de
l’oreillette pour répondre à un appel.
Pour mettre fin à un appel, appuyez sur le
bouton de contrôle d’appel de l’oreillette, puis
raccrochez le combiné.
REMARQUE : si le son en réception est peu audible pour
vous ou votre interlocuteur, procédez à une vérification de
compatibilité (reportez-vous à la page 30).
Afstemmen bij verwisselen
van headset
Een oproep plaatsen:
1. Neem de telefoonhoorn van de haak. U dient
met de telefoonhoorn een kiestoon te horen
(zo niet, raadpleeg de compatibiliteit op pagina
31).
2. Druk op de gespreksknop op de headset. Het
spraakindicatielampje op het basisstation en
op de headset moet nu gaan branden, wat
aangeeft dat er verbinding is. U dient door de
headset een kiestoon te horen. Toets op de
telefoon het gewenste nummer in.
Een oproep aannemen:
1. Neem de telefoonhoorn van de haak.
2. Druk op de gespreksknop van de headset om
het gesprek aan te nemen.
Als u een gesprek wilt beëindigen, drukt u
op de gespreksknop van de headset en legt u
vervolgens de telefoonhoorn weer op de haak.
OPMERKING: Indien u of de ontvanger problemen
ondervindt met het geluid, raadpleegt u de compatibiliteit
(pagina 31).
21
Multi-shift Pairing
Enable
Aktivieren
Aktiver
Activar
Ota käyttöön
Activer
Attivato
Inschakelen
Activar
Aktivera
2
Setup 1, 2, 3 & 4
Flerskift-sammenkobling
Slik ringer du:
1. Løft av håndsettet. Du skal høre summetonen
gjennom håndsettet (hvis ikke, kontrollerer du
kompatibiliteten - se side 32).
2. Trykk på ringekontrollknappen på hodesettet.
Taleindikatorlampene på basen og hodesettet
skal tennes for å angi at sammenkoblingen
var vellykket. Du skal høre summetonen
gjennom hodesettet. Slå nummeret på
telefontastaturet.
Slik svarer du på en samtale:
1. Løft av håndsettet.
2. Trykk på ringekontrollknappen på hodesettet
for å svare på en samtale.
Når du skal avslutte en samtale, trykker du på
ringekontrollknappen på hodesettet og legger
det på.
MERK: Hvis enten du eller mottakeren har problemer
med å høre, kontrollerer du kompatibiliteten (side 32).
PT
22
SE
Or
Oder
Eller
O
Tai
Ou
Oppure
Of
Ou
Hvis du vil foretage en opringning, skal du
trykke på knappen til opkaldsstyring. Der
lyder en klartone i håndsættet (hvis ikke, skal
du kontrollere kompatibiliteten - se
Konfiguration 1, 2, 3 og 4). Ring op ved hjælp
af telefonens tastatur.
1
Tryk på knappen til opkaldsstyring på
headsettet for at besvare et opkald.
Tryk på knappen til opkaldsstyring på
headsettet for at afslutte et opkald. Hvis du
selv eller modtageren har problemer med at
høre samtalen, skal du kontrollere
kompatibiliteten (Konfiguration 1, 2, 3 og 4).
Multi-shift-matchning
Så här ringer du:
1. Lyft av luren. Kopplingstonen ska höras genom
luren (om den inte gör det kontrollerar du
kompatibiliteten – se sidan 32).
2. Tryck på headsetets samtalsknapp.
Talindikatorlamporna på basenheten och
headsetet bör tändas, vilket indikerar en
anslutning. Kopplingstonen ska höras genom
headsetet. Slå numret med knappsatsen på
telefonen.
Så här svarar du:
1. Lyft av luren.
2. Svara på ett samtal genom att trycka på
headsetets samtalsknapp.
Om du vill avsluta ett samtal trycker du på
samtalsknappen på headsetet och lägger sedan
på luren.
OBS! Om du eller personen i andra änden har svårt att
höra kontrollerar du kompatibiliteten (sidan 32)
ES
Para responder a una llamada, pulse el botón
de control de llamada del auricular.
Para poner fin a una llamada, pulse el botón
de control de llamada del auricular. Si tiene
problemas para escuchar la conversación, o
los tiene su interlocutor, consulte la sección
de compatibilidad de Configuración 1, 2, 3 y 4.
To make a call, press call control button. Dial
tone should sound through handset (If not,
check compatibility — see Setup 1, 2, 3 & 4).
Dial using the telephone keypad.
To answer a call, press the call control button
on the headset.
To end a call, press the call control button on
the headset. If either you or the recipient have
trouble hearing, please check compatibility
(Setup 1, 2, 3 & 4).
DE
Tätigen/Annehmen/Beenden
von Anrufen (Einrichtung 1, 2, 3 & 4)
Drücken Sie zum Tätigen eines Anrufs auf die
Gesprächstaste. Es sollte das Freizeichen zu
hören sein. (Ist dies nicht der Fall, überprüfen
Sie die Kompatibilität. Siehe Einrichtung 1, 2,
3 & 4.) Wählen Sie über das Tastenfeld des
Telefons die Nummer.
Drücken Sie zum Annehmen eines Anrufs auf
die Gesprächstaste auf dem Headset.
Realización, respuesta y
fin de llamadas
(Configuración 1, 2, 3 y 4)
Para realizar una llamada, pulse el botón de
control de llamada. Debería oír un tono de
llamada en el auricular (si no es así,
compruebe la compatibilidad; consulte
Configuración 1, 2, 3 y 4). Marque un número
mediante el teclado numérico del teléfono.
GBMaking/answering/ending
calls (Setup 1, 2, 3 & 4)
Emparelhamento múltiplo
Para efectuar uma chamada:
1. Levante o auricular. O tom de marcação
deverá soar através do auricular (se tal não
suceder, certifique-se da compatibilidade dos
dispositivos - consulte a página 32).
2. Prima o botão de conversação no auricular.
As luzes indicadoras de estado na base e no
auricular deverão iluminar-se, assinalando
uma ligação bem sucedida. Deverá ouvir
um toque de marcação no auricular. Marque
utilizando o teclado do telefone.
Para atender uma chamada:
1. Levante o auricular.
2. Prima o botão de conversação no auricular
para atender uma chamada.
Para terminar uma chamada, prima o botão de
conversação do auricular e pouse o auricular.
NOTA: Se se registarem problemas de audição, quer no
seu dispositivo quer no do seu interlocutor, certifique-se
da compatibilidade (página 32).
Foretage/besvare/
afslutte opkald
(Konfiguration 1, 2, 3 og 4)
Disable / Deaktivieren / Deaktiver
Desactivar / Poista käytöstä / Désactiver
Disattivato / Uitschakelen / Avaktivera
NO
DK
2
1
Making/Answering/Ending Calls
FI
Soittaminen, vastaaminen ja
puhelun lopettaminen
(Asennus 1, 2, 3 ja 4)
Soita puhelu painamalla puhelunhallintapaini
ketta. Luurista pitäisi kuulua valintaääni. (Jos
ääntä ei kuulu, tarkista laitteen
yhteensopivuus. Katso kohta Asennus 1, 2, 3
ja 4). Valitse numero puhelimesta.
Vastaa puheluun painamalla kevytkuulokkeen
puhelunhallintapainiketta.
Lopeta puhelu painamalla kevytkuulokkeen p
uhelunhallintapainiketta. Jos soittaja tai
vastaaja kuulee puheäänen huonosti, tarkista
laitteen yhteensopivuus (Asennus 1, 2, 3 ja 4).
Drücken Sie zum Beenden eines Anrufs auf
die Gesprächstaste auf dem Headset. Wenn
Sie oder Ihr Gesprächspartner Störgeräusche
wahrnehmen, überprüfen Sie die
Kompatibilität Einrichtung 1, 2, 3 & 4.
23
Making/Answering/Ending Calls
Making/Answering/Ending Calls
FR
Setup 5
Passer/prendre/terminer
des appels (Configurations 1, 2, 3 et 4)
NO
(Oppsett 1, 2, 3 og 4)
Pour passer un appel, appuyez sur le bouton
de contrôle d’appel. La tonalité doit se faire
entendre dans le combiné (si ce n’est pas le
cas, procédez à une vérification de
compatibilité en vous reportant aux
configurations 1, 2, 3 et 4). Composez le
numéro à l’aide du clavier de votre téléphone.
Druk op de gespreksknop om een oproep te
plaatsen. U dient door de headset een
kiestoon te horen (zo niet, raadpleeg de
compatibiliteit—zie Installatie 1, 2, 3 & 4).
Toets op de telefoon het gewenste nummer
in.
Druk op de gespreksknop op de headset om
een oproep te beëindigen. Indien u of de
ontvanger problemen ondervindt met het
geluid, raadpleegt u de compatibiliteit
(Installatie 1, 2, 3 & 4).
24
B. To make/answer a call:
1. Press the call control button to raise the
handset lifter.
2. Use the telephone keypad to dial the number.
Para efectuar uma chamada, prima o botão
de conversação. O tom de marcação deverá
soar através do auricular (Se tal não suceder,
certifique-se da compatibilidade dos
dispositivos - consulte Configuração 1, 2, 3 &
4). Marque utilizando o teclado do telefone.
To end a call, press the call control button to lower
the handset lifter. The handset will return to the
base.
A
Para atender uma chamada, prima o botão de
conversação no auricular.
If either you or the recipient have trouble hearing,
please check compatibility (page 29).
DE
2
SE
A. Testen Sie zunächst die richtige Einstellung des
Telefonhörer-Lifters.
1. Drücken Sie auf dem Headset auf die
Gesprächstaste, um den Telefonhörer-Lifter zu
aktivieren, und nehmen Sie anschließend den
Hörer ab. Wenn der Hörer hoch genug
abgenommen wird, ertönt das Freizeichen.
Ringa/besvara/avsluta samtal
(Konfiguration 1, 2, 3 och 4)
2. Wenn dies nicht der Fall ist, stellen Sie den
Höhenschalter des Telefonhörer-Lifters ein
oder positionieren Sie den Lifter unter dem
Hörer neu.
Om du vill ringa trycker du på
samtalsknappen. Kopplingstonen ska höras
genom luren (om den inte gör det kontrollerar
du kompatibiliteten – se Konfiguration 1, 2, 3
och 4). Slå numret med knappsatsen på
telefonen.
Om du vill besvara ett samtal trycker du på
samtalsknappen på headsetet.
Om du vill avsluta ett samtal trycker du på
samtalsknappen på headsetet. Om du eller
personen i andra änden har svårt att höra
kontrollerar du kompatibiliteten
(Konfiguration 1, 2, 3 och 4).
Tätigen/Annehmen/Beenden
von Anrufen (Einrichtung 5 mit
optionalem Telefonhˆrer-Lifter)
Para terminar uma chamada, prima o botão
de conversação no auricular. Se se
detectarem problemas de audição, quer no
seu dispositivo quer no do seu interlocutor,
certifique-se da compatibilidade
(Configuração 1, 2, 3 & 4).
Verwenden Sie Klebeband, um den TelefonhörerLifter zu befestigen.
B. So nehmen Sie Anrufe an:
B
1. Drücken Sie auf die Gesprächstaste, um den
Telefonhörer-Lifter anzuheben.
2
Druk op de gespreksknop op de headset om
een oproep aan te nemen.
Use mounting tape to secure the handset lifter in
position.
1
(Configuração 1, 2, 3 & 4)
Per rispondere a una chiamata, premere il
pulsante di controllo delle chiamate
sull’auricolare.
(Installatie 1, 2, 3 & 4)
2. If no dial tone, adjust handset lifter height
switch or re-position the lifter under the
handset.
PTEfectuar/atender/
terminar chamadas
Per effettuare una chiamata, premere il
pulsante di controllo delle chiamate. La
cornetta emette il segnale di centrale (in caso
contrario, verificare la compatibilità - vedere
la sezione Configurazione 1, 2, 3 e 4). Digitare
il numero utilizzando la tastiera del telefono.
Oproepen plaatsen/
aannemen/beëindigen
A. First, test proper set up of the handset lifter.
1. Press the call control button on headset to
activate handset lifter and lift handset from
phone. Dial tone should sound if the handset is
raised high enough.
Når du skal avslutte en samtale, trykker du
på ringekontrollknappen på hodesettet. Hvis
enten du eller mottakeren har problemer
med å høre, kontrollerer du kompatibiliteten
(oppsett 1, 2, 3 og 4).
(Configurazione 1, 2, 3 e 4)
NL
GBMaking/answering/ending
calls (Setup 5 with Optional Handset Lifter)
Når du skal svare på en samtale, trykker du
på ringekontrollknappen på hodesettet.
ITEsecuzione/risposta/
termine delle chiamate
Per terminare una chiamata, premere il
pulsante di controllo delle chiamate
sull’auricolare. Se si riscontrano problemi di
comunicazione, verificare la compatibilità
(Configurazione 1, 2, 3 e 4).
with Optional Handset Lifter
Når du skal ringe, må du trykke på
ringekontrollknappen. Ringetone skal høres i
hodesettet (Hvis ikke, kan du sjekke
kompatibilitet – se oppsett 1, 2, 3 og 4). Slå
nummeret på telefontastaturet.
Pour décrocher, appuyez sur le bouton de
contrôle d’appel sur l’oreillette.
Pour raccrocher, appuyez sur le bouton de
contrôle d’appel sur l’oreillette. Si le son en
réception est peu audible pour vous ou votre
interlocuteur, procédez à une vérification de
compatibilité (reportez-vous aux
configurations 1, 2, 3 et 4).
Ringe / svare på samtaler /
avslutte samtaler
2. Wählen Sie über das Tastenfeld des Telefons die
gewünschte Nummer.
Um einen Anruf zu beenden, drücken Sie die
Gesprächstaste, um den Telefonhörer wieder
abzusenken. Der Hörer wird auf die Basisstation
zurückgelegt.
Wenn Sie oder Ihr Gesprächspartner
Störgeräusche wahrnehmen, überprüfen Sie die
Kompatibilität (siehe Seite 29).
25
Making/Answering/Ending Calls
Setup 5
DK
with Optional Handset Lifter
Foretage/besvare/afslutte
opkald (Installation 5 – Med håndsætløfter
Making/Answering/Ending Calls
FI
B. Sådan foretages/besvares et opkald:
Kiinnitä luuripidike paikalleen kiinnitysteipillä.
1. Tryk på knappen til opkaldsstyring for at
aktivere håndsætløfterens løftefunktion.
B. Puhelun soittaminen ja puheluun
vastaaminen
Utilizzare il nastro di montaggio per posizionare
in modo sicuro il dispositivo di risposta
automatico.
2. Ring op ved hjælp af telefonens tastatur.
1. Nosta luuripidikettä painamalla puhelunhallin
tapainiketta.
B. Per eseguire/rispondere a una chiamata:
Realización, respuesta y fin
de llamadas (ConfiguraciÛn 5 con el
dispositivo para descolgar el telÈfono optativo)
A. Antes,compruebe que el dispositivo para
descolgar el teléfono se ha instalado
correctamente.
1. Pulse el botón de control de llamada del
auricular para activar el dispositivo y
descuelgue el microteléfono. Si lo levanta lo
suficiente, oirá un tono de llamada.
2. En caso contrario, ajuste el interruptor de
altura del dispositivo para descolgar el teléfono
o corrija la posición de dicho dispositivo bajo el
microteléfono.
B
Utilice cinta adhesiva para fijar el dispositivo para
descolgar el teléfono en la posición correcta.
B. Para realizar o responder a una llamada:
2
1. Pulse el botón de control de llamada para
levantar el dispositivo para descolgar el
teléfono.
2. Marque el número utilizando el teclado
numérico del teléfono.
Para finalizar una llamada, pulse el botón de
control de llamada para bajar el dispositivo para
descolgar el teléfono. El microteléfono volverá a la
base.
Si tiene problemas para escuchar la conversación,
o los tiene su interlocutor, consulte la sección de
compatibilidad de la página 30.
26
1. Premere il pulsante di controllo delle
chiamate sull’auricolare per attivare il
dispositivo di risposta automatico e sollevare
la cornetta. Se la cornetta è stata sollevata a
sufficienza, è possibile udire il segnale di
centrale.
2. Jos valintaääntä ei kuulu, säädä
luuripidikkeen korkeutta kytkimestä tai
vaihda luuripidikkeen paikkaan.
2. Se non viene emesso alcun segnale, regolare
l’altezza del dispositivo di risposta automatico
o riposizionare il dispositivo sotto la cornetta.
1. Premere il pulsante di controllo delle
chiamate per sollevare il dispositivo di
risposta automatico.
2. Valitse numero puhelimesta.
Lopeta puhelu painamalla puhelunhallintapainik
etta, jolloin luuripidike asettuu kannattimeen.
Luuri palautuu tukiasemalle.
Hvis du selv eller modtageren har problemer med
at høre samtalen, skal du kontrollere
kompatibiliteten (side 30).
ES
A. In primo luogo, verificare la corretta
configurazione del dispositivo di risposta
automatico.
Brug monteringstape til at fastgøre
håndsætløfteren på den korrekte placering.
Hvis du vil afslutte et opkald, skal du trykke på
knappen til opkaldsstyring for at aktivere
håndsætløfterens sænkefunktion. Håndsættet
sættes tilbage i baseenheden.
2
dispositivo di risposta automatico opzionale)
1. Aktivoi luuripidike painamalla
kevytkuulokkeen puhelunhallintapainiketta ja
nosta luuri puhelimesta. Valintaäänen pitäisi
kuulua, kun luuri nostetaan tarpeeksi
korkealle.
2. Hvis der ikke er nogen klartone, skal du justere
håndsætløfterens højdekontakt eller justere
løfterens placering under håndsættet.
A
ITEsecuzione/risposta/termine
delle chiamate (Configurazione 5 con
A. Testaa ensin, että luurinpidike on oikein
asennettu.
1. Tryk på knappen til opkaldsstyring på
headsettet for at aktivere håndsætløfteren, og
løft håndsættet af telefonen. Der lyder en
klartone, hvis håndsættet er løftet højt nok.
1
Soittaminen, vastaaminen
ja puhelun lopettaminen
(Asentaminen 5 – Kun käytössä on luuripidike
/lisävaruste)
/ekstraudstyr)
A. Først skal du kontrollere, at håndsætløfteren er
korrekt installeret.
FR
2. Utilizzare la tastiera del telefono per digitare
il numero.
HUOMAUTUS: jos soittaja tai vastaaja kuulee
puheäänen huonosti, tarkista laitteen
yhteensopivuus (sivu 30).
Per terminare una chiamata, premere il
pulsante di controllo delle chiamate per
abbassare il dispositivo di risposta automatico
La cornetta tornerà nella base.
Passer/prendre/terminer
des appels (Configuration 5 avec levier
Se si riscontrano problemi di comunicazione,
verificare la compatibilità (pagina 31).
dÈcrochÈ du combinÈ en option)
A. Vérifiez avant tout l’installation du décroché
de combiné :
1. Appuyez sur le bouton de contrôle d’appel de
l’oreillette afin d’activer le levier décroché du
combiné, puis décrochez le combiné. Si le
combiné est suffisamment en hauteur, vous
devriez entendre une tonalité.
2. Si vous n’entendez rien, réglez la hauteur du
levier décroché ou replacez le levier décroché
sous l’icône du combiné.
Utilisez l’adhésif de montage pour maintenir le
levier décroché du combiné en position.
B. Pour passer/prendre un appel :
1. Appuyez sur le bouton de contrôle d’appel
pour que le levier décroche le combiné.
2. Utilisez les touches du téléphone pour
composer le numéro.
Pour raccrocher, appuyez sur le bouton de
contrôle d’appel pour abaisser le levier du
combiné. Le combiné du téléphone reprend sa
position sur le socle.
Si le son en réception est peu audible pour vous
ou votre interlocuteur, procédez à une
vérification de compatibilité (page 30).
NL
Oproepen plaatsen/
aannemen/beëindigen
(Installatie 5 met optionele telefoonhoorn-lifter)
A. Test eerst de installatie van de
telefoonhoorn-lifter:
1. Druk op de gespreksknop op de headset om
de telefoonhoorn-lifter te activeren en de
telefoonhoorn van de haak te nemen. U dient
de gesprekstoon te horen als de
telefoonhoorn hoog genoeg is opgetild.
2. Als u geen kiestoon hoort, moet u de hoogte
van de telefoonhoorn-lifter of de positie van
de lifter onder de hoorn aanpassen.
Gebruik montagetape om de telefoonhoornlifter op de juiste positie vast te maken.
B. Een oproep plaatsen/aannemen:
1. Druk op de gespreksknop om de
telefoonhoorn-lifter op te tillen.
2. Gebruik het toetsenblok van de telefoon om
het nummer te kiezen.
Als u een gesprek wilt beëindigen, drukt u op de
gespreksknop om de telefoonhoorn-lifter te
laten zakken. De handset wordt terug op het
basisstation geplaatst.
Indien u of de ontvanger problemen ondervindt
met het geluid, raadpleegt u de compatibiliteit
(pagina 31).
27
Making/Answering/Ending Calls
2. Hvis du ikke hører noen ringetone, justerer
du håndsettløfterens høydebryter eller
flytter på løfteren under håndsettet.
Bruk festetape til å holde håndsettløfteren på
plass.
B. Slik ringer/svarer du på en samtale:
1. Trykk på ringekontrollknappen for å løfte
håndsettløfteren.
2. Slå nummeret på telefontastaturet.
Når du skal avslutte en samtale, trykker du
på ringekontrollknappen for å senke
håndsettløfteren. Håndsettet går tilbake til
baseenheten.
Hvis enten du eller mottakeren har problemer
med å høre, kontrollerer du kompatibiliteten
(side 32).
PTEfectuar/atender/
terminar chamadas
(Configuração 5 com o Controlador de
Auscultador Opcional.)
A. Comece por testar a configuração
adequada do controlador de auscultador.
1. Prima o botão de conversação do auricular
para activar o controlador e levante o
auscultador do telefone. Deverá escutar o
tom de chamada, se o auscultador estiver à
altura suficiente.
2. Se tal não suceder, ajuste o interruptor de
altura do controlador ou volte a colocar o
controlador sob o auscultador.
Utilize fita adesiva para fixa o controlador na
posição correcta.
B. Para efectuar/atender uma chamada:
1. Prima o botão de conversação para
levantar o controlador.
2. Utilize o teclado do telefone para marcar o
número.
Para terminar uma chamada, prima o botão
de conversação para pousar o controlador. O
auscultador regressa à base.
A. Kontrollera först att lurlyftaren är korrekt
installerad.
2
1. Tryck på headsetets samtalsknapp så att
lurlyftaren aktiveras och lyft upp luren från
telefonen. Kopplingstonen ska höras om
luren lyfts tillräckligt högt.
1
2. Om du inte hör någon kopplingston
anpassar du lurlyftarens höjdinställning
eller justerar lurlyftarens placering under
luren.
Montera lurlyftaren stabilt i läge med fästtejp.
B. Så här ringer/besvarar du ett samtal:
1
1. Tryck på samtalsknappen så att lurlyftaren
lyfter luren.
3
1. Trykk på ringekontrollknappen på
hodesettet for å aktivere håndsettløfteren,
og løft håndsettet fra telefonen. Du skal
høre en ringetone hvis håndsettet er løftet
høyt nok.
(Konfiguration 5 med lurlyftare /tillval))
4
A. Slik tester du at håndsettløfteren er stilt
riktig inn:
Ringa/besvara/avsluta samtal
2
tilleggsutstyr)
SE
4
Ringe / svare på samtaler /
avslutte samtaler
(Oppsett 5 med håndsettløfter som
3
NO
Checking Compatibility
2. Slå numret med knappsatsen på telefonen.
Avsluta ett samtal genom att trycka på
samtalsknappen så att lurlyftaren sänker
luren. Luren återgår till basenheten.
Om du eller personen i andra änden har svårt
att höra kontrollerar du kompatibiliteten
(sidan 32)
GB
Checking compatibility
NOTE: The compatibility setting of “1” is set at the
factory to work with most phones. However, if you do not
hear a dial tone, if either you or the recipient are having
trouble hearing, or if you experience buzzing/hissing,
please follow the directions below.
Adjust your telephone configuration dial on
the base to position 3 for the following
telephones: 2420, 4610SW, 4620, 4620SW,
4621SW, 4622SW, 4625SW, 4630SW, 5420,
5610, 5620, 7403D, 7405D, 7407D, 7406, 8403,
8405, 8410D, 8411D, 8434, 8510ISDN and
7506ISDN.
Adjust the configuration dial to position 1 for
the following telephones: 2410, 4630, 5410,
6416D+M, 6424D+M and 9600 series.
If you cannot hear a dial tone through your
headset, use a coin or small screwdriver to
turn the telephone configuration dial until you
can. Make sure that a number is aligned with
the position indicator.
1. Make a call to someone you know.
2. While speaking, turn the configuration dial
through the four positions.
3. Select the position that provides the best
sound quality for both you and the
recipient.
DE
Überprüfen der
Kompatibilität
HINWEIS: Die Kompatibilität wird bei den meisten
Telefonen ab Werk auf „1“ eingestellt. Wenn jedoch kein
Freizeichen ertönt bzw. Sie oder Ihr Gesprächspartner
Störgeräusche wahrnehmen, befolgen Sie die
nachstehenden Anweisungen.
Stellen Sie den Konfigurationsdrehschalter
des Telefons für die folgenden Telefone an der
Basisstation auf Position 3 ein: 2420, 4610SW,
4620, 4620SW, 4621SW, 4622SW, 4625SW,
4630SW, 5420, 5610, 5620, 7403D, 7405D,
7407D, 7406, 8403, 8405, 8410D, 8411D, 8434,
8510ISDN und 7506ISDN.
Stellen Sie den Konfigurationsdrehschalter
für die folgenden Telefone auf Position 1 ein:
2410, 4630, 5410, 6416D+M, 6424D+M und
9600 Serie.
Wenn Sie über Ihr Headset kein Freizeichen
hören, drehen Sie mithilfe einer Münze oder
eines kleinen Schraubendrehers den Konfigur
ationsdrehschalter des Telefons, bis Sie den
Wählton hören können. Stellen Sie sicher,
dass der eingestellte Wert an der
Positionsanzeige ausgerichtet ist.
1. Tätigen Sie einen Anruf und
2. D
rehen Sie während des Gesprächs den K
onfigurationsdrehschalter auf alle vier
Positionen.
3. Wählen Sie die Position aus, die Ihnen und
Ihrem Gesprächspartner die beste
Tonqualität bietet.
Se se registarem problemas de audição, quer
no seu dispositivo quer no do seu
interlocutor, certifique-se da compatibilidade
(página 32).
28
29
Checking Compatibility
Checking Compatibility
FI
2
3
4
1
HUOMAUTUS: Yhteensopivuuskytkimen tehdasasetuksena
on 1, jotta laite toimisi useimpien puhelinten kanssa. Jos
et kuitenkaan kuule valintaääntä, jos soittaja tai puhelun
vastaanottaja kuulee äänen huonosti tai jos linjalta kuuluu
surinaa tai suhinaa, noudata seuraavia ohjeita.
IT
Regolare il selettore di configurazione del
telefono posto sulla base in posizione 3 per i
seguenti telefoni: 2420, 4610SW, 4620, 4620SW,
4621SW, 4622SW, 4625SW, 4630SW, 5420,
5610, 5620, 7403D, 7405D, 7407D, 7406, 8403,
8405, 8410D, 8411D, 8434, 8510ISDN e
7506ISDN.
3
Säädä puhelimesi asetussäädin asentoon 1
seuraaville puhelimille: 2410, 4630, 5410,
6416D+M, 6424D+M ja 9600-sarja.
Regolare il selettore di configurazione in
posizione 1 per i seguenti telefoni: 2410, 4630,
5410, 6416D+M, 6424D+M e serie 9600.
Jos kuulokkeesta ei kuulu valintaääntä, käännä
puhelimen asetussäädintä kolikolla tai
ruuvimeisselillä, kunnes kuulet sen. Tarkista,
että numero on merkin kohdalla.
Se l’auricolare non emette alcun segnale di
centrale, utilizzare una moneta o un piccolo
cacciavite per ruotare il selettore di
configurazione del telefono fino a bloccarla.
Accertarsi di allineare un numero all’indicatore
di posizione.
1. Soita jollekin tutullesi.
DK
Kontrol af kompatibilitet
Bemærk: Kompatibilitetsindstillingen “1” er angivet fra
fabrikken, for at sikre kompatibilitet med de fleste
telefoner. Hvis der imidlertid ikke lyder en klartone, eller
hvis enten du eller modtageren har problemer med at
høre samtalen eller du kan høre susen eller hvislen,
skal du følge vejledningen nedenfor.
Hvis du bruger en af følgende telefoner, skal
du sætte telefonens konfigurationsdrejeknap
på baseenheden i position 3: 2420, 4610SW,
4620, 4620SW, 4621SW, 4622SW, 4625SW,
4630SW, 5420, 5610, 5620, 7403D, 7405D,
7407D, 7406, 8403, 8405, 8410D, 8411D, 8434,
8510ISDN eller 7506ISDN.
Hvis du bruger en af følgende telefoner, skal
baseenhedens konfigurationsknap sættes i
position 1: 2410, 4630, 5410, 6416D+M,
6424D+M eller 9600-serien.
Hvis du ikke kan høre en klartone i headsettet,
skal du ved hjælp af en mønt eller en lille
skruetrækker dreje på konfigurationsdrejeknapp
en på telefonen, indtil du kan høre en klartone.
Kontroller, at der står et tal ud for
positionsindikatoren.
1. Ring til en, du kender.
2. Mens du taler, skal du prøve hver af de fire
positioner på konfigurationsdrejeknappen.
3. Vælg den indstillingsmulighed, som giver
den bedste lyd for både dig og modtageren.
ES
NOTA: el ajuste de compatibilidad 1, predeterminado de
fábrica, funciona con la mayoría de los teléfonos. No
obstante, si no oye ningún tono de llamada, si quien
realiza o quien recibe la llamada no puede escuchar
nítidamente la conversación, o si oye un zumbido o
silbido, siga las instrucciones que se indican a
continuación.
Ajuste el regulador de configuración del
teléfono en la base en la posición 3 para los
siguientes teléfonos: 2420, 4610SW, 4620,
4620SW, 4621SW, 4622SW, 4625SW, 4630SW,
5420, 5610, 5620, 7403D, 7405D, 7407D, 7406,
8403, 8405, 8410D, 8411D, 8434, 8510ISDN y
7506ISDN.
Ajuste el regulador de configuración del
teléfono en la posición 1 para los siguientes
teléfonos: 2410, 4630, 5410, 6416D+M,
6424D+M y serie 9600.
Si no oye un tono de llamada en el auricular,
utilice una moneda o un destornillador
pequeño para ajustar el regulador de
configuración del teléfono hasta que encuentre
una posición que solucione el problema.
Asegúrese de que haya un número alineado
con el indicador de posición.
1. Realice una llamada.
2. Durante la conversación, pruebe las cuatro
posiciones del regulador de configuración y
3. Seleccione la que ofrezca el sonido de
mejor calidad para ambos.
30
2. Säädä puhuessasi asetussäädintä
vuorotellen kaikkiin neljään asentoon.
Comprobación de
compatibilidad
FR
Verifica della compatibilità
NOTA: per la maggior parte dei telefoni, l’impostazione di
compatibilità predefinita è “1”. Tuttavia, se non si riceve il
segnale di centrale, se uno o entrambi degli interlocutori
riscontrano problemi nella comunicazione o se vengono
emessi ronzii o sibili, attenersi alle istruzioni riportate di
seguito.
Säädä puhelimesi asetussäädin tukiasemassa
asentoon 3 seuraaville puhelinmalleille: 2420,
4610SW, 4620, 4620SW, 4621SW, 4622SW,
4625SW, 4630SW, 5420, 5610, 5620, 7403D,
7405D, 7407D, 7406, 8403, 8405, 8410D, 8411D,
8434, 8510ISDN ja 7506ISDN.
2
4
1
Yhteensopivuuden
tarkistaminen
1. Effettuare una chiamata.
3. Valitse asento, jossa ääni kuuluu parhaiten
sekä sinun että vastaanottajan kuulokkeesta.
2. Durante la conversazione, ruotare il selettore
di configurazione del telefono nelle quattro
posizioni.
Vérification de la
compatibilité
3. Selezionare la posizione che consente agli
interlocutori di ricevere la migliore qualità
audio.
REMARQUE : le réglage de compatibilité « 1 » est
paramétré en usine et assure généralement une
compatibilité avec la plupart des téléphones. Cependant,
si vous n’entendez pas de tonalité, si l’un des
interlocuteurs a du mal à entendre l’autre ou si vous
entendez des bourdonnements ou des sifflements,
veuillez suivre les instructions ci-dessous.
Réglez la position du cadran de configuration
de la base sur 3 pour les téléphones suivants :
2420, 4610SW, 4620, 4620SW, 4621SW, 4622SW,
4625SW, 4630SW, 5420, 5610, 5620, 7403D,
7405D, 7407D, 7406, 8403, 8405, 8410D, 8411D,
8434, 8510ISDN et 7506ISDN.
Réglez la position du cadran de configuration
sur 1 pour les téléphones suivants : 2410, 4630,
5410, 6416D+M, 6424D+M et la série 9600.
Si vous n’entendez pas de tonalité dans votre
oreillette, tournez le cadran de configuration à
l’aide d’une pièce de monnaie ou d’un petit
tournevis jusqu’à l’obtenir. Assurez-vous qu’un
chiffre est aligné avec l’indicateur de position.
1. Appelez quelqu’un que vous connaissez.
2. Tout en parlant, faites tourner le bouton de
configuration pour essayer les quatre positions.
3. Choisissez celle qui offre la meilleure qualité
de communication pour vous et votre
interlocuteur.
NL
Compatibiliteit testen
OPMERKING: de compatibiliteitsinstelling “1” is een
fabrieksinstelling en werkt bij de meeste telefoons.
Echter, als u geen kiestoon hoort, als u of de ontvanger
problemen ondervindt met het geluid, of als u last hebt
van brom- of sisgeluiden, volgt u de onderstaande
stappen.
Voor de volgende telefoons dient u de
configuratieschakelaar voor uw telefoon op het
basisstation in te stellen op stand 3: 2420,
4610SW, 4620, 4620SW, 4621SW, 4622SW,
4625SW, 4630SW, 5420, 5610, 5620, 7403D,
7405D, 7407D, 7406, 8403, 8405, 8410D, 8411D,
8434, 8510ISDN, en 7506ISDN.
Voor de volgende telefoons dient u de
configuratieschakelaar in te stellen op stand 1:
2410-, 4630-, 5410-, 6416D+M-, 6424D+M- en
9600-serie.
Indien u geen kiestoon hoort in uw headset,
kunt u met behulp van een muntje of kleine
schroevendraaier de configuratieregeling van
uw telefoon bijstellen tot u de kiestoon wel
hoort. Zorg er voor dat een cijfer uitgelijnd is
met de positie-indicator.
1. Bel iemand op die u kent.
2. Draai, terwijl u spreekt, de
configuratieregeling langs de vier posities.
3. Zet de regeling in de positie die de beste
geluidskwaliteit biedt voor zowel u als de
ontvanger.
31
Checking Compatibility
NO
Kontrollere
kompatibiliteten
MERK: Kompatibilitetsinnstillingen 1 er fabrikkinnstilt til
å fungere med de fleste telefoner. Hvis du ikke hører
summetonen, hvis enten du eller mottakeren har
problemer med å høre, eller hvis du hører summing/
susing, følger du retningslinjene nedenfor.
Juster telefonens konfigurasjonshjul på basen
til posisjon 3 for de følgende telefonene: 2420,
4610SW, 4620, 4620SW, 4621SW, 4622SW,
4625SW, 4630SW, 5420, 5610, 5620, 7403D,
7405D, 7407D, 7406, 8403, 8405, 8410D,
8411D, 8434, 8510ISDN og 7506ISDN.
Juster konfigurasjonshjulet til posisjon 1 for
de følgende telefonene: 2410, 4630, 5410,
6416D+M, 6424D+M og 9600-serien.
Hvis du ikke kan høre summetonen gjennom
hodesettet, bruker du en mynt eller en liten
skrutrekker til å dreie på konfigurasjonshjulet
til telefonen helt til du kan høre den. Pass på
at et nummer står på linje med
posisjonsindikatoren.
1. Ring noen du kjenner.
PT
SE
Adjusting the Volume
Kontrollera kompatibilitet
OBS! Kompatibilitetsinställningen 1 är fabriksinställd för
att fungera med de flesta telefoner. Men om du inte hör
någon kopplingston, om du eller personen i andra änden
har svårt att höra eller om du hör surrande/brus följer
du anvisningarna nedan.
A
A.
Listening volume
NOTE: Ensure you set your telephone’s volume at the mid
range before adjusting the AWH75 volume.
Justera konfigurationsväljaren på basenheten
till läge 3 för följande telefoner: 2420,
4610SW, 4620, 4620SW, 4621SW, 4622SW,
4625SW, 4630SW, 5420, 5610, 5620, 7403D,
7405D, 7407D, 7406, 8403, 8405, 8410D,
8411D, 8434, 8510ISDN och 7506ISDN.
Minor adjust
Push on the “+” and “–” buttons to adjust listening volume
in minor incremental adjustments.
NOTE: You must be in talk mode (i.e. on a call) to adjust.
Justera konfigurationsväljaren till läge 1 för
följande telefoner: 2410, 4630, 5410,
6416D+M, 6424D+M och 9600-serien.
Major adjust
Use listening volume major adjust control on the back of
the base for large incremental adjustments.
Om du inte hör kopplingstonen genom
headsetet kan du vrida på
konfigurationsväljaren med ett mynt eller en
liten skruvmejsel tills du hör tonen.
Kontrollera att konfigurationsindikatorn är
riktad rätt mot ett nummer.
NOTE: 1 is the loudest setting.
4 is the lowest setting.
B.
2. Under samtalet vrider du på
konfigurationsväljaren och provar de fyra
olika inställningarna.
3. Velg posisjonen som gir best lydkvalitet for
både deg og den du snakker med.
3. Välj det läge som ger bäst ljudkvalitet för
både dig och den du pratar med.
Headset mute
To mute headset, long press the volume down button (3
seconds). Press again to unmute.
1. Ring upp någon du känner.
2. Mens du snakker, dreier du
konfigurasjonshjulet gjennom de fire
posisjonene.
Talk indicator light on base will flash while muted.
You will hear 3 rapid beeps every 30 seconds to indicate
that mute is on.
B
C.
Speaking volume
Minor adjust
Use the speaking volume minor adjust control on the back
of the base for minor incremental adjustments.
Verificar compatibilidade
NOTA: A maioria dos telefones apresenta uma definição
de compatibilidade de “1” vinda de fábrica. No entanto,
se não escutar um tom de marcação, se se detectarem
dificuldades de audição no seu auricular ou no do seu
interlocutor, ou se ouvir zumbidos/silvos, siga as
instruções em baixo.
Ajuste o botão de configuração do telefone
para a posição 3, nos seguintes telefones:
2420, 4610SW, 4620, 4620SW, 4621SW,
4622SW, 4625SW, 4630SW, 5420, 5610, 5620,
7403D, 7405D, 7407D, 7406, 8403, 8405,
8410D, 8411D, 8434, 8510ISDN e 7506ISDN.
gb VOLUME
NOTE: You must be in talk mode (i.e. on a call) to adjust.
Major adjust
Use the speaking volume major adjust control on the
bottom of the base for large incremental adjustments.
C
NOTE: A is the lowest setting.
B is the most common setting.
D is the loudest setting.
Ajuste o botão de configuração do telefone para
a posição 1, nos seguintes telefones: 2410,
4630, 5410, 6416D+M, 6424D+M e a série 9600.
Se não ouvir um tom de marcação no seu
auricular, utilize uma moeda ou chave de
fendas pequena para rodar o botão de
configuração do telefone até ao máximo.
Certifique-se de que um número está
alinhado com o indicador de posição.
1. Efectue uma chamada.
2. Durante a conversação, coloque o botão de
configuração nas quatro posições
disponíveis.
3. Seleccione a posição que lhe proporciona a
melhor qualidade de som para si e para o
seu interlocutor.
32
33
Adjusting the Volume
A
Adjusting the Volume
de LAUTSTÄRKEREGELUNG
dk VOLUMENKONTROL
es AJUSTE DEL VOLUMEN
A. Hörlautstärke
A. Lyttevolumen
A.
HINWEIS: Stellen Sie sicher, dass Sie das
Telefon auf eine angenehme Lautstärke
eingestellt haben, bevor Sie die Lautstärke des
AWH75 einstellen.
Anpassen der Lautstärke (geringfügig)
Drücken Sie auf die Tasten „+“ oder „–“, um
die Hörlautstärke geringfügig lauter oder
leiser zu stellen.
B.
B. Headset-Stummschaltung
C.
C
Sprechlautstärke
Anpassen der Lautstärke (geringfügig)
Verwenden Sie die auf der Rückseite der
Basisstation befindliche Taste zur
geringfügigen Anpassung der
Sprechlautstärke.
HINWEIS: Sie müssen sich zum Anpassen im
Gesprächsmodus (d. h. im Gespräch) befinden.
Anpassen der Lautstärke (in größeren
Schritten)
Verwenden Sie die auf der Unterseite der
Basisstation befindliche Taste zur Anpassung
der Sprechlautstärke in größeren Schritten.
HINWEIS: „A“ ist die niedrigste Einstellung.
„B“ ist die häufigste Einstellung.
„D“ ist die lauteste Einstellung.
34
NOTA: debe estar en el modo de conversación
(es decir, en una llamada) para realizar ajustes.
Ajuste amplio
Utilice el controlador de ajuste amplio del
volumen de escucha, situado en la parte
posterior de la base, para ajustar el volumen
en una escala de variación amplia.
Deaktivering af lyden på
headsettet
NOTA:el ajuste de volumen más alto es 1.
El ajuste de volumen más bajo es 4.
B.
Cuando la función Mute está activada, la luz
indicadora de conversación de la base
parpadea.
Baseenhedens indikatorlampe for tale
blinker, mens lyden er deaktiveret.
Der lyder 3 hurtige bip hvert 30. sekund for at
angive, at lydløs er aktiveret.
C.
Talevolumen
Finindstilling
Brug knappen til finindstilling af talevolumen
bag på baseenheden, hvis du vil justere
volumen i små trin ad gangen.
BEMÆRK: Du skal være i taletilstand (dvs. en
samtale skal være i gang) for at kunne udføre
justeringen.
Overordnet indstilling
Brug knappen til finindstilling af talevolumen
bag på baseenheden, hvis du vil justere
volumen i små trin ad gangen.
BEMÆRK: A er den svageste indstilling.
B er den mest almindelige indstilling.
D er den kraftigste indstilling.
Función Mute del auricular
Para activar la función Mute del auricular,
mantenga pulsado el botón de bajar el
volumen durante tres segundos. Vuelva a
pulsarlo para desactivar la función Mute.
Hvis du vil deaktivere lyden på headsettet,
skal du trykke på volumen ned i tre sekunder.
Tryk på knappen igen for at aktivere
mikrofonen.
Während der Stummschaltung des Headsets
blinkt die Gesprächsleuchtanzeige.
Alle 30 Sekunden erklingen 3 schnell
aufeinander folgende Pieptöne, die darauf
hinweisen, dass das Headset
stummgeschaltet ist.
Ajuste corto
Pulse los botones + y – para ajustar el
volumen de escucha en una escala de
variación corta.
BEMÆRK: 1 er den kraftigste indstilling.
4 er den laveste indstilling.
Halten Sie zum Stummschalten des Headsets
die Taste zum Verringern der Lautstärke 3
Sekunden lang gedrückt. Um die
Stummschaltung aufzuheben, drücken Sie
erneut auf diese Taste.
B
Finindstilling
Tryk på knapperne “+” og “–” for at justere
lyttevolumen i små trin ad gangen.
Overordnet indstilling
Brug knappen til overordnet indstilling af
lyttevolumen bag på baseenheden, hvis du vil
justere lyttevolumen i store trin ad gangen.
Anpassen der Lautstärke (in größeren
Schritten)
Verwenden Sie die auf der Rückseite der
Basisstation befindliche Taste zur Anpassung
der Hörlautstärke in größeren Schritten.
HINWEIS: „1“ ist die lauteste Einstellung.
„4“ ist die niedrigste Einstellung.
NOTA: antes de ajustar el volumen del auricular
AWH75, asegúrese de que el volumen del
teléfono está en un nivel intermedio
BEMÆRK: Du skal være i taletilstand (dvs. en
samtale skal være i gang) for at kunne udføre
justeringen.
HINWEIS: Sie müssen sich zum Anpassen im
Gesprächsmodus (d. h. im Gespräch) befinden.
Volumen de escucha
BEMÆRK: Kontroller, at volumen på telefonen
er indstillet til middel, før du justerer volumen
på AWH75
Oirá tres avisos acústicos rápidos cada 30
segundos, lo que significa que la función
Mute está activada.
C.
Volumen de conversación
Ajuste corto
Utilice el controlador de ajuste corto del
volumen de conversación, situado en la parte
posterior de la base, para ajustar en volumen
en una escala de variación corta.
NOTA: debe estar en el modo de conversación
(es decir, en una llamada) para realizar ajustes.
Ajuste amplio
Use the speaking volume major adjust control
on the bottom of the base for large
incremental adjustments.
NOTA: el ajuste de volumen más bajo es A.
El ajuste de volumen más común es B.
D es la configuración de volumen más
alta.
35
Adjusting the Volume
A
fi
A.
ÄÄNENVOIMAKKUUDEN
SÄÄTÄMINEN
Kuunteluvoimakkuus
Adjusting the Volume
fr RÉGLAGE DU VOLUME
A. Volume d’écoute
Remarque : assurez-vous de régler le volume de
votre téléphone sur la moitié de la plage avant
de procéder au réglage du volume du AWH75.
HUOMAUTUS: tarkista ennen AWH75tukiaseman äänenvoimakkuuden säätämistä,
että puhelimen äänenvoimakkuus on asetettu
keskitasolle.
B.
Kevytkuulokkeen
mykistäminen
Kun mykistys on päällä, kuulet kolme nopeaa
piippausta 30 sekunnin välein.
C
36
Regolazione secondaria
Premere i pulsanti “+” e “–” per regolare il
volume di ascolto con piccoli incrementi
graduali.
NOTA: per eseguire la regolazione, è necessario
attivare la modalità di conversazione (ad
esempio, durante una chiamata).
Regolazione principale
Utilizzare il controllo del volume di ascolto
principale posto sul retro della base per
regolare il volume con incrementi maggiori.
Touche secret de
l’oreillette
NOTA: 1 è il livello maggiore.
4 è quello minimo.
B.
Pour activer la fonction secret de l’oreillette,
appuyez de manière prolongée sur le bouton
de diminution de volume (pendant 3
secondes). Appuyez à nouveau dessus pour
désactiver cette fonction.
Puheen merkkivalo vilkkuu tukiasemassa,
kun mykistys on päällä.
Puheäänen voimakkuus
NOTA: accertarsi di impostare il volume del
telefono su un livello medio prima di regolare il
volume di AWH75.
REMARQUE : le réglage « 1 » correspond au
volume maximum.
Le réglage « 4 » correspond au volume
minimum.
Voi mykistää kevytkuulokkeen painamalla
pitkään (3 sekuntia) äänenvoimakkuuden
vähennyspainiketta. Poista mykistys
painamalla painiketta uudelleen.
C.
Volume di ascolto
Réglage principal
Le réglage principal du volume d’écoute se
trouve au dos du socle et permet de régler le
volume par grands paliers.
Äänenvoimakkuuden suuret säädöt
Voit lisätä kuunteluvoimakkuuden tasoa
asteittain tukiaseman takana olevasta
säätimestä.
B.
A.
REMARQUE : vous devez être en mode
conversation (c’est-à-dire en train de passer un
appel) pour procéder au réglage.
HUOMAUTUS: puhetilan on oltava käytössä (eli
puhelun on oltava käynnissä), jotta asetusta voi
säätää.
B
REGOLAZIONE DEL
VOLUME
Réglage secondaire
Appuyez sur les boutons « + » et « – » pour
régler le volume d’écoute par petits paliers.
Äänenvoimakkuuden pienet säädöt
Voit hienosäätää kuuntelun
äänenvoimakkuutta painamalla painikkeita +
ja –.
HUOMAUTUS:
1 tarkoittaa voimakkainta ääniasetusta.
4 on matalin asetus.
it
C.
Esclusione del microfono
dell’auricolare
Per escludere il microfono dell’auricolare,
tenere premuto il pulsante volume giù (3
secondi). Per riattivare il microfono, premere
nuovamente il pulsante.
Lorsque la fonction secret est activée, le
témoin de conversation du socle clignote.
Quando il microfono viene disattivato,
l’indicatore luminoso di conversazione sulla
base lampeggia.
Vous entendrez trois bips rapprochés toutes
les 30 secondes, indiquant que le mode secret
est activé.
Tre rapidi segnali acustici a intervalli di 30
secondi indicano che il microfono è
disattivato.
Volume à l’émission
Äänenvoimakkuuden pienet säädöt
Voit muuttaa puheäänen voimakkuutta
asteittain tukiaseman takana olevasta
säätimestä.
Réglage secondaire
Le réglage secondaire du volume d’écoute se
trouve au dos du socle et permet de régler le
volume par petits paliers.
HUOMAUTUS: puhetilan on oltava käytössä (eli
puhelun on oltava käynnissä), jotta asetusta voi
säätää.
REMARQUE : vous devez être en mode
conversation (c’est-à-dire en train de passer un
appel) pour procéder aux ajustements.
Äänenvoimakkuuden suuret säädöt
Voit muuttaa puheäänen voimakkuutta
asteittain tukiaseman takana olevasta
säätimestä.
Réglage principal
Le réglage principal du volume à l’émission
se trouve au bas du socle et permet de régler
le volume par grands paliers.
HUOMAUTUS:
A tarkoittaa matalinta äänenvoimakkuutta.
B on yleisin asetus.
D on voimakkain ääniasetus.
REMARQUE : le réglage « A » correspond au
volume minimum.
« B » est le réglage le plus courant.
Le réglage
« D » correspond au volume maximum.
C.
Volume di conversazione
Regolazione secondaria
Utilizzare il controllo del volume di
conversazione secondario posto sul retro
della base per regolare il volume con piccoli
incrementi graduali.
NOTA: per eseguire la regolazione, è necessario
attivare la modalità di conversazione (ad
esempio, durante una chiamata).
Regolazione principale
Utilizzare il controllo del volume di
conversazione principale posto sul retro della
base per regolare il volume con piccoli
incrementi graduali.
NOTA: A è il livello minimo.
B è il livello più comune.
D è il livello maggiore.
37
Adjusting the Volume
A
Adjusting the Volume
nl HET VOLUME INSTELLEN
no JUSTERE VOLUMET
pt AJUSTAR O VOLUME
A.
A.
A.
Luistervolume
MERK: Pass på at du stiller inn telefonvolumet
til mellomområdet før du justerer volumet til
AWH75.
NOTA: Certifique-se de que configura o volume
do telefone para os valores médios antes de
ajustar o volume AWH75.
Fijnafstelling
Druk op de knoppen “+” en “–” om het
luistervolume af te stellen met kleine
stappen.
Små justeringer
Trykk på knappene + og – for å justere
lyttevolumet i små trinn.
Ajuste em intervalos curtos
Prima os botões “+” e “–” para ajustar o
volume de audição em intervalos curtos.
MERK: Du må være i talemodus (dvs. “i
telefonen”) for å justere.
NOTA: Deverá estar no modo de conversação
(isto é, a efectuar uma chamada) para ajustar o
volume
Store justeringer
Bruk kontrollen for store
lyttevolumjusteringer på baksiden av
baseenheten til større, trinnvise justeringer.
Hoofdafstelling
Gebruik de hoofdafstellingsregeling voor het
luistervolume op de achterzijde van het
basisstation voor het afstellen met grote
stappen.
OPMERKING: 1 is het maximumvolume.
De laagste instelling is 4.
C.
C
Hvis du vil dempe lyden i hodesettet, trykker
du på volum ned-knappen (tre sekunder).
Trykk en gang til for å oppheve dempingen.
C.
OPMERKING: A is het minimumvolume.
B is de meest voorkomende
instelling.
D is het maximumvolume.
A luz do indicador de conversação na base
mantém-se intermitente durante o corte de
som.
Talevolum
MERK: Du må være i talemodus (dvs. “i
telefonen”) for å justere.
Store justeringer
Bruk kontrollen for store justeringer av
talevolum på baksiden av baseenheten til
større, trinnvise justeringer.
MERK: A er den laveste innstillingen.
B er den vanligste innstillingen.
D er den høyeste innstillingen.
Corte de som do auricular
Para cortar o som do auricular, mantenha o
botão de volume sob pressão durante 3
segundos. Volte a premir para activar o som.
Du hører tre raske pipetoner hver 30. sekund
som indikerer at dempingen er på.
Spraakvolume
Hoofdafstelling
Gebruik de hoofdafstellingsregeling voor het
spraakvolume op de onderzijde van het
basisstation voor het afstellen met grote
stappen.
B.
Taleindikatorlampen på baseenheten blinker
under demping.
Drie snelle geluidssignalen om de 30
seconden geven aan dat de mutefunctie aan
staat.
Fijnafstelling
Gebruik de fijnafstellingsregeling voor het
spraakvolume op de achterzijde van het
basisstation voor het afstellen met kleine
stappen.
NOTA: 1 é a configuração de volume mais
elevada. 4 é a configuração de volume mais
baixa.
Demping av hodesettet
Små justeringer
Bruk kontrollen for små justeringer av
talevolum på baksiden av baseenheten til
mindre, trinnvise justeringer.
OPMERKING: het apparaat moet hiervoor in de
spreekstand staan (dus het kan alleen tijdens
een telefoongesprek).
38
B.
Headset dempen
Het spraakindicatielampje op het basisstation
knippert zolang de mutefunctie is
ingeschakeld.
Ajuste em intervalos longos
Utilize o controlo de volume de audição em
intervalos longos na parte posterior da base
para efectuar ajustes em intervalos longos.
MERK: 1 er høyeste innstilling.
4 er den laveste innstillingen.
Als u de headset wilt dempen, houdt u de
omlaagknop voor het volume lang ingedrukt
(3 seconden). Druk nogmaals op de knop om
de demping weer op te heffen.
B
Volume de audição
OPMERKING: Zet de volumeregeling van de
telefoon eerst half open voordat u het volume
van de AWH75 aanpast.
OPMERKING: het apparaat moet hiervoor in de
spreekstand staan (dus het kan alleen tijdens
een telefoongesprek).
B.
Lyttevolum
Escutará 3 toques rápidos cada 30 segundos
como indicação de que o corte de som está
ligado.
C.
Volume de conversação
Ajuste em intervalos curtos
Utilize o controlo de ajuste do volume de
conversação em intervalos curtos na parte
posterior da base para efectuar ajustes em
intervalos curtos.
NOTA: Deverá estar no modo de conversação
(isto é, a efectuar uma chamada) para ajustar o
volume
Ajuste em intervalos longos
Utilize o controlo de ajuste do volume de
conversação em intervalos longos na parte
posterior da base para efectuar ajustes em
intervalos longos.
NOTA: A é a configuração de volume mais baixa
B é a configuração de volume de
utilização corrente.
D é a configuração de volume mais alta.
39
Adjusting the Volume
A
Headset Controls
se JUSTERA VOLYMEN
A.
Lyssningsvolym
OBS! Kontrollera att du ställt in telefonens
volym i mellanregistret innan du ställer in
volymen på AWH75.
Finjustering
Finjustera lyssningsvolymen genom att trycka
på knapparna + och –.
OBS! Samtalsläget måste vara aktiverat för att
du ska kunna göra justeringar.
GB
Headset Controls
Grundinställning
Gör en grundinställning av lyssningsvolymen
med grundinställningsreglaget på
basenhetens baksida.
FEATURE
Action
Tone
Listening volume minor adjust
Press + to increase or – to
decrease
Ascending/descending tones,
2 tones at limit
Mute
Long press _ key
(3 seconds)
3 mid tones = Mute
3 low tones = Unmute
Note: Tones repeat every
15 seconds when muted.
Answering/ending calls
Short press call
control button
Mid tone
Low battery warning
Replace headset in
charging cradle
1 tone every 10 seconds
OBS! 1 är den högsta inställningen.
4 är den lägsta inställningen.
B.
Sekretess för headset
Om du vill använda sekretess för headsetet
trycker du länge på knappen volym ned (3
sekunder). Aktivera ljudet genom att trycka
igen.
B
Basenhetens samtalsindikator blinkar när
sekretess används.
Tre snabba pipsignaler hörs var 30:e sekund
som en indikering på att sekretess används.
C.
Talvolym
N/A
Out of range warning — when
on active call
Move closer to base
2 tones
Finjustering
Gör en grundinställning av talvolymen med gr
undinställningsreglaget längst ned på
basenheten.
N/A
Incoming call notification*
Press call control button
to answer call
3 repetitive tones
* Only works when using optional Handset Lifter.
OBS! Samtalsläget måste vara aktiverat för att
du ska kunna göra justeringar.
C
Grundinställning
Verwenden Sie die auf der Unterseite der
Basisstation befindliche Taste zur Anpassung
der Sprechlautstärke in größeren Schritten.
DE
Headset-Regler
Funktion
Aktion
Ton
Anpassen der Hörlautstärke
(geringfügig)
Drücken Sie auf „+“ oder „–“,
um die Lautstärke leiser bzw.
lauter zu stellen.
Lauter bzw. leiser werdende Pieptöne,
2 Töne bei den Minimal-/Maximalwerten
Stummschaltung
Halten Sie die _-Taste
3 Sekunden lang gedrückt
3 mittlere Pieptöne = Stummschaltung
3 leise Pieptöne = Aufhebung der
Stummschaltung
HINWEIS: Wenn das Headset stummgeschaltet
ist, ertönen diese Pieptöne alle 15 Sekunden.
Annehmen und Beenden von
Anrufen
Drücken Sie kurz auf die
Gesprächstaste
Mittlerer Ton
Warnung bei niedrigem
Akkustand
Setzen Sie das Headset in die
Ladestation ein
1 Piepton alle 10 Sekunden
-
Reichweitenwarnung – bei
aktivem Anruf
Bewegen Sie das Headset näher
an die Basisstation.
2 Pieptöne
-
Benachrichtigung bei
eingehenden Anrufen*
Drücken Sie zur Annahme eines
Anrufs die Gesprächstaste
3 sich wiederholende Pieptöne
OBS! A är den lägsta inställningen.
B är den vanligaste inställningen.
D är den högsta inställningen.
40
*Funktioniert nur bei der Verwendung des optionalen Telefonhörer-Lifters
41
Headset Controls
DK
Ikke
relevant
Ikke
relevant
Headset Controls
FI
Knapper på headset
Kevytkuulokkeen ohjaimet
Funktion
Handling
Tone
Ominaisuus
Toimi näin
Äänimerkki
Finindstilling af lyttevolumen
Tryk på + for at øge eller – for at
reducere
Stigende/faldende toner,
2 toner ved grænse
Kuunteluvoimakkuuden
pienet säädöt
Lisää voimakkuutta painamalla
painiketta +, vähennä painamalla
painiketta -.
Nousevat tai laskevat äänimerkit, enintään 2
äänimerkkiä
Lydløs
Langt tryk _ tast
(3 sekunder)
3 mellemhøje toner = Lydløs
3 lave toner = Deaktiver lydløs
BEMÆRK: Tonerne gentages hvert
15. sekund, når lydløs er aktiveret.
Mykistys
Pidä painiketta _ alhaalla
(3 sekuntia)
3 keskikorkeaa äänimerkkiä = mykistys
3 matalaa äänimerkkiä = ei mykistystä
Huomautus: äänimerkki toistuu 15 sekunnin
välein, kun mykistys on käytössä.
Besvare/afslutte opkald
Kort tryk på knappen til
opkaldsstyring
Mellemhøj tone
Soittaminen ja puhelun
lopettaminen
Paina lyhyesti puhelunhallinta
painiketta
Keskikorkea äänimerkki
Advarsel om fladt batteri
Placer headsettet i opladergaflen
1 tone hvert 10. sekund
Varoitus akun virran
loppumisesta
Aseta kevytkuuloke takaisin
latauspidikkeeseen
1 äänimerkkiä 10 sekunnin välein
Advarsel om uden for
rækkevidde – under et aktivt
opkald
Gå tættere på baseenheden
2 toner
-
Ilmoitus tulevasta puhelusta*
Siirry lähemmäs tukiasemaa
2 äänimerkkiä
3 gentagne toner
-
Besked om indgående
opkald*
Vastaa puheluun painamalla
puhelunhallintapainiketta
3 toistuvaa äänimerkkiä
Besked om indgående
Tryk på knappen til opkaldsstyring
* Fungerer kun ved brug af håndsætløfter (ekstraudstyr).
opkald*
for at besvare opkaldet
* Fungerer kun ved brug af håndsætløfter (ekstraudstyr).
ES
42
* Toimii vain, kun käytössä on luuripidike (lisävaruste).
Controles del auricular
FR
Característica
Acción
Tono
Ajuste corto del volumen de
escucha
Pulse + o - para aumentar o
reducir el volumen
Tonos ascendentes y descendentes. Dos tonos al
alcanzar el límite
Mute
Mantenga pulsado el botón _
durante tres segundos
Tres tonos medios: la función mute está activada
Tres tonos bajos: la función mute está desactivada
Nota: con la función Mute activada, los tonos se repiten
cada 15 segundos.
Respuesta y fin de llamadas
Pulse brevemente el botón de
control de llamada
Tono medio
Aviso de batería baja
Vuelva a colocar el auricular en
la horquilla de carga
Un tono cada diez segundos
N/D
Aviso de fuera de alcance
mientras se está en una
llamada activaf
Acérquese a la base
Dos tonos
N/D
Notificación de llamada
entrante*
Pulse el botón de control de
llamada para responder a la
llamada
Tres tonos repetitivos
* Sólo funciona cuando se utiliza el dispositivo para descolgar el teléfono, que es optativo.
Commandes de l’oreillette
Caractéristique
Etat
Tonalité
Réglage secondaire du
volume d’écoute
Appuyez sur « + » pour augmenter
le volume ou sur « – » pour le
baisser.
Tonalités ascendantes ou descendantes, 2
tonalités pour le son maximal
Secret
Pression longue
(3 secondes)
3 tonalités moyennes = fonction Secret activée
3 tonalités graves = fonction Secret désactivée
Remarque : lorsque la sourdine est activée, les
tonalités se répètent toutes les 15 secondes.
Décrocher/Raccrocher
Appuyez brièvement sur le bouton
de contrôle d’appel
Tonalité moyenne
Avertissement de batterie
faible
Replacez l’oreillette sur son socle
chargeur
1 tonalité toutes les 10 secondes
N/A
Avertissement d’utilisation
hors du rayon de portée (en
cours de conversation)
Rapprochez-vous de la base.
2 tonalités
N/A
Signal d’appel entrant*
Pour prendre l’appel, appuyez sur
le bouton de conversation
3 tonalités répétitives
* Ne fonctionne qu’avec le levier décroché de combiné en option.
43
Headset Controls
IT
Headset Controls
Comandi della cuffia
NO
Funzione
Tono
Funksjon
Handling
Tone
Regolazione secondaria del
volume di ascolto
Premere il pulsante + per
aumentare o – per ridurre
Toni ascendenti/discendenti, 2 toni al
raggiungimento del limite
Små justeringer av lyttevolum
Trykk på + for å heve eller – for
å senke
Stigende/synkende toner,
to toner ved grense
Esclusione del microfono
Pressione prolungata tasto
(3 secondi)
3 toni medi = Esclusione microfono
3 toni bassi = Riattivazione microfono
Nota: quando il microfono non è attivo, i toni
vengono ripetuti ogni 15 secondi.
Demp (mute)
Trykk på knappen _
(tre sekunder)
Tre middels toner = Demp
Tre lave toner = Opphev demping
Merk: Tonene gjentas hvert
15. sekund under demping.
Risposta/termine delle
chiamate
Pressione breve pulsante di
controllo chiamate
Tono medio
Svare på / avslutte samtaler
Trykk raskt på
ringekontrollknappen
Middels tone
Avviso di batteria in
esaurimento
Posizionare l’auricolare sul
supporto di ricarica
2 toni
Advarsel om lavt batterinivå
Sett hodesettet tilbake i
ladeholderen
Én tone hvert 10. sekund
N/D
Avviso di superamento della
portata durante una chiamata
Avvicinarsi alla base
2 tones
I/T
Utenfor rekkevidde-advarsel
– i en aktiv samtale
Flytt deg nærmere baseenheten
To toner
N/D
Notifica di chiamate in
entrata*
Premere il pulsante di controllo
delle chiamate per rispondere alla
chiamata
3 toni ripetuti
I/T
Varsel om innkommende
samtale*
Trykk på ringekontrollknappen for
å svare på et anrop
Tre gjentatte toner
* Fungerer bare når du bruker den valgfrie håndsettløfteren.
* Disponibile solo se si utilizza il dispositivo di risposta automatico opzionale.
NL
44
Hodesettkontroller
Azione
Headsetbediening
PT
Functie
ACTIE
Toon
Fijnafstellen van het
luistervolume
Druk op + om te verhogen of
– om te verlagen
Stijgende/dalende geluidssignalen,
2 bij maximumniveau
Mutefunctie
Druk lang op _
(3 seconden)
3 middelhoge signalen = mutefunctie inschakelen
3 lage signalen = mutefunctie uitschakelen
Opmerking: als mute is ingeschakeld, wordt het
signaal om de 15 seconden herhaald.
Oproep aannemen/
beëindigen
Druk kort op de gespreksknop.
Middelhoog geluidssignaal
Waarschuwing voor laag
batterijniveau
Plaats de headset weer in de
oplader/houder
1 signaal om de 10 seconden
n.v.t.
Waarschuwing voor buiten
bereik — tijdens een
gesprekf
Verklein de afstand tot het
basisstation
2 geluidssignalen
n.v.t.
Waarschuwing voor
binnenkomend gesprek*
Druk op de gespreksknop om de
oproep te beantwoorden
3 repeterende geluidssignalen
* Werkt alleen wanneer u de optionele telefoonhoorn-lifter gebruikt.
Controlo do auricular
Característica
Acção
Tom
Ajuste do Volume de Audição
(Intervalos Curtos)
Premir + para aumentar e para diminuir
Volume ascendente/descendente,
2 tons ao atingir o limite
Corte de som
Pressão do botão durante
3 segundos
3 meios tons = Cortar o som
3 tons baixos = Reactivar o som
Nota: Os tons são repetidos de 15 em 15
segundos, quando o auricular está sem som.
Resposta/finalização de
chamadas
Pressão curta do botão de
conversação
Meio tom
Aviso de bateria fraca
Voltar a colocar o auricular no
suporte para carregamento
1 tom a cada 10 segundos
N/A
Aviso de fora do alcance - com
chamada activa
Aproximar da base.
2 tons
N/A
Notificação de chegada de
chamada*
Premir o botão de conversação
para atender a chamada
3 tons repetitivos
* Apenas funciona quando utilizar o Controlador de Auscultador opcional.
45
Headset Controls
SE
Base Indicator Lights
Headsetkontroller
GB
Åtgärd
Funktion
Finjustering av lyssningsvolym
Ton
Action
Öka med + och minska med –
Stigande/fallande toner, högst två toner
Håll ned knappen
(3 sekunder)
3 medelhöga toner=sekretess på
3 låga toner=sekretess av
Obs! Tonerna upprepas var 15:e sekund vid
sekretess.
Tryck snabbt på samtalsknappen
Normal ton
Light
DE
Sekretess
Svara på/avsluta samtal
DK
Sätt tillbaka headsetet i
laddningsklykan
En ton var 10:e sekund
Räckviddsvarning – vid
pågående samtal
Flytta dig närmare basenheten.
Två toner
Finns ej
Indikering av inkommande
samtal*
Base Indicator Lights
FR
A
1
2
3
An/Aus
Sprechen
Stummschaltung
Leuchtanzeige
Blinkt gelb
Leuchtet gelb auf
Leuchtet rot auf
Leuchtet grün auf
Blinkt grün
Indikatorlamper på baseenheden
Opladning
Fuldt opladet
Strøm
Tale
Lydløs aktiveret
Blinker gult
Lyser gult
Lyser rødt
Lyser grønt
Blinker grønt
Luces indicadoras de la base
Recarga
Carga completa
Alimentación
Conversación
Función Mute activada
Ámbar: sin
parpadeo
Rojo: sin parpadeo
Verde: sin parpadeo
Verde: parpadeo
Tukiaseman merkkivalot
Toimi näin
Latautuu
Täyteen ladattu
Virta
Puhelu
Mykistys
Merkkivalo
Vilkkuu
keltaisena
Palaa keltaisena
Palaa punaisena
Palaa vihreänä
Vilkkuu vihreänä
Indicateurs d’appel sur la base
Indicator lights
Talking/muted
(green)
Power
(red)
Charging
(amber)
DE
Leuchtanzeigen
Gesprächs-/
Stummschaltungsanzeige
(Grün)
Ein/Aus-Anzeige
(Rot)
Ladeanzeige
(Gelb)
DK
Indikatorer
Tale/Lydløs
(grøn)
Strøm
(rød)
Opladning
(gul)
ES
Luces indicadoras
Conversación o función
Mute activada (verde)
Encendido
(rojo)
Carga
(ámbar)
Témoin
IT
Spia
FI
Merkkivalot
Puhelu/mykistys
(vihreä)
Virta
(punainen)
Lataus
(keltainen)
FR
Témoins lumineux
Appel/secret
(vert)
Alimentation
(rouge)
Chargement
(orange)
IT
Indicatori luminosi
Conversazione/esclusione
del microfono (verde)
Accensione
(rosso)
Carica
(ambra)
NL
Waarschuwingslampjes
Spraakstand/gedempt
(Groen)
Voeding
(Rood)
Opladen
(Oranje)
NO
Indikatorlamper
Tale/dempet
(grønn)
Strøm
(rød)
Lader
(gul)
PT
Luzes indicadoras
Em conversação/
Corte de som (verde)
Ligado
(vermelho)
A carregar
(laranja
SE
Indikatorlampa
Samtal/sekretess
(grön)
Ström
(röd)
Laddar
(gul)
Lampje
Lys
Conversation
Sourdine
Témoin rouge
Témoin vert
Témoin vert clignote
Ricarica
Carica completata
On/Off
Conversazione
Esclusione microfono
Lampeggia in
ambrar
Ambra fissa
Rosso fisso
Verde fisso
Lampeggia in verde
Opladen
Volledig opgeladen
Voeding
Spreekstand
Gedempt
Knippert oranje
Brandt oranje
Brandt rood
Brandt groen
Knippert groen
Lading
Fullt oppladet
Strøm
Tale
Dempet
Blinker gult
Kontinuerlig gult
Kontinuerlig rødt
Kontinuerlig grønt
Blinker grønt
Luzes indicadoras na base
Acção
Luz
SE
Alimentation
Témoin orange
Lampene på baseenheten
Handling
PT
Chargement
terminé
Waarschuwingslampjes basisstation
ACTIE
NO
Chargement
Témoin orange
clignote
Indicatori luminosi della base
Azione
NL
46
Flashes green
Volle Aufladung
Etat
3
Muted
Solid green
Tre upprepade toner
FI
GB
Talking
Solid red
Luz indicadora Ámbar: parpadeo
Besvara ett samtal genom att
trycka på samtalsknappen
2
Power
Solid amber
Laden der
Batterie
Acción
* Fungerar bara då tillvalet lurlyftare används.
A1
Fully charged
Aktion
Lampe
Varning för låg batterinivå
Charging
Flashes amber
Leuchtanzeigen an der Basisstation
Handling
ES
Finns ej
Base Indicator Lights
Carregamento
Carga completa
Ligado
A conversar
Sem som
Laranja
intermitente
Laranja
Vermelho
Verde
Verde intermitente
Basenhetens indikatorlampor
Åtgärd
Laddning
Fulladdad
Ström
Talar
Sekretess
Lampa
Blinkar gult
Fast gult sken
Fast rött sken
Fast grönt sken
Blinkar grönt
47
GB Troubleshooting
Problem
Solution
Problem
Solution
I’ve plugged everything in
but the lights won’t come
on.
• Check that the AC charger jack is connected to the base unit.
• Check that the AC charger is securely connected to a working wall outlet.
• Check that the AC charger is the model supplied by Avaya.
I can hear too much
background conversation,
noise or sidetone.
Speaking volume is too high. Lower the speaking volume by adjusting the
speaking volume minor adjust buttons on the base. If the volume is still too
high, select another speaking volume major adjust setting. See page 33.
My headset does not work
with the base unit.
• Check that the phone is connected to the base unit’s phone cord jack and
it is pushed in firmly.
• Check that the phone handset is connected to the base’s phone handset
jack and it is pushed in firmly.
• Headset may be out of range of the base. Move closer to base unit until
headset is within range. Range varies with office environment.
• Headset battery is dead. Recharge the battery by placing the headset in
the headset charging cradle. See page 16.
• Listening volume too low. Press the volume up button on the headset. If
the volume is still too low, select another listening volume major adjust
switch setting. See page 33.
• Incorrect configuration dial setting for your phone. Try other phone
configuration dial settings on the base unit. Ensure the selected number is
in line with the position indicator. See page 29.
• You may have to re-subscribe your headset with the base. See page 72.
People I talk to can hear a
buzz in the background.
• AC charger is plugged into a power strip. Plug the AC charger into the
wall directly.
• Picking up another radio frequency. Call the Avaya Headset Helpdesk for
an RF filter.
Battery talk time
performance is significantly
degraded even after a full
recharge.
Battery is going bad. Replace the battery with a new battery pack. See page
74.
The call is dropped. (Talk
indicator on the headset
and base will not be
illuminated.)
Headset lost subscription. Try to reset the system. See page 72. If this does
not work, try the resubscription procedure on page 72.
I hear static that does not
allow me to communicate.
• Link to headset is lost. Try to re-establish a link by pressing the headset
talk button.
• Unplug the AC charger from the base for 7 seconds, then plug back in.
• Reset the whole system as described on page 72.
I hear beeps in the headset.
• One beep every 10 seconds is caused by a low battery warning. Recharge
battery by returning it to the base charge cradle for one to three hours until
charge light stays lit or stops blinking.
• Two beeps is an out of range warning. Move closer to the base.
• Three rapid beeps every 30 seconds indicate your mute is on. Press the
mute control dial once to turn mute off.
• When an optional lifter is connected, three repetitive beeps indicate a call
is coming into the headset. Press the talk button on the headset to answer
the call.
Handset lifter is installed
but does not lift handset.
Ensure the handset lifter power cord is firmly pushed into the handset
lifter jack on the base.
My handset lifter operates
every time I remove or
replace my headset in the
base unit.
IntelliStand is enabled. To disable the handset lifter, move the IntelliStand
switch to position–.
Callers cannot hear me.
48
GB Troubleshooting
• Headset is muted. Press the mute button on headset to unmute the
microphone. See page 33.
• Speak volume is too low. Increase the speaking volume by adjusting the
speaking volume minor adjust buttons on the base unit as described on
page 33. If the volume is still too low, select another speaking volume
major adjust setting as described on page 33.
• Incorrect configuration dial setting for your phone. Try other phone
configuration dial settings on the base unit. Ensure the selected number is
in line with the position indicator. See page 29.
I can hear a dial tone in
more than one
configuration position.
Phone will work in more than one configuration dial position. Use the
position that sounds best to you and the person you call.
I cannot hear a dial tone in
any configuration position.
• Check that the phone is connected to the base’s phone cord jack. See
pages 5-9.
• Check that the phone handset is connected to the base’s phone handset
jack. See pages 5-9.
I cannot hear caller/dial
tone.
• Check that all cords and jacks are connected correctly.
• Check that the base has power (red indicator light) and the headset
battery is fully charged.
• Try other phone configuration dial settings on the base unit. Ensure the
selected number is in line with the position indicator. See page 23.
• Ensure you are in headset mode. Press the talk button to select correct
mode. The talk indicator light on the base is green.
Sound in handset is
distorted/hear echo in
handset.
• Reduce speaking volume by changing the speaking volume major adjust
switch setting. See page 33.
• Point microphone towards your chin.
• Listening volume too high on phone. If your phone has a handset volume
control, lower this until the distortion disappears.
• If the distortion is still present, lower the listening volume adjust button
on the headset. If the distortion persists, select another listening volume
major adjust switch setting. See page 33.
• Base is too close to computer or phone. See page 18 for proper
positioning.
• System needs to be reset. Perform system reset as described on page 70.
49
DE Fehlerbehebung
PROBLEM Lösung
PROBLEM Lösung
Ich habe alles angeschlossen,
aber keine der Leuchten
leuchtet.
• Überprüfen Sie, ob das Netzgerät an die Basisstation angeschlossen ist.
• Überprüfen Sie, ob das Netzgerät ordnungsgemäß mit einer Steckdose
verbunden ist.
• Überprüfen Sie, ob Sie das von Avaya mitgelieferte Ladegerät verwenden.
Es sind verzerrte Töne oder
ein Echo zu hören.
Mein Headset funktioniert
nicht mit meiner
Basisstation.
• Überprüfen Sie, ob das Telefonkabel fest mit der entsprechenden Buchse
an der Basisstation verbunden ist.
• Überprüfen Sie, ob das Kabel des Telefonhörers fest mit der
entsprechenden Buchse an der Basisstation verbunden ist.
• Das Headset befindet sich möglicherweise außerhalb der Reichweite der
Basisstation. Bewegen Sie das Headset näher an die Basisstation, bis es
sich innerhalb der Reichweite befindet. Die Reichweite hängt von der
Büroumgebung ab.
• Der Headset-Akku ist leer Laden Sie den Akku auf, indem Sie das
Headset in die Headset-Ladestation einsetzen. Siehe Seite 16.
• Die Hörlautstärke ist zu niedrig. Drücken Sie auf dem Headset auf die
Lautstärketaste, um die Lautstärke zu erhöhen. Wenn die Lautstärke
immer noch zu niedrig ist, verwenden Sie die Taste zur Anpassung der
Hörlautstärke in größeren Schritten. Siehe Seite 34.
• Der Konfigurationsdrehschalter für Ihr Telefon ist falsch eingestellt.
Versuchen Sie andere Einstellungen des Konfigurationsdrehschalters an
der Basisstation. Stellen Sie sicher, dass der ausgewählte Wert an der
Positionsanzeige ausgerichtet ist. Siehe Seite 29.
• Sie müssen gegebenenfalls Ihr Headset bei der Basisstation neu
anmelden. Siehe Seite 72.
• Verringern Sie die Sprechlautstärke mit der Taste zur Anpassung der
Sprechlautstärke in größeren Schritten. Siehe Seite 35.
• Drehen Sie das Mikrofon zu Ihrem Kinn.
• Die Hörlautstärke ist zu hoch. Wenn Ihr Telefon über einen
Lautstärkeregler verfügt, setzen Sie ihn herunter, bis die Verzerrung nicht
mehr zu hören ist.
• Ist der Empfang weiterhin verzerrt, verringern Sie die Hörlautstärke über
die entsprechende Taste am Headset. Ist der Empfang immer noch
verzerrt, verwenden Sie die Taste zur Anpassung der Hörlautstärke in
größeren Schritten. Siehe Seite 35.
• Die Basisstation befindet sich zu nah am Computer oder Telefon. Weitere
Informationen zur ordnungsgemäßen Positionierung erhalten Sie auf Seite 18.
• Das System muss zurückgesetzt werden. Setzen Sie das System wie auf
Seite 70 beschrieben zurück.
Ich kann zu viele
Hintergrund- oder
Nebengeräusche hören.
Die Sprechlautstärke ist zu hoch. Verringern Sie die Sprechlautstärke mit
der auf der Basisstation befindlichen Taste zur geringfügigen Anpassung
der Sprechlautstärke. Wenn die Lautstärke immer noch zu hoch ist,
verwenden Sie die Taste zur Anpassung der Sprechlautstärke in größeren
Schritten. Siehe Seite 35.
Meine Gesprächspartner
hören im Hintergrund
Geräusche.
• Das Ladegerät wurde an eine Mehrfachsteckdose angeschlossen.
Schließen Sie das Ladegerät direkt an eine Wandsteckdose an.
• Andere Funkfrequenzen werden empfangen. Rufen Sie das Avaya
Headset-Helpdesk an und bitten Sie um einen RF-Filter.
Die Akku-Sprechzeit ist auch
nach vollständiger Aufladung
des Akkus deutlich kürzer.
Die Lebensdauer des Akkus geht zu Ende. Ersetzen Sie den Akku durch
einen neuen Akku. Siehe Seite 74.
Der Anruf wurde unterbrochen.
(Die Gesprächsanzeige auf dem
Headset und auf der
Basisstation leuchtet nicht auf.)
Das Headset hat die Anmeldung verloren. Versuchen Sie, das System
zurückzusetzen. Siehe Seite 72. Wenn dies das Problem nicht behebt,
führen Sie eine Neuanmeldung durch, wie auf Seite 72 beschrieben.
Ich höre statische Geräusche.
Dadurch wird die
Gesprächsqualität
beeinträchtigt.
• Die Verbindung zum Headset besteht nicht mehr. Versuchen Sie, die
Verbindung wiederherzustellen, indem Sie auf die Headset-Gesprächstaste
drücken.
• Trennen Sie für 7 Sekunden das Ladegerät von der Basisstation und
verbinden Sie es anschließend wieder.
• Setzen Sie das gesamte System zurück, wie auf Seite 72 beschrieben.
Ich höre über das Headset
Pieptöne.
• Bei einem niedrigen Akkustand wird alle 10 Sekunden ein Piepton
ausgegeben. Laden Sie den Akku für 1 bis 3 Stunden auf, indem Sie das
Headset in die Ladestation setzen. Das Headset ist vollständig aufgeladen,
wenn die Leuchtanzeige aufleuchtet oder nicht mehr blinkt.
• Zwei Pieptöne werden ausgegeben, wenn sich das Headset außerhalb der
Reichweite befindet. Bewegen Sie das Headset näher an die Basisstation.
• Drei kurze Pieptöne alle 30 Sekunden zeigen an, dass die
Stummschaltung aktiviert ist. Drücken Sie auf die Stummschaltungstaste,
um die Stummschaltung zu deaktivieren.
• Bei einem angeschlossenen optionalen Telefonhörer-Lifter signalisieren
drei kurze Pieptöne, dass ein Anruf beim Headset eingeht. Drücken Sie auf
die Gesprächstaste auf dem Headset, um den Anruf entgegenzunehmen.
Der Telefonhörer-Lifter
wurde installiert, jedoch wird
der Hörer nicht abgehoben.
Stellen Sie sicher, dass das Kabel des Telefonhörer-Lifters fest mit der
entsprechenden Buchse an der Basisstation verbunden ist.
Der Telefonhörer-Lifter wird
jedes Mal aktiviert, wenn ich
mein Headset aus der
Basisstation nehme oder es
wieder in die Basisstation
einsetze.
Die IntelliStand-Funktion ist aktiviert. Um den Telefonhörer-Lifter zu
deaktivieren, setzen Sie den IntelliStand-Schalter auf die Position „–“.
Anrufer können mich nicht
hören.
50
DE Fehlerbehebung
• Das Headset ist stummgeschaltet. Drücken Sie die Stummschaltung am
Headset, um die Stummschaltung des Mikrofons aufzuheben. Siehe Seite
34.
• Die Sprechlautstärke ist zu niedrig. Erhöhen Sie die Sprechlautstärke mit
der an der Basisstation befindlichen Taste zur geringfügigen Anpassung der
Lautstärke, wie auf Seite 34 beschrieben. Wenn die Sprechlautstärke
immer noch zu niedrig ist, verwenden Sie die Taste zur Anpassung der
Sprechlautstärke in größeren Schritten, wie auf Seite 34 beschrieben.
• Der Konfigurationsdrehschalter für Ihr Telefon ist falsch eingestellt.
Versuchen Sie andere Einstellungen des Konfigurationsdrehschalters an
der Basisstation. Stellen Sie sicher, dass der ausgewählte Wert an der
Positionsanzeige ausgerichtet ist. Siehe Seite 29.
Ich kann in mehr als einer
Konfigurationsposition ein
Freizeichen hören.
Das Telefon funktioniert in mehr als einer Position des Konfigurationsdrehs
chalters. Verwenden Sie die Position, die für Sie und Ihren
Gesprächspartner am besten klingt.
Ich kann in keiner
Konfigurationsposition ein
Freizeichen hören.
• Überprüfen Sie, ob das Telefonkabel mit der entsprechenden Buchse an
der Basisstation verbunden ist. Siehe Seiten 5-9.
• Überprüfen Sie, ob das Kabel des Telefonhörers mit der entsprechenden
Buchse an der Basisstation verbunden ist. Siehe Seiten 5-9.
Ich kann den Anrufer/das
Freizeichen nicht hören.
• Überprüfen Sie, ob alle Kabel an den Buchsen richtig angeschlossen sind.
• Überprüfen Sie, ob die Basisstation an eine Stromversorgung
angeschlossen (Leuchtanzeige leuchtet rot auf) und das Headset vollständig
aufgeladen ist.
• Versuchen Sie andere Einstellungen des Konfigurationsdrehschalters an
der Basisstation. Stellen Sie sicher, dass der ausgewählte Wert an der
Positionsanzeige ausgerichtet ist. Siehe Seite 23.
• Stellen Sie sicher, dass Sie sich im Headset-Modus befinden. Drücken Sie
die Sprechtaste, um den richtigen Modus auszuwählen. Die
Sprechleuchtanzeige auf der Basisstation leuchtet grün auf.
51
DK Fejlfinding
Problem
Løsning
Problem
Løsning
Jeg har tilsluttet alt, men
der er ingenting, der lyser.
• Kontroller, at stikket til lysnetopladeren er sluttet til baseenheden.
• Kontroller, at lysnetopladeren er sluttet til en fungerende stikkontakt i
væggen.
• Kontroller, at lysnetadapteren er den model, der leveres sammen med
Avaya.
Lyden i håndsættet er
forvrænget/der er ekko i
håndsættet.
Headsettet virker ikke
sammen med baseenheden.
• Kontroller, at telefonen er forbundet med stikket på telefonledningen fra
baseenheden, og at stikket er skubbet ind, så det sidder på plads.
• Kontroller, at håndsættet til telefonen er forbundet med stikket til håndsæt
på baseenheden, og at stikket er skubbet ind, så det sidder på plads.
• Headsettet er muligvis uden for baseenhedens rækkevidde. Gå tættere på
baseenheden, indtil headsettet er inden for rækkevidde. Rækkevidden
varierer afhængigt af, hvilket kontormiljø du befinder dig i.
• Batteriet i headsettet er fladt. Genoplad batteriet ved at placere headsettet
i opladningsgaflen til headsettet. Se side 16.
• Lyttevolumen er for lav. Tryk på headsettets knap til forøgelse af volumen.
Hvis volumen stadig er for lav, skal du vælge en anden indstilling for
kontakten til overordnet justering af lyttevolumen. Se side 35.
• Forkert indstilling af konfigurationsdrejeknappen til telefonen. Prøv en
anden indstilling af konfigurationsdrejeknappen på baseenheden. Kontroller,
at det valgte nummer passer til positionsindikatoren. Se side 30.
• Du skal muligvis tilmelde headsettet til baseenheden igen. Se side 72.
• Reducer talevolumen ved at vælge en anden indstilling for kontakten til
overordnet justering af talevolumen. Se side 35.
• Drej mikrofonen mod din hage.
• Lyttevolumen er for høj på telefonen. Hvis telefonen har en knap til
justering af volumen på håndsættet, skal du skrue ned, indtil forvrængningen
forsvinder.
• Hvis forvrængningen fortsætter, skal du skrue ned for lyttevolumen på
headsettet. Hvis forvrængningen fortsætter, skal du vælge en anden
indstilling for kontakten til overordnet justering af lyttevolumen. Se side 35.
• Baseenheden er for tæt på computeren eller telefonen. Der er oplysninger
om korrekt placering på side 18.
• Systemet skal nulstilles. Udfør en nulstilling af systemet som beskrevet på
side 70.
Jeg hører for meget
baggrundskonversation, støj
eller andre uvedkommende
lyde.
Talevolumen er for høj Reducer talevolumen ved at justere knapperne til
finindstilling af talevolumen på baseenheden. Hvis volumen stadig er for høj,
skal du vælge en anden indstilling for kontakten til overordnet justering af
talevolumen. Se side 33.
De personer, jeg taler med,
hører brummen i
baggrunden.
• Lysnetopladeren sidder i en stikdåse. Slut lysnetopladeren direkte til
stikkontakten i væggen.
• Modtager en anden radiofrekvens. Ring til Avaya Headset Helpdesk for at
anskaffe et RF-filter.
Den, der ringer op, kan ikke
høre mig.
52
DK Fejlfinding
• Headset er sat på lydløs. Tryk på knappen til lydløs på headsettet for at
aktivere mikrofonen. Se side 35.
• Talevolumen er for lav. Øg talevolumen ved at justere knapperne til
finindstilling af talevolumen på baseenheden som beskrevet på side 35. Hvis
volumen stadig er for lav, skal du vælge en anden overordnet indstilling af
talevolumen som beskrevet på side 35.
• Forkert indstilling af konfigurationsdrejeknappen til telefonen. Prøv en
anden indstilling af konfigurationsdrejeknappen på baseenheden. Kontroller,
at det valgte nummer passer til positionsindikatoren. Se side 30.
Batteriets taletid er
mærkbart reduceret, også
efter en fuld opladning.
Batteriet er ved at være slidt. Udskift batteriet med en ny batteripakke. Se
side 74.
Opkaldet mistes.
(Indikatorlampen for tale på
headsettet og baseenheden
bliver ikke tændt).
Headsettet har mistet sit abonnement. Prøv at nulstille systemet. Se side 72.
Hvis det ikke løser problemet, skal du prøve proceduren for gentilmelding,
som er beskrevet på side 72.
Jeg kan høre en klartone i
mere end én
konfigurationsposition.
Telefonen fungerer i mere end én position på konfigurationsdrejeknappen.
Brug den position, der lyder bedst for dig selv og den person, du ringer til.
Der er så meget støj, at man
ikke kan tale sammen.
Jeg kan ikke høre en
klartone i nogen af konfigur
ationspositionerne.
• Kontroller, at telefonen er forbundet med stikket til telefonledning på
baseenheden. Se side 5-9.
• Kontroller, at telefonens håndsæt er forbundet med håndsætstikket på
baseenheden. Se side 5-9.
• Linket til headsettet er gået tabt. Prøv at gendanne et link ved at trykke på
taleknappen på headsettet.
• Tag stikket til netopladeren ud af baseenheden i 7 sekunder, og slut det
derefter til baseenheden igen.
• Nulstil hele systemet som beskrevet på side 72.
Jeg kan høre bip i
headsettet.
Jeg kan ikke høre den, der
ringer/klartone.
• Kontroller, at alle ledninger og stik er korrekt tilsluttet.
• Kontroller, at der er strøm på baseenheden (rød indikatorlampe), og at
headsettets batteri er fuldt opladet.
• Prøv en anden indstilling af konfigurationsdrejeknappen på baseenheden.
Kontroller, at det valgte nummer passer til positionsindikatoren. Se side 23.
• Kontroller, at systemet er i headsettilstand. Tryk på taleknappen for at
vælge korrekt tilstand. Baseenhedens indikatorlampe for tale er grøn.
• Et bip hvert 10. sekund er en advarsel om fladt batteri. Genoplad batteriet
ved at sætte headsettet tilbage i opladningsgaflen i baseenheden i 1-3 timer,
indtil opladningslampen lyser konstant eller holder op med at blinke.
• To bip er en “uden for område”-advarsel. Gå tættere på baseenheden.
• Tre hurtige bip hvert 30. sekund betyder, at Lydløs er aktiveret. Tryk én
gang på drejeknappen til Lydløs for at deaktivere Lydløs.
• Når en håndsætløfter (ekstraudstyr) er tilsluttet, angiver tre gentagne bip
et indgående opkald på headsettet. Tryk på taleknappen på headsettet et for
at besvare opkaldet.
Håndsætløfteren er
installeret, men den løfter
ikke håndsættet.
Kontroller, at netledningen til håndsætløfteren er skubbet helt ind i stikket
til håndsætløfteren på baseenheden.
Håndsætløfteren aktiveres,
hver gang jeg fjerner eller
lægger headsettet tilbage
på baseenheden.
IntelliStand er aktiveret. Hvis du vil deaktivere håndsætløfteren, skal du
skifte IntelliStand-kontaktens position til–.
53
ES Resolución de problemas
Problema
Solución
Problema
Solución
He conectado todos los
elementos pero las luces no
se encienden.
• Compruebe que el cargador de CA esté conectado a la unidad base.
• Compruebe que el cargador de CA esté conectado correctamente a una
toma de alimentación activa.
• Compruebe que el cargador de CA sea el proporcionado por Avaya.
Se oye un eco o el sonido del
microteléfono está
distorsionado.
El auricular no funciona con
la unidad base.
• Compruebe que el teléfono esté conectado al conector del cable del
teléfono de la base y que esté bien insertado.
• Compruebe que el microteléfono esté conectado al conector del
microteléfono de la base y que está bien insertado.
• Puede que el auricular esté fuera del alcance de la base. Acérquese a la
unidad base hasta que el auricular vuelva a estar dentro del radio de alcance.
El radio de alcance varía en función del entorno de oficina en que se encuentre.
• La batería del auricular está agotada. Para cargar la batería, coloque el
auricular en la horquilla de carga del auricular. Consulte la página 16.
• El volumen de escucha es demasiado bajo. Pulse el botón de subir el
volumen del auricular. Si aun así el volumen sigue siendo demasiado bajo,
modifique la configuración del interruptor de ajuste amplio del volumen de
escucha. Consulte la página 35.
• El ajuste del regulador de configuración no es válido para el teléfono.
Pruebe otro ajuste del regulador de configuración de la unidad base.
Asegúrese de que el número elegido está alineado con el indicador de
posición. Consulte la página 30.
• Quizás tenga que volver a registrar el auricular con la base. Consulte la
página 72.
• Para bajar el volumen de conversación, elija otra configuración del interruptor
de ajuste amplio del volumen de conversación Consulte la página 35.
• Coloque el micrófono a la altura de la barbilla.
• El volumen de escucha del teléfono es demasiado alto. Si el microteléfono
dispone de un control de volumen, bájelo hasta que desaparezca la distorsión.
• En caso de que el sonido siga distorsionado, reduzca el volumen de
escucha del auricular por medio del botón de ajuste del volumen de escucha
del auricular. Si aun así persiste la distorsión, elija otra configuración del
interruptor de ajuste amplio del volumen de escucha. Consulte la página 35.
• La base está demasiado cerca del ordenador o del teléfono. Consulte la
página 18 para colocar correctamente el teléfono.
• Es necesario reiniciar el sistema. Realice el reinicio del sistema según se
describe en la página 70.
Quien recibe la llamada oye
un zumbido de fondo.
• El cargador de CA está conectado a un enchufe múltiple. Conecte el
cargador de CA directamente a la red eléctrica.
• Se registran interferencias con otra frecuencia de radio. Póngase en
contacto con el servicio técnico de los teléfonos Avaya para adquirir un filtro
de radiofrecuencias.
El rendimiento del tiempo
de conversación de la
batería ha disminuido
considerablemente, incluso
cuando se realiza una carga
completa.
La batería no funciona bien. Coloque una batería nueva. Consulte la página
74.
Se ha cortado la llamada.
(Los indicadores de
conversación del auricular y
de la base no estarán
iluminados.)
Se ha perdido el registro del auricular. Reinicie el sistema. Consulte la página
72. Si esto no soluciona el problema, realice el procedimiento de registro
descrito en la página 72.
Se oyen interferencias que
hacen la comunicación
imposible.
• Se ha perdido la conexión con el auricular. Intente restablecer la conexión
pulsando el botón de conversación del auricular.
• Desconecte el cargador de CA de la base durante siete segundos y vuélvalo
a conectar.
• Reinicie todo el sistema como se describe en la página 72.
Se oyen avisos acústicos en
el auricular.
• Un aviso acústico cada diez segundos indica que la batería está baja. Para
cargar la batería, colóquela en la horquilla de carga de una a tres horas,
hasta que la luz de carga se ilumine sin parpadear.
• Dos avisos acústicos indican que el auricular se encuentra fuera de
alcance. Acérquese a la base.
• Tres avisos acústicos rápidos cada 30 segundos indican que la función Mute
está activada. Pulse el regulador de control de la función Mute para
desactivar esta característica.
• Cuando esté conectado el dispositivo para descolgar el teléfono optativo,
tres avisos acústicos que se repiten indican que se ha recibido una llamada
en el auricular. Pulse el botón de conversación del auricular para responder
a la llamada.
El dispositivo para
descolgar el teléfono está
instalado pero no
descuelga el teléfono.
Asegúrese de que el cable de alimentación de dicho dispositivo está
correctamente insertado en el conector del dispositivo para descolgar el
teléfono de la base.
El dispositivo para
descolgar el teléfono entra
en funcionamiento cada vez
que se retira o se vuelve a
colocar el auricular en la
unidad base.
La función IntelliStand está activada. Para desconectar el dispositivo para
descolgar el teléfono, cambie el interruptor IntelliStand a la posición –.
La persona que llama no me
oye.
• La función Mute del auricular está activada. Para desactivarla, pulse el
botón Mute. Consulte la página 35.
• El volumen de conversación es demasiado bajo. Para aumentar el volumen
de conversación, ajuste los botones de ajuste corto del volumen de
conversación que están situados en la base, tal como se describe en la
página 35. Si aun así el volumen sigue siendo demasiado bajo, elija otra
configuración de ajuste amplio del volumen de conversación, tal como se
describe en la página 35.
• El ajuste del regulador de configuración no es válido para el teléfono.
Pruebe otro ajuste del regulador de configuración de la unidad base.
Asegúrese de que el número elegido está alineado con el indicador de
posición. Consulte la página 30.
Se oye un tono de llamada
en más de una posición de
configuración.
El teléfono funciona en más de una posición del regulador de configuración.
Utilice la posición que más le convenga a usted y a la persona a la que llama.
No se oye ningún tono de
llamada en ninguna posición
de configuración.
• Compruebe que el teléfono esté conectado al conector del cable del
teléfono de la base. Consulte las páginas 5-9.
• Compruebe que el microteléfono esté conectado al conector del
microteléfono de la base. Consulte las páginas 5-9.
No puedo oír el tono de
llamada ni a la persona que
llama.
• Compruebe que todos los cables y conectores estén colocados
correctamente.
• Compruebe que la base esté conectada a la red eléctrica (la luz indicadora
roja debe estar encendida) y que la batería del auricular esté totalmente
cargada.
• Pruebe otro ajuste del regulador de configuración de la unidad base.
Asegúrese de que el número elegido está alineado con el indicador de
posición. Consulte la página 23.
• Asegúrese de que se encuentre en el modo de auriculares. Pulse el botón
de conversación para seleccionar el modo correcto. La luz indicadora de
conversación de la base debe ser verde.
Se oye demasiada
conversación, ruido o tonos
de fondo.
54
ES Resolución de problemas
El volumen de conversación es demasiado alto. Para bajar el volumen de
conversación, ajuste los botones de ajuste corto del volumen de conversación
que se encuentran en la base. Si aun así el volumen sigue siendo demasiado
alto, modifique la configuración del interruptor de ajuste amplio del volumen
de conversación. Consulte la página 35.
55
FI
56
Vianmääritys
FI
Vianmääritys
Ongelma
Ratkaisu
Ongelma
Ratkaisu
Tein kaikki kytkennät, mutta
merkkivalot eivät pala.
• Tarkista, että verkkolaite on kytketty tukiasemaan.
• Tarkista, että laturi on kunnolla kiinni toimivassa pistorasiassa.
• Tarkista, että käytät Avayan toimittamaa verkkolaitetta.
Kuulen liikaa taustapuhetta,
melua tai muita sivuääniä.
Kevytkuuloke ei toimi
tukiaseman kanssa.
• Tarkista, että puhelin on liitetty tukiaseman puhelinjohtoliittimeen ja että
se on kunnolla paikallaan.
• Tarkista, että puhelin on liitetty tukiaseman puhelinjohtoliittimeen ja että
se on kunnolla paikallaan.
• Kevytkuuloke saattaa olla tukiaseman kuuluvuusalueen ulkopuolella.
Siirry lähemmäs tukiasemaa, kunnes kevytkuuloke on kuuluvuusalueella.
Kuuluvuusalue vaihtelee toimistoympäristön mukaan.
• Kevytkuulokkeen akku on tyhjä. Lataa akku asettamalla kevytkuuloke
lataustelineeseen. Katso sivu 16.
• Kuunteluääni on liian alhainen. Paina kevytkuulokkeen
äänenvoimakkuuden lisäyspainiketta. Jos ääni on edelleen liian hiljainen,
valitse sopiva äänenvoimakkuuden taso. Katso sivu 36.
• Tukiaseman asetussäädin on väärässä asennossa. Kokeile
asetussäätimen muita asentoja. Tarkista, että valittu numero on merkin
kohdalla. Katso sivu 30.
• Kevytkuuloke on ehkä liitettävä uudelleen tukiasemaan. Katso sivu 72.
Puheen äänenvoimakkuus on liian suuri. Hiljennä puheen
äänenvoimakkuutta tukiaseman pienten säätöjen painikkeilla. Jos ääni on
edelleen liian korkea, valitse suurilla säädöillä sopiva äänenvoimakkuuden
taso. Katso sivu 36.
Puhekumppanini kuulee
puhelun taustalla surinaa.
• Laturi on kytketty autojohtoon. Kytke laturi kunnolla pistorasiaan.
• Muun radiotaajuuden poiminen. Ota yhteys Avaya-kevytkuulokkeiden
asiakastukeen ja pyydä RF-suodatin.
Akun puheaika on selvästi
aiempaa lyhyempi jopa
täyden latauksen jälkeen.
Akku on liian vanha. Vaihda akku uuteen. Katso sivu 74.
Puhelu katkeaa. (Puheen ja
tukiaseman merkkivalot
eivät pala.)
Kevytkuulokkeen liitäntä on irronnut. Kokeile järjestelmän nollaamista.
Katso sivu 72. Jos tästä ei ole apua, kokeile uudelleenliittämistä
noudattamalla sivulla 72 annettuja ohjeita.
Linjalla on häiriöitä, joiden
vuoksi keskusteleminen on
hankalaa.
• Yhteys kevytkuulokkeeseen on katkennut. Koeta luoda yhteys uudelleen
painamalla puhelunhallintapainiketta.
• Irrota laturi tukiasemasta 7 sekunniksi ja liitä se sitten takaisin.
• Nollaa järjestelmä noudattamalla sivulla 72 annettuja ohjeita.
Kuulokkeesta kuuluu
piippauksia.
• Kevytkuulokkeesta kuuluu yksi piippaus 10 sekunnin välein, jos akun
virta on vähissä. Lataa akku asettamalla kevytkuuloke lataustelineeseen
pariksi, kolmeksi tunniksi, kunnes latauksen merkkivalo palaa tasaisesti
tai lakkaa vilkkumasta.
• Kaksi piippausta varoittaa kuuluvuusalueen ylittämisestä. Siirry
lähemmäs tukiasemaa.
• Kolme nopeaa piippausta 30 sekunnin välein tarkoittaa, että mykistys on
käytössä. Katkaise virta painamalla mykistyspainiketta.
• Kun laitteeseen liitetään lisävarusteena saatava luuripidike, kolme
peräkkäistä piippausta ilmoittaa, että kevytkuulokkeeseen on tulossa
puhelu. Vastaa puheluun painamalla kevytkuulokkeen puhelupainiketta.
Luuripidike on asennettu,
mutta se ei nosta luuria.
Tarkista, että luuripidikkeen virtajohto on kunnolla kiinni tukiaseman
luuriliittimessä.
Luuripidike toimii aina, kun
nostan kevytkuulokkeen
tukiasemasta tai asetan sen
takaisin tukiasemaan.
IntelliStand-toiminto on käytössä. Voit poistaa luuripidikkeen käytöstä
siirtämällä IntelliStand-kytkimen asentoon –.
Soittajat eivät kuule ääntäni.
• Kevytkuuloke on mykistetty. Poista mykistys käytöstä painamalla
kevytkuulokkeen mykistyspainiketta. Katso sivu 36.
• Puheääni on liian hiljainen. Lisää äänenvoimakkuutta tukiaseman
pienten säätöjen painikkeilla noudattamalla sivulla 36 annettuja ohjeita.
Jos ääni on edelleen liian hiljainen, valitse sopiva äänenvoimakkuuden taso
noudattamalla sivulla 36 annettuja ohjeita.
• Tukiaseman asetussäädin on väärässä asennossa. Kokeile
asetussäätimen muita asentoja. Tarkista, että valittu numero on merkin
kohdalla. Katso sivu 30.
Kuulen valintaäänen useissa
eri asetussäätimen
asennoissa.
Puhelin toimii useissa asetussäätimen asennoissa. Käytä asentoa, joka
kuulostaa parhaalta puhelun molempien osapuolten mielestä.
En kuule valintaääntä
missään asetussäätimen
asennossa.
• Tarkista, että puhelin on liitetty tukiaseman puhelinjohtoliittimeen. Katso
sivuja 5-9.
• Tarkista, että puhelimen luuri on liitetty tukiaseman
puhelinjohtoliittimeen. Katso sivuja 5-9.
En kuule soittajan ääntä tai
valintaääntä.
• Tarkista, että kaikki johdot ja liittimet on liitetty oikein.
• Tarkista, että tukiasemaan tulee virtaa (punainen merkkivalo) ja että
kuulokkeen akku on täyteen ladattu.
• Kokeile asetussäätimen muita asentoja. Tarkista, että valittu numero on
merkin kohdalla. Katso sivu 23.
• Varmista, että kevytkuuloketila on käytössä. Valitse oikea tila painamalla
puhelupainiketta. Tukiaseman puheen merkkivalo palaa vihreänä.
Luurin ääni kaikuu tai
kuulostaa vääristyneeltä.
• Pienennä äänenvoimakkuutta muuttamalla puheen
äänenvoimakkuustasoa. Katso sivu 36.
• Käännä mikrofoni leukaasi kohti.
• Puhelimen kuunteluvoimakkuus on liian korkea. Jos puhelimessasi on
luurin äänenvoimakkuussäädin, vähennä äänenvoimakkuutta, kunnes
vääristymä häviää.
• Jos vääristymä ei häviä, vähennä kevytkuulokkeen äänenvoimakkuutta.
Jos vääristymä ei vieläkään häviä, valitse suurilla säädöillä sopiva
äänenvoimakkuuden taso. Katso sivu 36.
• Tukiasema on liian lähellä tietokonetta tai puhelinta. Lisätietoja
sijoittamisesta on sivulla 18.
• Järjestelmä on nollattava. Nollaa järjestelmä noudattamalla sivulla 70
annettuja ohjeita.
57
FRDépannage
Problème
Solution
Problème
Solution
J’ai branché tous les
éléments mais les
indicateurs sont toujours
éteints.
• Assurez-vous que le chargeur secteur est branché sur le socle.
• Vérifiez que le chargeur secteur est correctement branché sur une prise
d’alimentation qui fonctionne.
• Assurez-vous que vous utilisez le chargeur secteur fourni par Avaya.
Le son dans le combiné est
déformé ou il y a de l’écho.
Mon oreillette ne fonctionne
pas avec la base.
• Vérifiez que le téléphone est connecté au socle par l’intermédiaire du
cordon approprié et que ce dernier est complètement enfoncé dans la
fiche.
• Vérifiez que le combiné est connecté au socle par l’intermédiaire du
cordon approprié et que ce dernier est complètement enfoncé dans la
fiche.
• L’oreillette est peut-être hors du rayon de portée de la base. Approchezvous de la base jusqu’à ce que l’oreillette soit dans le rayon de portée. La
portée varie en fonction de l’environnement de travail.
• La batterie de l’oreillette est à plat. Rechargez la batterie en replaçant
l’oreillette sur son socle chargeur. Reportez-vous à la page 16.
• Le volume d’écoute est trop faible. Appuyez sur le bouton permettant
d’augmenter le volume sur l’oreillette. Si le volume est toujours trop bas,
sélectionnez une autre position sur le réglage principal du volume
d’écoute. Reportez-vous à la page 37.
• Position incorrecte du cadran de configuration pour votre téléphone.
Essayez de modifier la position du cadran de configuration du téléphone
sur le socle. Assurez-vous que le chiffre sélectionné est aligné avec
l’indicateur de position. Reportez-vous à la page 30.
• Vous devrez peut-être connecter de nouveau l’oreillette à la base.
Reportez-vous à la page 72.
• Réduisez le volume à l’émission à l’aide de l’interrupteur de réglage
principal du volume à l’émission. Reportez-vous à la page 37.
• Dirigez le microphone vers votre menton.
• Le volume d’écoute est trop élevé sur le téléphone. Si votre téléphone
dispose d’un bouton de réglage du volume, abaissez le volume jusqu’à la
disparition de la déformation.
• Si cette déformation ne disparaît toujours pas, abaissez le contrôle du
volume d’écoute sur l’oreillette. Si le problème persiste, changez la
position du réglage du volume d’écoute principal. Reportez-vous à la page
37.
• Le socle est trop près de l’ordinateur ou du téléphone. Reportez-vous à la
page 18 pour connaître le positionnement adéquat.
• Le système doit être réinitialisé. Effectuez une réinitialisation du
système, comme indiqué à la page 70.
J’entends trop de bruit de
fond.
Le volume à l’émission est trop élevé. Baissez le volume à l’émission en
utilisant le réglage principal du socle. Si le volume est toujours trop élevé,
sélectionnez une autre position sur le réglage principal du volume
d’écoute. Reportez-vous à la page 37.
Mon interlocuteur entend
un bruit de fond
ressemblant à un
bourdonnement.
• Le chargeur secteur est branché sur une multiprise. Branchez
directement le chargeur secteur sur une prise murale.
• Choisissez une autre fréquence radio. Appelez l’assistance technique
d’Avaya pour obtenir un filtre de fréquences radio.
L’autonomie de
conversation est largement
réduite, même après une
recharge complète.
Les performances de la batterie ne sont plus satisfaisantes. Remplacez la
batterie. Reportez-vous à la page 74.
L’appel est coupé (les
témoins d’appel de
l’oreillette et de la base
sont éteints).
L’oreillette est déconnectée. Essayez de réinitialiser le système. Reportezvous à la page 72. Si cela ne règle pas le problème, essayez de suivre la
procédure de connexion décrite à la page 72.
J’entends des parasites qui
empêchent la
communication.
• La liaison à l’oreillette est désactivée. Essayez de rétablir la liaison en
appuyant sur le bouton de conversation de l’oreillette.
• Débranchez le chargeur secteur pendant 7 secondes, puis rebranchez-le.
• Réinitialisez tout le système comme indiqué à la page 72.
J’entends des bips dans
l’oreillette.
• Un bip toutes les 10 secondes correspond à un avertissement de batterie
faible. Rechargez la batterie en la laissant sur le socle chargeur pendant
une à trois heures, jusqu’à ce que le témoin reste allumé ou cesse de
clignoter.
• Deux bips signifient que vous quittez le rayon de portée. Rapprochez-vous
du socle.
• Si vous entendez trois bips rapprochés toutes les 30 secondes, c’est que
la sourdine est activée. Appuyez sur le bouton de contrôle de la sourdine
pour désactiver cette fonction.
• Lorsqu’un levier décroché du combiné (en option) est connecté, trois bips
indiquent qu’un appel arrive vers votre oreillette. Appuyez sur le bouton de
conversation de l’oreillette pour prendre l’appel.
Le levier décroché du
combiné est installé, mais il
ne soulève pas le combiné.
Assurez-vous que le cordon d’alimentation du levier décroché est bien
enfoncé dans la fiche de levier décroché du socle.
Mon levier décroché du
combiné fonctionne chaque
fois que je replace mon
oreillette sur la base ou que
je l’en retire.
La fonction IntelliStand est activée. Pour désactiver le levier, changez
l’interrupteur IntelliStand de position.
Les interlocuteurs
n’entendent pas.
58
FRDépannage
• Le son de l’oreillette est coupé. Appuyez sur la touche Secret de
l’oreillette pour désactiver le mode secret du microphone. Reportez-vous à
la page 37.
• Le volume à l’émission est trop faible. Augmentez le volume à l’émission
en utilisant les boutons de réglage secondaire du socle, comme indiqué à
la page 37. Si le volume est toujours trop bas, sélectionnez une autre
position pour le réglage principal du volume à l’émission, comme indiqué à
la page 37.
• Position incorrecte du cadran de configuration pour votre téléphone.
Essayez de modifier la position du cadran de configuration du téléphone
sur le socle. Assurez-vous que le chiffre sélectionné est aligné avec
l’indicateur de position. Reportez-vous à la page 30.
J’entends une tonalité dans
plusieurs positions de
configuration.
Le téléphone peut fonctionner avec plusieurs réglages du cadran de
configuration. Utilisez la position qui permet la meilleure écoute possible
pour vous et votre interlocuteur.
Quelle que soit la position
du cadran de configuration,
je n’entends pas de tonalité.
• Assurez-vous que le téléphone est relié au socle au moyen du cordon du
téléphone. Reportez-vous aux pages 5-9.
• Vérifiez que le combiné est connecté au socle par l’intermédiaire du
cordon approprié. Reportez-vous aux pages 5-9.
Je n’entends pas
l’interlocuteur/la tonalité.
• Vérifiez que les fiches et les cordons sont tous connectés correctement.
• Vérifiez que la base est alimentée (témoin lumineux rouge) et que la
batterie de l’oreillette est complètement chargée.
• Essayez de modifier la position du cadran de configuration du téléphone
sur le socle. Assurez-vous que le chiffre sélectionné est aligné avec
l’indicateur de position. Reportez-vous à la page 24.
• Vérifiez que vous avez bien sélectionné le mode oreillette. Appuyez sur le
bouton de conversation pour sélectionner le mode adéquat. Le témoin vert
de conversation du socle s’allume.
59
IT
Risoluzione dei problemi
Risoluzione dei problemi
Problema
Soluzione
Problema
Soluzione
Tutti i collegamenti sono
stati effettuati, ma le luci
non si accendono.
• Controllare che il cavo jack del caricabatterie CA sia collegato alla base.
• Controllare che il caricabatterie CA sia correttamente collegato a una
presa a parete funzionante.
• Accertarsi di utilizzare il caricabatterie CA fornito da Avaya.
La cornetta emette suoni
distorti o eco.
L’auricolare non funziona
con la base.
• Controllare che il telefono sia collegato alla presa jack del cavo telefonico
della base e che sia correttamente inserito.
• Controllare che la cornetta del telefono sia collegata alla presa jack della
cornetta sulla base e che sia correttamente inserita.
• L’auricolare potrebbe essere fuori portata rispetto alla base. Avvicinare
l’auricolare alla base finché la prima non rientra nel raggio d’azione. La
portata varia a seconda dell’ambiente lavorativo.
• La batteria della cuffia è scarica. Ricaricare la batteria inserendo
l’auricolare nell’apposita base di alloggiamento. Vedere pagina 16.
• Il volume di ascolto è troppo basso. Premere il pulsante per la
regolazione del volume sull’auricolare. Se il volume è ancora troppo basso,
impostare l’interruttore di regolazione principale del volume di ascolto.
Vedere pagina 37.
• Impostazione errata del selettore di configurazione per il proprio
telefono. Impostare correttamente il selettore di configurazione del
telefono sulla base. Accertarsi che il numero selezionato sia allineato con
l’indicatore di posizione. Vedere pagina 30.
• Potrebbe essere necessario registrare nuovamente l’auricolare con la
base. Vedere pagina 72.
• Ridurre il volume di conversazione modificando l’impostazione
dell’interruttore di regolazione principale del volume di conversazione.
Vedere pagina 37.
• Puntare il microfono verso il mento.
• Il volume di ascolto del telefono è troppo alto. Se il telefono dispone di un
controllo del volume della cornetta, ridurre il livello fino alla scomparsa
della distorsione.
• Se la distorsione permane, premere il pulsante del volume di ascolto
sull’auricolare verso il basso. Se il problema persiste, impostare
diversamente l’interruttore di regolazione principale del volume di ascolto.
Vedere pagina 37.
• La base è troppo vicina al computer o al telefono. Vedere pagina 18 per
informazioni sul corretto posizionamento.
• È necessario ripristinare il sistema. Eseguire il ripristino del sistema
come descritto a pagina 70.
Si avvertono troppi rumori,
voci e disturbi di sottofondo.
Il volume di conversazione è troppo alto. Abbassare il volume di
conversazione utilizzando i pulsanti per la regolazione secondaria del
volume di conversazione sulla base. Se il volume è ancora troppo alto,
impostare diversamente l’interruttore di regolazione principale del volume
di conversazione. Vedere pagina 37.
Il tempo di conversazione è
notevolmente ridotto anche
dopo una ricarica completa.
La batteria si sta deteriorando. Sostituirla con una batteria nuova. Vedere
pagina 74.
È caduta la linea
(l’indicatore di
conversazione
sull’auricolare e sulla base
è spento).
La registrazione è andata perduta. Provare a ripristinare il sistema. Vedere
pagina 72. Se il problema persiste, eseguire nuovamente la procedura di
registrazione a pagina 72.
La comunicazione è
disturbata da interferenze.
• Il collegamento all’auricolare è stato interrotto. Provare a ristabilire il
collegamento premendo il pulsante di conversazione della cuffia.
• Scollegare il caricabatterie CA dalla base per 7 secondi, quindi
ricollegarlo.
• Ripristinare il sistema come descritto a pagina 72.
L’auricolare emette segnali
acustici.
• Se il segnale acustico viene emesso a intervalli di 10 secondi, la carica è
in esaurimento. Ricaricare la batteria inserendola nel supporto di ricarica
sulla base per una o tre ore finché l’indicatore di carica rimane acceso o
smette di lampeggiare.
• Due segnali acustici indicano un avviso di rilevamento del limite di
portata. Avvicinarsi alla base.
• Tre rapidi segnali acustici a intervalli di 30 secondi indicano che il
microfono è disattivato. Premere il selettore per l’esclusione del microfono
una volta per riattivarlo.
• Quando è collegato un dispositivo di risposta automatico opzionale, tre
segnali acustici ripetuti indicano una chiamata in arrivo. Premere il
pulsante di conversazione sulla cuffia per rispondere.
Il dispositivo di risposta
automatico è installato, ma
non solleva la cornetta.
Accertarsi che il cavo di alimentazione del dispositivo di risposta
automatico sia inserito correttamente nella presa jack della base.
Il dispositivo di risposta
automatico entra in
funzionamento ogni volta
che si rimuove o si
sostituisce l’auricolare sulla
base.
IntelliStand è attivato. Per disattivare il dispositivo di risposta automatico,
spostare in posizione l’interruttore di IntelliStand.
Gli interlocutori non
riescono a sentire.
• L’auricolare è in modalità esclusione microfono. Premere il pulsante di
esclusione microfono sull’auricolare per riattivare il microfono. Vedere
pagina 37.
• Il volume in conversazione è troppo basso. Aumentare il volume di
conversazione utilizzando i pulsanti per la regolazione secondaria del
volume sulla base come descritto a pagina 37. Se il volume è ancora troppo
basso, impostare diversamente la regolazione principale del volume di
conversazione come descritto a pagina 37.
• Impostazione errata del selettore di configurazione per il proprio
telefono. Impostare correttamente il selettore di configurazione del
telefono sulla base. Accertarsi che il numero selezionato sia allineato con
l’indicatore di posizione. Vedere pagina 30.
Il segnale di centrale viene
emesso con diverse
configurazioni.
Il telefono funziona con diverse impostazioni del selettore di
configurazione. Utilizzare la posizione che consente la migliore qualità di
ricezione e trasmissione.
Il segnale di centrale non
viene emesso in alcuna
impostazione del selettore
di configurazione.
• Controllare che il telefono sia collegato alla presa jack del cavo telefonico
sulla base. Vedere pagine 5-9.
• Controllare che la cornetta del telefono sia collegata alla presa jack della
cornetta sulla base. Vedere pagine 5-9.
Impossibile sentire
l’interlocutore o il segnale
di composizione.
• Controllare che tutti i cavi e le prese jack siano collegati correttamente.
• Controllare l’alimentazione della base (indicatore luminoso rosso) e
accertarsi che la batteria dell’auricolare sia completamente carica.
• Impostare correttamente il selettore di configurazione del telefono sulla
base. Accertarsi che il numero selezionato sia allineato con l’indicatore di
posizione. Vedere pagina 24.
• Accertarsi di aver selezionato la modalità auricolare. Premere il pulsante
di conversazione per selezionare la modalità corretta. L’indicatore luminoso
di conversazione sulla base è verde.
Gli interlocutori avvertono
un ronzio di sottofondo.
60
IT
• Il caricabatterie CA è inserito in una prolunga. Collegarlo direttamente
alla presa a parete.
• Ricezione di un’altra frequenza radio. Contattare l’Helpdesk degli
auricolari Avaya per richiedere un filtro RF.
61
NL Problemen oplossen
Probleem
Oplossing
Probleem
Oplossing
Ik heb alles aangesloten,
maar de lampjes gaan niet
branden.
• Controleer of de wisselstroomadapter is aangesloten op het basisstation.
• Controleer of de wisselstroomadapter stevig is aangesloten op een
werkend stopcontact.
• Controleer of de wisselstroomadapter het door Avaya geleverde model is.
Geluid in de telefoonhoorn
is vervormd/ik hoor een
echo in de telefoonhoorn.
Mijn headset werkt niet
met het basisstation.
• Controleer of de telefoon is aangesloten op de telefoonsnoeraansluiting
van het basisstation en of deze stevig is aangedrukt.
• Controleer of de telefoonhoorn is aangesloten op de
telefoonhoornaansluiting van het basisstation en of deze stevig is
aangedrukt.
• De headset is mogelijk buiten bereik. Verklein de afstand tot het
basisstation totdat de headset binnen bereik is. Het bereik is afhankelijk van
de kantooromgeving.
• De batterij van de headset is leeg. Laad de batterij op door de headset in
de oplader/houder te plaatsen. Zie pagina 16.
• Het luistervolume is te laag. Druk op de knop voor het verhogen van het
volume op de headset. Als het volume nog steeds te laag is, past u de
hoofdafstelling voor het luistervolume aan. Zie pagina 38.
• De configuratieregeling voor uw telefoon is niet juist ingesteld. Probeer de
andere instellingen van de configuratieregeling op het basisstation. Zorg er
voor dat het geselecteerde cijfer is uitgelijnd met de positie-indicator. Zie
pagina 31.
• Het is mogelijk dat u de headset opnieuw moet koppelen met het
basisstation. Zie pagina 72.
• Verminder het spraakvolume door de instelling van de
hoofdafstellingsregeling te wijzigen. Zie pagina 38.
• Richt de microfoon naar uw kin.
• Het luistervolume op de telefoon is te hoog. Indien uw telefoon een
volumeregeling voor de telefoonhoorn heeft, verlaagt u het volume tot de
vervorming verdwijnt.
• Als de vervorming nog steeds aanwezig is, verlaagt u het luistervolume op
de headset. Als de vervorming niet wordt opgeheven, selecteert u een
andere instelling voor de hoofdafstellingsregeling. Zie pagina 38.
• Het basisstation is te dicht bij een computer of telefoon. Zie pagina 18 voor
de juiste plaatsing.
• Het systeem moet worden gereset. Voer een systeemreset uit zoals
beschreven op pagina 70.
Ik hoor te veel gesprekken,
geluid of ruis op de
achtergrond.
Het spraakvolume is te hoog. Verminder het spraakvolume door de
instelling van de fijnafstellingsregeling op het basisstation te wijzigen. Als
het volume nog steeds te hoog is, selecteert u een andere instelling voor de
hoofdafstellingsregeling van het spraakvolume. Zie pagina 38.
Mensen met wie ik spreek,
horen een bromtoon op de
achtergrond.
• De wisselstroomadapter is aangesloten op een stekkerdoos. Sluit de
wisselstroomadapter rechtstreeks aan op een stopcontact.
• Ik ontvang een andere radiofrequentie. Bel de Avaya Headset Helpdesk
voor een RF-filter.
De gesprekstijd van de
batterij is aanzienlijk
verminderd, zelfs nadat
deze volledig is opgeladen.
De batterij wordt slecht. Vervang de batterij. Zie pagina 74.
De verbinding is verbroken.
(Het spraakindicatielampje
op de headset en op het
basisstation brandt niet.)
De headset is niet meer gekoppeld. Probeer het systeem te resetten. Zie
pagina 72. Voer, als dit niet werkt, de koppelingsprocedure uit die is
beschreven op pagina 72.
Ik hoor ruis die de
communicatie belemmert.
• De verbinding met de headset is verbroken. Probeer opnieuw verbinding
te maken door op de spreekknop te drukken van de headset.
• Koppel de wisselstroomadapter gedurende 7 seconden los van het
basisstation en sluit deze dan weer aan.
• Reset het hele systeem zoals beschreven op pagina 72.
Ik hoor geluidssignalen in
de headset.
• Een geluidssignaal om de 10 seconden geeft aan dat de batterij bijna leeg
is. Herlaad de batterij door de headset gedurende 1 tot 3 uur in de oplader/
houder te plaatsen, totdat het laadlampje blijft branden of ophoudt met
knipperen.
• Twee geluidssignalen betekent een waarschuwing dat u buiten bereik
bent. Verklein de afstand tot het basisstation.
• Drie snelle geluidssignalen om de 30 seconden geeft aan dat de
mutefunctie aan staat. Druk eenmaal op de muteknop om de mutefunctie
uit te schakelen.
• Wanneer een optionele lifter is aangesloten, betekent drie repeterende
geluidssignalen dat er een binnenkomend gesprek is. Druk op de
spreekknop van de headset om de oproep te beantwoorden.
De telefoonhoorn-lifter is
geïnstalleerd maar tilt de
hoorn niet op.
Controleer of het netsnoer van de telefoonhoorn-lifter stevig is aangesloten
op de desbetreffende aansluiting op het basisstation.
De telefoonhoorn-lifter
treedt steeds in werking
wanneer ik de headset van
het basisstation neem of
daarop terug plaats.
IntelliStand is ingeschakeld. Als u de telefoonhoorn-lifter wilt uitschakelen,
moet u de IntelliStand-schakelaar in de stand – zetten.
Bellers horen mij niet.
62
NL Problemen oplossen
• De headset is gedempt. Druk op de muteknop op de headset om de
mutefunctie van de microfoon uit te schakelen. Zie pagina 38.
• Het spreekvolume is te laag. Verhoog het spraakvolume door de
fijnafstellingsregeling van het spraakvolume op het basisstation aan te
passen, zoals beschreven op pagina 38. Als het volume nog steeds te laag
is, selecteert u een andere instelling voor de hoofdafstellingsregeling zoals
beschreven op pagina 38.
• De configuratieregeling voor uw telefoon is niet juist ingesteld. Probeer de
andere instellingen van de configuratieregeling op het basisstation. Zorg er
voor dat het geselecteerde cijfer is uitgelijnd met de positie-indicator. Zie
pagina 29.
Ik hoor een kiestoon in
meerdere
configuratieposities.
De telefoon werkt in meerdere posities van de configuratieregeling Gebruik
de positie die het best klinkt voor u en uw gesprekspartner.
Ik hoor in geen enkele
configuratiepositie een
kiestoon.
• Controleer of de telefoon is aangesloten op de telefoonsnoeraansluiting
van het basisstation. Zie pagina’s 5-9.
• Controleer of de telefoonhoorn is aangesloten op de
telefoonhoornaansluiting van het basisstation. Zie pagina’s 5-9.
Ik hoor geen gespreks- of
kiestoon.
• Controleer of alle snoeren en aansluitingen correct zijn aangesloten.
• Controleer of het basisstation stroom heeft (rood indicatielampje) en of de
batterij van de headset volledig is opgeladen.
• Probeer de andere instellingen van de configuratieregeling op het
basisstation. Zorg er voor dat het geselecteerde cijfer is uitgelijnd met de
positie-indicator. Zie pagina 24.
• Controleer of u de headsetmodus hebt ingeschakeld. Druk op de
spreekknop om de juiste modus te selecteren. Het spraakindicatielampje op
het basisstation is groen.
63
NO Feilsøking
Problem
Løsning
Problem
Løsning
Jeg har koblet til alt, men
lysene tennes ikke.
• Kontroller at laderkontakten er koblet til baseenheten.
• Kontroller at vekselstrømsladeren er koblet riktig til et vegguttak som
fungerer.
• Kontroller at vekselstrømsadapteren er levert av Avaya.
Jeg hører for mye snakk,
bråk eller ekkostøy i
bakgrunnen.
Talevolumet er for høyt. Senk talevolumet ved å justere knappene for
mindre justering av talevolum på baseenheten. Hvis volumet fremdeles er
for høyt, velger du en annen bryterinnstilling for store justeringer av
talevolum. Se side 39.
Hodesettet mitt fungerer
ikke med baseenheten.
• Kontroller at telefonen er koblet til baseenhetens telefonkontakt og er
skjøvet helt inn.
• Kontroller at håndsettet er koblet til baseenhetens håndsettkontakt og er
skjøvet helt inn.
• Hodesettet kan være utenfor rekkevidden til baseenheten. Flytt deg
nærmere baseenheten helt til hodesettet er innenfor rekkevidden.
Rekkevidden varierer med kontormiljøet.
• Hodesettbatteriet er dødt. Lad batteriet ved å plassere hodesettet i
ladeholderen. Se side 16.
• Lyttevolumet er for lavt Trykk på knappen for volumøkning på hodesettet.
Hvis volumet fremdeles er for lavt, velger du en annen bryterinnstilling for
store volumjusteringer. Se side 39.
• Feil konfigurasjonshjulinnstilling for telefonen. Prøv andre konfigurasjons
hjulinnstillinger på baseenheten. Pass på at valgt nummer er på linje med
posisjonsindikatoren. Se side 32.
• Det kan være nødvendig å tilknytte hodesettet til basen på nytt. Se side 72.
De jeg snakker med, kan
høre summing i
bakgrunnen.
• Vekselstrømsladeren er koblet til en strømskinne. Koble
vekselstrømsladeren direkte til vegguttaket.
• Jeg får inn en annen radiofrekvens. Ring kundesenteret for Avayahodesett for å få et RF-filter.
Batteriet gir betydelig
redusert taletid, selv etter
full opplading.
Batteriet er dårlig. Bytt batteriet med en ny batteripakke. Se side 74.
Jeg mister samtalen.
(Taleindikatoren på
hodesettet og baseenheten
lyser ikke.)
Hodesettet har mistet tilknytningen. Prøv å tilbakestille systemet. Se side
72. Hvis dette ikke fungerer, kan du prøve metoden for ny tilknytning på
side 72.
Jeg hører støy på linjen
som gjør at jeg ikke kan
kommunisere.
• Du har ikke forbindelse med hodesettet. Forsøk å gjenopprette
forbindelsen ved å trykke på taleknappen på hodesettet.
• Koble vekselstrømsladeren fra baseenheten i sju sekunder, og koble den
til igjen.
• Tilbakestill hele systemet som forklart på side 72.
Jeg hører pipetoner i
hodesettet.
• Én pipetone hvert 10. sekund forårsakes av advarsel om lavt batterinivå.
Lad opp batteriet ved å sette telefonen i ladeholderen i én til tre timer helt
til ladelampen lyser kontinuerlig eller slutter å blinke.
• To pipetoner varsler om at du er utenfor rekkevidde. Flytt deg nærmere
baseenheten.
• Tre raske pipetoner hvert 30. sekund angir at demping er på. Trykk på
dempingskontrollen én gang for å slå av dempingen.
• Hvis en ekstra løfter er koblet til, angir tre gjentatte pipetoner at det
kommer en samtale inn til hodesettet. Trykk på taleknappen på hodesettet
for å svare på samtalen.
Håndsettløfteren er
montert, men løfter ikke
håndsettet.
Pass på at håndsettløfterens strømledning er koblet riktig til
løfterkontakten på baseenheten.
Håndsettløfteren starter
hver gang jeg fjerner eller
setter tilbake hodesettet i
baseenheten.
IntelliStand er aktivert. Når du skal deaktivere håndsettløfteren, flytter du
IntelliStand-bryteren til riktig posisjon.
De som ringer, kan ikke
høre meg.
64
NO Feilsøking
• Hodesettet er dempet. Trykk på Demp-knappen for å oppheve dempingen
av mikrofonen. Se side 39.
• Talevolumet er for lavt. Hev talevolumet ved å justere knappene for små
justeringer av talevolum på baseenheten, som forklart på side 39. Hvis
volumet fremdeles er for lavt, velger du en annen av innstillingene for store
justeringer av talevolum, som forklart på side 39.
• Feil konfigurasjonshjulinnstilling for telefonen. Prøv andre konfigurasjons
hjulinnstillinger på baseenheten. Pass på at valgt nummer er på linje med
posisjonsindikatoren. Se side 32.
Jeg hører en summetone i
mer enn én konfigurasjons
hjulposisjon.
Telefonen fungerer i mer enn én konfigurasjonshjulposisjon. Bruk
posisjonen som høres best ut for deg og personen du ringer til.
Jeg kan ikke høre noen
summetone i noen av konfi
gurasjonshjulposisjonene.
• Kontroller at telefonen er koblet til telefonkontakten på baseenheten. Se
sidene 5-9.
• Kontroller at håndsettet er koblet til håndsettkontakten på baseenheten.
Se sidene 5-9.
Jeg hører ikke den som
ringer/summetonen.
• Kontroller at alle ledninger og kontakter er riktig tilkoblet.
• Kontroller at baseenheten har strømtilførsel (rød indikatorlampe) og at
hodesettbatteriet er fulladet.
• Prøv andre konfigurasjonshjulinnstillinger på baseenheten. Pass på at
valgt nummer er på linje med posisjonsindikatoren. Se side 24.
• Kontroller at du er i hodesettmodus. Trykk på taleknappen for å velge
riktig modus. Taleindikatorlampen på baseenheten lyser grønt.
Lyden i håndsettet er
forvrengt/jeg hører ekko i
håndsettet.
• Senk talevolumet ved å flytte på bryteren for stor justering av talevolum.
Se side 339.
• Rett mikrofonen mot haken din.
• Lyttevolumet på telefonen er for høyt. Hvis telefonen har en volumkontroll
for håndsettet, senker du volumet helt til forvrengingen forsvinner.
• Hvis forvrengingen ikke forsvinner, senker du lyttevolumet på hodesettet.
Hvis forvrengningen vedvarer, velger du en annen innstilling på bryteren for
stor lyttevolumjustering. Se side 39.
• Baseenheten er for nærme en datamaskin eller telefon. Riktig plassering
vises på side 18.
• Systemet må tilbakestilles. Tilbakestill systemet som forklart på side 70.
65
PT Resolução de problemas
Problema
Solução
Problema
Solução
Liguei todos os cabos, mas
as luzes não se acendem.
• Verifique se o Adaptador de corrente CA está ligado à unidade de base.
• Certifique-se de que o carregador CA está ligado correctamente a uma
tomada de parede operacional.
• Certifique-se de que o carregador CA é o modelo fornecido pela Avaya.
O som do auricular
apresenta-se distorcido/
oiço eco no auricular.
O meu auricular não
funciona com a unidade de
base.
• Certifique-se de que o telefone está ligado à tomada para fio telefónico da
base e de que está bem introduzido.
• Certifique-se de que o auscultador está ligado à tomada para auscultador
da base e de que está bem introduzido.
• O auricular pode estar fora do alcance da base. Aproxime-se da base até
que o auricular esteja dentro do alcance. O alcance varia consoante o
ambiente do escritório.
• A bateria está sem carga. Recarregue a bateria, colocando o auricular no
suporte para carregamento. Consulte a página 16.
• O volume de audição está demasiado baixo. Prima o botão de aumento do
volume do auricular. Se o volume continuar demasiado baixo, seleccione
outra definição de ajuste de volume de audição em intervalos longos.
Consulte a página 39.
• Definição incorrecta da configuração de marcação do telefone.
Experimente outra definição da configuração de marcação na unidade de
base. Certifique-se de que o número seleccionado está alinhado com o
indicador de posição. Consulte a página 32.
• Poderá ter de voltar a registar o auricular na base. Consulte a página 72.
• Reduza o volume de conversação, mudando a configuração de ajuste do
volume de conversação em intervalos longos. Consulte a página 39.
• Aponte o microfone na direcção do seu queixo.
• Volume de audição do telefone demasiado alto. Se o telefone tiver
controlo do volume, reduza-o até a distorção desaparecer.
• Se a distorção continuar, reduza o controlo do volume de audição do
auricular. Se a distorção se mantiver, seleccione outra definição de ajuste
do volume de audição em intervalos longos. Consulte a página 39.
• A base encontra-se demasiado próxima do computador ou telefone.
Consulte a página 18 para obter informação acerca do posicionamento
correcto.
• O sistema tem de ser reposto. Efectua a reposição do sistema tal como se
indica na página 70.
Oiço demasiada
conversação, ruído ou som
lateral de fundo.
O volume de conversação está demasiado alto. Reduza o volume de
conversação, utilizando os botões de ajuste do volume de conversação em
intervalos curtos, localizados na base. Se o volume continuar demasiado
alto, seleccione outra definição de ajuste de volume de audição em
intervalos longos. Consulte a página 39.
Os meus interlocutores
ouvem um ruído de fundo.
• O carregador de CA está ligado a uma extensão. Ligue o carregador de CA
directamente a uma tomada de parede.
• Sintonizo outra frequência de rádio. Contacte o Centro de Apoio de
Auriculares da Avaya para obter um filtro de RF.
O desempenho do tempo de
conversação da bateria
está significativamente
reduzido, mesmo após o
recarregamento completo.
A bateria está no fim da sua vida útil. Substitua a bateria.
Consulte a página 74.
A chamada corta-se. (O
indicador de conversação
no auricular e base não se
ilumina)
O auricular perdeu o registo. Experimente repor o sistema. Consulte a
página 72. Se esta solução não funcionar, experimente o procedimento de
novo registo descrito na página 72.
Oiço interferências que
impedem a comunicação.
• A ligação ao auricular caiu. Experimente restabelecer a ligação premindo
o botão de conversação.
• Desligue o carregador CA da base durante 7 segundos; em seguida, volte
a ligá-lo.
• Reconfigure o sistema tal como se descreve na página 72.
Ouço bips no auricular.
• Um bip a cada 10 segundos é provocado por um aviso de bateria fraca.
Recarregue a bateria deixando o auricular na base para carregamento,
durante 1 a 3 horas, até que a luz de carga permaneça acesa ou deixe de
tremeluzir.
• Dois bips são um aviso de fora de alcance. Aproxime o auricular da base.
• Três bips a cada 30 segundos indicam que o corte de som está activado.
Prima o botão de corte de som uma vez para desactivar o corte de som.
• Quando um controlador do auscultador está ligado, três bips repetitivos
indicam a chegada de uma chamada ao auricular. Prima o botão de
conversação no auricular para atender uma chamada.
O controlador do
auscultador está instalado,
mas não levanta o
auscultador.
Certifique-se de que o fio de alimentação do controlador está bem
introduzido na tomada correspondente da base.
O controlador do
auscultador funciona
sempre que retiro ou
reponho o auricular na
unidade de base.
O interruptor IntelliStand está activado. Para desactivar o controlador,
coloque o interruptor IntelliStand na posição –.
Os emissores das
chamadas não conseguem
ouvir-me.
66
PT Resolução de problemas
• O som do auricular foi cortado. Prima o botão de corte de som no
auricular para anular o corte de som do microfone. Consulte a página 39.
• O volume de conversação está demasiado baixo. Aumente o volume de
conversação, regulando os botões de ajuste em intervalos curtos na
unidade de base, tal como se indica na página 39. Se o volume continuar
demasiado baixo, seleccione outra configuração do volume em intervalos
longos, tal como se indica na página 39.
• Definição incorrecta da configuração de marcação do telefone.
Experimente outra definição da configuração de marcação na unidade de
base. Certifique-se de que o número seleccionado está alinhado com o
indicador de posição. Consulte a página 32.
Consigo ouvir o sinal de
marcação em mais do que
uma posição de
configuração.
O telefone funciona em mais do que uma posição da Configuração de
marcação Utilize a posição que tem melhor som para si e para a pessoa a
quem liga.
Não oiço o toque de
marcação em nenhuma das
posições de configuração.
• Certifique-se de que o telefone está ligado à tomada para fio telefónico da
base. Consulte as páginas 5-9.
• Certifique-se de que o auscultador está ligado à tomada para auscultador
da base. Consulte as páginas 5-9.
Não consigo ouvir o
emissor da chamada/sinal
de marcação.
• Certifique-se de que os fios e tomadas estão ligados correctamente.
• Certifique-se de que a base está ligada à corrente (luz indicadora
vermelha) e de que a bateria do auricular está carregada.
• Experimente outra definição da configuração de marcação na unidade de
base. Certifique-se de que o número seleccionado está alinhado com o
indicador de posição. Consulte a página 24.
• Certifique-se de que está no modo Auricular. Carregue no botão de
conversação para seleccionar o modo correcto. A luz indicadora de
conversação na base é verde.
67
SE Felsökning
68
SE Felsökning
Problem
Lösning
Problem
Lösning
Jag har kopplat in allting
men lamporna tänds inte.
• Kontrollera att laddaren är ansluten till basenheten.
• Kontrollera att laddaren är ordentligt ansluten till ett fungerande
vägguttag.
• Kontrollera att laddaren är av den modell som tillhandahålls av Avaya.
Konversationer, brus eller
återuppspelning hörs för
mycket i bakgrunden.
Talvolymen är för hög. Sänk talvolymen genom att ställa in finjusteringen av
talvolymen på basenheten. Om volymen ändå är för hög väljer du en annan
grundinställning för talvolym. Se sidan 40.
Headsetet fungerar inte
med basenheten.
• Kontrollera att telefonen är ansluten till basenhetens telefonsladdsuttag
och att kontakten är ordentligt isatt.
• Kontrollera att telefonluren är ansluten till basenhetens telefonlursuttag
och att kontakten är ordentligt isatt.
• Headsetet kanske är utom räckvidd för basenheten. Flytta dig närmare
basenheten tills headsetet är inom räckvidd. Räckvidden varierar beroende
på kontorsmiljön.
• Headsetets batteri är urladdat. Ladda batteriet genom att placera
headsetet i laddningsklykan. Se sidan 16.
• Lyssningsvolymen är för låg. Höj volymen genom att trycka på knappen
på headsetet. Om volymen ändå är för låg väljer du en annan
grundinställning för lyssningsvolym. Se sidan 40.
• Fel konfigurationsalternativ för telefonen. Prova andra
konfigurationsalternativ på basenheten. Kontrollera att det valda numret är
riktat rakt mot positionsindikatorn. Se sidan 32.
• Du kan behöva göra om matchningen av headsetet till basenheten. Se
sidan 72.
Personer i andra änden hör
ett surr i bakgrunden.
• Laddaren är kopplad till ett grenuttag. Anslut laddaren direkt till ett
vägguttag.
• Tar in en annan signalfrekvens. Ring Avaya Headset Helpdesk och beställ
ett RF-filter.
Batteriets samtalstid är
märkbart försämrad också
efter fullständig laddning.
Batteriets livslängd närmar sig sitt slut. Byt ut batteriet mot ett nytt. Se
sidan 74.
Samtalet kopplas bort.
(Talindikator på headset
och basenhet är inte tända.)
Headsetet har förlorat sin matchning till basenheten. Prova med att
återställa systemet. Se sidan 72. Om det inte hjälper provar du med att
matcha om på det sätt som beskrivs på sidan 72.
Störningar gör det omöjligt
att kommunicera.
• Länkningen till headsetet har tappats. Försök att återupprätta länken
genom att trycka på headsetets talknapp.
• Koppla bort laddaren från basenheten i sju sekunder och anslut den
sedan igen.
• Återställ hela systemet på det sätt som beskrivs på sidan 72.
Pipljud hörs i headsetet.
• Ett pip var 10:e sekund är en varning för låg batterinivå. Ladda batteriet
genom att placera headsetet i basenhetens laddningsklyka i en till tre
timmar tills laddningslampan lyser med fast sken eller slutar blinka.
• Två pip varnar för att headsetet är utom räckvidden. Flytta dig närmare
basenheten.
• Tre snabba pip var 30:e sekund indikerar att sekretessfunktionen är
aktiverad. Stäng av sekretessen genom att trycka en gång på
sekretessknappen.
• När tillvalet lurlyftare är anslutet indikerar tre upprepade pip ett
inkommande samtal till headsetet. Svara på samtalet genom att trycka på
headsetets talknapp.
Lurlyftare är installerad
men lyfter inte på luren.
Kontrollera att lurlyftarens strömsladd är ordentligt isatt i basenhetens
uttag för lurlyftare.
Lurlyftaren aktiveras varje
gång jag tar bort eller
sätter tillbaka headsetet i
basenheten.
IntelliStand är aktiverat. Avaktivera lurlyftaren genom att flytta IntelliStandomkopplaren till läge –.
Personer som ringer kan
inte höra mig.
• Headsetet är i sekretessläge. Stäng av mikrofonens sekretessfunktion
genom att trycka in sekretessknappen på headsetet. Se sidan 40.
• Talvolymen är för låg. Öka talvolymen med finjusteringsknapparna på
basenheten på det sätt som beskrivs på sidan 40. Om volymen fortfarande
är för låg väljer du en annan grundinställning för talvolym på det sätt som
beskrivs på sidan 40.
• Fel konfigurationsalternativ för telefonen. Prova andra
konfigurationsalternativ på basenheten. Kontrollera att det valda numret är
riktat rakt mot positionsindikatorn. Se sidan 32.
Jag får kopplingston med
mer än ett konfigurationsal
ternativ.
Telefonen fungerar med mer än ett konfigurationsalternativ. Använd det
läge som låter bäst för dig och personen du pratar med.
Jag får ingen kopplingston
med något konfigurationsal
ternativ.
• Kontrollera att telefonen är ansluten till basenhetens telefonsladdsuttag.
Se sidorna 5-9.
• Kontrollera att telefonluren är ansluten till basenhetens telefonlursuttag.
Se sidorna 5-9.
Jag kan inte höra personen
som ringer/kopplingstonen.
• Kontrollera att alla sladdar och uttag är korrekt anslutna.
• Kontrollera att basenheten får ström (röd indikatorlampa) och att
headsetets batteri är fulladdat.
• Prova andra konfigurationsalternativ på basenheten. Kontrollera att det
valda numret är riktat rakt mot positionsindikatorn. Se sidan 24.
• Kontrollera att headsetläget är inställt. Välj rätt läge genom att trycka på
talknappen. Talindikatorlampan på basenheten lyser grönt.
Ljudet i luren har
störningar/ekar.
• Minska talvolymen genom att ändra grundinställningen för talvolym. Se
sidan 40.
• Rikta mikrofonen mot hakan.
• Lyssningsvolymen är för hög på telefonen. Om telefonen har
volyminställning för luren sänker du ljudet tills störningen försvinner.
• Om störningen finns kvar sänker du lyssningsvolymen med knappen på
headsetet. Om störningen finns kvar väljer du en annan grundinställning
för lyssningsvolym. Se sidan 40.
• Basenheten står för nära en dator eller telefon. Information om korrekt
placering finns på sidan 18.
• Systemet behöver återställas. Gör en Systemåterställning på det sätt som
beskrivs på sidan 70.
69
System Reset
System Reset
deZurücksetzen des Systems
1
1
1
dk
2
4
es
Es posible que para solucionar ciertos fallos, tenga que
reiniciar el sistema (consulte la sección Resolución de
problemas). Para reiniciar el sistema, siga estas
instrucciones:
1. Pulse simultáneamente el botón de control de llamada
y ambos botones de volumen de escucha (+ y -) durante
5 segundos. Suelte los botones cuando parpadee la luz
indicadora de conversación del auricular.
2. Vuelva a pulsar el botón de control de llamada. La luz
indicadora de conversación volverá a parpadear
brevemente para indicar que el auricular ha vuelto al
modo de funcionamiento normal.
3. Desconecte el cargador de CA del conector durante
cinco segundos.
4. Vuelva a conectarlo.
El reinicio del sistema habrá terminado.
GBSystem reset
To recover from some fault conditions
(refer to the Troubleshooting Section), you
may need to perform a system reset. To
perform the system reset, follow this
procedure:
1. Simultaneously press the call control
button and both the “+” and “–” volume
buttons for 5 seconds. When the talk
indicator light on the headset blinks,
release all buttons.
2. Press the call control button again. The
talk indicator light will again blink
briefly to indicate the headset is back
to normal operation mode.
3. Disconnect the AC charger from the AC
charging jack for 5 seconds.
4. Reconnect.
The system reset operation is complete.
70
Reinicio del sistema
fi
Järjestelmän noll a aminen
Järjestelmän nollaamisella voi korjata joitakin virhetiloja
(lisätietoja on vianmääritysosassa). Nollaa järjestelmä
noudattamalla seuraavia ohjeita.
1. Paina samanaikaisesti puhelunhallintapainiketta ja
äänenvoimakkuuden painikkeita + ja –. Vapauta kaikki
painikkeet, kun puheen merkkivalo vilkkuu.
2. Paina puhelunhallintapainiketta uudelleen. Puheen
merkkivalo vilkkuu uudelleen lyhyesti merkiksi siitä,
että kevytkuuloke toimii normaalisti.
3. Irrota laturi laturiliittimestä 5 sekunniksi.
4. Liitä uudelleen.
Järjestelmä on nollattu.
Réinitialisation du
système
Pour retrouver une situation de fonctionnement
normal après échec (consultez la section de
dépannage), vous devrez peut-être réinitialiser le
système. Pour ce faire, suivez la procédure cidessous :
1. Appuyez simultanément sur le bouton de
contrôle d’appel et les deux boutons de
contrôle de volume « + » et « - » pendant 5
secondes. Lorsque le témoin de
conversation du socle clignote, relâchez tous
les boutons.
2. Appuyez à nouveau sur le bouton de contrôle
d’appel. Le témoin de conversation se remet
à clignoter brièvement pour indiquer le
retour au mode de fonctionnement normal.
3. Débranchez le chargeur secteur de la fiche
de recharge secteur pendant 5 secondes.
4. Rebranchez-le.
La réinitialisation du système est terminée.
Nulstilling af systemet
Hvis du vil gendanne systemet efter en fejlfunktion (her
henvises til afsnittet Fejlfinding), kan det være nødvendigt at
nulstille systemet. Følg denne fremgangsmåde, hvis du vil
nulstille systemet:
1. Tryk samtidig på knappen til opkaldsstyring og begge
volumenknapperne “+” og “–” i 5 sekunder. Når
headsettets indikatorlampe for tale blinker, skal du
slippe alle knapperne igen.
2. Tryk igen på knappen til opkaldsstyring.
Indikatorlampen for tale blinker igen kort, for at angive
at headsettet igen er vendt tilbage til normal drift.
3. Tag stikket ud af netopladeren i 5 sekunder.
4. Tilslut det igen.
Nulstillingen af systemet er fuldført.
3
4
fr
Um die Standardeinstellungen nach fehlerhaften Vorgängen
wiederherzustellen (siehe Abschnitt „Fehlerbehebung“),
müssen Sie möglicherweise das System zurücksetzen.
Befolgen Sie zum Zurücksetzen des Systems folgende
Schritte:
1. Halten Sie gleichzeitig die Gesprächstaste und die
Lautstärketasten „+“ und „–“ 5 Sekunden lang
gedrückt. Wenn die Gesprächsleuchtanzeige am
Headset blinkt, lassen Sie alle Tasten los.
2. Drücken Sie die Gesprächstaste erneut. Die
Gesprächsleuchtanzeige blinkt noch einmal kurz auf,
um anzuzeigen, dass sich das Headset wieder im
normalen Betriebsmodus befindet.
3. Trennen Sie für 5 Sekunden das Ladegerät von der
Ladegerätbuchse.
4. Schließen Sie es anschließend wieder an.
Damit ist die Zurücksetzung des Systems abgeschlossen.
it
Ripristino del sistema
Per risolvere alcuni problemi (vedere la sezione
Risoluzione dei problemi), potrebbe essere
necessario eseguire il ripristino del sistema. Per
eseguire il ripristino del sistema, attenersi alla
seguente procedura:
1. Premere contemporaneamente il pulsante
di controllo chiamate e i pulsanti del volume
“+” e “–” per 5 secondi. Quando l’indicatore
luminoso di conversazione sulla cuffia
lampeggia, rilasciare tutti i pulsanti.
2. Premere nuovamente il pulsante di controllo
delle chiamate. L’indicatore luminoso di
conversazione lampeggia brevemente per
indicare che la cuffia ha ripreso il regolare
funzionamento.
3. Scollegare il caricabatterie dalla presa jack
per 5 secondi.
4. Effettuare nuovamente il collegamento.
L’operazione di ripristino del sistema è
completata.
nlSysteemreset
Voor het herstellen van sommige fouten
(raadpleeg het gedeelte over de
probleemoplossing), moet u mogelijk een
systeemreset uitvoeren. Voer voor een
systeemreset de volgende procedure uit:
1. Houd de gespreksknop en de knoppen “+”
en “-” van het luistervolume samen 5
seconden ingedrukt. Wanneer het
spraakindicatielampje op de headset
knippert, laat u alle knoppen los.
2. Druk nogmaals op de gespreksknop. Het
spraakindicatielampje knippert nogmaals
kort om aan te geven dat de headset weer
terug is in de normale modus.
3. Koppel de wisselstroomadapter gedurende 5
seconden los van het basisstation.
4. Sluit de wisselstroomadapter weer aan.
Het systeem is gereset.
no Tilbakestilling av
systemet
Du kan gjenopprette noen feil ved å tilbakestille
systemet (se kapitlet om feilsøking). Slik
tilbakestiller du systemet:
1. Trykk samtidig på ringekontrollknappen og
både volumknappen + og – i fem sekunder.
Når taleindikatorlampen på hodesettet
blinker, slipper du alle knappene.
2. Trykk på ringekontrollknappen en gang til.
Taleindikatorlampen blinker igjen kort for å
angi at hodesettet er tilbake i normal
driftsmodus.
3. Koble vekselstrømsladeren fra
laderkontakten i fem sekunder.
4. Koble den til igjen.
Tilbakestilling av systemet er nå fullført.
pt
Reposição do sistema
Para recuperar de falhas (consulte a secção
Resolução de problemas), poderá precisar de
realizar uma reposição do sistema. Para efectuar
a reposição do sistema, siga o procedimento
descrito:
1. Prima simultaneamente o botão de
conversação e os botões de volume “+” e “–”
durante 5 segundos. Quando a luz
indicadora de conversação do auricular se
tornar intermitente, liberte todos os botões.
2. Volte a premir o botão de conversação. A luz
indicadora de conversação fica intermitente
durante alguns segundos assinalando o
regresso ao funcionamento normal.
3. Desligue o carregador CA da tomada de
carregamento durante 5 segundos.
4. Volte a ligar.
A operação de reposição do sistema fica então
concluída
seSystemåterställning
För att åtgärda vissa fel (mer information finns i
felsökningsavsnittet) kan du behöva göra en
systemåterställning. Gör en systemåterställning
på följande sätt:
1. Tryck på samtalsknappen och
volymknapparna + och – samtidigt i fem
sekunder. När talindikatorn på headsetet
blinkar släpper du alla knapparna.
2. Tryck på samtalsknappen igen.
Talindikatorlampan blinkar kort igen som en
indikering på att headsetet har återställts
till normalt driftsläge.
3. Koppla bort laddaren från basenhetens
laddningsuttag i fem sekunder.
4. Anslut igen.
Systemåterställningen är slutförd.
71
Subscription
GBSubscription
Maintenance
it
The headset and base unit are supplied
subscribed to each other. However, if you wish
to use a replacement headset with the base
unit, then the units must be re-subscribed. To
do so, please follow the instructions on page
20 for Multi-Shift Pairing.
Collegamento
GBMaintenance
L’auricolare e la base sono già collegati al
momento dell’acquisto. Tuttavia, se si desidera
utilizzare una cuffia di ricambio con la base,
sarà necessario effettuare nuovamente la
registrazione. A questo scopo, seguire le
istruzioni a pagina 21 relative all’associazione
multipla.
1. Replace voice tube every 6–9 months (voice
tube models only).
2. Unplug the unit from the telephone and the
AC charger from the power source before
cleaning.
3. Clean the equipment with a damp (not wet)
cloth.
4. Do not use solvents or other cleaning
agents.
deAnmeldung
Das Headset und die Basisstation werden mit
gegenseitiger Anmeldung geliefert. Wenn Sie
allerdings ein Ersatz-Headset mit der
Basisstation verwenden möchten, müssen die
Geräte neu angemeldet werden. Befolgen Sie
dazu die Anweisungen auf Seite 20 zur MultiShift-Paarung.
dkAbonnering
Headsettet og baseenheden leveres, så de
abonnerer på hinanden. Hvis du ønsker at
bruge et reserveheadset sammen med
baseenheden, skal der abonneres på
enhederne igen. Hvis du vil udføre dette, skal
du læse vejledningen om Multi-Shift-parring
på side 20.
nl
Koppelen
De headset en het basisstation worden aan
elkaar gekoppeld geleverd. Als u echter een
vervangende headset bij het basisstation wilt
gebruiken, moeten die opnieuw worden
gekoppeld. Daartoe volgt u de instructies op
pagina 21.
de
Hodesettet og baseenheten er tilknyttet
hverandre ved levering. Hvis du vil bruke et
annet hodesett sammen med baseenheten,
må enhetene tilknyttes på nytt. Det gjør du ved
å følge instruksjonene på side 22 for flerskiftsammenkobling.
dk
es
Orificio de acceso
El auricular y la unidad base se proporcionan
ya registrados. Por tanto, si desea utilizar un
auricular de repuesto con la unidad base,
deberá volver a registrar las unidades. Para
ello, siga las instrucciones sobre
emparejamiento múltiple de la página 20.
fi
Liittäminen
Kevytkuuloke ja tukiasema toimitetaan
toisiinsa liitettyinä. Jos kuitenkin haluat
käyttää tukiaseman kanssa muuta
kevytkuuloketta, laitteet on liitettävä toisiinsa
uudelleen sivulla 21 olevien usean laitteen
pariliitosta koskevien ohjeiden mukaan.
fr
O auricular e a unidade de base são fornecidos
subscritos um ao outro. Contudo, se pretender
utilizar um auricular de substituição com a
unidade de base, as unidades precisam de ser
novamente subscritas. Para tal, siga as
instruções na página 22 referentes ao
Emparelhamento Múltiplo.
seMatchning
1. Cambie el tubo de voz cada seis o nueve
meses (sólo los modelos con tubo de voz).
2. Desconecte la unidad del teléfono y el
transformador de CA de la red de
alimentación eléctrica antes de limpiarlo.
3. Limpie el equipo con un paño húmedo (no
mojado).
4. No utilice disolventes ni otros productos de
limpieza.
fi
Huolto
1. Vaihda ääniputki 6–9 kuukauden välein (vain
ääniputkimallit).
2. Irrota laite puhelimesta ja laturi
virtalähteestä ennen puhdistamista.
3. Puhdista laite kostealla (ei märällä) liinalla.
4. Älä käytä liuottimia tai muita
puhdistusaineita.
Onderhoud
1. Vervang het spreekbuisje elke 6 tot 9
maanden (alleen voor spreekbuismodellen).
2. Koppel het basisstation los van de telefoon
en de wisselstroomadapter van de
netvoeding voordat u deze schoonmaakt.
3. Neem de apparatuur af met een vochtige,
niet te natte doek.
4. Gebruik geen oplos- of
schoonmaakmiddelen.
no Vedlikehold
1. Bytt talerøret hver 6–9 måned (bare
modeller med talerør).
2. Koble enheten fra telefonen og
vekselstrømsladeren fra strømuttaket før
rengjøring.
3. Rengjør utstyret med en fuktig (ikke våt)
klut.
4. Ikke bruk løsemidler eller andre
rengjøringsmidler.
ptManutenção
1. Substitua o microfone cada 6 a 9 meses
(apenas modelos com microfone).
2. Desligue a unidade do telefone e o
carregador de CA da corrente eléctrica
antes de efectuar tarefas de limpeza.
3. Limpe o equipamento com um pano húmido
(não molhado).
4. Não utilize diluentes ou outros agentes de
limpeza.
esMantenimiento
Headsetet och basenheten levereras matchade
till varandra. Om du vill använda ett annat
headset tillsammans med basenheten måste
enheterna matchas först. Gör det genom att
följa anvisningarna för Multi-shift-matchning
på sidan 22.
Connexion
L’oreillette et la base fournis sont connectés
l’un à l’autre. Si vous souhaitez utiliser une
autre oreillette avec le socle, les unités doivent
être reconnectées. Pour ce faire, veuillez
suivre les instructions page 21 afin d’en savoir
davantage sur le couplage.
nl
Vedligeholdelse
1. Udskift stemmerøret hver 6.-9. måned (kun
modeller med stemmerør).
2. Fjern stikket til telefonen, og tag stikket til
netopladeren ud af stikkontakten, før du
starter rengøringen.
3. Rengør udstyret med en fugtig (ikke våd)
klud.
4. Brug ikke opløsnings- eller
rengøringsmidler.
ptSubscrição
1. Sostituire il tubo vocale con una frequenza di
6-9 mesi (solo per modelli con tubo vocale).
2. Scollegare l’unità dal telefono e il
caricabatterie CA dalla presa elettrica prima
di effettuare la pulizia dell’unità.
3. Pulire l’apparecchiatura con un panno umido
(ma non bagnato).
4. Non utilizzare solventi o detersivi.
Pflege
1. Bei Modellen mit Sprechröhrchen sollte das
Sprechröhrchen alle 6 bis 9 Monate
ausgetauscht werden.
2. Entfernen Sie vor der Reinigung die
Basisstation vom Telefon sowie das
Ladegerät von der Stromversorgung.
3. Reinigen Sie das Gerät mit einem feuchten
(nicht nassen) Tuch.
4. Verwenden Sie keine Lösungsmittel oder
anderen Reinigungsmittel.
no Tilkny tning
itManutenzione
se
Underhåll
1. Byt ut mikrofonarmen var sjätte-nionde
månad (gäller endast modeller med
mikrofonarm).
2. Koppla bort enheten från telefonen och
laddaren från strömkällan före rengöring.
3. Rengör utrustningen med en fuktig (inte
blöt) tygduk.
4. Använd inte lösningsmedel eller andra
rengöringsmedel.
frEntretien
1. Remplacez le tube vocal tous les 6 à 9 mois
(uniquement pour les modèles à tube vocal).
2. Avant de procéder au nettoyage, débranchez
l’appareil du téléphone et le chargeur
secteur de la source d’alimentation.
3. Utilisez un chiffon humide (non pas mouillé)
pour nettoyer le matériel.
4. N’utilisez pas de dissolvant ni de produits de
nettoyage.
72
73
Battery Replacement
GBBattery replacement
The custom battery supplied should last 2–3
years. When talk time decreases significantly,
you should replace the battery. Call
Plantronics at (800) 544-4660 ext. 5538 for
information on sending back to factory to
install new battery.
deAustauschen des Akkus
Der im Lieferumfang enthaltene Akku hat eine
Lebenszeit von 2 bis 3 Jahren. Wenn die
Sprechzeit deutlich abnimmt, sollte der Akku
ausgetauscht werden. Rufen Sie Plantronics
unter der Nummer +1 (800) 544-4660, Nbst.
5538 an, um Informationen zur Rücksendung
ans Werk zu erhalten, damit der Akku
ausgetauscht wird.
dk
Udskiftning af batteri
Det medfølgende specialbatteri er beregnet til
2-3 års brug. Når taletiden bliver mærkbart
kortere, skal du udskifte batteriet. Ring til
Plantronics på tlf. (800) 544-4660 lokal 5538 for
at få oplysninger om returnering til fabrikken
for at få installeret et nyt batteri.
es
Cambio de la batería
La batería personalizada que se proporciona
tiene una vida media de dos a tres años. Si el
tiempo de conversación disminuye
considerablemente, cambie la batería. Si
desea obtener información sobre cómo enviar
el auricular a la fábrica para la instalación de
una nueva batería, póngase en contacto con
Plantronics llamando al (800) 544-4660,
extensión 5538.
fiAkun vaihtaminen
Laitteen mukana toimitetun akun käyttöikä on
noin 2–3 vuotta. Kun puheaika lyhenee
huomattavasti, akku on vaihdettava.
Soittamalla Plantronicsin numeroon (800) 5444660 (5538) saat lisätietoja akun vaihtamisesta
tehtaalla.
fr
Remplacement de la
batterie
La batterie fournie spécialement pour ce
modèle dure normalement 2 à 3 ans. Lorsque
la durée de conversation diminue de manière
significative, il est temps de la remplacer.
Appelez Plantronics au (800) 544 4660 poste
5538 pour obtenir les informations relatives au
renvoi de l’appareil à l’usine pour l’installation
d’une nouvelle batterie.
itSostituzione della
batteria
La durata della batteria in dotazione è di 2-3
anni. Quando l’autonomia di conversazione si
riduce significativamente, è necessario
sostituire la batteria. Contattare Plantronics al
numero (800) 544-4660 est. 5538 per
informazioni sulla spedizione del prodotto alla
fabbrica per installare una nuova batteria.
nlBatterijen vervangen
Batterijen vervangen
De speciale batterij dient 2 tot 3 jaar te
functioneren. Wanneer de gesprekstijd
beduidend afneemt, moet u de batterij
vervangen. Bel Plantronics: (800) 544-4660,
toestel 5538 voor informatie over het naar de
fabriek terugsturen voor een nieuwe batterij.
noBy tte batteri
Originalbatteriet som følger med produktet,
varer i 2–3 år. Når taletiden reduseres
betraktelig, bytter du batteri. Ring Plantronics
på (800) 544-4660 linje 5538 for informasjon
om hvordan du sender telefonen tilbake til
fabrikken for å få satt inn et nytt batteri.
Accessing the AVAYA UCC
GB
Accessing the Avaya Unified Communication
Centre (UCC) from the AWH75 wireless
1. C
onnect the AWH75 wireless to the Avaya
telephone. Follow the instructions in this user
guide.
2. A
sk your switch administrator to configure
your telephone for ringdown to the UCC in
your telephone first call appearance.*
*Notes for switch administrators on configuring
ringdown for your AVAYA telephones:
Some phones allow for direct ringdown
configuration, i.e. 2500.
Other phones do not allow for direct ringdown
configurations, i.e. 64XX. In order to configure the
ringdown in these phones, the administrator
needs to:
ptSubstituição da bateria
A bateria fornecida de fábrica deverá durar 2–
3 anos. Quando o tempo de conversação
diminuir de forma significativa, deverá
substituir a bateria. Contacte a Plantronics
através do telefone + 1 (800) 544-4660, ext.
5538 (Estados Unidos) ou 800 844 517
(Portugal) para obter informação acerca do
envio da unidade para instalação de nova
bateria.
seBy te av batteri
Det anpassade medföljande batteriet bör räcka
i två–tre år. Om taltiden minskar markant bör
du byta ut batteriet. Ring Plantronics på
(800) 544-4660 ankn. 5538 om du vill ha
information om hur du returnerar enheten till
fabriken för installation av ett nytt batteri.
DE
Kontaktieren des Avaya Unified Communication
Center (UCC) über das AWH75
1. Slut den trådløse AWH75 til Avayatelefonen. Følg instruktionerne i denne
brugervejledning.
2. Bed din administrator om at konfigurere din
telefon, så den kan ringe op til UCC ved din
telefons første opkald.*
*Noter til administratorer i forbindelse med
konfiguration af opkald til AVAYA-telefoner:
Nogle telefoner kan konfigureres direkte til
opkald, dvs. 2500.
Andre telefoner har ikke denne mulighed, dvs.
64XX. For at konfigurere opkald på disse telefoner
skal administratoren:
• Oprette en fantomlinje som en 2500-type (der
skal ikke tildeles en rigtig port).
• Oprette et opkald til UCC for fantomlinjen.
• Slutte fantomlinjen til den første
opkaldsforekomst (konfigurer den som
“abrdg-appr”, og sæt “Auto Select Any Idle
Appearance” til Yes).
es
Acceso al centro de comunicación unificada de
Avaya (Unified Communication Center, UCC) desde
el auricular AWH75
1. V
erbinden Sie das AWH75 Wireless
mit dem Avaya-Telefon. Folgen Sie den
Anleitungen in diesem Benutzerhandbuch.
2. D
as Telefon muss von Ihrem SwitchAdministrator so konfiguriert werden, dass
über die erste Direktwahltaste Ihres Telefons
eine Verbindung zum UCC hergestellt wird.*
* Anmerkungen für Switch-Administratoren für die
Konfigurierung von AVAYA-Telefonen für eine
Direktwahl.
1. Conecte el auricular AWH75 al teléfono
Avaya. Siga las instrucciones de esta guía
del usuario.
2. Póngase en contacto con el administrador
para configurar el teléfono en el que se
señalará el UCC del teléfono en la primera
llamada.*
*Notas para administradores de conmutación
acerca de la configuración de señalización para
los teléfonos AVAYA:
Bei einigen Telefonen (z B. 2500) kann eine
Direktwahlkonfigurierung vorgenommen werden.
Algunos teléfonos permiten la configuración
de señalización directa, por ejemplo, el 2500.
Bei anderen Telefonen ist dies nicht möglich
(z. B. 64XX). Folgende Schritte müssen durchführt
werden, um bei diesen Telefonen eine Direktwahl
zu konfigurieren:
Otros teléfonos no permiten la configuración
de señalización directa, por ejemplo, 64XX. Para
configurar la señalización en estos teléfonos, el
administrador debe:
74
•C
reate a phantom extension setup as a 2500
type. (No real port has to be assigned).
•C
reate a ringdown to the UCC for the phantom
extension.
•B
ridge the phantom extension to the
telephone call appearance 1 (configure it as
an “abrdg-appr” and setup the “Auto Select
Any Idle Appearance” to Yes).
dk
Sådan får du adgang til Avaya Unified
Communication Centre (UCC) via den trådløse
AWH75
•R
ichten Sie eine Scheindurchwahl des
Typs 2500 ein. (Es muss kein realer Anschluss
zugewiesen werden.)
•K
onfigurieren Sie das Telefon so, dass über
die Scheindurchwahl eine Verbindung zum
UCC hergestellt wird.
•D
as Telefon muss so eingestellt werden,
dass mit der Direktwahltaste 1 über die
Scheindurchwahl eine Verbindung zum UCC
hergestellt wird. (Konfigurieren Sie diese als
„abrdg-appr“, und stellen Sie „Auto Select
Any Idle Appearance“ auf „Ja“ ein.)
• Crear una configuración de extensión ficticia,
de tipo 2500. (No se asigna ningún puerto
real.)
• Crear una señalización al UCC para la
extensión ficticia.
• Unir la extensión ficticia a la primera llamada
de teléfono (configurarla como “abrdg-appr”
y establecer la opción “Auto Select Any Idle
Appearance” (“Seleccionar automáticamente
cualquier llamada ficticia”) en Yes (Sí)).
75
Accessing the AVAYA UCC
fi
Avaya Unified Communication Center (UCC) puhelinkeskuksen käyttäminen langattoman
AWH75 Wireless -tukiaseman avulla
1. Liitä langaton AWH75 Wireless -tukiasema
Avaya-puhelimeen. Noudata tässä
käyttöoppaassa annettuja ohjeita.
2. Pyydä puhelinvaihteen hoitajaa siirtämään
puhelusi UCC-puhelinkeskukseen
ensimmäisestä soitosta.*
*Huomautuksia puhelinvaihteen hoitajille
puheluiden siirtämisestä AVAYA-puhelimiin:
Joihinkin, esimerkiksi 2500-sarjan puhelimiin,
puhelut voi siirtää suoraan.
Jotkin muut, esimerkiksi 6400-sarjan puhelimet,
eivät kuitenkaan tue tätä toimintoa. Jos puhelin ei
tue puhelunsiirtoa, puhelinvaihteen hoitajan on
toimittava seuraavasti:
• Luo haamualanumero, kuten 2500-sarjan
puhelimissa. (Oikeaa porttia ei tarvitse
määrittää.)
• Luo puhelunsiirto UCC-puhelinkeskukseen
haamualanumeroa varten.
• Yhdistä haamualanumero ensimmäisenä
näkyvään puhelimeen 1 (määritä sen
muodoksi abrdg-appr ja valitse kohdassa Auto
Select Any Idle Appearance asetukseksi Yes).
fr
Accès à l’UCC Avaya (Unified Communication
Center) depuis le AWH75 sans fil
1. Connectez le AWH75 sans fil au téléphone
Avaya. Suivez les instructions de ce guide de
l’utilisateur.
2. Demandez à l’administrateur du
commutateur de configurer votre téléphone
de façon à ce que les appels soient dirigés
vers l’UCC (dans la première touche de
description d’appel de votre téléphone).*
*Remarques pour les administrateurs au sujet de
la configuration de l’acheminement des appels
pour vos téléphones AVAYA :
Certains téléphones, comme le 2500, permettent
de configurer directement l’acheminement des
appels.
D’autres téléphones, comme le 64XX, ne
permettent pas une telle configuration. Pour
configurer l’acheminement des appels sur ces
téléphones, l’administrateur doit :
76
• Créer une configuration d’extension fantôme
en tant que type 2500. (Aucun port réel n’a
besoin d’être attribué.)
• Créer un acheminement d’appel vers l’UCC
pour l’extension fantôme.
• Lier l’extension fantôme à la touche de
description d’appel 1 du téléphone (configurezla en tant que « abrdg-appr » et choisissez «
Yes » (Oui) pour l’option « Auto Select Any Idle
Appearance » (Sélectionner automatiquement
toute touche de description d’appel inactive).
it
Accesso all’UCC (Unified Communication Center)
Avaya da AWH75 Wireless
1. Collegare AWH75 Wireless al telefono Avaya.
Attenersi alle istruzioni contenute nella
presente guida per l’utente.
2. Richiedere all’amministratore dello switch
di configurare il segnale di attivazione
nell’UCC per la prima indicazione di linea del
telefono.*
*Note per gli amministratori di switch per la
configurazione del segnale di attivazione nei
telefoni AVAYA:
Alcuni telefoni, ad esempio il modello 2500,
consentono la configurazione diretta del segnale
di attivazione, i.e. 2500.
Accessing the AVAYA UCC
no
Slik får du tilgang til Avaya Unified
Communication Center (UCC) fra det trådløse
AWH75-hodesettet:
1. K
oble det trådløse AWH75-hodesettet til
Avaya-telefonen. Følg instruksjonene i
denne brukerhåndboken.
2. B
e sentralbordadministratoren om å
konfigurere telefonen for “ringdown” til
UCC under telefonens første samtale.*
*Merknader for sentralbordadministratoren
om å konfigurere “ringdown” for AVAYAtelefonene:
Noen telefoner tillater direkte “ringdown”konfigurasjon, f.eks. 2500.
Altri, come il modello 64XX, non consentono
questo tipo di configurazione. In tal caso, è
necessario:
Andre telefoner tillater ikke direkte
“ringdown”-konfigurasjon, f.eks. 64XX. For å
kunne konfigurere “ringdown” i disse
telefonene må administratoren:
• Configurare un’ estensione “fantasma” come
tipo 2500 (senza assegnare una porta reale).
• Creare un segnale di attivazione nell’UCC per
l’estensione fantasma.
• Collegare a ponte l’estensione fantasma
alla prima indicazione di linea del telefono
(configurarla come “abrdg-appr” e impostare
l’opzione “Auto Select Any Idle Appearance”
su Yes).
nl
Het Unified Communication Center (UCC) van
Avaya openen met de AWH75 Wireless
1. Sluit de AWH75 Wireless aan op de Avayatelefoon. Volg de aanwijzingen in deze
handleiding.
2. Vraag de beheerder van uw telefooncentrale
om uw telefoon te configureren voor
ringdown naar de UCC in de weergave van de
eerste oproep van uw telefoon.*
*Opmerkingen voor beheerders over het
configureren van ringdown op AVAYA-telefoons:
Sommige telefoons, zoals de 2500, ondersteunen
rechtstreekse ringdown-configuratie.
Andere telefoons, zoals de 64XX, ondersteunen dit
niet. Om ringdown voor deze telefoons te
configureren, dient de beheerder:
• een schijnextensie in te stellen als 2500-type.
(Er hoeft geen werkelijke poort te worden
toegewezen.)
• een ringdown naar de UCC te maken voor de
schijnextensie.
• De schijnextensie te verbinden aan de
weergave van de eerste oproep van de
telefoon (te configureren als een “abrdg-appr”
en“Auto Select Any Idle Appearance” in te
stellen op Yes).
•o
pprette et fantomlinjeoppsett som
en 2500-type (Ingen faktisk port må
tilordnes.)
•o
pprette en “ringdown” til UCC for
fantomlinjen
•o
verføre fantomlinjen til telefonsamtaleforekomst 1 (konfigurer den som
“abrdg-appr” og sett “Auto Select Any
Idle Appearance” (Velg ledig forekomst
automatisk) til “Yes” (Ja))
se
Åtkomst till Avaya Unified Communication
Center (UCC) från trådlösa AWH75
1. Anslut trådlösa AWH75 till Avayatelefonen. Följ instruktionerna i den här
användarhandboken.
2. Be din växeladministratör konfigurera
din telefon för ringdown till UCC som
telefonens primära call appearance.*
*Information till växeladministratörer för
konfigurering av ringdown för AVAYA-telefoner:
Vissa telefoner möjliggör direkt ringdown,
t.ex. 2500.
Andra telefoner har inte funktioner för direkta
ringdown-konfigurationer, t.ex. 64XX. Om du
vill konfigurera ringdown för de här telefonerna
måste administratören göra följande:
• Skapa inställningar för phantomanknytningar av typen 2500. (En riktig port
måste inte tilldelas)
• Skapa en ringdown till UCC för phantomanknytningen.
• Koppla spökförlängningen till telefonens
primära call appearance (konfigurera
den som en “abrdg-appr” och aktivera
inställningen “Auto Select Any Idle
Appearance”).
pt
Aceder ao Avaya Unified Communication Center
(UCC) a partir do auricular AWH75 Wireless
1. L
igue o AWH75 Wireless ao telefone
Avaya. Siga as instruções neste manual
do utilizador.
2. P
eça ao seu administrador de comutação
que configure o telefone para gerar um
toque no UCC, quando uma chamada
chegar ao telefone.*
*Notas para os administradores de comutação
acerca da configuração de toques nos telefones
AVAYA:
Alguns telefones permitem a configuração de
toque directo, isto é, 2500.
Outros não permitem esse tipo de
configuração, isto é, 64XX. Para configurar o
toque nestes telefones, o administrador
deverá:
•C
riar uma configuração de extensão
fantasma, por exemplo, do tipo 2500. (Não
é necessário atribuir uma porta real.)
•C
riar um toque para o UCC associado à
extensão fantasma.
•L
igar a extensão fantasma à detecção 1
de chamada no telefone (configurar como
“abrdg-appr” e definir a opção “Auto
Select Any Idle Appearance”, Selecção
Automática de Qualquer Detecção de
Inactividade, para Yes - Sim).
77
www.avayaheadsets.com
© 2005–2006 Plantronics, Inc. All rights reserved. Avaya and the Avaya Logo are trademarks of Avaya,
Inc. and may be registered in certain jurisdictions.
IntelliStand and the voice tube clear color trade dress are trademarks or registered trademarks of
Plantronics, Inc.
Patents U.S. 5,210,791; 6,735,453; D469,756; D512, 984; Australia 147229; France 651,857-651,865;
Germany 40108524.4; GB Regd.Des.No. 2104923 and Patents Pending
80
Printed in USA 73870-03 (11.06)
USER GUIDE
AWH75N
PROFESSIONAL HEADSET SYSTEM
© 2007 Plantronics, Inc. All rights reserved. Avaya and the Avaya Logo are trademarks of Avaya, Inc.
and may be registered in certain jurisdictions.
IntelliStand is a trademark of Plantronics, Inc.
Patents U.S. 5,210,791; 6735,453, D469,756; D523,412; D539,266; Australia 303053; China
ZL200530008542.5; EM 293964-0003; Taiwan D113940 and Patents Pending
73870-04 (04.07)
Welcome
Components
This User Guide provides instructions on the setup and usage of the Avaya AWH75N
Professional Headset System.
Before getting started, please review the safety booklet included in your package. For
additional help, service or support information, refer to the product warranty card or
visit www.avayaheadsets.com.
Headset
Table of Contents
2
Gel Eartips
Components
3
Setup 1–5
6
IntelliStand
9
Charging
10
Positioning
10
Adjusting Fit
11
Multi-shift Pairing
11
Making/Answering/Ending Calls
12
Checking Compatibility
14
Volume
15
Headset Controls
17
Base Indicator Lights
18
Troubleshooting
19
Subscription
21
System Reset
21
Maintenance
21
Battery Replacement
21
Accessing UCC
22
Technical Assistance
23
Regulatory Notices
23
Eartips
Base
AC Charger
Telephone Cord
Ring Detector
D + M Filter Cord
24 /46 Hookswitch
Control Cord
8400 Hookswitch
9600 Hookswitch
Control Cord*
Control Cord
* Optional.
The 8400 cable is not delivered with the
product; call the Avaya Headset Line to
obtain: 1 800 544-4779.
3
Components
Components
Base - Underside View
Base - Top View
Speak Volume
Major Adjust
Front:
Indicator Lights
Handset Jack
Talking (Green)
Power (Red)
AC Power
Adapter Jack
Charging (Amber)
Accessory Jack
Ring Detector Jack
Charging Cradle
Telephone Base Jack
EU24/ADJ
Telephone
Configuration Dial
Headset
Rear:
Speaking Volume
Minor Adjust
IntelliStand™
On/Off Switch
(to automate
call control button)
Listening Volume/Mute
Call Control Button
Talk Indicator Light
Noise Canceling Boom
Listening Volume
Major Adjust
Telephone Cord
NOTE: Please refer to the separate Safety Instructions booklet for
important product safety information prior to installation or use of
the product.
4
5
Setup 1
Setup 2
with AVAYA 2420, 4610SW, 4620, 4620SW, 4621SW, 4622SW, 4625SW
4630SW, 5420, 5610 and 5620 telephones*
with AVAYA 2410, 4630, 5410, 6416 D+M and 6424 D+M telephones
Configuration
dial set to 3
Configuration
dial set to 1
*24xx and 54xx phones require 4.0 firmware or greater.
46xx and 56xx phones require 1.8 firmware or greater.
6
7
Setup 3 w/AVAYA 8403, 8405, 8410D, 8411D, 8434 telephones
Setup 5 with other AVAYA telephones
Warning: It is important for correct and safe operation that the base cord
is installed into the proper jack of your telephone. Follow these instructions
carefully, especially if your telephone has two jacks where the handset was
attached. Be sure to note or mark which jack was used for the handset.
Configuration
dial set to 3
* Optional.
The 8400 cable is not
delivered with the product;
call the Avaya Headset Line
to obtain: 1 800 544-4779.
Configuration
Dial
{see page 14}
Optional
Lifter
Optional
Lifter
O
NTR
PLA
Be sure to connect
this plug into the
jack where the
handset was
connected.
NICS
Setup 4 with AVAYA 1600 and 9600 series telephones
NICS
PLANTRO
Optional
Lifter
Configuration
dial set to 1
IntelliStand™
IntelliStand™
off
IntelliStand
on
8
Set the IntelliStand
switch to IntelliStand off
( –) if you want to control
the handset lifter with
the call control button
on your headset.
Set the IntelliStand
switch to IntelliStand on
( = ) if you want the
handset to automatically
pick up when you take
the headset off the
charging cradle.
9
Charging
Adjusting Fit
1
2
1. Slide the headset into the charging
cradle. The earpiece with the microphone goes into the cradle.
2. Gently press down on the the headset to ensure that the headset is in
the correct position. The amber
charge indicator light on the base
will flash while charging and will
change to solid amber when fully
charged.
1
• 20 minutes = minimum charge
to continue setup
2
3
NOTE: Depending on your preference, you can
replace the pre-installed leatherette ear cushions
with the included alternative foam cushions.
• 3 hours = full charge
1. Adjust headband to fit.
2. Rotate noise-cancelling microphone until it is pointed towards your chin.
Positioning
Multi-shift Pairing
2
1
Enable
12
”
OR
OR
6“
Disable
1. To pair another headset to the same base, you must first enable the multi-shift
pairing feature. Long press (5 sec.) the speaking volume minor adjust up button
on back of the base until the power indicator flashes.
The minimum recommended separation distance is shown above.
IMPORTANT: Incorrect positioning can cause noise and interference problems.
2. Place a charged headset in charging cradle. The red indicator light on base will flash
for 2 seconds if the multi-shift pairing feature is enabled. Within 10 of doing so, press
either the “+” or”-” listening volume button for 3 seconds until the green talk indicator
lights to indicate pairing mode and goes out after successful pairing. Repeat steps 1
and 2 if headset and base do not link when call control button is pressed.
NOTE: Only the last paired headset will work with the base. You must NOT be in talk mode
(on a call) to enable or disable this feature.
To disable the multi-shift pairing feature, long press (5 sec.) the speaking volume minor
adjust down button until the power indicator light flashes.
10
11
Making/Answering/Ending Calls
Making/Answering/Ending Calls
Setup 1, 2, 3 & 4
Setup 5
with Optional Handset Lifter
2
2
1
1
To make a call, press call control button. Dial tone should sound through headset
(If not, check compatibility—see Setup 1, 2, 3 & 4). Dial using the telephone keypad.
To answer a call, press the call control button on the headset.
To end a call, press the call control button on the headset. If either you or the recipient
have trouble hearing, please check compatibility (Setup 1, 2, 3 & 4).
First, test proper set up of the handset lifter.
1. Press the call control button on headset to activate handset lifter and lift handset
from phone. Dial tone should sound if the handset is raised high enough.
2. If no dial tone, adjust handset lifter height switch or reposition the lifter under the
handset.
Use mounting tape to secure the handset lifter in position.
2
1
To make/answer a call:
1. Press the call control button to raise the handset lifter.
2. Use the telephone keypad to dial the number.
To end a call, press the call control button to lower the handset lifter. The handset will
return to the base.
If either you or the recipient have trouble hearing, please check compatibility (page 14).
12
13
Checking Compatibility
Listening Volume
NOTE: The compatibility setting of “1” is set at the factory to work with most phones.
However, if you do not hear a dial tone, if either you or the recipient is having trouble hearing,
or if you experience buzzing/hissing, please follow the directions below.
NOTE: Be sure to set your telephone’s volume at the mid range before adjusting
the AWH75N volume.
Major Adjust
Push on the “+” and “–” buttons to adjust
listening volume in minor incremental
adjustments.
NOTE: You must be in talk mode (i.e. on a
call) to adjust.
Use listening volume major adjust
control on the back of the base for
large incremental adjustments.
2
3
4
Minor Adjust
2
4
1
3
1
WARNING:
Do not use headset at high volumes for
extended periods of time. Doing so can
cause hearing loss. Always listen at
moderate levels. For more information
on headsets and hearing, visit:
www.plantronics.com/healthandsafety
Adjust your telephone configuration dial on the base to position 3 for the following telephones: 2420, 4610SW, 4620, 4620SW, 4621SW, 4622SW, 4625SW, 4630SW, 5420, 5610,
5620, 8403, 8405, 8410D, 8411D and 8434.
Adjust the configuration dial to position 1 for the following telephones:
2410, 4630, 5410, 6416D+M, 6424D+M, and 1600 and 9600 series.
If you cannot hear a dial tone through your headset, use a coin or small screwdriver to
turn the telephone configuration dial until you can. Make sure that a number is aligned
with the position indicator.
1. Place a call to someone you know.
2. While speaking, turn the configuration dial through the four positions.
3. Select the position that provides the best sound quality for both you and the recipient.
NOTE: 1 is the loudest setting.
4 is the lowest setting.
Headset Mute
To mute headset, long press the volume
down button (3 seconds). Press again to
unmute.
Talk indicator light on base will flash
while muted.
You will hear 3 rapid beeps every 15
seconds to indicate that mute is on.
14
15
Speaking Volume
Minor Adjust
Major Adjust
Use the speaking volume minor adjust
control on the back of the base for
minor incremental adjustments.
Use the speaking volume major adjust
control on the bottom of the base for
large incremental adjustments.
NOTE: You must be in talk mode (i.e. on a
call) to adjust.
NOTE: A is the lowest setting.
B is the most common setting.
D is the loudest setting.
Headset Controls
N/A
N/A
Feature
Action
Tone
Listening volume
minor adjust
Press + to increase
or – to decrease
Ascending/descending
tones, 2 tones at limit
Mute
Long press – key
(3 seconds)
3 mid tones = Mute
3 low tones = Unmute
NOTE: Tones repeat every
15 seconds when muted.
Answering/
ending calls
Short press call
control button
Mid tone
Low battery
warning
Replace headset in
charging cradle
1 tone every 10
seconds
Out of range
warning — when
on active call
Move closer to base
2 tones
Incoming call
notification*
Press call control
button to answer call
3 repetitive tones
* For some phone models, this only works when using
either the optional Headset Lifter or the Ring Detector.
16
17
Base Indicator Lights
Troubleshooting
Problem
Talking/Muted (Green)
Power (Red)
Charging (Amber)
Action
Light
Charging
Flashes amber
Fully Charged
Solid amber
Power
Solid red
Talking
Solid green
Muted
Flashes green
18
Solution
I plugged everything in but
the lights won’t come on.
• Check that the AC charger jack is connected to the base unit.
• Check that the AC charger is securely connected to a
working wall outlet.
• Check that the AC charger is the model supplied by Avaya.
My headset does not work
with the base unit.
• Check that the phone is connected to the base unit’s phone
cord jack and it is pushed in firmly.
• Check that the phone handset is connected to the base’s
phone handset jack and it is pushed in firmly.
• Headset may be out of range of the base. Move closer to
base unit until headset is within range. Range varies with
office environment.
• Headset battery is dead. Recharge the battery by placing
the headset in the headset charging cradle. See page 10.
• Listening volume too low. Press the volume up button on the
headset. If the volume is still too low, select another
listening volume major adjust switch setting. See page 15.
• Incorrect configuration dial setting for your phone. Try other
phone configuration dial settings on the base unit. Ensure
the selected number is in line with the position indicator.
See page 14.
• You may have to resubscribe your headset with the base.
See page 21.
Callers cannot hear me.
• Headset is muted. Press the mute button on headset to
unmute the microphone. See page 15.
• Speak volume is too low. Increase the speaking volume by
adjusting the speaking volume minor adjust buttons on the
base unit as described on page 16. If the volume is still too
low, select another speaking volume major adjust setting
as described on page 16.
• Incorrect configuration dial setting for your phone. Try
other phone configuration dial settings on the base unit.
Ensure the selected number is in line with the position
indicator. See page 14.
I can hear a dial tone in
more than one
configuration position.
Phone will work in more than one configuration dial
position. Use the position that sounds best to you and the
person you call.
I cannot hear a dial tone in
any configuration position.
• Check that the phone is connected to the base’s phone
cord jack. See pages 6–9.
• Check that the phone handset is connected to the base’s
phone handset jack. See pages 6–9.
I cannot hear caller/dial tone.
• Check that all cords and jacks are connected correctly.
• Check that the base has power (red indicator light) and
the headset battery is fully charged.
• Try other phone configuration dial settings on the base
unit. Ensure the selected number is in line with the
position indicator. See page 14.
• Ensure you are in headset mode. Press the talk button to
select correct mode. The talk indicator light on the base
is green.
19
I can hear too much
background conversation,
noise or sidetone.
Speaking volume is too high. Lower the speaking volume by
adjusting the speaking volume minor adjust buttons on the
base. If the volume is still too high, select another speaking
volume major adjust setting. See page 16.
People I talk to can hear a
buzz in the background.
• AC charger is plugged into a power strip. Plug the AC
charger into the wall directly.
• Picking up another radio frequency. Call the Avaya Headset
Helpdesk for an RF filter.
Battery talk time performance
is significantly degraded even
after a full recharge.
Battery is going bad. Replace the battery with a new
battery pack. See page 22.
The call is dropped. (Talk
indicator on the headset and
base will not be illuminated.)
Headset lost subscription. Try to reset the system. See
page 21. If this does not work, try the resubscription
procedure on page 21.
I hear static that does not
allow me to communicate.
I hear beeps in the headset.
• Link to headset is lost. Try to reestablish a link by pressing
the headset talk button.
• Unplug the AC charger from the base for 7 seconds, then
plug back in.
• Reset the whole system as described on page 21.
• One beep every 10 seconds is caused by a low battery
warning. Recharge battery by returning it to the base
charge cradle for one to three hours until charge light stays
lit or quits blinking.
• Two beeps is an out of range warning. Move closer to the base.
• Three rapid beeps every 15 seconds indicates your mute is
on. Press the mute control dial once to turn mute off.
• When an optional lifter is connected, three repetitive beeps
indicate a call is coming into the headset. Press the talk
button on the headset to answer the call.
Handset lifter is installed
but does not lift handset.
Be sure the handset lifter power cord is firmly pushed into
the handset lifter jack on the base.
My handset lifter operates
every time I remove or
replace my headset in the
base unit.
IntelliStand is enabled. To disable the handset lifter, move
the IntelliStand switch to position .
20
System Reset
To recover from some fault conditions (refer to the Troubleshooting Section), you may need
to perform a system reset. To perform the system reset, follow this procedure:
3
2
• Reduce speaking volume by changing the speaking volume
major adjust switch setting. See page 16.
• Point microphone towards your chin.
• Listening volume too high on phone. If your phone has a
handset volume control, lower this until the distortion
disappears.
• If the distortion is still present, lower the listening volume
adjust button on the headset. If the distortion persists,
select another listening volume major adjust switch
setting. See page 15.
• Base is too close to computer or phone. See page 10 for
proper positioning.
• System needs to be reset. Perform system reset as
described on page 21.
The headset and base unit are supplied subscribed to each other. However, if you wish
to use a replacement headset with the base unit, then the units must be re-subscribed.
To do so, please follow the instructions on page 11 for Multi-Shift Pairing.
1
Sound in handset is
distorted/hear echo in
handset.
Solution
1
Problem
Subscription
1
Troubleshooting
4
4
1. Simultaneously press the call control button and both the "+" and "–" volume buttons
for 5 seconds. When the talk indicator light on the headset blinks, release all buttons.
2. Press the call control button again. The talk indicator light will again blink briefly to
indicate the headset is back to normal operation mode.
3. Disconnect the AC charger from the AC charging jack for 5 seconds.
4. Reconnect.
The system reset operation is complete.
Maintenance
1. Unplug the unit from the telephone and the AC charger from the power source before cleaning.
2. Clean the equipment with a damp (not wet) cloth.
3. Do not use solvents or other cleaning agents.
Battery Replacement
The custom battery supplied should last 2– 3 years. When talk time decreases
significantly, you should replace the battery. Call Plantronics at (800) 544-4660
ext. 5538 for information on sending back to factory to install new battery.
21
Accessing the Avaya Unified
Communication Center (UCC)
from the AWH75N
1. Connect the AWH75N to the Avaya telephone. Follow the instructions in
this user guide.
2. Ask your switch administrator to configure your telephone for ringdown to the UCC
in your telephone first call appearance.*
* Notes for switch administrators on configuring ringdown for your AVAYA telephones:
• Some phones allow for direct ringdown configuration, i.e. 2500.
• Other phones do not allow for direct ringdown configurations, i.e. 64XX. In order
to configure the ringdown in these phones, the administrator needs to:
• Create a phantom extension setup as a 2500 type.
(No real port has to be assigned.)
• Create a ringdown to the UCC for the phantom extension.
• Bridge the phantom extension to the telephone call appearance 1
(configure it as an “abrdg-appr” and setup the “Auto Select Any Idle Appearance”
to Yes).
Technical Assistance
The Avaya Headset Helpdesk is ready to assist you! Dial (800) 544-4779, or
visit the support section of our website at www.avayaheadsets.com.
Regulatory Notices
FCC Requirements – Part 15
This device complies with Part 15 of the FCC Rules. Operation is subject to the following two conditions:
1. This device may not cause harmful interference, and
2. This device must accept any interference received, including interference that may cause
undesired operation.
This equipment has been tested and found to comply with the limits for a Class B digital device, pursuant to Part 15 of the FCC Rules. These limits are designed to provide reasonable protection against
harmful interference in a residential installation. This equipment generates, uses, and can radiate
radio frequency energy and, if not installed and used in accordance with the instructions, may cause
harmful interference to radio communications. However, there is no guarantee that interference will
not occur in a particular installation. If this equipment does cause harmful interference to radio or
television reception which can be determined by turning the radio or television off and on, the user is
encouraged to try to correct interference by one or more of the following measures:
1. Reorient or relocate the receiving antenna.
2. Increase the separation between the equipment and receiver.
3. Connect the equipment into an outlet on another circuit.
4. Consult the dealer or an experienced radio/TV technician for help.
FCC Requirements – Part 68
This equipment complies with Part 68 of the FCC rules and the requirements adopted by ACTA. On
the exterior of this equipment is a label that contains a product identifier in the format
US:AAAEQ##TXXXX. If requested, this information must be provided to your telephone company.
A plug and jack used to connect this equipment to the premises wiring and telephone network must
comply with the applicable FCC Part 68 rules and requirements adopted by ACTA. A compliant telephone cord and modular plug is provided with this product. It is designed to be connected to a compatible jack that is also compliant. See installation instructions for details.
The REN is useful to determine the quantity of devices you may connect to your telephone line.
Excessive RENs on a telephone line may result in the devices not ringing in response to an incoming
call. In most, but not all areas, the sum of the RENs should not exceed five (5.0). To be certain of the
number of devices you may connect to your line, as determined by the REN, contact your local telephone company. For product approved after July 23, 2001, the REN for this product is part of the
product identifier that has the format US:AAAEQ##TXXXX. The digits represented by ### are the
REN without the decimal point. (For example, 03 represents a REN of 0.3.) For earlier producers, the
REN is separately shown on the label.
If this telephone equipment causes harm to the telephone network, the telephone company will notify you in advance that temporary discontinuance of service may be required. But if advance notice
isn’t practical, the telephone company will notify the customer as soon as possible. Also, you will be
advised of your right to file a complaint with the FCC if you believe it is necessary.
The telephone company may make changes in its facilities, equipment, operations, or procedures
that could affect the proper functioning of your equipment. If they do, you will be notified in advance
in order for you to make necessary modifications to maintain uninterrupted service.
If trouble is experienced with this unit, for repair or warranty information, please contact customer
service at (800) 544-4779. If the equipment is causing harm to the network, the telephone company
may request that you disconnect the equipment until the problem is resolved.
DO NOT DISASSEMBLE THIS EQUIPMENT: it does not contain any user serviceable components.
We recommend the installation of an AC surge arrester in the AC outlet to which this equipment is
connected. Telephone companies report that electrical surges, typically lighting transients, are very
destructive to customer terminal equipment connected to AC power sources.
Exposure to RF Radiation
22
The internal wireless radio operates within the guidelines found in radio frequency safety standards and
recommendations, which reflect the consensus of the scientific community. Independent studies have
shown that the internal wireless radio is safe for use by consumers. Visit www.avayaheadsets.com for
more information.
NOTE: Modifications not expressly approved by Avaya could void the user's authority to operate the
equipment.
23