1
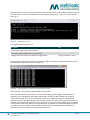
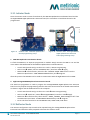
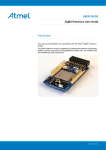
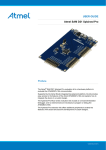
User Guide: Quick Start - ATZB-256RFR2-XPRO Introduction The Quick Start - ATZB-256RFR2-XPRO software package has been developed to demonstrate the capabilities and the performance of the Metirionic Ranging Base Layer (RBL) by executing wireless distance measurements between two radio nodes based on the Atmel system on chip device ATmega256RFR2. It consists of an easy to use demo application named Metirionic Ranging Application lite (mRApp lite) which utilizes the RBL with its integrated ranging core algorithms. The software package is ready to run on the Atmel ATmega256RFR2 ZigBit Xplained Pro Extension hardware platform and to immediately start range measurements after programming it. Features: Accurate wireless distance measurement in the license free 2.4 GHz frequency band. Utilization of the ATmega256RFR2 Phase Measurement Unit for wireless distance measurements. Simple and easy to use demo application for point to point distance measurement. o Single range measurement o Continuous range measurement Support of Atmel hardware platform ATmega256RFR2 ZigBit Xplained Pro Extension in connection with the SAM D21 Xplained Pro Evaluation Kit. User Guide: Quick Start - ATZB-256RFR2-XPRO DOC NO: 002-0515 Page 1 Table of Contents 1 Overview...................................................................................................................................... 3 2 Metirionic Software Package ...................................................................................................... 4 2.1 Software Package Architecture ............................................................................................... 5 2.2 mRApp lite ............................................................................................................................... 5 2.3 mRApp lite User Interface ....................................................................................................... 5 3 Third Party Hardware .................................................................................................................. 7 3.1 Hardware Description ............................................................................................................. 7 3.1.1 SAM D21 Xplained Pro Evaluation Kit ................................................................................. 7 3.1.2 ATmega256RFR2 ZigBit Xplained Pro Extension ................................................................. 7 3.1.3 Atmel Battery Case 2xAAA .................................................................................................. 7 3.1.4 Programmer Atmel ICE ........................................................................................................ 7 3.2 Hardware Setup....................................................................................................................... 8 3.2.1 Initiator Node ...................................................................................................................... 8 3.2.2 Reflector Node .................................................................................................................... 8 3.3 Hardware Programming .......................................................................................................... 8 3.3.1 Initiator Node ...................................................................................................................... 9 3.3.2 Reflector Node .................................................................................................................... 9 4 Running the mRApp lite............................................................................................................. 10 5 mRApp lite Troubleshooting ...................................................................................................... 11 6 Document History ..................................................................................................................... 12 User Guide: Quick Start - ATZB-256RFR2-XPRO DOC NO: 002-0515 Page 2 Disclaimer Any information about third party materials or parts was included into this document for convenience. The vendor may have changed the information that has been published. Check the individual vendor information for latest changes. Note, that the firmware package is provided for demonstration purposes only and adapted to this specific hardware configuration and application scenario. In case of a different hardware configuration and application scenario a customized firmware is needed. 1 Overview The Quick Start - ATZB-256RFR2-XPRO is targeted for evaluating the Metirionic RBL on a Zigbit Atmega256RFR2 Xplained Pro Extension platform. This document will guide the user through the setup and will introduce the usage of the mRApp lite. The mRApp lite provides an easy-to-operate demonstration of the ATmega256RFR2 phase measurements capabilities. First practical experiences can be gained from running a point-to-point wireless distance measurement. The application makes use of the Metirionic RBL, which comprises all functionality to configure and execute phase measurements between two radio nodes and to calculate the distance between these nodes based on the gathered phase measurement results with a high accuracy. The document has been structured in a way that after an introduction to the software architecture of the mRApp lite and the RBL, all required third party hardware components get introduced. A detailed description of the hardware setup and configuration procedure is given as well as a guidance to start distance measurement. The Metirionic software delivery supports the Atmel Xplained Pro hardware platform. The following table summarizes all required software and hardware components to setup and run the demo application and provides references for its acquisition. # Name Quantity Manufacturer 1 mRApp lite 1 Metirionic 2 ATmega256RFR2 ZigBit Xplained Pro Extension 2 Atmel ATZB-256RFR2-XPRO 3 SAM D21 Xplained Pro Evaluation Kit 1 Atmel ATSAMD21-XPRO 4 Battery pack 1 Atmel ATBATTERY-CASE-2AAA 5 AAA Battery 2 Not specified 6 ATMEL ICE 1 Atmel ATATMEL-ICE 7 Atmel Studio 1 Atmel Free download 8 Micro-USB cable 1 Not specified 9 Terminal emulator program 1 Not specified User Guide: Quick Start - ATZB-256RFR2-XPRO DOC NO: 002-0515 Ordering Code Quick Start - ATZB-256RFR2XPRO Page 3 The hardware setup consists of two assemblies, the stationary initiator which is connected to the PC and the mobile reflector device. Initiator Reflector Stationary device Mobile device Zigbit Atmega256RFR2 Xplained Pro Evaluation Kit Zigbit Atmega256RFR2 Xplained Pro Evaluation Kit J100 Extension Serial Terminal in PC SAM D21 Xplained Pro Evaluation Kit Figure 1: Micro-USB + - Battery Pack mRApp lite Setup The initiator is responsible to start the ranging process, obtain the phase measurements from the reflector once the measurement phase has been completed and calculate the distance between the nodes. Control of the measurement procedure as well as result representation is done via a command terminal on a connected PC. The reflector device follows the requests of the initiator. Gathered phase data will be sent to the initiator after the measurement phase. The ATmega256RFR2 ZigBit is equiped with an integrated ceramic antenna and a MS-147 RF-connector. Only the ceramic antenna is used in the mRApp lite. 2 Metirionic Software Package This section describes the architecture of the Quick Start - ATZB-256RFR2-XPRO software package, the functionality of the mRApp lite and its user interface. User Guide: Quick Start - ATZB-256RFR2-XPRO DOC NO: 002-0515 Page 4 2.1 Software Package Architecture The software architecture used by the Metirionic RBL, consist of different modules interconnected, creating a different abstraction level. RBL-API Ranging Engine HAL TRX SPI Metirionic RBL mRApp lite MCU Hardware Figure 2: RBL Architecture The Hardware Abstraction Layer (HAL) enables the upper layer software to access the hardware functionality. For example the HAL is used by the Ranging Engine to obtain access to the radio transceiver using the SPI interface. The Ranging Engine executes the phase measurements, obtains the measurement data and calculates the distance from these values. This layer handles as well the reception and transmission of IEEE 802.15.4 standard compliant data frames, allowing low-energy communications between the radio nodes involved into the range measurement. HAL and Ranging Engine form the Metirionic RBL. An application like the mRApp lite communicates with the RBL through the RBL application programming interface (API). Controlled by a simple text based user interface (UI), the mRApp lite is able to initiate phase measurements and display the measured ranges. When licensing the Metirionic RBL the API can be easily accessed by customer applications. Note, the Quick Start - ATZB-256RFR2XPRO software package does not provide access to the RBL-API. 2.2 mRApp lite The mRApp lite is the responsible to start and display the ranging measurements. A range measurement consists of several phases. The first phase is an interchange of packets to negotiate the ranging parameters. Once both devices have the same configuration and are synchronized, the measurement phase starts. This measurement is done in the license free frequency band from 2403 MHz to 2483 MHz with a 1 MHz step width. Finally all phase measurement results are transferred to the initiator and the range is calculated. The mRApp lite returns the distance value to the UI. 2.3 mRApp lite User Interface The user interface in the mRApp lite is based on a terminal interface where all the functionality can be controlled and measurement results can be displayed. User Guide: Quick Start - ATZB-256RFR2-XPRO DOC NO: 002-0515 Page 5 Once the device is correctly connected to the serial interface, a menu will be displayed after pressing the reset button on the connected device, or pressing any key (except ‘r’ and ‘c’) on the keyboard (see Fig. 3). Figure 3: Application menu The application main options are: Function Key Executing a single range measurement r Executing range measurements continuously c Display menu and stop the continuous ranging mode Any key (except ‘r’ and c’) On continuous range measurement the terminal prompts continuously range measurement results and additional information as shown in Figure 4. Figure 4: Result prompt - continuous range measurement The first value is the distance value obtained in centimeters. The second parameter in the result row is the Distance Quality Factor (DQF). The DQF gives an indication on the reliability of the range measurement. A value of 100% indicates an excellent measurement result, 0% a poor measurement result. For the DQF calculation an implemented algorithm analyzes all individual phase measurement values on measurement signal disturbances. A low DQF value could be an indication for the presence of strong interfering radio signals, or that the measurements have been done in a strong reflective environment or the received signal strength is not sufficient. The user application can take the DQF value into consideration as an additional indication of the trust level of the actual measurement run. User Guide: Quick Start - ATZB-256RFR2-XPRO DOC NO: 002-0515 Page 6 The last parameter depicts the measurement duration. This time is the duration of the entire process, including the configuration time and the result calculation time. Please note that this demo application has not been optimized for maximum measurement speed. 3 Third Party Hardware The required hardware to run the software package is described in this section. Ordering codes to purchase the hardware are given as well. 3.1 Hardware Description 3.1.1 SAM D21 Xplained Pro Evaluation Kit The Atmel® SAM D21 Xplained Pro Evaluation Kit has been designed for evaluating and prototyping with the Atmel SAM D21 ARM® Cortex®-M0+ based microcontrollers. The boards can be purchased via the Atmel web shop using the ordering ID: ATSAMD21-XPRO. The main function of this board in the mRApp lite is to provide a USB-USART connection between the ATmega256RFR2 ZigBit Xplained Pro Extension and the PC Figure 5: user interface. The SAM D21 Xplained Pro board powers any extension boards like the ATmega256RFR2 ZigBit Xplained Pro when connected to it. SAM D21 Xplained Pro Evaluation board 3.1.2 ATmega256RFR2 ZigBit Xplained Pro Extension The ATmega256RFR2 ZigBit Xplained Pro Extension board is targeted for evaluating the features of the ATmega256RFR2 wireless SoC device. This device combines an AVR 8-bit microcontroller and a 2.4GHz RF transceiver compliant to the standard IEEE 802.15.4. The extension board is designed to be connected to an Xplained Pro Evaluation Kit but can be operated also stand-alone in combination with a battery pack. Figure 6: The ordering ID for this device is: ATZB-256RFR2-XPRO. Two boards are required for the setup. ATmega256RFR2 ZigBit Xplained Pro Extension board 3.1.3 Atmel Battery Case 2xAAA This component is necessary to provide energy to the ATmega256RFR2 ZigBit Xplained Pro Extension module. The battery case allows to operate the module as a mobile node. The ordering ID for this device is: ATBATTERY-CASE-2AAA. 3.1.4 Programmer Atmel ICE The programmer Atmel ICE is a development tool for debugging and programming Atmel ARM® Cortex®-M based Atmel SAM and AVR® microcontrollers with on-chip debug capability. The User Guide: Quick Start - ATZB-256RFR2-XPRO DOC NO: 002-0515 Page 7 programmer is required to flash the ATmega256RFR2 ZigBit Xplained Pro Extension boards by using the JTAG interface. The ordering ID for this device is: ATATMEL-ICE. (The version with the ordering ID ATATMEL-ICEBASIC is suitable as well.) 3.2 Hardware Setup This section details how to connect and program the hardware to set up the initiator node and the reflector node. 3.2.1 Initiator Node Connect the ATmega256RFR2 ZigBit Xplained Pro Extension board to the first J100 XPRO extension of the SAM D21 Xplained Pro board (EXT1). The SAM D21 Xplained Pro board needs to be connected to a PC using a USB-microUSB cable by plugging it to the DEBUG USB port. If the SAM D21 is connected correctly the power LED will be turned on. The Initiator setup is shown in Figure 10. 3.2.2 Reflector Node To operate the second ATmega256RFR2 ZigBit Xplained Pro Extension board as a mobile node, the battery case needs to be connected to the J4 External Power header. The reflector setup is shown in Figure 7. Figure 7: Reflector node connected to battery pack Figure 8: Detail – polarity of battery connection Note, do not connect a battery powered ATmega256RFR2 ZigBit Xplained Pro Extension board to a SAM D21 Xplained Pro Evaluation board. This could cause permanent damages to the boards. 3.3 Hardware Programming Once the boards have been connected as described above and all boards are power, the microcontrollers on the boards need to be flashed. The Atmel ICE programmer user interface is integrated to the Atmel Studio integrated development environment (IDE). The software package can be downloaded from http://www.atmel.com. The handling of the IDE and the flash process is explained in detail in the accompanying documentation. User Guide: Quick Start - ATZB-256RFR2-XPRO DOC NO: 002-0515 Page 8 3.3.1 Initiator Node Since the Initiator node consists of two boards, the SAM D21 Xplained Pro Evaluation board and the ATmega256RFR2 ZigBit Xplained Pro Extension board, the controllers on both boards need to be programmed. Figure 9: Initiator node - SAM D21 Xplained Pro board programming setup Figure 10: Initiator node - ATmega256RFR2 ZigBit Xplained Pro Extension board programming setup 1. SAM D21 Xplained Pro Evaluation board: To flash the SAM D21, no separate programmer is needed. Simply connect the USB to a PC and the micro-USB to the DEBUG USB of the SAM D21 Xplained Pro Evaluation Board. Launch Atmel Studio and go to the menu: Tools → Device Programming. Select: Tool EDBG | Device ATSAMD21J18A | Interface: SWD Apply. Memories in flash memory select the file: “SAMD21-USART-SWITCH.elf” from the Metirionic Quick Start - ATZB-256RFR2-XPRO delivery and Program. After this process the SAM D21 can be used to communicate with the Zigbit RFR2 via the USART. 2. Zigbit Atmega256RFR2 Xplained Pro Extension board: The Atmel ICE programmer is used to program the ATmega256RFR2 ZigBit Xplained Pro Extension board. For this purpose the programming interface has to be connected to the on-board JTAG interface as shown in Figure and the USB interface to the computer. Launch Atmel Studio and go to the menu: Tools Device Programming. Select: Tool Atmel-ICE | Device ATmega256RFR2| Interface: JTAG Apply. Memories in flash memory select the file: “ZIGBIT_256RFR2_XPRO-mRApp lite.elf” from the Metirionic Quick Start - ATZB-256RFR2-XPRO delivery and Program. Fuses: The fuses need to be set: EXTENDED: 0xFE, HIGH: 0x90, LOW: 0xA7. 3.3.2 Reflector Node The initiator configuration step 2 needs to be repeated using the ATmega256RFR2 Xplained Pro Extension board which has been prepared to become the reflector node. User Guide: Quick Start - ATZB-256RFR2-XPRO DOC NO: 002-0515 Page 9 4 Running the mRApp lite Once hardware setup and programming has been completed, the devices are able to perform ranging. Running any serial terminal application and selecting the COM port where the SAM D21 is connected. One example of serial application is on Microsoft Windows Tera Term. The configuration details of the serial interface are given in the following table. Parameter Setting Baud rate 57.600 Data 8 Bits Flow control None Parity None Stop 1 Bit User Guide: Quick Start - ATZB-256RFR2-XPRO DOC NO: 002-0515 Page 10 5 mRApp lite Troubleshooting This section gives the user recommendation in case the startup or operation of the mRApp lite fails. The following table summarizes possible failure scenarios after startup. Problem Solution The application menu it is not displayed in terminal (compare to Figure 3) Potential source of defect: SAM D21 Xplained Pro is not connected to the PC Serial interface parameters settings are not correct (selected COM port, baud rate, parity, etc) Solution: Apply correct serial interface settings according to section 4. Try to connect/reconnect the USB cable to the computer properly If the problem persist re-flash the devices. The terminal displays strange characters. Potential source of defect: Serial interface parameters settings are not correct (selected COM port, baud rate, parity, etc) Solution: Apply correct serial interface settings according to section 4. Reconnect the USB cable to the computer properly The application returns “Error” all the time. Potential source of defect: The Reflector device is not powered Batteries of Reflector node run out of power Reflector node has not programmed correctly Reflector node is out of communication range Solution: Power-up the Reflector node properly Connect the reflector node to the SAM D21 Xplained Pro board to verify correct programming. The application menu (see Figure 3) shall show-up in the terminal program. If not, re-flash the devices. Reduce distance between reflector node and Initiator node The application returns “Error” randomly. Potential source of defect: Battery power discharged to critical low value in Reflector node Reflector node is out of communication range Solution: Replace batteries Reduce distance between reflector node and Initiator node User Guide: Quick Start - ATZB-256RFR2-XPRO DOC NO: 002-0515 Page 11 6 Document History Modification Date Initial release 13.05.2015 User Guide: Quick Start - ATZB-256RFR2-XPRO DOC NO: 002-0515 Page 12