1
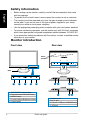
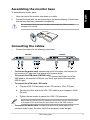
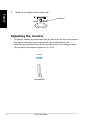
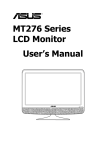
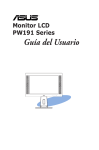
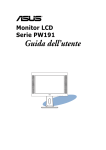
Quick start guide
English
VW202xR/VW202B
LCD Monitor
Safety information
English
•
Before setting up the monitor, carefully read all the documentation that came
with the package.
•
To prevent fire or shock hazard, never expose the monitor to rain or moisture.
•
The monitor should be operated only from the type of power source indicated
on the label. If you are not sure of the type of power supplied to your home,
consult your dealer or local power company.
•
Use the appropriate power plug which complies with your local power standard.
•
To ensure satisfactory operation, use the monitor only with UL listed computers
which have appropriate configured receptacles marked between 100-240V AC.
•
If you encounter technical problems with the monitor, contact a qualified service
technician or your retailer.
Monitor introduction
Front view
Rear view
Stereo
speakers
Base
VW202xR
1
2
3
4
5
1
2
3
4
3
4
VW202B
1. SPLENDID™ mode hotkey
2. Decrease button/Volume hotkey
3. MENU button
4. Increase button/Brightness hotkey
5. Power button
Quick start guide
2
1. Audio-in port
2. AC-in port
3. DVI port / USB port (VW202B only)
4. VGA port
Assembling the monitor base
1.
Have the front of the monitor face down on a table.
2.
Connect the base with the arm according to the below drawing. A click shows
that the base has been connected successfully.
English
To assemble the monitor base:
We recommend that you cover the table surface with soft cloth to prevent
damage to the monitor.
Connecting the cables
1.
Connect the cables as the following instructions:
VW202B
VW202xR
2.0
(B-Type)
•
To connect the power cord: connect one end of the power cord securely to
the monitor’s AC input port, the other end to a power outlet.
•
To connect the USB cable (VW202B only): connect the B-type end of the
USB cable to the monitor's USB port, and the A-type end to the computer's
USB 2.0 port.
•
To connect the VGA cable / DVI cable:
a. Plug the VGA / DVI connector to the LCD monitor’s VGA / DVI port.
b. Connect the other end of the VGA / DVI cable to your computer’s VGA /
DVI port.
c. Tighten the two screws to secure the VGA / DVI connector.
When both the VGA and the DVI cables are connected, you can choose either
VGA mode or DVI mode from the Input Select item of the OSD functions.
•
To connect the audio cable: connect one end of the audio cable to the
monitor’s Audio-in port, the other end to the computer's audio-out port.
Quick start guide
2.
Gather all the cables with the cable hook.
English
Cable hook
Adjusting the monitor
•
For optimal viewing, we recommend that you look at the full face of the monitor,
then adjust the monitor to the angle that is most comfortable for you.
•
Hold the stand to prevent the monitor from falling when you change its angle.
•
You can adjust the monitor’s angle from -3° to 20°.
-3º–20º
Quick start guide
ASUS VW202B provides the easy-to-use EzLink Display that allows you to transfer
digital video signal from your PC to your LCD via a standard USB 2.0 cable.
Without the necessity of purchasing additional graphics cards, EzLink Display
provides the flexibility for multi-screen applications.
System requirements
English
ASUS EzLink Display (VW202B only)
Before you install the ASUS EzLink Display software, check if your system meets
the following requirements:
Hardware:
Supporting operating system:
•
•
Windows 2000 SP4
•512MB of RAM or higher
•
Windows XP SP2/SP3
•
USB 2.0 port
•
Windows Vista
•
30MB of available disk space
•
Super VGA (800 x 600) video
adaptor or higher resolution
•
USB cable A-type to B-type
PC with 1.2 GHz or higher
Installing ASUS EzLink Display:
1.
Close all other applications.
2.
Insert the support CD into the optical drive and select the EzLink Driver.
3.
Select the language of the software end user licence agreement and click I
Accept.
4.
The software installation starts. When finished, click Yes to restart the
computer.
•
Refer to www.asus.com for details about ASUS EzLink Display.
•
ASUS EzLink Display supports 32-bit Windows® OS environment only. No
image will be displayed under computer POST, motherboard BIOS, or DOS
environment.
•
ASUS EzLink Display supports 16-bit and 32-bit desktop color depth only.
•
We recommend that you use the following media players for the optimum
video playback quality:
1. Windows Media Player 11
(www.microsoft.com/windows/windowsmedia/default.mspx)
2. WinDVD 8 (www.intervideo.com)
3. RealPlayer 11 (www.real.com)
•
Your system might encounter low performance or stop responding when
running 3D applications or screensaver with ASUS EzLink Display. We
recommend that you run 3D applications on a monitor connected to a
discrete graphics card instead.
Quick start guide
Using ASUS EzLink Display:
English
Right-click the EzLink system tray icon to show the EzLink software menu.
Check and configure software update
options
Fast-switch supported screen
resolutions (Recommended: 1680x1050)
Sets the color depth between 16 bit and
32 bit (Recommended: 32 bit)
Sets the direction of screen rotation
Sets the location of the extended desktop
Enables desktop extension
Mirrors the content of the primary
desktop to the extended desktop
Turn off the mirror/extended display
Launches the Windows® Display
Settings tool
3. ASUS EzLink Display (USB_XXXX-XXXXXXXXXXXX)
Quick start guide
Problem
Possible Solution
Power LED is not ON
• Press the button to check if the monitor is in the ON mode.
• Check if the power cord is properly
connected to the monitor and the power
outlet.
The power LED lights amber and there is no • Check if the monitor and the computer are
screen image
in the ON mode.
• Make sure the signal cable is properly connected the monitor and the computer.
• Inspect the signal cable and make sure
none of the pins are bent.
• Connect the computer with another
available monitor to check if the computer
is properly working.
Screen image is too light or dark
• Adjust the Contrast and Brightness
settings via OSD.
Screen image is not centered or sized
• Press the
button for two seconds to
properly
automatically adjust the image.
• Adjust the H-Position or V-Position
settings
via OSD.
Screen image bounces or a wave pattern is • Make sure the signal cable is properly
present in the image
connected to the monitor and the
computer.
• Move electrical devices that may cause
electrical interference.
Screen image has color defects (white does • Inspect the signal cable and make sure
not look white)
that none of the pins are bent.
• Perform Reset via OSD.
• Adjust the R/G/B color settings or select
the Color Temperature via OSD.
Screen image is blurry or fuzzy
• Press the
button for two seconds to
automatically adjust the image (for VGA
mode only).
• Adjust the Phase and Clock settings via
OSD.
No sound or sound is low
• Ensure that the audio cable is properly
connected to the monitor and the
computer.
• Adjust the volume settings of both your
monitor and computer.
• Ensure that the computer sound card
driver is properly installed and activated.
Quick start guide
English
Troubleshooting (FAQ)
Supported operating modes
English
Standard
DOS
VGA
SVGA
XGA
SXGA
VESA
UXGA
VESA (Primary)
Resolution
Frequency
Horizontal
Frequency
Vertical
Frequency
Pixel
70Hz
28.32MHz
640 x 480
640 x 480
640 x 480
800 x 600
800 x 600
800 x 600
800 x 600
1024 x 768
1024 x 768
1024 x 768
1280 x 960
1280 x 1024
1280 x 1024
1152 x 864
1440 x 900
1600 x 1200
31.47KHz
37.90KHz
37.50KHz
35.16KHz
37.90KHz
48.10KHz
46.90KHz
48.40KHz
56.50KHz
60.02KHz
60.00KHz
64.00KHz
80.00KHz
67.50KHz
55.94KHz
75.00KHz
60Hz
72Hz
75Hz
56Hz
60Hz
72Hz
75Hz
60Hz
70Hz
75Hz
60Hz
60Hz
75Hz
75Hz
60Hz
60Hz
25.18MHz
31.50MHz
31.50MHz
36.00MHz
40.00MHz
50.00MHz
49.50MHz
65.00MHz
75.00MHz
78.75MHz
108.00MHz
108.00MHz
135.00MHz
108.00MHz
106.5MHz
162.00MHz
1680 x 1050
65.29KHz
60Hz
146.25MHz
720 x 400
31.47KHz
* Modes not listed in the table may not be supported. For optimal resolution, we recommend that you choose a mode listed in the table above.
Quick start guide