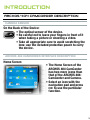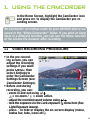
1
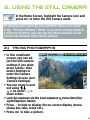
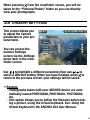
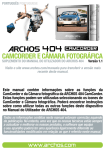
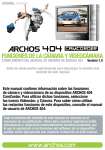
English
404
CAMCORDER
CAMCORDER
& CAMERA FUNCTIONS
Supplement to the ARCHOS 404 User Manual
Version 1.1
Please visit www.archos.com/manuals
to download the latest version for this manual.
This manual contains information about the CamCorder and
Camera functions of your ARCHOS 404 CamCorder device.
These functions can be used by selecting the CamCorder
and Camera icons. You can find instructions on how to use
all other functions of this device in the ARCHOS 404 User
Manual.
All the information contained in this manual was correct at the time
of publication. However, as our engineers are always updating and
improving our products, your device’s software may have a slightly
different appearance or modified functionality than presented in this
manual.
Table Of Contents
Introduction . . . . . . . . . . . . . . . . . . . . . . . . . . . . 3
ARCHOS 404 CamCorder description. . . . . . . . . . . 3
1.Using the CamCorder. . . . . . . . . . . . . . . . 4
1.1Video Recording Procedure . . . . . . . . . . . . . . . 4
1.2CamCorder Settings. . . . . . . . . . . . . . . . . . . . . . 5
2. Using the Still Camera. . . . . . . . . . . . . . . . . . 8
2.1Taking Photographs . . . . . . . . . . . . . . . . . . . . . . 8
2.2Camera Settings . . . . . . . . . . . . . . . . . . . . . . . . . 9
2.3Taking Photos Using the Timer. . . . . . . . . . . . 11
3. Controlling the Image Quality. . . . . . 12
3.1Blurred images . . . . . . . . . . . . . . . . . . . . . . . . . 12
3.2Light/Exposure issues . . . . . . . . . . . . . . . . . . . 12
Technical Specifications. . . . . . . . . . . . . . . . . 14
Introduction
ARCHOS 404 CamCorder description
Camera Sensor
On the Back of the Device:
• The optical sensor of the device.
• Be careful not to leave your fingers in front of it
when taking a picture or shooting a video.
• Take all appropriate care to avoid scratching the
lens: use the included protective pouch to carry
the device.
ARCHOS 404 CamCorder Interface Description
Home Screen
• The Home Screen of the
ARCHOS 404 CamCorder
has two more icons than
that of the ARCHOS 404:
CamCorder and Camera.
• Select an icon with the
navigation pad and press
OK to use the particular
function.
1.Using the CamCorder
In the Home Screen, highlight the CamCorder icon
and press OK to display the CamCorder pre-recording screen.
All CamCorder recordings made by your ARCHOS device are
saved in the “Video/Camcorder” folder. If you wish to keep
them in a different location, you can use the Move function
of the Archos file browser after recording.
1.1 Video Recording Procedure
• In the pre-recording screen, you can
adjust the recording
settings if you wish:
press MENU, then
select Settings to
enter the CamCorder
Settings Screen (see:
CamCorder Settings).
• Before and during
recording, you can:
- zoom in and out using / .
= no zoom / = zoom active.
- adjust the recorded sound volume using / .
- lock the exposure via the Lock exposure menu item (See
Light/Exposure issues).
- press to hide or display the on-screen display (menu,
status bar, tabs, icons etc.).
• Press OK to start
recording.
• You can pause and
restart your recording
by pressing OK.
• You can adjust certain settings, such
as Exposure and
White Balance, during a recording: press
MENU and select the
Settings menu item.
• Press to stop recording.
When pressing from the pre-recording screen, you will be
taken to the “Video/Camcorder” folder so you can directly
view your recordings.
1.2 CamCorder Settings
This screen allows you
to adjust the CamCorder
recording parameters to
your personal taste.
You can access the
CamCorder Settings
screen via the Settings
menu item in the prerecording screen.
Use / to highlight a different parameter, then use / to
select a different setting. When you have finished, press to
return to the previous screen: your settings will be saved.
• Rename
- Recorded files are automatically named CAM0000,
CAM0001, CAM0002, etc.
- this option allows you to define a custom filename before the recording begins, using the virtual keyboard.
See: Using the Virtual Keyboard in the ARCHOS 404 User
Manual.
• Resolution
- Options: QVGA (320x240) / VGA (640x480).
- Use this to set the resolution (fineness) of the recorded
image.
- You can leave this on QVGA if you intend to watch your
recorded videos on the built-in screen of your ARCHOS
device: the image will be smooth and the file size smaller. However, if you plan to watch your recordings on a TV,
you should set this to VGA for a sharper image.
• Bitrate
- Options: Low / Medium (default) / High.
- Use this to set the level of compression of the recorded
video file.
- A higher bitrate will result in a higher-quality image, but
will also take up more space on the hard drive.
- The default setting (Medium) will be appropriate for
most situations.
• Exposure
- Options: Brighter +2/+1,5/+1/+0,5 / Normal /
Darker -0,5/-1/-1,5/-2.
- This parameter allows you to adjust to bright or dark
conditions.
- Darker values will decrease the amount of exposure.
- Brighter values will increase the exposure.
- If your subject has a bright background, you may want
to overexpose your image a little bit so that the person’s
face is more visible, thus you would set it to Brighter +1
or +2.
- If you are recording a video where there is a lot of snow
or the sun’s reflection on water, you may want to reduce
the exposure, thus set it to Darker -1 or -2.
• White Balance
- Options: Auto / Daylight / Cloudy / Fluorescent
/ Tungsten
- This parameter lets the camera adjust to the ambient
light source in order to best record the natural colors.
• Sampling
- Options: 22 kHz / 32kHz / 44kHz / 48kHz.
- The sound sampling rate. The higher value gives a higher
sound quality but will take up more space on the hard
drive.
• Reset
- This will reset the values in this screen to the factory
default settings.
2.Using the Still Camera
In the Home Screen, highlight the Camera icon and
press OK to enter the still camera mode.
All photographs taken by your ARCHOS device are saved
in the “Pictures/Photos” folder. If you wish to keep them in
a different location, you can use the Move function of the
Archos file browser after taking photos.
2.1 Taking Photographs
• In this viewfinder
screen, you can adjust the still camera
settings if you wish:
press MENU, then
select Settings to
enter the Camera
Settings Screen (see:
Camera Settings).
• You can zoom in and
out using / .
= no zoom / =
zoom active.
• Lock the exposure via the Lock exposure menu item (See
Light/Exposure issues).
• Press to hide or display the on-screen display (menu,
status bar, tabs, icons etc.).
• Press OK to take a picture.
When pressing from the viewfinder screen, you will be
taken to the “Pictures/Photos” folder so you can directly
view your photographs.
2.2 Camera Settings
This screen allows you
to adjust the Camera
parameters to your personal taste.
You can access the
Camera Settings
screen via the Settings
menu item in the viewfinder screen.
Use / to highlight a different parameter, then use / to
select a different setting. When you have finished, press to
return to the previous screen: your settings will be saved.
• Rename
- Photographs taken with your ARCHOS device are automatically named PHOTO0000, PHOTO0001, PHOTO0002,
etc.
- This option allows you to define the filename before taking a picture, using the virtual keyboard. See: Using the
Virtual Keyboard in the ARCHOS 404 User Manual.
• Resolution
- Options: VGA / 1.2 Megapixels
- 1.2 Megapixels (1280x960) gives the best image quality
but the largest file size.
- VGA (640x480) will give a smaller file size, but the images will not be as sharp.
• Image Quality
- Options: Basic / Normal / Fine
- For the best possible image, set this parameter to Fine.
• Exposure
- Options: Brighter +2/+1,5/+1/+0,5 / Normal /
Darker -0,5/-1/-1,5/-2.
- This parameter allows you to adjust to bright or dark
conditions.
- Darker values will decrease the amount of exposure.
- Brighter values will increase the exposure.
- If your subject has a bright background, you may want
to overexpose your image a little bit so that the person’s
face is more visible, thus you would set it to Brighter +1
or +2.
- If you are taking a photo where there is a lot of snow or
the sun’s reflection on water, you may want to reduce
the exposure, thus set it to Darker -1 or -2.
• White Balance
- Options: Auto / Daylight / Cloudy / Fluorescent
/ Tungsten
- This parameter lets the camera adjust to the ambient
light source in order to best record the natural colors.
10
• Timer
- Options: Off / 5 seconds / 10 seconds
- The timer setting allows you to delay the moment at
which the photo is taken, for example if you want to include yourself in the picture.
• Reset
- This will reset the values in this screen to the factory
default settings.
2.3 Taking Photos Using the Timer
1. From the Home Screen, select the Camera icon.
. In the viewfinder screen, select the Settings menu item.
3. In the Camera Settings screen, highlight the Timer parameter and set it to 5 or 10 seconds. Press to return to the
viewfinder screen.
4. The timer icon appears on the top of the viewfinder screen
( or ). Press OK: the ARCHOS device will count down to
zero and then take the picture.
Note that the timer function will stay active for successive
pictures you take, unless you return to the Home Screen or
set the Timer setting to Off.
11
3.Controlling the Image Quality
3.1Blurred images
If you notice that some of your videos or photographs are
blurred, it could be due to various reasons. As with any other
camcorder or still camera, keep in mind the following:
• If you use the zoom, you must have a very steady hand to
hold the ARCHOS 404 CamCorder when filming or taking a
picture. Any shakiness is magnified and often renders the
image blurry.
• Shooting in low light conditions requires more time so that
the device’s sensor can capture a sufficient amount of
light. Thus, any camera movement or fast movement in the
camera’s sight will be blurred.
• Trying to film or take pictures of close objects may also
give out-of-focus results.
3.2 Light/Exposure issues
When taking a photo against a bright light source (for example a window when you are inside, or the sun when you
are in an open space), it can happen that the object or person appears too dark in the photo. This is because the bright
background makes the camera select an exposure which is
not appropriate to capture the person or object in the foreground. There are two ways of correcting this:
• Use the Exposure setting (see: CamCorder Settings or
Camera Settings).
12
• Use the Lock exposure menu item:
- Point the ARCHOS 404 CamCorder away from the bright
light, towards an area where the light conditions are
similar to those around the person or object.
- Select the Lock exposure menu item: the exposure
settings become fixed and the exposure-locked icon
will appear on top of the screen. Now if you take a picture against the bright light source, the exposure will
stay fixed at the previous light adjustment. The image of
the person or object should no longer appear as dark as
before.
- To return to automatic exposure, select the Auto exposure menu item.
13
Technical Specifications
These are specifications for the CamCorder functions only.
For general specifications of the ARCHOS 404 series, please
see the ARCHOS 404 user manual.
RESOLUTION
• Digital Still Camera: 1.2 mega pixels.
• CamCorder: 640x480 (300.000 pixels).
SENSOR
• CCD (Charge Coupled Device).
CamCorder FILE FORMAT
• MPEG-4 SP (QVGA or VGA resolution).
FIELD OF VIEW
• Focale 4.31mm (equivalent to 36mm for a 35mm camera).
F number
• F2.8
DEPTH FIELD
• 0.50m to infinity.
WHITE BALANCE
• 5 settings: Auto - Daylight - Cloudy - Fluorescent Tungsten.
ZOOM
• Digital 2x.
All brands and product names are registered trademarks and the property of their
respective owners. Specifications are subject to change without notice. Errors or
omissions excepted. Images and illustrations may not always match contents.
All the information contained in this guide was correct at the time of publication.
COPYRIGHT ARCHOS™ © 2006. All rights reserved.
14