1
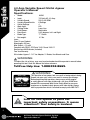
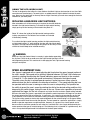
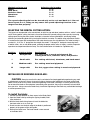
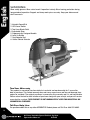
4.0 Amp VS Orbital Jig Saw
Operator’s Manual
Scie sauteuse orbitale à vitesse variable, 4,0 A
Manuel d’utilisation
Sierra caladora de velocidad variable de 4.0 A
Manual del Operario
AJS40
ARS55
English
4.0 Amp Variable Speed Orbital Jigsaw
Operator’s Manual
Specifications:
• Model:
AJS40
• Input: 120 Volts AC, 4.0 Amp
• Variable Speed: 500-3,000 SPM.
• Variable Speed Switch: 6 Settings
• Orbital Settings: 4
• Work Light:
LED
• Cutting Guide: Laser Line
• Dust Blower: Switchable
• Base Bevel: 0-45 degrees, Left and Right
• Blade Type: "T" Shank
• Net weight:
4.2 lbs.
Laser:
Class II Laser Product.
Wavelength: 650 nm.
Max Output: <1.0 mW.
Complies with FDA21 CFR Parts 1040.10 and 1040.11
Runs on two AAA Batteries (Included)
Two-Year Warranty.
Kit includes Jigsaw, 1-1/4" Vac Adaptor, 2- Blades, Hex Wrench and Case
Warning:
To reduce the risk of injury, user must read and understand this operator’s manual before
operating this tool. Save this Manual for future reference.
Toll-Free Help Line: 1-888-552-8665.
Warning:
The Operation of any power tool can result in foreign objects being
thrown into your eyes, which can result in severe eye damage.
Safety glasses
Before beginning tool operation, always wear safety goggles
or safety glasses with side shields and a full face shield when
foresight is better needed. We recommend Wide Vision Safety Mask for use over
Than no sight
eyeglasses or standard safety glasses with side shields. Always
wear eye protection which is marked to comply with ANSI Z87.1.
wear your
Look for this symbol to point out
important safety precautions. It means
attention!!! Your safety is involved.
2
4.0 Amp Variable Speed Orbital Jig Saw
Operators Manual
AJS40
Warning:
Some dust created by power sanding, sawing, grinding, drilling, and
other construction activities contains chemicals known to cause
cancer, birth defects or other reproductive harm. Some examples of
these chemicals are:
English
GENERAL SAFETY RULES
• lead from lead-based paints,
• crystalline silica from bricks and cement and other masonry products, and
• arsenic and chromium from chemically treated lumber.
Your risk from these exposures varies, depending on how often you do this type of work. To reduce your exposure to these chemicals: work in a well ventilated area, and work
with approved safety equipment, such as those dust masks that are specially designed to
filter out microscopic particles.
Warning:
READ AND UNDERSTAND ALL WARNINGS, CAUTIONS AND
OPERATING INSTRUCTIONS BEFORE USING THIS EQUIPMENT.
Failure to follow all instructions listed below may result in electric
shock, fire and/or serious personal injury.
SAVE THESE INSTRUCTIONS
1.
READ THE INSTRUCTION MANUAL BEFORE OPERATING THE
MACHINE. To minimize the possible occurrence of accidents and personal injury, learn the tool’s application, limitations, and specific potential hazards peculiar to
this tool.
2.
WEAR EYE AND HEARING PROTECTION. ALWAYS USE SAFETY
GLASSES WITH SIDE SHIELDS. Unless otherwise specified, everyday glasses provide only limited impact resistance, they are NOT safety glasses. Use only certified safety equipment; eye protection equipment should comply with ANSI Z87.1 standards. Protective hearing equipment should comply with ANSI S3.19 standards.
3.
DO NOT USE THIS OR ANY OTHER MACHINE WHEN YOU
ARE TIRED, UNDER THE INFLUENCE OF DRUGS, ALCOHOL, OR
MEDICATION. WATCH WHAT YOU ARE DOING, STAY ALERT AND
USE COMMON SENSE.
4.
WEAR PROPER CLOTHING. Do not wear loose clothing, gloves, neckties, rings, bracelets, wrist watches or other jewelry which may get caught in moving parts. Wearing nonskid footwear is recommended as well as wearing protective hair covering to contain long hair.
3
English
5. USE AND KEEP GUARDS IN PLACE and in good working order. Never operate the machine with any guard or cover removed. Check that all guards are in place, secured, and working correctly before each use to reduce the risk of injury.
6.
DO NOT USE THE TOOL IN DANGEROUS ENVIRONMENTS. Keep the work area well lighted to prevent tripping or inadvertently placing arms, hands,or fingers in dangerous positions. Do not use power tools in damp or wet locations or in the rain which can cause shock or electrocution.
7. KEEP THE WORK AREA CLEAN. Cluttered areas and benches invite accidents.
8.
CHECK THE TOOL FOR DAMAGED PARTS before using the machine. Check for proper alignment of moving parts, binding of moving parts, component breakage, and any other conditions that may affect the tool’s operation. A guard or any other part that is damaged must be properly repaired or replaced by an authorized service center to avoid risk of personal injury.
9. REMOVE ADJUSTING KEYS AND WRENCHES BEFORE STARTING
THE TOOL. Keys, wrenches, scrap, and other debris can be thrown at high speed, possibly causing serious personal injury.
10.KEEP CHILDREN AND VISITORS AWAY. Your shop is a potentially dangerous environment and visitors should not be allowed to contact any tools, extension cords, or roam about unsupervised. All visitors should wear safety glasses and be kept a safe distance from the work area.
11.MAKE THE WORKSHOP CHILDPROOF by using padlocks, master switches, and by removing starter keys from tools.
12.MAINTAIN ALL TOOLS AND MACHINES WITH CARE. Keep tools sharp and clean for best and safest performance. Follow instructions for lubricating and changing accessories.
13.DISCONNECT TOOLS WHEN NOT IN USE, before servicing, or when changing attachments, blades, bits, cutters, etc.
14.REDUCE THE RISK OF UNINTENTIONAL STARTING. Check to be sure that the tool’s switch is in the “OFF” position before plugging in the power cord. Should a power failure occur, move the switch to the “OFF” position. Accidental start-ups can cause serious personal injury.
15.USE THE CORRECT TOOL FOR THE JOB. Don’t force the tool or attachment to do a job for which it was not designed. Don’t use the tool for a purpose not intended as damage to the machine and/or personal injury may result.
4
4.0 Amp Variable Speed Orbital Jig Saw
Operators Manual
AJS40
17.MAKE SURE YOUR EXTENSION CORD IS THE PROPER SIZE AND
IS IN GOOD CONDITION. When using an extension cord, be sure to use one heavy enough to carry the current your product will draw. An undersized cord will cause a drop in line voltage resulting in loss of power and tool overheating. Consult the Extension Cord Chart for the correct size based on the cord length and nameplate ampere rating. If ever in doubt, use the next heavier wire gauge cord. The smaller the gauge number, the heavier the cord.
English
16.USE RECOMMENDED ACCESSORIES. Using accessories and attachments not recommended by the manufacturer or intended for use on this type tool, may cause damage to the machine or result in personal injury to the user. Consult the instruction manual for recommended accessories.
18.SECURE THE WORK-PIECE. Use clamps or a vise to hold the work-piece
when practical. Using clamps or similar mechanical device is safer than using your hand(s) and allows you to use both hands to operate the tool. Losing control of the work-piece can cause personal injury.
19.DON’T OVERREACH. Maintain proper footing and balance at all times; loss of balance can cause you to fall into the working machine, possibly causing an injury.
20.NEVER STAND ON THE TOOL. An injury may occur if the machine is tipped or if you should unintentionally contact the cutting tool.
21.DO NOT FORCE THE TOOL. The tool will perform the job better and safer at the feed rate for which it was designed. Forcing the tool could possibly damage
the machine and may result in personal injury.
22.FEED THE WORK-PIECE IN THE CORRECT DIRECTION AND
SPEED. Feed the work-piece into a blade, cutter, or abrasive surface against the direction of the cutting tool’s direction of rotation only. Incorrectly feeding the work-piece in the same direction as the cutting tool rotates causes the work-piece to
be thrown out at high speed.
23.NEVER LEAVE THE TOOL RUNNING UNATTENDED. TURN THE
POWER OFF. Don’t leave the machine until it comes to a complete stop.
24.TURN THE MACHINE “OFF”, AND DISCONNECT THE MACHINE
FROM THE POWER SOURCE before adjusting or changing set-ups, or when making repairs. An accidental start-up may occur causing personal injury.
25.NEVER USE THE TOOL IN AN EXPLOSIVE ATMOSPHERE. Normal sparking of the motor could ignite fumes.
26.KEEP THE TOOL DRY, CLEAN, AND FREE FROM OIL AND
GREASE. Always use a clean cloth when cleaning. Never use brake fluids, gasoline, petroleum-based products, or any solvents to clean the tool.
5
English
27.DO NOT USE THE TOOL IF SWITCH DOES NOT TURN IT ON AND
OFF. Have defective switches replaced by an authorized service center.
28.USE ONLY CORRECT BLADES. Do not use blades with incorrectly sized arbor holes. Never use blade washers or blade bolts that are defective or incorrect.
29.BEFORE MAKING A CUT, BE SURE ALL ADJUSTMENTS ARE
SECURE. DOUBLE CHECK ALL SETUPS. Make sure the blade is tight and not making contact with the saw or work-piece before connecting to the power supply.
30.AVOID CUTTING NAILS. Inspect for and remove all nails from lumber before cutting.
31.NEVER TOUCH THE BLADE OR OTHER MOVING PARTS
DURING USE.
32.NEVER START A TOOL WHEN ANY ROTATING COMPONENT IS IN
CONTACT WITH THE WORK-PIECE.
33.MAKE SURE THE WORK AREA HAS AMPLE LIGHTING to see the work and that no obstructions will interfere with safe operation BEFORE performing any work.
34.INSPECT TOOL CORDS PERIODICALLY. If a damaged cord is found, have it repaired by a qualified service technician at an authorized service facility. The conductor with insulation having an outer surface that is green with or without yellow stripes is the equipment-grounding conductor. If repair or replacement of the electric cord or plug is required, do not connect the equipment-grounding conductor
to a live terminal. Repair/replace damaged or worn cords immediately. Be constantly aware of the cord location and keep it well away from the rotating blade.
35.POLARIZED PLUGS. To reduce the risk of electric shock, this tool has a polarized plug (one blade is wider than the other). This plug will fit in a polarized outlet only one way. If the plug does not fit fully in the outlet, reverse the plug. If it
still does not fit, contact a qualified electrician to install the proper outlet. Do not change the plug in any way.
Warning:
USE OF THIS TOOL CAN GENERATE AND DISBURSE DUST OR OTHER
AIRBORNE PARTICLES, INCLUDING WOOD DUST, CRYSTALLINE
SILICA DUST AND ASBESTOS. Direct particles away from face and
body. Always operate tool in a well ventilated area and provide for
proper dust removal. Use dust collection system wherever possible.
Exposure to the dust may cause serious and permanent respiratory
or other injury, including silicosis (a serious lung disease), cancer, and
death. Avoid breathing the dust, and avoid prolonged contact with
6
4.0 Amp Variable Speed Orbital Jig Saw
Operators Manual
AJS40
English
the dust. Allowing dust to get into your mouth or eyes, or lay on your
skin may promote absorption of harmful material. Always use properly
fitting NIOSH/OSHA approved respiratory protection appropriate for
dust exposure, and wash exposed areas with soap and water.
EXTENSION CORDS
Grounded tools require a three wire extension cord. Double insulated tools can use
either a two or three wire extension cord. As the distance from the power supply outlet
increases, you must use a heavier gauge extension cord. Using extension cords with
inadequately sized wire causes a serious drop in voltage, resulting in loss of power
and possible tool damage. Refer to the table shown below to determine the required
minimum wire size.
The smaller the gauge number of the wire, the greater the capacity of the cord. For
example: a 14 gauge cord can carry a higher current than a 16 gauge cord. When using
more than one extension cord to make up the total length, be sure each cord contains
at least the minimum wire size required. If you are using one extension cord for more
than one tool, add the nameplate amperes and use the sum to determine the required
minimum wire size.
Guidelines for Using Extension Cords
• If you are using an extension cord outdoors, be sure it is marked with the suffix “W-A” (“W” in Canada) to indicate that it is acceptable for outdoor use.
• Be sure your extension cord is properly wired and in good electrical condition. Always replace a damaged extension cord or have it repaired by a qualified person before using it.
• Protect your extension cords from sharp objects, excessive heat, and damp or wet areas.
Recommended Minimum Wire Gauge for Extension Cords (120 Volt)
Nameplate
Amperes
(At Full Load)
Extension Cord Length
25 Feet
50 Feet
75 Feet
100 Feet
150 Feet
200 Feet
0–2.0
18
18
18
18
16
16
2.1–3.4
18
18
18
16
14
14
3.5–5.0
18
18
16
14
12
12
5.1 –7.0
18
16
14
12
12
10
7.1–12.0
18
14
12
10
8
8
12.1–16.0
14
12
10
10
8
6
16.1–20.0
12
10
8
8
6
6
7
English
SPECIFIC SAFETY RULES FOR JIG SAWS
Warning:
DO NOT allow familiarity with the Jig Saw from repeated use replace strictly following all operating
rules. If the tool is used unsafely or incorrectly, you or a bystander can suffer serious personal injury!
Warning:
Hold tool by insulated gripping surfaces when performing an operation where
cutting tools may contact hidden wiring or its own cord. Contact with a “live” wire
will make exposed metal parts of the tool “live” and shock the operator!
DO NOT let comfort or familiarity with product (gained from
repeated use) replace strict adherence to jig saw safety rules. If
you use this tool unsafely or incorrectly, you can suffer serious
personal injury.
1. Hold tool by insulated gripping surfaces when performing an operation where the cutting tools may contact hidden wiring or its own cord. Contact with a “live” wire will make exposed metal parts of the tool “live” and shock the operator.
2. Always use safety glasses or goggles. Ordinary eye glasses are NOT safety glasses.
3. Avoid cutting nails. Inspect workpiece for any nails and remove them before operation.
4. Do not cut hollow pipe.
5. Check for the proper clearance beyond the workpiece before cutting so that the blade will not strike the floor, workbench, etc.
6. Hold the tool firmly.
7. Make sure the blade is not contacting the workpiece before the switch is turned on.
8. Keep hands away from moving parts.
9. Do not leave the tool running. Operate the tool only when hand-held.
10. Always switch off and wait for the blade to come to a complete stop before removing from the workpiece.
11. Do not touch the blade or the workpiece immediately after operation; they may be extremely hot and could burn your skin.
12. Some material contains chemicals which may be toxic. Take caution to prevent dust inhalation and skin contact. Follow material supplier safety data.
SAVE THESE INSTRUCTIONS
WARNING: MISUSE or failure to follow the safety rules stated in this Operator's manual may cause serious personal injury.
8
4.0 Amp Variable Speed Orbital Jig Saw
Operators Manual
AJS40
Warning:
Always check that the power supply corresponds to the voltage on the rating name
plate.
SWITCH ACTION
Warning:
English
OPERATION
Always be sure that the tool is switched off and unplugged before adjusting or checking function on the tool.
Switch can be locked in “ON” position for ease of operator comfort during extended use. Use caution when
locking tool in “ON” position and maintain a firm grasp on the tool.
Your jig saw is equipped with an “on/off” switch trigger which is operated by squeezing or releasing.
Your jig saw is also equipped with a “Lock-On” button, located on the left side of the saw's handle just
above the switch trigger. Using the “Lock-On” button allows the saw to be run continuously without the
operator having to constantly apply pressure to the switch trigger.
— To start the tool, simply pull the switch trigger.
— To stop the tool, release the switch trigger.
Using with the “Lock-On” button:
— To start the tool and run the tool continuously, pull the switch trigger then push in the “Lock-On” button and release the switch trigger.
— To unlock the switch, pull the switch trigger fully and release it.
Warning: If the “Lock-On” button is continuously being depressed,
the trigger cannot be released.
USING THE LASER GUIDE:
Only turn on the laser light on when the tool is on the work piece.
X
1. First mark the line of cut on your work piece, good side down.
2. Insert plug into power source.
Y
3. Place the front edge of the saw foot on the work piece, turn
Z
on the Laser Guide and align the beam with the line of cut.
4. Hold tool firmly, squeeze the trigger
and allow the tool reach desired speed.
5. Press down (keeping the saw foot flat against the work piece)
as you slowly push the saw forward keeping the Laser beam
LED/ Laser Switch (X) Laser Light(Y) LED Light(Z)
on center with your cut line.
6. After completing the cut, Release the trigger and turn off the laser light.
WARNING: LASER RADIATION. AVOID DIRECT EYE EXPOSURE. DO NOT stare
into the laser light source. Never aim light at another person or object other than the work piece. Laser light
can Damage your eyes.
WARNING: DO NOT use tinted glasses to enhance the laser light. Tinted glasses will reduce
overall vision for the application and interfere with the normal operation of the tool.
WARNING: NEVER aim the Beam at a work piece with a reflective surface. Bright shiny reflective
sheet steel or similar reflective surfaces are not recommended with laser use. Reflective surfaces could
direct the beam back toward the operator.
9
English
USING THE LED WORK LIGHT:
The tool is designed so that either the Laser Guide or the Work Light can be turned on at one time. Both
cannot be used simaltaniously. The work light is an added source of light to better illuminate the work
area. Never use the work light as the only source of light. Illuminate your work area enough to eliminate
shadows on your work piece.
REPLACING LASER/WORK LIGHT BATTERIES:
After extended use it will be neccessary to replace the two AAA batteries
located in the light control housing. To remove the light control housing,
simply push up on the housing as illustrated in the photo "A".
A
Photo "B" shows the inside of the light control housing and the
battery compartment. The Batteries are installed as illustrated
in the battery drawing.
To re-attach the light control housing, position the light control housing
as illustrated in photo "A" while aligning the tabs and slide it back down
into place. The Light Control Housing can only be put on one way. It must
sit flush to the tool body to be installed correctly.
B
WARNING:
Make sure the Light Control House is securely in place before opporating
the Jig Saw. Failure to do so could cause the Light Control Housing to fall off
while opperating the tool. This could result in damaging the Tool, Light control housing
and your work piece.
SPEED ADJUSTMENT DIAL:
Your jigsaw is equipped with a speed adjusting dial located on the upper, forward portion of
the saw's handle. Tool speed can be infinitely adjusted between 500 and 3,000 strokes per
minute by rotating the adjusting dial. Speed indicators appear on the dial as the numbers
1 through 6: 1 is the slowest saw speed and number 6 represents the highest speed.
Therefore, when the dial is rotated towards number 6 speed increases; lower speed is
obtained when the dial is rotated in the direction of number 1. The speed adjusting dial can
be operated while the saw is running or when the saw is not operating. The operator has
the ability to preset the saw's speed by rotating the dial to the desired setting and then fully
depressing the switch trigger, urning the saw on for use. Please note: regardless of pressure
applied on the trigger, the tool will not operate any faster than the maximum speed setting selected.
Be aware that when the jigsaw is operated at low speed the motor temperature will begin to rise due to
the slower speed of the internal cooling fan. In such cases, it is necessary to occasionally run the tool
at full speed for a few minutes to aid internal cooling to keep the motor operating at high efficiency.
The jigsaw cutting speed (or stroke rate) required depends on the material being cut, the type of blade
being used, and the feed rate used by the operator. The best speed for a particular application is largely
based on operator experience or experimentation. However, as a general rule, slower speeds are for
denser materials and faster speeds for soft materials. Saw blade life is also largely determined by the
motor speed and the type of material being cut. The following chart is intended as a guideline only; test
cuts in scrap should be performed first to determine the best speed setting.
10
4.0 Amp Variable Speed Orbital Jig Saw
Operators Manual
AJS40
The speed adjusting dial can be turned only as far as 6 and back to 1. Do not
force it past 6 or 1, doing so may cause the speed adjusting function to no
longer function properly.
English
Workpiece being cut Adjusting dial number
Wood 4–6
Mild Steel 3–6
Stainless Steel 3–4
Aluminum 3–6
Plastics 1–4
SELECTING THE ORBITAL CUTTING ACTION:
This jigsaw can be operated in the conventional straight line (up and down) mode or with an “orbital” cutting
action. During orbital cutting, the blade is thrust forward on the upward (cutting) stroke, greatly increasing
cutting speed. During the down stroke, the blade is cleared of accumulated debris, enhancing cutting
efficiency and extending blade life by causing the blade to run cooler. The orbital action adjustment switch
is located on the lower left hand portion of the motor housing near the chip deflector. The motor housing is
marked: 0, I, II, III. The “0” designates the straight-line mode. “I” through “III” designate increasing levels
of orbital action. Just as with blade speed, selecting the proper orbital action is largely a matter of operator
experience and experimentation on scrap. The chart shown below is intended as a guideline only.
Position
Cutting Action
0 Straight-line
Applications
For clean cuts in wood and plywood. For cutting mild steel, stainless steel, and plastics.
For cutting mild steel, aluminum, and hard wood.
I Small orbit II Medium orbit III Large orbit For cutting wood and plywood.
For fast, aggressive cutting in wood and plywood.
INSTALLING OR REMOVING SAW BLADE:
CAUTION: Always be sure that the tool is switched off and unplugged before performing any work
or adjustments on the tool. Always clean out all chips or foreign matter adhering to the blade and/or blade
holder. Failure to do so may cause insufficient tightening of the blade, resulting in a serious personal injury.
Do not touch the blade or the workpiece immediately after operation; they may be extremely hot and could
burn your skin. Always secure the blade firmly. Insufficient tightening of the blade may cause blade breakage
or serious personal injury.
To install the blade:
1. Position the chip deflector to allow access to the Blade Collet.
2. Open the Blade collet by rotating the (Spring Loaded) Collet
Lever clockwise.
3. With the blade teeth facing forward, insert the blade into
the blade collet as far as it will go.
4. Check to make sure the back edge of the blade is positioned
properly in the groove of the roller guide.
5. Release the Collet Lever. The blade should is now secured
in the Blade Collet.
Collet Lever (a)
11
English
6. Lower the chip shield completely.
To remove the blade, follow the installation procedure in reverse.
CHIP SHIELD:
CAUTION: Always cut with the Chip Shield down and hold the base flush with the workpiece.
Failure to do so may cause blade breakage, resulting in a serious injury.
DUST BLOWER:
Your Jig Saw is equiped with a blower that directs air flow to
the cutting area. This feature provide a stream of air that keeps
the dust away from the cut line, improving visibility.
This feature can be turned OFF by rotating the blower switch
to the vertical position. To turn the Blower Feature ON, turn
the blower switch to the horizontal position.
Blower Switch (b)
GENERAL CUTTING:
CAUTION: Always hold the base flush with the workpiece. Failure to do so may cause blade breakage, resulting in a serious injury.
Advance the tool very slowly when cutting curves or scrolling. Forcing the tool may cause a
slanted cutting surface and blade breakage.
Jig saws cut on the upstroke, causing the workpiece surface facing upwards to splinter.
Therefore, determine the “good” side of your work piece, and place your guidelines for
cutting on the opposite side. Properly support and clamp the workpiece with the “good” side
down, and with the guidelines clearly visible and unobstructed (above & below) the surface
to be cut. To start the cut, place the front edge of the saw base on the workpiece and align
the blade with the previously drawn guideline. Make sure the blade does not contact the
workpiece. Turn the saw on, wait for the blade to attain full speed and slowly move the
blade into the workpiece. Apply only enough downward pressure to keep the saw steady on
the workpiece and only enough forward pressure to keep the blade cutting.
BEVEL CUTTING:
CAUTION: Always be sure that the tool is switched off and unplugged before tilting the base.
Raise the chip shield all the way before making bevel adjustments and cuts.
To bevel or tilt the saw base, turn the saw over so the base is facing upward and locate the bolt that
secures the base to the saw. Loosen the bolt in the base with the hex key provided. Tilt the base until
the desired bevel angle is obtained, then tighten the bolt to secure the base in place.
INTERIOR CUTOUTS:
An interior cutout is needed when a cutting pattern is located in the workpiece without a lead-in cut
from an edge. These cuts can be performed using one of two methods: either using starting holes or by
plunge cutting.
Using starting holes
Within the cutout pattern, pre-drill one or more holes larger then saw blade being used. Then insert the
blade through the hole(s) to start your cut.
12
4.0 Amp Variable Speed Orbital Jig Saw
Operators Manual
AJS40
When using the plunge cutting method, a starting hole or lead in cut from the workpiece edge is not
necessary. It is best to practice plunge cutting on scrap wood so the operator becomes familiar with
the technique and determines the blade speed and orbital settings that work best.
1. Set the speed at 5 or 6 and orbital setting to III.
2. Tilt the tool up on the front edge of the base with the blade point positioned just above the workpiece
surface.
3. Make sure the blade is in the area to be cut.
4. Apply downward pressure to the tool so that the front edge of the base will not move when you turn
on the tool.
5. Turn on the tool and gently lower the back end of the saw until the blade contacts the work surface.
6. As the blade pierces the workpiece, slowly lower the base of the tool down onto the workpiece
surface until it is in the normal cutting position.
7. Complete the cut in the normal manner.
English
Plunge cutting
VACUUM ATTACHMENT
Your Jig Saw comes with a vacuum attachment. This attachment allows you to connect it to a standard
1-1/4" vacuum hose.
To connect the Vac Attachment to the tool, align the two tabs on the narrow end of the vac attachment
with the corresponding slots on the back of the jig saw just below the power cord restraint. 13
English
Warning:
Wear safety glasses. Wear a dust mask if operation is dusty. Wear hearing protection during
long periods of operation. Support and clamp work piece securely. Keep your balance and
don’t overreach.
1. Variable Speed Dial
2. LED/Laser Switch
3. Tool-Less Blade Collet
4. Adjustable Shoe
5. Ergonomically Designed Handle
6. Lock On Button
7. Dust Adaptor Port
8. Orbital Control Selector
1
5
6
2
7
3
8
4
Two-Year Warranty
This product is warranted free from defects in material and workmanship for 2 years after
date of purchase. This limited warranty does not cover normal wear and tear nor damage from
neglect or accident. The original purchaser is covered by this warranty and it is not transferable.
Please return the tool to store location of purchase along with your receipt, and you will receive
a new tool for a refund. THIS PRODUCT IS NOT WARRANTED IF USED FOR INDUSTRIAL OR
COMMERCIAL PURPOSES.
Toll-Free Help Line:
For questions about this or any other APPRENTICE Product please call Toll-Free: 888-552-8665.
14
4.0 Amp Variable Speed Orbital Jig Saw
Operators Manual
AJS40