1
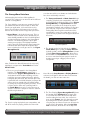
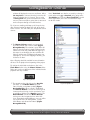
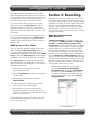
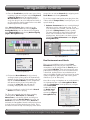
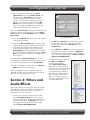
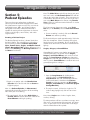
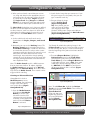
GarageBand Tutorial
An overview of how to create and edit digital
audio using GarageBand 3
Section 1: Projects p1 - 3
Starting a New Music Project
The GarageBand Interface
Section 3: Recording p5 - 7
Software Instruments and
MIDI Controller
Real Instruments and Vocals
Section 2: Loops
p4 - 5
Composing Music with Loops
Adding Loops to Your Library
Section 4: Filters and
Audio Effects p7
Section 5: Podcast Episodes
p8 - 10
Creating a Podcast Project
Jingles, Stingers, &
Sound Effects
Creating an Enhanced Podcast
Section 6: Movie Scores
p10 - 11
Section 7: Sharing p12
Send Song/Podcast/Movie
to iTunes
Send Podcast to iWeb
Send Movie to iDVD
Export Song/Podcast/
Movie to Disk
Section 1: Projects
GarageBand is suitable for musical compositions, spoken word projects, podcasting, and video scoring. There are
three different types of GarageBand projects: Music Projects, Podcast Episodes, and Video Scores. For the purposes
of this tutorial, the focus will begin with Music Projects for learning the interface and functionality of GarageBand.
Regardless of whether your project is creating a podcast or scoring a video, the basic functionality and interface will
be the same.
Starting a New Music Project
To begin a new project, start-up GarageBand by
clicking on its icon in the Dock (the Guitar). The New
Project window will give options for the three different
types of projects as well as opening an existing project
(Figure GarageBand.1).
1. Select the type of project by clicking on it. For our
example, New Music Project will be the choice.
The New Project window can also be found by
selecting New Project in the File Menu. Select the
appropriate Tempo, Time, and Key, and also enter a
file name. Click on Create to begin the project (Figure
GarageBand.2).
Figure GarageBand 1
Note: Tempo refers to the speed of the piece
(measured in beats per minute or bpm). Time is for
the time signature. 4/4 means that there are four beats
per measure and each beat is a quarter note. Key is a
musical term for the how many sharps and flats are in
the piece you will be playing.
Figure GarageBand 2
Tip: Do not worry about Tempo, Time, or Key if you
are only using loops to create your musical project.
The only time to worry about these settings is if actual
music will be played and recorded in GarageBand
through an instrument (real or software). For example,
if the user is playing Beethoven’s Fifth Symphony, then
he or she needs to be aware of the tempo, time, and
key for that piece.
Instructional Technology Outreach, a division of
Technology Services at Los Angeles County Office of Education
GarageBand Tutorial
The GarageBand Interface
Understanding the interface of GarageBand is
essential. This section gives an overview of the different
controls in GarageBand.
Tip: If you hold the cursor over any control, it will tell
you what that button or slider function is. When first
learning an application, it is beneficial to use this
feature to read about each button and see the link
between the function and the image that represents it.
1. Grand Piano is the default instrument. This is a
software instrument that can be controlled by an
external MIDI controller or the included Keyboard
and Musical Typing windows in the GarageBand
interface. The default Keyboard is open upon
starting a new project. This Keyboard window
can be closed by clicking on the Close button (the
leftmost button at the top of the Keyboard that
turns red when the cursor goes over it. See Figure
GarageBand.3).
Figure GarageBand 3
sure that none of the mute buttons and solo buttons
have been accidentally activated.
3. The Transport Controls or Main Controls begin
recording, play back your composition, and move
the Playhead to the beginning of the piece (Figure
GarageBand.5). The Cycle Button that looks
like two curvy arrows in the shape of an oval is
important in playback and recording. Cycling your
piece will play a segment over and over so that
finding loops that match the overall tone of the
composition is easier. The section to be cycled is
represented by a yellow line that appears above all
the tracks.
Figure GarageBand 5
4. The controls on the left side include: the Add a
Track Button (plus symbol), the Loop Browser
(eyeball symbol), and the Editing Button (scissors
symbol) (Figure GarageBand 6). Above these
three buttons is a Zoom Slider that can be used
to access more detail of your project’s tracks or
to zoom out and get a bigger picture of your
composition.
Note: To delete the Grand Piano track (or any track),
highlight it, navigate to the Track Menu and select
Delete Track.
2. There are several controls in the GarageBand
interface. The Track Buttons control each
individual track (Figure GarageBand.4). There
are buttons that will enable recording, mute the
track (play your song without this track), solo the
track (play only this track), lock the track (the track
is protected from accidental deletion), and open the
volume and pan controls (this will enable fading
in, fading out, and panning along channels). There
is also a volume slider and a panning knob in
the Track Mixer that can be used to increase or
decrease each track’s output or move the audio to
the left or right channel.
Figure GarageBand 4
Tip: If you’re trying to play back your composition, and
not all the tracks are playing, double check to make
Figure GarageBand 6
Note: When the Loop Browser or Editing Button is
activated, it will glow a different color. To de-activate
the button, just click on it one more time.
Figure GarageBand 7
5. The Time Display (Figure GarageBand 7) shows
the location of the Playhead (the triangle with
a red vertical line that is found at the top of the
interface along the beat ruler), the current time
view, and the Tempo. You can change the tempo
by clicking on the number (default is 120) and
using the pop-up slider to increase or decrease the
speed of your composition. When the tiny blue
note is activated, the beat ruler at the top of the
Instructional Technology Outreach, a division of
Technology Services at Los Angeles County Office of Education
GarageBand Tutorial
window will display the measures and beats. When
the tiny clock is activated, then the beat ruler will
show the absolute time in seconds. There is also
a Tuning Fork that can be activated and used to
tune any instrument (like a guitar) that is connected
to the computer through an audio interface.
Note: Track Info can also be accessed by selecting a
track and pressing k-I to Get Info or by going to the
Track Menu and selecting Show Track Info. As with
other applications, there are several different ways
to do each action.
Tip: If you are working with loops at all, keep the tiny
note activated so that the loops will snap to the beats
of the measure. This will make your composition sound
cleaner.
Figure GarageBand 8
6. The Master Volume controls are represented
by a LED monitor and a volume slider (Figure
GarageBand 8). The monitor’s green LEDs will
light up when the project is playing. When louder
sounds are made, the yellow LEDs will light up. If
the output is set too high, then the red LEDs will
light up and the two red Clipping Indicators may
also light up. To reset the Clipping Indicators, just
click once on them.
Note: Clipping should be avoided because distortion
will occur in the playback and exporting of the project.
Tip: Adjust the individual track volumes first in the
Track Mixer before using the Master Volume slider.
To be safe, make sure that none of the individual tracks
playback with any red LEDs.
Figure GarageBand 9
7. The controls on the right side are the Get Info
(the letter ‘i’) and Media Button (musical
notes, filmstrip, and photo symbols) (Figure
GarageBand 9). When a track is highlighted,
the Get Info Button is used to access the type of
instrument that is being used. It can also be used
to add filters (hidden in the Details triangle). The
Media Button activates the Media Browser
and accesses the integrated pieces of the iLife
Suite. Through the Media Browser, users can utilize
any audio in iTunes or GarageBand , images
from iPhoto, and videos from iMovie (Figure
GarageBand 10).
Figure GarageBand 10
Instructional Technology Outreach, a division of
Technology Services at Los Angeles County Office of Education
GarageBand Tutorial
Section 2: Loops
Loops are phrases of music that are generally a single instrument. They are composed in such a way that they are
simple to repeat over and over (to loop). GarageBand comes with over 1000 loops, but more can be added. GarageBand is an easy-to-use loop sequencer (an application that can be used to arrange loops in a composition), so
no musical experience is required to compose a song.
Composing Music with Loops
1. To find a loop, open the Loop Browser by clicking
on the button with the eyeball. The buttons are
organized to help users search for specific sounds.
The buttons on the left half are the instruments. The
buttons on the right half are the genres, or styles,
of music. For example, clicking on the Guitar
Button will display all loops that use guitar. By also
highlighting the World Button, the results will be
narrowed to world guitars (Figure GarageBand
11). Loops can also be found by typing information
in the search area.
3. When you find a loop that you want to use, click
and drag it to an open space in the grey area
below the beats ruler. Let go of the loop when it is
in the place you want it to be.
Figure GarageBand 12
Figure GarageBand 11
Note: Green loops vs. blue loops. Green loops
are recordings of a software instruments (for
more information on software instruments vs. real
instruments, go down to Section 3: Recording).
Because green loops have been input with a MIDI
controller, each note can be edited or changed. In the
Track Editor, you will see each note. Blue loops are
recordings of a real instrument. The individual notes
cannot be edited. In the Track Editor, you will only be
able to see the waveform.
2. To sample a loop, click on its name one time. The
loop will automatically begin playing. To make the
loop stop playing, click on it again a single time.
The arrow keys on the computer keyboard can
also be used to scroll more quickly through the
available loops (Figure GarageBand 12).
Note: The Favorites check box can be activated
if there is a loop that you want to use later. All the
favorites will be displayed when the Favorites Button
is activated.
Note: Once placed, the loops can be moved. Position
the cursor toward the middle of a loop and click and
drag it to the desired location.
4. Loops will need to be lengthened to make the music
project longer. To lengthen a loop, navigate to the
top right corner of the loop itself. When the Loop
symbol appears (a curved arrow), click and drag it
to the right to lengthen it (Figure GarageBand
13).
Figure GarageBand 13
5. To begin searching for another loop, begin by
clicking on the Reset Button on the instrument
side and all the Loop Browser buttons will be
selectable again.
6. To add more loops to your project, find a loop and
drag-and-drop it below the rest of your tracks.
When you release the mouse button, a new track
with that loop will automatically be created.
Instructional Technology Outreach, a division of
Technology Services at Los Angeles County Office of Education
GarageBand Tutorial
Note: Disregard the key signature and tempo of the
loops. GarageBand will match the beat and transpose
the key. In other words, if your project is in the key of C
and 120 beats per minute, then all the loops you use
will automatically change to that tempo and key.
Tip: It’s best to listen to your project as you sample
other loops. Activate the Cycle Button so that the
playback will repeat over a specific section of your
composition. While it is playing, you can sample new
loops to test whether or not they “fit in” with the rest of
your project.
Tip 2: If you want a loop to be repeated with a break,
it can be copied by holding down the Option key on
the keyboard and clicking and dragging the loop. A
duplicate will be created and placed wherever you let
go of the loop.
Adding Loops to Your Library
There are thousands of loops available for purchase
online including the Apple Jam Packs. However,
there are several gigabytes of loops that are free.
GarageBand 3 also provides support for utilizing ACID
Loops as well as the Apple Loops. By adding loops to
your library, they will be available for all future projects.
Note: Apple Loops are the preferred format for use
with GarageBand. Some ACID Loops are not tagged
correctly and will be unavailable for use even if they are
added to the loop library.
1. Download some free loops from a site like
http://icompositions.com.
2. Open the Loop Browser by clicking on the button
with the eyeball.
Section 3: Recording
GarageBand is more than a loop sequencer. It is also
a virtual recording studio that will allow you to record
music from a variety of inputs. Users can plug-in a MIDI
controller and manage any of the software instruments
that are included or added to GarageBand. Audio
interfaces and microphones can also be connected to
GarageBand to record real instruments (like vocals,
electric guitars, or any instrument that can be recorded
through a microphone).
Software Instruments and
MIDI Controllers
Software instruments are virtual instruments that
are controlled by a MIDI controller, the Keyboard
window, or the Musical Typing window. Real
instruments are actual instruments that are recorded
into the computer. For example, if a guitar is plugged
into the computer, it is a real instrument. If a violin is
recorded with a microphone, it is a real instrument
as well. Vocals are considered real instruments. MIDI
controllers come in all shapes and sizes. Although the
included Keyboard and Musical Typing windows are
convenient, they are limited. USB MIDI controllers begin
at approximately $49 and there are great ones like the
M-Audio Keystation 49e for $99. The simpler ones are
often Plug-and-Play. MIDI controllers with knobs and a
variety of tools usually require a driver.
1. Add a track (the button with a plus symbol)
and select Software Instrument (Figure
GarageBand.14). Click on the Create Button.
This will open up the Track Info panel. Select
an instrument family on the left column and the
specific instrument on the right column (Figure
GarageBand 15).
2. Select the loops that you want to add from a
Finder Window.
3. Drag-and-drop the new loops to the right side
where you get search results of loops.
4. Depending on the quantity of loops that are
being added, within a few minutes (or more), the
computer will add the loops to the library and index
them for use in projects.
Tip: Whole folders of loops can be added, but do not
drag multiple folders of loops at once because your
system can stall or crash.
Figure GarageBand 15
Instructional Technology Outreach, a division of
Technology Services at Los Angeles County Office of Education
GarageBand Tutorial
2. Close the Track Info to provide more space during
recording. If you are using the included Keyboard
or Musical Typing, open one of them via the
Window Menu. If an external USB keyboard is
used, then plug it in to a free USB port and switch it
on. The computer should recognize that a new USB
or MIDI input has been added.
Note: Musical Typing allows people to use the
computer keyboard as MIDI input device (Figure
GarageBand.16). You can activate it by navigating
to the Window Menu and selecting Musical Typing
(Figure GarageBand 17).
tempo. You can activate Count In by navigating to the
Tools Menu and selecting Count In.
Tip 2: If the tempo is too fast for you to play, then slow
it down with the Tempo Slider, record your part, and
speed it back up.
5. Software Instruments that are recorded through
MIDI inputs can be edited note by note. To edit
music that has been recorded, select the track and
click on the Editing Button (scissors symbol).
The notes will display as bars with a keyboard
on the side much like the rolls used on a selfplaying piano. Musical notes can also be viewed
selecting the Musical Notation button (Figure
GarageBand.18).
Figure GarageBand 16
Figure GarageBand 18
Real Instruments and Vocals
Figure GarageBand 17
3. Click on the Record Button (the big red one)
and begin playing. Your project will automatically
playback as you record. To end recording, you can
click on the Record Button, but the composition
will continue to play. If you end recording by
pressing the space bar, that will stop the
recording and playback at the same time.
4. If more recording is needed, click on the Record
Button and continue playing.
Tip: There are two tools that help when recording
in GarageBand: Metronome and Count In.
Metronome is activated by default, and will give a
steady beat when the Record Button is pressed, but
Count In needs to be turned on. When Count In is
activated, the GarageBand interface will play four beats
(a single measure) before beginning to record. This is
an effective feature to help musicians play at the correct
There are several different ways to record Real
Instruments. Depending on your computer, some
microphones can be plugged into the Line In port or
any available USB Port. If you are interested in more
professional recordings, the use of an audio interface
is beneficial. Audio interfaces are audio boxes that
connect via USB or FireWire and have inputs for studioquality microphones (XLR inputs) and electric guitars
and basses (1/4” or TRS inputs).
Note: When using a microphone or an audio interface,
it is important to open up the GarageBand Menu
and select Preferences. In the preferences, navigate
to the Audio/MIDI
section and change
the Audio Input
to the device you
want to use (Figure
GarageBand 19).
Figure GarageBand 19
Instructional Technology Outreach, a division of
Technology Services at Los Angeles County Office of Education
GarageBand Tutorial
1. Add a track (plus symbol) and select Real
Instrument. Click on the Create button. This
will open up the Track Info panel. Select an
instrument family on the left column and the
specific instrument on the right column. For this
example, select Vocals for the family and No
Effects for the specific instrument. A No Effect
vocal means that GarageBand will record your
voice with no effects or filters whatsoever.
Note: A new Basic Track can also be created for quick
recording of vocals and instruments. To add a Basic
Track, navigate to the Track Menu and select New
Basic Track.
Figure GarageBand 20
2. Close the Track Info to provide more space for the
tracks during recording.
3. Click on the Record Button (big red button) and
begin singing, speaking, or playing an instrument.
Your project will automatically playback as you
record. To stop recording, you can click on the
Record Button, but the composition will continue
to play. If you stop recording by pressing the space
bar, that will stop the recording and playback at
the same time.
Note: Recording a Real Instrument will result in
waveform being recorded, not individual notes, so you
are unable to edit single notes in the Track Editor.
4. If more recording is needed, click on the Record
Button and continue performing.
Tip: Use headphones when recording so that the
metronome ticking and previously recorded material
does not re-record onto the new track.
Section 4: Filters and
Audio Effects
2. The Echo and Reverb sliders will vary the amount
of echo and reverb in the track. There are also
check boxes to activate the Equalizer and the
Compressor.
3. Several Filters and Effects are activated in the two
drop-down menus that are above the Equalizer.
The default will display as “None,” but those menus
are used to select many different Filters or Effects
(Figure GarageBand 21).
Tip: Spend some time exploring
the Filters and Effects to
discover what each one
does. Vocal Transformer is
especially fun when adding an
effect to a voice. Students should
have ample time to explore. It
is beneficial to give students a
journal to write down what they
discover about each filter or
effect. For example, what is a
“Flanger?” What happens when
you add “Distortion?”
Filters and audio effects change the sound of a track.
GarageBand includes several filters and effects that
can make your instruments or voice sound more
professional, clear, or ridiculous.
1. Select a track (vocal or instrumental) and click
on the Track Info Button (the letter ‘i’ on the
right side. Towards the bottom of the panel, there
is a triangle that hides the Details of the track.
Clicking on the triangle will reveal the hidden
details (Figure GarageBand 20).
Instructional Technology Outreach, a division of
Technology Services at Los Angeles County Office of Education
Figure GarageBand 21
GarageBand Tutorial
Section 5:
Podcast Episodes
There are three types of podcasts: audio-only,
enhanced, and video. Enhanced podcasts are AAC
files (also known as mp4 or m4a). They can include
embedded images, URLs, and chapter markers.
Garageband 3 includes a Podcast Studio that is
capable of creating enhanced podcasts. Its features
include musical jingles, sound effects, and audio
engineer tools.
Creating a Podcast Project
The Podcast Episode interface is almost identical to
the Music Project. The main difference is that there
are five tracks pre-loaded: Podcast Track, Male
Voice, Female Voice, Jingles, and Radio Sounds
(Figure GarageBand 22). Another difference is in a
feature called Ducking. The Ducking Controls are in
the Mixer of each track.
Note: The Male Voice track will not change your voice
to a man’s voice and the Female Voice track will not
change your voice into a female’s. There are some preselected filters that will enhance your voice if you are a
man using Male Voice and a woman using Female
Voice. However, it will not matter which track is used to
record your vocals.
Tip: If you want to change your voice, go to Track
Info and, in the Details, select a Vocal Transformer
effect.
3. If more recording is needed, click on the Record
Button and continue speaking.
Tip: Record with your mouth approximately 6-10 inches
from the microphone. Closer recordings will register
louder, but may cause distortion. Be sure to check the
monitor levels and make sure that the red LEDs do not
light up.
Jingles, Stingers, & Sound Effects
GarageBand 3 features several other sounds that are
useful in podcasting. The sounds include Jingles,
Stingers, and Sound Effects, and can be accessed
through the Loop Browser. Jingles are short tunes.
Stingers are one-shot sounds that rarely last for more
than 5 seconds. Sound Effects are ambient noise and
generally longer than a Stinger.
Figure GarageBand 23
Figure GarageBand 22
1. Begin a new project and select New Podcast
Episode. Name the file and click on Create to
begin the project.
Note: In a Podcast Episode, the Metronome is
automatically deactivated so there will be no ticking
noise when you are recording.
2. To record vocals, click on either Male Voice or
Female Voice to activate that track. Click on the
Record Button and begin speaking.
1. Open the Loop Browser by clicking on the
eyeball symbol. In a Podcast Episode, the
Loop Browser does not automatically show the
instrument buttons. It defaults to the Podcast
Sounds and has the categories of All, Jingles,
Stingers, Sound Effects, and Favorites (Figure
GarageBand 23).
2. To sample a sound, click on it a single time. To
make it stop playing back, click on it one more
time.
Note: Many Jingles come in three lengths: short,
medium, or long.
Tip: Most podcasts will have a welcome message, some
intro music, an introduction of that episode, and outro
music. In general, the music doesn’t last much longer
than the introduction of the episode.
Instructional Technology Outreach, a division of
Technology Services at Los Angeles County Office of Education
GarageBand Tutorial
3. When you have found a sound that you want to
use, drag-and-drop it to the appropriate place in
your project. You can also move it after you drop
it, just like the musical loops. Jingles can go in
the Jingles Track. Drag Stingers and Sound
Effects to an empty area below your other tracks,
and a new track will be opened with that sound.
Tip: Music Beds (underlying music during any talking)
are often used to add depth and mood to a podcast
or video. However, make sure that music beds do not
detract from the spoken words. Decrease the music
bed’s volume in the Track Mixer with the volume
slider.
4. Set the audio levels so that all vocals can be
heard above the Jingles, Stingers, and Sound
Effects.
5. Alternately, you can use the Ducking feature. The
Ducking controls are the triangles found in the
Track Mixer. Ducking is a radio term that refers
to a track that decreases in volume when a more
important track begins playing. For example, music
often fades to a lower volume when the main
vocals begin. Any track with a triangle pointing
upward will cause ducking to occur. Any track with
a triangle pointing downward will duck below the
more important tracks.
Note: The Radio Sounds track is a MIDI instrument
that can store sound effects. To explore, highlight
the Radio Sounds track and open up the Musical
Typing (go to the Window Menu). Press some of the
keys to hear the Radio Sounds. These sounds can be
triggered while recording.
2. Search for the image that you want to use. If you
title your images or use keywords, then you can
type in word to search by.
3. Drag-and-drop the image
into the Podcast Track
(Figure GarageBand
25). Once placed, you can
Figure GarageBand 25
move an image by clicking
and dragging it left or right.
Continue adding more images to the Podcast
Track by dragging them from the Media Browser
(Figure GarageBand 26).
Figure GarageBand 26
Tip: Record all audio before placing images in the
Podcast Track because it’s easier to match an image
to what is being said. Also, it is easier to add images
from the beginning of the podcast and move towards
the end.
4. To create Chapter Markers, highlight the
Podcast Track and select the Track Editor.
Thumbnails of each picture will display in the
Track Editor. To create a Chapter Marker that
is selectable in iTunes, enter a Title. If you want
a URL to be displayed during playback, enter
the URL Title and the URL that your browser
will open up when the link is selected (Figure
GarageBand 27).
Creating an Enhanced Podcast
GarageBand 3 includes a
Media Browser to access
images in iPhoto. You can browse
images in the entire library
or a specific album (Figure
GarageBand 24).
1. Open the Media Browser
by clicking on the Media
Button (it’s on the right
side of the interface and
represented by musical notes,
a filmstrip, and a photo) and
make sure that the Photos
Button is activated.
Figure GarageBand 24
Figure GarageBand 27
Note: To add Album Art, highlight the Podcast
Track and select the Track Editor. There will be an
open space for your
Episode Artwork.
Drag-and-drop your
logo or any picture to
the space for Episode
Artwork (Figure
GarageBand 28).
Figure GarageBand 28
Instructional Technology Outreach, a division of
Technology Services at Los Angeles County Office of Education
GarageBand Tutorial
5. You can “brand” your podcast with specific
information for the Album, Artist, Episode,
Composer, and Description. There are two
locations to do this. Highlight the Podcast
Track and select the Track Info button. This
will open up the Episode Info panel. Enter the
appropriate information here for the Title, Artist,
Parental Advisory, and Description (Figure
GarageBand 29).
Tip: You should always preview your work. To get a
preview, highlight the Podcast Track and select the
Track Info. Now, during playback, the images and
URLs will display in the Preview Window (Figure
GarageBand 32).
Figure GarageBand 32
Figure GarageBand 29
6. Navigate to the GarageBand Menu and select
Preferences. In the General Preferences, you
can also enter information for the Composer and
the Album (Figure GarageBand 30).
Section 6:
Movie Scores
Scoring a video means to add any audio (music or
sound effects) to a movie. Users can watch their video
in GarageBand 3 to synchronize all sound effects and
music with the action and mood in their video project.
Although iMovie has the ability to add sound effects
and music to a video, using GarageBand will give you
more tracks to layer sounds in a video project.
1. Begin a New Project and select New Movie
Score. After entering the name, select Create.
2. Open the Media Browser and make sure that the
Movies Button is activated.
3. Drag-and-drop a movie project into the Video
Track.
Figure GarageBand 30
Tip: The following are what many podcasters use
these ID3 tags for. Album refers to the name of the
podcast. The Artist is the name of the podcaster or
group. The Composer is the person who edited the
podcast. The Title is the name of that episode of the
podcast.
Note: Images in the Episode
Artwork or the Podcast Track
can be edited. Double click on
the thumbnails, and the Artwork
Editor will pop-up. Re-center the
image, zoom-in, or zoom-out. Click
on the Set Button when you are
finished (Figure GarageBand
31).
Figure GarageBand 31
10
Note: GarageBand projects may have a Podcast
Track or Video track. It cannot have both because of
the format that it exports as.
4. Begin adding music, narration, or other sound
effects as previously learned in the Music Projects
and Podcast Episodes.
Note: When you open the Loop Browser in Movie
Score mode, it will default to the buttons found in the
Music Projects. To switch to Podcast Sounds, just
click on the podcast symbol by the music note (Figure
GarageBand 33).
Figure GarageBand 33
Instructional Technology Outreach, a division of
Technology Services at Los Angeles County Office of Education
GarageBand Tutorial
5. As with Podcast Episodes, you can add Chapter
Markers to a Movie Score project. Highlight the
Video Track and select the Track Editor. Click
on the Add Marker Button for each Chapter and
enter any Chapter Titles or URLs.
6. Enter Episode Info if you are exporting as a video
podcast. To access the Episode Info, highlight the
Video Track, and select the Track Info Button.
Section 7: Sharing
When your project is complete, it is time to share it
with the world! There are a number of sharing options
available. They are found in the Share Menu (Figure
GarageBand 34). The Share
Menu changes depending on
what kind of a project you are
creating. For example, if you
have a Podcast Track open,
“Send Song to iTunes” will be
replaced by “Send Podcast to
Figure GarageBand 34
iTunes.”
Note: You need to set the compression levels for
podcasts and videos prior to Sharing. Navigate to
the GarageBand Menu and select Preferences.
The Export selection will open up the choices for
compressing your project. For podcasts, use the
Spoken Podcast setting if it’s mainly talking. If you
are creating music, select Musical Podcast. The
more compressed something is, the poorer the quality.
The Movie Settings will vary the compression of
your video. The main ones to keep in mind are that
Video Podcast will format it for the iPod and Full
Quality should be used if the movie will end up on a
DVD project or if you want the highest quality copy
available. The checkbox for the Podcast Artwork will
automatically limit all images to 300x300. This helps
reduce the file size of your project, but it also decreases
the quality of the photos (Figure GarageBand 35).
Tip: Try not to use Mono Podcast. It compresses the
audio to a very small file, but the quality is poor.
Tip 2: If you want to have higher quality images in an
enhanced podcast, first reduce their size in iPhoto by
Exporting them at a size no greater than 800x600.
Re-import these images into iPhoto and use them in
your the podcast.
Send Song/Podcast/Movie to iTunes
This option will mix your project and put a copy of the
final product into iTunes. If you have a Music Project,
it will export as an AIFF (uncompressed audio file). If
you are creating a Podcast Episode, it will export as
an AAC (compressed audio file). If you are creating a
Movie Score, it will export as an M4V or MOV (video
files).
Send Podcast to iWeb
Using this option will add your song, podcast, or video
to the iWeb application. iWeb is an application that
creates Websites through templates. It offers one-click
publishing and will write the necessary RSS feeds for
blogs and podcasts. It is best used with a .Mac account.
Send Movie to iDVD
If you are creating a Movie Score, then you have the
option of sending your project to iDVD. Selecting this
option will open iDVD and place your video project
in it. If you have created any Chapter Markers, the
DVD will include a Play All button as well as a Scene
Selection menu.
Export Song/Podcast/Movie to Disk
This option is similar to Send Song/Podcast/Movie
to iTunes. However, instead of placing a copy in the
iTunes library, it will save a copy to your hard drive. This
is handy if you are archiving projects and want to save
it elsewhere. This option also facilitates transferring the
project to another computer for a compilation DVD or
CD.
Tip: Make note of where you save the file when you
choose the Export to Disk option.
Figure GarageBand 35
Instructional Technology Outreach, a division of
Technology Services at Los Angeles County Office of Education
11