1
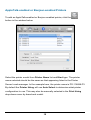
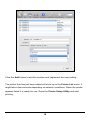
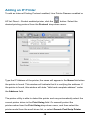
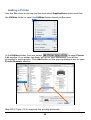
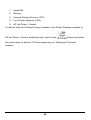
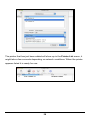
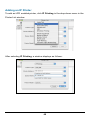
Mac 10.3 ~Mac 10.6 Installation Instruction
The instruction is for your reference only. Screenshots may be slightly
different than your system.
Mac OS X Snow Leopard (10.6)
NOTE: Mac OS printing is supported by Postscript printers only!
With Mac OS X Snow Leopard (10.6), you can use Bonjour, Internet Printing
Protocol (IPP), Line Printer Daemon (LPD), and HP Jetdirect - Socket printing
through Print Server.
Click this icon
in your Dock to open your System Preferences window
as below.
Click the Network icon in System Preferences menu to view the menu below.
Select Ethernet on the left to view the information on the right.
1
2
Adding a Printer
Click this icon
in your Dock to open your System Preferences window
as below.
Click the Print & Fax icon in System Preferences menu to view the menu
below.
Click the + button to add a new printer.
3
Mac OS X Snow Leopard (10.6) supports five printing protocols:
1. Bonjour
2. Internet Printing Protocol (IPP)
3. Line Printer Daemon (LPD)
4. HP Jetdirect – Socket
To add an Internet Printing Protocol enabled, Line Printer Daemon enabled or
HP Jet Direct – Socket enabled printer, click the
button and follow the
instructions to add an IP Printer beginning on “Adding an IP printer” session.
Bonjour-enabled Printers
To add a Bonjour-enabled printer, click the
button in the window below.
Select the printer model from Printer Name list and Kind type. The printer
4
name selected should be the same as that appearing listed in the Printer
Server’s web manager. In the example here, the printer name is PS-116688-P3.
By default the Printer Using will use Auto Select to determine what printer
configuration to use. This may also be manually selected in the Print Using
drop-down menu by brand and model.
Click the Add button to exit the window and implement the new setting.
The printer that has just been added will show up in the Printer List menu, it
might take a few seconds depending on network conditions. When the printer
appears listed it is ready for use. Quite the Printer Setup Utility then start
5
printing.
Adding an IP Printer
To add an Internet Printing Protocol enabled, Line Printer Daemon enabled or
HP Jet Direct – Socket enabled printer, click the
button. Select the
desired printing protocol from the Protocol drop-down menu.
6
Type the IP Address of the printer, the name will appear in the Name field when
the printer is found. This window will indicate that it is verifying the address. If
the printer is found, this window will state “Valid and complete address” under
the Address field.
The printer utility is able to detect the printer and may automatically select the
correct printer driver in the Print Using field. Or manually select the
printer-maker from the Print Using drop-down menu, and then select the
printer model from the scroll-down list, or select Generic PostScrip Printer
option from the Print Using drop-down menu if the model is not listed. To
implement the setting, click Add button.
The setup procedures for these three printing protocols (Internet Printing
Protocol (IPP), Line Printer Daemon (LPD), and HP Jetdirect – Socket) are
basically the same. Illustrated examples as included below for reference.
7
For set up LPD Printing:
1. Enter the IP address of the print server to which the printer is attached
in Address field.
2. Type the port name in Queue field.
Click Add button after done the section of printer model in the Print Using
drop-down menu.
For set up IPP Printing:
1. Enter the IP address of the print server to which the printer is attached
in Address field. After that, enable print server’s second port, and type
“: second port”.
NOTE: It is highly recommended to configure second port as 631, or
any port from 1024 to 65535.
2. Type the port name in Queue field.
8
Click Add button after done the section of printer model in the Print Using
drop-down menu.
For set up Socket Printing:
1. Enter the IP address of the print server to which the printer is attached in
Address field. After that, type “: 9100” for port 1, “: 9101” for port 2 or “:
9102” for port 3.
2. Keep the blank in queue field.
9
Click Add button after done the section of printer model in the Print Using
drop-down menu.
The printer that has just been added will show up in the Printer List menu, it
might take a few seconds depending on network conditions. When the printer
appears listed it is ready for use. Quite the Printer Setup Utility then start
printing.
10
Mac OS X Leopard (10.5)
NOTE: Mac OS printing is supported by Postscript printers only!
With Mac OS X Leopard (10.5), you can use Apple Talk, Bonjour, Internet
Printing Protocol (IPP), Line Printer Daemon (LPD), and HP Jetdirect - Socket
printing through Print Server.
Click this icon
in your Dock to open your System Preferences window
as below.
Click the Network icon in System Preferences menu to view the menu below.
Select Ethernet on the left to view the information on the right.
11
Click the Advanced button and then the AppleTalk tab to see the window
below. Check to select the Make AppleTalk Active option. Click the OK button
and the Apply button. AppleTalk is now active on the system. Now a printer can
be added.
12
Adding a Printer
Click this icon
in your Dock to open your System Preferences window
as below.
Click the Print & Fax icon in System Preferences menu to view the menu
below.
Click the + button to add a new printer.
13
Mac OS X Leopard (10.5) supports five printing protocols:
1. AppleTalk
2. Bonjour
3. Internet Printing Protocol (IPP)
4. Line Printer Daemon (LPD)
5. HP Jetdirect – Socket
To add an Internet Printing Protocol enabled, Line Printer Daemon enabled or
HP Jet Direct – Socket enabled printer, click the
button and follow the
instructions to add an IP Printer beginning on “Adding an IP printer” session.
14
AppleTalk-enabled or Bonjour-enabled Printers
To add an AppleTalk-enabled or Bonjour-enabled printer, click the
button in the window below.
Select the printer model from Printer Name list and Kind type. The printer
name selected should be the same as that appearing listed in the Printer
Server’s web manager. In the example here, the printer name is PS-116688-P3.
By default the Printer Using will use Auto Select to determine what printer
configuration to use. This may also be manually selected in the Print Using
drop-down menu by brand and model.
15
Click the Add button to exit the window and implement the new setting.
The printer that has just been added will show up in the Printer List menu, it
might take a few seconds depending on network conditions. When the printer
appears listed it is ready for use. Quite the Printer Setup Utility and start
printing.
16
17
Adding an IP Printer
To add an Internet Printing Protocol enabled, Line Printer Daemon enabled or
HP Jet Direct – Socket enabled printer, click the
button. Select the
desired printing protocol from the Protocol drop-down menu.
Type the IP Address of the printer, the name will appear in the Name field when
the printer is found. This window will indicate that it is verifying the address. If
the printer is found, this window will state “Valid and complete address” under
the Address field.
The printer utility is able to detect the printer and may automatically select the
correct printer driver in the Print Using field. Or manually select the
printer-maker from the Print Using drop-down menu, and then select the
printer model from the scroll-down list, or select Generic PostScrip Printer
18
option from the Print Using drop-down menu if the model is not listed. To
implement the setting, click Add button.
The setup procedures for these three printing protocols (Internet Printing
Protocol (IPP), Line Printer Daemon (LPD), and HP Jetdirect – Socket) are
basically the same. Illustrated examples are include below for the sake of
reference.
For set up LPD Printing:
1. Enter the IP address of the print server to which the printer is attached
in Address field.
2. Type the port name in Queue field.
Click Add button after done the section of printer model in the Print Using
drop-down menu.
19
For set up IPP Printing:
1. Enter the IP address of the print server to which the printer is attached in
Address field. After that, enable print server’s second port, and type
“: second port”.
NOTE: It is highly recommended to configure second port as 631, or any
port from 1024 to 65535.
2. Type the port name in Queue field.
Click Add button after done the section of printer model in the Print Using
drop-down menu.
20
For set up Socket Printing:
1. Enter the IP address of the print server to which the printer is attached in
Address field. After that, type “: 9100” for port 1, “: 9101” for port 2 or “:
9102” for port 3.
2. Keep the blank in queue field.
Click Add button after done the section of printer model in the Print Using
drop-down menu.
The printer that has just been added will show up in the Printer List menu, it
might take a few seconds depending on network conditions. When the printer
appears listed it is ready for use. Quite the Printer Setup Utility and start
printing.
21
22
Mac OS X Tiger (10.4)
NOTE: Mac OS printing is supported by Postscript printers only!
With Mac OS X Tiger (10.4), you can use Apple Talk, Bonjour, Internet Printing
Protocol (IPP), Line Printer Daemon (LPD), and HP Jet Direct-Socket printing
through Print Server.
Click this icon
in your Dock to open your System Preferences
window as below.
Click the Network icon in System Preferences menu to view the menu below.
Select the Apple Talk tab in the Network menu. Check to select the Make
Apple TalkActive option. Click the Apply Now button and close the menu.
Apple Talk is now active on the system. Now a printer can be added.
23
24
Adding a Printer
Use the Go menu at the top tool bar and select Applications option and find
the Utilities folder or open the Utilities folder directly in Go menu.
In the Utilities folder, find and select
to open Printer
List window. If no printer has been set up on your Macintosh, you will be
prompted to add a printer. Click Add button on the pop-up dialogue box to open
Printer Browser window.
Mac OS X Tiger (10.4) supports five printing protocols:
25
1. AppleTalk
2. Bonjour
3. Internet Printing Protocol (IPP)
4. Line Printer Daemon (LPD)
5. HP Jet Direct – Socket
To add an Internet Printing Protocol enabled, Line Printer Daemon enabled or
HP Jet Direct – Socket enabled printer, click on the
button and follow
the instructions to add an IP Printer beginning on “Adding an IP printer”
session.
26
AppleTalk-enabled or Bonjour-enabled Printers
To add an AppleTalk-enabled or Bonjour-enabled printer, click the
button in the Printer Browser menu.
Select the printer model from Printer Name list and Connection type in the
Printer Browser menu. The printer name selected should be the same as that
appearing listed in the Printer Server’s web manager. In the example here, the
printer name is PS-C0D26A-U3. By default the Printer Browser will use the
Auto Select for Print Using to determine what printer configuration to use.
This may also be manually selected in the Print Using drop-down menu by
brand and model. Click the Add button to exit the Printer Browser window and
implement the new setting.
27
The printer that has just been added will show up in the Printer List menu, it
might take a few seconds depending on network conditions. When the printer
appears listed it is ready for use. Quit the Printer List and start printing.
28
Adding an IP Printer
To add an Internet Printing Protocol enabled, Line Printer Daemon enabled or
HP Jet Direct – Socket enabled printer, click the IP Printer button in the Printer
Browser window. Select the desired printing protocol from the Protocol
drop-down menu.
Type the IP Address of the printer, the name will appear in the Name field when
the printer is found. The Printer Browser will indicate that it is verifying the
address. If the printer is found, the Printer Browser will state “Valid and
complete address” under the Address field.
he printer utility is able to detect the printer and may automatically select the
correct printer driver in the Print Using field. Or manually select the
printer-maker from the Print Using drop-down menu, and then select the
printer model from the scroll-down list, or select Generic PostScript Printer
29
option from the Print Using drop-down menu if the model is not listed. To
implement the setting, click Add button.
The setup procedures for these three printing protocols (Internet Printing
Protocol (IPP), Line Printer Daemon (LPD), and HP Jet Direct – Socket) are
basically the same. Illustrated examples are include below for the sake of
reference.
For set up LPD Printing:
1. Enter the IP address of the print server to which the printer is attached
in Address field.
2. Type the port name in Queue field.
Click Add button after done the section of printer model in the Print Using
drop-down menu.
30
For set up IPP Printing:
1. Enter the IP address of the print server to which the printer is attached in
Address field. After that, type “: 80” or “: second port” if print server’s
second port is enabled.
2. Type the port name in Queue field.
Click Add button after done the section of printer model in the Print Using
drop-down menu.
31
For set up Socket Printing:
1. Enter the IP address of the print server to which the printer is attached in
Address field. After that, type “: 9100” for port 1, “: 9101” for port 2 or “:
9102” for port 3.
2. Keep the blank in Queue field.
Click Add button after done the section of printer model in the Print Using
drop-down menu.
When the Installable Options pop-up window shows up as below, click
Continue button.
32
The printer that has just been added will show up in the Printer List menu, it
might take a few seconds depending on network conditions. When the printer
appears listed it is ready for use. Quit the Printer Setup Utility and start
printing.
33
Mac OS X Panther (10.3)
NOTE: Mac OS printing is supported by Postscript printers only!
With Mac OS X Panther (10.3), you can use Apple Talk, Line Printer Daemon
(LPD), and Rendezvous, printing through Print Server.
Click this icon
in your Dock to open your System Preferences
window as below.
Click the Network icon in System Preferences menu to view the menu below.
34
Select the Apple Talk tab in the Built-in Ethernet menu. Check to select the
Make AppleTalk Active option. Click the Apply Now button and close the
menu. Apple Talk is now active on the system. Now a printer can be added.
35
Adding a Printer
Use the Go menu at the top tool bar and select Applications option and find
the Utilities folder or open the Utilities folder directly in Go menu.
In the Utilities folder, find and select Printer Setup Utility to open Printer List
window.
If no printer has been set up on your Macintosh, you will be prompted to add a
printer. Click Add button on the pop-up dialogue box to open the window below.
36
Mac OS X Panther (10.3) supports three printing protocols:
1. AppleTalk
2. Rendezvous
3. Line Printer Daemon (LPD)
To add an LPD enabled printer, click IP Printing in the drop-down menu and
follow the instructions to add an IP Printer beginning on “Adding an IP printer”
session.
37
AppleTalk-enabled or Rendezvous-enabled Printers
To add an AppleTalk-enabled or Rendezvous-enabled printer, click either
AppleTalk or Rendezvous in the drop-down menu.
Select a printer name from the Name list. The printer name selected should be
the same as that appearing listed in the Printer Server’s web manager. In the
example here, the printer name is PS-1168-U1. By default the Printer Model
will use the Auto Select to determine what printer configuration to use. This
may also be manually selected in the Print Model drop-down menu by brand
and model. Click the Add button to see the newly added printer in the Printer
List window.
38
The printer that has just been added will show up in the Printer List menu, it
might take a few seconds depending on network conditions. When the printer
appears listed it is ready for use.
39
Adding an IP Printer
To add an LPD enabled printer, click IP Printing in the drop-down menu in the
Printer List window.
After selecting IP Printing, a window displays as follows:
40
Set up LPD Printing:
1. Enter the IP address of the print server to which the printer is attached in
the Printer Address field.
2. Type the port name in Queue field.
3. The printer utility is able to detect the printer and may automatically select
the correct printer driver in the Print Model field. Or, manually select the
printer-maker from the Print Model drop-down menu, and then select the
printer model from the scroll-down list, or select Generic option from the
Print Model drop-down menu if the model is not listed.
4. To implement the setting, click Add button.
41