1
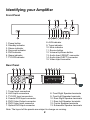
EN
Home Theater
DE
Amplifier Audio System
FR
IT
ES
NL
PT
SW
DK
TU
User Guide
PL
GR
RU
82-136-00061
Identifying your Amplifier
Front Panel
8. AUX indicator
9. Tuner indicator
10. Mute indicator
11. Source button
12. Volume Up/Down button
13. Audio Input (RIGHT) connector
14. Audio Input (LEFT) connector
15. Video Input connector
1. Power button
2. Standby indicator
3. Stereo indicator
4. Surround indicator
5. DVD indicator
6. Game indicator
7. TV/VCR indicator
Rear Panel
1. Tuner Input connectors
2. AUX Input connectors
3. TV/VCR Input connectors
4. Coaxial DVD Input connector
5. DVD Video Output connector
6. DVD Video Input connector
7. Optical DVD Input connector
8. Front Right Speaker terminals
9. Front Left Spearker terminals
10. Rear Right Speaker terminals
11. Rear Left Speaker terminals
12. Center Speaker terminals
13. Subwoofer Speaker terminals
Note: The layout of the panels are subject to change on revising.
2
Remote Control
1.
2.
3.
4.
5.
6.
7.
8.
9.
10.
11.
12.
13.
14.
15.
16.
17.
18.
19.
20.
21.
22.
23.
24.
25.
26.
27.
Normal button--Default listening mode.
Jazz button--Press to listen to Jazz music sound effect.
Classic button--Press to listen to Classic music sound
effect.
POP button--Press to listen to POP music sound effect.
Rock button--Press to listen to Rock music sound
effect.
Dance button--Press to listen to Dance music sound
effect.
Standby button--Press to switch the amplifier from
POWER ON to STANDBY mode. (The main power of
the amplifier must be ON at this time.)
Center Up/Down Volume button--Press to adjust center
speaker’s sound level.
Front Left Up/Down Volume button--Press to adjust
Front Left speaker’s sound level.
Front Right Up/Down Volume button--Press to adjust
Front Right speaker’s sound level.
Rear Left Up/Down Volume button--Press to adjust
Rear Left speaker’s sound level.
Rear Right Up/Down Volume button--Press to adjust
Rear Right speaker’s sound level.
Subwoofer Up/Down Volume button--Press to adjust
Subwoofer speaker’s sound level.
Default button--Press to restore customized settings to
the factory default settings.
Test Tone button--Press to check the spearker
connection.
Volume Up button--Press to raise all speaker’s volume.
Stereo button--Press to output 2.1 channel sound.
Surround button--Press to output 5.1 channel sound.
Mute button--Press to turn off the sound. To restore the
sound, press it again.
Volume Down button--Press to lower all speaker’s
volume.
Coaxial DVD button--Press the button when your
amplifier connects to the DVD player via coaxial cable.
Optical DVD button--Press the button when your
amplifier connects to the DVD player via optical cable.
Game button--Press to select the TV Game or Video
Camera as the input source.
Tuner button--Press to select the Tuner as the input
source.
TV/VCR button--Press to select the TV/VCR as the
input source.
AUX button--Press to select the AUX as the input
source.
Night Mode button--Usually press to lower and balance
the sudden burst loud voice of the input souce when
playing the amplifier at night.
3
EN
Using Amplifier
Before starting using the amplifier, please get ready all the audio devices that
connect to the device first. Refer to the included Amplifier Connection Diagram.
Basic Operation
Test Tone Checking
1. Press the POWER button on the
main unit, the amplifier goes to
STANDBY mode.
2. Press any button on the main unit or
on the remote control, the amplifier
goes to POWER ON mode.
3. Press the POWER button again to
turn off the amplifier, or press on the
STANDBY button on the remote
control to keep the device in standby
mode.
1. Press the TEST TONE button when
the amplifier is in POWER ON
mode.
2. The amplifier will output a test tone
to the 6 spearkers by turns.
Input Source Selection
Volume Adjustment
1. Press the SOURCE button on the
amplifier repeatedly to select an
input source, or
2. Press the individual Optical DVD,
Coaxial DVD, Game, TV/VCR,
Tuner or AUX buttons on the remote
control to select the audio input
source directly.
3. The corresponding indicator will light.
(see the amplifier front panel).
1. Press the VOLUME UP/DOWN
buttons to raise/lower all speaker’s
volume, or
2. Press the Front Left Up/Down
Volume button, Front Right Up/
Down Volume button, Center Up/
Down Volume button, Rear Left
Up/Down Volume button, Rear
Right Up/Down Volume button and
Subwoofer Up/Down Volume
button to adjust the individual
speaker’s volume control.
Note: To stop the test tone, simply
press any button on the remote control
or on the main unit.
Note: When the Optical DVD input is
selected, the DVD indicator lights up.
However, when the Coaxial DVD input is
selected, both the DVD and Game
indicator light up at the same time.
4
Using Amplifier
Before starting using the amplifier, please get ready all the audio devices that
connect to the device first. Refer to the included Amplifier Connection Diagram.
Equalizer Setting
Night Mode
Press the NORMAL, CLASSIC, JAZZ,
ROCK, POP or DANCE buttons to
select the tones you like for listening.
1. Press the
button on the remote
control.
2. The Mute LED on the front panel of
the amplifier will keep blinking.
3. The amplifier will automatically lower
and balance the sudden burst
loudness of the input souce before
outputting it.
4. To cancel the function, press the
Note: The factory default setting is
NORMAL.
button again.
Note: Usually this function is used
when the amplifier is playing at night to
prevent the unexpected loudness.
Mute
1. Press the MUTE button in POWER
ON mode.
2. The Mute LED on the front panel of
the amplifier will be lit. The sound is
turned off.
3. To restore the sound, press any
button on the amplifier or on the
remote control.
5
EN
Using Amplifier
Before starting using the amplifier, please get ready all the audio devices that
connect to the device first. Refer to the included Amplifier Connection Diagram.
Stereo Mode
Surround Mode
1. Press the STEREO button in
POWER ON mode.
2. The amplifier will playback the input
source from the Front Left, Front
Right and the Subwoofer speakers.
1. Press the SURROUND button in
POWER ON mode.
2. The amplifier will playback the input
source from the 6 speakers.
Note: The amplifier will auto-detect and
playback whatever was recorded on the
DVD or audio disc. If a Dolby Digital
recorded DVD (5.1 channel) is loaded,
the amplifier will playback the disc
according to its sound system automatically. That means the sound will come
out of 5 speakers plus the subwoofer.
Note: The amplifier will decode and
playback whatever was recorded on
the DVD or audio CD. If a stereo DVD
(2 channel) is loaded, the amplifier will
playback the disc according to its
sound system automatically. That
means the sound will come out of the
2 front speakers plus the subwoofer.
Note: If a stereo DVD disc (2 channel)
or audio CD is loaded, press the
SURROUND button will force the
amplifier to manually change and
playback the disc as a 5.1 channel
surround system and the sound will
come out of all 5 speakers plus the
subwoofer.
Note: If a Dolby Digital (5.1 channel)
recorded DVD is loaded, press the
STEREO button will force the amplifier
to manually change and playback the
disc as a stereo sound system and the
sound will only come out of the 2 front
speakers plus the subwoofer.
6