1
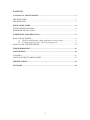
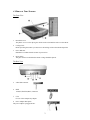
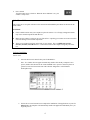
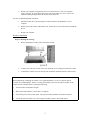
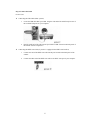
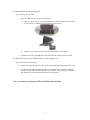
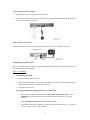
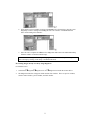
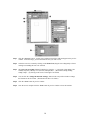
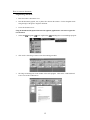
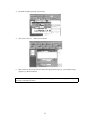
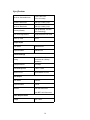
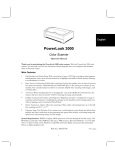
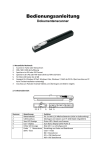
POWERLOOK 1000
Color Scanner
Operation Manual
For Quick installation instructions, see the section “Quick Start Guide” starting on page 6.
Trademarks
IBM PC/AT is a trademark of International Business Machines Corporation. MS-Windows, Windows, and
MS-DOS are trademarks of Microsoft Corporation. Mac OS, iMac, iMac DV, Mac G3/G4, G4 Cube and
Mac Series are trademarks of Apple Computer, Inc. Other names and trademarks appearing herein are
trademarks of their respective holders.
Important Safeguards
Read all of the instructions.
Follow all warnings and instructions marked on the product.
Do not use this product near water or in rainy/moist environment.
Do not place the scanner on an uneven surface, which may cause serious damage to the product.
The product should be operated only from the type of power source indicated on the marketing label.
Use of power supplies not conforming to these standards can cause serious damage to the product.
Do not attempt to service this product yourself as opening or removing the enclosure may expose you
to dangerous voltage or other hazards.
The sound level at the operators position according to IEC 704-1:1982 should be less than or equal to
70dB(A).
1
CONTENTS
A GLANCE AT YOUR SCANNER……………………………………………………………..3
THE FRONT VIEW……………………………………………………………………………….3
THE REAR VIEW…………………………………………………………………………………3
QUICK START GUIDE………………………………………………………………………….4
SOFTWARE INSTALLATION…………………………………………………………………...4
HARDWARE INSTALLATION………………………………………………………………….5
COMPLETING YOUR FIRST SCAN………………………………………………………….8
HOW TO SCAN IMAGES………………………………………………………………………...8
A. Using the bundled image editing application to scan the image………………………8
B. Scanning images directly to a file by using MagicScan………………………………...9
HOW TO SCAN TEXT DOCUMENTS…………………………………………………………12
TROUBLESHOOTING………………………………………………………………………...14
MAINTENANCE………………………………………………………………………………..15
CLEANING………………………………………………………………………………………15
STATIC ELECTRICITY PRECAUTIONS……………………………………………………...15
SPECIFICATIONS……………………………………………………………………………...16
GLOSSARY……………………………………………………………………………………...18
2
A Glance at Your Scanner
The Front View
1.
Document Cover
The plastic cover over the object glass which can be raised and lowered over a document.
2.
Carriage Lock
Before operating the scanner you must move the locking switch to the unlocked position.
3.
Power Indicator
Illuminates to indicate that the scanner is powered on.
4.
Object Glass
The glass surface on which the document or image should be placed.
The Rear View
5.
4-Pin USB connector
6.
IEEE
1394(PC)/FireWire(MAC) Connector
7.
UTA
For use with a transparency adapter.
8. Power Adapter Receptacle
The power adapter is plugged in here.
3
9.
Power Switch
Turn the scanner power switch on. When the Power Indicator is on, your
scanner is ready to use.
Quick Start Guide
This section serves as a quick reference to the connection and installation procedures for the PowerLook
1000 scanner.
CAUTION:
Find a suitable location near your computer to place the scanner. Use of longer, unsupported cables
may cause connection problems and data loss.
Make sure the scanner is resting on an even, flat surface. Operating your scanner on an uneven surface
can cause damage to the internal components.
There are tow kinds of interfaces on the back of your scanner. They are IEEE 1394 (for PC)/
Firewire (for Mac) and USB interface. Connect the scanner to the computer using only one of the
two.
Software Installation
For PC users:
1.
Insert the PowerLook 1000 CD into your CD-ROM drive.
Note: If a window does not appear automatically, double-click the My Computer icon to
open it, double-click the PowerLook 1000 CD-ROM icon to open it as shown in picture A
(please be aware the PowerLook 1000 CD is labeled “MagicScan” in the Windows
desktop/directory).
2.
Follow the on-screen instructions to complete the installation of the applications on your CD.
Please Note: the computer will automatically install each application individually once you
begin the process.
4
3.
Restart your computer as suggested by the on-screen instructions. Once your computer
restarts, click the ‘X’ in the upper right corner of all open windows to close. You are now
finished installing the applications on the PowerLook 1000 CD.
For users of APPLE Macintosh computers:
1.
Install the scanner driver by inserting the scanner CD into the CD-ROM drive of your
computer.
2.
Double-click on the scanner CD installer icon. Follow the on-screen instructions to install the
drivers.
3.
Restart your computer.
Hardware Installation
Step 1. Unlocking the Carriage
1.
Before operating the scanner, please unlock the restraint.
2.
To better access the lock switch, remove the document cover by lifting it up from the scanner.
3.
To unlock the restraint, move the carriage lock toward the unlocked position as shown above.
Note:
When transporting or shipping the scanner over a significant distance, be sure to relock the optical
assembly to avoid damaging it. Before re-locking the assembly, make sure the optical assembly of the
scanner is in the “Home Position” by doing the following:
1.
Turn the scanner off and then on again.
2.
Wait for the ready indicator of the scanner’s to light up.
3.
Turn off the power of the scanner again. The optical assembly should be in the Home Position.
4.
To lock the optical assembly, move the carriage lock until it points to the locked symbol.
5
Step 2. Connect the Cable
For PC Users:
Connecting the USB Cable (Most systems)
1.
Locate the USB cable that is provided. Plug the wide end of the cable firmly into one of
the available USB ports on your computer.
2.
Plug the small end of the cable into the port marked “USB” located on the back panel of
the scanner as shown in picture C.
Connecting the IEEE 1394 Cable (If your PC is equipped with a IEEE 1394 interface)
1.
Connect one end of the IEEE 1394 cable into the port located on the back panel of the
scanner.
2.
Connect the other end of the IEEE 1394 cable to one IEEE 1394 port of your computer.
6
For APPLE Macintosh (USB equipped) users:
Connecting the USB Cable
1.
2.
Plug your USB cable into any open USB connector.
a.
iMac DV: There are two on your keyboard and two located toward the lower rear part
of your monitor, as indicated by the black arrows shown below.
b.
APPLE G3, G4: There are two located on the back panel of your computer.
Attach the other end of the USB cable to the USB connector on the back of the scanner.
For APPLE Macintosh (G3, G4, iMac DV or other FireWire equipped) users:
Connecting the FireWire cable
1.
Connect one end of the FireWire cable into the port located on the back panel of the scanner.
2.
Connect the other end of the FireWire cable to one FireWire port of your Mac. IMac DV
FireWire ports are located on the right side of the computer. The FireWire ports on Mac G3,
G4, and G4 Cube are located on the back panel of the computer.
Note: Use only one connection (USB or FireWire but not both.)
7
Step 3. Connect the Power Adapter
1.
Plug the scanner’s power cord into an electrical outlet.
2.
Insert the other end of this cord into the power adapter receptacle marked “POWER” on the back panel
of the scanner as shown in picture G.
Step 4. Turn on your scanner
Turn the scanner power switch on. When the Power Indicator is on, your scanner is ready to use.
Completing your First Scan
Before proceeding with the steps below, please finish the hardware and software installation first. Refer to
the section of the Quick Start Guide.
How to scan images
Original Image Placement
1.
Raise the scanner’s document cover.
2.
Place the document (graphic, text, or photo) face down on the scanner. Use the triangular marks
along the edge of the glass to position your document.
3.
Lower the document cover.
A. Using the bundled image editing application to scan the image
1.
Open Adobe PhotoShop Elements and select File, Import, Select Twain Source. Select
MagicScan as your Twain source (this only needs to be done the first time you use the
scanner).
2.
Select File, Import, MagicScan to launch MagicScan driver.
3.
The UMAX scanner driver MagicScan windows will appear as shown in fig. 1. Click on the
“Preview” button to pre-scan the document.
8
4.
Select the area to be scanned by clicking on the Frame tool as shown below, drag the cursor
diagonally to form a rectangle surrounding the area to be scanned. Click Scan as shown
below and scanning will commence.
5.
Once the scan is complete click Exit to close MagicScan and return to the Adobe PhotoShop
Elements window to edit the scanned image.
For more details on using bundled image editing application Adobe PhotoShop Elements, please
refer to its help by clicking on the “help” command in the menu.
B. Scanning Images directly to a file by using MagicScan
For Windows users:
1.
Select Start
Programs
MagicScan V4.X
2.
The MagicScan interface will appear which contains four windows. There are preview window,
scanner control window, job list window, and info window.
9
MagicScan to launch the scanner driver.
Step 1 Click the “Preview” button. A quick, low-resolution scan will be made and appear in the preview
window. From this image, you can determine the area you want to scan.
Step 2 Select the area to be scanned by clicking on the Frame Tool, drag the cursor diagonally to form a
rectangle surrounding the area to be scanned.
Step 3 Select the type of original (Flatbed, Transmissive, Negative…), scan mode (Color RGB, Color
CMYK, Gray 256), intensity level (No filter, Sharpen, Blur…), Resolution (300dpi, 200dpi,
100dpi, 50dpi…) by clicking on the arrows on the right of each field.
Step 4 You can click the “change the filename of image” button in the scan job list window to change
the filename or the file format. (The button looks like a file folder.)
Step 5 Click the “Scan” button in preview window.
Step 6 Once the scan is complete click the “Exit” button in preview window to close the interface.
10
For iMac \ iMac DV \ G4 Cube users
1.
Launch the “MagicScan” program.
2.
The MagicScan interface will appear which contains four windows. There are preview window,
scanner control window, job list window, and info window.
Step 1 Click the Preview button. A quick, low-resolution scan will be made and appear in the preview
window. From this image, you can determine the area you want to scan.
Step 2 Select the area to be scanned by clicking on the Frame Tool, drag the cursor diagonally to form a
rectangle surrounding the area to be scanned.
Step 3 Select the type of original (Flatbed, Transmissive, Negative…), scan mode (Color RGB, Color
CMYK, Gray 256), intensity level (No filter, Sharpen, Blur…), Resolution (300dpi, 200dpi,
100dpi, 50dpi…) by clicking on the arrows on the right of each field.
Step 4 You can click the “change the filename of image” button in the scan job list window to change
the filename or the file format. (The button looks like a file folder.)
Step 5 Click on the “Scan” button to start the scanning process.
Step 6 Once the scan is complete click the “Quit” button in the preview window to close the interface.
For more details about scanning the image, please refer to on-line help of MagicScan.
11
How to scan text documents
Original Image Placement
1.
Raise the scanner’s document cover.
2.
Place the document (graphic, text, or photo) face down on the scanner. Use the triangular marks
along the edge of the glass to align the document.
3.
Lower the document cover.
Using the bundled OCR (Optical Character Recognition) application to scan and recognize the
text document
1.
Select Start
Programs
Caere Applications
2.
Click on the “Scan Image” button to start the scanning procedure.
3.
The image scanned appears in the window of the OCR program. Click on the “OCR and Proof”
icon to execute the OCR function.
12
OmniPage Pro to run OmniPage program.
4.
The OCR recognition program is processing.
5.
Click on the “Save As…” button to save the file.
6.
Input a name for the processed file and choose the appropriate file type for your word processing
program (e.g. Microsoft Word).
For more details on using bundled OCR application OmniPage, please refer to its help by clicking on
the “help” command in the menu.
13
Troubleshooting
The scanners are designed to be reliable and easy to install. If, however, you have a problem with your
scanner, these troubleshooting steps should indicate the cause of the problem.
If the scanner lamp flickers, dims, or fails to come on:
The scanning lamp is failing or has failed and needs to be changed. Please contact your dealer or Technical
Support.
If the indicator comes on, but software returns “scanner link failed”, or similar message:
1.
2.
Make sure the cables are connected properly.
Check the installation procedures to make sure you followed all of the instructions. Including
unlocking the scanner.
If you see the error message “Scanner link failed” when executing the Preview or Scan command or
encounter another system exception event, do the following:
1.
2.
3.
Remove the cable from the USB port and re-insert it.
If you have another open USB port try attaching the cable to that port.
Check the installation procedures to ensure that all instructions have been followed.
Which should you use, USB or IEEE 1394/FireWire?
All newer computers have at least one USB port so the USB option will work well for most systems. F you
have a computer with a IEEE 1394/FireWire port on your computer you may want to use that connection
instead of USB. IEEE 1394/FireWire allows for faster data transfer of large files resulting in better
scanning performance.
If All Else Fails:
If the above solutions do not resolve the problem, contact Technical Support at [email protected].
Be sure to have the following information ready:
1.
The scanner model you are using.
2.
The version number of the scanner driver. (Located on the front of the CD.)
3.
The computer model you are using.
4.
The Windows/Mac OS version that you are using.
5.
The application software packages that you are using.
6.
Error codes or messages seen.
7.
A description of what you were doing at the time of the malfunction so that the problem can
be re-recreated.
8.
Other observations that may aid the technician in identifying the problem and solution.
14
Maintenance
With the exception of periodic cleaning, the scanner is virtually maintenance free. The following sections
give the procedures for basic maintenance of the scanner.
Cleaning
Regularly cleaning the object glass will ensure that dirt or smudges will not reduce the quality of your
scanned images. Before you clean the glass, make sure the scanner is turned off and the power cord is
unplugged.
Clean the object glass and document cover with a soft damp cloth and a mild detergent or alcohol.
Warning:
Do not spray the cleaning fluid directly on the object glass. Spraying the liquid directly on the glass may
cause the liquid to penetrate the seams around the glass and contaminate the mirrors and lenses inside the
scanner. Please be sure you spray the liquid on the cleaning cloth and then wipe the glass clean.
Static Electricity Precautions
Static electricity is a constant danger to computer systems. The charge that can build up in your body may
be strong enough to damage electronic components on the scanner’s printed circuit board or the computer’s
interface card. Therefore, it is important to observe basic precautions whenever handling electronic
components for your computer. Although areas with high humidity are much less prone to static
electricity, it is best to always take precautions against accidental damage that can result in expensive
repairs.
The following measures should generally be enough to protect your equipment from static discharge.
Discharge any static electricity that may have built-up in your body by touching a grounded or
anti-static surface. For example, touch some large metal object or the silver-toned expansion slot
covers at the rear of your computer’s case. Be sure to do this immediately before removing any
components from their anti-static bags.
When handling any electronic components, be sure to carefully avoid touching any metal part of
the component. Avoid touching any of the gold “fingers” that plug into the expansion slot. It is
best to handle system components either by their edges or by the mounting bracket which attaches
to the slot opening in the rear of the case.
Follow the above to the best of your ability. Excessive caution is not necessary, simply take reasonable
care.
15
Specifications
Maximum Scannable Area
215.9 x 355.6 mm
(8.5 x 14 Inches)
Hardware Resolution
2400 (H) x 2400 (V) dpi
Maximum Resolution
9600 (H) x 9600 (V) dpi
Scanning Density
1 dpi to 9600 dpi, via Ultra
View Technology
Color Scanning Method
Single pass with color CCD
Warm Up Time
30 sec.
Sample Depth
Color Mode
42/24 Bit/Pixel
Grayscale Mode
14/8 Bit/Pixel
Scanner Settings
Scaling
1% to 200% in 1%
Increments at 1200 dpi
Resolution
Highlight/Shadow
255 Steps
Contrast/Brightness
+100%~-100%
Gamma Curve
Downloadable Curves
Data Output
Color Mode
24/42 Bit
Grayscale Mode
8/14 Bit
Interface
One USB Connector
One IEEE 1394 Connector
Power Requirements
Voltage
100 ~ 240V
16
Frequency
50HZ / 60HZ
Power Consumption
Maximum 15 Watts
Environmental Ranges
Operating Temperature
10°C ~ 40°C
Relative Humidity
25% ~ 85%
Dimensions (F/B)
542mm x 330mm x 105mm
(L x W x H)
Net Weight
4.5 Kg
Systems Supported
PC Win 98se/ 2000/ ME/ XP
Mac OS 9.0/ 9.04/ 9.1/ 9.21
Apple G3, G4, iMac DV
Options
Transparency Adapter
17
Glossary
Application Software: Software that is used to perform a specific function, e.g., image processing, OCR
(Optical Character Recognition), or DTP (Desktop Publishing).
BET: Bit Enhancement Technology. This is a digital image processing technique that increases the
number of bits used per pixel in order to acquire a more vivid and clearer image.
Black and White: A 1-bit image file capable of only displaying black and white image data with no
intermediate gray levels.
Document Cover: The plastic cover that is lowered over a document on the scanner’s object glass.
Folder: An electronic storage area used to store and organize files and other folders and is often
represented on a computer screen by a folder-like icon.
Grayscale: An 8-bit image file capable of representing all tones and colors in the image using 256 shades
of gray.
Icon: The graphical representation of a computer file or piece of computer software.
Indicator Panel: The area of the scanner that contains the LED indicators to show scanner status.
Non-TWAIN Driver: An interfacing system that does not follow the TWAIN standard and is designed for
a specific software package and a specific image input device.
Object Glass: The tempered glass of the scanner where documents or objects to be scanned are placed.
Optical Assembly: The component system of the scanner that contains all of the optical components.
Sometimes referred to as a carriage or carriage assembly.
Peripheral Device: A device attached to a computer that adds functionality to a computer system.
Power Indicator: The indicator that glows when the scanner’s power cable is connected to the scanner
and a “live” outlet and the power switch is turned on.
Transparency Adapter: A scanner option that consists of additional hardware allowing the scanning of
transparent originals, such as slides or X rays.
TWAIN Compliant: Any software or image input device that conforms to the TWAIN standard.
TWAIN: A standardized interfacing system that allows many different software applications to access
many different image input devices. TWAIN is currently more popular on the Windows platform than it is
on the Macintosh.
USB: Universal Serial Bus, an interface between host and peripherals.
•
The power adapter bundled with the scanner is for use only with Power Supply Touch, SA06N 12-V.
•
The power adapter bundled with the scanner is for use only with Power Supply Hitron, HES24-12012.
18