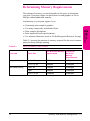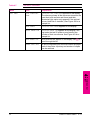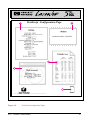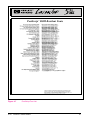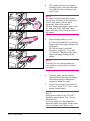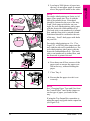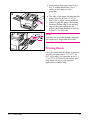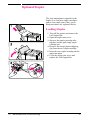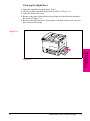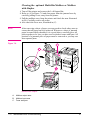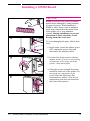
1
Manual Part No.
C3166-90952
Printed on
Recycled Paper
HP LaserJet 5Si/5Si Mx/5Si NX Printer User’s Guide
Copyright© 1996
Hewlett-Packard Co.
Printed in USA 12/96
English
HP LaserJet 5Si/5Si MX/5Si NX
Printer User’s Guide
HP LaserJet 5Si/5Si MX/5Si NX
Printer
User’s Guide
© Copyright HewlettPackard Company, 1996
All Rights Reserved.
Reproduction,
adaptation, or
translation without prior
written permission is
prohibited, except as
allowed under the
copyright laws.
Publication number
C3166-90952
First edition,
December 1996
Warranty
The information
contained in this
document is subject to
change without notice.
Hewlett-Packard
makes no warranty of
any kind with regard
to this material,
including, but not
limited to, the implied
warranties of
merchantability and
fitness for a particular
purpose.
Hewlett-Packard shall
not be liable for errors
contained herein or for
incidental or
consequential damages
in connection with the
furnishing, performance,
or use of this material.
Hewlett-Packard Company
11311 Chinden Boulevard
Boise, Idaho 83714
Trademark Credits
Adobe™, PostScript™ ,
and PostScript II™ are
trademarks of Adobe
Systems Incorporated
which may be registered
in certain jurisdictions.
Arial, Times New
Roman, and Monotype
are registered
trademarks of the
Monotype Corporation.
Bi-Tronics™, PCL5™ ,
and REt™ are
trademarks of
Hewlett-Packard
Company. Helvetica and
Univers are trademarks
of Linotype AG and/or
its subsidiaries in the
U.S. and other
countries. Macintosh
computer is a product of
Apple Computer, Inc.
Microsoft® and
Windows® are U.S.
registered trademarks of
Microsoft Corporation.
Novell™ is a trademark
of Novell, Incorporated.
TrueType™ is a
trademark of Apple
Computer, Inc.
Conventions
This manual uses the following conventions:
Italics are used for emphasis or to refer to another document.
COMPUTER FONT indicates text visible on a computer screen.
DISPLAY FONT indicates text visible on the printer control panel display.
The cursive letter l is used in examples to distinguish the letter l from
the numeral 1 (one). The character 0 is used in examples to distinguish
the numeral 0 from the letter O.
[Key Face] indicates keys (such as [On]Line] ) on the printer control
panel.
[Key Face] indicates keys (such as [Insert] ) on your computer
keyboard.
Note
Notes contain important information about a topic in the text.
CAUTION
Caution messages appear before procedures which, if not observed,
could result in loss of data or in damage to equipment.
WARNING
Warning messages alert you to a specific procedure or practice
which, if not followed correctly, could cause serious personal injury.
iii
Supplementary Documents
The technical reference guides listed below are designed for
programmers. The Paper Specification Guide is useful for purchasing
agents and paper buyers. These documents are available in English only.
You can order these documents through HP Direct Distribution or by
contacting your authorized HP dealer. (See Appendix E for a list of HP
sales and service offices.) There is a charge for some documents.
Documentation Available for the HP LaserJet 5Si/5Si MX/5Si NX Printers
Title
Part Number
The PCL/PJL Technical Reference Package contains the following
documents:
5010-3997
• PCL 5 Printer Language Technical Reference Manual
Explains the PCL 5 printer language for experienced users and
programmers.
• Printer Job Language Technical Reference Manual
Explains HP’s Printer Job Language (PJL) for experienced users and
programmers.
• PCL/PJL Technical Quick Reference Guide
• PCL Comparison Guide
Describes the different implementation of commands and extensions
across the printer family supporting PJL and PCL 5.
HP LaserJet Printer Family Paper Specification Guide
5010-6394
HP JetDirect Print Server Software Installation Guide
5963-6599
The following related documents provide further information about the
PostScript printer language:
• The PostScript Language Reference Manual (Adobe)
• PostScript Language Supplements (Adobe)
Also check the README files that come with the software.
iv
TABLE OF CONTENTS
Conventions . . . . . . . . . . . . . . . . . . . . . . . . . . . .
Supplementary Documents . . . . . . . . . . . . . . . . . . . .
i-iii
i-iv
1 About Your Printer
Introduction . . . . . . . . . . . . . . . . . . . . . . . . . . . .
Standard Features of the HP LaserJet 5Si/5Si MX/5Si NX Printer
Paper Handling . . . . . . . . . . . . . . . . . . . . . . . . .
Memory Management . . . . . . . . . . . . . . . . . . . . .
Printing System . . . . . . . . . . . . . . . . . . . . . . . . .
Input/Output . . . . . . . . . . . . . . . . . . . . . . . . . .
Energy Efficiency . . . . . . . . . . . . . . . . . . . . . . . .
EconoMode . . . . . . . . . . . . . . . . . . . . . . . . . . .
PCL Fonts . . . . . . . . . . . . . . . . . . . . . . . . . . . .
Special Features of the HP LaserJet 5Si MX Printer . . . . . . .
Additional Memory . . . . . . . . . . . . . . . . . . . . . . .
Networking Capabilities . . . . . . . . . . . . . . . . . . . .
PostScript Fonts . . . . . . . . . . . . . . . . . . . . . . . . .
Special Features of the HP LaserJet 5Si NX Printer . . . . . . .
Memory Management . . . . . . . . . . . . . . . . . . . . .
Networking Capabilities . . . . . . . . . . . . . . . . . . . .
Printer Parts . . . . . . . . . . . . . . . . . . . . . . . . . . . .
Accessories and Options . . . . . . . . . . . . . . . . . . . . . .
The Optional Printer Hard Disk . . . . . . . . . . . . . . . . . .
1-1
1-4
1-4
1-5
1-5
1-6
1-6
1-6
1-7
1-8
1-8
1-8
1-9
1-10
1-10
1-10
1-11
1-13
1-14
2 Memory and Memory Management
Introduction . . . . . . . . . . . . . . . . . .
Storing Print Data . . . . . . . . . . . . . . .
Saving Resources . . . . . . . . . . . . . .
Determining Memory Requirements . . . . .
Improving Performance with I/O Buffering
.
.
.
.
.
.
.
.
.
.
.
.
.
.
.
.
.
.
.
.
.
.
.
.
.
.
.
.
.
.
.
.
.
.
.
.
.
.
.
.
.
.
.
.
.
.
.
.
.
.
2-1
2-2
2-2
2-3
2-4
Printing System . . . . . . . . . . . . . . . . . . .
Drivers . . . . . . . . . . . . . . . . . . . . . . . .
What is a Driver? . . . . . . . . . . . . . . . . .
HP LaserJet 5Si/5Si MX/5Si NX Printer Drivers
Software Components . . . . . . . . . . . . . . . .
End-User Software . . . . . . . . . . . . . . . .
Network Administrator Software . . . . . . . . .
.
.
.
.
.
.
.
.
.
.
.
.
.
.
.
.
.
.
.
.
.
.
.
.
.
.
.
.
.
.
.
.
.
.
.
.
.
.
.
.
.
.
.
.
.
.
.
.
.
3-1
3-3
3-3
3-4
3-6
3-6
3-7
3 Printer Software
EN
TABLE OF CONTENTS-1
4 Printer Control Panel
Introduction . . . . . . . .
Control Panel Layout . . .
Indicator Lights . . . . .
Control Panel Keys . . .
Control Panel Display .
Settings and Defaults . .
Control Panel Menus . . .
Selecting a Menu Item .
Tray Menu . . . . . . .
Job Control Menu . . .
Test Menu . . . . . . . .
PCL Menu . . . . . . .
Configuration Menu . .
Print Quality Menu . . .
PostScript Menu . . . .
Input/Output (IO) Menu
.
.
.
.
.
.
.
.
.
.
.
.
.
.
.
.
.
.
.
.
.
.
.
.
.
.
.
.
.
.
.
.
.
.
.
.
.
.
.
.
.
.
.
.
.
.
.
.
.
.
.
.
.
.
.
.
.
.
.
.
.
.
.
.
.
.
.
.
.
.
.
.
.
.
.
.
.
.
.
.
.
.
.
.
.
.
.
.
.
.
.
.
.
.
.
.
.
.
.
.
.
.
.
.
.
.
.
.
.
.
.
.
.
.
.
.
.
.
.
.
.
.
.
.
.
.
.
.
.
.
.
.
.
.
.
.
.
.
.
.
.
.
.
.
.
.
.
.
.
.
.
.
.
.
.
.
.
.
.
.
.
.
.
.
.
.
.
.
.
.
.
.
.
.
.
.
.
.
.
.
.
.
.
.
.
.
.
.
.
.
.
.
.
.
.
.
.
.
.
.
.
.
.
.
.
.
.
.
.
.
.
.
.
.
.
.
.
.
.
.
.
.
.
.
.
.
.
.
.
.
.
.
.
.
.
.
.
.
.
.
.
.
.
.
.
.
.
.
.
.
.
.
.
.
.
.
.
.
.
.
.
.
.
.
.
.
.
.
.
.
.
.
.
.
.
.
.
.
.
.
.
.
.
.
.
.
.
.
.
.
.
.
.
.
.
.
.
.
.
.
.
.
.
.
.
.
.
.
.
.
.
.
.
.
.
.
.
.
.
.
.
.
.
.
.
.
.
.
.
.
4-1
4-2
4-2
4-3
4-4
4-5
4-7
4-7
4-8
4-9
4-10
4-23
4-24
4-26
4-27
4-28
Introduction . . . . . . . . . . . . . . . . . . . . . . . . . .
Print Source and Media Options . . . . . . . . . . . . . . .
Media Selection Guidelines . . . . . . . . . . . . . . . .
Media Use Guidelines . . . . . . . . . . . . . . . . . . .
Paper Trays 1, 2, 3, and (optional) Tray 4 . . . . . . . . . . .
Loading Media Into Tray 1 (Multi-purpose) . . . . . . . .
Loading Paper into Tray 2 or Tray 3 . . . . . . . . . . . .
Optional 2000 Sheet Input Tray . . . . . . . . . . . . . . . .
Loading Paper into Tray 4 . . . . . . . . . . . . . . . . .
Envelopes in Tray 1 . . . . . . . . . . . . . . . . . . . . . .
Loading Envelopes into Tray 1 . . . . . . . . . . . . . . .
Printing Envelopes from Your Software Application . . .
Optional Envelope Feeder . . . . . . . . . . . . . . . . . . .
Printing from the Optional Envelope Feeder . . . . . . . .
Changing Media Type and Size from the Control Panel . . .
Output Bins . . . . . . . . . . . . . . . . . . . . . . . . . .
Selecting the Left Output Bin . . . . . . . . . . . . . . .
Adjusting the Paper Stop . . . . . . . . . . . . . . . . . .
Printing to the Multibin Mailbox or Mailbox with Stapler
Stapling Documents . . . . . . . . . . . . . . . . . . . .
Different First Page . . . . . . . . . . . . . . . . . . . . . .
Custom Size Paper in Tray 1 . . . . . . . . . . . . . . . . .
Printing on the Smallest-Sized Paper . . . . . . . . . . .
Printing Bleeds . . . . . . . . . . . . . . . . . . . . . . .
Two-Sided Printing with the Duplex Unit . . . . . . . . . . .
Binding Options . . . . . . . . . . . . . . . . . . . . . .
Selecting Two-Sided Printing from the Control Panel . . .
Stopping a Print Request . . . . . . . . . . . . . . . . . . .
.
.
.
.
.
.
.
.
.
.
.
.
.
.
.
.
.
.
.
.
.
.
.
.
.
.
.
.
.
.
.
.
.
.
.
.
.
.
.
.
.
.
.
.
.
.
.
.
.
.
.
.
.
.
.
.
.
.
.
.
.
.
5-1
5-2
5-3
5-5
5-8
5-9
5-11
5-13
5-14
5-16
5-17
5-18
5-19
5-19
5-21
5-22
5-25
5-26
5-27
5-28
5-30
5-31
5-31
5-32
5-33
5-34
5-34
5-35
5 Print Tasks
TABLE OF CONTENTS-2
EN
6 Print Quality
Introduction . . . . . . . . . . . . . . . . . . . . . . . . . . . .
Print Resolution . . . . . . . . . . . . . . . . . . . . . . . . . .
Changing the Print Resolution Setting from the Control Panel
Print Density . . . . . . . . . . . . . . . . . . . . . . . . . . . .
Adjusting Print Density from the Control Panel . . . . . . . .
Resolution Enhancement . . . . . . . . . . . . . . . . . . . . .
Activating REt from the Control Panel . . . . . . . . . . . . .
Solving Print Quality Problems . . . . . . . . . . . . . . . . . .
EconoMode . . . . . . . . . . . . . . . . . . . . . . . . . . . .
Turning on EconoMode . . . . . . . . . . . . . . . . . . . . .
6-1
6-2
6-2
6-3
6-3
6-4
6-4
6-5
6-9
6-10
7 Maintenance and Troubleshooting
Introduction . . . . . . . . . . . . . . . . . . . . . . .
Cleaning Tasks . . . . . . . . . . . . . . . . . . . . . .
Cleaning the Printer . . . . . . . . . . . . . . . . . .
Toner Cartridge . . . . . . . . . . . . . . . . . . . . .
Extending Toner Cartridge Life . . . . . . . . . . .
Storing and Installing the Toner Cartridge . . . . . .
HP Policy on Use of Non-HP Toner Cartridges . . .
Redistributing Toner in the Cartridge . . . . . . . . .
Clearing the TONER LOW Message . . . . . . . . .
Optional Stapler . . . . . . . . . . . . . . . . . . . . .
Loading Staples . . . . . . . . . . . . . . . . . . . .
Clearing Staple Jams . . . . . . . . . . . . . . . . .
Troubleshooting Checklist . . . . . . . . . . . . . . . .
Printer Response Problems . . . . . . . . . . . . . .
Software, Computer, and Printer Interface Problems
Problems with Accessories . . . . . . . . . . . . . .
Paper Jams . . . . . . . . . . . . . . . . . . . . . . . .
Repeated Paper Jams . . . . . . . . . . . . . . . . .
Printer Messages . . . . . . . . . . . . . . . . . . . . .
Calling for Help . . . . . . . . . . . . . . . . . . . . .
.
.
.
.
.
.
.
.
.
.
.
.
.
.
.
.
.
.
.
.
.
.
.
.
.
.
.
.
.
.
.
.
.
.
.
.
.
.
.
.
.
.
.
.
.
.
.
.
.
.
.
.
.
.
.
.
.
.
.
.
.
.
.
.
.
.
.
.
.
.
.
.
.
.
.
.
.
.
.
.
.
.
.
.
.
.
.
.
.
.
.
.
.
.
.
.
.
.
.
.
7-1
7-1
7-2
7-3
7-3
7-3
7-3
7-4
7-5
7-6
7-6
7-7
7-8
7-8
7-10
7-16
7-23
7-35
7-36
7-48
.
.
.
.
.
.
.
.
.
.
.
.
.
.
.
.
.
.
.
.
.
.
.
.
.
.
.
.
.
.
.
.
.
.
.
.
.
.
.
.
.
.
.
.
.
.
.
.
.
.
A-1
A-3
A-4
A-4
A-4
A-5
A-6
A-6
A-6
A-7
A Specifications
Location Requirements . . . . . . . .
Printer Specifications . . . . . . . .
Regulatory Statements . . . . . . . . .
FCC Regulations . . . . . . . . . .
Canadian DOC Regulations . . . .
VCCI Statement (Japan) . . . . . .
Safety Information . . . . . . . . . . .
Laser Safety . . . . . . . . . . . . .
Material Safety Data Sheet (MSDS)
Laser Statement for Finland . . . .
EN
.
.
.
.
.
.
.
.
.
.
.
.
.
.
.
.
.
.
.
.
.
.
.
.
.
.
.
.
.
.
.
.
.
.
.
.
.
.
.
.
.
.
.
.
.
.
.
.
.
.
.
.
.
.
.
.
.
.
.
.
.
.
.
.
.
.
.
.
.
.
.
.
.
.
.
.
.
.
.
.
.
.
.
.
.
.
.
.
.
.
TABLE OF CONTENTS-3
B PCL Printer Commands (Escape Sequences)
PCL Printer Command Syntax
Escape Character . . . . . .
Setup Strings . . . . . . . .
PCL Font Selection . . . . . .
.
.
.
.
.
.
.
.
.
.
.
.
.
.
.
.
.
.
.
.
.
.
.
.
.
.
.
.
.
.
.
.
.
.
.
.
.
.
.
.
.
.
.
.
.
.
.
.
.
.
.
.
.
.
.
.
.
.
.
.
.
.
.
.
.
.
.
.
.
.
.
.
B-1
B-2
B-3
B-3
C Memory and Personality SIMM Installation
Installing a SIMM Board . . . .
Testing a SIMM Board . . . . .
Verifying a Memory SIMM .
Verifying a PostScript SIMM
.
.
.
.
.
.
.
.
.
.
.
.
.
.
.
.
.
.
.
.
.
.
.
.
.
.
.
.
.
.
.
.
.
.
.
.
.
.
.
.
.
.
.
.
.
.
.
.
.
.
.
.
.
.
.
.
.
.
.
.
.
.
.
.
.
.
.
.
C-2
C-4
C-4
C-5
.
.
.
.
.
.
.
.
.
.
.
.
.
.
.
.
.
.
.
.
.
.
.
.
.
.
.
.
.
.
.
.
.
.
.
.
.
.
.
.
.
.
.
.
.
.
.
.
.
.
.
.
.
.
.
.
.
.
.
.
.
.
.
.
.
.
.
.
.
.
.
.
.
.
.
.
.
.
.
.
.
.
.
.
.
.
.
.
.
.
.
.
.
.
.
.
.
.
.
.
.
.
.
.
.
.
.
.
.
.
.
.
.
.
.
.
.
.
.
.
.
.
.
.
.
.
.
.
.
.
D-1
D-1
D-2
D-2
D-2
D-3
D-3
D-3
D-4
D-5
D Warranty and Software License
HP Maintenance Agreements . . . . .
On-Site Service Agreements . . . .
Warranty . . . . . . . . . . . . . . . .
One-Year On-Site Limited Warranty
Exclusions . . . . . . . . . . . . .
Warranty Limitations . . . . . . . .
Service During the Warranty Period
Service After the Warranty Period .
Repacking Guidelines . . . . . . . . .
HP Software Product License . . . . .
.
.
.
.
.
.
.
.
.
.
E HP Customer Services and Sales
HP Support, Sales, and Service Information . . . . . . . . . . . .
Customer Support . . . . . . . . . . . . . . . . . . . . . . . .
Sales and Services . . . . . . . . . . . . . . . . . . . . . . . .
E-1
E-1
E-4
INDEX
TABLE OF CONTENTS-4
EN
1
About Your Printer
Introduction
This chapter introduces the features of the HP LaserJet 5Si/5Si MX and
5Si NX printers.
Table 1-1 lists the printer’s standard features.
Table 1-1
Standard Printer Features
Feature
Description
Speed/Performance
• 24 pages per minute
• 40 Megahertz AMD processor
Print Resolution
• 600 x 600 dots per inch with
Resolution Enhancement
technology (REt)
• More than 120 levels of gray
• Microfine toner
Memory
• 4 (5Si/5Si NX) or 12 (5Si MX)
MBytes of RAM , expandable
using industry standard SIMMs
• Memory Enhancement
Technology (MEt) automatically
compresses data to use RAM
more efficiently
Languages/Fonts
• HP PCL 5e
• Printer Job Language (PJL)
• Printer Management Language
(PML)
• 45 scaleable PCL fonts
(plus 65 additional fonts with HP
FontSmart)
EN
About Your Printer 1-1
Feature
Description
Languages/Fonts available only
• 39 scaleable PostScript fonts
with PostScript SIMM (Optional on
5Si/5Si NX, Standard on 5Si MX) • Auto language switching
• Adobe PostScript Level 2
Paper Handling (Input)
• Tray 1: A multipurpose tray for
paper, transparencies, and
envelopes. Capacity is up to 100
sheets with standard paper
• Trays 2 and 3 accept up to 500
sheets each, and automatically
sense paper size. These trays
should be used for paper only
Paper Handling (Output)
• Top output bin holds up to 500
sheets of standard paper only,
and automatically senses when
full
• Left output bin holds up to 100
sheets of paper, usable for
envelopes, transparencies, or
standard paper
Software
• Full-function printer drivers (PCL
and PostScript) for all major
operating systems
• HP JetAdmin network printer
software for all major operating
systems
• Improved document production
and monitoring capability
• Transparent access to printer
capabilities and information in
Windows 95 and Windows 3.1
Connectivity
• HP JetDirect Print Server
(Standard on 5Si MX, optional
on 5Si/5Si NX)
• Bi-directional parallel port with
ECP and MLC support
• One available MIO slot for
optional I/O. (2 available on 5Si)
1-2 About Your Printer
EN
Environmental features
• EconoMode reduces toner
consumption
• Power Save setting (meets
Energy Star guidelines)
• High content of recyclable
components and materials
• 15,000-page toner cartridge
capacity (average)
Duty Cycle
• 100,000 pages per month
The HP LaserJet 5Si Printer is shown in Figure 1-1.
Figure 1-1
HP LaserJet 5Si Printer
EN
About Your Printer 1-3
About Your Printer
Description
1
Feature
Standard Features of the HP LaserJet
5Si/5Si MX/5Si NX Printer
The HP LaserJet 5Si/5Si MX/5Si NX printer provides 24-ppm
(pages-per-minute) printing of Letter or ISO A4 paper at true 600-dpi
(dots-per-inch) resolution. Your printer handles a wide variety of paper
weights and sizes, including wide format paper 11 x 17 in (279 x 432
mm).
Paper Handling
HP JetAssist, Hewlett Packard’s trademark for an accessible
paper-handling architecture, is available in the HP LaserJet 5Si/5Si
MX/5Si NX printers. It enables intelligent, friendly communication with
paper-handling devices, making them easy to use.
Table 1-2 identifies each tray and bin with the specific capacity and the
media each supports. Tray 1, the multi-purpose tray, accommodates all
media types and sizes. Trays 2 and 3 are equipped with sensors that
automatically detect the size of paper you have loaded and the amount
of paper in the tray.
Optional paper handling accessories are available through your HP
dealer. They are described later in this chapter.
Table 1-2
Tray or Bin
Input
Trays
Paper Handling
Capacity
Media
Tray 1
up to 100 sheets Paper: Letter, ISO A4, Executive, Legal, 11 x 17 in
(multi-purpose)
(279 x 432 mm), ISO A3, JIS B5, JIS B4
Maximum size: 11.7 x 17.7 in (297 x 450 mm)
Minimum size: 3.9 x 7.5 in (99 x 191 mm)
Other media: transparencies and sheets of labels
Envelopes: Commercial #10, C5, DL, Monarch,
ISOB5
Tray 2
up to 500 sheets Paper: Letter, ISO A4, Legal, JIS B4
Tray 3
up to 500 sheets Paper: Letter, ISO A4, Legal, JIS B4, ISO A3, 11
x 17 in (279 x 432 mm)
Tray 4
(optional)
up to 2000 sheets Paper: Letter, ISO A4, Legal, JIS B4, ISO A3, 11
x 17 in (279 x 432 mm)
1-4 About Your Printer
EN
Tray or Bin
Capacity
Media
up to 100 sheets Paper: Letter, ISO A4, Executive, Legal, 11 x 17 in
(279 x 432 mm), ISO A3, JIS B5, JIS B4
Addressable
Mailbins
(optional)
up to 250 sheets Paper: Letter, ISO A4, Legal, JIS B4, ISO A3, 11 x
per bin
17 in (279 x 432 mm), ISO A3, JIS B5, JIS B4
No envelopes, transparencies, or labels
Stapler Bin
(optional)
up to 350 sheets Paper: Letter, ISOA4 ONLY
Memory Management
The 5Si is equipped with 4 MByte RAM and can be expanded to 132
MBytes maximum. To allow for expansion, the printer has 4 slots for
Single Inline Memory Modules, which accept 2, 4, 8, 16, or 32
megabytes of RAM each. The 5Si MX ships with an 8 MByte SIMM
installed for a total of 12 MBytes.
Memory Enhancement Technology (MEt) automatically compresses
page data to provide the most efficient use of the printer’s RAM.
For more information on memory management, see Chapter 2,
“Memory and Memory Management”.
Printing System
Included with your HP LaserJet 5Si/5Si MX/5Si NX Printer is a CD
containing the HP LaserJet 5Si/5Si MX/5Si NX/5Si Mopier Printing
System (hereafter called the Printing System.). On the Printing System
CD are software components and drivers that benefit end users and
network administrators by providing full-feature support and
management capabilities for your printer.
The Printing System includes software designed for end users operating
in the following environments:
•
•
•
•
•
Microsoft Windows 3.1x
Microsoft Windows 95
Microsoft Windows NT 3.51 and 4.0
IBM OS/2 version 2.0 or greater
Apple Macintosh System 7 or greater
It also includes software for network administrators using the following
network operating systems:
EN
About Your Printer 1-5
About Your Printer
Left Output
Bin (face-up)
1
Output Top Output Bin up to 500 sheets Paper: Letter, ISO A4, Executive, Legal, 11 x 17 in
Bins
(face-down)
(279 x 432 mm), ISO A3, JIS B5, JIS B4
•
•
•
•
Novell NetWare 3.x or 4.x
Microsoft Windows NT 3.51 and 4.0
IBM LAN Server 3.0 or greater
Apple AppleTalk
For more information about software and drivers, see Chapter 3,
“Printer Software.”
Input/Output
A built in Bi-Tronics parallel interface allows high-speed two-way
communication between the printer and your computer. Two MIO slots
allow for extended connectivity. If serial connection is required, contact
an authorized HP dealer for information about an optional serial MIO
card or a serial-to-parallel converter.
The HP JetDirect Print Server (standard on the 5Si MX/5Si NX and
available as an option on the 5Si) allows the printer to function through
most networks without a separate print server.
Energy Efficiency
The printer’s Power Save feature conserves electricity by substantially
reducing power consumption when idle for a user-specified length of
time. As an EPA Energy Star partner, Hewlett-Packard has determined
that this product meets the Energy Star guidelines for energy efficiency.
You may change the POWER SAVE DELAY from the default of 1 hour.
This item is located in the CONFIGURATION MENU on the printer control
panel.
EconoMode
EconoMode reduces the amount of toner applied to the printed page and
is ideal for printing document drafts. When EconoMode is on, the print
on the page appears significantly lighter but is still readable.
(EconoMode has no effect on the speed of the printer or the amount of
energy used—it only conserves toner.)
1-6 About Your Printer
EN
1
PCL Fonts
Figure 1-2
PCL Fonts
EN
About Your Printer 1-7
About Your Printer
The printer comes with 35 scaleable fonts, as well as 10 True Type fonts.
You can scale True Type fonts within the printer. You also receive
matching True Type screen fonts for true WYSIWYG, short for “what
you see is what you get.” These internal fonts are part of the PCL
language. PCL font samples appear in Figure 1-2.
Special Features of the HP LaserJet 5Si
MX Printer
The HP LaserJet 5Si MX printer is configured with additional memory,
Hewlett-Packard’s PCL 5 language, Adobe’s PostScript Level 2
language, and an HP JetDirect print server that allows you to connect
your printer to Ethernet or Local Talk networks.
Additional Memory
The HP LaserJet 5Si MX contains 12 MBytes of installed memory. By
adding optional SIMMs with 2,4,8,16, or 32 MBytes, you can increase
memory to a total of 76 MBytes.
Networking Capabilities
The HP LaserJet 5Si MX printer’s factory-installed HP JetDirect print
server allows you to connect your printer directly to your Local Area
Network (LAN). The HP JetDirect automatically switches among
networked protocols, so a single printer can serve many networks at
once or be moved to a new network with no additional hardware
investment.
The HP JetDirect print server supports the following network operating
systems:
• Novell NetWare 286 v. 2.15c and beyond; 386 v. 3.11,3.12, 4.0, 4.01,
•
•
•
•
•
•
•
•
•
•
•
•
and 4.1
Microsoft LAN Manager for OS/2, v. 2.1
IBM LAN Server for OS/2, v. 3.0
Microsoft Windows and Windows for Workgroups, v. 3.1, 3.11
Apple Ether Talk
Apple Local Talk
Microsoft Windows NT, v. 1.0, 3.51, and 4.0
Microsoft Windows 95
HP-UX v. 8.0, 9.0, 10
SunOS v. 4.1.1, 4.1.2, 4.1.3
SCO UNIX V/386 v. 3.2.2, 3.2.4
Solaris v. 2.1, 2.2, 2.3, 2.4
IBM AIX v. 3.2.5
1-8 About Your Printer
EN
The HP LaserJet 5Si MX is configured with Adobe’s PostScript Level 2
language and includes 35 scaleable PostScript fonts. The 5Si/5Si NX
requires the optional Adobe PostScript SIMM be installed before this
option is available. Adobe’s PostScript Level 2 is compatible with earlier
versions of the language. PostScript font samples are shown in Figure
1-3.
Figure 1-3
Courier
Courier Oblique
Courier Bold
Courier Bold Oblique
Times Roman
Times Italic
Times Bold
Times Bold Italic
Symbol Σψµβολ
ITC Zapf Dingbats
PostScript Fonts
EN
About Your Printer 1-9
About Your Printer
PostScript Fonts
1
Clients may be DOS, Windows, Windows NT, OS/2, Macintosh, or
UNIX. Refer to the JetDirect documentation for further details.
Special Features of the HP LaserJet 5Si
NX Printer
The HP LaserJet 5Si NX printer is configured with Hewlett-Packard’s
PCL 5 language, and an HP JetDirect print server that allows you to
connect your printer to Ethernet networks.
Memory Management
The HP LaserJet 5Si NX printer contains 4 MBytes of installed memory,
and can be expanded to as much as 132 MBytes by adding optional
SIMMs with 2, 4, 8, 16, or 32 MBytes each.
Networking Capabilities
The HP LaserJet 5Si NX printer’s factory-installed HP JetDirect print
server allows you to connect your printer directly to your Local Area
Network (LAN). The HP JetDirect automatically switches among
networked protocols, so a single printer can serve many networks at
once or be moved to a new network with no additional hardware
investment.
The HP JetDirect print server supports the following network operating
systems:
• Novell NetWare 286 v. 2.15c and beyond; 386 v. 3.11,3.12, 4.0, 4.01,
•
•
•
•
•
•
•
•
•
•
and 4.1
Microsoft LAN Manager for OS/2, v. 2.1
IBM LAN Server for OS/2, v. 3.0
Microsoft Windows and Windows for Workgroups, v. 3.1, 3.11
Microsoft Windows NT, v. 1.0, 3.51, and 4.0
Microsoft Windows 95
HP-UX v. 8.0, 9.0, 10
SunOS v. 4.1.1, 4.1.2, 4.1.3
SCO UNIX V/386 v. 3.2.2, 3.2.4
Solaris v. 2.1, 2.2, 2.3, 2.4
IBM AIX v. 3.2.5
Clients may be DOS, Windows, Windows NT, OS/2, Macintosh, or
UNIX. Refer to the JetDirect documentation for further details.
1-10 About Your Printer
EN
1
Printer Parts
Figure 1-4
Key Printer Parts: Front View
1. Left Output Bin
7.
Tray 1 extensions
2. Control Panel
8.
Tray 1 Paper Width Guides
3. Top Output Bin
9.
Tray 2
4. Adjustable paper stop
10. Tray 3
5. Top cover
11. Power Switch
6. Tray 1 (multi-purpose)
12. Front door
EN
About Your Printer 1-11
About Your Printer
Figures 1-4 and 1-5 show the locations and names of key printer parts.
Figure 1-5
Key Printer Parts: Rear View
1. Printer Circuit Assembly (formatter board)
2. Printer’s Hard Disk (optional)
3. HP MIO slots (on the 5Si MX/5Si NX slot 1 contains the HP JetDirect Server)
4. Bi-Tronics parallel port
5. External Paper Handling Controller Board
6. SIMM slots
7. Power connector
8. Print engine serial number
1-12 About Your Printer
EN
1
Accessories and Options
Figure 1-6
Paper Handling Accessories and Options
1. Envelope Feeder
2. Duplex Unit
3. 2000-Sheet Input Tray
4. Multi-Bin Mailbox (provides mailbox, job seperation, and job stacking)
5. Mailbox with Stapler (provides mailbox, job seperation, job stacking, and stapling)
EN
About Your Printer 1-13
About Your Printer
As printing and network needs grow, you can increase the printer’s
capabilities by adding accessories and options. Figure 1-6 shows the
paper handling options available. These options are described in Table
1-3, along with other available options. Ordering information can be
found in Appendix E, “HP Sales and Customer Service”. Look for
information about using the accessories in Chapter 5, “Print Tasks.”
The Optional Printer Hard Disk
The Printer Hard Disk accessory can be used to permanently store
downloaded fonts and forms in the printer. Unlike standard printer
memory, items on the Printer Hard Disk remain in the printer even when
the printer is powered off.
Fonts downloaded to the Printer Hard Disk are available to all users of
the printer.
Macintosh Users can use the HP LaserJet Utility, and Windows users
can use the HP printer driver to download fonts. The Printer Hard Disk
can also be write-protected through software for additional security.
Refer to the online help associated with your HP Software for more
information. For the Macintosh environment, refer to the HP LaserJet
Utility Guide online help included with your HP LaserJet Utility
software. For the Windows environment, refer to your HP Windows
driver online help.
If you are a PostScript language programmer, refer to Adobe’s
PostScript Language Reference Manual for information about
downloading forms and patterns to the disk.
1-14 About Your Printer
EN
Table 1-3
Accessories and Options
1
Part Number
Description
Toner Cartridge
C3909A
Replacement toner cartridge
Stapler Cartridges
C3772A
3-pack of staple cartridges. Each cartridge
contains 2000 staples.
Memory upgrades
2 MByte—C3131A
4 MByte—C3132A
8 MByte—C3133A
16 MByte—C3146A
Additional printer memory
Adobe PostScript
Level 2 SIMM
C3169A
Adds Adobe’s PostScript Level 2 language to
the 5Si/5Si NX printers
Duplex Unit
C3762A
Provides duplexed (double-sided) printing
capability
Envelope Feeder
C3765A
Attaches to printer above Tray 1; holds up to
100 envelopes. Supports Commercial #10,
C5, DL, Monarch, ISO B5.
2000-Sheet Input
Tray
C3765A
Adjustable for Letter, Legal, 11x17, ISO A4,
ISO A3, JIS B4
Multi-Bin Mailbox
C3764A
Features eight bins holding up to 250 sheets
each
32 MB SIMMs are also available from third
party suppliers
Mailbox with Stapler C3774A
Features five bins holding up to 250 sheets
each and a stapler
HP parallel printer
cable (2 meter)
C2950A
HP-recommended IEEE-1284 Cable, with A
and B connectors
HP parallel printer
cable (3 meter)
C2951A
HP-recommended IEEE-1284 Cable, with A
and B connectors
Modular I/O and
Network Cards
J2550A
HP JetDirect Multi-protocol Network Card
with Ethernet/IEEE802.3 10Base-T
J2555A
HP JetDirect Multi-protocol Network Card with
Token Ring (DB9 and RJ45)
Printer Hard Disk
C2965A
420 MByte Hard Disk Drive for PCL and
PostScript
110V Maintenance
Kit
C3971A
Maintenance kit that contains replacement
rollers and fuser for 110V printers and
mopiers. May be purchased through an
HP-authorized dealer
220V Maintenance
Kit
C3972A
Maintenance kit that contains replacement
rollers and fuser for 220V printers and
mopiers. May be purchased through an
HP-authorized dealer
EN
About Your Printer 1-15
About Your Printer
Option
1-16 About Your Printer
EN
2
Memory and Memory Management
Introduction
The HP LaserJet 5Si/5Si NX printer comes with 4 MBytes of internal
memory and 4 SIMM slots to allow for memory expansion. The 5Si MX
features a pre-installed 8-MByte single inline memory module (SIMM)
for a total of 12 MBytes. Memory is added in increments of 2, 4, 8, 16,
or 32 MBytes. (Note that 32-MByte SIMMs are not available from HP;
contact third-party providers.)
The SIMM slots can also hold optional languages, fonts, and other
SIMM-based products. The 5SI MX comes with a SIMM for the
PostScript language installed in one of the slots.
Memory Enhancement technology (MEt), a standard HP LaserJet
printer feature, allows most documents to print using the standard
amount of memory. MEt automatically compresses data to print
complex pages.
EN
Memory and Memory Management 2-1
Storing Print Data
The print engine memory receives, holds, and processes data from
incoming print jobs. It manages downloaded resources, including PCL
language, soft fonts, symbol sets, macros, and patterns. The print engine
also stores PostScript fonts, forms, patterns, and dictionaries.
In heavy use installations, the optional 420-MByte hard disk is
recommended to optimize the functionality of your print engine.
Saving Resources
When two or more personalities (such as PCL and PostScript) are
installed, the print engine reserves a portion of memory for each
personality’s resources. This feature is called Resource Saving. It
enables the print engine to keep downloaded resources (such as fonts,
forms, and macros) in memory under most conditions.
Resource Saving is automatically available on the print engine. By
default, the print engine allocates resources to each print engine
personality, based on the amount of memory each personality needs.
Most users do not need to customize the Resource Saving configuration,
but you can change the amount of memory allocated to each print
engine personality.
See Chapter 4, “Printer Control Panel,” to learn how to configure
memory for your printer.
2-2 Memory and Memory Management
EN
Determining Memory Requirements
The amount of memory you need depends on the types of documents
you print. Your print engine can print most text and graphics at 300 or
600 dpi without additional memory.
Add memory to your print engine if you:
Table 2-1 presents the amount of memory required for the most common
print jobs using 600-dpi printing.
Table 2-1
Minimum Memory Requirements
PCL Minimum Memory PostScript
Requirements
Minimum
Memory
Requirements
Print Job
Paper Size
single-sided printing
Letter, A4, Legal
4 MBytes
9 MBytes
11 x 17 in, A3
4 MBytes
12 MBytes
Letter, A4
4 MBytes
12 MBytes
Legal
4 MBytes
14 MBytes
11 x 17 in, A3
10 MBytes
22 MBytes
two-sided printing
EN
Memory and Memory Management 2-3
Memory
Management
Commonly print complex graphics.
Use many temporarily downloaded fonts.
Print complex documents.
Print duplexed PostScript documents.
Use advanced functions (such as I/O Buffering and Resource Saving).
2
•
•
•
•
•
Improving Performance with I/O Buffering
When you select a print command from your software application, the
software sends your request to the print engine. To help you get back to
work more quickly, the print engine reserves a portion of its memory to
hold the file or page to be printed in an I/O buffer until it is the next to
be printed.
For each MByte of memory you add to your printer, 10 KBytes is
automatically reserved to hold print jobs in progress. The more memory
that is reserved, the greater the number of files or pages the printer can
store.
In most cases, it is to your advantage to let the printer automatically
reserve memory for I/O buffering. However, you may change the
amount of the I/O buffer by increments of 100 KBytes up to a maximum
of 10,000 KBytes.
See Chapter 4, “Printer Control Panel,” to learn how to use the printer’s
Input/Output (I/O) Menu to change the I/O buffer.
Note
When you change the I/O buffer setting, all downloaded resources are
deleted, unless they are stored on the optional hard disk.
2-4 Memory and Memory Management
EN
3
Printer Software
Printing System
Included with your HP LaserJet 5Si/5Si MX/5Si NX printer is a CD
containing the HP LaserJet 5Si /5Si MX /5Si Mopier Printing System.
On the Printing System CD are software components and drivers that
benefit end users and network administrators. The CD has two
partitions, one for Intel-based systems and one for Apple Macintosh
systems. When you insert the CD, the partition that corresponds to your
operating system is automatically made available to you. The other
partition will be hidden.
The Printing System includes software designed for end users operating
in the following environments:
•
•
•
•
•
Windows 3.1x
Windows 95
Windows NT 3.51 and 4.0
IBM OS/2 version 2.0 or greater
Apple Macintosh System 7 or greater
Additional drivers for Apple Macintosh GX System 7.5 or greater and
DOS WordPerfect 5.x and 6.x are available through your
Hewlett-Packard distributor or through electronic BBS channels.
The Printing System also includes software for network administrators
using the following network operating systems:
•
•
•
•
Novell NetWare 3.x or 4.x
Windows NT 3.51 and 4.0
IBM LAN Server 3.0 or greater
Apple AppleTalk
Network administration software for UNIX and Microsoft LAN
Manager is available through your Hewlett-Packard distributor or
through electronic BBS channels.
EN
Printer Software 3-1
The drivers and software components for end users and administrators
using the environments listed above are described in the following
sections.
3-2 Printer Software
EN
Drivers
What is a Driver?
A driver is a software program that enables your software applications to
access your printer’s features. For example, when you print a document,
the application sets up your print job with formatting commands such as
page breaks, font selections, paper tray selections, and number of copies.
The driver takes these commands, translates them into a printer language
(such as Hewlett-Packard’s Printer Control Language (PCL) or Adobe’s
PostScript), and then sends the job to the printer or printer. The driver’s
interface allows you to select various printer features that other software
applications don’t support directly, like automatic stapling.
Typically, a driver must be installed on your computer for each printer or
printer you are using.
Note
In some environments, the printer can send status information back to
the operating system. This capability is called bi-directional
communication, since information is sent to and from the printer. In a
bi-directional environment, the optional printer accessories are detected
and enabled in the driver automatically. In non-bi-directional
environments, accessories that are installed in your printer need to be set
manually in your driver.
EN
Printer Software 3-3
Printer Software
Most applications allow you to access the printer driver through the
Properties, Print, Print Setup, or Page Setup commands. Print job
settings selected through your application typically override equivalent
settings made through the printer driver. Printer settings made in the
application or printer driver typically override the corresponding setting
made on the printer control panel.
3
The information in this chapter applies to users of Windows (3.1x, NT,
or ‘95), OS/2, or the Macintosh OS. DOS applications must support
advanced printers directly. Users of WordPerfect v 5.x-6.x for DOS can
obtain a special driver from HP. Users of other DOS programs may be
able to print using a program driver designed for an earlier model of HP
LaserJet (or a PostScript driver), but may not be able to use some of the
advanced features of the printer. UNIX systems also work differently consult the documentation which accompanies the Printing System for
UNIX.
HP LaserJet 5Si/5Si MX/5Si NX Printer Drivers
Overview
The drivers for the HP LaserJet 5Si/5Si MX/5Si NX printers allow the
selection of printer features that may not be supported directly in your
software applications. These features allow you to:
•
•
•
•
Staple documents.
Print watermarks.
Print multiple page images on a single page (n-Up).
Print the first page of a document on one type of media and the
remaining pages on another type of media.
• Select the paper on which to print (by source or type).
• Select which output bin to send output to.
• Download fonts to the printer’s hard disk (if installed)
Access the drivers directly from your application. The steps needed to
access the drivers may vary from application to application. Typically,
they are accessed from the application’s File menu by selecting Print,
then Printer Options.
Note
To ensure the best performance when using collation, turn off the
collation feature in your application and turn it on in the driver. If an
installed accessory is not available in the driver, click the Accessories
tab and ensure that the accessory appears in the installed accessories list.
(If bi-directional communication is functioning, the Accessories tab will
not appear. The driver will automatically detect installed accessories.)
The following sections list the drivers available on the Printing System
CD. For more information on drivers, see the on-line help provided
within your selected driver.
PCL drivers
The Printing System includes PCL drivers for the following systems:
• Microsoft Windows 3.1x and Windows 95 (One driver that supports
both systems.)
• Microsoft Windows NT 3.51
• Microsoft Windows NT 4.0
• IBM OS/2 Version 2.0 or greater
3-4 Printer Software
EN
PostScript Drivers
The Printing System includes PostScript drivers for the following
systems:
•
•
•
•
•
•
Microsoft Windows 3.1x
Microsoft Windows 95
Microsoft Windows NT 3.51
Microsoft Windows NT 4.0
IBM OS/2 version 2.0 or greater
Apple Macintosh System 7 or greater
The PostScript drivers access Adobe’s PostScript Level 2 language.
They cannot be used on the 5Si/5Si NX without installing the optional
Adobe PostScript SIMM (a standard feature of the 5Si MX.)
Additional Drivers
The following drivers are available from your Hewlett-Packard
distributor or from electronic BBS channels:
EN
If a driver is not available, use an older HP LaserJet printer driver (such
as the HP LaserJet 4 printer driver) until a newer driver becomes
available. However, some of the advanced features of the new printer
may not be usable with an older driver. If the necessary software is not
listed in this chapter, contact your software manufacturer or distributor
and request software for the HP LaserJet 5Si family of printers.
Printer Software 3-5
Printer Software
Note
3
• Apple Macintosh GX System 7.5 or greater
• DOS WordPerfect 5.x and 6.x
Software Components
In addition to drivers, the Printing System includes the software
components listed below.
For End-Users:
•
•
•
•
HP Font Smart
HP Toolbox
DocWise
HP JetPrint
For Network Administrators:
• HP JetAdmin
• HP Print Server NLM
• Macintosh Utilities
• HP LaserJet Utility
• Bitmapped Screen Fonts
• HP Symbol Set utility for DOS
Install the software by following the procedures listed on the disk labels
or on the insert in the CD ROM package. Software application notes are
available by calling HP First. See the “Calling for Help” section of
Chapter 7 for the HP First phone number.
The software components listed above are described in the following
sections.
End-User Software
HP Font Smart
The HP Font Smart utility is a font management tool. It allows you to
display on your computer screen the 45 fonts included in your printer.
This approximation of screen display to printed result is known as
WYSIWYG, an acronym for “what you see is what you get.” The
printer’s fonts are automatically loaded and configured when you install
the Printing System. Samples of all the fonts available to you are located
in Chapter 1. (HP Font Smart is not needed on Macintosh systems.)
3-6 Printer Software
EN
HP JetPrint
HP JetPrint is printer management software available only to Windows
3.1x clients running under Novell NetWare. It allows users to view,
select, and print to all HP printers and printers on the network from one
screen. Users can view control panel messages and check the status and
progress of print jobs. Access HP JetPrint from the “Utilities” tab of
HP Toolbox.
HP Toolbox
HP Toolbox is a one-step access tool to document status, printer status,
and “Show-Me-How” information available to Windows 95 clients on
Novell NetWare that is installed as part of the Printing System. From the
Toolbox, which is accessed from the printer icon on the taskbar in
Windows 95, users can also configure printer alerts and launch other
utilities like HP Font Smart. (A subset of this functionality is available
for Windows 3.1 clients as well.)
DocWise
HP JetAdmin
HP JetAdmin is a printer management tool for network administrators.
With HP JetAdmin, a network administrator can remotely install,
configure, troubleshoot, manage, and set passwords for JetDirect
connected printers (as well as printers connected to file servers on
Novell NetWare.) Also, a network administrator can configure printer
accessories for network printers remotely.
HP JetAdmin is included on the Printing System CD for the following
operating environments:
• Novell NetWare 3.x, 4.x (from a Windows 3.1x or Windows 95
client)
• Windows NT 3.51, 4.0 (from a Windows 3.51 or 4.0 client)
• IBM LAN Server 3.0 or greater with clients running OS/2 version 3
or greater
EN
Printer Software 3-7
Printer Software
Network Administrator Software
3
DocWise is document monitoring software available to Windows 3.1
and 95 clients on Novell NetWare that is installed as part of the Printing
System. It provides status information on the document being printed or
on the status of the printer at the time the document was submitted. It
also includes helpful hints on using the printer.
Printer management software is available for the following systems
through your Hewlett-Packard distributor or through electronic BBS
channels:
• UNIX (HP-UX 9.x/10.x, Sun OS 4.1.3/4.1.4, or Solaris
2.2/2.3/2.4/2.5)
• Microsoft LAN Manager
To learn more about HP JetAdmin for the HP LaserJet 5Si family of
printers, see the HP JetDirect Print Server Software Installation Guide.
HP Print Server NLM
The Printing System includes Hewlett-Packard’s print server network
loadable module (NLM), which runs on NetWare 3.x and 4.x file
servers. It allows a network administrator to manage and control a
peripheral attached to a parallel port on a NetWare file server. HP’s Print
Server NLM (JETPS.NLM) can be used as a replacement for Novell’s
PSERVER.NLM. It services print queues on one or more file servers
and provides the same NetWare printing functionality as HP’s JetDirect
products. To run the Print Server NLM, HP JetAdmin must also be
installed.
Note
If the HP JetDirect Print Server (a hardware solution) is available, use
that in preference to the HP Print Server NLM (a software solution.)
This provides the same services and frees the server to concentrate on
other tasks.
Macintosh Utilities
The Macintosh software partition on the Printing System CD is only
accessible from Macintosh systems.
• HP LaserJet Utility
The HP LaserJet Utility allows the network administrator to configure
many printer features from the computer. This is especially helpful in a
network environment when the printer is not near your desktop. With
this utility you can:
• Name the printer, assign it to a zone on your network, download
files and fonts, and change many of the default settings
• Permanently download fonts to the printer’s hard disk (if installed)
• Monitor the status of networked printers
• Lock the printer control panel and set a password without leaving
your computer
3-8 Printer Software
EN
• Bitmapped Screen Fonts
The bitmapped screen fonts match your printer’s 35 internal PostScript
fonts, allowing you to see on screen how your printed page will look.
DOS Symbol Sets Utility
An additional utility is included with the Printing System. Use this
utility to print the symbol sets for each of the printer’s typefaces.
Symbol sets are collections of unique characters for international
languages, mathematical equations, legal citations, line drawings, and
other special applications.
Printing the Symbol Sets
1 Insert the Printing System CD.
2 At the DOS command prompt, switch to the drive where you inserted
the Printing System CD.
3 Type SYMSETS and press [Return] to start the utility.
4 At the DOS command prompt, type SYMSETS id number LPTx,
EN
Printer Software 3-9
Printer Software
Table 3–1 lists the symbol set names and identification numbers. This
table also shows which symbol sets are available for each typeface.
3
where id number is the PCL Symbol Set identification number and x is
the number of the printer port.
Table 3-1
PCL
Symbol
Set ID
DOS Symbol Sets
Typeface
Symbol Set
Antique Clarend.
Garmnd Letter
Albertus Olive Cond. Coronet Courier Antiqua Gothic
Line
CG
Printer Marigold Omega
CG
Univers
Times Univers Cond
8U
Roman-8
•
•
•
•
•
•
•
•
•
•
•
•
•
0N
ISO 8859-1 Latin 1
(previously called
ECMA 94 Latin 1)
•
•
•
•
•
•
•
•
•
•
•
•
•
2N
ISO 8859-2 Latin 2
•
•
•
•
5N
ISO 8859-9 Latin 5
•
•
•
•
10U
PC-8 (Default)
•
•
•
•
•
•
•
•
•
•
•
•
•
11U
PC-8 D/N
•
•
•
•
•
•
•
•
•
•
•
•
•
12U
PC-850
•
•
•
•
•
•
•
•
•
•
•
17U
PC-852
9T
PC-Turk
•
•
•
•
•
•
•
•
•
•
•
•
•
•
•
•
•
•
•
•
19U
Windows 3.1 Latin 1
(Microsoft calls it
ANSI)
•
•
•
•
•
•
•
9E
Windows 3.1 Latin 2
•
•
•
•
•
•
•
•
5T
Windows 3.1 Latin 5
•
•
•
•
•
•
•
•
•
•
•
•
•
7J
DeskTop
•
•
•
•
•
•
•
•
•
•
•
•
10J
PS Text
•
•
•
•
•
•
•
•
•
•
•
•
13J
Ventura International
•
•
•
•
•
•
•
•
•
•
•
•
14J
Ventura US
•
•
•
•
•
•
•
•
•
•
•
•
6J
Microsoft Publishing
•
•
•
•
•
•
•
•
•
•
•
•
8M
Math-8
•
•
•
•
5M
PS Math
•
•
•
•
6M
Ventura Math
•
•
•
•
15U
Pi Font
•
•
•
•
1U
Legal
•
•
•
•
•
•
•
•
•
•
•
•
•
1E
ISO United Kingdom*
•
•
•
•
•
•
•
•
•
•
•
•
•
0U
ASCII*
•
•
•
•
•
•
•
•
•
•
•
•
•
0S
ISO Swedish: names*
•
•
•
•
•
•
•
•
•
•
•
•
•
0I
ISO Italian*
•
•
•
•
•
•
•
•
•
•
•
•
•
2S
ISO Spanish*
•
•
•
•
•
•
•
•
•
•
•
•
•
1G
ISO German*
•
•
•
•
•
•
•
•
•
•
•
•
•
0D
ISO Norwegian*
•
•
•
•
•
•
•
•
•
•
•
•
•
1F
ISO French*
•
•
•
•
•
•
•
•
•
•
•
•
•
9U
Windows 3.0 Latin 1
(previously called
Windows)
•
•
•
•
•
•
•
•
•
•
•
•
•
•
•
•
•
•
•
•
•
•
•
•
12J
MC Text
19M
Symbol
579L
Wingdings
* These symbol sets are variations of the Roman-8 symbol set.
3-10 Printer Software
EN
4
Printer Control Panel
Introduction
This chapter describes the following topics:
• An introduction to the control panel and an explanation of how to use
each of its options.
• How to print text pages that show the current printer settings,
including the configurations for PCL and PostScript.
• Illustration of common messages displayed on the control panel.
The most convenient way to control the printer is through software
applications or the software that comes with the printer. In fact,
commands in the software override control panel settings. Refer to the
on-line help files associated with the software for more information.
Note
In this chapter, control panel refers to the control panel on the printer,
not to the Windows Control Panel. Menus refers to the menus on the
control panel display, not to menus on the computer screen. Reach the
printer menus by pressing the [Menus] key.
Use the printer control panel for overall configuration requirements or to
obtain printer status information. You also can use the control panel to
access printer features not supported by your software applications.
Note
EN
Refer to the HP JetDirect Print Server Software Installation Guide for
information about controlling the printer in a network environment. Also
refer to the online help files provided with HP JetAdmin and the HP
LaserJet Utility.
Printer Control Panel 4-1
Control Panel Layout
The control panel includes three indicator lights, five keys, and a 2-line
display (20 characters per line).
Figure 4-1
+
*
Printer Control Panel
Indicator Lights
The control panel indicator lights are described in the following table.
Table 4-1
Indicator
Light
On Line
Data
Attention
Indicator Lights
Appearance
Meaning
Action Required
On
Ready to print
No action required
Flashing
Going off-line
No action required
Off
Printer off-line
Read and respond to control panel
message.
On
Data being received or processed; more data
coming
No action required
Flashing
Data being received or processed
No action required
Off
No data being received or processed
No action required
On
Printer requires service
Note control panel message and
call for service.
Flashing
Printer needs attention
Read and respond to control panel
message.
Off
No messages or error conditions requiring attention No action required
4-2 Printer Control Panel
EN
Control Panel Keys
The function of each of the five keys on the control panel is labeled
above each key.
Figure 4-2
+
*
Control Panel Keys
The control panel arranges various printer options in a simple menu
structure similar to the levels of an outline. Each menu contains several
items. These items are operations the printer performs when you select
them.
Table 4-2 summarizes the function of each control panel key (examples
are provided later in this chapter).
Key
Function
[On Line]
Switches the state of communication between computer and printer to ON
(online) or OFF (offline). Stops printing as soon as possible.
[Menus]
Provides a menu system for obtaining status information or changing the
printer configuration.
[Items]
Cycles through the items on the selected menu. Menu items vary
depending on the options installed and configuration of other menu choices.
[+]
Steps through the item choices.
[Select *]
Selects a desired menu item choice.
EN
Printer Control Panel 4-3
Printer Control
Panel
Control Panel Keys
4
Table 4-2
Control Panel Display
The control panel presents messages about the printer in one or two lines
of the character display.
Figure 4-3
Control Panel Character Display
The control panel displays the following types of messages:
• Ready status messages mean the printer is ready to accept data.
• Printer status messages tell you what the printer is doing at a given
time. For example:
PROCESSING JOB
FROM TRAY 2
• Printer attendance messages tell you to perform some action, such as
adding paper or clearing a paper jam.
• Error messages communicate data and print errors. The printer stops
printing for ten seconds, displays a message, and then automatically
attempts to return to the online state.
• Service messages communicate a printer failure. Some errors can be
cleared by pressing the [Select *] key or by cycling power to the
printer (turn power off and then back on). Others stop all operations
and require service.
4-4 Printer Control Panel
EN
Settings and Defaults
The printer makes most printing decisions based on either temporary
settings or permanent defaults.
Note
Settings you send from software applications override equivalent printer
defaults.
Table 4-3
Settings and Defaults
Setting or
Default
Explanation
Temporary setting
A value set for the current print job by your software application. For
example, if your printer default is portrait, you can request your software
to print pages with a landscape orientation. This temporary setting
remains in effect until the current print job is finished.
Control panel
default
A value set at the control panel by selecting a menu item and pressing
[Select *]. An asterisk (*) next to the item name indicates that it is now
the default. The printer retains this new value even when power is
switched OFF.
Factory default
The value set for each menu item at the factory. Factory defaults
(permanent default settings) are listed in Table 4-4.
Restoring Factory Settings
1 With power off, press and hold [On Line].
2 Continue to hold [On Line] and turn the printer on (push power ON).
3 Hold [On Line] until this message appears:
Note
EN
By printing a PCL configuration page, you can see the current settings
and all the choices available. Refer to Figures 4-4 and 4-5 later in this
chapter.
Printer Control Panel 4-5
Printer Control
Panel
Factory defaults are listed in Table 4-4.
4
COLD RESET
This message is followed by the power-on self test message. Then the
following message appears:
RESTORING FACTORY
SETTINGS
until the printer system completes power-on initialization.
Table 4-4
Factory Default Settings
Menu Item
Default Setting
DISPLAY LANGUAGE=
ENGLISH
PAPER DESTINATION=
TOP OUTPUT BIN
PAPER SIZE=
LETTER or A4 (if 220 V)
PAPER TYPE=
PLAIN
ENVELOPE FEEDER SIZE=
COM10
ORIENTATION=
PORTRAIT
PERSONALITY=
AUTO
RESOLUTION ENHANCEMENT=
ON
PRINT DENSITY=
3
ECONOMODE=
OFF
2-SIDED=
OFF
BINDING=
LONG EDGE
PRINT POSTSCRIPT
ERRORS=
OFF
JAM RECOVERY=
OFF
PAGE PROTECT=
AUTO
RESOLUTION=
600 DOTS PER INCH
I/O TIMEOUT=
15 SECONDS
AUTO CONTINUE=
ON
TONER LOW=
STOP
POWER SAVE DELAY=
1 HOUR
RESOURCE SAVING=
AUTO
PARALLEL I/O SPEED
SETTING=
HIGH
IO BUFFER=
AUTO
IO SIZE=
10K
COLD RESET PAPER=
LETTER or A4 (if 220 V)
SERVICE MESSAGE=
OFF
DIAGNOSTICS=
OFF
4-6 Printer Control Panel
EN
Control Panel Menus
Pressing [Menus] gives you access to control panel menu options.
Menus appear in the following order:
•
•
•
•
•
•
•
•
Tray Menu
Job Control Menu
Test Menu
PCL Menu
Configuration Menu
Print Quality Menu
Input/Output (IO) Menu
PostScript Menu (on 5Si MX or 5Si/5Si NX with optional PostScript
SIMM)
• HP MIO 1 Menu (on 5Si MX/5Si NX or 5Si with optional MIO
board installed)
• HP MIO 2 Menu (if a second MIO card is installed)
Each of these menus is described in a separate table later in this chapter.
Selecting a Menu Item
1 Press [Menus] repeatedly until the menu you want appears.
2 Press [Items] repeatedly until the item you want appears.
3 Press [+] repeatedly until the setting you want appears.
5 Press [Menus] or [On Line] to exit.
Note
EN
In a menu mode, if no keys are pressed for approximately 30 seconds,
the system automatically returns to the top level and displays READY
(or an existing error or service message).
Printer Control Panel 4-7
Printer Control
Panel
next to your choice, indicating that it is now the default.
4
4 Press [Select *] to select and save your setting. An asterisk (*) appears
Tray Menu
This menu shows the paper status (type or size) of all available paper
trays.
Press [Items] repeatedly to see each tray size and type in turn.
Table 4-5 presents the messages that appear when you select each of the
menu items.
Table 4-5
Menu
Tray Menu
Item
ENVELOPE FEEDER
TYPE=PLAIN
ENVELOPE FEEDER
SIZE=COM10
TRAY MENU
Note
Explanation
Note: Available only if you have the optional
Envelope Feeder.
Type of envelopes available in the optional
Envelope Feeder. Provides selection of other types.
Note: Available only if you have the optional
Envelope Feeder.
Size of envelopes available in the optional
Envelope Feeder. Provides selection of other sizes.
TRAY 1
TYPE=LETTERHEAD
Type of media loaded in Tray 1 (multi-purpose).
Provides selection of other types.
TRAY 1
SIZE=LETTER
Size of media available in Tray 1. Provides
selection of other sizes.
TRAY 2
TYPE=PLAIN
Type of media available in Tray 2. Provides
selection of other types.
TRAY 3
TYPE=PLAIN
Type of media available in Tray 3. Provides
selection of other types.
TRAY 4
TYPE=PLAIN
Type of media available in optional 2000-Sheet
Input Tray (Tray 4). Provides selection of other
types.
Tray 1 and the optional Envelope Feeder do not have a sensor for
identifying paper size. If either is being used, you will also have a menu
item for media size. You must set the size of the paper loaded before
continuing. Paper sizes for Trays 2, 3, and 4 are automatically sensed.
4-8 Printer Control Panel
EN
Changing Paper Type from the Control Panel
1 Press [Menus] repeatedly until TRAY MENU appears.
2 Press [Items] repeatedly to scroll through the trays and their types.
3 Press [+] repeatedly to scroll through the paper type or size options.
4 Press [Select *] to save your choice.
Selecting media by type rather than source is similar to locking out the
tray(s), which is a feature of previous HP LaserJet printers. If letterhead
is loaded in Tray 1, and print on plain paper is selected in the driver, the
printer will not pull the letterhead paper from Tray 1. However, the
printer will pull from either of the other trays if plain paper is loaded,
and has been set on the printer control panel.
Job Control Menu
The Job Control Menu is used to cancel a current job or to eject data that
has been sent to the printer. The CANCEL JOB option will cancel the job
from the control panel. The FORMFEED option is useful when the data
light is on, but nothing is printing out. This situation occurs when the
application has not told the printer that it has finished sending data. This
commonly occurs when printing from DOS. Table 4-6 presents the
messages that appear after selecting each menu item.
Table 4-6
Menu
Job Control Menu
Item
FORMFEEDING is displayed. The online indicator
flashes until the page is delivered to the output bin.
Printer Control Panel 4-9
Printer Control
Panel
PRESS SELECT TO
FORMFEED
4
CANCEL JOB
Press [Select *]. STOPPING CHECK LAST PAGE
appears until the last page currently being printed
is placed in the output bin. PRESS SELECT TO
CANCEL JOB is displayed. If you press [Select *]
again, CANCELING JOB appears until the entire print
job is removed or deleted. To ignore job
cancellation, press [On Line].
JOB CONTROL MENU
EN
Explanation
Test Menu
Use selections from this menu to print configuration and font
demonstration pages. Samples of the printouts are presented on the
following pages with keys for interpreting the information. Table 4-7
presents the messages that appear after selecting each of the menu items.
Table 4-7
Menu
TEST MENU
Test Menu
Item
Explanation
PRINTING CONFIGURATION PAGE appears on the
control panel display. Two pages are printed. The
first page presents variables and default
information relating attributes such as paper,
memory, and I/O channels. See Figure 4-4a and
PCL
the key to Figure 4-4a for a sample and further
CONFIGURATION PAGE
explanation of the page. This page is similar to the
Self Test Page from other HP LaserJet printers.
The second page (Figure 4-4b) is a simple layout
of the menu structure with items and current
default settings for those items.
PRINTING CONFIGURATION PAGE appears on the
display. See Figure 4-5 and the key to Figure 4-5
for a sample and further explanation of the page.
POSTSCRIPT
CONFIGURATION PAGE (This option will not appear on the 5Si unless the
optional Adobe PostScript SIMM has been
installed.)
PCL FONT LIST
PRINTING FONT LIST appears on the display. The
page presents a list of fonts used by PCL. See
Figure 4-6 for a sample list.
POSTSCRIPT
FONT LIST
PRINTING FONT LIST appears on the display. The
PostScript Font List has samples of the 35 built-in
PostScript language fonts plus fonts downloaded to
the printer’s memory and optional printer hard disk
(if installed.) See Figure 4-7 for a sample list.
Continued on the next page.
4-10 Printer Control Panel
EN
Table 4-7
Test Menu, continued
Menu
Item
Explanation
TEST MENU
DISK DIRECTORY
PAGE
PRINTING DISK DIRECTORY appears on the display.
The directory shows all the resources stored on the
hard disk (such as fonts and forms) and their
directories (this option only appears if the optional
printer Hard Disk is installed.) See Figure 4-8 for a
sample list.
DEMO PAGES
PRINTING DEMO PAGES appears on the display.
PRINT ERROR LOG
PRINTING ERROR LOG appears on the display. This
log tracks the last 50 printer errors listed by the
number of their occurrences. See Figure 4-9 for a
sample list.
SHOW ERROR LOG
A list of errors will appear on the display. Use [+] to
scroll through the list.
PAPER PATH TEST
A user-configurable print test that checks the paper
path of the printer. Input tray and number of copies
can be selected.
4
Printer Control
Panel
EN
Printer Control Panel 4-11
Configuration
Page
Figure 4-4a
Sample PCL Configuration Page
4-12 Printer Control Panel
EN
Key to Figure 4-4a
1.
Printer Information lists printer specific statistics.
Serial Number shows the serial number of the print engine.
Formatter Number shows the serial number of the formatter board.
Firmware Datecode is an eight-digit date (YYYYMMDD) of the
internal code.
Processor Revision shows the revision number of the firmware
processor.
Page Count shows the number of pages printed.
Pages Since Last Power Cycle shows the number of pages printed
since the last time the printer was turned off.
Pages Since Last Maintenance shows the number of pages printed
since the time a maintenance kit was installed.
3.
Error Log shows the number of errors currently in the error log and
the last three errors that occurred.
4.
Memory shows the total amount of installed memory and indicates the
amount of available memory for PCL applications (such as font
downloading software). Information about the current I/O Buffering and
Resource Saving configuration appears here. If the printer does not
have enough memory installed to enable these two features, the
amount of additional memory needed appears.
5.
Security lists whether the control panel is locked, whether the control
panel has a security password, and if the optional hard disk has been
write-protected (if present.)
6.
Paper Handling Options lists the installed paper handling
accessories. These accessories may include the Duplex Unit, optional
Envelope Feeder, 2000-Sheet Input Tray, Multi-Bin Mailbox or Multi-Bin
Mailbox with Stapler.
7. HP MIO information is reserved for the HP MIO and network statistics.
For some installed MIO options, this block of information can be as
long as 20 lines and three columns.
EN
Printer Control Panel 4-13
Printer Control
Panel
Installed Personalities and Options lists printer languages and all
accessories that are installed.
4
2.
Figure 4-4b
PCL Menu Map Page
4-14 Printer Control Panel
EN
Key to Figure 4-4b
1.
Tray Menu lists the current media types settings for each tray, and the
media size for Tray 1.
2.
Job Control Menu shows the Cancel Job and Form Feed items.
3.
Test Menu lists the different available printer tests.
4.
PCL Menu lists the PCL font settings used by your printer.
5.
Configuration Menu lists the current settings for the configuration
items.
6.
Print Quality Menu lists the current settings for the different print
quality items.
7.
PostScript Menu lists the current settings for the two PostScript menu
items.
8.
IO Menu lists the current settings for the Parallel IO Speed and the IO
Timeout.
9.
HP MIO Menu(s) list the current settings for the HP MIO(s).
4
Printer Control
Panel
EN
Printer Control Panel 4-15
PostScript Configuration Page
™
HP LaserJet 5Si MX
342
Page Count
Adobe, Postscript, and the PostScript Logo are trademarks of Adobe Systems Incorporated which may be registered incertain jurisdictions.
Figure 4-5
PostScript Configuration Page
4-16 Printer Control Panel
EN
Key to Figure 4-5
1.
Settings (current printer control panel default settings and
product-specific information):
Printer Name is the name set by the user (a network name, for
instance).
Product Name is the HP LaserJet printer model.
PostScript Version refers to the version of PostScript installed (if
any.)
Copies indicates the default number of originals to be printed.
Resolution is either 600 or 300 dpi.
Resolution Enhancement indicates if Resolution Enhancement is
set to ON, OFF, or AUTO (see Chapter 6, “Print Quality”).
Halftone Type indicates the current halftone type.
EconoMode indicates whether EconoMode is ON or OFF (see
Chapter 6, “Print Quality”).
Wait Timeout shows how long PostScript waits for additional data.
Print Errors indicates if a PostScript error page is automatically
printed when a PostScript error occurs.
Jam Recovery indicates whether Jam Recovery is ON or OFF.
Manual Feed indicates whether Manual Feed is ON or OFF.
Duplex indicates whether the duplexing feature is ON or OFF.
Trays 1-4 indicate the media specified for each tray.
3.
Printable Area gives the dimensions within the margins of the image
area. The current default is shown in the hollow box.
4.
Disk Accessory show whether the optional printer hard disk is
present, and if so the total capacity of the printer’s hard disk, how many
bytes are available for use, and whether or not the hard disk is
write-protected.
5.
Page Count shows how many pages have been printed by the printer in
all printer languages. Use the page count to track printer use.
Printer Control Panel 4-17
Printer Control
Panel
Memory shows how much memory is installed in the printer. This value
may be useful for more experienced users, since PostScript Level 2
allows users to configure memory parameters. (See Adobe’s PostScript
Language Reference Manual for specific information about these values.)
4
EN
2.
Figure 4-6
PCL Font List
4-18 Printer Control Panel
EN
Key to Figure 4-6
1.
Font is the name of the font.
2.
Pitch/Point indicates the specified pitch or point size of the font.
“Scale” indicates a scaleable font.
3.
Escape Sequence (a PCL programming command) is used to select
the designated font.
4.
Font # is the number used to select internal or downloaded soft fonts
from the control panel. (Do not confuse the font number with the soft
font ID, described next.) The letter preceding the font number shows
the source of the font (I means Internal, and S means permanent soft
font, and M means SIMM - slot number follows).
5.
Font ID is the number the user assigns to soft fonts when downloading
them through software.
4
Printer Control
Panel
EN
Printer Control Panel 4-19
PostScript ROM Resident Fonts
™
Figure 4-7
PostScript Font List
4-20 Printer Control Panel
EN
Figure 4-8
Disk Directory Page
Key to Figure 4-8
2.
File Size lists the size of each file under the Directory/File Name
column. If a directory is listed on the line, then Directory appears in this
column and its path is listed in the Directory/File Name column.
3.
Directory/File Name lists the name of the file. Files in a sub-directory
are listed right after the directory line. The files are not necessarily
listed in alphabetic order.
Printer Control Panel 4-21
Printer Control
Panel
Disk Information indicates the disk model number, serial number,
capacity, available free space, and write protection status.
4
EN
1.
Figure 4-9
Error Log Page
Key to Figure 4-9
1.
Page Count lists the number of pages printed.
2.
Serial Number shows the serial number of the printer.
3.
Number indicates the order in which the errors occurred. The last
error to occur has the highest number.
4.
Error lists the internal error codes for the 50 most recent errors.
5.
Page Count indicates the number of pages printed when the error
occurred.
6.
Personality or Jam Cause indicates whether the error occurred
due to a problem within a printer personality or a paper jam.
4-22 Printer Control Panel
EN
PCL Menu
This menu is used to change the default PCL font settings used by your
printer. Table 4-8 presents the messages that appear when each of the
menu items is selected.
Table 4-8
Menu
PCL MENU
PCL Menu
Item
Explanation
SOURCE=
[INTERNAL*,SLOT
4,SLOT 3,SLOT 2,
SLOT 1,SOFT]
Indicates source of font information. Internal fonts
are those stored in the printer; slot numbers
correlate to font SIMMs that may be installed; and
soft fonts are those that have been manually
downloaded to the printer.
NUMBER=
[0,..22]
Each font is listed by a number. The default font
number can be manually changed here.
PITCH=
[0.44..99.99]
This entry displays the pitch of the default font.
The FORM setting is the number of lines that will
be printed per page. The default is 60 lines.
* Factory Default
EN
Printer Control Panel 4-23
Printer Control
Panel
FORM=
[60 LINES*,
5..128]
4
SYM SET=
This is the default symbol set, which is normally
[ROMAN-8*,ISO
Roman 8. The symbol set may be different
L1, ISO L2,ISO
depending on the application.
L5,PC-8,PC-8DN,
PC-850,PC-852,
PC-8 TK, WIN
L1,WIN L2,
WINL5,DESKTOP,PS
TEXT,VN INTL,VN
US,MS PUBL,
MATH-8,PS MATH,
VN MATH, PI
FONT, LEGAL,
ISO 4,ISO 6,ISO
11,ISO 15,ISO
17,ISO 21,ISO
60,ISO 69,WIN3.0]
Configuration Menu
The items on the Configuration Menu set default parameters for
two-sided printing, binding, selected output bin, printing personality,
auto continue, power saving, resource saving, page protection and the
display of maintenance messages when the toner supply is low or
service is needed. Table 4-9 presents the messages that appear when you
select each of these menu items.
Table 4-9
Configuration Menu
Menu
Item
Explanation
SERVICE MESSAGE=
[ON,OFF]
Appears at approximately 350,000-image intervals,
when the PERFORM USER MAINTENANCE message
appears.
2-SIDED=
[OFF*,ON]
Allows selection of duplex (two-sided) printing as
the default printing mode (only appears if the
optional Duplex Unit is installed.)
BINDING=
[LONG EDGE*,
SHORT EDGE]
Allows control of the binding edges of duplexed
documents (only appears if the optional Duplex
Unit is installed.) More information about binding
options is located in Chapter 5, “Print Tasks.”
Allows the selection of the default output bin. More
information about the output bins is located in
Chapter 5.
When an output bin is full of paper, printing is
CONFIGURATION MENU
PAPER DESTINATION= stopped and one of the following messages is
[TOP OUTPUT BIN*, displayed: REMOVE PAPER FROM TOP OUTPUT BIN or
LEFT OUTPUT BIN,
REMOVE PAPER FROM OPTIONAL OUTBIN n. Empty
OPTIONAL OUTBIN]
the bin to resume printing.
(Note that the Left Output Bin will not cause the bin
full message to be displayed.)
By selecting the Stapler (if installed) as the output
bin, you can have your documents stapled.
ORIENTATION=
[PORTRAIT*,
LANDSCAPE]
Sets the default orientation of the printed page. The
orientation setting in your software application
overrides the control panel setting.
POWER SAVE DELAY=
[1 HR*
2 HRS
3 HRS
OFF
15 MINUTES
30 MINUTES]
Allows you to change the setting for the time
interval the printer remains inactive prior to
entering Power Save mode. Warm up time for the
printer after the power save delay is approximately
60 seconds.
* Factory default.
Continued on the next page
4-24 Printer Control Panel
EN
Table 4-9
Configuration Menu, continued
Menu
Item
Explanation
AUTO CONTINUE=
[ON*,OFF]
Allows the printer to resume printing after
noncritical errors occur. If ON is selected, the
printer goes offline and the error message is
displayed for ten seconds. After ten seconds, the
printer automatically returns to online. If turned off,
the printer will remain offline until attended.
RESOURCE SAVE=
[AUTO*,OFF,ON]
Sets resource saving to ON, OFF, or AUTO (which
automatically determines how much memory to
use for each installed personality). When set to ON,
you can select a specific amount of memory for
resource saving.
PCL MEM=nnnnnK
or
POSTSCRIPT MEM=
nnnnnK
This item becomes visible only if Resource Save is
set to ON. The value nnnnnK indicates the number
of KBytes of memory reserved for that personality.
The choices for this item range from 0 to the total
amount of available memory in the printer in
100-KByte increments. Press [+] repeatedly to
increase reserved memory.
TONER LOW=
[STOP*,CONTINUE]
This item controls the printer action taken when low
toner levels are detected. By default, the printer will
stop. (As toner runs low, the quality of the printed
page will deteriorate.)
PAGE PROTECT=
[ON,AUTO*]
PAGE PROTECT appears after a 21 PRINT OVERRUN
error has occurred. Try to simplify the format of the
job. If you must print the job “as is,” set PAGE
PROTECT to ON, then later return it to AUTO. Do not
leave PAGE PROTECT set to ON as it will degrade
performance.
CONFIGURATION MENU
* Factory default.
EN
Printer Control Panel 4-25
Printer Control
Panel
Controls selection of the printer personality. The
choices available depend on which personalities
are installed. AUTO is the default, and allows the
printer to automatically determine the personality
needed for a given job.
4
PERSONALITY=
[AUTO*,PCL,
POSTSCRIPT]
Print Quality Menu
The Print Quality Menu allows you to change the physical
characteristics of the printed page. All choices are saved until the current
print job has ended, except for Print Density, which changes after a few
pages. See Chapter 6, “Print Quality,” for more information.
Table 4-10 presents the messages that appear when you select each of
the menu items.
Table 4-10
Print Quality Menu
Menu
PRINT QUALITY MENU
Item
Explanation
ECONOMODE= [OFF*,
ON]
Reduces the amount of toner on the printed page;
the result is similar to draft mode on some dot
matrix printers. (See Chapter 6.)
RESOLUTION=
(600*,300) DOTS
PER INCH
Prints at 300 or 600 dpi. If the printer is unable to
print a job at 600 dpi, it reverts to 300 dpi for the
remainder of the job.
RESOLUTION
ENHANCEMENT=
[OFF,ON*]
Prints fine quality characters and graphics by
smoothing the gradations along the angles and
curves of the printed image.
PRINT DENSITY=
[1,2,3*,4,5]
Varies the amount of toner applied to the paper
while printing. The higher the setting (5 is highest)
the darker the page; the lower the setting (1 is
lowest) the lighter the page.
Changes to this setting are effected during a print
job by stopping the receipt of new data, clearing
the printer of pages, changing the density, and then
resuming the print job.
* Factory default
4-26 Printer Control Panel
EN
PostScript Menu
This menu is only available if the Adobe PostScript SIMM is installed in
your printer. The HP LaserJet 5Si MX comes with PostScript
pre-installed. The HP LaserJet 5Si/5Si NX do not, but will accept the
SIMM as an upgrade.
Use this menu to print PostScript errors and to recover from paper jams.
Table 4-11 presents the messages that appear when you select each of
the menu items.
Table 4-11
Menu
PostScript Menu
Item
Explanation
PRINT POSTSCRIPT
ERRORS= [OFF*,ON]
Determines whether PostScript error messages
print.
JAM RECOVERY=
[OFF*,ON]
Determines whether PostScript attempts to recover
automatically from paper jams. Jam recovery uses
more memory and thus may affect performance.
POSTSCRIPT MENU
* Factory default.
4
Printer Control
Panel
EN
Printer Control Panel 4-27
Input/Output (IO) Menu
This menu contains the items related to I/O buffering. See Chapter 2,
“Memory and Memory Management,” for additional information about
the I/O functionality of your printer.
Table 4-12 presents the messages that will appear when you select each
of the menu items.
Table 4-12
Menus
IO Menu
Item
Explanation
PARALLEL IO
SPEED=[HIGH,LOW]
The rate at which data is transferred to print a page.
IO TIMEOUT=
[5 SEC,
10 SEC,
15 SEC*,
20 SEC,
30 SEC,
60 SEC,
120 SEC,
180 SEC,
240 SEC,
300 SEC]
The time, measured in seconds, that the printer
waits before ending an incomplete print job. Once
the item is selected, press [+] repeatedly to choose
the desired setting for best performance.
IO BUFFER=
[AUTO*,OFF,ON]
The portion of the printer memory set aside to hold
incoming data. When this item is set to AUTO, the
memory set aside for I/O buffering is automatically
determined by the printer based on available
memory. When it is set to ON, the size can be
manually adjusted. When it is set to OFF, no
memory is set aside. This menu item will NOT
appear in the menu unless sufficient memory is
available to allow I/O buffering. For PCL, the
standard 4 Mbytes of memory is sufficient. For
PostScript it will take more than 12 Mbytes of
memory. See Chapter 2 to learn how I/O buffering
improves performance.
Note: When the I/O buffer settings change, all
downloaded resources are deleted, unless they are
stored on the optional printer hard disk.
IO SIZE=
nnnK
Becomes visible only if IO BUFFER is set to ON. It is
used to set the size of the buffer. Once the item is
selected, press [+] repeatedly to reach the
increment value desired. If you hold down the [+]
key, the values speed the increments.
IO MENU
* Factory default.
4-28 Printer Control Panel
EN
5
Print Tasks
Introduction
This chapter explains how to:
• Print media from the best source.
• Load media into the input trays.
• Print a variety of media from Tray 1, including labels and
transparencies, custom-size paper, letterhead documents, preprinted
forms, and special papers.
• Print paper from the optional 2000-Sheet Input Tray (Tray 4).
• Verify the correct size and type of media in the paper trays.
• Print envelopes from Tray 1, from the optional Envelope Feeder, or
using a software application.
• Select print media and the output bins.
• Adjust the paper stop.
• Print to the optional Multi-Bin Mailbox or Mailbox with Stapler.
• Staple Documents with the optional Mailbox with Stapler
• Print the first page of a document on a different size or type of paper.
• Select two-sided printing with the Duplex Unit.
• Stop a print request.
• Print multiple copies of a document.
EN
Print Tasks 5-1
Print Source and Media Options
Your printer can print on the media identified in the following table
using the adjustable Trays 1, 2, 3, and (if installed) 4. The Duplex Unit
provides two-sided printing.
• Tray 1 (multi-purpose) holds up to 100 sheets of paper or up to 10
envelopes.
• Trays 2 and 3 hold up to 500 sheets of paper.
• An optional Tray 4 holds up to 2000 sheets of paper.
• An optional Envelope Feeder provides automatic feeding of up to 100
envelopes.
Note
Paper or envelope holding capacities may vary depending on paper
weight. Stated capacities refer to standard 20-lb bond paper.
CAUTION
Print heavy-weight papers, labels, maximum-size papers, and
transparencies only from Tray 1. The destination for heavy-weight
papers should be either the left or top output bins. Do not send
heavy-weight papers to the stapler or mailbox bins. Heavier papers
should be printed using Manual Feed. Load only one size of paper at a
time in Tray 1.
Table 5-1 lists specifications and guidelines for each media type
supported by the printer.
5-2 Print Tasks
EN
Media Selection Guidelines
Media Selection Guidelines
Tray 1
Dimensions
Maximum paper size
11.7 x 17.7 in
Single-sided: 16-lb Bond
(297 x 450 mm) to 110-lb Index (60 to
2
199 g/m )
3.9 x 7.5 in
(100 x 191 mm)
Two-sided: 16- to 28-lb
2
Bond (60 to 105 g/m )
8.5 x 11 in
(216 x 279 mm)
Paper weighing above
2
8.3 x 11.7 in
28-lb (105 g/m ) should
(210 x 297 mm) be manually fed from
Tray 1.
7.25 x 10.5 in
(184 x 267 mm)
Two-sided printing is
8.5 x 14 in
NOT available for
(216 x 356 mm) Maximum sized paper
or on media smaller
11 x 17 in
(279 x 432 mm) than Executive size.
Minimum paper size
Paper, Letter
Paper, ISO A4
Paper, Executive
Paper, Legal
Paper, 11 x 17 in
Paper, ISO A3
11.7 x 16.5 in
(297 x 420 mm)
Paper, JIS B5
7.16 x 10.12 in
(182 x 257 mm)
Paper, JIS B4
10.12 x 14.33 in
(257 x 364 mm)
Transparency
See minimum
and maximum
paper sizes
listed above.
Label
Weight
Capacity
100 sheets of 20-lb
2
Bond (75 g/m ) paper
(Do not load to more
than a maximum height
of 10 mm—the paperfill
mark.)
0.0039 – 0.0045 in. thick Limit to paperfill mark
(0.099 to 0.114 mm)
on paper width guides
0.005 – 0.007 in. thick
(0.127 to 0.178 mm)
Envelope, Commercial
#10 (Com 10)
4.1 x 9.5 in
Should not exceed 24-lb Up to 10 at one time
2
(105 x 241 mm) Bond (75 g/m )
Envelope, C5
6.4 x 9.0 in
(163 x 231 mm)
Envelope, DL
4.3 x 8.7 in
(109 x 220 mm)
Envelope, Monarch and 3.9 x 7.5 in
B5
(99 x 191 mm)
EN
Should not exceed 24-lb Up to 10 at one time
2
Bond (75 g/m )
Print Tasks 5-3
Print Tasks
Table 5-1
5
Table 5-1 displays guidelines for selecting the appropriate media to print
from Trays 1, 2, 3, and 4, and to the optional Mailbox with Stapler.
Tray 2
Dimensions
Paper, Letter
8.5 x 11 in
Single-sided: 16- to
2
(216 x 279 mm) 28-lb (60 to 105 g/m )
Paper, ISO A4
8.3 x 11.7 in
(210 x 297 mm)
Paper, Legal
8.5 x 14 in
(216 x 356 mm)
Paper, JIS B4
10.12 x 14.33 in
(257 x 364 mm)
Tray 3 and (optional)
Tray 4
Dimensions
Paper, Letter
8.5 x 11 in
Single-sided: 16- to
2
(216 x 279 mm) 28-lb (60 to 105 g/m )
Paper, ISO A4
8.3 x 11.7 in
(210 x 297 mm)
Paper, Legal
8.5 x 14 in
(216 x 356 mm)
Paper, JIS B4
10.12 x 14.33 in
(257 x 364 mm)
Paper, ISO A3
11.7 x 16.5 in
(297 x 420 mm)
Paper, 11 x 17 in
11 x 17 in
(279 x 432 mm)
(Optional)
Stapler Unit
Dimensions
Paper, Letter
8.5 x 11 in
Single-sided: 16- to
2
(216 x 279 mm) 28-lb (60 to 105 g/m )
No transparencies or
labels
Paper, ISO A4
8.3 x 11.7 in
(210 x 297 mm)
(Optional)
Mailbox Bins
Dimensions
Face-Up Bin (Left
Output Tray)
All media types
Up to 8.5 x 11 in Single-sided: 16- to
2
(216 x 279 mm) 28-lb (60 to 105 g/m )
Face-Down Bins
(Mailboxes)
Paper, Letter
Up to 8.5 x 11 in No envelopes,
(216 x 279 mm) transparencies or
labels
5-4 Print Tasks
Weight
Weight
Capacity
500 sheets of 20-lb
2
Bond (75 g/m ) paper
Capacity
For Tray 3, 500 sheets
2
of 20-lb Bond (75 g/m )
paper
For (optional) Tray 4,
2000 sheets of 20-lb
2
Bond (75 g/m ) paper
Weight
Weight
Capacity
20 sheets of 20-lb Bond
2
(75 g/m ) paper per
stapled document, up to
400 sheets
Capacity
500 sheets of 20-lb
2
Bond (75 g/m ) paper
EN
Media Use Guidelines
Note
Hewlett-Packard neither warrants nor recommends the use of a
particular brand of print media. Media properties are subject to change
by the manufacturer, and HP has no control over these changes. It is
possible that paper could meet all of the guidelines and still not print
satisfactorily. This might be due to improper handling, unacceptable
temperature and humidity levels in the room, or other variables over
which HP has no control.
HP recommends testing any paper before buying it in large quantities.
CAUTION
Using media outside the specifications listed on the previous pages or in
the HP LaserJet Printer Family Paper Specification Guide may cause
problems requiring service. This service is not covered by the
Hewlett-Packard warranty or service agreements.
EN
Print Tasks 5-5
Print Tasks
Before purchasing any media or specialized forms in quantity, make
sure your paper supplier obtains and understands the paper and print
media requirements specified in the HP LaserJet Printer Family Paper
Specification Guide, which is available through HP Direct Distribution.
Refer to Chapter 7, “Calling for Help,” for ordering information.
5
The previous table presents guidelines for using media in the printer.
Media that does not meet these guidelines may increase the incidence of
paper jams, cause premature wear to the printer, and contribute to repair
costs.
Table 5-2
Media Type
Media Use Guidelines
Guidelines
• For best results, use conventional 20-lb (75 g/m2 ) xerographic paper. Make sure the paper is
Paper and
Preprinted Forms of good quality and free of cuts, nicks, tears, spots, loose particles, dust, wrinkles, voids, and
curled or bent edges.
• Do not use paper with cutouts or perforations (including standard pre-punched paper) with
holes 8 mm in diameter or larger.
• Do not use letterhead papers that are printed with low-temperature inks, such as those used in
some types of thermography.
• Use only colored papers or preprinted forms that use inks compatible with your printer’s fusing
temperature (392°F/200°C for 0.1 second).
• Keep paper stored in moisture-proof wrapping to prevent changes in moisture content that
may cause poor print quality, jamming, or curling.
• Avoid paper with ragged or cut edges to prevent feeding problems.
• Do not use paper heavier than 28-lb (105 g/m2 ) from trays other than Tray 1. Tray 1 can feed
2
16-lb Bond to 110-lb Index (60 - 199 g/m ) paper. Heavier paper may cause misfeeds,
stacking problems, paper jams, poor toner fusing, poor print quality, and excessive mechanical
wear.
• Do not use paper that is very rough, very smooth, or embossed. Such paper may cause
feeding or print quality problems, and rough papers may have poor toner adhesion.
Adhesive Labels
• Use only labels recommended for use in laser printers.
• Use only the Left Output Bin for printing labels.
• The adhesive material should be stable at the 392° F/200° C temperatures encountered in the
fusing process. None of the adhesive between the labels should be exposed.
• Use labels with no exposed areas between labels. Using label stock with spaces between
labels often causes labels to peel off during the printing cycle, causing serious jamming
problems. Use a sheet of labels only once.
• Labels must lie flat with no more than 0.5 in (13 mm) of curl in any direction.
• Do not use labels that have separated from the backing sheet or with wrinkles, bubbles, or
other indications of delamination.
Overhead
Transparencies
• Overhead transparencies used in HP LaserJet printers must be able to withstand the
392°F/200°C temperature encountered in the fusing process.
• Use only transparencies recommended for use in laser printers. Because transparency films
tend to stick to each other, remove each transparency from the output bin before printing the
next one.
• Use only the Left or Top Output Bins for printing transparencies.
5-6 Print Tasks
EN
Guidelines
Envelopes
• The weight of the envelope paper should not exceed a 24-lb (90 g/m2 ) Bond rating, or
• Envelopes should lie flat with less than 0.25 in (6 mm) curl.
• Do not use envelopes with windows or clasps.
• Make sure envelopes are not wrinkled, nicked, or otherwise damaged.
• Envelopes with a peel-off adhesive strip or with more than one flap that folds over to seal must
use adhesives compatible with the heat and pressure of the fusing rollers in the printer. The
extra flaps and strips may result in wrinkling or creasing, and may cause jamming.
EN
Print Tasks 5-7
Print Tasks
jamming may result. Use only the Left or Top Output Bins for printing envelopes.
5
Media Type
Paper Trays 1, 2, 3, and (optional) Tray 4
You can load a single sheet of paper into Tray 1 or a stack of up to 100
sheets. Tray 1 (multi-purpose) is used for standard and custom paper
sizes, envelopes, labels, and transparencies.
Paper Trays 2 and 3 each hold up to 500 sheets of 20-lb Bond paper.
Tray 4 holds up to 2000 sheets of 20-lb bond paper.
Paper Tray 2 holds:
•
•
•
•
Letter
Legal
ISO A4
JIS B4
Paper Tray 3 and (optional) Tray 4 hold:
•
•
•
•
•
•
Letter
Legal
ISO A4
ISO A3
11 x 17 in
JIS B4
Adjustable paper size guides for each of the media listed are located
inside the paper trays. See Tables 5-1 and 5-2 earlier in this chapter for
media selection and use guidelines.
When all trays have the same type and size media loaded, by default the
printer prints from paper sources in the following order:
1. Tray 1
2. Tray 4 (if installed)
3. Tray 2
4. Tray 3
For example, assume all paper sources contain the same size of paper. If
you specify Tray 1 or Automatic, send a print request to the printer, and
Tray 1 is empty, the printer prints from Tray 4. If Tray 4 is also empty
(or not installed), the printer prints from Tray 2, and then from Tray 3.
5-8 Print Tasks
EN
1
Open Tray 1.
2
Pull out the tray extension, if needed
for the paper size you are printing.
3
Slide the paper width guides to the
appropriate size marked on the tray.
Continued on the next page.
EN
Print Tasks 5-9
Print Tasks
CAUTION
To avoid a paper jam, never add or
remove media from Tray 1 while the
printer is printing.To avoid damaging the
printer, print labels and transparencies
only from Tray 1. Send them to the Left
Output Bin, and do not print them
two-sided.
When printing multiple transparencies,
promptly remove each print as soon as it
emerges from the printer (so the sheets
do not stick together).
5
Loading Media Into Tray 1
(Multi-purpose)
4
Place paper into the tray without
stacking it above the paperfill mark.
Less than 100 sheets of paper may
not lay flat.
Note
For single-sided printing place paper
into the tray with side-to-be-printed up.
Load 3-hole paper with the holes
toward the front of the printer.
For two-sided printing place paper with
the front side down, and load 3-hole
paper with the holes toward the back of
the printer.
5
Paper loading differs by size:
a. Load Letter and ISO A4 with the
longer edge of the page leading into
the printer.
b. Load envelopes, postcards,
Executive, Legal, 11 x 17 in, ISO
A3, JIS B5, or JIS B4 with the short
edge of the page leading into the
printer.
Note
You may use two-sided printing for
sizes equal to or larger than executive
size paper.
6
7
Slide the paper into the printer,
until paper fits squarely and firmly
between the paper width guides,
without bending the paper.
Set the correct paper type and size
for Tray 1 in the TRAY MENU on the
printer control panel.
Note
Paper heavier than 28-lb (105 g/m2)
should be printed from Tray 1 using
Manual Feed.
If you are using the Top Output Bin,
adjust the paper stop guide for the paper
size to be printed (see Figure 5-4).
5-10 Print Tasks
EN
Open the tray until it stops.
2
Turn the paper guide lock to the
unlocked position.
3
Slide the paper guide to the mark
indicating the size of paper you are
loading.
4
Turn the paper guide lock to re-lock
the position of the tray.
Continued on the next page.
EN
Print Tasks 5-11
Print Tasks
1
5
Loading Paper into Tray 2
or Tray 3
5 Adjust the left paper guide by
pushing in (1), then lifting up and out
(2).
6 Position the guide over the
appropriate lines marked in the tray.
Press the guide into the rear slot (1)
and then lower down (2) into the front
slot (3). Be sure the guide is not
skewed.
7 Place paper into the tray without
stacking it above the paperfill mark.
Fewer than 100 sheets of paper may
not lay flat (from rear to front).
Note
For single-sided printing place paper into
the tray with side-to-be-printed down.
Letterhead should orient to the rear of the
tray. Load 3-hole paper with holes on
your right.
For two-sided printing place paper with
the front side (odd-numbered) up.
Letterhead should be oriented to the rear
of the tray. Load 3-hole paper with holes
on your left.
8 Ensure that the paper size tab is set
correctly. Then slide the tray back
into the printer.
9 If you wish to select your paper by
type rather than tray (source) in your
software, set the correct paper type
for Trays 2 and 3 in the TRAY MENU
on the printer control panel.
Adjust the paper stop guide on the Top
Output Bin for the paper sizes larger than
Letter or A4 (see Figure 5-4).
Note
If paper curls or skews excessively during
printing, open the tray and turn the stack
of paper over. To avoid a paper jam,
never open the tray while it is in use.
5-12 Print Tasks
EN
An optional 2000 Sheet Input Tray is available as an option for the HP
LaserJet 5Si/5Si MX/5Si NX printers (see Figure 5-1.) The tray fits
under the printer, acting as a base.
Figure 5-1
4
2000 Sheet Input Tray (Tray 4)
Tray 4 adjusts for Letter, Legal, ISO A4, ISO A3, 11 in. x 17 in., and JIS
B4 paper. The tray holds approximately 2000 sheets of 20-lb Bond paper.
EN
Print Tasks 5-13
Print Tasks
5
Optional 2000 Sheet Input Tray
Loading Paper into Tray 4
5-14 Print Tasks
1
Slide Tray 4 open until it stops.
2
Adjust the front guide by pulling up
on the pin, placing the guide into
the corresponding top and bottom
slots, and then pushing in the pin.
3
Adjust the back guide by pulling up
on the pin, placing the guide into
the corresponding top and bottom
slots, and then pushing in the pin.
4
Adjust the left guide by pulling up
on the pin and placing the guide
into the corresponding top and
bottom slots. Store the left guide
when using 11 x 17 in paper.
EN
5 Load up to 2000 sheets of paper into
For single-sided printing on 11 x 17 in,
Legal, A3, or JIS B4, place paper into the
tray with the side-to-be-printed down. For
two-sided printing, place paper with the
front side (odd-numbered) up. The back
side (even-numbered) is printed first, and
the front side is printed second.
6 Press down on all four corners of the
paper stack to ensure the paper rests
flat in the tray, without bending the
paper.
7 Close Tray 4.
8 Ensure that the paper size tab is set
correctly.
Note
See “Changing Paper Type and Size from
the Control Panel” later in this chapter to
set the type of paper you loaded in the
tray.
If using the Top Output Bin, remember to
adjust the paper stop guide on the output bin
(see Figure 5-4).
EN
Print Tasks 5-15
Print Tasks
Note
For single-sided printing on Letter or A4
paper, place paper into Tray 4 with the
side-to-be-printed down. Letterhead
should be oriented to the rear of the tray.
Load 3-hole paper with holes on your
right. For two-sided printing, place paper
with the front side (odd-numbered) up.
The back side (even-numbered) is printed
first, and the front side is printed second.
Letterhead should be oriented to the rear
of the tray. Load 3-hole paper with holes
on your left.
5
the tray; do not allow paper to extend
above the paperfill mark on the sides.
Envelopes in Tray 1
You can print up to ten envelopes from Tray 1. This section explains
how to print an envelope using your software application. Table 5-1 lists
the kinds of envelopes you can print. Check the media use guidelines in
Table 5-2 before loading envelopes. (See “Media Use Guidelines”
earlier in this chapter.)
CAUTION
Never use envelopes with clasps, snaps, windows, coated linings,
self-stick adhesives (peel and seal), or other synthetic materials. These
items can severely damage your printer. Never try to print on both sides
of an envelope. Jamming and printer damage can result. Do not staple
envelopes or send them to mailbox bins.
Before you load an envelope in Tray 1, check to make sure it is
rectangular in shape and undamaged. It is a good idea to run a pen or
pencil down the leading edge (side being fed into the printer) to flatten it
before you insert it in Tray 1.
Figure 5-2
A) Good Construction for Envelopes B) Poor Construction for Envelopes
5-16 Print Tasks
EN
2 If necessary, pull out the tray
extension for the envelope size you
are printing.
3 Gently place up to ten envelopes
between the paper width guides, face
up, with the back flap lying against
the rear paper guide.
4 Slide the paper width guides until they
lightly touch both sides of the
envelope stack without bending it.
5 Set the envelope size and type in the
TRAY MENU on the control panel for
Tray 1.
EN
Print Tasks 5-17
Print Tasks
1 Open the door of Tray 1.
5
Loading Envelopes into
Tray 1
Printing Envelopes from
Your Software Application
1 Load up to ten envelopes into Tray 1.
2 Specify Tray 1, Automatic, or select
the media source by type in your
software application, and set the
envelope size and type to the
appropriate envelope size, such as
COM 10 or DL.
3 If your software does not
Paper Source:
TRAY 1
Paper Size:
Com 10 Envelope
automatically format an envelope,
specify Landscape for page
orientation in your application.
CAUTION
To avoid a printer jam, once you begin
printing, do not remove an envelope and
reinsert it.
Orientation
Portrait
Landscape
5-18 Print Tasks
For best print quality, use the following
table to set margins for a return and
mailing address. It gives you typical
address margins for a Commercial #10 or
DL envelope. For envelopes of other sizes,
adjust the margin settings until they please
you. Avoid printing over the area where an
envelope’s three back flaps meet.
Type of Address
Left Margin
Top Margin
Return
0.5 in (15 mm) 0.5 in (15 mm)
Mail destination
4.0 in (85 mm) 2.0 in (51 mm)
EN
The optional Envelope Feeder can hold 2X
postcards and B5, Com 10, C5, DL, and
Monarch envelopes. You can load up to 100
envelopes in the optional Envelope Feeder.
Select the appropriate envelope size and type
through the printer control panel before
printing.
Printing from the Optional
Envelope Feeder
1 Load up to 100 envelopes in the
feeder (do not exceed the paperfill
mark).
2 From the control panel, press [Menus]
repeatedly until TRAY MENU appears.
3 Press [Items] repeatedly until ENV
FEEDER TYPE= PLAIN * appears.
4 Press [+] to view options.
Note
If printer displays a load envelope
message, load envelopes and press
Select * .
EN
Print Tasks 5-19
Print Tasks
5
Optional Envelope Feeder
5 Press [Select *] to select the
appropriate choice.
6 Press [Items] again to see ENV
FEEDER SIZE= COM10 *
Select *
7 Press [+] to view options.
8 Press [Select *] to select the
appropriate choice.
Items
+
When printing you may select the optional
Envelope Feeder as your media source, or
you may select your media by type. To
select by media type, you choose the type
in the printer driver that matches the
envelope type you set on the printer
control panel.
If you cannot access the optional Envelope
Feeder when printing, you may need to
ensure that the optional Envelope Feeder
has been installed in your printer driver.
See Chapter 3, “Printer Software” for
information on accessing the printer driver.
Select *
5-20 Print Tasks
EN
Menus
MENU appears.
2 Press [Items] repeatedly to scroll
through the trays and their media
types.
Items
Note
You must select the size of the media
before using Tray 1 or the optional
Envelope Feeder since they do not have a
sensor for identifying paper size . If either
is being used, you will also have a menu
item for media size.
3 Press [+] repeatedly to scroll through
+
the media type options.
4 Press [Select *] to choose the type of
media you loaded in the tray.
Select *
If you want to select the media for your
job by type, and not by the paper tray
(source), you will have to set the type
value for each tray on the printer control
panel, and in the printer driver. See
Chapter 3 for information on accessing the
printer driver.
Selecting media by type rather than source
is similar to locking out the tray(s). If you
have letterhead loaded in Tray 1, and you
select to print on plain paper in your
driver, the printer will not pull the
letterhead paper from Tray 1. However, it
will pull from one of the other trays if
plain paper is loaded, and has been set on
the printer control panel.
EN
Print Tasks 5-21
Print Tasks
1 Press [Menus] repeatedly until TRAY
5
Changing Media Type and Size from the
Control Panel
Output Bins
The Top Output Bin, located at the top of the printer (see 1 in Figure
5-3), holds up to 500 sheets of paper in the correct order as they exit the
printer. A sensor causes the printer to stop when the paper bin is full.
Printing continues when you empty or reduce the amount of paper in the
bin. The Top Output Bin is the factory default bin.
The Left Output Bin, located on the upper left side of the printer (see 2
in Figure 5-3), holds up to 125 sheets of paper face up as they exit the
printer. This bin is mainly used for special media types, such as labels or
transparencies, that cannot tolerate the curved paper path of the Top
Output Bin. This output bin does not sense when the bin is full.
The optional Multi-Bin Mailbox or Mailbox with Stapler (see 4 in
Figure 5-3) attaches to the left side of the printer. The Multi-Bin
Mailbox contains eight bins which hold up to 250 sheets each. The
Mailbox with Stapler contains five bins which hold 250 sheets each,
plus a stapler. The mailbox accessories work in one of the following
three modes:
• Mailbox - Each bin can be addressed individually as the output
destination, and can have a name assigned to it by the network
administrator.
• Job Separation - Automatically separates incoming jobs assigning a
bin to each job, which may include multiple copies. It uses all five
mailbox bins for this purpose, but is seen in the printer software as
one logical bin. If a mailbox bin is full, the printer round robins to the
other bins, and puts any overflow in the top output bin.
• Stacking - This mode stacks the printed output from the lowest bin to
the top, regardless of job boundaries. This mode of operation takes
advantage of the total capacity of the five mailbox bins. The device is
seen by the printer software as one logical bin.
In a bidirectional environment, the printer automatically selects the
mode established by the network administrator. In nonbidirectional
environments, you can change the mode in the driver. The method for
changing the mode varies by driver and by operating system. Refer to
your driver’s on-line help.
The printer control panel will display different messages depending on
which mode you are using.
5-22 Print Tasks
EN
OPTIONAL OUTPUT BIN 1
Left Output Bin
OPTIONAL OUTPUT BIN
2 through 6
Mailbox 1-5
OPTIONAL OUTPUT BIN X
Stapler Bin
Print Tasks
Then the physical
location is:
5
In Mailbox Mode, if the
Control Panel says:
(X represents any number other than 1 through 6.)
In Job Separator or Stacking Then the physical
Modes, if the Control Panel location is:
says:
OPTIONAL OUTPUT BIN 1
Top Output Bin
OPTIONAL OUTPUT BIN 2
Mailbox bins
OPTIONAL OUTPUT BIN X
Stapler Bin
(X represents any number other than 1 through 6.)
Note
EN
The mailbox handles all of the printer’s supported paper sizes.
Envelopes, labels, and transparencies are sent only to the Left Output
Bin (face-up).
Print Tasks 5-23
Figure 5-3
Output Bins
1.
Top Output Bin
2.
Left Output Bin
3.
Stapler Bin
4.
Optional Mailbox Bins
5-24 Print Tasks
EN
Selecting the Left Output Bin
You can select an output bin through your software application or printer
driver, or from the printer control panel. Normally, we recommend
designating the paper destination in your software or printer driver, since
options set there override printer control panel settings. Follow the
instructions below for setting the Left Output Bin as the printer’s default
output bin through the printer control panel.
Note
Where and how you make selections depends on your software
application or associated printer driver. In some environments, the
selection process may be available only from within the printer driver (if
the control panel has been locked by the network administrator, for
example.) See Chapter 3 or your application manual for more
information.
Selecting the Left Output Bin from the Control Panel
1 Press [Menus] repeatedly until CONFIGURATION MENU appears.
2 Press [Items] repeatedly until PAPER DESTINATION=TOP OUTPUT
BIN * appears.
3 Press [+] repeatedly until OPTIONAL OUTPUT BIN 1 or bin name
assigned to it by the Network Administrator appears.
4 Press [Select *] to save your choice. An asterisk (*) appears next to your
selection.
EN
Print Tasks 5-25
Print Tasks
Selecting the Left Output Bin through the Software
5
The Left Output Bin should be used for envelopes, transparencies, and
labels. Using this bin helps reduce paper curl.
Adjusting the Paper Stop
The paper stop (shown in Figure 5-4) is located near the Top Output
Bin. It can be adjusted to help paper lay flat as it exits the printer. The
paper stop does not have to be raised for Letter or A4 size media. Note
that the printer jams if the paper stop is set to a smaller size of media
than is being printed.
1 Pull the left side of the paper stop up until the stop is in an upright position.
2 Slide the paper stop to the mark indicating the largest paper size to be
printed.
Figure 5-4
7
x1
11 3
A
B4 GL
L
Adjustable Paper Stop
5-26 Print Tasks
EN
The printer control panel displays different names for the mailboxes and
stapler, depending on which mode the driver is using.
In Mailbox Mode, if the
Control Panel says:
Then the physical
location is:
OPTIONAL OUTPUT BIN 1
Left Output Bin
OPTIONAL OUTPUT BIN
2 through 6
Mailbox 1-5
OPTIONAL OUTPUT BIN X
Stapler Bin
(X represents any number other than 1 through 6.)
In Job Separation or
Stacking Modes, if the
Control Panel says:
Then the physical
location is:
OPTIONAL OUTPUT BIN 1
Top Output Bin
OPTIONAL OUTPUT BIN 2
Mailbox bins
OPTIONAL OUTPUT BIN X
Stapler Bin
(X represents any number other than 1 through 6.)
Selecting the Multi-Bin Mailbox or Mailbox with Stapler
through the Software
You can select these output bins through your software application,
printer driver, or from the printer control panel. It is better to designate
the paper destination in your software or printer driver since you will
control to which output bin your job is sent. Otherwise, follow the
instructions below for setting the overall default output bin selection.
Note
EN
Where and how you make selections depends on your software
application or associated printer driver. The selection process may be
available only from within the printer driver. See Chapter 3 or your
application manual for more information.
Print Tasks 5-27
Print Tasks
The optional Multi-Bin Mailbox or Mailbox with Stapler can work in
one of three modes: mailbox mode, job separation mode, or stacking
mode. The network or printer administrator determines which mode of
operation is chosen through an HP network configuration utility, such as
HP JetAdmin or HP LaserJet Utility. You need to set up your printer
driver to reflect the mode chosen by the administrator. Bidirectional
environments automatically reflect the administrator’s choices in your
printer driver.
5
Printing to the Multibin Mailbox or Mailbox
with Stapler
Selecting the Multi-Bin Mailbox or Mailbox with Stapler
as default destination from the Control Panel
1 Press [Menus] repeatedly until CONFIGURATION MENU appears.
2 Press [Items] repeatedly until PAPER DESTINATION= TOP OUTPUT
BIN * appears.
3 Press [+] repeatedly until PAPER DESTINATION= OUTBIN x appears.
The x represents a number from 1–7 (for the output bins). Your network
administrator may have changed these names.
4 Press [Select *] to save your choice. An asterisk (*) appears next to your
selection.
Stapling Documents
The stapler can staple documents of 2 to 20 pages on 16 lb. to 20 lb.
bond paper, Letter and A4 size only. The stapler should not be set as the
default output bin. If your job is only one page, or if it is greater than 20
pages, the printer will print your job to the bin, but it will not be stapled.
The stapler bin can hold up to 350 stapled sheets. To have your job
stapled, send it to OPTIONAL OUTBIN 7.
Selecting the Stapler through the Software
You can select the stapler through your software application or printer
driver. This is the recommended method for stapling. If you are unable
to designate the paper destination in your software or printer driver,
follow the instructions below for setting the overall default printer
output bin selection.
Note
Where and how you make selections depends on your software
application or associated printer driver. The selection process may be
available only from within the printer driver. See Chapter 3, “Printer
Software,” or your application manual for more information.
Selecting the Stapler as default destination from the
Control Panel
If your software does not support stapling, set it using the directions
below.
1 Press [Menus] repeatedly until CONFIGURATION MENU appears.
2 Press [Items] repeatedly until PAPER DESTINATION= TOP OUTPUT
BIN * appears.
5-28 Print Tasks
EN
3 Press [+] repeatedly until PAPER DESTINATION= OUTBIN 7 appears.
selection.
EN
Print Tasks 5-29
Print Tasks
4 Press [Select *] to save your choice. An asterisk (*) appears next to your
5
Your network administrator may have changed the name of this bin. For
example, it may be called STAPLER.
Different First Page
Use the following procedure to print the
first page of a document on preprinted or
special paper, such as a letter with just the
first page on letterhead paper.
1 Select a different paper for the first
page in your application or printer
driver.
Note
Where and how you make selections
depends on your software application or
associated printer driver. The selection
process may be available only from within
the printer driver. See Chapter 3 or your
application manual for more information.
2 Choose the designated tray (or
Manual Feed) for the first page and
the other tray for the remaining pages.
3 Place the paper for the first page in
the tray.
For manual feed, place a page in Tray
1 after the job is sent to the printer,
and the printer requests the paper to
be loaded. Place the page with the
side to be printed up, with the top of
the page placed towards the rear of
the printer and the long edge leading
into the printer.
4 Load the paper for the remaining
pages of the document in another tray.
You may select the first and remaining
pages by type of media. You must set the
types of media loaded in the trays through
the control panel (see “Changing Paper
Type and Size from the Control Panel”
earlier in this chapter). Then select the
paper source in the printer driver not by
tray, but by type.
5-30 Print Tasks
EN
Paper Source:
TRAY 1
Paper Size:
Maximum
2
You can print on custom-size paper from
Tray 1. The largest size of paper
supported is 11.7 x 17.7 in (297 x 450
mm). The smallest size is 3.9 x 7.5 in (99
x 191 mm). When you select maximum
size of paper, the printer assumes the
maximum page size is 11.7 x 17.7 in (297
x 450 mm).
Printing on the
Smallest-Sized Paper
Some applications require you to calculate
margins in order to print on custom-size
paper. The following example is provided
as a guideline. Adapt this example to your
paper size and unit of measurement.
1 In your software application, select
Tray 1 for the paper source and
Maximum (Windows PCL) or
Oversize (Macintosh and Windows
PostScript) for the paper size.
2 Calculate margins to identify the area
to be printed. Illustration 2 and steps
2a and 2b show how to calculate a
margin for 3.9 x 7.5-in (99 x 191 mm)
paper.
a. Take the maximum paper width
size 11.7 in (297 mm) and subtract
3.9 in (99 mm) for the width of the
paper. Take the answer, 7.8 in (198
mm), and divide it by 2, which equals
3.9 in (99 mm).
In your software application, select a
left margin of 3.9 in (99 mm) and a
right margin of 3.9 in (99 mm).
b. If your software allows, also set the
bottom margin. Take the maximum
paper length size, 17.7 in (450 mm),
and subtract 7.5 in (191 mm), the
length of the paper. The bottom
margin equals 10.2 in (259 mm).
Continued on the next page.
EN
Print Tasks 5-31
Print Tasks
1
5
Custom Size Paper in Tray 1
3 Print custom-size paper from Tray 1.
See “Loading Media into Tray 1”
earlier in this chapter for the
procedure.
4 The edge of the paper feeding into the
printer must be at least 3.9 in (99
mm) wide to allow rollers inside the
printer to grab the paper. Measuring
from the leading edge to the trailing
edge of the paper going into the
printer, the length dimension must be
at least 7.5 in (190 mm).
Note
You may use two-sided printing on paper
sizes equal to or larger than Executive.
Printing Bleeds
Since the printer has the ability to print on
specially cut paper up to 11.7 x 17.7 in
(297 x 450 mm), you can print up to 11 x
17 in (279 x 432 mm) bleed images with
crop marks. Refer to your software
application or online help.
5-32 Print Tasks
EN
Figure 5-5
Duplex Unit
EN
Print Tasks 5-33
Print Tasks
The Duplex Unit (shown in Figure 5-5) allows printing on both sides of
the paper (two-sided) with either portrait or landscape orientation. You
can select two-sided printing through your application, the printer driver,
or the printer control panel.
5
Two-Sided Printing with the Duplex Unit
Binding Options
Before printing in two-sided mode, decide how you want your finished
document bound: stapled (stitches), in three-hole binders, glued, or by
some other means. The binding setup options are:
• Book (long-edge) binding, which is the conventional layout used in
book binding (see A in Figure 5-6 below).
• Tablet (short-edge) binding, which is the type often used with
calendars (see B in Figure 5-6 below).
Figure 5-6
Binding Options
You may select two-sided printing in your application or printer driver.
See Chapter 3 for information on accessing the printer driver. The
printer settings usually come first from the application, second from the
printer driver, and last from the control panel.
Selecting Two-Sided Printing from the Control
Panel
1 Press [Menus] repeatedly until CONFIGURATION MENU appears.
2 Press [Items] repeatedly until 2-SIDED= OFF * appears.
3 Press [+] repeatedly until 2-SIDED= ON appears.
4 Press [Select *] to choose two-sided printing. An asterisk (*) appears
next to your selection.
5 Press [Items] repeatedly until BINDING=LONG EDGE * or
BINDING=SHORT EDGE * appears.
6 Press [Select *] to save your choice. An asterisk (*) appears next to your
selection.
5-34 Print Tasks
EN
You can stop a print request from your software application or from the
printer control panel. To stop a print job from a computer on a network,
refer to the HP JetDirect Print Server Software Installation Guide.
Note that it may take some time for all printing to clear after canceling a
print job.
Stopping the Current Print Job from Your Software
Application
If many requests have been sent to the printer through your software,
they may be waiting in a print queue (in Windows Print Manager, for
example). See the instructions that come with your software for specific
instructions about canceling a print request in the computer.
Note
In order to cancel a print job, at least one (and sometimes two) printed
page(s) must be delivered to the destination output bin. This ensures that
you identify the correct print job.
Stopping the Current Print Job from the Control Panel
1 Press [Menus] repeatedly until JOB CONTROL MENU appears.
2 Press [Items] repeatedly until CANCEL JOB appears.
3 Press [Select *] to cause the printer to stop printing, and display the
message STOPPING CHECK LAST PAGE until the last page currently
being printed is placed in the output bin.
4 PRESS SELECT TO CANCEL JOB appears on the display. To cancel the
job, press [Select *].
5 The message CANCELING JOB appears. This message remains until the
job is cleared from the system.
Note
EN
To skip canceling the job, press the [On Line], [Menus] or [Items] key.
Print Tasks 5-35
Print Tasks
5
Stopping a Print Request
5-36 Print Tasks
EN
6
Print Quality
Introduction
The HP LaserJet 5Si/5Si MX/5Si NX prints at true 600 dots-per-inch
(dpi) with Resolution Enhancement technology (REt) and MicroFine
toner. REt adjusts the size and placement of each dot to smooth angles
and curves. Combined with MicroFine toner, this sharpens the
appearance of text and graphics. The printer also offers 300-dpi printing
with REt to give you a wider range of printing alternatives.
This chapter tells you how to:
•
•
•
•
Note
EN
Choose print resolution.
Fine-tune print quality by adjusting the print density.
Improve print quality.
Use EconoMode to print drafts and save toner.
To find the current printer settings, use the printer control panel to print
a configuration page. This procedure is described in “Test Menu” in
Chapter 4, “Printer Control Panel.”
Print Quality 6-1
Print Resolution
You can select 300- or 600-dpi resolution for your printed page; however,
600 dpi (the default setting) provides better print quality. If available, you
can select resolution through your software application; otherwise you can
use the control panel.
Changing the Print Resolution Setting from the
Control Panel
1 Press [Menus] repeatedly until the PRINT QUALITY MENU appears.
2 Press [Items] repeatedly until RESOLUTION= 600 DOTS PER INCH
appears.
3 Use the [+] to switch between 600 and 300 dpi.
4 Press [Select *] to save the 600- or 300-dpi setting.
6-2 Print Quality
EN
Print Density
Print density is a measure of the darkness of the print on the page. The
degree of darkness depends on how much toner is applied to the paper
while printing.
The higher the print density setting, the more toner the printer uses. To
extend the life of your toner cartridge, choose lighter print density
settings.
If available, you can change this setting through your software
application; otherwise, use the control panel.
Adjusting Print Density from the Control Panel
5 Press [Menus] repeatedly until PRINT QUALITY MENU appears.
6 Press [Items] repeatedly until PRINT DENSITY=3* appears.
7 Press [+] repeatedly until the desired setting appears.
Your choices are 1-5; 1 = the lightest; 5 = darkest.
8 Press [Select *] to save the setting.
EN
Print Quality 6-3
Print Quality
Note
6
Print density adjustments are made through the control panel. Settings
range from Print Density = 1 to Print Density = 5, with 5 being the
darkest setting. See the procedure below to change the print density
setting from the control panel. Changes to this setting are effective
during a printed job within one or two pages.
Resolution Enhancement
Resolution Enhancement technology (REt) refines the print quality of
characters and graphics by smoothing the fine gradations along the
angles and curves of the printed image. Figure 6-1 shows two magnified
images: the left one (A) shows REt set to OFF; the right one (B) shows
it set to ON.
Figure 6-1
Resolution Enhancement
If available, you can change this setting through your printer setup
screen in the printer drivers; otherwise, use the control panel.
Activating REt from the Control Panel
1 Press [Menus] repeatedly until PRINT QUALITY MENU appears.
2 Press [Items] repeatedly until RESOLUTION ENHANCEMENT= ON appears.
3 Press [+] to switch between OFF and ON.
4 Press [Select *] to save your selection. An asterisk (*) appears next to
that setting.
6-4 Print Quality
EN
Solving Print Quality Problems
Solutions to general causes of print quality problems are given in the
checklist below, followed by specific samples of common print quality
problems. If the listed solutions do not work, see Chapter 7,
“Maintenance and Troubleshooting,” for other possible solutions.
Below are the actions you can take if you have problems with print
quality:
•
•
•
Note
EN
Toner cartridges should be allowed to stabilize at room temperature
prior to use; otherwise, print quality may be affected.
Print Quality 6-5
Print Quality
•
•
•
•
later in this chapter.)
Redistribute the toner in the toner cartridge. (See Chapter 7.)
Clean the inside of the printer. (See Chapter 7.)
Adjust the print density. (See “Print Density” earlier in this chapter.)
Check the paper type and quality. (See Tables 5-1 and 5-2 in Chapter
5, “Print Tasks,” for media selection and use guidelines.)
Make sure you are printing at 600-dpi resolution.
Adjust the REt setting to ON or OFF.
Replace the toner cartridge.
6
• Check the EconoMode setting; be sure it is OFF. (See “EconoMode”
Note
All sample pages depict Letter size and portrait orientation. Similar
problems may show up on different paper edges, depending on the paper
feed.
Fading
If a white streak or faded area appears on the page (in the direction the
paper passes through the printer):
• The toner cartridge supply is low. Remove the toner cartridge from
the printer and rotate it back and forth. If shaking the cartridge does
not improve the print quality, replace the toner cartridge.
• The print density adjustment is too light. Adjust print density.
Dropouts
If faded areas, generally rounded, occur randomly on the page:
• The moisture content of the paper is uneven or the paper has moist
spots on its surface. Try paper from a different source.
• The paper lot is bad. The manufacturing processes can cause some
areas to reject toner.
Try paper from a different source. If using paper within the specification
required by the printer does not correct your problem, your printer may
need service (refer to Table 5-1 in Chapter 5 for media selection
guidelines). Contact your authorized HP dealer or your HP service
representative.
Lines
If sharp black streaks appear on the page (in the direction the paper
passes through the printer), the light-sensitive drum inside the toner
cartridge has probably been scratched. Replace the toner cartridge.
If smeared black streaks appear (in the direction the paper passes
through the printer), the fuser may be bad. Contact your HP service
representative.
6-6 Print Quality
EN
Toner Smear
If toner smears appear on the leading edge (as it passes through the
printer) of the paper, the paper guides are dirty. Clean the printer as
described in Chapter 7.
If toner on the paper is loose or can be wiped off easily, your fuser may
be damaged. Contact your authorized HP dealer or your HP service
representative.
6
If the amount of background toner shading becomes unacceptable:
• Lower the density setting. (See “Print Density” earlier in this
chapter.) This decreases the amount of background shading.
• Replace the toner cartridge.
• Change the paper to a lighter basis weight.
• Check the printer’s environment; very dry (low humidity)
conditions can increase the amount of background shading.
If these procedures do not fix the problem, the transfer roller may need
to be replaced. Contact your authorized HP dealer or your HP service
representative.
Repetitive Defects
If any of the following marks appear repeatedly on the printed side of
the page, replace the toner cartridge:
• If a repetitive mark occurs every 3 3/4 inches (94 mm) in the
direction the paper passes through the printer, the toner cartridge
drum is damaged.
• If a repetitive mark occurs every 2 inches (51 mm) in the direction
the paper passes through the printer, the developer roller is damaged.
• If black lines occur every 1 1/2 inches (38 mm) on the back of the
page, the charger roller is damaged.
If defects occur every 2 3/8 inches (61 mm) on the back of the page, the
transfer roller has toner on it. This problem will likely correct itself after
a few pages.
EN
Print Quality 6-7
Print Quality
Background Gray Toner Shading
Improperly Formed Characters
If characters are improperly formed, producing hollow characters, your
paper stock may be too slick. Make sure that the EconoMode setting is
set to OFF. Try a different paper.
If characters are improperly formed, producing a wavy effect, the laser
scanner needs service. Call your authorized HP dealer or HP service
representative.
Line at Edge of Paper
If a line appears on the top of the paper toward the end of the toner
cartridge life (usually on the right side and running the direction that the
paper travels through the printer), the drum in your toner cartridge is
wearing out. The line will grow wider, with cross-hatching. Replace the
toner cartridge. Shaking the cartridge does not relieve the problem.
6-8 Print Quality
EN
EconoMode
EconoMode lowers printing costs by reducing the amount of toner on
the printed page. When set to ON, the printed image is lighter but still
readable, as shown in Figure 6-2, side (A). Full time use may result in a
loss of print quality due to normal toner cartridge mechanical wear.
Normal printing with the EconoMode set to off is shown in Figure 6-2,
side (B).
Figure 6-2
6
Print Quality
A. EconoMode B. Normal
EN
Print Quality 6-9
Turning on EconoMode
You may be able to turn on EconoMode through your software
application or driver. If your software permits, you will probably prefer
to use this method. Otherwise, see “Turning on EconoMode from the
Control Panel” in the following section.
Note
Where and how you make selections depends on your software
application or associated printer driver. The selection process may be
available only from within the driver. See Chapter 3 or your application
documentation for more information.
Turning on EconoMode from the Control Panel
1 Press [Menus] repeatedly until PRINT QUALITY MENU appears.
2 Press [Items] repeatedly until ECONOMODE=OFF * appears.
3 Press [+] to choose ON.
4 Press [Select *] to save your choice.
Note
The printer settings usually come first from the application, then from
the printer driver, and finally from the control panel.
6-10 Print Quality
EN
7
Maintenance and Troubleshooting
Introduction
This chapter describes normal routine maintenance, which includes:
•
•
•
•
•
•
Cleaning the printer
Working with the toner cartridge
Extending toner cartridge life
Clearing the TONER LOW message
Replacing staples
Clearing staple jams
The following sections help you troubleshoot the most common printer
problems, clear paper jams, and understand printer messages.
Cleaning Tasks
To maintain print quality, thoroughly clean the printer:
• Every time you change the toner cartridge
• After printing approximately 15,000 images
• Whenever print quality problems occur
Clean the outside of the printer with a lightly water-dampened cloth.
Clean the inside with only a dry, lint-free cloth. Observe the warnings
and cautions that follow the cleaning tasks on the following page.
CAUTION
EN
To avoid permanent damage to the toner cartridge, do not use
ammonia-based cleaners on or around your printer.
Maintenance and Troubleshooting 7-1
Cleaning the Printer
1 Before you begin these steps, turn the
printer OFF and unplug all cords.
2 Open the top cover of the printer and
remove the toner cartridge.
WARNING
Avoid touching the adjacent fusing
area in the left door. It may be HOT.
3 With a dry lint-free cloth, wipe any
residue from the paper path area, the
registration roller (B), and the toner
cartridge cavity.
CAUTION
Do not touch the transfer roller (A). Skin
oils on the roller can reduce print quality.
If toner gets on your clothes, wipe it off
with a dry cloth and wash your clothes in
cold water. Hot water sets toner into
fabric.
4 Replace the toner cartridge, close the
printer, reconnect all cables, and switch
the printer ON.
7-2 Maintenance and Troubleshooting
EN
Toner Cartridge
Extending Toner Cartridge Life
The life of your toner cartridge depends on the amount of toner your
print jobs require. When you print word-processed text, average toner
cartridge yield is 15,000 pages printed at 5% coverage. (A typical
full-page business letter is about 5% coverage.) This assumes that the
print density setting is in the middle range. Using EconoMode can
further extend average toner cartridge yield. (See Chapter 6, “Print
Quality.”)
EconoMode extends toner usage beyond the specified 15,000 images.
However, extended use of the toner cartridge assembly may result in
wear of moving parts within the cartridge; this may produce unusual
noises. Because of this HP cautions you not to use EconoMode full time.
Storing and Installing the Toner Cartridge
WARNING
Avoid touching the adjacent fusing area. It may be HOT.
HP Policy on Use of Non-HP Toner Cartridges
Hewlett-Packard does not recommend use of non-HP toner cartridges,
either new or remanufactured. HP cannot influence or control the quality
of these cartridges because they are not HP products.
EN
Maintenance and Troubleshooting 7-3
Maintenance &
Troubleshooting
To install a new toner cartridge, follow the instructions in the
Installation Instruction Guide included in your toner cartridge box. A
separate Recycling Instruction Guide is also included.
7
Do not remove the toner cartridge from its packaging until you are ready
to use it. The shelf life of an unopened cartridge package is
approximately 2 1/2 years; the shelf life of an opened cartridge package
is approximately six months. Use the cartridge before the expiration date
(the expiration date is stamped on your toner cartridge box).
Redistributing Toner in the
Cartridge
When the TONER LOW message appears,
you can extend the life of your toner
cartridge and temporarily re-establish
print quality by redistributing the toner.
1 Open the printer’s top cover.
2 Remove the toner cartridge.
WARNING
Avoid touching the adjacent fusing
area in the print engine. It may be
HOT.
3 Rotate the toner cartridge back and
forth five or six times to redistribute
toner.
4 Reinsert the toner cartridge and close
the top cover.
The TONER LOW message may continue to
appear, but the print quality should
improve. If the print remains light, replace
the toner cartridge using the instructions
in the Installation Instruction Guide
inside the toner cartridge box.
7-4 Maintenance and Troubleshooting
EN
Clearing the TONER LOW Message
When the toner level in the toner cartridge gets low, a TONER LOW
message appears in the control panel display. You can either rotate the
cartridge back and forth to redistribute the toner (shown in the previous
section) or replace the cartridge. If you continue to use the cartridge,
your print will become lighter and white streaks may appear.
From the Configuration Menu, you can set TONER LOW=STOP or
TONER LOW=CONTINUE.
• When set to TONER LOW=CONTINUE, the printer continues to print
after detecting that toner is low. The TONER LOW message is
displayed on the control panel instead of READY. Use TONER
LOW=CONTINUE when printing long or unattended print jobs.
• When set to TONER LOW=STOP, the printer stops printing and goes
offline when low toner is detected. To resume printing, press
[Select *]. The printer continues to display the TONER LOW message
until you change the cartridge. The default setting is TONER
LOW=STOP.
7
For more information about the Configuration Menu, see Chapter 4,
“Printer Control Panel.”
Maintenance &
Troubleshooting
EN
Maintenance and Troubleshooting 7-5
Optional Stapler
The only maintenance required for the
Stapler is to load new staple cartridges,
and to clear staple jams if they occur.
Both procedures are explained below.
Loading Staples
1 Turn off the printer and remove the
Left Output Bin.
2 Open the stapler unit cover.
3 Squeeze the stapler cartridge tabs
together and the pull empty staple
cartridge out.
4 Remove the orange plastic shipping
clip from the new staple cartridge.
5 Insert the new staple cartridge until it
snaps into place.
6 Close the stapler unit cover and
replace the Left Output Bin.
7-6 Maintenance and Troubleshooting
EN
Clearing Staple Jams
1 Turn off the printer and remove the
Left Output Bin.
2 Open the stapler unit cover.
3 Press the colored tab with your thumb
4
5
6
7
and pull the colored circular tab with
your forefinger to open the stapler.
Remove loose or damaged staples
from the stapler head.
Push the circular tab to snap it back
into place.
Close the stapler unit cover and
replace the Left Output Bin.
Clear all paper paths that may have
jammed as a result of the jammed
staples.
Maintenance and Troubleshooting 7-7
Maintenance &
Troubleshooting
EN
7
Note
After clearing a stapler jam, up to 12
documents may not be stapled when
printing resumes because the stapler must
reload. Once the unit begins stapling
again, either manually staple the unstapled
documents or resend the job.
Troubleshooting Checklist
Use the following information to help solve printer problems. For
networked printers, check with your network administrator if you suspect a
network-related problem.
Printer Response Problems
Printer Does Not Turn On
Check to see if ...
Solution
Printer is not plugged in.
Plug the AC power cord firmly into the grounded power receptacle
and into the printer. (Be sure the power source is energized.)
Printer voltage is not
correct.
Make sure line voltage is in the correct range. (See the product
label next to the power receptacle on the back of your printer for
voltage requirements.)
Blank or Garbled Control Panel Display
Check to see if ...
Solution
Printer is not switched
ON.
Put the printer’s power switch in the ON position.
Printer is switched ON
but internal fans are not
running.
Make sure the line voltage is correct for the printer’s power
configuration. (See the plate next to the power receptacle on the
back of your printer for voltage requirements.) If you are using a
power strip and its voltage is not within specification, plug the
printer directly into the power receptacle.
Display is blank and
internal fans are not
running.
Press all the keys to see if one is stuck; contact your HP service
representative if this does not work.
Printer display is in the
wrong language or
displays unfamiliar
characters.
Reconfigure the control panel display language. Refer to the
Getting Started Guide.
7-8 Maintenance and Troubleshooting
EN
Printer Cannot Print Configuration Page
Check to see if ...
Solution
Correct size of paper is
not loaded
Check paper trays to be sure correct size media is loaded (Letter
or A4). Also, check that guides are set correctly.
Toner cartridge sealing
tape is not removed.
Remove sealing tape from toner cartridge. See the Getting Started
Guide or the installation guide that came with your toner cartridge.
Paper tray is out of paper. Add paper and close tray, if appropriate.
Printer cover(s) is open.
Firmly close the printer top cover and all doors (left, front, and
right).
Paper is jammed in the
printer.
Check for paper jams. (See “Paper Jams” later in this chapter.)
Messages appear in the
display.
Review the messages for help. (See “Printer Messages” later in
this chapter.) If no error messages appear but the configuration
page still does not print, call for assistance.
Display Messages Cannot be Cleared
Message
Solution
TONER LOW
See “Clearing the TONER LOW Message” earlier in this chapter.
7
LOAD TRAY 2
PLAIN LEGAL
(or similar messages
requesting that you load
media)
Load the requested media into the indicated tray. Press [Select *]
to override and to print on an already loaded paper size.
HP MIO 1 INITIALIZING
HP MIO 2 INITIALIZING
Wait for the message to disappear (approximately 5 minutes). If
the printer MIO card is operating correctly and communicating
with the network, this message disappears after approximately
one minute and no action is required.
Maintenance &
Troubleshooting
If the MIO card is unable to communicate with the network, this
message remains for five minutes and then disappears. In this
case the printer is not communicating with the network (even
though the message is no longer present). The problem may be a
bad MIO card, a bad cable or connection on the network, or a
network problem. Contact your network administrator.
EN
Maintenance and Troubleshooting 7-9
Software, Computer, and Printer Interface Problems
Print Job Does Not Print
Check to see if ...
Solution
Printer is OFF or not Make sure the printer is ON and that all power cables are firmly
connected to an
plugged into both the printer components and an active power source.
active power source.
Printer is offline.
Press [On]Line] to put the printer online. Printer should display READY
and [On]Line] should be lit.
Printer is online but
not receiving data
(the Data light does
not blink).
Check your I/O cable:
1. Check for loose I/O cable connections at printer and computer or
network port.
2. Try your I/O cable on a system that you know works.
3. Check that the correct interface cable was selected and securely
connected to both the printer and the computer. If the cable is not
correctly configured, see the Getting Started Guide for
configuration information.
Printer displays a
message.
See Table 7-2, “Printer Messages,” later in this chapter for printer
messages and recommended actions.
Data from a previous Select FORMFEED item from the Job Control Menu to print the pages
print job is still in the stored in the buffer.
printer’s buffer.
Last page did not
print and the Data
light is on.
Select FORMFEED item from the Job Control Menu to print the page
stored in the printer buffer. (Some older software programs do not
automatically send an “end of job” command.)
Data light is flashing
but nothing prints.
If at least one page has printed, go to the Job Control Menu. When
CANCEL JOB shows in the display, press [Select *] and then press
[Select *] again when the message changes to PRESS SELECT TO CANCEL
JOB. The display shows CANCELING JOB until the job terminates. (If the job
continues indefinitely, the application is stuck in a loop. Cycle printer power
OFF and ON and then attempt to determine the source of the problem.)
In the POSTSCRIPT MENU, set PRINT POSTSCRIPT ERRORS=ON* to print out a
PostScript error page when an error occurs.
Check your software application setup to ensure that it is correct. Also
check your cabling to ensure that it is secure.
7-10 Maintenance and Troubleshooting
EN
Computer, Network, or I/O Port Problems
Situation
Solution
Printer interface
problems
Print out a configuration page to verify that the interface configurations
shown on the printout match those on your host computer. (See
Chapter 4 to print a configuration page.)
Computer software
problem
Check that your computer is working correctly by printing from a
software application you know works or by printing a plain MS-DOS file
to see if the problem is with your software application or printer driver.
(For example, C:\dir>LPTn where n is the number of the computer
port the printer is connected to, for example LPT1.) To output the page,
you may have to send a formfeed command from your computer or
from the Job Control Menu.
Software is selecting Check your software application to be sure the print job is being sent to
the wrong port.
the correct port (for example, LPT1).
Network or shared
printer problems
Check for network or shared printer problems by connecting your
computer directly to the printer and printing from an application you
know works. If you suspect network problems, check with your network
administrator or consult the network documentation that came with
your printer network card(s).
Computer displays
DOS messages
such as: Write
Fault Error
Writing Device
LPTn: Abort,
Retry, Ignore?
1. Add a Mode command to your computer’s AUTOEXEC.BAT file for
the parallel port. It should be inserted immediately following the
PATH statement:
EN
For DOS versions below 4.0, add: MODE LPT1:,,P
For DOS versions 4.0 and above, add: MODE LPT1:,,B
2. Your I/O cable might be faulty; see “Printing Incomplete or
Incorrect” later in this section.
Maintenance and Troubleshooting 7-11
Maintenance &
Troubleshooting
Check that your computer’s port is configured and working properly.
One way to check this is to connect another printer to that port on your
computer and print an application you know works.
7
Printer port problem
Print Speed Too Slow
Situation
Solution
First page takes
Set the Power Save feature for a longer time period or turn it off. (See
much longer to print “Configuration Menu” in Chapter 4.) A page may take longer to print
than following pages. due to complex formatting commands, so changing the Power Save
period may not result in the first page being printed faster.
Printer is usually
slow to respond.
1. Printer speed is highly dependent on how your software
application is set up, which printer driver you are using, and how
much traffic is on the network. See the Getting Started Guide for
configuration information.
2. You may need to add more memory. See Chapter 1, “About Your
Printer,” for HP memory part numbers. Also see the “Determining
Memory Requirements” section in Chapter 2, “Memory and
Memory Management.”
Printing Incomplete or Incorrect
Situation
Blank pages print.
Solution
1. Turn the printer OFF and then back ON.
2. Make sure toner cartridge is installed properly.
3. Make sure the toner cartridge sealing tape has been removed.
(See the Getting Started Guide or the installation guide that came
with your toner cartridge.)
Garbled pages print,
there are overprints,
or only a portion of a
page prints.
1. Ensure that your software application is configured for the correct
printer.
2. Replace the printer interface (I/O) cable with a cable you know
works to see if the cable is defective.
3. Your parallel printer cable quality may be defective. Use a high-quality
cable; see Chapter 1 for an HP cable part number.
4. Set the PERSONALITY item in the Configuration Menu to AUTO
(see Chapter 4). The printer may have been set to PCL and a
PostScript job was sent to the printer, or vice versa.
5. Data file sent to the printer may be corrupt. Try sending another
file to see if it prints.
The job wasn’t
duplexed.
You may need to add more printer memory. See Chapter 1, “About
Your Printer,” for HP memory part numbers. Also see the “Determining
Memory Requirements” section in Chapter 2, “Memory and Memory
Management.”
7-12 Maintenance and Troubleshooting
EN
Data is missing, but
there are no printer
messages.
1. Check your software application to be sure the print file contains
no errors.
2. Check your cable to ensure that it is securely connected to both
the printer connector and the computer connector.
3. Your parallel printer cable may be defective. Use a high-quality
cable; see Chapter 1 for an HP printer cable part number.
Printing stops in the
middle of the job.
1. Check the control panel for an error message.
2. If you are on a network, make sure your computer is correctly
configured and there is not a network problem (see your network
administrator).
3. Check your line voltage to ensure that it is steady and within
printer specifications. (See Appendix A, “Specifications.”) Turn the
printer OFF and then back ON.
4. Check the time-out setting in your network application. It may
need to be increased.
5. If you are trying to copy a file to the printer from the DOS prompt,
use the copy command COPY filename LPTn /B (where n is
the number of printer port, such as LPT1).
7
Note: To output the page, you may have to send a formfeed
command from your computer or from the Job Control Menu.
Maintenance &
Troubleshooting
EN
Maintenance and Troubleshooting 7-13
Printer Ignores Font, Format, or Tray/Bin Selection
Situation
Printer prints some
wrong fonts or
formats.
Solution
1. The font is not present in the printer and must be downloaded by
your software application or the proper font SIMM must be
installed. Check your software program to ensure the correct
printer driver has been installed and configured. To verify that the
font or format you want is available, print a font list (see Chapter 4).
2. Your software selected a substitute font for one that is not available
in the printer. (See your software application manual for more
information on font selection.)
Printer draws media
from the wrong
paper source.
1. Be sure your software application is selecting the correct size of
media.
2. Ensure that the driver for your software application is correctly
installed, configured, and capable of requesting desired size and
type of media.
3. The size of paper you are requesting is not in the tray you have
selected. The printer draws paper from the next default tray with
the correct size. Put the correct size paper in the tray and make
sure it is adjusted correctly. Check Tray Menu for correct type and
size (for Tray 1). For Trays 2–4 look at the size loaded and correct
as needed. Ensure that the tray is loaded with enough paper to
complete the print job.
4. If you selected the 2000-Sheet Input Tray (Tray 4) and did not turn
the printer off when installing it, the printer does not recognize it
and draws paper from the next default paper size source. (Switch
the printer OFF, then back ON, and the printer will recognize Tray
4.)
Printer prints in
wrong personality
(for example, a text
listing of PostScript
commands prints
instead of your
document).
1. Ensure that the printer personality (such as PostScript) is installed
in the printer (see Chapter 4).
2. If your software application allows you to set personality, ensure
that it is set for the correct one. If your software application does
not allow you to select personality, set the PERSONALITY item in the
CONFIGURATION MENU to the correct personality (see Chapter 4).
3. Check PERSONALITY= setting to see if it is set to POSTSCRIPT or
PCL. If it is set to PCL, change it to AUTO. If it is set to AUTO, set it to
POSTSCRIPT for this print job only. When the job has printed, return
the setting to AUTO.
Control panel
settings, such as
resolution or
orientation, do not
work or are ignored.
Software commands override control panel settings. (See Chapter 4 for
information about how your software works with control panel settings.)
7-14 Maintenance and Troubleshooting
EN
Situation
Solution
Job went to a
different bin than
was expected.
The wrong size or type of media was used for the job. The Mailbox
with Stapler, the optional Envelope Feeder, and each tray supports
specific media. See the “Media Selection Guidelines” section of
Chapter 5 for selecting the most appropriate media for your print job.
Job prints on the
wrong side of the
paper.
Make sure you have loaded the media correctly.
If you are printing one-sided copies, load media into Tray 1 with the
side to be be printed facing up. Load media into Trays 2, 3, and 4 with
the side to be printed facing down.
If you are printing two-sided copies, load media into Tray 1 with the first
side to be printed (odd-numbered) facing down. Load media into Trays
2, 3, and 4 with the first side to be printed (odd-numbered) facing up.
7
Maintenance &
Troubleshooting
EN
Maintenance and Troubleshooting 7-15
Problems with Accessories
Tray 1
Situation
Solution
Cannot clear manual feed A previous print job may still be in the printer’s buffer. Go to the
messages
Job Control Menu and select FORMFEED.
Cannot print from Tray 1
Check to be sure you have selected Manual Feed or Tray 1
through your software application for the size and type for which
the tray is configured. For Manual Feed, wait for the printer to
request the manual feed before loading the media.
Paper is loaded into Tray Load the correct media in the tray. See Chapter 5 for information
1, and the control panel
on loading Tray 1. If the correct media is already loaded, press
displays a load or manual [On Line] so the printer will use that media.
feed message
Tray 2 and Tray 3
Situation
Solution
General operation
problems
For general paper operation information, see Chapter 5, “Print Tasks.”
Paper jams and
paper feeding
problems
1. See “Paper Jams” later in this chapter.
Cannot access Tray
2 or Tray 3
1. The printer selects paper from trays in a certain priority; see
Chapter 5.
2. Ensure that paper weight is within recommended range. See Chapter
5 for media specifications (Table 5-1) and media use guidelines
(Table 5-2).
2. Software application paper size and type must be selected for the
same media size and type as loaded in Tray 2 or 3.
3. Ensure that the tray is adjusted correctly for the paper size you are
using. See Chapters 4 and 5 for more information.
4. Check the Tray Menu for correct type of paper available.
LOAD TRAY x SIZE
Type media size
message
1. Load the requested media size. The printer has a job in the buffer
and is waiting to print on the correct media size.
2. Set the media type. (See Chapter 4.)
7-16 Maintenance and Troubleshooting
EN
Optional 2000-Sheet Input Tray (Tray 4)
Situation
Solution
Media size
adjustment and
installation
See Chapter 5.
Paper jams and
paper feeding
problems
1. See “Paper Jams” later in this chapter.
2. Ensure that the paper weight is within recommended range. See
Chapter 5 for media specifications (Table 5-1) and media use
guidelines (Table 5-2).
3. Don’t pull a paper tray out while printing.
4. Check cables and connectors between units.
5. Make sure media is fully and correctly loaded.
6. Make sure the paper guides are adjusted properly, and not
skewed. See Chapter 5 for more information on adjusting the
guides.
Cannot access
Tray 4.
1. Ensure that the paper tray guides are adjusted correctly for the
paper size you are using. (See Chapter 5.)
1. Ensure the 2000-Sheet Input Tray has been installed in your
printer driver. Refer to Chapter 3 for more information on
accessing the printer driver.
2. Switch the printer OFF then ON again.
3. Ensure that the cable from the Tray 4 base is plugged into the
printer. If not, turn the power OFF and plug the cable into the
printer, then switch the printer ON again.
4. If the printer still does not recognize Tray 4, contact your dealer or
authorized HP service provider.
Refer also to “Tray 2 and Tray 3” earlier in this section. The problems listed may occur in Tray 4,
also.
EN
Maintenance and Troubleshooting 7-17
Maintenance &
Troubleshooting
Printer does not
recognize Tray 4.
7
2. Check Tray Menu for correct type of paper in Tray 4.
Optional Multi Bin Mailbox or Mailbox with Stapler
Situation
Solution
The job wasn’t
stapled.
Jobs sent to the stapler may not be stapled for one or more of the
following reasons:
1. The wrong size or type of media was used for the job.
2. More than 20 pages were sent to the stapler, exceeding its
capacity.
3. The stapler may have an obstruction (bent or broken staples) in
the stapling bed.
4. If a staple jam was recently cleared, up to 12 following jobs may
not be stapled.
5. The job may have been sent to a bin other than the stapler bin.
The wrong size or type of media was used for the job.
6. One-page jobs will not be stapled.
7. Check the interface cable between the multi-bin mailbox and the
stapler unit.
General repeated
staple jam problems.
1. Check to see that the job to be stapled is less than 2 mm thick.
Printer does not
recognize Mailbox
with Stapler
1. Ensure that the Mailbox with Stapler has been installed in your
printer driver. Refer to Chapter 3, “Printer Software,” for more
information on accessing the printer driver.
2. Stapler may have some trapped staple wires that are obstructing
the magazine. Remove loose staples and paper dust from the
inside of the stapler.
2. Ensure that the cable from the Mailbox with Stapler is plugged into
Tray 4. If not, turn the power off and plug the cable into Tray 4,
then turn the power back on.
3. Ensure that all bins are properly installed.
4. If the printer still does not recognize the Mailbox with Stapler,
contact you dealer or authorized HP service provider.
Printer does not
recognize stapler.
Paper jams and
paper feeding
problems
Check the cable between the printer and the stapler. Make sure it is
properly connected at both ends.
1. Ensure that you are using 20-lb bond paper.
2. Do not pull paper out of the bins while printing.
3. Check cables and connectors between units.
7-18 Maintenance and Troubleshooting
EN
Optional Envelope Feeder
Situation
Envelope jams and
envelope feeding
problems
Solution
1. Make sure the envelopes are within the specifications listed in
Chapter 5 and the HP LaserJet Printer Family Paper Specification
Guide.
2. Make sure the envelopes are properly loaded.
3. Make sure the envelope lever is down.
4. Make sure the optional Envelope Feeder extension is fully pulled
out.
Multifeeds
1. The envelopes must meet Envelope Feeder specifications.
2. Make sure to feed the envelope all the way down. The first
envelope to be fed must be closer to the Pick Up Roller than the
others.
3. The slide which stops the envelopes must be on the outside.
4. Adjust the tray to the right width of the envelope.
No Picks
1. The envelopes must meet Envelope Feeder specifications.
2. Make sure you are not overloading the Envelope Feeder.
1. Turn the printer OFF, remove and re-install the optional Envelope
Feeder, then turn the printer back ON.
2. Ensure the optional Envelope Feeder has been installed in your
printer driver. Refer to Chapter 3 for more information on
accessing the printer driver.
Optional Printer Hard Disk
Situation
Solution
Printer does not
recognize disk.
Turn power off and verify that the ribbon cable that connects the disk to
the printer is securely fastened.
Disk is not initialized. Use the Windows-based HP JetAdmin utility or the Macintosh-based
(Control panel
HP LaserJet Utility to initialize the disk.
displays 30.1.0
DISK NOT
INITIALIZED.)
Disk failure. (Control
panel displays
31.1.0 DISK
FAILURE.)
EN
Turn power off and verify that the ribbon cable that connects the disk to
the printer is securely fastened. If the control panel message continues
to be displayed, the disk drive needs to be replaced.
Maintenance and Troubleshooting 7-19
Maintenance &
Troubleshooting
Printer does not
recognize optional
Envelope Feeder.
7
3. When loading the envelopes it is necessary to push them all the
way down to touch the rollers.
Disk is write
protected.
Fonts and forms cannot be stored on the disk when the disk is
write-protected. Use the Windows-based HP JetAdmin utility or the
Macintosh-based HP LaserJet Utility remove write-protection.
Attempted to use a
disk-resident font,
but the printout
substituted a
different font.
If you are using PCL, print the PCL Font Page, and verify that the font
is on the disk. If you are using PostScript, print the PostScript Font
Page and verify that the font is on the disk. If the font is not on the disk,
use the Windows-based HP JetAdmin utility or the Macintosh-based
HP LaserJet Utility to download the font to the disk.
Optional SIMM Boards
Situation
Solution
61.x SERVICE
where x = 0, 1, 2, 3,
or 4.
This error indicates a SIMM parity error. The x indicates which SIMM
slot generated the error. If x = 0, the slot with the defective SIMM could
not be determined. Check the HP part number to make sure you have
the right SIMM board; if you do, see the checking procedure for
61.x SERVICE and 62.x ERROR below.
62.x ERROR
where x = 0, 1, 2, 3,
or 4.
This error indicates that your printer has identified a problem while
checking memory. If x = 0, the problem is in internal Read-Only
Memory (ROM); see your HP service representative. If x = 1, 2, 3, or
4, the problem is in SIMM slot 1, 2, 3, or 4.
63 NEEDS SERVICE / This indicates that the printer has found a problem in its internal RAM
63 SERVICE
memory. Switch your printer OFF, and then ON, to clear the error. If the
message reappears, call your authorized HP dealer or service
representative.
To check memory for the 61.x SERVICE and 62.x ERROR messages:
1 Switch the printer OFF, then back ON (data will be lost).
2 If the error message appears again, switch your printer OFF and
verify that the SIMM board is installed correctly; then switch your
printer ON.
3 If the error message appears again, switch your printer OFF and
remove the SIMM board(s); then switch your printer back ON.
4 If the error message appears again, the problem is in on-board
memory. If the error message does not appear, the problem is in
SIMM memory. Call your HP service representative.
7-20 Maintenance and Troubleshooting
EN
SIMM Validation Error Messages
Validation error messages appear when a SIMM fails to be initialized
when the printer is turned on. This error is in the format
53.XY.ZZ ERROR. Table 7-1 lists these errors.
Table 7-1
Validation Error Messages
X (Hardware Type) Y (Hardware Device)
ZZ (Error Number)
0: ROM
1: RAM
0:
1:
2:
3:
4:
5:
6:
7:
8:
9:
10:
11:
12:
0:
1:
2:
3:
4:
Internal Memory
SIMM Slot 1
SIMM Slot 2
SIMM Slot 3
SIMM Slot 4
Unsupported memory
Unrecognized memory
Unsupported memory size
Failed RAM test
Exceeded maximum RAM size
Exceeded maximum ROM size
Invalid SIMM speed
SIMM reporting information incorrectly
SIMM RAM parity error
(n/a)
SIMM address conflict
ROM out of bounds
Could not make temporary mapping
Maintenance and Troubleshooting 7-21
Maintenance &
Troubleshooting
EN
7
Although these errors can be ignored, the SIMM that caused the error
will not be configured. If the SIMM causing the error is a RAM SIMM,
the printer will continue to function with less RAM. If the SIMM is a
ROM containing a printer personality (such as PostScript) the printer
will continue but without that personality.
PostScript Troubleshooting
Situation
Solution
A text listing of PostScript
commands prints instead
of your PostScript printing
job.
The control panel PERSONALITY=AUTO setting may have been
confused by a nonstandard PostScript code. Check PERSONALITY=
to see if it is set to POSTSCRIPT or PCL. If it is set to PCL, set it
to PERSONALITY=AUTO. If it is set to AUTO, set it to POSTSCRIPT
for this print job only. When the job has printed, return the setting
to AUTO.
The job prints in Courier The requested typeface is not available in the printer or is not
(the printer’s default font) present on the disk. Use a font download utility to download the
instead of the font you
desired font.
requested.
Fonts downloaded to memory are lost when the printer is switched
OFF. They are also lost if Resource Saving is not used and a
personality switch is performed to print a PCL job. Disk fonts are
not affected by PCL jobs or by switching the printer to OFF.
Print a PostScript Font Page to verify that the font is available. If a
disk font appears to be missing, it may be because a software
utility was used to delete the font, because the disk was
re-initialized, or because the disk drive is not installed correctly.
Print a configuration page to verify that the disk drive is installed
and functioning correctly.
Print a Disk Directory to aid you in identifying available fonts.
A page prints with clipped If the page margins are clipped, you may have to print the page at
margins.
300-dpi resolution or install more memory. Also try turning
Resource Saving and I/O Buffering OFF.
A page fails to print.
Set PRINT POSTSCRIPT ERRORS=ON, and then send the job again to
print a PostScript error page. If an error page prints, refer to the
next table entry “A PostScript error page prints.” If this does not
correct the problem try turning Resource Saving and I/O Buffering
OFF, or installing more memory. (See Chapters 2 or 4 for more
information about PostScript printing.)
A PostScript error page
prints.
Make sure the print job is a PostScript job. Check to see whether
your software expected you to send a setup or PostScript header
file to the printer. Check the printer setup in your software
application to ensure that the printer is selected. Check cable
connections to ensure that they are secure.
Reduce the complexity of the graphic. Add available memory by
turning on Resource Saving.
7-22 Maintenance and Troubleshooting
EN
Paper Jams
If one of these messages appears in the display panel, look for jammed
paper in the locations indicated in Figure 7-1:
•
•
•
•
13.x PAPER JAM CLEAR n PAGES
13.0 PAPER JAM CLEAR PRINTER
STAPLER MALFUNCTION
STAPLER ALIGN ERROR
x = the number for a specific jam
n = the number of pages jammed in the printer
7
Maintenance &
Troubleshooting
EN
Maintenance and Troubleshooting 7-23
Figure 7-1 shows the possible locations for most paper jams.
Figure 7-1
Paper Path Jam Locations
1 Toner cartridge area
7 Tray 2 and Tray 3
2. Tray 1 pick-up roller and feed area
8. Fusing Assembly Area
3. Right door
9. Left Door
4 Vertical transfer door
10. Optional Multi-Bin Mailbox
5. Optional 2000-Sheet Input Tray (Tray 4) 11. Optional Mailbox with Stapler
6. Front door
7-24 Maintenance and Troubleshooting
EN
Open and close all printer covers to clear the paper jam message. After
removing a sheet of paper you may need to check other areas to ensure
that all paper has been removed.
Note
Whenever a sheet of jammed paper becomes badly shredded it is a good
idea to carefully piece all parts together to be sure you haven’t
overlooked some small part. All portions of a jammed piece of paper
must be removed or you may run into repeated jams.
If after you clear a paper jam (by following the procedures on the next
few pages) the printer still jams, there are a few things you can do:
• Use the JAM RECOVERY=ON menu item under the PostScript Menu. The
•
•
•
Paper jams occur most often when:
•
•
•
•
EN
Paper trays are not correctly loaded (see Chapter 5, “Print Tasks”).
Your print media does not meet the specifications listed in Chapter 5.
The media is in poor condition.
The printer needs cleaning.
Maintenance and Troubleshooting 7-25
Maintenance &
Troubleshooting
Also refer to “Repeated Paper Jams” later in this chapter.
7
•
printer will attempt to automatically recover from paper jams.
Execute a formfeed from the computer or the printer control panel (a
menu item under the Job Control Menu). A formfeed may flush any
paper or envelopes left in the printer.
Check to make sure you have located and removed all scraps of paper
from inside the printer.
Use the Error Log Page and Error Codes to aid you in isolating where
the errors are occurring. (See Chapter 4 “Error Log Page,” and the
“Printer Messages” table at the end of this chapter.)
Ensure the area under the registration in not jammed. Remove the toner
cartridge and lift the two green tabs located below the toner cartridge
area.
Clearing the Top Output Bin
If the paper jam extends into the output area, as shown in Figure 7-2,
slowly and carefully pull the paper straight out of the printer so it
doesn’t tear.
Figure 7-2
Top Output Bin
Clearing Tray 1
1 Open the door of Tray 1.
2 Check for paper in the pick-up roller of Tray 1.
3 Remove any paper from this area by pulling it in the direction shown by
the arrow in Figure 7-3.
4 Remove any and all pieces of torn paper. Carefully check to be sure you
have removed all scraps.
Figure 7-3
Paper Tray 1
7-26 Maintenance and Troubleshooting
EN
Clearing the Right Door
Open the right door located below Tray 1.
Check for paper jammed in the pick-up roller of Tray 2 or 3.
Open the jam access cover.
Remove any paper from this area by pulling it in the direction shown by
the arrow in Figure 7-4.
5 Remove any and all pieces of torn paper. Carefully check to be sure you
have removed all scraps.
1
2
3
4
Figure 7-4
7
Maintenance &
Troubleshooting
Right Door
EN
Maintenance and Troubleshooting 7-27
Clearing the Top Cover
1 Open the top cover.
2 Remove the toner cartridge.
WARNING
Avoid touching the adjacent fusing area. It may be HOT.
3 Lift the handle that has a “2” printed on it and the plate below it that has
a ”3” printed on it to clear any jams that may be hidden.
4 Remove any paper in this area by pulling it in the direction shown in
Figure 7-5.
5 Remove all pieces of torn paper. Carefully check to be sure you have
removed all scraps.
6 Replace the toner cartridge and close the top cover.
Figure 7-5
Top Cover
7-28 Maintenance and Troubleshooting
EN
Clearing the Front Door (Duplex Area)
1 Open the front door.
2 Check for paper jammed in this area.
3 Remove any paper by pulling it in the direction shown by the arrow (A)
in Figure 7-6. Be careful not to tear the page.
4 If you cannot remove all the paper from the front door, open the left
door and carefully pull out any jammed paper (B). If a mailbox
accessory is installed, push it away from the printer to access the left
door.
WARNING
Avoid touching the adjacent fusing area. It may be HOT.
5 If a Duplex Unit is installed, remove the Duplex Unit (C) by pressing
the colored tab on the lower right side of the unit and pulling the entire
unit out of its slot.
6 Remove any paper remaining in the Duplex Unit (C).
7 Reinstall the Duplex Unit by sliding it back into the slot until it clicks
into place and close all open doors.
8 Push the mailbox accessory back into place, if one is installed.
7
Figure 7-6
Maintenance &
Troubleshooting
Front Door (Duplex Area)
Note
EN
A.
Front door jam
B.
Left door jam
C.
Duplex Unit removed
After removing a sheet of paper, you may need to check other areas to
ensure that all paper has been removed. Whenever a sheet of jammed
paper becomes badly shredded, it is a good idea to carefully piece all
parts together to be sure you haven’t overlooked some small part. All
portions of a jammed piece of paper must be removed, or you may run
into repeated jams.
Maintenance and Troubleshooting 7-29
Clearing the Left Door (Fuser Area)
1 Open the left door. If a mailbox accessory is installed, push it away
from the printer first to access the left door.
WARNING
Avoid touching the adjacent fusing area. It may be HOT.
2 Remove any jammed or damaged paper from this area by pulling it in
the direction shown by the arrow (A) in Figure 7-5.
3 Lower the two green tabs and carefully check for additional pieces of
paper. Remove all scraps.
4 Close the door.
5 Push the mailbox back into place, if one is installed.
Figure 7-7
Left Door
A.
Left door jam
B.
Fuser area jam
7-30 Maintenance and Troubleshooting
EN
Clearing Tray 2 (or Tray 3)
1 Open the tray.
2 Remove jammed or damaged paper from this area by pulling it in the
direction shown by the arrow in Figure 7-8.
3 Be sure to clear any torn pieces of paper.
4 Close the tray.
Figure 7-8
7
Tray 2 (Tray 3 is below Tray 2)
Maintenance &
Troubleshooting
EN
Maintenance and Troubleshooting 7-31
Clearing the optional Multi-Bin Mailbox or Mailbox
with Stapler
1 Turn off the printer and remove the Left Output Bin.
2 Refer to (A) in Figure 7-9 and clear paper from the jammed area by
carefully pulling it out, away from the printer.
3 Pull the mailbox away from the printer and check the area illustrated
in (B). Carefully remove all scraps.
4 Also check the fuser area, illustrated in (C).
After removing a sheet of paper you may need to check other areas to
ensure that all paper has been removed. Whenever a sheet of jammed
paper becomes badly shredded, it is a good idea to carefully piece all
parts together to be sure you have not overlooked some small part. All
portions of a jammed piece of paper must be removed or you may run
into repeated jams.
Note
Figure 7-9
Mailbox with Stapler
A.
Mailbox output area
B.
Mailbox input area
C.
Fuser area jam
7-32 Maintenance and Troubleshooting
EN
Clearing the optional 2000-Sheet Input Tray (Tray 4)
1 Slide open Tray 4.
2 Remove damaged or jammed paper from area (A) by pulling it in the
direction shown by the arrow in Figure 7-10.
3 Be sure to clear any torn pieces of paper.
4 Check the vertical transfer door and other areas for additional damaged
or jammed paper; refer to area (B) in Figure 7-10.
5 Close the tray and vertical transfer door.
Figure 7-10
7
Maintenance &
Troubleshooting
2000-Sheet Input Tray (Tray 4)
EN
A.
Tray 4 jammed paper
B.
Vertical transfer door paper jam
Maintenance and Troubleshooting 7-33
Clearing the Optional Envelope Feeder
1 Open the top cover.
2 Remove toner cartridge.
WARNING
Avoid touching the adjacent fusing area. It may be HOT.
3 Remove envelopes in this area by pulling them in the direction shown by
the arrow in Figure 7-11.
4 Remove any and all pieces of torn paper. Carefully check to be sure you
have removed all scraps. Lift both green user tabs to clear any jams that
may be hidden.
5 You may need to remove the optional Envelope Feeder to release any
jammed envelopes or scraps of paper.
6 After removing all pieces of the envelope or paper, replace the optional
Envelope Feeder and toner cartridge.
Figure 7-11
Optional Envelope Feeder
7-34 Maintenance and Troubleshooting
EN
Repeated Paper Jams
Situation
Solution
General repeated
paper jam problems
1. Check to see that media is correctly loaded in the trays, and that
all width guides are correctly set (not skewed). See Chapter 5,
“Print Tasks.”
2. Try turning over the stack of paper in the tray. If you are using
letterhead paper, try printing from Tray 1.
3. Do not use previously printed paper or torn, worn, or irregular paper.
For the recommended paper and other media for your printer, see
Chapter 5.
4. Check the media specifications (if outside of the recommended
specifications, problems may occur).
5. Printer may be dirty. Clean the printer as described in the first
section of this chapter.
6. Check that paper is NOT longer than 17.7 in (450 mm), wider than
11.7 in (297 mm), shorter than 3.9 in (100 mm), or slimmer than 7.5
in (191 mm). (These are the maximum and minimum dimensions that
the printer can feed, otherwise the printer will jam.)
EN
Maintenance and Troubleshooting 7-35
Maintenance &
Troubleshooting
If jams continue, contact your authorized HP service provider.
7
7. Ensure that the paper tray is set for the size of paper installed and
that the tray is not overloaded with paper.
Printer Messages
Table 7-2 lists and describes printer messages and suggests
recommended actions.
Printer Messages
Message
Description
Recommended Action
READY
The default ready message. The
printer is ready to use.
No action required.
OFFLINE
The printer is offline and cannot
print data.
Press [On Line].
WARMING UP
The printer is warming up and is
not ready to accept data.
Wait until the printer signals
READY.
POWER SAVE ON
The printer is in Power Save mode. No action required. The job
prints when the fuser has
In Power Save mode all control
panel keys operate normally. (See warmed (about 45 seconds).
“Configuration Menu” in Chapter 4.)
PERFORM USER
MAINTENANCE
This message indicates that the
printer requires routine
maintenance. It will replace the
READY message until it is cleared.
Purchase a maintenance kit
and install the new parts. Then
remove the message by
turning SERVICE MESSAGE=
OFF in the CONFIGURATION
MENU.
PRINTING
CONFIGURATION PAGE
The printer is printing a
configuration page.
No action required.
PRINTING FONT LIST
The printer is printing a font list.
(Note that PCL/PostScript formats
are the same.)
No action required.
PRINTING DEMO PAGE
The printer is printing a
Demonstration Page.
No action required.
COPY XX OF YY from
Tray n
This message indicates the
progress of the current job.
No action required.
INTERNAL TEST
The printer is conducting a test of
its components.
No action required.
PROCESSING JOB FROM
TRAY n
The printer is working on a job
from the indicated tray.
No action required.
TRAY n LIFTING
The printer is lifting the paper tray
to its working position after paper
was loaded.
No action required.
Continued on the next page.
7-36 Maintenance and Troubleshooting
EN
Printer Messages, continued
Message
Description
Recommended Action
TRAY n EMPTY
The indicated tray is empty.
The printer will still function.
Load paper, if desired.
TRAY n OPEN
The indicated tray is open.
The printer will still function.
Close the tray, if desired.
RESTORING FACTORY
SETTINGS
The printer returns almost all
settings to their factory default
configurations.
Reconfigure your printer and
MIO.
One of the printer’s covers or
doors is not firmly closed, or your
toner cartridge is not installed
correctly.
ACCESS DENIED
Your network administrator has
See your network
locked out access to the control
administrator.
panel menu system, except for the
Test Menu and Tray 1 size.
INSTALL TONER CARTRIDGE The toner cartridge is not installed Insert a toner cartridge or
correctly or is not installed.
make sure the cartridge is
fully seated and the covers
are fully closed.
LOAD TRAY X
<media type> <paper
size>
or
LOAD ENV FEEDER
<media type> <paper
size>
The printer received a request for
a media type, or paper/envelope
size not available in the printer.
Load the indicated tray with
the correct media, or see
Chapter 4 or 5 to change the
media size and type through
the control panel.
Continued on the next page.
EN
Maintenance and Troubleshooting 7-37
Maintenance &
Troubleshooting
Make sure your toner
cartridge is fully seated and
the printer top cover or doors
(left, front, and right) are
firmly closed.
CLOSE PRINTER COVERS
7
When you install an MIO
card(s), to reinitialize the
printer control panel you may
need to perform a cold reset.
(Note: In a shared
environment, this task should
only be performed by the
system administrator.) To
perform a cold reset, hold
down [On Line] while
switching the printer ON until
RESTORING FACTORY
SETTINGS appears in the
display.
Printer Messages, continued
Message
Description
Recommended Action
MANUAL FEED TRAY 1
<media type> <paper
size>
The printer received a request for
a media of a certain type and size
to be manually fed in Tray 1.
Load the correct media in the
tray. See Chapter 5 for
information on loading Tray 1.
If the correct media is already
loaded, press [On Line] so the
printer will use that media.
PAPER DESTINATION =
ALL BINS
Paper will be output to all available No action required.
bins.
INPUT TRAY = ALL
TRAYS
Paper will be pulled from all
available trays.
No action required.
TONER LOW
The toner cartridge is running out
of toner.
Shake the toner cartridge or
replace it. Press [Select *] to
override the stopped condition
and continue printing.
HP MIO 1 INITIALIZING The MIO card(s) are initializing.
or
This is a status message; during
HP MIO 2 INITIALIZING initialization the MIO is not active,
but since the printer supports I/O
switching, the printer remains
online.
No action required. Display
clears automatically (this may
take up to five minutes,
depending on the card).
However, if the message
remains after five minutes a
problem does exist. Contact
you network administrator or
consult the network
documentation that came with
your MIO card.
Continued on the next page.
7-38 Maintenance and Troubleshooting
EN
Printer Messages, continued
Message
Description
Recommended Action
CLEARING PAPER FROM
PRINTER
The printer is attempting to
remove unusable paper (such as
after a paper jam)
No action required.
REMOVE PAPER FROM TOP
OUTPUT BIN
or
REMOVE PAPER FROM
OPTIONAL OUTBIN n
The destination output bin is full
Remove the paper from the
and no more pages can be sent to indicated output bin.
that bin.
INPUT DEVICE FEED PATH The 2000-sheet input tray (Tray 4)
OPEN
is open.
Push Tray 4 into the printer
until completely closed.
OUTPUT DEVICE DELIVERY The output device is not properly
PATH OPEN
seated against the printer or the
stapler lid is open.
Ensure the output device is
pushed flush against the
side of the printer and close
the stapler lid.
Send only print jobs of 20
pages or less to the stapler.
STAPLER SUPPLY OUT
The stapler is out of staples. Job is Load a new stapler cartridge.
not stapled.
STAPLER MALFUNCTION
The stapler has not finished
correctly.
Clear the stapler jam and
resend job.
STAPLER ALIGN ERROR
The paper is misaligned and
cannot be stapled.
Remove the paper from the
stapler and resend the job.
Continued on the next page.
EN
Maintenance and Troubleshooting 7-39
Maintenance &
Troubleshooting
The stapler’s 20-sheet limit has
been reached. Job is not stapled.
7
STAPLE LIMIT REACHED
Printer Messages, continued
If the following errors persist, call your HP-authorized service provider.
Message
Description
Recommended Action
13.x PAPER JAM CLEAR n
PAGES
or
13.x PAPER JAM CLEAR THE
PRINTER
Paper is jammed in the
printer or in an input/output
accessory.
Remove jammed paper from
under the toner cartridge, the
right door, the front door, the
left door, and in any installed
input/output accessories.
20 MEMORY OVERFLOW
DATA LOST
The printer received more
data from the computer than
can fit in its available user
memory.
Press [Select *] to print the
transferred data (data loss
may result). Then make more
memory available in the
printer by removing some
fonts, macros, or any other
data from memory; simplify
the page sent to the printer;
or install additional memory.
(Note: if AUTO CONTINUE=ON
the printer will automatically
continue printing when this
error occurs.)
21 PRINT OVERRUN
DATA LOST
The data (dense text, rules,
raster or vector graphics) sent
to the printer was too
complex.
Press [Select *] to resume
printing. (Note: if AUTO
CONTINUE=ON the printer will
automatically continue
printing when this error
occurs). You may lose some
data. Try to simplify your print
job.
7-40 Maintenance and Troubleshooting
EN
Printer Messages, continued
If the following errors persist, call your HP-authorized service provider.
Message
Description
Recommended Action
22 PARALLEL IO ERROR
CHECK SETUP
For Bi-Tronics parallel (PAR)
configuration, the computer and
printer are not communicating
because of improper signal
protocols. Check both computer
and printer I/O settings.
Press [Select *] to clear the
error message (data will be
lost). If the error continues, call
your authorized HP dealer or
service representative.
22 HP MIO 1 IO ERROR
CHECK SETUP (or HP MIO
2)
For the MIO error, this is an I/O
buffer overrun error.
For the parallel configuration,
check for loose cable; use a
high-quality cable (see
Chapter 1 for HP cable part
numbers and information).
(Note: some non-HP parallel
cables may be missing pin
connections.)
30.x.y DISK
NOT INITIALIZED
The printer hard disk is not
initialized.
Press [Select *] to continue.
Use the Windows based HP
JetAdmin utility or the
Macintosh based HP LaserJet
Utility to initialize the disk.
30.x.y DISK
FAILURE
The printer hard disk has failed
self test.
Press [Select *] to continue.
Turn power off and verify that
the ribbon cable that connects
the disk to the printer is
securely fastened. If the
control panel message
continues to be displayed, the
disk drive needs to be
replaced.
Continued on the next page.
EN
Maintenance and Troubleshooting 7-41
Maintenance &
Troubleshooting
If problem persists,
power-cycle the printer. These
error messages are saved in
the Error Log.
7
If you are using an I/O other
than the Bi-Tronics parallel I/O,
see the manual for that device
or contact your dealer. If you
are on a network, contact your
network administrator.
Printer Messages, continued
If the following errors persist, call your HP-authorized service provider.
Message
Description
31. X.Y DISK FAILURE
The printer detected a disk failure. Printer operation may
continue, if access to the
disk is not required. Press
[Select *] to continue printing
when this error occurs. Call
service to repair or replace
the disk.
40.1 HP MIO ERROR
40.2 HP MIO ERROR
An abnormal connection break
occurred while transferring data
from the computer. Error 40.1 is
for port 1 (upper slot), and error
40.2 is for port 2 (lower slot).
(If you are using an I/O other
than the Bi-Tronics parallel
I/O, refer to the user’s
manual for that product.)
Press [Select *] to clear the
error message. I/O
connections on that MIO
card will not be used.
41.1 GENERAL
MISPRINT ERROR
41.2 BEAM DETECT
MALFUNCTION
41.4 NO VIDEO
SYNC
41.5 NOISY VIDEO
SYNC REQ SIGNAL
A nonfatal error has occurred in
the printed page.
Press [Select *] and attempt
to continue. If problem
persists, turn printer OFF
and then back ON.
The printer detected that the
actual paper size is not the same
as the paper tray setting.
Verify that the paper tray size
is properly set. Trays 2, 3,
and 4 are set by positioning
the adjustment bars. Tray 1
is set via the tray menu on
the printer control panel.
The printer identified an internal
service error (hardware problem
with fuser).
Switch the printer OFF and
then back ON.
41.3 IMPROPER
PAPER SIZE
50.x FUSER ERROR
CYCLE POWER
Recommended Action
50.1 Fuser low-temperature failure
50.2 Fuser warm-up failure (timed
out)
50.3 Fuser over-temperature
failure
50.4 Fuser with wrong voltage
Continued on the next page.
7-42 Maintenance and Troubleshooting
EN
Printer Messages, continued
If the following errors persist, call your HP-authorized service provider.
Message
Description
Recommended Action
51.x ERROR
CYCLE POWER
The printer detected a laser sub-system Turn the printer OFF then
problem.
ON again.
51.1 Beam detection malfunction
51.2 Laser malfunction
52.x ERROR
CYCLE POWER
The printer detected a scanning
sub-system problem.
Turn the printer OFF then
ON again.
52.1 Scanner startup failure
52.1 Scanner rotation failure
53.XY.ZZ MEMORY
ERR CYCLE POWER
An error occurred during configuration
and validation of SIMM memory:
X (Hardware Type):
0: ROM
1: RAM
54 2-SIDED ERROR
CHECK DUPLEXER
There is a Duplex Unit guide
malfunction.
Remove and re-install the
Duplexer Unit. Remove any
jammed paper from the
Duplexer Unit.
Continued on the next page.
EN
Maintenance and Troubleshooting 7-43
Maintenance &
Troubleshooting
ZZ (Error Number):
0: Unsupported memory
1: Unrecognized memory
2: Unsupported memory size
3: Failed RAM test
4: Exceeded maximum RAM size
5: Exceeded maximum ROM size
6: Invalid SIMM speed
7: SIMM reporting information
incorrectly
8: SIMM RAM parity error
9: Not used
10: SIMM address conflict
11: ROM out of bounds
12: Could not make temporary mapping
7
Y (Hardware Device):
0: Internal Memory
1: SIMM Slot 1
2: SIMM Slot 2
3: SIMM Slot 3
4: SIMM Slot 4
Make sure your SIMM
board is installed correctly
(see Appendix C, “Memory
and Personality SIMM
Installation”). Replace the
SIMM that caused the error.
[Select *] will allow you to
continue but the SIMM that
caused the error will not be
configured. If the SIMM
device has more than one
bank of memory, the good
banks will be configured.
Printer Messages, continued
If the following errors persist, call your HP-authorized service provider.
Message
Description
Recommended Action
55.xx ERROR
PRESS SELECT KEY
Printer command error;
Press [Select *] to resume
commands cannot be exchanged operation. If necessary turn
between the print engine and its
the printer OFF and then ON.
formatter board.
56.x ERROR
PRESS SELECT KEY
An invalid input
source/destination output
bin has been requested.
Press [Select *] to resume
operation.
56.1 Invalid input source
56.2 Invalid output destination
(for example, improper media
size being sent to duplexer)
Correct invalid request(s).
If necessary turn the printer
OFF and then ON.
57.x FAN FAILURE
CALL SERVICE
One of the cooling fans has failed. Turn printer off and call
service immediately.
Do not operate with this
condition.
58.x PRINTER ERROR
CYCLE POWER
One of the input paper tray lifters
has failed.
Press [Select *] to resume
operation. Note: the tray
indicated by this error will be
ignored until the next time the
printer is turned off then on
again.
59.x PRINTER ERROR
CYCLE POWER
There is a problem with the main
motor.
Turn the printer OFF then ON
again.
Continued on the next page.
7-44 Maintenance and Troubleshooting
EN
Printer Messages, continued
If the following errors persist, call your HP-authorized service provider.
Message
Description
Recommended Action
61.x PRINTER ERROR
CYCLE POWER
The printer encountered a parity
error when accessing internal
RAM or some SIMM memory in
slot x.
Switch the printer OFF and
then ON (data stored in
printer will be lost). If the
error is still present, first
verify that the SIMM board is
correctly installed. Switch the
printer ON. If the error is still
present, switch the printer
OFF and remove the SIMM
board. Switch the printer
back ON. If the error
message does not appear,
the problem is on the SIMM.
See Appendix C, “Memory
and Personality SIMM
Installation,” for more
information.
0:
1:
2:
3:
4:
0:
1:
2:
3:
4:
Internal memory
SIMM slot 1
SIMM slot 2
SIMM slot 3
SIMM slot 4
Switch the printer OFF and
then ON (data stored in
printer will be lost). If the
error is still present, first
verify that the SIMM board is
correctly installed. Switch the
printer ON. If the error is still
present, switch the printer
OFF and remove the SIMM
board. Switch the printer
back ON. If the error
message does not appear,
the problem is on the SIMM.
See Appendix C, “Memory
and Personality SIMM
Installation,” for more
information.
64 PRINTER ERROR
CYCLE POWER
The printer identified a scan buffer Turn the printer OFF then
error.
ON again.
65 PRINTER ERROR
CYCLE POWER
The printer identified a dynamic
RAM controller error.
EN
Turn the printer OFF then
ON again.
Maintenance and Troubleshooting 7-45
Maintenance &
Troubleshooting
The printer identified a CRC error
while checking its memory. x
refers to the memory the printer
was checking when it encountered
the error.
7
62.x PRINTER ERROR
CYCLE POWER
Internal memory
SIMM slot 1
SIMM slot 2
SIMM slot 3
SIMM slot 4
Printer Messages, continued
If the following errors persist, call your HP-authorized service provider.
Message
Description
Recommended Action
66.x.yy DEVICE ERROR
CYCLE POWER
The printer identified a paper
handling controller error. x
identifies the device (1–5) and yy
is the error code (0–99)
Turn the printer OFF then ON
again.
0: Paper Handling
Controller (PHC)
1: First device attached
to the PHC
2: Second device attached to
the PHC
3: Third device attached to
the PHC
4: Fourth device attached to
the PHC
5: Fifth device attached to
the PHC
67 PRINTER ERROR
The printer identified a
miscellaneous interface hardware
error.
Turn the printer OFF then ON
again.
68 ERROR
CHECK CONFIGURATION
There is a checksum error in the
printer’s nonvolatile memory
(NVRAM). Some or all of the menu
items have been reset to the
factory default values.
Check all menu settings; reset
if necessary. Press [Select *]
to continue. If you switch the
printer OFF and then ON, you
may lose settings (to check
settings, print a configuration
page).
68 NVRAM FULL
CHECK CONFIGURATION
The printer’s nonvolatile memory
(NVRAM) is full.
Press [Select *] to continue.
The system will automatically
perform a cold reset and
display RESTORING FACTORY
SETTINGS. The system will
complete initialization and
return to the online condition.
Continued on the next page.
7-46 Maintenance and Troubleshooting
EN
Printer Messages, continued
If the following errors persist, call your HP-authorized service provider.
Recommended Action
70 ERROR or 71 ERROR
CHECK CONFIGURATION
A firmware SIMM problem was
identified (incompatibility between
SIMM/hardware/BIOS).
Switch the printer OFF and
then back ON.
79 SERVICE (xxxx)
CALL SERVICE
An internal controller error
occurred. xxxx indicates the error
type.
Switch the printer OFF and
then back ON. If the error
appears again, turn power
OFF and remove any non-HP
SIMM memory boards from
the printer. Then switch the
printer back ON. If the error
appears again, record the
numbers following the error
message and call your
authorized HP dealer or
service representative.
80 SERVICE (xxxx)
CALL SERVICE
The printer detected a problem in
the MIO card. xxxx indicates the
error type.
Switch the printer OFF and
then back ON. If the error
appears again, record the
numbers following the error
message and call your card
supplier, or authorized HP
dealer or service
representative.
Continued on the next page.
EN
Maintenance and Troubleshooting 7-47
Maintenance &
Troubleshooting
Description
7
Message
Calling for Help
If you try all the suggestions given in this manual and still need
assistance, call the authorized Hewlett-Packard dealer where you
purchased your printer. See appendix E for a listing of HP Sales and
Service offices.
Customer Support Options US and Canada
Customer Support Assistance
(208) 323-2551 Mon-Fri 6 a.m. to 6 p.m. (Mountain Time) Free of charge during the
Warranty Period. Please have your serial number ready when calling.
Post-warranty telephone assistance is available to answer your product questions.
(900) 555-1500 ($2.50** per minute, US only) or call (800) 999-1148 ($25** per call,
Visa or Master Card, US and Canada) Mon-Fri 7 a.m. to 6 p.m. and Saturday from 9
a.m. to 3 p.m. (Mountain Time) Charges begin only when you connect with a
support technician.
Obtaining Printer Drivers
Phone:
(970) 339-7009
Fax:
(970) 330-7655
Mail:
Hewlett Packard
P.O. Box 1754
Greeley, CO 80632
Internet: Anonymous FTP to ftp.hp.com
World-Wide Web: www.hp.com
HPBulletin Board Service: (208) 344-1691 and set your communication software
to N,8,1
America On-Line: Type HP to start your tour, or call (800) 827-6364 and ask for
representative 1118 to subscribe.
CompuServe: HP forum (GO HP), or call (800) 524-3388 and ask for
representative #51.
Accessories and Supplies
(800) 538-8787
HP Support Assistant CD-ROM
This support tool offers a comprehensive online information system designed to
provide technical and product information on HP products. To subscribe to this
quarterly service in the US or Canada, call (800) 457-1762.
HP Authorized Dealers and Service (800) 243-9816 (US) (800) 387-3867 (Canada)
Parts and Manuals
(800) 227-8164 (US) (800) 387-3154 (Canada)
HP Repair Contracts
(800) 743-8308 (US) (800) 268-1221 (Canada)
HP FIRST*
(800) 333-1917
(208) 344-4809
Software Application Notes and Audio Tips
* HP FIRST (Fax Information Retrieval Support Technology) is a no-charge, 24 hours self-help service that
provides answers to the most common questions about your printer. Through HP FIRST, you can receive
ordering information, software application notes and printer driver update request forms. Simply dial the
HP FIRST number from a touch tone phone connected with a Group 3 Facsimile machine and follow the
voice prompts that guide you to select an index of available support and product documents.
** Prices subject to change without notice.
Continued on the next page.
7-48 Maintenance and Troubleshooting
EN
Customer Support Options Europe
Customer Support Assistance
See the flyer included with printer.
Obtaining Printer Drivers
Call HP First.
Accessories and Supplies
See Appendix E.
HP Authorized Service
See Appendix E.
HP Dealer
See Appendix E.
World-Wide Web:
www.hp.com
Software Application Notes
HP FIRST*
United Kingdom
0-800-96-02-71
Belgium
078-11-19-06
Belgium (French)
078-11-70-43
China
010-505-5280
Germany
0130-8100-61
France
05-90-5900
Switzerland (German)
155-1527
Switzerland (French)
155-1526
9800-13134
Netherlands
06-02-22-420
Norway
800-11319
Denmark
800-10453
Sweden
020-795743
Taiwan
02-791-5589
English outside of U.K.
(31) 20-681-5792
* HP FIRST (Fax Information Retrieval Support Technology) is a no-charge, 24 hours self-help service that
provides answers to the most common questions about your printer. Through HP FIRST, you can receive
ordering information, software application notes and printer driver update request forms. Simply dial the
HP FIRST number from a touch tone phone connected with a Group 3 Facsimile machine and follow the
voice prompts that guide you to select an index of available support and product documents.
EN
Maintenance and Troubleshooting 7-49
Maintenance &
Troubleshooting
0660-8128
Finland
7
Austria
7-50 Maintenance and Troubleshooting
EN
A
Specifications
Location Requirements
Place your printer on a sturdy, level surface in a well ventilated room.
The environment should be stable, with no abrupt changes in
temperature or humidity and no exposure to direct sunlight or chemicals.
Figure A-1 shows the suggested amount of space to leave around the
printer. Figure A-2 shows the suggested amount of space if you have
installed an optional mailbox accessory. Leave adequate space to remove
paper trays and to allow air circulation around vents to prevent
overheating.
Figure A-1
Printer Clearance Dimensions
EN
Specifications A-1
Figure A-2
Printer Clearance Dimensions
1.
Printer Top View
2.
Printer Side View
A-2 Specifications
EN
Printer Specifications
The following tables contain specifications for the HP LaserJet 5Si/5Si
MX Printers.
Physical Dimensions
Height
21.3 in (540 mm)
Height of optional 2000-Sheet Input Tray
18.9 in (480 mm)
Width of the Printer
22.3 in (566 mm)
Width of the optional Multi-Bin Mailbox
19.5 in (495 mm)
Width of the optional Mailbox with Stapler
19.5 in (495 mm)
Depth (body)
20.5 in (520 mm)
Weight (without toner cartridge and with paper
cassette)
99 lb (45 kg)
Electrical Specifications
Power Requirements
100/120V (+/- 10%) 50/60Hz (+/- 2Hz) 220/240V (+/- 10%) 50Hz (+/- 2Hz)
127V, 60Hz (+/- 2Hz)
220V (+/- 10%) 60Hz (+/- 2Hz)
Typical Power Consumption
During printing, 550 W (average)
During standby, 160 W (average)
During Power Save, 43 W (average)
During printing, 550 W (average)
During standby, 160 W (average)
During Power Save, 47 W (average)
Min. recommended circuit
capacity, typical installation
14.0 Amps at 120 V
7.0 Amps at 220 V
Environmental Specifications
A
Operating Printing
Storage/ Standby
Temperature
(printer and toner
cartridge)
50° to 91° F (10° to 32.5° C)
32° to 105° F (0° to 40° C)
Relative humidity
15% to 80%
15% to 90%
Acoustic Emissions
Operating Position
(Per ISO 9296)
Bystander 1m
Position
(Per ISO 9296)
Sound Power
Level
(Per ISO 9296)
Printing
LPA 62 dB(A)
Printing
LPA 58 dB(A)
Printing
LWAD=7.6 bels(A)
Standby
LPA 42 dB(A)
Standby
LPA 38 dB(A)
Standby
LWAD=5.3 bels(A)
EN
Specifications A-3
Specifications
Item
Regulatory Statements
FCC Regulations
This equipment has been tested and found to comply with the limits for
a Class B digital device, pursuant to Part 15 of the FCC rules. These
limits are designed to provide reasonable protection against harmful
interference in a residential installation. This equipment generates, uses,
and can radiate radio frequency energy, and, if not installed and used in
accordance with the instructions, may cause harmful interference to
radio communications.
There is, however, no guarantee that interference will not occur in a
particular installation. If this equipment does cause harmful interference
to radio or television reception, which can be determined by turning the
equipment off and on, the user is encouraged to try to correct the
interference by one or more of the following measures:
• Reorient or relocate receiving antenna.
• Increase separation between equipment and receiver.
• Connect equipment to an outlet on a circuit different from that to
which the receiver is connected.
• Consult your dealer or an experienced radio/TV technician.
Note
Any changes or modifications not expressly approved by HP could void
the user’s authority to operate this equipment. Use of a shielded
interface cable is required to comply within the Class B limits of Part 15
of FCC rules.
Canadian DOC Regulations
Complies with Canadian EMC Class B requirements.
<<Conforme à la classe B des normes canadiennes de compatibilité
électromagnétiques. << CEM >> . >>
A-4 Specifications
EN
VCCI Statement (Japan)
The following VCCI statement, similar to the FCC regulations, is
required in Japan.
Figure A-3
VCCI Statement (Japan)
A
Specifications
EN
Specifications A-5
Safety Information
Laser Safety
The Center for Devices and Radiological Health (CDRH) of the U.S. Food
and Drug Administration has implemented regulations for laser products
manufactured since August 1, 1976. Compliance is mandatory for products
marketed in the United States.
This printer is certified as a “Class 1” laser product under the U.S.
Department of Health and Human Services (DHHS) Radiation
Performance Standard according to the Radiation Control for Health and
Safety Act of 1968. Since radiation emitted inside this printer is
completely confined within protective housings and external covers, the
laser beam cannot escape during any phase of normal user operation.
WARNING
Use of controls, adjustments, or performance of procedures other
than those specified in this manual may result in hazardous
radiation exposure.
Ozone Emission
The HP LaserJet 5Si/5Si MX/5Si NX printers do not use high voltage
corona wires in the electrophotographic process, and therefore generates
no measurable ozone gas (O3). Instead, these printers use charging
rollers in the toner cartridge and in the print engine.
Material Safety Data Sheet (MSDS)
Toner Material Safety Data Sheet (MSDS) can be obtained by calling
HP First at (800) 333-1917 or (208) 344-4809. HP First is a 24-hour Fax
information service. International customers should refer to Appendix E
for appropriate numbers and information.
A-6 Specifications
EN
Laser Statement for Finland
LASERTURVALLISUUS
LUOKAN 1 LASERLAITE
KLASS 1 LASERAPPARAT
HP LaserJet 5Si printer laserkirjoitin on käyttäjän kannalta turvallinen luokan 1 laserlaite. Normaalissa käytössä
kirjoittimen suojakotelointi estää lasersäteen pääsyn laitteen ulkopuolelle. Laitteen turvallisuusluokka on määritetty
standardin EN 60825-1 (1994) mukaisesti.
VAROITUS !
Laitteen käyttäminen muulla kuin käyttöohjeessa mainitulla tavalla saattaa altistaa käyttäjän turvallisuusluokan 1
ylittävälle näkymättömälle lasersäteilylle.
VARNING !
Om apparaten används på annat sätt än i bruksanvisning specificerats, kan användaren utsättas för osynlig
laserstrålning, som överskrider gränsen för laserklass 1.
HUOLTO
HP LaserJet 5Si printer-kirjoittimen sisällä ei ole käyttäjän huollettavissa olevia kohteita. Laitteen saa avata ja
huoltaa ainoastaan sen huoltamiseen koulutettu henkilö. Tällaiseksi huoltotoimenpiteeksi ei katsota väriainekasetin
vaihtamista, paperiradan puhdistusta tai muita käyttäjän käsikirjassa lueteltuja, käyttäjän tehtäväksi tarkoitettuja
ylläpitotoimia, jotka voidaan suorittaa ilman erikoistyökaluja.
VARO !
Mikäli kirjoittimen suojakotelo avataan, olet alttiina näkymättömälle lasersäteilylle laitteen ollessa toiminnassa. Älä
katso säteeseen.
VARNING !
Om laserprinterns skyddshölje öppnas då apparaten är i funktion, utsättas användaren för osynlig laserstrålning.
Betrakta ej strålen.
Tiedot laitteessa käytettävän laserdiodin säteilyominaisuuksista:
Aallonpituus 775-795 nm
Teho 5 mW
Luokan 3B laser
A
Specifications
EN
Specifications A-7
DECLARATION OF CONFORMITY
according to ISO/IEC Guide 22 and EN 45014
Manufacturer’s Name:
Hewlett-Packard Company
Manufacturer’s Address:
11311 Chinden Boulevard
Boise, Idaho 83714-1021, USA
declares that the product
Product Name:
HP LaserJet 5Si/5Si MX*/5Si NX Printer*
Model Number:
C3166A/C3167A*/C3950A*
Product Options:
All
conforms to the following Product Specifications:
Safety:
EN60950:1992, Amd. 1:93, Amd. 2:93
IEC 950: 1991, Amd. 1:92, Amd. 2:93
EN60825:1991
IEC 825:84, Amd. 1:90 CLASS 1
EMC:
1
CISPR-22:1993 / EN 55022:1994 class B
CISPR-22:1993 / EN 55022:1994 class A*
EN 50082-1:1992
IEC 801-2:1991/prEN55024-2:1992-3 kV CD, 8 kV AD
IEC 801-3:1984/prEN55024-3:1991-3 V/m
IEC 801-4:1988/prEN55024-4:1992-0.5kV Signal Lines, 1kV Power Lines
Supplementary Information:
The product herewith complies with the requirements of the Low Voltage Directive 73/23/EEC
and the EMC Directive 89/336/EEC, and carries the CE marking accordingly.
1
The product was tested in a typical configuration with Hewlett-Packard Personal Computer
and Test Systems.
* This printer contains Local Area Network (LAN) options. When the interface cable is attached
to either of the IEEE 802.3 connectors, the printer meets the requirements of EN55022
Class A.
Office of Quality Manager
Boise, Idaho USA
August 1, 1995
European Contact: Your local Hewlett-Packard Sales and Service Office or Hewlett-Packard GmbH, Department ZQ /
Standards Europe, Herrenberger Strae 130, D-7030 Böblingen (FAX: + 49-7031-14-3143)
A-8 Specifications
EN
B
PCL Printer Commands (Escape
Sequences)
Most software applications do not require you to enter printer
commands. See your computer and software documentation to find the
method to use for entering printer commands.
PCL printer commands tell the printer which tasks to perform or which
fonts to use. This appendix is not intended to provide complete
information about PCL commands, but only to provide a quick reference
for users who are already familiar with PCL command structure.
Note
Table B-3 contains frequently used PCL commands. For a complete
listing and explanation of how to form PCL, HP-GL/2, and PJL
commands, see the PCL/PJL Technical Reference Package, which is
described in “Supplementary Documents” at the front of this manual.
(See Chapter 7, “Calling for Help,” for ordering information.)
PCL Printer Command Syntax
Before using printer commands, note these characters:
Lowercase l:
l
Number one: 1
Uppercase O: O
Number 0:
0
Many printer commands use the lowercase letter l (l) and the number
one (1), or the uppercase letter O (O) and the number zero (0). These
characters may not appear on your screen as shown here. You must use
the exact character and case specified for PCL printer commands.
EN
PCL Printer Commands (Escape Sequences) B-1
Figure B-1 shows the elements of a typical printer command (in this
instance a command for page orientation).
Figure B-1
&
O
Printer Command Syntax
1.
Escape character (begins escape sequence)
2.
Command category
3.
Value field (contains both alpha and numeric characters)
4.
Uppercase letter (terminates escape sequence)
Escape Character
Printer commands always begin with the escape character (?). Table
B-1 shows the escape character for various software applications. (The
keyboard [Esc] key does not produce the escape character.) Check your
software manual for additional information.
Table B-1
Software Escape Character Commands
DOS Software
Package
What You Enter
Lotus 1-2-3 and
Symphony
Type \027
Microsoft Word for DOS
Hold down [Alt] key and type 027 on
the numeric keypad
WordPerfect for DOS
Type <27>
MS-DOS Editor
Hold down [CTRL] [P] then press [Esc]
MS-DOS Edlin
Hold down [CTRL] [V] then type [
dBase
Type ?? CHR(27)+command
B-2 PCL Printer Commands (Escape Sequences)
What Appears on
Screen
027
<27>
^[
?? CHR(27)+command
EN
\027&l1O\027(s0p16.67h8.5v0s0b0T
PCL Font Selection
PCL printer commands for selecting fonts appear in the PCL Typeface
List (see Chapter 3, “Printer Software”). An example from this list is
shown below. Notice the two variable boxes for symbol set “?(” and
point size.
If these variables are not filled in, the printer uses defaults. For example,
if you want a symbol set that contains line-draw characters, select the
10U (PC-8) or 12U (PC-850) symbol set. Other common symbol set
codes are listed in Table B-2. Order the PCL/PJL Technical Reference
Package if you require symbol set charts or want more information.
Table B-2
Common Symbol Set Values
Code
Symbol Set
Code
8U
HP Roman-8
19U
Windows 3.1 Latin 1
10U
IBM Layout (PC-8) (code page 437) Default
Symbol Set
9E
Windows 3.1 Latin 2 (commonly used in Eastern
Europe)
12U
IBM Layout for Europe (PC-850) (code page 850)
5T
Windows 3.1 Latin 5 (commonly used in Turkey)
8M
Math-8
579L
Symbol Set
Wingdings Font
Point size (or pitch) is another variable. In the following example,
“12U” has been filled in for the PC-850 symbol set and “12” for the
point size. This printer command selects a 12-point Univers Medium
font:
?(12U?(s1p12v0s0b4148T
Frequently used PCL printer commands are shown in Table B-3.
EN
PCL Printer Commands (Escape Sequences) B-3
PCL Printer
Commands
Some software applications, like older versions of Lotus 1-2-3 for DOS,
require setup strings with PCL printer commands. In the following
example, the Lotus escape character (\027) is shown. This setup string is
used to change the orientation to landscape and to select the small Line
Printer font.
B
Setup Strings
Table B-3
Frequently Used PCL Printer Commands
Printer
Command
Function
# Refers To
?
Escape character
(See Table B-1 or your software manual.)
L
F
Line feed
n/a
Formfeed
n/a
F
F
C
Carriage return
n/a
?E
Resets the Printer
n/a
?&l0H
Ejects page
n/a
?&l#X
Indicates number of copies
1 to 32,767
?&l#G
Selects paper destination
0 = Automatic selection
1 = Top Output Bin (face-down)
2 = Left Output Bin (face-up)
3 = Multi-Bin Mailbox #1
4 = Multi-Bin Mailbox #2
5 = Multi-Bin Mailbox #3
6 = Multi-Bin Mailbox #4
7 = Multi-Bin Mailbox #5
8 = Stapler Bin
?&l#H
Selects paper source
0 = prints/ejects current page
1 = Tray 2
2 = Manual Feed - paper
3 = Manual Feed - envelope
4 = Tray 3
5 = 2000-Sheet
Input Tray (Tray 4)
6 = Envelope Feeder
7 = Auto Select
8 = Tray 1
?&l#A
Sets paper size or envelope size
?&l#O
Selects orientation
?&a#L
Sets left margin
Column number
?&a#M
Sets right margin
Column number
?&l#E
Sets top margin
Number of lines
?&l#F
Sets text length (bottom margin)
Number of lines from top margin
?&l#D
Sets line spacing
Lines per inch (1, 2 , 3, 4, 6, 8, 12, 16, 24, or 48)
?&d#D
Begins underline
?&d@
Ends underline
n/a
?&k#H
Sets horizontal motion index
1/120 in (.21 mm) increments (compresses print horizontally)
R
1= Executive
2 = Letter
3 = Legal
6 = 11 in x17 in
26 = A4
27 = A3
45 = JIS B5
46 = JIS B4
72 = JPOSTD
80 = Monarch
81 = Commercial 10
90 = DL
91 = International C5
100 = Commercial B5
101 = Maximum
0 = portrait
1 = landscape
2 = reverse portrait
3 = reverse landscape
0 = fixed
3 = floating
Continued on the next page.
B-4 PCL Printer Commands (Escape Sequences)
EN
Table B-3
Frequently Used PCL Printer Commands, continued
B
# Refers To
?&l#C
Sets vertical motion index
1/48 in (.53 mm) increments (compresses print vertically)
?&a#R
Sets # of vertical position, rows
Sets current vertical print position to specified row number (#)
?*p#Y
Sets # of vertical position, dots
Sets current vertical print position to specified dot number (#)
?&a#V
Sets # of vertical position,
decipoints
Sets current vertical print position to specified decipoint number (#)
?&a#C
Sets # of horizontal position, rows
Sets current horizontal print position to specified row number (#)
?*p#X
Sets # of horizontal position, dots
Sets current horizontal print position to specified dot number (#)
?&a#H
Sets # of horizontal position,
decipoints
Sets current horizontal print position to specified decipoint number (#)
EN
PCL Printer Commands (Escape Sequences) B-5
PCL Printer
Commands
Printer
Command Function
B-6 PCL Printer Commands (Escape Sequences)
EN
C
Memory and Personality SIMM
Installation
Your HP LaserJet 5Si/5Si MX/5Si NX has four single inline memory
module (SIMM) slots for memory expansion. For the 5Si/5Si NX, all
four are available for expansion. For the 5Si MX, one slot is occupied by
a 8 MByte memory SIMM and another slot is occupied by a SIMM
holding Adobe’s PostScript Level 2 language. Therefore, there are two
available slots that you can use to install additional printer memory and
printer personalities.
The printer contains 4 MBytes of on board memory. By adding optional
SIMMs with 2, 4, 8, 16, or 32 MBytes, you can increase memory to a
total of 76 MBytes (for the 5Si MX).
Note
Memory SIMMs for the HP LaserJet 4 Plus and 4M Plus printers can be
used in the HP LaserJet 5Si series. PostScript language SIMMs for any
other printer cannot be used in the HP LaserJet 5Si series.
When you get a new memory board, compare the part number on the
outside of the package to the part number in Table C-1 below. If you
have not received the correct SIMM, notify your authorized
Hewlett-Packard dealer.
Table C-1
Note
EN
Memory SIMM Part Numbers
Size
Part Number
2 MBytes
C3131A
4 MBytes
C3132A
8 MBytes
C3133A
16 MBytes
C3146A
32-MByte SIMMs are not available from HP. The 32-MByte SIMMs are
supported, but must be obtained through third-party providers.
Memory and Personality SIMM Installation C-1
Installing a SIMM Board
CAUTION
SIMM boards and your printer formatter
board can be damaged by small amounts
of static electricity. When handling a
SIMM or other board, wear an antistatic
wrist strap connected to the metal frame
of the printer (or to your antistatic
system). During installation, to prevent
generation of static electricity, avoid
moving about the work area.
To avoid damaging the parts, follow these
steps:
1 In this order, switch the printer power
OFF, unplug the power cord, and
disconnect any attached cables.
2 Loosen (but do not remove) the two
captive screws. If you are not wearing
an antistatic wrist strap, touch the
printer’s bare metal plate.
3 Grasp the screws and pull the printer
controller board out of the printer. Do
not touch any component on the
board. Place the board on a flat,
nonconductive surface. (For ease of
replacement, note how the board fits
into slots in the printer.)
C-2 Memory and Personality SIMM Installation
EN
4 Remove the SIMM board from the
5 Insert the board firmly into the SIMM
slot (5) at about a 20-degree angle.
Use the closest open slot, starting
with 4 as illustrated.
6 Rotate the SIMM toward the back of
45
the printer to about a 45-degree angle
until it clicks into the metal locking
tabs. If it is properly seated, it will not
lift away from the slot. (To remove a
SIMM, you must first release the
metal locking tabs.)
7 Align the printer formatter board with
the top slot, slide the board back into
the printer (A), and tighten the two
screws (B).
8 Re-attach any cables and the power
cord; then switch the printer power
ON and test the SIMM (see the
following section).
EN
Memory and Personality SIMM Installation C-3
SIMM
Installation
20
C
antistatic package. Do not touch any
component on the SIMM board. Hold
the board with your forefingers on the
side edges and your thumbs against
the back edge, so the notch on one
end is on the right and the metal teeth
face toward the SIMM slot.
Testing a SIMM Board
Use the procedures below to print a self test to verify SIMM board
installation. Procedures are given for both memory and PostScript or
other personality SIMMs.
Verifying a Memory SIMM
1 Plug in the power cord and switch the printer ON.
2 After a few seconds, the On Line indicator should light and READY
should appear in the control panel display. If a printer message
appears, see the “Optional SIMM Board Troubleshooting” section in
Chapter 7, “Maintenance and Troubleshooting.”
3 Press [Menus] until TEST MENU appears.
4 Press [Items] until PCL CONFIGURATION PAGE appears.
5 Press [Select *] to print a self test.
Locate “Total Memory” on the configuration page printout. This is the
amount of memory now installed in your printer. (See Chapter 4,
“Printer Control Panel,” for more information.)
If the amount of memory has not increased since installing the SIMM, it
may not be installed correctly (repeat installation procedure) or it may
be defective. (See “Optional SIMM Board” in Chapter 7.)
C-4 Memory and Personality SIMM Installation
EN
Verifying a PostScript SIMM
1 Plug in the power cord and turn the printer ON.
2 After a few seconds, the On Line light should go on and READY
should appear in the control panel display. If a printer message
appears instead, see the “Optional SIMM Board” section in Chapter 7.
3 Press [Menus] until POSTSCRIPT MENU appears. This indicates that
your printer recognizes that the PostScript language is installed. If
POSTSCRIPT MENU does not appear, check the SIMM installation.
Memory and Personality SIMM Installation C-5
SIMM
Installation
EN
Only a PostScript language SIMM designed for the HP LaserJet 5Si
series can be used.
C
Note
C-6 Memory and Personality SIMM Installation
EN
D
Warranty and Software License
HP Maintenance Agreements
HP has several types of maintenance agreements that meet a wide range
of support needs.
On-Site Service Agreements
To provide you with the support level best suited to your system usage
and support budget, HP has on-site service agreements with three
response times:
Priority On-Site Service is designed for production-critical applications,
giving you four-hour service response to your site for calls made during
normal HP business hours.
Next Day On-site Service provides on-site support by the next working
day following your service request. Extended coverage hours and
extended travel beyond HP designated service zones are available for
additional charges on most on-site service agreements.
Weekly (Volume) On-site Service Agreement, for organizations with
many HP LaserJet printers, provides economical, scheduled on-site
coverage. Designated for customer sites using 25 or more workstation
products, this service provides scheduled weekly repair visits to your
central location. HP can write an agreement for any combination of 25
or more workstation products including printers, plotters, computers,
and disk drives.
EN
Warranty and Software License D-1
Warranty
This warranty entitles you to standard warranty services for your printer
and is available from HP worldwide. However, there may be local
variations in the level of warranty service. You should contact the local
HP Service Center to check for the applicable local warranty in your
country or province.
One-Year On-Site Limited Warranty
Hewlett-Packard warrants its computer hardware products against
defects in materials and workmanship for a period of one year from
purchase by the end user. During the warranty period, HP will, at its
option, either repair or replace products which prove to be defective.
The warranty period begins either on the date of delivery or, where the
purchase price includes installation by Hewlett-Packard, on the date of
installation.
Should HP be unable to repair or replace the product within a reasonable
amount of time, you will be entitled to a refund of the purchase price if
you return the product.
To have your printer serviced by HP you should contact the closest HP
Service Center.
Exclusions
The warranty on your HP LaserJet 5Si/5Si MX/5Si NX shall not apply
to defects resulting from:
•
•
•
•
•
•
•
Improper or inadequate maintenance by customer.
Customer supplied software or interfacing.
Unauthorized modification or misuse.
Operation outside of the environmental specifications for the product.
Operation of non-supported printing media.
Duty cycle abuse (see note on page D-3).
Operating the printer from a mechanical switch box without a
designated surge protector.
• Improper site preparation and maintenance.
• Failure to perform key operator maintenance every 350,000 pages.
• Use of non-HP toner cartridges (see the note following), memory boards
or interface boards.
D-2 Warranty and Software License
EN
Note
The use of a non-HP or refilled toner cartridge alone does not affect
either your warranty or any maintenance contract you may have
purchased. However, if an HP LaserJet printer failure or damage is
found to be attributable directly to the use of a non-HP toner cartridge,
HP will not repair the printer free-of-charge. In this case, standard time
and materials charges will be applied to service your printer for that
particular failure or damage.
Caution
Operation of the printer beyond the limit of its duty cycle (printing
greater than the equivalent of 100,000 single-sided pages per month)
shall be deemed printer abuse and all repairs thereafter will be billed on
a time and materials basis.
Caution
If you are using a mechanical switch box, ensure that it is equipped with
a surge protector. Damage to your printer could occur from the use of
unprotected mechanical switch boxes.
Warranty Limitations
If your hardware should fail during the warranty period, contact an
authorized HP dealer or an HP Customer Service Center.
Service After the Warranty Period
If your hardware fails after the warranty period, contact an authorized
HP dealer or your local Customer Service Center. If you have an HP
Maintenance Agreement, request service under your agreement.
EN
Warranty and Software License D-3
Warranty and
Software License
Service During the Warranty Period
D
The warranty set forth above is exclusive and no other warranty,
whether written or oral, is expressed or implied. Hewlett-Packard
specifically disclaims the implied warranties of merchantability and
fitness for a particular purpose.
Repacking Guidelines
To repack the print engine:
• Remove and retain the toner cartridge.
• Remove and retain all of the following optional accessories (if
installed): Envelope feeder, 2000 sheet input tray, Mailbox with
Stapler, or Multi-Bin Mailbox.
• Use the original shipping container and packing materials, if possible.
• Include print samples and 50-100 sheets of the paper or forms you
are having trouble printing, if possible.
Note
If you have already disposed of your printer’s packaging material,
packaging material can be ordered from HP (see Appendix E or
“Calling for Help” in Chapter 7). Order part number C3986-90005.
If it is necessary to return the Multi-Bin Mailbox, Mailbox with Stapler,
the 2000-Sheet Input Tray, or any accessories, repack in the original
shipping container(s), if available.
D-4 Warranty and Software License
EN
HP Software Product License
IMPORTANT: Please read this License carefully before using this Software. The right to use this Software is granted only
if the Customer agrees to the terms of this License. If you do not agree to the terms of this License, you may return the
unused software for a refund. HOWEVER, USE OF THIS SOFTWARE INDICATES YOUR ACCEPTANCE OF THESE
TERMS AND CONDITIONS.
In return for the payment of the applicable one-time license fee(s), HP grants you a license to use one copy of the
Software subject to the following terms and conditions. No title or ownership of the Software is conferred with this license.
2.
The Software may not be copied except for archival purposes or for backup, error identification, or replacement of
defective media. All authorized copies must bear the copyright notice on or in the original.
3.
The Software may not be disassembled, decompiled, decrypted, or reverse engineered unless HP’s prior written
consent is either obtained or not required by law. Upon request, the user will provide HP with reasonably detailed
information regarding any disassembly, decompilation, decryption, or reverse engineering.
4.
Any third party supplier of the Software is a third party beneficiary of this License and may protect its rights in the
Software against violations of this License.
5.
HP reserves the right to terminate this License upon breach. In the event of termination at HP’s election, all copies
of the Software must be returned to HP or destroyed.
6.
This License and the Software product may be transferred to a third party, provided the third party agrees to all the
terms of this License and that no copies of the Software are retained by the transferring party.
7.
Use, duplication, or disclosure by the U.S. Government is subject to restrictions as set forth in subparagraph (c) (1)
(ii) of the Rights in Technical Data and Computer Software clause on DFARS 252.227-7013. Hewlett-Packard
Company 3000 Hanover Street, Palo Alto, CA 94304 U.S.A. Rights for non-DOD U. S. Government Departments
and Agencies are as set forth in FAR 52.227-19 (c) (1, 2).
8.
No title or ownership of the Software is conferred with this License.
9.
The Software may not be exported in violation of U.S. Export Administration regulations.
10.
If your Hewlett-Packard product includes Adobe’s PostScript, you are expressly notified that Adobe Systems
Incorporated, a California corporation located at 1585 Charleston Road, Mountain View, California 94039-7900
(“Adobe”) is a third-party beneficiary to this License.
EN
Warranty and Software License D-5
Warranty and
Software License
The Software may be used on one HP LaserJet printer.
D
1.
D-6 Warranty and Software License
EN
E
HP Customer Services and Sales
HP Support, Sales, and Service
Information
Hewlett-Packard products are sold and supported worldwide through
Hewlett-Packard Sales and Service Offices and through dealers. There
are more than 240 Hewlett-Packard Sales and Services Offices
worldwide. To locate the nearest one, use your phone directory or call
one of the Hewlett-Packard regional offices listed in this appendix.
Customer Support
Customer Support Options – US and Canada
Customer Support Assistance (208) 323-2551 Monday-Friday
6:00 a.m. to 6:00 p.m. (Mountain Time)*
Free of charge during the Warranty Period. Please have your
serial number ready when calling.
Obtaining Software Utilities
and Electronic Information
Phone: (970) 339-7009
Fax: (970) 330-7655
Mail: Hewlett-Packard
P.O. Box 1754
Greeley, CO 80632
World Wide Web: www.hp.com/go/cposupport
HP Bulletin Board Service: (208) 344-1691 and set your
communication software to N,8,1
America On-line: Type HP to start your tour, or call
(800) 827-6364 and ask for representative 1118 to subscribe.
CompuServe: HP User’s forums (GO HP), or call
(800) 524-3388 and ask for representative #51.
Accessories and Supplies
(800) 538-8787
HP Support Assistant
CD-ROM
This support tool offers a comprehensive online information
system designed to provide technical and product information
on HP products. To subscribe to this quarterly service in the
US or Canada, call (800) 457-1762.
EN
HP Customer Services and Sales E-1
Customer Support Options – US and Canada
To Locate HP Authorized
Dealers
(800) 243-9816 (US)
(800) 387-3867 (Canada)
HP Authorized Dealer Support (800) 544-9976 (dealers only)
Parts and Manuals
(800) 227-8164 (US)
(800) 387-3154 (Canada)
HP Repair Contracts
(800) 743-8308 (US)
(800) 267-1221 (Canada)
HP FIRST*
(800) 333-1917 or (208) 344-4809
* The time listed for the US Customer Support Center varies by printer line; the center is currently open
for the personal printer and scanner customers until 10:00 p.m. Monday through Friday, and Saturday
from 9:00 a.m. to 4:00 p.m.
Customer Support Options – Worldwide
Customer Support Assistance Dutch
+31.20.681.64.73
(language options available)
Danish
+31.20.681.61.71
English
+31.20.682.82.91 or 0891 391 000
Spanish
+31.20.581.33.19 or 906 39 10 00
French
+31.20.681.82.60 or 3670 39 49
German
+31.20.681.71.74
Italian
+31.20.581.33.18
Norwegian +31.20.682.00.94
Finnish
+31.20.681.12.14
Swedish
+31.20.681.80.25
Japanese 81 3 3335-8333
Mexican
(+52 5) 326-45-00 or 91-800-50-198
Obtaining Software
Call HP FIRST
World-Wide Web: URL http://www.hp.com/go/cposupport
Accessories and Supplies
Call HP FIRST
HP Authorized Service
Call HP FIRST
HP Dealer
Call HP FIRST
E-2 HP Customer Services and Sales
EN
Customer Support Options – Worldwide
HP First
United Kingdom
0-800-96-02-71
Netherlands
06-02-22-420
Belgium (Dutch)
0800-1-1906
Belgium (French)
0800-1-7043
Germany 0130-8100-61
France
05-90-5900
Spain
900-993123
Italy
1678-59020
Switzerland (German) 155-1527
Switzerland (French)
155-1526
Austria
0660-8128
Finland
9800-13134
Norway
800-11319
Denmark 800-10453
Sweden
020-795743
Taiwan
02-791-5589
China
86 10 505 5280
Japan
81 3 3335-8622
English outside of U.K. +31 20 681 5729
E
HP Sales and
Customer Service
EN
HP Customer Services and Sales E-3
Sales and Services
Worldwide Hewlett-Packard Sales and Service Offices
Before calling an HP Sales and Service
office, be sure to contact the appropriate
Customer Support Center number listed
in the previous table.
Argentina:
Australia/New Zealand:
Austria:
Hewlett-Packard Australia Ltd.
31-41 Joseph Street
Blackburn, Victoria 3130
Australia
Telephone:
Australia 61 3 272-2895
New Zealand 09 356 6640
Customer Support Center: 03 9272 8000
HP First Fax: 61 3 272 2627
Hewlett-Packard Ges.m.b.H.
Lieblgasse 1
P.O. Box 72
A-1222 Vienna
Austria
Telephone: 43 1 2500-0
Customer Support Center: +31 20 681 7174
HP First Fax: 0660-8128
Belgium:
Brazil:
Hewlett-Packard Belgium SA/NV
Boulevard de la Woluwe, 100, Woluwedal
B-1200 Brussels
Belgium
Telephone: 32 2 761 31 11
Customer Support Center:
French +31 20 681 8260
Dutch +31 20 681 6473
HP First Fax:
French 0800 17043
Dutch 0800 1 1906
Edisa Hewlett Packard
Alameda Rio Negro 750
Alphaville
06400 Barueri Sao Paulo
Brazil
Telephone: 55 11 709-1444
Hewlett-Packard Argentina
Montaneses 2140
1428 Buenos Aires
Argentina
Telephone 54 1 781-4061/69
Canada:
Hewlett-Packard (Canada) Ltd.
17500 Trans-Canada Highway
Kirkland, Quebec H9J 2X8
Canada
Telephone: 1 (514) 697-4232
Canadian Customer Information Center:
1 (800) 387-3867
Hewlett-Packard (Canada) Ltd.
5150 Spectrum Way
Mississauga, Ontario L4W 5G1
Canada
Telephone: 1 (905) 206-4725
Customer Support Center
(English service only): 1 (208) 323-2551
HP Direct Marketing: 1 (416) 671-8383
Hardware Service: 1 (800) 268-1221
Continued on the next page.
E-4 HP Customer Services and Sales
EN
Worldwide Hewlett-Packard Sales and Service Offices, continued
Hewlett-Packard Company
5-6/F, West Wing Office
China World Trade Center
No. 1, Jian Guo Men Wai Avenue
Beijing, 100004, China
Telephone: 86 1 505 3888
Customer Support Center: 86 10 262 5666
HP First Fax: 86 10 505 5280
Hewlett-Packard S. R. O.
Novodvorska 82
14200 Praha 414
Czech Republic
Telephone: 42 (2) 471 73 21
Denmark:
European Headquarters:
Hewlett-Packard A/S
Kongevejen 25
DK-3460 Birkerød
Denmark
Telephone: 45 45 99 10 00
Customer Support Center: +31 20 681 6171
HP First Fax: 800-10453
Hewlett-Packard S.A.
Route du Nant-d’Avril 150
CH-1227 Meyrin 2 (Geneva)
Switzerland
Telephone: 41 22/780 81 11
Far East Area:
Finland:
Hewlett-Packard Asia Pacific Ltd.
17-21/. Shell Tower, Times Square
1 Matheson Street, Causeway Bay
Hong Kong
Telephone: 852 599-7777
HP First Fax: 852 506 2422
Hewlett-Packard Oy
Piispankalliontie 17
P.O. Box 68
FIN- 02207 Espoo
Finland
Telephone: 358 0/887 21
Customer Support Center: +31 20 681 1214
HP First Fax: 9800 13134
France:
Germany:
Hewlett-Packard France
42, Quai du Point du Jour
F-92659 Boulogne
France
Telephone: 46 101700
Customer Support Center: +31 20 681 8260
HP First Fax: 05-905900
Hewlett-Packard GmbH
Herrenberger Strasse 130
71034 Böblingen
Germany
Telephone: 49 7031/14-0
Customer Support Center: +31 20 681 7174
HP First Fax: 0130 810061
Greece:
Hungary:
Hewlett-Packard Hellas
62, Kifissias Avenue
GR Maroussi-Athens 15125
Greece
Telephone: 30 1 689 64 11
Hewlett-Packard & Magyarors g Kft.
Erzsebet kiralyne utja 1/c
H-1146 Budapest
Hungary
Telephone: 36 (1) 2524505
EN
HP Customer Services and Sales E-5
HP Sales and
Customer Service
Czech Republic:
E
China:
Worldwide Hewlett-Packard Sales and Service Offices, continued
Italy:
Japan:
Hewlett-Packard Italiana S.p.A.
Via Giuseppe di Vittorio, 9
I-20063 Cernusco sul Naviglio
Milano
Italy
Telephone: 39 2/92 121
Customer Support Center: +31 20 581 3318
HP First Fax: 1678-59020
Hewlett-Packard Japan, Ltd.
3-29-21, Takaido-Higashi
Suginami-Ku, Tokyo 168
Japan
Telephone: 81 3 3331-6111
Customer Support Center: 81 3 3335 8333
HP First Fax: 81 3 3335 8622
Korea:
Latin American Headquarters:
Hewlett-Packard Korea, Ltd.
25-12, Yoido-dong
Youngdeungpo-gu
Seoul 150-010
Korea
Yoido P.O. Box 595
Telephone: 82 2 769-0114
Customer Support Center: 82 2 3270-0700
HP First Fax: 82 2 769 0543
5200 Blue Lagoon Drive
Suite 950
Miami, FL 33126
Telephone 1-(305) 267-4220
Mexico, D.F.:
Mexico Guadalajara:
Hewlett-Packard de México, S.A.
Prolongacion Reforma 700
Colonia Lomas de Santa Fé
C.P. 01210 Mexico, D.F.
Mexico
Telephone: 362 46 00
Hewlett-Packard de México, S.A.
de C. V. Montemorelos No. 299
Fracc. Loma Bonita Xopopan
C. P. 45060
Telephone: 669 95 00
Mexico Monterrey:
Middle East/Africa:
Hewlett-Packard de México, S.A.
de C. V. Calzada del Valle Oriente
No. 409 4o. Piso Colonia del Valle
Garza García, 76030
Telephone: 378-42-40
Middle East, Central Africa
Sales Headquarters
Hewlett-Packard S.A.
Rue de Veyrot 39
CH-1217 Meyrin 1 (Geneva)
Switzerland
Telephone: 41 22/780 71 11
E-6 HP Customer Services and Sales
EN
Worldwide Hewlett-Packard Sales and Service Offices, continued
Hewlett-Packard Nederland B.V.
Startbaan 16
NL-1187 XR Amstelveen
P.O. Box 667
The Netherlands
Telephone: +31 20/547 69 11
Customer Support Center: +31 20 681 6473
HP First Fax: 06 0222420
Hewlett-Packard Norge A/S
Drammensveien 169
Box 60 Skyen
N-0212 Olso
Norway
Telephone: 47 735600
Customer Support Center: +31 20 682 0094
HP First Fax: 800 11319
Poland:
Portugal:
Hewlett-Packard Polska Sp. z o.o.
Ul.Newelska Nr. 6
PL-01447 Warszawa
Poland
Telephone: 48 22 37 50 65
Hewlett-Packard Portugal, S.A.
Rua Gregório Lopes, Lote 1732A
1400 Lisboa
Portugal
Telephone: 351 1-3017330
Russia:
Singapore:
Hewlett-Packard Representative Office
Pokrovski Blvd. 4/17 KV12
101000 Moscow
Russia
Telephone: 7095 923 50 01
Hewlett-Packard Singapore (Pte.) Ltd.
150 Beach Rd #29-00 Gateway West
Singapore 0718
Telephone: 65 272-5300
Customer Support Center: 65 272 5300
HP First Fax: 65 291 7951
Spain:
Sweden:
Hewlett-Packard Española, S.A.
E28230 Las Rozas
Crta. de la Coruña, km 16,500
Madrid, Spain
Telephone: 34 1 626 16 00
Customer Support Center: +31 20 581 3319
HP First Fax: 900-9993123
Hewlett-Packard Sverige AB
Skalholtsgatan 9
Box 19
S-164 93 Kista
Sweden
Telephone: 46 8/750 20 00
Customer Support Center: 31 20 681 8025
HP First Fax: 020-795743
EN
HP Customer Services and Sales E-7
HP Sales and
Customer Service
Norway:
E
Netherlands:
Worldwide Hewlett-Packard Sales and Service Offices, continued
Switzerland:
Taiwan:
Hewlett-Packard (Schweiz) AG
In der Luberzen 29
CH-8902 Urdorf
Switzerland
Telephone: 41 1 735 7111
Customer Support Center:
German: +31 20 681 7174
French +31 20 681 8260
HP First Fax:
French 155-1526
German 155-1527
Hewlett-Packard Taiwan Ltd.
8F, 337, Fu-Hsing North Road
Taipei, Taiwan
Telephone: (02) 717 9609
Customer Support Center: (02) 717 9609
HP First Fax: (02) 719 5589
Thailand:
Turkey:
Hewlett-Packard Thailand Ltd.
11th Floor, Pacific Place
140 Sukhumvit Road
Bangkok, 10110
Thailand
Telephone: 66 2 254-6720
Hewlett-Packard
Bilgisayar ve Ölçüm Sistemleri A.S.
19 Mayis cad.Nova/Baran
Plaza K.12 (Headquarters)
80220 S is li-Istanbul
Turkey
Telephone: 90 1 224 59 25
United Kingdom:
United States:
Hewlett-Packard Limited
Cain Road
Bracknell
GB-Berkshire RG12 1HN
United Kingdom
Telephone: 01 344 369 222
Customer Support Center: +31 20 682 8291
HP First Fax: 0800-960271
Hewlett-Packard Company
11311 Chinden Blvd.
Boise, ID 83714
USA
Customer Support Center: (208) 323-2551
Monday-Friday, 7:00 a.m. to 6:00 p.m.
Saturday 9:00 a.m. to 4:00 p.m.
(Mountain Standard Time)
HP First Fax:
(800) 333-1917
(208) 334-4809
To find an authorized repair center:
(800) 243-9816
To purchase a service contract:
(800) 743-8308
Accessories and Supplies:
(800) 538-8787
Obtaining HP Printer Drivers:
(970) 339-7009
Fax (970) 330-7655
E-8 HP Customer Services and Sales
EN
Worldwide Hewlett-Packard Sales and Service Offices, continued
Venezuela:
Hewlett-Packard de Venezuela
Tercera Transuersal Los Ruices
Norte
Edificio Segre Zdo y 3er piso
Caracas 1071
Telephone: 58 2 239 5664
E
HP Sales and
Customer Service
EN
HP Customer Services and Sales E-9
E-10 HP Customer Services and Sales
EN
INDEX
!
2000-Sheet Input Tray
clearing jams 7-33
loading paper 5-14
troubleshooting 7-17
32-MByte SIMM 2-1
A
accessories
part numbers 1-15
acoustic emissions A-3
B
Bi-Tronics parallel port,
location 1-12
bidirectional communication
defined 3-3
binding options 5-34
C
cables
part numbers 1-15
recommended 1-15
calling for help 7-48
Canadian DOC regulations A-4
canceling print jobs 5-35
character set
printer commands B-3
selection B-3
cleaning
generally 7-1
printer 7-2
collation feature
disabling in application 3-4
enabling in driver 3-4
computer font i-iii
Configuration Menu 4-24
Configuration Page
example from PCL 4-12
example from PostScript 4-16
example of a Menu Map 4-14
conservation, saving toner 7-3
control panel
activating REt 6-4
adjusting print density 6-3
changing paper type 4-9
changing print resolution
setting 6-2
display 4-2, 4-4
display language wrong 7-8
IO Menu 4-28
keys 4-3
layout 4-2
lights 4-2
location 1-11
media type, selecting 5-21
menus 4-7
messages 7-33, 7-36, 7-40
PostScript Menu 4-27
EN
Print Quality menu 4-26
selecting items 4-7
selecting media size 5-21
selecting Multi-Bin Mailbox
5-27 - 5-28
selecting paper output bin
5-25
selecting two-sided printing
5-34
setting defaults 4-5
settings problems 7-14
stopping current print job
5-35
Test Menu 4-10
Tray Menu 4-8
conventions, manual i-iii
customer support options
Canada 7-48
Europe 7-49
United States 7-48
D
dBase B-2
default settings 4-6
defaults
Tray Menu 4-8
deleting print jobs 5-35
density, print 6-3
different first page 5-30
disk directory page 4-21
disk drive
troubleshooting 7-19
display
control panel 4-2
wrong language displayed 7-8
display font i-iii
display messages, clearing 7-9
DOS Editor B-2
DOS symbol sets 3-10
draft mode 1-6
drivers 3-3
accessing 3-3
definition 3-3
printer 1-6
duplex unit
clearing jams 7-29
configuration 5-34
description 5-33
printing 5-34
duty cycle D-3
E
EconoMode 1-6
printing described 6-9
toner cartridge life 7-3
electrical specifications A-3
envelope feeder 5-19
clearing jams 7-34
troubleshooting 7-17
envelopes
avoiding paper jams 5-18
loading 5-17
manual feed 5-18
margins 5-18
media use guidelines 5-6
printing 5-16, 5-18
environmental specifications
A-1, A-3
error log page 4-22
error messages 7-33, 7-40
SIMM boards 7-20
troubleshooting 7-8
escape character B-2
dBase B-2
MS Word for DOS B-2
MS-DOS Editor B-2
MS-DOS Edlin B-2
software selection B-2
Symphony B-2
WordPerfect for DOS B-2
escape sequences B-1 - B-6
Ethernet part numbers 1-15
European customer support
options 7-49
F
factory default settings 4-6
factory defaults
Test Menu 4-10
Tray Menu 4-8
fan, printer (internal) 7-8
FCC regulations A-4
field service repair agreement
D-1
Finland laser statement A-7
formatter board, location 1-12
fonts
available 1-1, 1-7
HP FontSmart 3-4
PCL 1-7
PCL selection B-3
PostScript 1-9, 4-20
printer commands B-3
screen fonts 3-4
G
graphics, print quality 6-4
H
height of printer A-3
help
support calls 7-48
HP customer services and sales
E-1 - E-10
INDEX-1
HP FIRST 7-48
Canada 7-48
European countries 7-49
United States 7-48
HP service support D-1
humidity A-3
I
I/O buffering, improving
performance 2-4
paper stop, adjusting 5-26
input/output 1-6
Input/Output (IO Menu 4-28
italics i-iii
J
jam recovery, PostScript 4-27
jams, paper 7-23
Japan VCCI statement A-5
JetDirect interfaces
part numbers 1-15
JetPrint network utility 3-6
Job Cancel 5-35
Job Control menu 4-9
K
key face i-iii
keys, control panel 4-3
L
labels
media use guidelines 5-6
specifications 5-3
landscape orientation 5-18
laser
regulations A-6
safety A-6
laser safety statement A-6
laser statement for Finland A-7
license, software D-5
line draw characters B-3
Lotus 1-2-3 B-2 - B-3
setup strings B-3
M
Macintosh utilities
Bitmapped Screen fonts 3-9
HP LaserJet Utility 3-8
Mailbox with Stapler 5-22
modes 5-22
selecting from Control Panel
5-28
selecting through software
5-27
maintenance
after warranty D-3
agreements D-1
during warranty D-3
manual conventions i-iii
manual feed
troubleshooting 7-16
manual feed, envelopes 5-18
media
loading into Tray 1 5-9
sizes 5-3
specifications 5-3
2-INDEX
memory
expansion 2-1
requirements 2-3
memory management 1-5
Menu Map example 4-14
menus
Configuration 4-24
control panel 4-7
Job Control 4-9
PCL 4-23
PostScript 4-27
Print Quality 4-26
selecting 4-7
Test 4-10
Tray 4-8
message types 4-4
messages
control panel 7-36
error 7-36
printer 7-36, 7-40
MIO, part numbers 1-15
modes
changing 5-22
control panel messages 5-23
job separation 5-22
mailbox 5-22
stacking 5-22
Mopier Printing System 3-1
environments 3-1
network operating systems
3-1
MP Tray, printing envelopes
5-17
Multi-Bin Mailbox
clearing 7-32
width measurement A-3
N
networks
HP JetPrint utility 3-6
interfaces part numbers 1-15
troubleshooting 7-11
O
offline 7-36
On Line 7-36
on/off switch, location 1-11
optional Printer Hard Disk,
location 1-12
options
part numbers 1-15
orientation of media
landscape 5-18
portrait 4-8
output bins 5-22
illustrated 5-24
ozone emission A-6
ozone emission statement A-6
P
packing guidelines D-4
paper
heavy stock 5-3
heavy weight 5-2
loading into Tray 1 5-9
loading into Tray 2 or Tray 3
5-11
media use guidelines 5-6
minimum size 5-3
sizes 5-3
specifications 5-3
weights 5-3
paper handling 1-4
envelopes 5-2
Paper Handling Controller
Board 1-12
paper jams
2000-Sheet Input Tray 7-33
avoiding 5-9
clearing 7-23, 7-25
Envelope Feeder 7-34
front door (duplex area) 7-29
left door (fuser area) 7-30
locations 7-24
Multi-Bin Mailbox with
Stapler 7-32
repeated 7-35
right door 7-27
top cover 7-28
top output bin 7-26
tray 1 7-26
Trays 2 and 3 7-31
paper output bins
left 5-25
paper source 5-2
Paper Specification Guide i-iv
paper Tray 1
loading envelopes 5-17
loading media 5-9
selecting paper size 5-21
paper trays
loading envelopes in Tray 1
5-17
loading Tray 2 or Tray 3 5-11
loading Tray 4 5-14
location 1-11
paper trays 1, 2, and 3 5-8
paper type, setting through
control panel 4-9
parallel cable 1-15
PCL
commands B-1
Configuration Page 4-12
font list 4-18
font selection B-3
Menu Map page 4-14
printer commands B-4
PCL fonts 1-7
PCL Menu 4-23
phone numbers
Customer Support Center
7-48
European CSC 7-49
HP FIRST - European
countries 7-49
HP FIRST - US/Canada 7-48
obtaining printer drivers 7-48
software application notes
7-48
United States CSC 7-48
EN
point size B-3
portrait orientation 4-8
PostScript
configuration page 4-16
font list 4-20
menu 4-27
option 2-2
SIMM installation C-1
testing SIMM board C-5
troubleshooting 7-22
Power Save feature 1-6, 4-24,
7-36
print density
adjusting 6-3
toner life 6-3
print overrun message 7-40
print quality
adjusting 6-4
SEE quality
Print Quality Menu 4-26
Printer
about 1-1 - 1-16
accessories and options 1-13
acoustic emissions A-3
cleaning 7-1 - 7-2
drivers 2-3, 3-3
duty cycle D-3
electrical specifications A-3
environmental specifications
A-1
features 1-4
illustration 1-3
introduction 1-1
location requirements A-1
messages 7-36 - 7-38, 7-40 7-46
PCL commands B-1
power consumption A-3
print quality 6-4
printing quantity limitations
D-3
Printing System 1-5
repacking guidelines D-4
safety information A-6
service D-1, D-3
speed problems 7-12
troubleshooting 7-8, 7-10
use limitations D-3
weight A-3
Printer commands, font
selection B-3
Printer control panel,
introduction 4-1
printer disk directory 4-21
printer drivers
accessing features 3-3
available, but not included on
CD 3-5
definition 3-3
overview 3-4
PCL drivers 3-4
PostScript drivers 3-5
printer drivers, ordering 7-48
Printer MIO cards 7-9
EN
Printer parts
cartridge slot 1-11
control panel 1-11
on/off switch 1-11
output bins 1-11
paper trays 1-11
top cover 1-11
Printer software 1-5, 3-1 - 3-10
printing
choosing a paper source 5-2
envelopes 5-16 - 5-18
faster 7-12
manual feed problems 7-16
quantity limitations D-3
selecting a tray 5-2
selecting output bin 5-25
standard-size paper 5-2
stopping 5-35
symbol sets 3-9
to Mailbox with Stapler 5-27
transparencies 5-9
two-sided, with duplex unit
5-33
printing drafts 6-9
programming, font selection B-3
Q
quality
solutions 6-5
troubleshooting 6-6 - 6-7
R
radiation performance A-6
radio reception A-4
recycling toner cartridges 7-3
regulatory statements A-4
repacking guidelines D-4
reset, cold 7-37
resolution
changing 6-2
enhancing 6-4
Resolution Enhancement
technology, described 6-4
resource saving, memory 2-3
restoring factory settings 4-5
REt
SEE Resolution Enhancement
technology
S
safety
Finland statement A-7
laser information A-6
ozone emission A-6
saving toner 6-9
selecting
paper size 4-9
paper type 4-9
self test 4-12
example 4-12
serial number, print engine
location 1-12 - 1-13
service
after warranty D-3
agreements D-1
during warranty D-3
settings, default 4-6
setup strings B-2 - B-3
font selection B-3
SIMM installation
error messages 7-21
introduction C-1
procedure C-2
testing memory board C-4
testing PostScript board C-5
troubleshooting SIMM
boards 7-20
validation error messages
7-21
SIMM slots, location 1-12
software
components 3-6
document monitoring 3-7
DocWise 3-7
DOS Symbol Sets Utility 3-9
drivers 3-3
end-user 3-6
HP FontSmart 3-4, 3-6
HP JetAdmin 3-7
HP JetPrint 3-6
HP Print Server NLM 3-8
HP Toolbox 3-7
license D-5
Macintosh utilities 3-8
network administration 3-6
network administrator 3-7
obtaining updates 7-48
software applications
printing envelopes from 5-18
setup strings B-3
stopping current print job
5-35
sound emission A-3
specifications A-1
environmental A-1
Stapler 7-6
clearing staple jams 7-7
loading staple cartridges 7-6
stapling documents 5-28
stop printing 5-35
stopping print requests 5-35
storing print data 2-2
supplies, accessories 1-11
switchboxes D-3
symbol sets
common values B-3
printing 3-9
Symphony, Lotus B-2
T
technical reference guides i-iv
television reception A-4
temperature A-3
terminating a job 5-35
Test Menu 4-10
test page 4-12
testing SIMM boards C-4
tests
PostScript 4-16
self 4-12
INDEX-3
toner
cartridge life 7-3
cleaning TONER LOW
message 7-5
extending toner life 6-3
redistributing in cartridge 7-4
reducing using EconoMode
6-9
saving 1-6
toner cartridge 7-3
installation 7-3
maintenance 7-3
non-HP, use 7-3
temperature 6-5
TONER LOW message 7-4 - 7-5
top cover, location 1-11
transparencies
media use guidelines 5-6
specifications 5-3
tray locking 4-9, 5-21
Tray Menu 4-8
4-INDEX
troubleshooting 7-1
2000-Sheet Input Tray 7-17
cancel a job 5-35
check list 7-8, 7-10 - 7-12,
7-14, 7-16
cleaning tasks 7-1
faster printing 7-12
formatting 7-14
manual feed 7-16
messages 7-33, 7-40
networks 7-11
PostScript 7-22
print quality 6-6 - 6-8
Printer Hard Disk 7-19
SIMM boards 7-20
SIMM error messages 7-21
SIMM validation error
messages 7-21
two-sided printing 5-33
typefaces
PCL selection B-3
selection B-3
V
VCCI statement A-5
ventilation A-1
vertical transfer door 7-24
voltage A-3
voltage, conformity A-8
W
warranty D-2
exclusions D-2
limitations D-3
limited D-2
printing use limitations D-3
repacking guidelines D-4
service after D-3
service during D-3
weight, printer A-3
Windows
drivers definition 3-3
Print Manager 5-35
Word, Microsoft B-2
WordPerfect B-2
EN