1
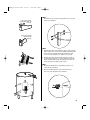
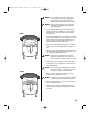
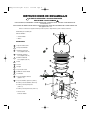
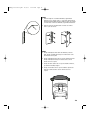
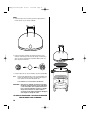
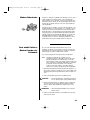
INSTR_810-5302-S.QXD
11/1/07
11:42 AM
Page 1
®
SMOKE’N GRILL
CHARCOAL SMOKER & GRILL
PARRILLERA Y AHUMADOR DE CARBÓN
®
DS-30 CHARCOAL SMOKER & GRILL
PARRILLERA Y AHUMADOR DE CARBÓN DS-30
OWNER’S MANUAL / MANUAL DEL PROPIETARIO
ASSEMBLY AND OPERATING INSTRUCTIONS
INSTRUCCIONES DE ARMADO Y OPERACIÓN
SAVE THIS MANUAL FOR FUTURE REFERENCE
GUARDE ESTE MANUAL PARA REFERENCIA FUTURA
WARNING/ADVERTENCIA
HAZARDOUS EXPLOSION MAY RESULT IF THESE WARNINGS AND INSTRUCTIONS ARE IGNORED. READ AND
FOLLOW ALL WARNINGS AND INSTRUCTIONS IN THIS MANUAL TO AVOID PERSONAL INJURY, INCLUDING
DEATH OR PROPERTY DAMAGE.
SE PUEDE PRODUCIR UNA EXPLOSIÓN PELIGROSA SI SE HACE CASO OMISO A ESTAS ADVERTENCIAS E
INSTRUCCIONES. LEA Y SIGA TODAS LAS ADVERTENCIAS E INSTRUCCIONES EN ESTE MANUAL PARA
EVITAR LESIONES PERSONALES, INCLUSO LA MUERTE, O LOS DAÑOS MATERIALES.
NOTICE TO INSTALLER:
LEAVE THESE INSTRUCTIONS WITH THE
GRILL OWNER FOR FUTURE REFERENCE.
®
SMOKER & GRILL
AVISO PARA EL
INSTALADOR:
ENTREGUE ESTAS INSTRUCCIONES AL
PROPIETARIO DE LA PARRILLA PARA
REFERENCIA FUTURA.
INSTR_810-5302-S.QXD
11/1/07
11:42 AM
Page 2
IMPORTANT SAFETY WARNINGS
WE WANT YOU TO ASSEMBLE AND USE YOUR SMOKER AS SAFELY AS POSSIBLE.
THE PURPOSE OF THIS SAFETY ALERT SYMBOL
IS TO ATTRACT YOUR ATTENTION TO POSSIBLE HAZARDS AS YOU ASSEMBLE AND USE YOUR SMOKER.
WHEN YOU SEE THE SAFETY ALERT SYMBOL, PAY CLOSE ATTENTION TO THE INFORMATION WHICH FOLLOWS!
READ ALL SAFETY WARNINGS & INSTRUCTIONS CAREFULLY
BEFORE ASSEMBLING AND OPERATING YOUR SMOKER.
WARNING
1
•
Only use this smoker on a hard, level, noncombustible, stable surface (concrete, ground, etc.). Never use on wooden or
other surfaces that could burn.
•
Always use a drip pan/ash guard under smoker to protect surface from heat damage and/or discoloration and to catch
ashes, embers and drippings. Place a thin layer of water in drip pan/ash guard to help extinguish falling ashes and embers.
A drip pan/ash guard is designed for use with a smoker for easy clean up of drippings that can cause discoloration of
surface and to catch falling ashes and embers.
•
Proper clearance of 10 feet (3m) between the smoker and combustible material (bushes, trees, wooden decks, fences,
buildings, etc.) or construction should be maintained at all times when smoker is in use. Do not place smoker under a roof
overhang or enclosed area.
•
For household use only. Do not use this smoker for other than its intended purpose.
•
For outdoor use only. Do not operate smoker indoors or in an enclosed area.Do not use on balconies.
•
Do not leave smoker unattended when in use.
•
Do not move smoker when water pan contains hot liquids.
•
Water pan should always be used when smoking. Do not allow liquid in water pan to completely evaporate. Check water
pan every 2 hours and add water if level is low (a sizzling sound may indicate a need for water). Follow instructions in
“Adding Water During Cooking” section of this manual.
•
Always keep water in water pan even after food is removed from smoker. Water will evaporate and grease in water pan can
catch on fire.
•
Use extreme caution when adding charcoal/wood. Follow instructions in “Adding Charcoal/Wood During Cooking” section
of this manual.
•
Never move smoker when it is in use or when water pans contain hot liquids.
•
Do not store or use smoker near gasoline or other flammable liquids, gases or where flammable vapors may be present.
•
We recommend the use of a Charcoal Chimney Starter to avoid the dangers associated with charcoal lighting fluid. If you
choose to use charcoal lighting fluid, only use lighting fluid approved for lighting charcoal. Carefully read instructions on
the charcoal lighting fluid and charcoal prior to use.
•
When using charcoal lighting fluid, allow charcoal to burn until covered with a light ash (approximately 20 minutes) prior
to closing door and placing dome lid on smoker. This will allow charcoal lighting fluid to burn off. Failure to do this could
trap fumes from charcoal lighting fluid in smoker and may result in a flash-fire or explosion when door is opened or dome
lid is removed.
•
Never use charcoal that has been pre-treated with lighter fluid. Use only high grade plain charcoal or charcoal/wood
mixture.
•
Do not use gasoline, kerosene or alcohol for lighting charcoal. Use of any of these or similar products will cause an
explosion possibly leading to severe bodily injury.
INSTR_810-5302-S.QXD
11/1/07
11:42 AM
Page 3
WARNING
•
Never add charcoal lighting fluid to hot or even warm coals as flashback may occur causing severe burns.
•
When grilling, grease from meat may drip into the charcoal and cause a grease fire. If this should happen replace dome lid
to suffocate the flame. Do not use water to extinguish grease fires.
•
Use caution since flames can flare-up when fresh air suddenly comes in contact with fire. When opening the dome lid,
keep hands, face and body a safe distance from hot steam and flame flare-ups. Remove the dome lid by tilting it toward
you to allow heat and steam to escape away from your face.
•
Use caution when assembling and operating your smoker to avoid scrapes or cuts from sharp edges of metal parts.
•
Check support brackets to make sure they are secure and notches are upright before each use.
•
Place smoker in an area where children and pets cannot come into contact with unit. Close supervision is necessary when
smoker is in use.
•
Use caution when lifting or moving smoker to prevent strains and back injuries.
•
In windy weather, place smoker in an outdoor area that is protected from the wind.
•
Do not wear loose clothing or allow hair to hang freely while using smoker.
•
Use caution when reaching into or under smoker. Always wear oven mitts or gloves to protect your hands from burns.
Avoid touching hot surfaces.
•
We advise that a fire extinguisher be on hand. Refer to your local authority to determine proper size and type of fire
extinguisher.
•
Accessory attachments not manufactured by The Brinkmann Corporation for this particular product are not recommended
and may lead to personal injury or property damage.
•
Never leave coals and ashes in smoker unattended.
•
Before smoker can be left unattended, remaining coals and ashes must be removed from smoker. Use caution to protect
yourself and property. Place remaining coals and ashes in a noncombustible metal container and completely saturate with
water. Allow coals and water to remain in metal container 24 hours prior to disposing.
•
Extinguished coals and ashes should be placed a safe distance from all structures and combustible materials.
•
With a garden hose, completely wet the surface beneath and around smoker to extinguish any ashes, coals or embers
which may have fallen during the cooking or cleaning process.
•
Store the smoker out of reach of children, indoors in a dry location when not in use.
•
Do not attempt to service smoker other than normal maintenance as explained in “After-Use Safety and Proper Care &
Maintenance” sections of this manual. Repairs should be performed by The Brinkmann Corporation only.
•
Properly dispose of all packaging material.
USE CAUTION AND COMMON SENSE WHEN USING YOUR SMOKER.
FAILURE TO ADHERE TO THE SAFETY WARNINGS AND GUIDELINES IN THIS MANUAL
COULD RESULT IN BODILY INJURY OR PROPERTY DAMAGE.
SAVE THIS MANUAL FOR FUTURE REFERENCE.
2
INSTR_810-5302-S.QXD
11/1/07
11:42 AM
Page 4
ASSEMBLY INSTRUCTIONS
READ ALL SAFETY WARNINGS & INSTRUCTIONS CAREFULLY
BEFORE ASSEMBLING AND OPERATING YOUR SMOKER.
FOR COVERS, ACCESSORIES AND OTHER PRODUCTS, PLEASE VISIT US ONLINE AT:
www.brinkmann.net
FOR GRILL WARRANTY REPLACEMENT PARTS, PLEASE VISIT US AT:
www.grillpartsonline.com
Inspect contents of the box to ensure all parts are included and undamaged.
Tools required to assemble
your Smoker:
10
9
•
Screwdriver
•
Pliers
1
PARTS LIST:
1
1
Dome Lid
2
1
Smoker Body
3
1
132" Water Pan
4
1
152" Charcoal Pan
5
2
152" Chrome Cooking Grills
6
3
Legs
7
1
Door
8
1
Door Hinge
9
3
Metal Brackets for Handles
11
10 6
Wooden Handle Halves
11 1
Heat Indicator
12 3
Lower Support Brackets (V Clip)
13 3
Upper Support Brackets (Single Clip)
18 10-24 x s" Screws and Square Nuts
6
6-32 x 4" Screws and Nuts (for Door)
6
8-32 x w" Screws and Nuts (for Handles)
1
Recipe Booklet
5
3
4
10
9
13
10
12
9
8
2
Wood Chunk (sample)
6
3
7
INSTR_810-5302-S.QXD
11/1/07
11:42 AM
Page 5
STEP 1
Lower support bracket
(V-clip) with notched side
facing up.
Attach the three legs to smoker body using 10-24 x s" screws and
square nuts as illustrated.
Upper support bracket
with notched side
facing up.
STEP 2
a. Attach the three lower support brackets (V clips) to inside of smoker
body through the three 4" holes that are located about halfway down
on sides. Mount each bracket with notched side facing up using
10-24 x s" screws and square nuts. Tighten screws securely.
b. Attach the three upper support brackets (single clips) to inside of
smoker body through the three 4" holes located near the top edge.
Mount each bracket with notched side facing up using 10-24 x s"
screws and square nuts. Tighten screws securely.
STEP 3
a. Attach wooden handle halves to metal brackets using 8-32 x w"
screws and nuts as illustrated.
b. Attach two handle assemblies to side of smoker body using
10-24 x s" screws and square nuts as illustrated.
4
INSTR_810-5302-S.QXD
11/1/07
11:42 AM
Page 6
STEP 4
a. Attach hinge to inside of smoker body as illustrated. Use the
6-32 x 4" screws and nuts to attach the hinge to smoker body.
NOTE: Attach the hinge so pin is facing out of smoker as illustrated.
b. Attach door to hinge using the remaining 6-32 x 4" screws and nuts.
STEP 5
a. Place charcoal pan inside smoker body on top of legs. Position
charcoal pan so the rim is resting securely on notched out step of
all three legs.
b. Place water pan on top of lower support brackets. Position water
pan so the rim is resting securely on notched out step of all three
support brackets.
c. Place a cooking grill on the lower support brackets directly on top
of water pan.
d. Place a cooking grill on the upper support brackets so the outer
rim is resting securely on notched out step of all three support
brackets.
5
INSTR_810-5302-S.QXD
11/1/07
11:42 AM
Page 7
STEP 6
a. Attach a handle assembly on top of dome lid using 10-24 x s" screws
and square nuts.
b. Install heat indicator in dome lid by aligning tabs on heat indicator with
slots in the opening on front of dome lid. Insert and turn 4 revolution
until the word “IDEAL” on the heat indicator is at the top of the dial.
DALLAS, TX 75244
BRINKMANN
BRINKMANN
DALLAS, TX 75244
c. Place dome lid on upper support brackets of smoker body.
NOTE:
The dome lid is not designed to fit snugly in the smoker body.
The gap between the dome lid and smoker body allows proper
air draft and circulation.
YOUR CHARCOAL SMOKER
IS NOW COMPLETELY ASSEMBLED.
IMPORTANT:
Before first use and after cleaning, apply a light coat of
vegetable oil or vegetable cooking spray to the interior
surface of the dome lid, smoker body, cooking grills and
water pan. This simple process will help reduce interior
rusting. DO NOT apply oil to the charcoal pan.
READ ALL SAFETY WARNINGS AND OPERATING INSTRUCTIONS
PRIOR TO USING YOUR SMOKER.
6
INSTR_810-5302-S.QXD
11/1/07
11:42 AM
Page 8
OPERATING INSTRUCTIONS
PLACE THE SMOKER OUTDOORS ON A HARD, LEVEL, NON-COMBUSTIBLE SURFACE AWAY FROM
ROOF OVERHANG OR ANY COMBUSTIBLE MATERIAL. NEVER USE ON WOODEN OR OTHER SURFACES THAT COULD
BURN. PLACE THE SMOKER AWAY FROM OPEN WINDOWS OR DOORS TO PREVENT SMOKE FROM ENTERING YOUR
HOUSE. IN WINDY WEATHER, PLACE THE SMOKER IN AN OUTDOOR AREA THAT IS PROTECTED FROM THE WIND.
READ ALL SAFETY WARNINGS & INSTRUCTIONS CAREFULLY
BEFORE ASSEMBLING AND OPERATING YOUR SMOKER.
Prior to first use, cure your smoker to minimize damage to the exterior finish
as well as rid the smoker of paint odor that can impart unnatural flavors to
the first meal prepared. Cure your smoker periodically throughout the year to
protect against rust.
Curing Your Smoker
1. Remove water pan from smoker. Lightly coat all interior surfaces of the
smoker and cooking grill with vegetable oil or vegetable oil spray. Do not
coat charcoal pan.
2. Follow instructions carefully in the "Smoking" section of this owner’s
manual to light charcoal in charcoal pan.
WARNING:
Charcoal lighting fluid must be allowed to completely burn off
prior to closing dome lid (approximately 20 minutes). Failure to
do this could trap fumes from charcoal lighting fluid in smoker
and may result in a flash-fire or explosion when lid is opened.
BRINKMANN
3. With coals burning strong in charcoal pan, close dome lid.
DALLAS, TX 75244
4. Allow temperature to reach the “Ideal” range on the heat indicator.
Maintain this temperature for two hours, then allow smoker to cool
completely. It is important that the exterior of the smoker is not scraped
or rubbed during the curing process.
IMPORTANT:
CAUTION:
To protect your smoker from excessive rust, the unit must be
cured periodically and covered at all times when not in use. A
smoker cover may be ordered directly from Brinkmann by
calling 1-800-468-5252.
Before each use, check handles and support brackets to make
sure they are securely fastened.
1. Remove dome lid, cooking grills and water pan from smoker body and set
aside.
2. Place a drip pan/ash guard or its equivalent under the base pan to catch
any ashes or drippings.
NOTE:
Heavy-duty aluminum foil folded several times can be used as a drip
pan/ash guard. Make the foil sheets large enough so it extends
beyond the legs of the smoker. Fold the edges up to contain any
embers and drippings. Place a thin layer of water in drip pan/ash
guard to help extinguish falling ashes and embers.
3. Open the door on the smoker body. Make sure the charcoal pan is resting
securely on notched out step of all three legs.
7
Smoking
INSTR_810-5302-S.QXD
11/1/07
11:42 AM
Page 9
WARNING:
Never use charcoal that has been pre-treated with
lighter fluid. Use only high grade plain charcoal or
charcoal/wood mixture.
4. If using a Charcoal Chimney Starter, follow all manufacturer’s
warnings and instructions regarding the use of their product.
Carefully place 8-10 pounds of hot coals in the charcoal pan.
Proceed to Step 7.
If using charcoal lighting fluid, follow all manufacturer’s warnings
and instructions regarding the use of their product. Use charcoal
lighting fluid approved for lighting charcoal ONLY. Do not use
gasoline, kerosene or alcohol for lighting charcoal. Place 8-10
pounds of high quality charcoal in charcoal pan.
5. Saturate charcoal with lighting fluid and wait 2 to 3 minutes for
fluid to soak in. Store charcoal lighting fluid safely away from
smoker.
6. Carefully light the charcoal and allow to burn until covered with a
light ash (approximately 20 minutes) prior to closing door and
placing dome lid on smoker. This will allow charcoal lighting fluid
to burn off.
WARNING:
Failure to do this could trap fumes from charcoal
lighting fluid in smoker and may result in a flash-fire or
explosion when door is opened or dome lid is removed.
7. Refer to “Flavoring Wood” section of this manual for the
recommended amount of flavoring wood. Use long cooking
tongs to carefully place flavoring wood on top of hot charcoal.
NOTE:
1" (2.5 cm)
Depending on the weather, a full pan of charcoal will burn
for
5-6 hours.
8. Place the water pan on the lower support brackets. Make sure
water pan is resting securely on notched out step of all three
support brackets.
9. Carefully fill water pan with warm water or marinade to 1" below
the rim. A full pan holds 4 quarts/1 gallon of water and will last
2-3 hours. Do not overfill and allow water to overflow from water
pan.
10. Place a cooking grill on the lower support brackets directly on
top of the water pan. Position the cooking grill so the rim is
resting securely on notched out step of all three support
brackets.
11. Place food on the cooking grill in a single layer with space
between each piece. This will allow smoke and moist heat to
circulate evenly around all pieces.
12. Place the other cooking grill on the upper support brackets.
Position the cooking grill so the rim is resting securely on
notched out step of all three support brackets. Place food on the
cooking grill.
8
INSTR_810-5302-S.QXD
11/1/07
11:42 AM
Page 10
13. Place the dome lid on smoker body and allow food to cook.
14. After 2-3 hours of cooking, check water and charcoal levels by
following instructions in the “Adding Water During Cooking and Adding
Charcoal/Wood During Cooking” sections of this manual.
WARNING:
Do not allow liquid in water pan to completely evaporate.
Always keep water in water pan even after food is removed
from smoker. Water will evaporate and grease in water pan
can catch on fire.
15. Always use a meat thermometer to ensure food is fully cooked before
removing from smoker.
16. Allow smoker to cool completely, then follow instructions in the
“After-Use Safety and Proper Care & Maintenance” sections of
this manual.
1. Remove dome lid, cooking grills, water and charcoal pans from smoker
body and set aside.
2. Place a drip pan/ash guard or its equivalent under the grill to catch
embers, ashes or drippings.
NOTE:
Heavy-duty aluminum foil folded several times can be used as a
drip pan/ash guard. Make the foil sheets large enough so it
extends beyond the legs of the smoker. Fold the edges up to
contain any embers and drippings. Place a thin layer of water in
drip pan/ash guard to help extinguish falling ashes and embers.
3. Open the door on the smoker body. Place a cooking grill on lower
support brackets.
4. If grilling food, place the charcoal pan on top of the cooking grill on
lower support brackets.
If searing food, place the charcoal pan on the upper support brackets.
Make sure charcoal pan is resting securely on notched out step of all
three support brackets.
9
Grilling & Searing
INSTR_810-5302-S.QXD
Grilling
11/1/07
11:42 AM
Page 11
WARNING:
It is very important that the rim of charcoal pan is
securely locked into the notches of upper support
brackets. Doing so will hold the pan in place on
brackets and prevent pan with hot coals from falling.
WARNING:
Never use charcoal that has been pre-treated with
lighter fluid. Use only high grade plain charcoal or
charcoal/wood mixture.
5. If using a Charcoal Chimney Starter, follow all manufacturer’s
warnings and instructions regarding the use of their product.
Carefully place 4-5 pounds of hot coals in the charcoal pan.
Proceed to Step 7.
If using charcoal lighting fluid, follow all manufacturer’s warnings
and instructions regarding the use of their product. Use charcoal
lighting fluid approved for lighting charcoal ONLY. Do not use
gasoline, kerosene or alcohol for lighting charcoal. Place 4-5
pounds of high quality charcoal in charcoal pan.
6. Saturate charcoal with lighting fluid and wait 2 to 3 minutes for
fluid to soak in. Store charcoal lighting fluid safely away from
grill.
7. With the door open, carefully light the charcoal and allow to burn
until covered with a light ash (approximately 20 minutes). This
will allow charcoal lighting fluid to burn off.
WARNING:
Failure to do this could trap fumes from charcoal
lighting fluid in grill and may result in a flash-fire or
explosion when door is opened or dome lid is removed.
8. If grilling food, place a cooking grill on upper support brackets.
If searing food, place a cooking grill on top of charcoal pan on
upper support brackets.
CAUTION:
Searing
The charcoal grill will be VERY HOT and caution must
be used when working in or around the grill. Use oven
mitts/gloves to protect your hands from burns.
9. Place food on the cooking grill in a single layer with space
between each piece and allow food to cook.
WARNING:
If a flame flare-up occurs while grilling, cover grill with
dome lid to limit airflow and extinguish the flare-up.
10. Always use a meat thermometer to ensure food is fully cooked
before removing from smoker.
11. Allow grill to cool completely, then follow instructions in the
“After-Use Safety and Proper Care & Maintenance” sections of
this manual.
10
INSTR_810-5302-S.QXD
11/1/07
11:42 AM
Page 12
To obtain your favorite smoke flavor, experiment by using chunks, sticks
or chips of flavor producing wood such as hickory, pecan, apple, cherry,
or mesquite. Most fruit or nut tree wood may be used for smoke
flavoring. Do not use resinous woods such as pine as it will produce an
unpleasant taste.
Flavoring Wood
Wood chunks or sticks 3" to 4" long and 2" to 1" thick work best. Unless
the wood is still green, soak the wood in water for 20 minutes or wrap
each piece in foil and tear several small holes in the foil to produce more
smoke and prevent the wood from burning too quickly. A lot of wood is
not required to obtain a good smoke flavor. A recommended amount is
3-4 wood chunks or sticks. Experiment by using more wood for stronger
smoke flavor or less wood for milder smoke flavor.
Additional flavoring wood should not have to be added during the cooking
process, however, it may be necessary when cooking very large pieces of
meat. Follow the instructions and cautions below to avoid injury while
adding wood and/or charcoal.
Additional charcoal may be required to maintain or increase cooking
temperature.
NOTE:
Dry wood burns hotter than charcoal so you may want to
increase the ratio of wood to charcoal to increase the cooking
temperature. Hardwood such as oak, hickory, mesquite, fruit and
nut wood are an excellent fuel because of their burning rate.
When using wood as fuel, make sure the wood is seasoned and
dry. DO NOT use resinous wood such as pine as it will produce
an unpleasant taste.
1. Remove dome lid by tilting it toward you to allow heat and steam to
escape away from your face. Use caution since flames can flare-up
when fresh air suddenly comes in contact with fire.
2. Stand back a safe distance and carefully open door.
CAUTION:
When the smoker is in use, the door will be very hot. Wear
oven mitts and use caution when handling the door.
3. Use long cooking tongs to lightly brush off ashes on hot coals. Use
tongs to add charcoal and/or wood, being careful not to stir-up ashes
and sparks.
WARNING:
Never add charcoal lighting fluid to hot or even warm coals
Never add charcoal lighting fluid to hot or even warm coals
as flashback may occur causing severe burns
4. When charcoal is burning strong again, close the door and replace the
dome lid.
11
Adding
Charcoal/Wood
During Cooking
INSTR_810-5302-S.QXD
11/1/07
11:42 AM
Adding Water
During Cooking
Page 13
Check the water level in water pan if the complete cooking process takes longer
than 2 hours. A low water level can be detected by listening for the sound of
water sizzling. Water can be added to the water pan through the top of smoker
or side of door. Use caution and follow instructions carefully.
OPTION 1: Adding Water Through Top of Smoker
1. Remove dome lid by tilting it toward you to allow heat and steam to escape
away from your face. Use caution since flames can flare-up when fresh air
suddenly comes in contact with fire. Inspect the water level in pan.
1" (2.5 cm)
2. If water level is low, add water to water pan. If food is on top cooking
grill only, water may be added to the water pan by moving food aside
on cooking grill and pouring water down through the cooking grill.
Fill water pan to 1" below the rim. Pour slowly to avoid splashing or
over-filling.
If using both cooking grills, wear oven mitts to remove food and the top
cooking grill. Move food aside on lower cooking grill and pour water through
the lower cooking grill into water pan. Pour slowly to avoid splashing or
over-filling.
3. Set the top cooking grill on the upper support brackets and place food back
on the cooking grill.
4. Place dome lid on smoker body and allow food to continue cooking.
OPTION 2: Adding Water Through the Side Door
1. Stand back and carefully open side door. Use caution since flames can
flare-up when fresh air suddenly comes in contact with fire. Inspect the
water level in pan.
2. If water level is low, add water to water pan. Stand back and carefully add
water using a funnel or a container with a spout. Fill water pan to 1" below
the rim. Pour slowly to avoid splashing or overfilling.
3. Close side door and allow food to continue cooking.
Cooking Tips
•
There is very little difference in temperature and cooking time between top
and bottom grill levels. When cooking different types or cuts of meat at the
same time, place the meat that requires the least cooking time on the top
cooking grill so that it may be easily removed first. If only one cooking grill
is required, use the upper grill level for best results.
•
During the smoking process, avoid the temptation to lift dome lid to check
food. Lifting the dome lid allows heat to escape, making additional cooking
time necessary.
•
We strongly recommend using a meat thermometer to determine the proper
degree of doneness. Many variables (outside cooking temperature, amount
of charcoal, the number of times the dome lid is removed, proximity of food
to heat source, etc.) will affect actual cooking times. When using a meat
thermometer, place probe midway into the thickest part of the meat, making
sure that it does not touch any fat or bone. Allow five minutes for the
thermometer to properly regulate temperature.
12
INSTR_810-5302-S.QXD
11/1/07
11:42 AM
Page 14
AFTER-USE SAFETY
WARNING
•
Always allow smoker and all components to cool completely before handling.
•
Never leave coals and ashes in smoker unattended.
•
Before grill can be left unattended, remaining coals and ashes must be removed from smoker. Use caution to protect
yourself and property. Place remaining coals and ashes in a noncombustible metal container and completely saturate with
water. Allow coals and water to remain in metal container 24 hours prior to disposing.
•
With a garden hose, completely wet surface beneath and around the smoker to extinguish any ashes, coals or embers
which may have fallen during the cooking or cleaning process.
•
Extinguished coals and ashes should be placed a safe distance from all structures and combustible materials.
•
Cover and store smoker in a protected area, out of reach of children.
•
Wash cooking grills, water and charcoal pans with hot, soapy water,
rinse well and dry. Lightly coat cooking grills with vegetable oil or
vegetable cooking spray.
•
Clean inside and outside of smoker by wiping off with a damp cloth.
After cleaning, apply a light coat of vegetable oil or vegetable cooking
spray to the interior surface of the dome lid, smoker body, cooking
grills and water pan. This simple process will help reduce interior
rusting. DO NOT apply oil to the charcoal pan.
NOTE:
13
Smoke will accumulate and leave a residue in the dome lid of
your smoker that may drip onto food during cooking. To
minimize accumulation of residue, wipe off dome lid after each
use.
•
If rust appears on the exterior surface of your smoker, clean and buff
the affected area with steel wool or fine grit emery cloth. Touch-up
with a good high-temperature resistant paint.
•
Never apply paint to the interior surface. Rust spots on the interior
surface can be buffed, cleaned, then lightly coated with vegetable oil or
vegetable cooking spray to minimize rusting.
•
Always keep your smoker covered when not in use to protect against
excessive rusting. The Smoke’N Grill cover may be ordered directly
from Brinkmann by calling 800-468-5252.
Proper Care
& Maintenance
INSTR_810-5302-S.QXD
11/1/07
11:42 AM
Page 15
IMPORTANTES PRECAUCIONES DE SEGURIDAD
¡ NUESTRO DESEO ES QUE USTED ARME Y USE SU AHUMADOR DE LA FORMA MÁS
SEGURA POSIBLE. ESTE SÍMBOLO DE PRECAUCIÓN
SE USA PARA AVISARLE SOBRE POSIBLES PELIGROS QUE PUEDEN SURGIR AL ARMAR EL AHUMADOR.
¡CUANDO VEA EL SÍMBOLO DE PRECAUCIÓN, PONGA ESPECIAL ATENCIÓN A LA INFORMACIÓN QUE LE SIGUE!
LEA TODAS LAS INSTRUCCIONES Y AVISOS DE PRECAUCIÓN
ANTES DE ARMAR Y USAR SU AHUMADOR
PRECAUCIÓN
•
Use este ahumador únicamente sobre una superficie sólida, plana, no combustible y estable (concreto, suelo, etc.). Jamás
coloque el ahumador sobre una superficie de madera o sobre otra superficie combustible.
•
Coloque siempre una bandeja recolectora de gotas y cenizas debajo del ahumador para proteger la superficie contra el calor y/o
la descoloración y para recoger las cenizas, los residuos de brasas y los goteos. Coloque una capa delgada de agua en la
bandeja recolectora de gotas y cenizas para extinguir las cenizas y brasas que caigan. La función de la bandeja recolectora es
limpiar fácilmente las cenizas que pueden descolorar las superficies y recoger las cenizas y residuos de brasas que caigan.
•
Cuando use el ahumador, deje una distancia mínima de 10 pies (3 metros) entre el ahumador y cualquier material combustible
(arbustos, árboles, plataformas de madera, cercas, edificios). No coloque el ahumador debajo de un techo o dentro de un área
cerrada.
•
Sólo para uso doméstico. No use este ahumador para otros usos que no sean los indicados.
•
Sólo para uso al exterior. No utilice el ahumador en interiores o en areas cerradas.
•
Mantenga el ahumador siempre a la vista cuando esté encendido.
•
No mueva el ahumador si la bandeja recolectora contiene líquido caliente.
•
Use siempre la bandeja recolectora cuando encienda el ahumador. No permita que el líquido de la bandeja se evapore
completamente. Revise la bandeja de agua cada 2 horas y añada agua si el nivel se encuentra muy bajo (si escucha un silbido
puede indicar la falta de agua). Siga las instrucciones de la sección “Para añadir agua cuando esté cocinando” que se encuentra
más adelante en este manual.
•
Mantenga siempre agua en la bandeja después de retirar los alimentos del ahumador. El agua de la bandeja recolectora puede
evaporarse provocando que la grasa se encienda.
•
Tenga mucho cuidado cuando añada carbón o madera. Siga las instrucciones de la sección “Para añadir carbón o madera
cuando esté cocinando” que se encuentran más adelante en este manual.
•
Jamás mueva el ahumador cuando esté encendido.
•
No guarde el ahumador cerca de gasolina u otros líquidos inflamables, gases o lugares en donde hayan vapores inflamables.
•
Le recomendamos usar una chimenea de encendido de carbón para evitar los riesgos asociados con el uso de liquidos
inflamables para encender el carbón. Si decide usar un liquido inflamable, use solamente un liquido especialmente para encender
carbón. Antes de encender el carbón, lea cuidadosamente las instrucciones incluidas con el carbón y el liquido inflamable.
•
Cuando use un liquido inflamable para encender el carbón, permita que el carbón se queme hasta que se cubra con una capa de
ceniza gris (unos 20 minutos) antes de cerrar la puerta y colocar la tapa sobre el ahumador. Esto permitirá que se consuma el
liquido inflamable. Si no hace lo anterior, el ahumador podría acumular vapores emitidos por el liquido inflamable y ocasionar
una llamarada o explosión al abrir la puerta o al levantar la tapa.
•
No use carbón de combustión automática. Use únicamente carbón puro o una mezcla de carbón y madera.
•
No use gasolina, kerosina o alcohol para encender el carbón. El uso de cualquiera de estos productos, o productos similares,
podría resultar en una posible explosión y severas lesiones.
14
INSTR_810-5302-S.QXD
11/1/07
11:42 AM
Page 16
PRECAUCIÓN
•
¡Jamás vierta liquido inflamable sobre los carbones calientes o tibios!
•
Al asar carnes, la grasa de las mismas podría caer sobre el carbón y hacer que estos se enciendan. Si esto sucede,
coloque la tapa sobre el ahumador para sofocar las llamas. No intente usar agua para apagar las llamas producidas por
grasa.
•
Tenga cuidado ya que las llamas pueden agrandarse si hay aire. Tenga cuidado al abrir la tapa, aleje el rostro y las manos
del vapor y de las llamas. Para abrir la tapa, inclínela hacia usted para permitir que las llamas y el vapor escapen en
dirección contraria a su rostro.
•
Tenga cuidado al ensamblar u operar el ahumador para evitar cortarse o rasguñarse con bordes afilados o piezas
metálicas.
•
Antes de cada uso, revise los soportes metálicos y verifique que las ranuras estén en posición vertical.
•
Coloque el ahumador lejos del alcance de los niños y animales domésticos. Supervise constantemente el ahumador
cuando esté encendido.
•
Tenga cuidado al levantar o mover el ahumador para evitar torcer y lesionar su espalda.
•
Si va a encender el ahumador en un lugar ventilado, colóquelo en el exterior y en un sitio protegido del viento.
•
No use ropa holgada o el cabello suelto al utilizar el ahumador.
•
Tenga cuidado al poner las manos dentro o debajo del ahumador. Use siempre guantes aislantes para proteger sus manos
de quemaduras. Evite tocar superficies calientes.
•
Le recomendamos tener siempre a mano un extinguidor. Solicite a sus autoridades locales información sobre el tipo y
tamaño de un extinguidor adecuado.
•
No se recomienda el uso de accesorios que no hayan sido fabricados especificamente por The Brinkmann Corporation
para este producto ya que podría resultar en lesiones personales o en daños a la propiedad.
•
Jamás deje carbones o cenizas en el ahumador sin la debida supervisión.
•
Antes de alejarse del ahumador, deben retirarse los restos de carbones y cenizas. Tome precauciones en cuanto a su
seguridad personal y de la propiedad. Coloque los restos de carbones y cenizas dentro de un recipiente incombustible
metálico y cubralos completamente con agua. Antes de desechar los restos de carbones y cenizas, déjelos dentro del
recipiente incombustible metálico durante 24 horas.
•
Los carbones y cenizas apagados deben colocarse en un sitio alejado de estructuras y materiales combustibles.
•
Use una manguera para mojar completamente las superficies que estén debajo y alrededor del ahumador y extinguir
completamente los residuos de cenizas, carbones o brasas que puedan haber caído al cocinar o al limpiar el ahumador.
•
Cuando no use el ahumador, guárdelo bajo techo y manténgalo lejos del alcance de los niños.
•
No intente dar servicio al ahumador a menos que se especifique en las secciones “Cuidado y mantenimiento adecuados
después de usar el ahumador” que se encuentra más adelante en este manual. Cualquier reparación debe ser efectuada
únicamente por The Brinkmann Corporation.
•
Deseche en forma adecuada todo el material de empaque.
TENGA CUIDADO Y USE SENTIDO COMÚN AL USAR EL AHUMADOR.
EL NO OBSERVAR LAS ADVERTENCIAS Y PAUTAS DE SEGURIDAD INDICADAS EN ESTE MANUAL PODRÍA
RESULTAR EN LESIONES PERSONALES O EN DAÑOS A LA PROPIEDAD.
CONSERVE ESTE MANUAL PARA FUTURAS REFERENCIAS.
15
INSTR_810-5302-S.QXD
11/1/07
11:42 AM
Page 17
INSTRUCCIONES DE ENSAMBLAJE
LEA TODAS LAS INSTRUCCIONES Y LOS AVISOS DE PRECAUCIÓN
ANTES DE ARMAR Y USAR SU AHUMADOR.
PARA CUBIERTAS, ACCESORIOS Y OTROS PRODUCTOS, FAVOR DE VISITARNOS POR LA RED MUNDIAL EN:
www.brinkmann.net
PARA PARTES DE REEMPLAZO DE PARRILLA BAJO GARANTIA, FAVOR DE VISITARNOS POR LA RED MUNDIAL EN:
www.grillpartsonline.com
Revise el contenido de la caja para verificar que todas las piezas se hayan incluido y estén en buenas condiciones.
Herramientas que necesitará para
armar su ahumador:
10
9
•
Un destornillador
•
Alicates
1
LISTA DE PIEZAS:
1 1 Tapa en forma de domo
2 1 Cuerpo del ahumador
11
3 1 Bandeja recolectora de
132" pulgadas (34,3 cm)
4 1 Bandeja de carbón de
152" pulgadas (39,4 cm)
5
5 2 Parillas cromadas de
152" pulgadas (39,4 cm)
3
6 3 Patas
7 1 Puerta
4
8 1 Bisagra
9 3 Soportes de las asas
10
10 6 Mitades de asas de madera
13
10
11 1 Termómetro
12 3 Soportes metálicos inferiores
(grapas en “V”)
9
12
13 3 Soportes metálicos superiores (sencillos)
9
8
18 Tornillos y tuercas cuadrados (10-24 x s")
6 Tornillos y tuercas para la puerta
(6-32 x 4")
2
6 Tornillos y tuercas para las asas (8-32 x w")
1 Libro de recetas
Trocitos de madera
6
7
16
INSTR_810-5302-S.QXD
11/1/07
11:42 AM
Page 18
PASO 1
Instale las tres patas en el cuerpo del ahumador usando los tornillos
10-24 x s" y las tuercas cuadradas, según indica la ilustración.
Soportes metálicos inferiores
(grapas en “V”) con las
ranuras hacia arriba.
Soportes metálicos inferiores
(sencillos) con la ranura
hacia arriba.
PASO 2
a. Instale los tres soportes metálicos inferiores (grapas en “V”) a la parte
interior del ahumador a través de las tres perforaciones de 4" (6 mm)
de pulgada ubicadas aproximadamente a la mitad del cuerpo. Use los
tornillos 10-24 x s" y las tuercas cuadradas para montar cada fijador
de modo que las ranuras queden en la parte superior. Apriete bien los
tornillos.
b. Instale los tres soportes metálicos inferiores (sencillos) a través de las
tres perforaciones de 4" (6 mm) de pulgada ubicadas cerca del borde
superior del cuerpo. Use los tornillos 10-24 x s" y las tuercas
cuadradas para montar cada fijador de modo que la ranura quede en la
parte superior. Apriete bien los tornillos.
PASO 3
a. Instale las mitades de las asas a los soportes metálicos usando los
tornillos 8-32 x w" y las tuercas cuadradas, según indica la ilustración.
b. Instale dos juegos de asas en la parte lateral del ahumador usando los
tornillos 10-24 x w" y las tuercas cuadradas, según indica la
ilustración.
17
INSTR_810-5302-S.QXD
11/1/07
11:42 AM
Page 19
PASO 4
a. Instale la bisagra en el costado del ahumador, según indica la
ilustración. Use los tornillos 6-32 x 4" y las tuercas para instalar la
bisagra al ahumador. NOTA: instale el pasador de modo que la clavija
se oriente hacia el exterior del ahumador, según indica la ilustración.
b. Instale la puerta con la bisagra usando el resto de los tornillos
6-32 x 4" y de las tuercas.
PASO 5
a. Coloque la bandeja de carbón dentro del ahumador y sobre las
patas. Coloque la bandeja de modo que el borde descanse sobre
las ranuras de las tres patas.
b. Coloque la bandeja de agua sobre los soportes metálicos inferiores.
Coloque la bandeja de modo que el borde descanse sobre las
ranuras de los tres soportes.
c. Coloque una de las rejillas sobre los soportes metálicos inferiores,
por encima de la bandeja de agua.
d. Coloque la otra rejilla sobre los soportes metálicos superiores de
modo que el borde descanse sobre las ranuras de los tres
soportes.
18
INSTR_810-5302-S.QXD
11/1/07
11:42 AM
Page 20
PASO 6
a. Instale un juego de asas en la parte superior de la tapa usando los
tornillos 10-24 x s” y las tuercas cuadradas.
b. Instale el termómetro, alineando las lengüetas del mismo con las
ranuras de la abertura que están en la tapa. Coloque el termómetro y
gírelo un cuarto de vuelta hasta que la palabra “IDEAL” quede en la
parte superior del termómetro.
DALLAS, TX 75244
BRINKMANN
BRINKMANN
DALLAS, TX 75244
c. Coloque la tapa sobre los soportes metálicos superiores del ahumador.
NOTA:
La tapa ha sido diseñada para no caber en forma ajustada sobre
el cuerpo del ahumador. El espacio que queda entre la tapa y el
cuerpo permite una circulación adecuada de aire.
SU AHUMADOR YA ESTÁ TOTALMENTE ENSAMBLADO
IMPORTANTE: Antes de usar el ahumador por primera vez y después
de limpiarlo, aplique una ligera capa de aceite vegetal
o rocíe aceite vegetal sobre la superficie interior de la
tapa, el cuerpo del ahumador, las rejillas y la bandeja
de agua. Este sencillo proceso ayuda a reducir la
corrosión de la parte interior del ahumador. NO aplique
aceite vegetal a la bandeja de carbón.
LEA TODAS LAS INSTRUCCIONES Y LOS AVISOS DE PRECAUCIÓN
ANTES DE ARMAR Y USAR SU AHUMADOR
19
INSTR_810-5302-S.QXD
11/1/07
11:42 AM
Page 21
INSTRUCCIONES DE OPERACIÓN
COLOQUE EL AHUMADOR EN EL EXTERIOR SOBRE UNA SUPERFICIE SÓLIDA, PLANA E INCOMBUSTIBLE Y ALEJADO DE
ALEROS O MATERIALES INFLAMABLES. JAMÁS PONGA EL AHUMADOR SOBRE UNA SUPERFICIE DE MADERA O SOBRE
OTRA SUPERFICIE COMBUSTIBLE. ALEJE EL AHUMADOR DE VENTANAS O PUERTAS ABIERTAS PARA EVITAR QUE EL
HUMO PENETRE DENTRO DE SU CASA. SI VA A ENCENDER EL AHUMADOR EN UN LUGAR VENTILADO, COLÓQUELO EN EL
EXTERIOR Y EN UN SITIO PROTEGIDO DEL VIENTO.
LEA TODAS LAS INSTRUCCIONES Y LOS AVISOS DE PRECAUCIÓN
ANTES DE ARMAR Y USAR SU AHUMADOR
Curing Your Smoker
Prior to first use, cure your smoker to minimize damage to the exterior finish
as well as rid the smoker of paint odor that can impart unnatural flavors to
the first meal prepared. Cure your smoker periodically throughout the year to
protect against rust.
1. Remove water pan from smoker. Lightly coat all interior surfaces of the
smoker and cooking grill with vegetable oil or vegetable oil spray. Do not
coat charcoal pan.
2. Follow instructions carefully in the "Smoking" section of this owner’s
manual to light charcoal in charcoal pan.
WARNING:
BRINKMANN
DALLAS, TX 75244
Charcoal lighting fluid must be allowed to completely burn off
prior to closing dome lid (approximately 20 minutes). Failure to
do this could trap fumes from charcoal lighting fluid in smoker
and may result in a flash-fire or explosion when lid is opened.
3. With coals burning strong in charcoal pan, close dome lid.
4. Allow temperature to reach the “Ideal” range on the heat indicator.
Maintain this temperature for two hours, then allow smoker to cool
completely. It is important that the exterior of the smoker is not scraped
or rubbed during the curing process.
IMPORTANT:
Para Ahumar
PRECAUCIÓN
To protect your smoker from excessive rust, the unit must be
cured periodically and covered at all times when not in use. A
smoker cover may be ordered directly from Brinkmann by
calling 1-800-468-5252.
: Antes de cada uso, revise las asas y los soportes
metálicos para verificar que estén firmemente
colocados.
1. Retire la tapa, las rejillas y la bandeja de agua del cuerpo del ahumador y
póngalas a lado.
2. Coloque una bandeja recolectora de gotas y cenizas, o similar, debajo de
la bandeja inferior para recoger las gotas y cenizas que caigan.
NOTA:
Puede usar papel de aluminio grueso, doblado varias veces, a
modo de bandeja recolectora de gotas y cenizas. Corte las hojas
de aluminio lo suficientemente largas como para que se extiendan
más allá de las patas del ahumador. Doble las orillas hacia arriba
para que recojan las brasas y gotas que caigan. Coloque una capa
delgada de agua en la bandeja recolectora de gotas y cenizas para
extinguir las cenizas y brasas que caen.
3. Abra la puerta que está en el cuerpo del ahumador. Asegúrese que la
bandeja de carbón descanse sobre las ranuras de las tres patas.
20
INSTR_810-5302-S.QXD
ADVERTENCIA:
11/1/07
11:42 AM
Page 22
Never use charcoal that has been pre-treated with
lighter fluid. Use only high grade plain charcoal or
charcoal/wood mixture.
4. Use siempre carbón de primera calidad. Si usa una chimenea de
encendido de carbón, siga todas las instrucciones y observe todas
las advertencias del fabricante con respecto al uso de su producto.
Coloque cuidadosamente unas 8 a 10 libras de carbones en la
bandeja de carbón. Vaya hasta el paso 7.
Si usa un liquido inflamable para encender el carbón, siga todas las
instrucciones y observe todas las advertencias del fabricante con
respecto al uso de su producto. Use liquidos inflamables aprobados
para encender EXCLUSIVAMENTE carbón. No use gasolina,
kerosene o alcohol para encender el carbón. Coloque unas 8 a 10
libras de carbón de primera calidad en la bandeja de carbón.
5. Sature el carbón con el liquido inflamable y espere 2 a 3 minutos
para que el carbón absorba el liquido. Guarde el liquido inflamable
en un lugar seguro y alejado del ahumador.
6. Encienda con cuidado el carbón y permita que arda hasta que se
cubra con una capa de ceniza gris (unos 20 minutos) antes de
cerrar la puerta y colocar la tapa sobre el ahumador. Esto permitirá
que se consuma el liquido inflamable.
ADVERTENCIA:
Si no hace lo anterior, el ahumador podría
acumular vapores emitidos por el líquido inflamable
y ocasionar una llamarada o explosión al abrir la
puerta o al levantar la tapa.
7. Vea la sección “Madera saborizante” que se encuentra más adelante
en este manual para determinar la cantidad de madera saborizante
que debe usar. Use tenazas largas para colocar con cuidado la
madera saborizante sobre el carbón caliente.
NOTA:
Dependiendo del clima, una bandeja repleta de carbón arderá
unas 5 a 6 horas.
8. Coloque la bandeja de agua sobre los soportes metálicos inferiores.
Asegúrese que la bandeja descanse sobre las ranuras de los tres
soportes.
9. Llene con cuidado la bandeja con agua tibia hasta 1 pulgada (2,5
cm) del borde. La bandeja llena contiene 1 galón (3,8 lts) de agua y
puede durar 2 a 3 horas. No la llene demasiado ni permita que el
agua se derrame.
10. Coloque una de las rejillas sobre los soportes metálicos inferiores,
encima de la bandeja de agua. Coloque la rejilla de modo que su
borde descanse sobre las ranuras de los tres soportes.
11. Coloque los alimentos sobre la rejilla en una sola hilera, dejando un
espacio entre cada pieza. Esto permitirá la circulación pareja de
humo, calor y humedad alrededor de todas las piezas.
12. Coloque la otra rejilla sobre los soportes metálicos superiores.
Coloque la rejilla de modo que su borde descanse sobre las ranuras
de los tres soportes. Coloque los alimentos sobre la rejilla.
21
1" (2.5 cm)
INSTR_810-5302-S.QXD
11/1/07
11:42 AM
Page 23
13. Coloque la tapa sobre el cuerpo del ahumador y deje cocinar los alimentos.
14. Después de 2 a 3 horas de cocinar, revise los niveles de agua y carbón
siguiendo las instrucciones de las secciones “Para añadir agua cuando
esté cocinando” y “Para añadir carbón o madera cuando esté cocinando”
que se encuentra más adelante en este manual.
ADVERTENCIA
: No permita que el líquido de la bandeja de agua se
evapore completamente. Mantenga siempre agua en la
bandeja después de retirar los alimentos del ahumador. El
agua de la bandeja recolectora puede evaporarse haciendo
que la grasa se encienda.
15. Use siempre un termómetro de carnes para asegurar que la comida quede
bien cocida antes de retirarla del ahumador.
16. Permita que el ahumador se enfríe completamente y luego siga las
instrucciones de la sección “Cuidado y mantenimiento adecuados después
de usar el ahumador” que se encuentran más adelante en este manual.
Para Asar y Tostar
1. Retire la tapa, las rejillas, la bandeja de agua y la bandeja de carbón del
cuerpo del ahumador y póngalas a lado.
2. Coloque una bandeja recolectora de gotas y cenizas, o similar, debajo de la
bandeja inferior para recoger las brasas, cenizas o gotas que caigan.
NOTA:
Puede usar papel de aluminio grueso, doblado varias veces, a modo
de bandeja recolectora de gotas y cenizas. Corte las hojas de
aluminio lo suficientemente largas como para que se extiendan más
allá de las patas del ahumador. Doble las orillas hacia arriba para que
recojan las brasas y gotas que caigan. Coloque una capa delgada de
agua en la bandeja recolectora de gotas y cenizas para extinguir las
cenizas y brasas que caigan.
3. Abra la puerta que está en el cuerpo del ahumador. Coloque una rejilla
sobre los soportes inferiores.
22
INSTR_810-5302-S.QXD
11/1/07
11:42 AM
Page 24
4. Si va a asar alimentos, coloque la bandeja de carbón sobre la rejilla que
está sobre los soportes metálicos inferiores.
Si va a rostizar alimentos, coloque la bandeja de carbón sobre los
soportes metálicos superiores. Asegúrese que la bandeja descanse sobre
las ranuras de los tres soportes.
ADVERTENCIA
: Es muy importante que el borde de la bandeja de carbón
descanse firmemente sobre las ranuras de los tres
soportes superiores. Esto mantendrá a la bandeja en
posición sobre los soportes y evitará que se voltee la
bandeja con los carbones calientes.
5. Use siempre carbón de primera calidad. Si usa una chimenea de
encendido de carbón, siga todas las instrucciones y observe todas las
advertencias del fabricante con respecto al uso de su producto. Coloque
cuidadosamente unas 4 a 5 libras (1,5 a 2,5 kg) de carbones en la bandeja
de carbón. Vaya hasta el paso 7.
Para Asar
Si usa un liquido inflamable para encender el carbón, siga todas las
instrucciones y observe todas las advertencias del fabricante con respecto
al uso de su producto. Use liquidos inflamables aprobados para encender
EXCLUSIVAMENTE carbón. No use gasolina, kerosene o alcohol para
encender el carbón. Coloque unas 4 a 5 libras (1,5 a 2,5 kg) de carbón de
primera calidad en la bandeja de carbón.
6. Sature el carbón con el liquido inflamable y espere 2 a 3 minutos para que
el carbón absorba el liquido. Guarde el liquido inflamable en un lugar
seguro y alejado del ahumador.
7. Manteniendo la puerta abierta, encienda con cuidado el carbón y permita
que arda hasta que se cubra con una capa de ceniza gris (unos 20
minutos) antes de cerrar la puerta y colocar la tapa sobre el ahumador.
Esto permitirá que se consuma el liquido inflamable.
ADVERTENCIA
: Si no hace lo anterior, el ahumador podría acumular
vapores emitidos por el líquido inflamable y ocasionar
una llamarada o explosión al abrir la puerta o al levantar
la tapa.
8. Si va a asar alimentos, coloque una de las rejillas sobre los soportes
metálicos inferiores.
Si va a rostizar alimentos, coloque una de las rejillas sobre la bandeja de
carbón que está sobre los soportes metálicos superiores.
PRECAUCIÓN
: La rejilla de asar estará MUY CALIENTE por lo cual debe
tener cuidado al trabajar sobre ésta o en sus alrededores.
Use guantes aislantes para proteger sus manos de
quemaduras.
9. Coloque los alimentos sobre la rejilla en una sola hilera y dejando un
espacio entre cada pieza para permitir que se cocinen bien.
ADVERTENCIA
: Si aumentan las llamas mientras esté asando, cubra la
rejilla con la tapa para limitar el flujo de aire y extinguir las
llamas.
10. Use siempre un termómetro de carnes para asegurar que la comida quede
bien cocida antes de retirarla del ahumador.
11. Permita que el ahumador se enfríe completamente y luego siga las
instrucciones de la sección “Cuidado y mantenimiento adecuados después
de usar el ahumador” que se encuentra más adelante en este manual.
23
Para Tostar
INSTR_810-5302-S.QXD
11/1/07
11:42 AM
Page 25
Madera Saborizante
Para dar a los alimentos un agradable sabor ahumado, use trozos, palos o
astillas de maderas que producen sabores, como nogal americano,
pacana, manzano, cerezo o mezquite. Se pueden usar las maderas de la
mayoría de los árboles frutales o de nueces para impartir sabor a través
del humo. No use maderas resinosas como el pino ya que imparten un
sabor desagradable.
Para obtener mejores resultados, use trozos o palos de madera de 3 a 4
pulgadas pulgadas (7 a 10 cm) de longitud y 2 a 1 pulgada (1 cm a 2,5
cm) de espesor. A menos que la madera esté verde, remójela en agua
durante 20 minutos o envuelva cada pieza en papel de aluminio y haga
varias perforaciones en el papel de aluminio para producir más humo y
evitar que la madera se queme demasiado rápido. No es necesario usar
demasiada madera para obtener una sabor ahumado agradable. Se
recomienda usar unos 3 ó 4 trozos. Experimente usando más o menos
madera para obtener un sabor ahumado más fuerte o más suave.
Para añadir Carbón o
Madera Cuando esté
Cocinando
No es necesario añadir madera adicional durante el proceso de
cocimiento, sin embargo, a veces pudiera ser necesario si cocina trozos
muy grandes de carne. Siga las instrucciones y precauciones indicadas
más abajo para no lesionarse al añadir carbón o madera.
Si es necesario agregue más carbón para aumentar la temperatura.
NOTA:
La madera se calienta más que el carbón por lo que
posiblemente prefiera usar más madera y menos carbón para
aumentar la temperatura. Las maderas duras como el roble,
nogal americano, mezquite y las maderas de árboles frutales y de
nueces constituyen un combustible ideal debido a su coeficiente
de quemado. Si piensa usar maderas como combustible,
asegúrese de que estén curadas y secas. NO use maderas
resinosas como el pino ya que imparten un sabor desagradable.
1. Abra la tapa inclinándola hacia usted para permitir que las llamas y el
vapor escapen en dirección contraria a su rostro. Tenga cuidado ya que
las llamas pueden aumentar repentinamente al entrar en contacto con
el aire.
2. Párese a una distancia segura y abra con cuidado la puerta.
PRECAUCIÓN
: La puerta del ahumador se calienta mucho durante su
uso. Use guantes aislantes y tenga cuidado al abrirla.
3. Usando tenazas largas limpie con cuidado los carbones calientes del
exceso de ceniza. Use las tenazas largas para añadir con cuidado
carbón y/o madera. Tenga cuidado de no levantar cenizas o crear
chispas.
ADVERTENCIA
: ¡Jamás vierta liquido inflamable sobre los carbones
calientes o tibios!
4. Cuando el carbón arda nuevamente con intensidad, cierre la puerta y
vuelva a colocar la tapa.
24
INSTR_810-5302-S.QXD
11/1/07
11:42 AM
Page 26
Si el proceso de cocinar toma más de 2 horas, revise la bandeja de agua. Si
escucha un silbido puede indicar la falta de agua. El agua se puede añadir a la
bandeja de agua a través de la parte superior del ahumador o a través de la
puerta lateral. Tenga cuidado y siga detenidamente las siguientes
instrucciones.
Para Añadir Agua
Cuando esté
Cocinando
OPCIÓN 1: Para añadir agua a través de la parte superior del ahumador
1. Abra la tapa inclinándola hacia usted para permitir que las llamas y el
vapor escapen en dirección contraria a su rostro. Tenga cuidado ya que las
llamas pueden aumentar repentinamente al entrar en contacto con el aire.
1" (2.5 cm)
2. Si el nivel de agua está bajo, añada más agua a la bandeja de agua. Si tiene
alimentos sobre la rejilla superior, puede apartarlos y vertir el agua a través
de la rejilla. Llene la bandeja con agua hasta 1 pulgada (2,5 cm) del borde.
Vierta despacio para evitar salpicar o llenar demasiado.
Si está usando ambas rejillas, use guantes aislantes para retirar el alimento
y la rejilla superior. Aparte el alimento de la rejilla inferior y vierta el agua
hacia la bandeja a través de la rejilla inferior. Vierta despacio para evitar
salpicar o llenar demasiado.
3. Coloque la rejilla superior sobre los soportes metálicos superiores y vuelva
a colocar el alimento sobre la rejilla.
4. Coloque la tapa sobre el ahumador y siga cocinando los alimentos.
OPCIÓN 2: Para añadir agua a través de la puerta lateral
1. Apártese y abra con cuidado la puerta lateral. Tenga cuidado ya que las
llamas pueden aumentar repentinamente al entrar en contacto con el aire.
Revise el nivel de agua de la bandeja.
2. Añada más agua si el nivel está demasiado bajo. Sepárese del ahumador y
vierta el agua a través de un embudo o de un recipiente con pico. Llene la
bandeja hasta 1 pulgada (2,5 cm) del borde. Vierta despacio para evitar
salpicar o llenar demasiado.
3. Cierre la puerta lateral y siga cocinando los alimentos.
•
Hay poca diferencia entre el tiempo y la temperatura de cocimento entre la
rejilla superior y la inferior. Cuando cocine diferentes tipos de carnes, o
carnes con distintos cortes, coloque la carne que necesite menos tiempo
de cocimento en la rejilla superior para que se pueda retirar primero. Si se
usa una sola rejilla, use el nivel superior para obtener mejores resultados.
•
Cuando esté ahumando los alimentos, no caiga en la tentación de levantar
la tapa para revisar el alimento. Al levantar la tapa el calor se escapa y
obliga a cocinar los alimentos durante más tiempo.
•
Recomendamos ampliamente el uso de un termómetro de carnes para
determinar el nivel de cocimento de los alimentos. Existen muchas
variables que pueden afectar el tiempo de cocimento (la temperatura
externa, la cantidad de carbón, el número de veces que se levanta la tapa,
la distancia entre los alimentos y la fuente de calor, etc.). Cuando use un
termómetro de carnes, inserte la varilla hasta el centro de la parte más
gruesa de la carne asegurando que ésta no entre en contacto con huesos
o grasa. Espere cinco minutos antes de leer la temperatura del
termómetro.
25
Recomendaciones
para Cocinar
INSTR_810-5302-S.QXD
11/1/07
11:42 AM
Page 27
PRECAUCIONES A TOMAR DESPUES DE USAR SU ASADOR
ADVERTENCIAS
•
Espere siempre a que el ahumador y todos sus componentes se enfríen antes de tocarlos.
•
Jamás deje carbones o cenizas en el ahumador sin la debida supervisión.
•
Antes de alejarse del ahumador, deben retirarse los restos de carbones y cenizas. Tome precauciones en cuanto a su
seguridad personal y de su propiedad. Coloque los restos de carbones y cenizas dentro de un recipiente incombustible
metálico y satúrelos completamente con agua. Antes de desechar los restos de carbones y cenizas, déjelos dentro del
recipiente incombustible metálico durante 24 horas.
•
Use una manguera para mojar completamente las superficies que estén debajo y alrededor del ahumador y extinguir
completamente los residuos de cenizas, carbones o brasas que puedan haber caído al cocinar o al limpiar el ahumador.
•
Los carbones y cenizas apagadas deben colocarse en un sitio alejado de estructuras y materiales combustibles.
•
Cuando no use el ahumador, guárdelo en un lugar seguro y manténgalo lejos del alcance de los niños.
•
Lave las rejillas y las bandejas de agua y carbón con agua caliente y
jabon, enjuague bien y seque. Aplique una capa ligera de aceite vegetal
o rocíe aceite vegetal sobre las rejillas.
•
Limpie las áreas externas e internas del ahumador con un trapo
húmedo. Después de limpiarlo, aplique una ligera capa de aceite
vegetal o rocíe aceite vegetal sobre la superficie interior de la tapa, el
cuerpo del ahumador, las rejillas y la bandeja de agua. Este sencillo
proceso ayuda a reducir la corrosión de la parte interior del ahumador.
NO aplique aceite vegetal a la bandeja de carbón.
NOTA:
Cuidado y
Mantenimiento
Adecuados
El humo tiende a acumularse y a dejar residuos en el interior de
la tapa de ahumador. Dichos residuos pueden gotear sobre los
alimentos al cocinar. Para reducir la acumulación de residuos,
limpie la tapa después de cada uso.
•
Si la superficie exterior del ahumador comienza a oxidarse, limpie y
pula las áreas afectadas usando lana de acero o una tela de esmeril de
grano fino. Luego, retoque usando una pintura resistente a altas
temperaturas.
•
Jamás pinte las superficies internas. Los puntos de corrosión que
aparezcan sobre la superficie interna se pueden bruñir, limpiar y
recubrir posteriormente con aceite vegetal para reducir la corrosión.
•
Cuando no use el ahumador, manténgalo siempre cubierto para
protegerlo de la corrosión excesiva.
26
INSTR_810-5302-S.QXD
11/1/07
11:42 AM
Page 28
FOR COVERS, ACCESSORIES AND OTHER PRODUCTS, PLEASE VISIT US ONLINE AT:
www.brinkmann.net
FOR GRILL WARRANTY REPLACEMENT PARTS, PLEASE VISIT US AT:
www.grillpartsonline.com
PARA CUBIERTAS, ACCESORIOS Y OTROS PRODUCTOS, FAVOR DE VISITARNOS POR LA RED MUNDIAL EN:
www.brinkmann.net
PARA PARTES DE REEMPLAZO DE PARRILLA BAJO GARANTIA, FAVOR DE VISITARNOS POR LA RED MUNDIAL EN:
www.grillpartsonline.com
ONE YEAR LIMITED WARRANTY
For one year from date of purchase, The Brinkmann Corporation warrants the Vertical Smoker against defects due to workmanship or materials to the original
purchaser. The Brinkmann Corporation’s obligations under this warranty are limited to the following guidelines:
•
This warranty does not cover smokers that have been altered or damaged due to: normal wear, rust, abuse, improper maintenance, improper use,
disassembly of parts and/or attempted repair by anyone other than an authorized employee of The Brinkmann Corporation.
•
This warranty does not cover surface scratches or heat damage to the finish, which is considered normal wear.
•
The Brinkmann Corporation may elect to repair or replace damaged units covered by the terms of this warranty.
•
This warranty extends to the original purchaser only and is not transferable or assignable to subsequent purchasers.
The Brinkmann Corporation requires reasonable proof of purchase. Therefore, we strongly recommend that you retain your sales receipt or invoice. To obtain
replacement parts for your Vertical Smoker under the terms of this warranty, please call Customer Service Department at 1-800-527-0717. A receipt will be
required. The Brinkmann Corporation will not be responsible for any smokers forwarded to us without prior authorization. Vertical Smoker must be returned
to the original place of purchase for replacement of the unit.
EXCEPT AS ABOVE STATED, THE BRINKMANN CORPORATION MAKES NO OTHER EXPRESS WARRANTY.
THE IMPLIED WARRANTIES OF MERCHANTABILITY AND FITNESS FOR A PARTICULAR PURPOSE ARE LIMITED IN DURATION TO ONE YEAR FROM THE
DATE OF PURCHASE. SOME STATES DO NOT ALLOW LIMITATIONS ON HOW LONG AN IMPLIED WARRANTY LASTS, SO THE ABOVE LIMITATION MAY NOT
APPLY TO YOU.
ANY LIABILITY FOR INDIRECT, INCIDENTAL OR CONSEQUENTIAL DAMAGES ARISING FROM THE FAILURE OF THE
VERTICAL SMOKER TO COMPLY WITH THIS WARRANTY OR ANY IMPLIED WARRANTY IS EXCLUDED. CUSTOMER ACKNOWLEDGES THAT THE PURCHASE
PRICE CHARGED IS BASED UPON THE LIMITATIONS CONTAINED IN THE WARRANTY SET OUT ABOVE. SOME STATES DO NOT ALLOW THE EXCLUSION OR
LIMITATION OF INCIDENTAL OR CONSEQUENTIAL DAMAGES, SO THE ABOVE LIMITATION OR EXCLUSION MAY NOT APPLY TO YOU. THIS WARRANTY
GIVES YOU SPECIFIC LEGAL RIGHTS, AND YOU MAY ALSO HAVE OTHER RIGHTS WHICH VARY FROM STATE TO STATE.
GARANTÍA LIMITADA DE UN AÑO
Por un año a partir de la fecha de compra, The Brinkmann Corporation le garantiza al comprador original del Ahumador Vertical contra defectos debidos a mano
de obra o materiales. Las obligaciones de The Brinkmann Corporation bajo esta garantía se limitan a las siguientes directrices:
•
Esta garantía no cubre ahumadores que han sido alterados o dañados debido a: desgaste normal, herrumbre, abuso, mantenimiento indebido,
desensamblado de piezas y/o intento de reparación por toda persona que no sea un empleado autorizado de The Brinkmann Corporation.
•
Esta garantía no cubre raspones superficiales o daños térmicos al acabado, considerándose desgaste normal.
•
The Brinkmann Corporation puede optar ya sea por reparar o reponer unidades dañadas cubiertas por las condiciones de esta garantía.
•
Esta garantía se le extiende solamente al comprador original y no es transferible o asignable a los compradores posteriores.
The Brinkmann Corporation requiere un comprobante razonable de compra. Por consiguiente, recomendamos mucho que guarde su recibo o factura de
compra. Para obtener las piezas de repuesto para su Ahumador Vertical bajo las condiciones de esta garantía, llame por favor al Departamento de Atención al
Cliente al 1-800-527-0717. Exigiremos un recibo. The Brinkmann Corporation no se hará responsable por cualquier ahumador que se nos envía sin previa
autorización. El ahumador vertical debe ser devuelto al lugar original de su compra para que la unidad sea repuesta.
EXCEPTO COMO SE DECLARÓ ARRIBA, THE BRINKMANN CORPORATION NO DA EXPRESAMENTE NINGUNA OTRA GARANTÍA.
LAS GARANTÍAS IMPLÍCITAS DE COMERCIALIZACIÓN Y ADECUACIÓN PARA UN PROPÓSITO EN ESPECIAL SE LIMITAN A UN AÑO A PARTIR DE LA FECHA
DE COMPRA. ALGUNOS ESTADOS NO PERMITEN LIMITACIONES RELACIONADAS CON LA DURACIÓN DE UNA GARANTÍA IMPLÍCITA, POR LO QUE LA
LIMITACIÓN ANTERIOR PUDIESE NO SER EPRTINENTE PARA USTED.
QUEDA EXCLUIDA TODA RESPONSABILIDAD CIVIL POR DAÑOS INDIRECTOS, INCIDENTALES O EMERGENTES DEBIDOS A QUE EL AHUMADOR VERTICAL
NO CUMPLE CON ESTA GARANTÍA O CUALQUIER GARANTÍA IMPLÍCITA. EL COMPRADOR RECONOCEQUE EL PRECIO DE COMPRA COBRADO SE BASA EN
LAS LIMITACIONES CONTENIDAS EN ESTA GARANTÍA PRESENTADAS ARRIBA. ALGUNOS ESTADOS NO PERMITEN LA EXCLUSIÓN O LIMITACIÓN DE DAÑOS
INCIDENTALES O EMERGENTES, POR LO QUE LA LIMITACIÓN O EXCLUSIÓN ANTERIOR QUIZÁ NO SEA PERTINENTE PARA USTED. ESTA GARANTÍA LE DA
DERECHOS LEGALES CONCREOS Y ES POSIBLE QUE USTED TENGA OTROS DERECHOS QUE VARÍAN DE UN ESTADO AL OTRO.
140-7033-S
11/07
©2007 The Brinkmann Corporation
Dallas, Texas 75244 U.S.A
www.brinkmann.net
Owner’s Manual for Model/Manual del Propietario para Modelos:
810-5301-C & 810-5301-M,
852-7006-0, 815-3060-C, 810-5302-S