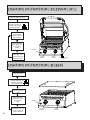
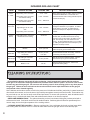
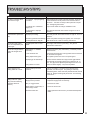
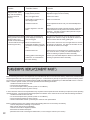
1
APPLY SERIAL NUMBER LABEL FROM CARTON
APPOSEZ LÉTIQUETTE DU NUMERO DE SERIE DU CARTON
Serial No. / NO de série
XXXXXX000000
MODEL NO. / NO DE MODÈLE
BISZ300-INFRARED
BISB245-SIDE BURNER
ASSEMBLY AND OPERATING INSTRUCTIONS
OUTDOOR GAS GRILL
INSTRUCTIONS D’INSTALLATION ET D’OPÉRATION
GRIL À GAZ EXTÉRIEUR
Cabinet Frame and Cabinet must be
made from NON-COMBUSTIBLE
material.
Le cabinet et la charpente du cabinet
doivent être faits de matériau INCOMBUSTIBLE.
This grill is designed for NON-COMBUSTIBLE enclosures only, and must be installed and serviced by a qualified installer to local codes.
Ce gril est conçu pour des cabinets incombustibles
seulement et doit être installé et entretenu par un
installateur qualifié selon les codes locaux.
MANUFACTURED BY / MANUFACTURE PAR: NAPOLEON APPLIANCE CORP.,
214 BAYVIEW DR., BARRIE, ONTARIO, CANADA L4N 4Y8 PHONE: (705)726-4278
FAX: (705)725-2564 EMAIL: [email protected] WEB SITE: www.napoleongrills.com
RETAIN THIS MANUAL FOR FUTURE REFERENCE.
GARDER CE LIVRE POUR RÉFÉRENCES FUTURES
N415-0173/APR04/08
Do not try to light this appliance without reading "LIGHTING"
instructions section of this manual.
WARNING
Do not store or use gasoline or other flammable liquids or vapors in the vicinity of
this or any other appliance. An L.P. cylinder not connected for use must not be
stored in the vicinity of this or any other appliance. If the information in these
instructions is not followed exactly, a fire or explosion may result, causing
property damage, personal injury or death.
DANGER
IF YOU SMELL GAS:
• Shut off gas to the appliance.
• Extinguish any open flame.
• Open lid.
• If odor continues, keep away from the appliance and immediately call your gas
supplier or your fire department
CAUTION
During unpacking and assembly it is recommended that you wear work gloves and safety glasses for
your protection. Although we make every effort to make the assembly process as problem free and safe
as possible, it is characteristic of fabricated steel parts that the edges and corners may be sharp and
can cause cuts if handled incorrectly.
SAFE OPERATING PRACTICES
• This gas grill must not be installed in or on recreational ve- •
hicles and/or boats.
•
• This gas grill must only be used outdoors in a well-ventilated space and must not be used inside a building, garage •
or any other enclosed area.
• Keep any electrical supply cord and fuel supply hose away
from any heated surfaces.
Under no circumstances should this gas grill be modified.
Gas must be turned off at the propane cylinder or at the
natural gas supply valve when the gas grill is not in use.
When the gas grill is to be stored indoors, the connection
between the propane cylinder and the gas grill must be disconnected and the cylinder removed and stored outdoors in
a well ventilated space out of reach of children. Disconnected
cylinders must not be stored in a building, garage or any
other enclosed area. Natural gas units must be disconnected
from the supply when being stored indoors.
• Inspect the gas supply hose before each use. If there is
evidence of excessive abrasion or wear or the hose is cut, it
must be replaced, prior to using the gas grill, with a replace- • The top lid is to be closed during the gas grill preheat period
ment hose assembly specified by the manufacturer.
(BISZ300NSS/PSS models only).
• When the propane cylinder is not disconnected from the
appliance, the gas grill and cylinder must be stored outdoors in a well ventilated space.
• Do not locate in windy settings. High winds adversely affect
the cooking performance of the gas grill.
•
Your flat top grill (BISZ300NFT/PFT) and the built in side
burner(BISB245) are supplied with a flat cover for storage
and protection from the elements. Never place this cover
on the grill while hot or operating. Allow grill to cool completely before covering.
• Do not use the condiment tray to store lighters, matches or
• Adults and especially children should be alerted to the hazother flammable materials.
ards of high surface temperatures. Young children should
• This gas grill is designed for outdoor use only.
be supervised near the gas grill.
2
NAPOLEON gas grills are manufactured under the strict Standard of the world recognized
ISO 9001-2000 Quality Assurance Certificate.
NAPOLEON products are designed with superior components and materials, and are assembled by trained
craftsmen who take great pride in their work. The burner and valve assembly are leak tested and test-fired at
a quality test station, and thoroughly inspected by a qualified technician before packaging and shipping to
ensure that you, the customer, receive the quality product you expect from NAPOLEON.
NAPOLEON GAS GRILL PRESIDENT'S LIMITED LIFETIME WARRANTY
NAPOLEON warrants the following materials and workmanship in your new NAPOLEON gas grill against
defects for as long as you own the gas grill. This covers: aluminum castings, stainless steel burners, stainless steel rod cooking grids, stainless steel side shelves, LUXIDIO® side shelf endcaps, wheels, knobs, porcelain enamelled lids and stainless steel lids. Subject to the following conditions. During the first ten years
NAPOLEON will provide replacement parts at our option free of charge. From the eleventh year to lifetime
NAPOLEON will provide replacement parts at 50% of the current retail price.
Components such as regulator, casters, stainless steel warming rack, hoses and connectors, fasteners and
accessories are covered and NAPOLEON will provide parts free of charge during the first year of the limited
warranty.
Components such as stainless steel sear plates, ceramic infrared burners (excluding screens), igniter
(excluding batteries), temperature gauge and brass valves are covered and NAPOLEON will provide parts free
of charge during the first three years of the limited warranty.
NAPOLEON shall not be liable for any transportation charges, labour costs or export duties.
CONDITIONS AND LIMITATIONS
"NAPOLEON warrants its products against manufacturing defects to the original purchaser only, provided that the purchase was made through an authorized
NAPOLEON dealer and is subject to the following conditions and limitations:"
This factory warranty is non-transferable and may not be extended what-so-ever by any of our representatives.
The gas grill must be installed by a licenced, authorized service technician or contractor. Installation must be done in accordance with the installation
instructions included with the product and all local and national building and fire codes.
This limited warranty does not cover damages caused by misuse, lack of maintenance, grease fires, hostile environments, accident, alterations, abuse or
neglect and parts installed from other manufacturers will nullify this warranty.
This limited warranty further does not cover any scratches, dents, painted finishes, corrosion or discolouring by heat, abrasive and chemical cleaners, nor
chipping on porcelain enamel parts, nor any components used in the installation of the gas grill.
Should deterioration of parts occur to the degree of non-performance within the duration of the warranted coverage, a replacement part will be provided.
In the first year only, this warranty extends to the replacement of warranted parts which are defective in material or workmanship provided that the product has
been operated in accordance with the operation instructions and under normal conditions.
After the first year, with respect to this President's Limited Lifetime Warranty NAPOLEON may, at its discretion, fully discharge all obligations with respect to this
warranty by refunding to the original warranted purchaser the wholesale price of any warranted but defective part(s).
NAPOLEON will not be responsible for the installation, labour or any other costs or expenses related to the re-installation of a warranted part, and
such expenses are not covered by this warranty.
Notwithstanding any provision contained in this President's Limited Lifetime Warranty NAPOLEON's responsiblity under this warranty is defined as above and it
shall not in any event extend to any incidental, consequential, or indirect damages.
This warranty defines the obligation and liability of NAPOLEON with respect to the NAPOLEON gas grill and any other warranties expressed or implied with
respect to this product, its components or accessories are excluded.
NAPOLEON neither assumes, nor authorizes any third party to assume, on its behalf, any other liabilities with respect to the sale of this product. NAPOLEON
will not be responsible for: over firing, blow outs caused by environmental conditions such as strong winds, or inadequate ventilation,
Any damages to the gas grill due to weather damage, hail, rough handling, damaging chemicals or cleaners will not be the responsibility of NAPOLEON.
The bill of sale or copy will be required together with a serial number and a model number when making any warranty claims from NAPOLEON.
NAPOLEON reserves the right to have its representative inspect any product or part prior to honouring any warranty claim.
NAPOLEON shall not be liable for any transportation charges, labour costs, or export duties.
3
GENERAL INFORMATION
THIS GAS BARBECUE IS CERTIFIED UNDER CANADIAN AND AMERICAN NATIONAL STANDARDS, CSA 1.6a2006 AND ANSI Z21.58a -2006 RESPECTIVELY FOR OUTDOOR GAS GRILLS AND SHOULD BE INSTALLED to
conform with local codes. In the absence of local codes, the installation must conform with either ANSI Z223.1 / NFPA
54, Natural Gas and Propane Installation code, CSA B149.1 or Propane Storage and Handling Code, B149.2.
If a rotisserie motor is used, it must be electrically grounded in accordance with local codes or, in absence of local
codes, with the current CSA C22.1 CANADIAN ELECTRICAL CODE in Canada or the National Electrical Code, ANSI/
NFPA 70 in the United States.
PROPANE CYLINDER SPECIFICATIONS: A dented or rusty cylinder may be hazardous and should be checked by
your propane supplier. Never use a cylinder with a damaged valve. Use only a propane supply cylinder constructed and
marked in accordance with the specifications for LP-gas cylinders of the Canadian Transport Commission (CTC) or the
US Department of Transportation (DOT). This appliance has been designed for use with a 20lb. (9.1 kg) size propane
cylinder only (not supplied).
The propane cylinder must be provided with a shut-off valve terminating in a propane cylinder valve type QCC1, and a
safety relief device having direct communication with the vapour space of the cylinder. The cylinder supply system must
be arranged for vapour withdrawal and the cylinder shall include a collar to protect the cylinder valve. The cylinder shall
incorporate an OPD (overfill protection device).
The outdoor cooking gas appliance and its individual shutoff valve must be disconnected from the gas supply
piping system during an pressure testing of that system at test pressures in excess of 0.5 psi (3.5 kPa).
The outdoor cooking gas appliance must be isolated from the gas supply piping system by closing its individual
manual shutoff valve during any pressure testing of the gas supply piping system at test pressures equal to or less
than 1/2 psi (3.5 kPa).
CALIFORNIA PROPOSITION 65: The burning of gas fuel creates byproducts, some of which are on the list as
substances known by the State of California to cause cancer or reproductive harm. When cooking with gas, always
ensure adequate ventilation to the unit, to minimize exposure to such substances.
IMPORTANT DO'S AND DON'TS
DO'S
DON'TS
Read the entire instruction manual before operating
the gas grill.
Do not attempt to use a cylinder which is not equipped
with a QCC1 type connection.
Maintain proper clearance to combustibles (16" to rear of
unit, 7" to sides). Additional clearance is recommended
(24”) near vinyl siding or large panes of glass.
Do not route hose underneath drip pan - proper hose
clearance to bottom of unit must be maintained.
Leak test the unit before initial use, annually and
whenever any gas components are replaced.
Follow lighting instructions carefully when operating
grill. Burner controls must be off when turning supply
cylinder valve on.
Clean grease tray regularly to avoid build-up which
may lead to grease fires.
Inspect infrared burner venturi tube for spider webs
and other obstructions periodically. Clean the tubes
completely if you find any such obstructions.
Do not locate unit under unprotected combustible
construction.
Do not leave grill unattended when operating.
Do not light burners with lid closed.
Do not move grill when hot or operating.
Do not allow cold water (rain, sprinkler, hose, etc.) to
come in contact with hot ceramic burners. A large
temperature differential can cause cracking in the
ceramic tile.
Do not use water to control flare-ups.
Do not use a pressure washer to clean any part of the
unit.
Do not operate the grill in a screened in porch, gazebo
or any other enclosed area.
4
GAS HOOK-UP INSTRUCTIONS
This grill is designed for NON-COMBUSTIBLE enclosures only, and must be installed and serviced by a qualified installer to
local codes.
BUILT IN PROPANE GAS HOOK-UP: The piping up to the gas grill is the responsibility of the installer and piping should be
located as shown in the built-in instructions. Do not use hose to connect the unit. It must be connected with either rigid pipe,
copper tube or an approved flexible metal connector. The installation must comply with CAN B149.1 Natural Gas and
Propane installation code in Canada, or to the National Fuel Gas code, ANSI Z223.1 in the United States. The minimum
recommended piping size is NPS 1/2" for rigid pipe, and 1/2" OD for copper tubing (based on a 20 ft run). Longer runs may
require larger sizes to conform with local codes or to conform with CAN B149.1. Propane Gas Installation Code in Canada
or to the National Fuel Gas Code, ANSI Z223.1 in the United States. A flexible metal connector is included to simplify the
installation of the unit. Connect this connector to the 3/8” flare fitting on the end of the manifold. Connect the other end of the
connector to the gas piping. Ensure that the connector does not pass through a wall, floor, ceiling or partition, and is protected
from damage. Do not use hose to connect the unit. For the BISZ300, the gas supply must be connected to the 3/8” flare
elbow fitting located under the right hand side of the control panel. For the BISB245, the gas supply must be connected to
the 3/8” flare fitting located under the center of the control panel. If installing a side burner, a separate line must be branched
off to the side burner unit and enter the side burner opening at the specified location. If the enclosure is to house a propane
cylinder, the tank portion of the enclosure must be ventilated according to local codes, and must not have communication
with the cavity used to enclose the gas grill. A propane tank can not be stored below the gas grill.
BUILT IN NATURAL GAS HOOK-UP: The piping up to the gas grill is the responsibility of the installer and piping should be
located as shown in the built-in instructions. Do not use hose to connect the unit. It must be connected with either rigid pipe,
copper tube or an approved flexible metal connector. The installation must comply with CAN B149.1 Natural Gas and
Propane Installation Code in Canada, or to the National Fuel Gas Code, ANSI Z223.1 in the United States. The minimum
recommended piping size is NPS 1/2" for rigid pipe, and 5/8" OD for copper tubing (based on a 20 ft run). Longer runs may
require larger sizes to conform with local codes or to conform with CAN B149.1. Natural Gas Installation Code in Canada or
to the National Fuel Gas Code, ANSI Z223.1 in the United States. A flexible metal connector is included to simplify the
installation of the unit. Connect this connector to the 3/8” flare fitting on the end of the manifold. Connect the other end of the
connector to the gas piping. Ensure that the connector does not pass through a wall, floor, ceiling or partition, and is protected
from damage. For the BISZ300, the gas supply must be connected to the 3/8” flare elbow fitting located under the right hand
side of the control panel. For the BISB245, the gas supply must be connected to the 3/8” flare fitting located on the inlet side
of the included regulator. The included regulator must be used with the appliance.
Built in units are supplied with a drip pan which holds only a minimal amount of grease. To prevent grease fires, the
pan must be cleaned after each use.
LEAK TESTING INSTRUCTIONS
DANGER
Do not use an open flame to check for gas leaks. Be sure there are no sparks or open flames in the area
while you check for leaks. Sparks or open flames will result in a fire or explosion, damage to property,
serious bodily injury or death.
LEAK TESTING: This must be done before initial use, annually and whenever any gas components are replaced
or serviced. Do not smoke while performing this test, and remove all sources of ignition. See Leak Testing Diagram
for areas to check.
1. Turn all burner controls to off. Turn supply valve on.
2. Brush a half and half solution of liquid soap and water onto all joints and connections of the regulator, hose,
manifolds and valves.
3. Bubbles will indicate a gas leak. Either tighten the loose joint or have the part replaced with one recommended
by the customer care department.
4. If the leak cannot be stopped, shut off the gas supply, disconnect it and have the barbecue inspected by your gas
supplier or dealer. Do not use the appliance until the leak has been corrected.
5. Turn off gas supply.
5
LIGHTING INSTRUCTIONS BISZ300NSS/PSS
Open lid / Remove Cover
Ensuring burner
controls are in the off
position, turn on the
gas supply valve.
Turn either left or
right infrared
burner control to
high position.
Press and hold
igniter button until
lit, or light by
match.
IGNITER
If ignition is not
immediate, turn
burner control off.
Wait 5 minutes.
LEFT
BURNER
RIGHT
BURNER
LIGHTING PORT
HOLE
LIGHTING INSTRUCTIONS BISB245
Remove Cover
Ensuring burner
controls are in the off
position, turn on the
gas supply valve.
Turn front or rear
burner control to
high.
Press and hold
igniter button until
lit, or light by
match.
6
If ignition is not
immediate, turn the
burner control off.
Wait 5 minutes.
IGNITER
FRONT
BURNER
REAR
BURNER
INFRARED HEAT
Most people don’t realize that the heat source that we are most familiar with, namely the sun warms the earth
using mainly infrared energy. Infrared energy is a form of electro-magnetic energy that has a wavelength just
greater than the red end of the visible light spectrum, but less than that of radio waves. This energy was
discovered in 1800 by Sir William Herschel who, dispersed sunlight into its component colours using a prism.
He showed that most of the heat in the beam fell into the spectral region just beyond the red end of the
spectrum, where no visible light existed. This is infrared energy. Most materials readily absorb infrared
radiation in a wide range of wavelengths, causing an increase in temperatures of the materials. This is the
same phenomenon that causes us to feel warmth when we are exposed to sunlight. The infrared rays from the
sun travel through the vacuum of space, through the atmosphere and penetrate our skin. This causes
increased molecular activity in the skin, which creates internal friction and generates heat, allowing us to feel
warmth.
Foods cooked over infrared heat sources are heated by the same principle. Charcoal is the traditional way of
infrared cooking that we are all familiar with. The glowing briquettes emit infrared energy to the food being
cooked, with very little drying effect. Any juices or oils that escape from the food drip down onto the charcoal
and vaporize into smoke giving the food its delicious grilled taste. The Napoleon infrared burner cooks in the
same way. In each burner, 10000 ports each with its own tiny flame cause the surface of the ceramic to glow
red. This glow emits the same type of infrared heat to the food, without the hassle or mess of charcoal. It also
provides a more consistent heated area that is far easier to regulate than a charcoal fire. For instantaneous
searing the burners can be set to high, yet they can also be turned down for slower cooking. We all know how
difficult that is on a charcoal fire. Traditional gas burners heat the food in a different way. The air surrounding
the burner is heated by the combustion process and then rises up to the food being cooked. This generates
lower grill temperatures that are ideal for more delicate cuisine such as seafood or vegetables. The bottom line
is that Napoleon’s infrared burners produce searing heat for juicier, tastier steaks, hamburgers and other meats.
For cooking times and tips refer to the Infrared Grilling Chart.
COOKING INSTRUCTIONS
When lit for the first time, the gas grill will emit a slight odour. This is a normal temporary condition caused by the
"burn-in" of internal paints and lubricants used in the manufacturing process and will not occur again. Simply run
the main burners on high for approximately ½ hour. When cooking very lean meats, such as chicken breasts, or
lean pork, the grids can be oiled before pre-heating to reduce sticking. Cooking meat with a high degree of fat
content, may create flare-ups. Either trim some fat or reduce temperatures to prevent this. Should a flare-up occur,
move food away from flames, reduce heat. Leave the lid open. See 'Your All Season Grill' cookbook by Napoleon
for more detailed instructions.
INFRARED MAIN BURNER USE:
1. Follow the infrared burner ignition procedures and operate on high for 5 minutes with the lid closed (NSS/PSS
models only) or until the ceramic burners glow red.
2. Place food on grills and cook according to times listed in the Infrared Grilling Chart.
3. Depending upon your taste, continue cooking over infrared burners on high, medium or low, turning food
frequently, or place food away from infrared burners, close lid, and allow oven temperature to slowly finish cooking
your food.
Caution: Due to the intense heat the infrared burners provide, food left unattended over burners will burn
quickly. Keep the lid open when cooking with the infrared burners on high. The intense heat ensures adequate
searing temperatures even with the lid open. This also allows observation of the food, so as to prevent burning.
SIDE BURNER USE:
The side burner can be used like any range top burner, for gravies, soups etc. The gas grill should be located
so that the side burner is protected from the wind, because the wind will adversely affect it's performance. NEVER
GRILL FOOD DIRECTLY ON THE SIDE BURNER GRATE. IT IS DESIGNED FOR USE WITH POTS AND
PANS ONLY.
7
INFRARED GRILLING CHART
FOOD
CONTROL SETTING
COOKING TIME
Steak
1” Thick
High setting 2 min. each side
4 min. - Rare
High setting 2 min. each side
then medium setting
6 min. - Medium
High setting 2 min. each side
then medium setting
8 min. - Well Done
High setting 2 min. each side
4 min. - Rare
High setting 2 1/2 min. each
side
5 min. - Medium
High setting 3 min. each side
6 min. - Well Done
Chicken
Pieces
High setting 2 min. each side
medium-low to low setting
20-25 min.
Pork Chops
Medium
6 min. per side
Trim off the excess fat before grilling. Choose
thicker chops to get more tender meat.
Spare Ribs
High setting for 5 minutes
low to finish
20 min. per side
turn often
Choose ribs that are lean and meaty. Grill until
meat easily pulls away from the bone.
Lamb Chops
High setting for 5 minutes
medium to finish
15 min. per side
Trim off the excess fat before grilling. Choose
extra thick chops to get more tender meat.
Hot Dogs
Medium - Low
4-6 min.
Hamburger
1/2” Thick
HELPFUL SUGGESTIONS
When selecting meat for grilling, ask for meat with
a marbled fat distribution. The fat acts as a
natural tenderizer while cooking and will keep the
meat moist and juicy.
Preparing hamburgers to order is made easier by
varying the thickness of your patties. To add an
exotic taste to your meat, try adding hickoryflavored woodchips into Napoleon’s woodchip
smoker.
The joint connecting the thigh and the leg from the
skinless side, should be sliced 3/4 of the way
though in order for the meat to lay flatter on the
grill. This will help it to cook faster and more
evenly. To add a trademark taste to your cooking,
try adding mesquite-flavoured woodchips in your
Napoleon woodchip smoker.
Select the larger size wieners. Slit the skin
lengthwise before grilling.
CLEANING INSTRUCTIONS
Ensure that the burners are turned off prior to cleaning. Avoid unprotected contact with hot surfaces.
Clean grill in an area where cleaning solutions will not harm decks, lawns or patios. Do not use oven cleaner
to clean any part of this gas grill. Do not use a self cleaning oven to clean cooking grids or any other parts of
the gas grill. Barbecue sauce and salt can be corrosive and will cause rapid deterioration of the gas grill
components unless cleaned regularly.
Note: Stainless steel tends to oxidize or stain in the presence of chlorides and sulfides, particularly in coastal areas and
other harsh environments, such as the warm, high humidity atmosphere around pools and hot tubs. These stains may
be perceived as rust, but can be easily removed and prevented. To ensure stain prevention, wash all stainless steel
surfaces every 3-4 weeks with fresh water and stainless steel cleaner or as often as required.
GRIDS AND WARMING RACK - The grids and warming rack are best cleaned during the pre-heat period with a
soft brass wire brush. Steel wool can be used for stubborn stains. Stainless grids will discolour permanently from
normal usage, due to the high temperature of the cooking surface.
CLEANING INSIDE THE GAS GRILL - Remove cooking grids. Use a soft brass wire brush to clean loose debris
from casting sides and insides of the lid. Brush all debris from inside the gas grill into the removable drip pan.
8
DRIP PAN - Slide the drip pan out for easy cleaning. It should be cleaned frequently (every use) to avoid grease
buildup. Grease and excess drippings pass through to the drip pan, located under the gas grill, and accumulate in
the disposable grease tray below the drip pan. Accumulated grease can cause a fire hazard. Do not line the drip
pan with aluminum foil or sand, as it can prevent the grease from flowing properly. The pan should be scraped out
with a putty knife or scraper, and all the debris should be scraped into the disposable grease tray. This tray should
be replaced every two to four weeks, depending on gas grill usage. For supplies, see your Napoleon Gas Grill
dealer.
CLEANING THE OUTSIDE OF THE GAS GRILL - Do not use abrasive cleaners to clean any painted, porcelain
or stainless steel parts. Porcelain enamel components must be handled with additional care. The baked on enamel
finish is glass like, and will chip if struck. Touch-up enamel is available from your Napoleon Gas Grill dealer. Exterior grill surfaces should be cleaned while warm to the touch, with warm soapy water. To clean stainless surfaces,
use a stainless steel cleaner or a non-abrasive cleaner. Always wipe in the direction of the grain. Do not use steel
wool, as it will scratch the finish. Stainless steel parts will discolour when heated, usually to a golden or brown
colour. This discolouration is normal and will not affect the performance of the grill.
INFRARED BURNERS - Because of the high intensity of the infrared burner, most drippings and food particles
that fall onto the burner surface are immediately incinerated. However, some debris and residue may remain. To
remove this residue after cooking, turn the grill on high with lid closed for 5-10 minutes.
MAINTENANCE INSTRUCTIONS
It is recommended that this gas grill be thoroughly inspected and serviced annually by a qualified service
person.
Turn off the gas at the source and disconnect unit before servicing. Maintenance should only be done
when the grill is cool, to avoid the possibility of burns. A leak test must be performed annually, and whenever any component of the gas train is replaced.
ALUMINUM CASTINGS - Clean castings periodically with warm soapy water. Aluminum will not rust, but due to
high temperatures and weathering, oxidation can occur on aluminum surfaces. This will appear as white spots on
the castings. To refinish the castings, clean them and sand lightly with fine sandpaper. Wipe surface to remove any
residue, and paint with high temperature barbecue paint. Protect surrounding areas from over-spray. Follow curing
directions found on the can.
PROTECTION OF INFRARED BURNERS - The infrared burners of your grill are designed to provide a long
service life. However, there are steps you must take to prevent cracking of their ceramic surfaces, which will cause
the burners to malfunction. Following are the common causes of cracks and the steps you must take to avoid them.
Damage caused by failure to follow these steps is not covered by your grill warranty.
1. Impact with Hard Objects - Never allow hard objects to strike the ceramic. Take care when inserting or removing cooking grates and accessories into or from the grill. If these objects were to fall on the ceramic, it is likely to
crack.
2. Water or Other Liquids - Cold liquid contacting a hot surface in substantial amounts can cause the surface to
break. Do not throw water into the grill to douse a flame. Also if the ceramic or interior of a burner becomes wet
while not in use, later operation of the burner can create steam, which may produce enough pressure to crack the
ceramic. In addition, repeated soaking of the ceramic will cause it to swell and expand. This expansion will cause
undue pressure on the ceramic and therefore it may crack and crumble.
i) Never throw water into the grill to control flare-ups
ii) Do not attempt to operate the infrared burners in open air while raining.
iii) If you find standing water in your grill (because of exposure to rainfall, sprinklers etc.), inspect ceramic
for
evidence of possible watersoaking. If ceramic appears to be wet,
remove the burner from the grill. Turn upside down to drain the excess water. Bring indoors and allow to dry thoroughly.
3. Impaired Ventilation of Hot Air From the Grill - In order for the burners to function properly, hot air must have a
way to escape the grill. If the hot air is not allowed to escape, the burners may become deprived of oxygen, causing
them to back flash. If this occurs repeatedly, the ceramic may crack. Do not cover more than 75% of the cooking
surface with solid metal (ie. griddle or large pan).
9
CAUTION BEWARE OF SPIDERS
PROPER FLAME PATTERN
BISB245
YELLOW
DARK BLUE
LIGHT BLUE
Spiders and insects are attracted to the smell of propane and natural gas. The nest or web will cause the burner to burn with a
soft yellow or orange flame. To clean the inside of the burner, remove the cap and use a soft wire brush to remove any debris
from the burner ports. Do not enlarge the ports. The burner caps are pocelain enamel and can be cleaned with warm soapy
water, rinse and dry thoroughly before re-installing.
BISZ300
WARNING
It is very important when re-installing the burner after
cleaning that the valve/orifice enters the burner tube before
lighting your gas grill. If the valve is not inside the burner
tube a fire or explosion could occur.
Spiders and insects are attracted to the smell of propane and natural gas. The nest or web will cause the burner to burn with a
soft yellow or orange flame or cause a fire (flashback) at the air shutter underneath the control panel. To clean the inside of the
burner, it must be removed from the gas grill. Lift the back of the burner upwards to remove. Use a flexible venturi tube cleaning
brush to clean out the inside of the burner. Shake any loose debris out of the burner, through the gas inlet. Check also that the
valve orifices are clean. Do not enlarge the orifices. Re-install the burner.
10
TROUBLESHOOTING
Problem
Low heat / Low flame when
valve turned to high.
Possible Causes
Solution
For propane - improper lighting
procedure.
Ensure lighting procedure is followed carefully. All gas grill
valves must be in the off position when the tank valve is
turned on. Turn tank on slowly to allow pressure to equalize. See lighting instructions.
For natural gas - undersized
supply line.
Pipe must be sized according to installation code.
For both gases - improper
preheating.
Pre-heat grill with both main burners on high for 10 to 15
minutes.
Improper pre-heating.
Pre-heat grill with both main burners on high for 10 to 15
minutes.
Excessive grease and ash build up
on sear plates and in drip pan.
Clean sear plates and drip pan regularly. Do not line pan
with aluminum foil. Refer to cleaning instructions.
Burners burn with yellow
flame, accompanied by the
smell of gas.
Possible spider web or other
debris.
Thoroughly clean burner by removing. See general
maintenance instructions. .
Burner will not light with the
igniter, but will light with a
match.
Dead battery / or installed
incorrectly.
Replace with heavy duty 'AAA' battery. Install with positive
terminal down.
Loose electrode wire.
Check that electrode wire is firmly pushed onto the terminal
on the back of the igniter.
Wrong replacement igniter.
One spark systems must use a one spark igniter.
Improper gap at electrode tip.
Ensure that the collector box is tight, and the gap between
the electrode end and the collector box is between 1/8 - 3/
16". The gap can be adjusted by bending the box in or out.
Lifting flames on burner.
Close air shutter slightly - see previous problem
"Paint" appears to be
peeling inside lid or hood.
Grease build up on inside
surfaces.
This is not a defect. The finish on the lid and hood is
porcelain, and will not peel. The peeling is caused by
hardened grease, which dries into paint-like shards, that will
flake off. Regular cleaning will prevent this. See cleaning
instructions.
Burner output on “high”
setting is too low. (Rumbling noise and fluttering
blue flame at burner
surface.)
Lack of gas.
Check gas level in propane cylinder.
Supply hose is pinched.
Reposition supply hose as necessary.
Dirty or clogged orifice.
Clean burner orifice.
Spider webs in venturi tube, or
other foreign matter.
Clean out venturi tube.
Cracked ceramic tile.
Order replacement burner from your Authorized Napoleon
dealer.
Excessive flare-ups/uneven
heat.
11
Problem
Burner output on “high”
setting is too low. (Rumbling noise and fluttering
blue flame at burner
surface.)
Infrared burner flashes back
(during operation the burner
abruptly makes a loud
“whoosh” sound, followed by
a continuous blow-torch type
sound and grows dim.)
Possible Causes
Solution
Lack of gas.
Check gas level in propane cylinder.
Supply hose is pinched.
Reposition supply hose as necessary.
Dirty or clogged orifice.
Clean burner orifice.
Spider webs in venturi tube, or
other foreign matter.
Clean out venturi tube.
Cracked ceramic tile.
Order replacement burner from your Authorized Napoleon
dealer.
Propane regulator in “low flow”
state.
Ensure lighting procedure is followed carefully. All gas grill
valves must be in the off position when the tank valve is
turned on. Turn tank on slowly to allow pressure to equalize. See lighting instructions.
Ceramic tiles overloaded with
grease drippings and build-up,
ports are clogged.
Turn burner off and allow to cool for at least two minutes.
Relight burner and burn on high for at least five minutes or
until the ceramic tiles are evenly glowing red.
Burner overheated due to
inadequate ventilation (too much
grill surface covered by griddle or
pan.)
Ensure that no more than 75% of the grill surface is covered
by objects or accessories. Turn burner off and allow to cool
for at least two minutes, then relight.
Cracked ceramic tile.
Allow burner to cool and inspect very closely for cracks. If
any cracks are found, contact your authorized Napoleon
dealer for ordering a replacement burner assembly.
Leaking gasket surrounding the
ceramic tile, or a weld failure in
the burner housing.
Contact your authorized Napoleon dealer for instructions on
ordering a replacement burner assembly.
ORDERING REPLACEMENT PARTS
Before contacting the customer care department, check the NAC web site for more extensive cleaning, maintenance, troubleshooting
and part replacement instructions at www.napoleongrills.com. Contact the factory directly for replacement parts and warranty claims.
The customer care department is available between 9 AM and 5 PM (Eastern standard time) at 1-866-820-8686 or fax at 1-705-7274282. In order to process a claim, we must be provided with the following information:
1. Model and serial number of the unit.
2. Part number and description.
3. A concise description of the problem ('broken' is not sufficient).
4. Proof of purchase (photocopy of the invoice).
In some cases the customer care representative may request to have the parts returned to the factory for inspection, before providing
replacement parts. The parts must be shipped prepaid to the attention of the customer service care with the following information:
1. Model and serial number of the unit.
2. A concise description of the problem ('broken' is not sufficient).
3. Proof of purchase (photocopy of the invoice).
4. Return Authorization number - provided by the customer care representative.
12
Before contacting customer care, please note that the following items are not covered by the warranty:
-costs for transportation, brokerage or export duties
-labor costs for removal and re-installation
-costs for service calls to diagnose problems
-discoloration of stainless steel parts
-part failure due to lack of cleaning and maintenance, or use of improper cleaners (oven cleaner).
Ne tentez pas d’allumer cet appareil avant d’avoir lu la section
“INSTRUCTIONS D’ALLUMAGE” de ce manuel.
AVERTISSEMENT
Pour votre sécurité n'entreposez pas et n'utilisez pas d'essence ou autres liquides et
vapeurs inflammables à proximité de cet ou tout autre appareil. Une bonbonne de propane de propane non branchée ne devrait pas être entreposée à proximité de cet ou de
tout autre appareil. Si ces instructions ne sont pas suivies à la lettre, un feu ou une
explosion pourraient s'ensuivre, causant des dommages à la propriété, des blessures
corporelles ou des pertes de vie.
DANGER
QUE FAIRE SI VOUS DÉTECTEZ UNE ODEUR DE GAZ:
• Fermez l’alimentation principale en gaz.
• Éteignez toute flamme nue.
• Ouvrez le couvercle.
• Si l’odeur persiste, appelez immédiatement votre fournisseur de gaz ou le service des
incendies.
ATTENTION
Lors du déballage et de l’assemblage, nous vous conseillons de porter des gants de travail et des lunettes de sécurité pour
votre protection. Malgré tous nos efforts pour assurer que l’assemblage soit aussi sécuritaire et sans problème que possible, il
se peut que les bords et les coins des pièces usinées en acier soient coupants et qu’ils causent des coupures si les pièces ne
sont pas manipulées correctement.
CONSIGNES DE SÉCURITÉ
* Ce gril à gaz ne doit pas être installé dans ou sur des véhicules
récréatifs et/ou des bateaux.
* Ce gril doit être utilisé uniquement à l’extérieur, dans un
endroit bien aéré et ne doit jamais être utilisé à l’intérieur d’un
bâtiment, d’un garage ou de tout autre endroit fermé.
* Gardez les fils électriques et les tuyaux d’alimentation en
gaz éloignés des surfaces chauffantes.
* Inspectez le tuyau d’alimentation en gaz avant chaque
utilisation. S’il montre des signes de fendillement excessif,
d’usure ou s’il est coupé, il doit être remplacé par un ensemble
de rechange spécifié par le fabricant avant d’utiliser le gril.
* Lorsque la bonbonne de propane n’est pas débranchée du
gril, la bonbonne et le gril doivent être entreposés à l’extérieur,
dans un endroit bien aéré.
* N’installez pas le gril dans un endroit venteux. Les vents
forts nuiront à la performance de cuisson de votre gril.
* Lorsque le gril n’est pas utilisé, l’alimentation en gaz doit
être fermée à la bonbonne de propane ou à la soupape
d’alimentation du gaz naturel.
* Les adultes et particulièrement les enfants doivent être
sensibilisés aux risques que représentent les surfaces
exposées à des températures élevées. Surveillez les jeunes
enfants lorsqu’ils sont près du gril.
* Ce gril ne devra être modifié en aucun cas.
* Lorsque le gril doit être entreposé à l’intérieur, la bonbonne
de propane doit être débranchée du gril et entreposée à
l’extérieur dans un endroit bien aéré, hors de la portée des
enfants. Les bonbonnes de propane ne doivent en aucun temps
être entreposées à l’intérieur d’un bâtiment, d’un garage ou
de tout autre endroit fermé. Les appareils au gaz naturel doivent
être débranchés de leur source d’alimentation en gaz lorsqu’ils
sont entreposés à l’intérieur.
* Le couvercle doit être fermé lors de la période de préchauffage
du gril.(BISZ300NSS/PSS model only)
* Votre gril encastré (BISZ300NFT/PFT) et brûleur latéral
(BISB245) est fourni avec un couvercle plat servant pour le
rangement et la protection contre les intempéries. Ne placez
jamais ce couvercle sur le gril lorsque celui-ci est chaud ou en
fonction. Laissez le gril refroidir complètement avant de placer
le couvercle.
* N’utilisez pas le plateau à condiments pour entreposer des
briquets, des allumettes ou autres matériaux inflammables.
* Ce gril à gaz est conçu pour un usage extérieur seulement.
13
Les grils à gaz NAPOLÉON sont fabriqués conformément aux normes strictes du
Certificat d’assurance de qualité mondialement reconnues ISO 9001-2000.
Les produits NAPOLÉON sont conçus avec des composantes et des matériaux de qualité supérieure,
assemblés par des artisans qualifiés qui sont fiers de leur travail. Le brûleur et le montage de la soupape
subissent un test de détection de fuites et d’allumage à une station de test de qualité et sont soigneusement
inspectés par un technicien qualifié avant d’être emballés et expediés pour garantir que vous, le client,
recevez le produit de qualité dont vous vous attendez de NAPOLÉON.
GARANTIE À VIE LIMITÉE DU PRÉSIDENT
NAPOLÉON garantit votre nouveau gril à gaz contre tous défauts concernant les matériaux et le
procédé de fabrication tels qu’énumérés ci-après tant et aussi longtemps que vous êtes propriétaire du
gril. Cette garantie couvre: la fonte d’aluminium, les brûleurs en acier inoxydable, les grilles de cuisson
en acier inoxydable (en tige), les tablettes latérale en acier inoxydable, les embout en LUXIDIO® de les
tablettes latérale, les roues, les boutons de contrôle, le couvercle de porcelaine émaillée et le couvercle
en acier inoxydable sous réserve des conditions suivantes. Pendant les dix premières années,
NAPOLÉON remplacera gratuitement les pièces de rechange selon son choix. De la onzième année à vie,
NAPOLÉON fournira les pièces de rechange à 50% du prix de détail courant.
Les composantes tels que le régulateur, roulettes, la grille-réchaud en acier inoxydable, les tuyaux et
les raccords, les fixations et les accessoires sont couverts et NAPOLÉON fournira les pièces
gratuitement durant la première année de la garantie limitée.
Les composantes tels que les plaques de brûleur en acier inoxydable, les brûleurs infrarouges en
céramique (à l'exclusion des écrans), l’allumeur exclure les pile, la jauge de température et les soupapes
de laiton sont couverts et NAPOLÉON fournira les pièces gratuitement durant les trois premières années
de la garantie limitée.
NAPOLÉON n’assumera aucun frais de transport, de main-d’oeuvre ou taxes d’exportation.
CONDITIONS ET LIMITATIONS
“NAPOLÉON garantit ses produits contre tous défauts de fabrication à l’acheteur d’origine seulement à condition que l’achat ait été fait par l’entremise d’un représentant
autorisé NAPOLÉON et sous réserve des conditions et limitations suivantes.”
Cette garantie d’usine n’est pas transférable et ne peut être prolongée par aucun de nos représentants qu’elle qu’en soit la raison.
Le gril à gaz doit être installé par un installateur ou entrepreneur qualifié. L’installation doit être faite conformément aux instructions d’installation incluses avec le produit et à
tous les codes d’incendie et de construction locaux et nationaux.
Cette garantie limitée ne couvre pas les dommages causés par un usage impropre, un manque d’entretien, feux de graisse, un environnement inadéquat, un accident, des
modifications, de l’abus ou de la négligence. L’installation de pièces d’autres fabricants annulera cette garantie.
Cette garantie limitée ne couvre pas non plus les éraflures, les bosselures, la corrosion ou la décoloration causés par la chaleur ou les produits d’entretien chimiques et
abrasifs ni l’écaillage des pièces de porcelaine émaillée ni les composantes utilisées dans l’installation du gril à gaz.
Dans le cas d’une détérioration des composantes causant un mauvais fonctionnement pendant la période couverte par la garantie, un remplacement part des
composantes sera effectué.
Au cours de la première année seulement, cette garantie s’applique à la réparation ou au remplacement des pièces garanties dont les matériaux ou la fabrication sont
défectueux à la condition que le produit ait été utilisé conformément aux instructions d’opération et dans des conditions normales.
Après la première année, selon cette Garantie à vie limitée du Président NAPOLÉON peut, à sa discrétion, se libérer complètement de toutes ses obligations en ce qui
concerne cette garantie en remboursant à l’acheteur d’origine le prix de gros de toutes pièces garanties qui sont défectueuses.
NAPOLÉON ne sera pas responsable de l’installation, main-d’oeuvre ou autres coûts ou dépenses relatives à la réinstallation d’une pièce garantie car de telles
dépenses ne sont pas couvertes par cette garantie.
Nonobstant toutes les dispositions contenues dans cette Garantie à vie limitée du Président, la responsabilité de NAPOLÉON sous cette garantie est définie comme cidessus et elle ne s’appliquera à aucun dommage accidentel, consécutif ou indirect.
Cette garantie définit les obligations et responsabilités de NAPOLÉON en ce qui concerne le gril à gaz NAPOLÉON. Tout autre garantie énoncée ou implicite en ce qui
concerne ce produit, ses composantes ou accessoires est exclue.
NAPOLÉON n’endosse ni n’autorise aucun tiers à assumer en son nom, tout autre responsabilité concernant la vente de ce produit. NAPOLÉON ne se tiendra pas
responsable d’une surchauffe ou d’explosions causées par des conditions environnementales tel que des vents forts ou une ventilation inappropriée.
Tous dommages causés au gril par la température, un usage abusif ou l’utilisation de produits d’entretien chimiques ou abrasifs ne seront pas la responsabilité de
NAPOLÉON.
La facture ou une copie sera requise ainsi que le numéro de série et de modèle du gril lors d’une réclamation auprès de NAPOLÉON.
NAPOLÉON se réserve le droit de demander à son représentant d’inspecter tous produits ou pièces avant d’approuver les réclamations.
NAPOLÉON n’assumera aucun frais de transport, de main-d’oeuvre ou taxes d’exportation.
14
INFORMATION GÉNÉRALE
CE GRIL À GAZ EST CERTIFIÉ SELON LES NORMES NATIONALES CANADIENNES ET AMÉRICAINES, CSA 1.6a2006 AND ANSI Z21.58a - 2006 RESPECTIVEMENT POUR DES GRILS À GAZ POUR L’EXTÉRIEUR ET SON INSTALLATION DEVRAIT ÊTRE CONFORME AUX CODES LOCAUX. En l’absence de codes locaux, installez selon les normes
courantes CAN1-B149.1 du code d’installation de Propane au Canada, ou B149.2 code sur le stockage et la manipulation
du propane, ou selon les normes ANSI Z223.1 / NFPA 54 du “National Fuel Gas” aux États-Unis.
Si un moteur de rôtissoire est utilisé, il doit être électriquement mis à la terre conformément aux codes locaux ou, en
l’absence de tels codes, conformément à la version courante du code CSA C22.1 Code électrique canadien ou au code
ANSI/NFPA 70 aux États-Unis.
SPÉCIFICATIONS POUR LA BONBONNE DE PROPANE: Une bonbonne bosselée ou rouillée peut être dangereuse
et devrait être vérifiée par votre fournisseur de propane. N’utilisez jamais une bonbonne avec une soupape
endommagée. Utilisez uniquement une bonbonne de propane fabriquée et étiquetée selon les normes pour les
bonbonnes de propane de la Commission canadienne des Transports ou le “US Department of Transportation (DOT)”.
Cet appareil a été conçu pour être utilisé avec une bonbonne de propane de 20 livres (9.1kg) uniquement (non fournie).
La bonbonne de propane doit être équipée d’une soupape d’arrêt se raccordant à une soupape de type QCC1. Une
valve de sécurité doit être branchée directement sur la bonbonne. Le système d’alimentation de la bonbonne doit être
installé de manière à permettre l’évacuation des vapeurs et doit avoir un collet pour protéger la soupape de la bonbonne.
La bonbonne doit être munie d’un dispositif de détection de trop-plein.
Cet appareil de cuisson extérieur au gaz et sa soupape d’arrêt doivent être débranchés de la ligne d’alimentation
en gaz pendant les essais de pression de ce système lorsque les pressions d’essai excèdent 1/2 lb/po² (3,5 kPa).
Cet appareil de cuisson extérieur au gaz doit être séparé de la ligne d’alimentation en gaz en fermant la soupape
d’arrêt manuelle pendant tout essai de pression du système d’alimentation en gaz lorsque la pression est de 1/2 lb/
po² (3,5 kPa) ou moins.
PROPOSITION 65 DE LA CALIFORNIE : La combustion de gaz crée des sous-produits, parmi lesquels certains se
retrouvent sur la liste de substances connues par l’état de Californie comme causant le cancer ou autres dangers pour la
reproduction. Lorsque vous cuisinez avec le gaz, assurez-vous de toujours avoir une ventilation adéquate afin de minimiser
l’exposition à ces substances.
QUOI FAIRE ET NE PAS FAIRE
À FAIRE
À NE PAS FAIRE
Lire le manuel d’instructions au complet avant d’utiliser le gril.
Ne pas tenter d’utiliser une bonbonne qui n’est pas équipée
d’un raccord de type QCC1.
Respecter les dégagements recommandés des matériaux
inflammables (18" à l’arrière du gril et 7" sur les côtés). Une
distance plus grande est recommandée (24”) à proximité
d’un recouvrement de vinyle ou d’une grande surface vitrée.
Ne pas passer le tuyau d’alimentation sous le tiroir
d’égouttement afin de garder une distance raisonnable entre le
tuyau et le fond du gril.
Faire un test de fuites avant la première utilisation,
annuellement et à chaque fois qu’une composante de gaz est
changée.
Ne pas laisser le gril sans surveillance lorsqu’il est allumé.
Suivre les instructions d’allumage à la lettre lorsque vous
utilisez votre gril. Les soupapes des brûleurs doivent être
fermées lorsque vous ouvrez la soupape d’alimentation en
gaz.
Nettoyer le tiroir d’égouttement régulièrement pour éviter les
feux de graisse.
Inspecter les tubes de venturi des brûleurs infrarouges pour
de toiles d’araignées ou toutes autres obstructions
régulièrement.
Nettoyer les tubes si vous découvrez des obstructions.
Ne pas placer le gril sous une construction inflammable nonprotégée.
Ne pas allumer le gril avec le couvercle fermé.
Ne pas déplacer le gril pendant qu’il fonctionne ou qu’il est
chaud.
Ne pas permettre à l’eau froide (pluie, arrosoir, boyeau
d’arrosage etc) de venir en contacte avec les brûleurs en
céramique. Une grande différence de température pourrait
causer la céramique à fissurer.
Ne pas faire fonctionner le brûleur infrarouges de cuve sans
que la veilleuse soit allumée.
Ne pas utiliser d’eau pour contrôler les poussées de flamme.
N’utilisez pas un pulvérisateur pour nettoyer l’appareil.
Ne faites pas fonctionner le gril dans une véranda avec paramoustique,
un gazebo ou tout autre endroit fermé.
15
INSTRUCTIONS DE BRANCHEMENT DU GAZ
Ce gril est conçu pour des cabinets incombustibles seulement et doit être installé et entretenu par un installateur qualifié
selon les codes locaux.
BRANCHEMENT DU PROPANE AU GRIL ENCASTRÉ: La tuyauterie jusqu’au gril à gaz est la responsabilité de l’installateur
et doit être positionnée comme illustré dans le manuel d’instructions du gril encastré. N’utilisez pas de boyau pour brancher
l’appareil. Il doit être branché avec un tuyau rigide, un tuyau de cuivre ou un raccord flexible métallique approuvé. L’installation
doit se conformer au Code d’installation du gaz naturel et du propane CAN B149.1 au Canada ou au National Fuel Gaz Code
ANSI Z223.1 aux États-Unis. La grosseur minimale recommandée des tuyaux est de 1/2" NPS pour les tuyaux rigides et de
1/2" OD pour les tuyaux de cuivre (d’après une course de 20 pi). Les courses plus longues pourraient nécessiter des
diamètres plus grands afin de se conformer aux codes locaux ou au Code d’installation du propane CAN B149.1 au Canada
ou au National Fuel Gaz Code ANSI Z223.1 aux États-Unis. Un raccord flexible métallique est inclus afin de faciliter l’installation
de l’appareil. Branchez ce raccord au raccord évasé de 3/8" situé à l’extrémité du collecteur. Branchez l’autre extrémité du
raccord à la conduite de gaz. Assurez-vous que le raccord ne passe pas à travers un mur, un plancher, un plafond ou une
cloison et qu’il soit protégé contre tout dommage. Pour le BISZ300, la conduite de gaz doit être branchée au raccord coudé
évasé de 3/8" situé sous le côté droit du panneau de contrôle. Pour le BISB245, la conduite de gaz doit être branchée au
raccord évasé de 3/8" situé sous le centre du panneau de contrôle. Si le cabinet doit servir de rangement pour le réservoir
de propane, la partie du cabinet servant de rangement au réservoir doit être ventilée selon les codes locaux et ne doit pas
communiquer avec la partie servant à encastrer le gril. Un réservoir de propane ne peut pas être rangé sous le gril.
BRANCHEMENT DU GRIL ENCASTRÉ AU GAZ NATUREL: La tuyauterie jusqu’au gril à gaz est la responsabilité de
l’installateur et doit être positionnée comme illustré dans le manuel d’instructions du gril encastré. N’utilisez pas de boyau
pour brancher l’appareil. Il doit être branché avec un tuyau rigide, un tuyau de cuivre ou un raccord flexible métallique
approuvé. L’installation doit se conformer au Code d’installation du gaz naturel et du propane CAN B149.1 au Canada ou au
National Fuel Gaz Code ANSI Z223.1 aux États-Unis. La grosseur minimale recommandée des tuyaux est de 1/2" NPS pour
les tuyaux rigides et de 5/8" OD pour les tuyaux de cuivre (d’après une course de 20 pi). Les courses plus longues pourraient
nécessiter des diamètres plus grands afin de se conformer aux codes locaux ou au Code d’installation du gaz naturel CAN
B149.1 au Canada ou au National Fuel Gaz Code ANSI Z223.1 aux États-Unis. Un raccord flexible métallique est inclus afin
de faciliter l’installation de l’appareil. Branchez ce raccord au raccord évasé de 3/8" situé à l’extrémité du collecteur. Branchez
l’autre extrémité du raccord à la conduite de gaz. Assurez-vous que le raccord ne passe pas à travers un mur, un plancher,
un plafond ou une cloison et qu’il soit protégé contre tout dommage. Pour le BISZ300, la conduite de gaz doit être branchée
au raccord coudé évasé de 3/8" situé sous le côté droit du panneau de contrôle. Pour le BISB245, la conduite de gaz doit être
branchée au raccord évasé de 3/8" situé sur le côté de l’entrée du gaz du régulateur fourni. Le régulateur fourni doit être
utilisé avec l’appareil.
Les grils encastrés sont munis d’un plateau d’égouttement qui ne peut contenir qu’une petite quantité de graisse.
Afin d’éviter les feux de graisse, le plateau doit être nettoyé après chaque utilisation.
TEST DE DÉTECTION DE FUITES
DANGER
N’utilisez pas une flamme nue pour vérifier pour des fuites de gaz. Assurez-vous qu’il n’y ait aucune étincelle ni flamme nue à
proximité de l’endroit à vérifier. Les étincelles ou les flammes nues provoqueront un feu ou une explosion, causant des dommages
matériels, des blessures graves ou des pertes de vie.
TEST DE FUITES: Il doit être fait avant la première utilisation, annuellement et à chaque fois qu’une pièce du système de gaz
est remplacée ou réparée. Ne fumez pas et enlevez toutes sources d’allumage lorsque vous faites ce test. Consultez le schéma de
test de fuites pour voir les endroits à tester.
1 - Fermez tous les boutons des brûleurs. Ouvrez la soupape de la bonbonne.
2 - Appliquez une solution de deux parts égales de savon liquide et d’eau sur tous les joints du régulateur, le tuyau et ses
raccords.
3 - Des bulles indiqueront une fuite de gaz. Resserrez le joint ou remplacez la pièce avec une autre recommandée par le
détaillant.
4 - Si la fuite ne peut être réparée, fermez l’alimentation de gaz à la bonbonne, enlevez-la et faites inspecter votre gril par votre
fournisseur de gaz ou détaillant. N’utilisez pas l’appareil jusqu’à ce que la fuite soit réparée.
5 - Fermez la soupape de la bonbonne.
16