1
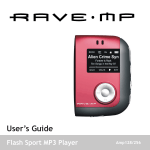
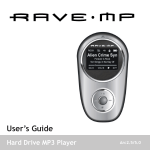
1
2
Unpack
Unpacking
•
•
•
•
•
•
•
•
•
Rave-MP Sport Player
Carrying Case with Arm Band
Sport Clip Earbuds
AAA Battery
USB Cable
Installation CD
Quick Start Guide
Customer Service Card
Bonus Track List
Inserting the Battery
Please refer to the
User’s Guide on the
Installation CD for
advanced settings and
operations.
Copyright/Trademarks
© 2004 Rave-MP. All rights reserved.
Rave-MP shall not be liable for any errors contained herein or for any damages arising out of or related to
this document or the information contained herein, even if Rave-MP has been advised of the possibility of
such damages. This document is intended for informational and instructional purposes only. Rave-MP reserves
the right to make changes in the specifications and other information contained in this document without
prior notification. Rave-MP disclaims any obligation to update the information contained herein. Rave-MP is a
registered trademark of GoVideo.
1
2
3
4
5
6
AAA Battery
Connecting the Earbuds
•
Connect the supplied earbuds as shown.
Earphone Plug
All other product names may be trademarks of the companies with which they are associated.
Amp128/256
4
Install Software
Turn on your computer and insert the
Installation CD into the CD-ROM drive.
The Welcome screen is displayed.
Install the driver (Windows 98SE only).
• No driver is required for Windows ME, XP,
2000 or Mac OSX.
Install Windows Media Player 9.
• If you do not already have Windows Media
Player 9, you will be prompted to install it
or update your current version.
Browse the Installation CD to check out:
• Bonus Music Tracks
• User’s Guide (PDF)
• Adobe Reader
Installation is complete!
• You’re now ready to connect the player to your
3
Remove the battery cover as shown.
Insert the supplied AAA battery, paying
attention to the correct polarities
(+ and -).
Replace the cover.
This product includes technology owned by Microsoft Corporation and cannot be used or distributed without
a license from Microsoft Licensing, Inc. Microsoft, Windows Media, and the Windows Logo are trademarks or
registered trademarks of Microsoft Corporation in the United States and/or other countries.
Flash Sport MP3 Player
Installing the Software
1
2
MPEG Layer-3 audio coding technology licensed from Fraunhofer IIS and Thomson Multimedia.
Quick Start Guide
3
Insert Battery
System Requirements
• Intel Pentium® II 300 MHz
or above
• 128 MB RAM minimum
• 150 MB available hard drive
space
• USB port
• CD-ROM drive
• Operating Systems
Supported: Windows 98SE/
ME/2000/XP/Mac OSX
Connect to PC
5
Load Music
Connecting the Player to your Computer
Using the Player as a Removable Drive
In order to download tracks to the player, you must first connect the player to your
PC or Mac using the supplied USB cable.
If you prefer, you can simply drag and drop files to the player, which appears as a
removable hard drive on your PC or Mac.
1
•
Connect the smaller end of the supplied USB cable to the mini-USB port on the
player as shown.
2 Connect the larger end of this cable to any available USB port on your computer.
• The player will power on automatically.
• If this is the first time you have connected the player to a PC running Windows
ME, 2000, or XP, your PC will detect “New hardware” and install the required
drivers automatically.
3 The USB icon appears on the player’s LCD screen.
4 You’re now ready to load your tunes...
computer...
NOTE: The player will not play DRM-protected files (such as those purchased
from online music stores) unless they are copied to the player via Windows Media
Player or the music management software compatible with your online music
store.
1
Make sure the player is powered on and connected to your computer using the
supplied USB cable.
Double-click the “My Computer” icon on your Windows desktop. The player
appears as a “Removable Disk” icon with its own drive letter.
• On a Mac, the player appears as a drive on the desktop.
3 Double-click the disk icon to view its
contents.
4 Drag and drop your music files from
your computer to the player.
• You can also copy and paste files
to the player using any standard
Windows method.
5 When you’ve finished copying files,
see Step 7 to safely unplug the
player.
2
Notice For Windows 98SE Users
• If you connect the player to a PC running Windows 98SE, you must first install
the Windows 98SE driver; see Step 3.
6
Using Windows Media Player
Using Windows Media Player
Ripping Tracks from your CDs
You can use Windows Media Player 9.0 to manage your music files, copy tracks from
your audio CDs, transfer tracks to the player, and more.
You can also use Windows Media Player to build your media library
by encoding your Audio CDs in WMA format:
Adding Tracks to your Media Library
1
2
Insert an Audio CD.
Click Copy from CD.
• The contents of the CD will be displayed.
• By default, all tracks are checked.
3 Click the check mark next to any track you do not wish to rip to WMA format.
4 Click the Copy Music button to begin encoding the selected tracks.
• NOTE: You can change your track encoding options by selecting Tools > Options >
Copy Music.
5 When finished, Windows Media Player will automatically add the new tracks to your
media library.
Windows Media Player will automatically gather all MP3 and/or WMA files on your PC
into a media library, where they can be played, edited, burned to CD, or copied to
your Rave-MP player:
1
2
3
4
5
6
Launch Windows Media Player.
Click Tools > Search for Media Files (or press F3).
In the “Add to Media Library by Searching
Computer” dialog box, browse to the drive and
folder where your music files are stored.
Click Search.
Windows Media Player will automatically add all
tracks in the selected folder(s) to your media
library.
When searching is complete, click Close.
Note On Other Music Management Applications...
In addition to Windows Media Player 9.0, the Rave-MP is compatible with other
music management applications. If you prefer, you can use these applications to
manage your music files, burn your CDs, load your music, etc. Many online music
stores offer their own music management applications, which may or may not be
compatible with the player. The player is NOT compatible with iTunes.
Transferring Tracks to the Player
To copy files from your PC to the player:
1
2
3
4
5
6
7
Make sure the player is powered on and connected to your PC
using the supplied USB cable.
Click Copy to CD or Device.
Under “Items on Device,” select “Removable Disk” to view the contents of the player.
Under “Items to Copy”, browse to the folder containing the tracks you want to add to
the player.
Click the checkbox(es) next to the desired track name(s).
Click Copy.
The selected track(s) are copied to the player.
• When you’re finished copying files, see Step 7 to safely unplug the player.
7
Disconnect Player
Safely Disconnecting the Player
If you are using Windows ME/2000/XP, it is recommended that you safely unplug the
player as follows:
1
2
3
4
5
6
Double-click the “Safely Remove Hardware” icon in the Windows toolbar.
Select the player from the list of Hardware Devices.
Click Stop.
Click OK to confirm.
Click Close.
It is now safe to unplug the player from
your PC.
• NOTE: Make sure all file transfers are
complete before disconnecting the
player.
8
9
Play Music
Basic Operations
Playing Albums, Artists &
Genres
Powering On the Player
•
•
To turn on the player, press POWER .
To turn off the player, press and hold POWER
The Play Music menu includes a variety of ways
to browse and play your music.
.
1
2
3
Basic Playback
•
•
•
•
•
•
•
To play the current track, press PLAY/PAUSE .
again.
To pause playback, press PLAY/PAUSE
To stop playback, press STOP .
To skip to the previous track (or to the start of the current track), press PREV
To skip to the next track, press NEXT .
To scan backward within a track, press and hold PREV .
To scan forward within a track, press and hold NEXT .
.
Adjusting the Volume
•
To adjust the volume, press VOLUME+/-.
Locking the Keys
•
To temporarily lock the keys and
prevent unwanted operation, slide
the HOLD switch toward the lock
icon.
Menu Navigation Keys
UP
MENU
About Menu Navigation
•
ENTER
LEFT
To navigate the menu system, use
the Control Pad as shown at right.
RIGHT
DOWN
Play Music
Play All
Albums
Artists
Genre
Tracks
Press MENU .
Select Play Music and press ENTER.
Select from the following options:
• Albums
- Lists all albums on the player.
- Select an album and press ENTER.
- Select Play All to play the entire album, or select a track and press ENTER to
play only that track.
• Artists
- Lists all artists on the player.
- Select an artist and press ENTER.
- Select Play All to play all tracks by that artist, or select an album and press
ENTER to view the contents of that album.
• Genres
- Lists all genres on the player.
- Select a genre and press ENTER.
- Select Play All to play all tracks in that genre, or select a track and press
ENTER to play only that track.
• Tracks
- Lists all tracks on the player.
- Select Play All to play all tracks, or select a track and press ENTER to play
only that track.
Listen to FM Radio
Using the FM Tuner
Switching to FM Tuner Mode
1
2
3
4
Press MENU .
Select Tuner and press ENTER.
Select Tuner again and press ENTER.
The FM Tuner LCD is displayed:
90
MANUAL
Searching for FM Stations
•
•
To manually search for stations (in 0.1 step
increments), press
or .
To automatically scan for stations, press and
hold
or .
•
VOL18
Store Preset
100.30MHz
Saving Presets
•
95 100 105
100.30MHz
To save a station as a Preset, press and hold
the ENTER button at the desired frequency.
You can store up to 20 presets in this manner.
Select preset
1
Selecting Presets
•
•
•
To enter Preset mode, press ENTER.
or .
To browse your Presets, press
To return to Manual mode, press ENTER again.
100.30 88.50
100.30MHz
PRESET
VOL18
LCD Overview
Player Overview
1
3
2
4
1
5
6
7
8
9
10
Rave-MP Limited Warranty
Who Provides the Limited Warranty
During the warranty period, the Rave-MP Warranty Administrator will honor service
for 90 days parts and labor from the original date of consumer purchase. See below
for Commercial, Industrial or Educational use coverage.
Who is Protected
This warranty protects the original consumer owner of this Rave-MP product.
What is Covered and How Long
This warranty covers internal operating parts and service/labor to repair or replace
covered parts in this Rave-MP product for 90 days parts and labor, from the date
of purchase, defined as follows: (1) Original Consumer Retail Purchase; (2) First
Rental Purchase Agreement; or (3) First Lease Purchase Agreement (the “Warranty
Period”). Labor and replacement parts supplied during the Warranty Period are
covered only for the remaining portion of the original Warranty Period. The Rave-MP
Warranty Administrator shall have no liability for service under this warranty if nonOEM (Original Equipment Manufacturer) replacement parts are used in the repair of
your Rave-MP product.
What the Owner Must Do If Service is Required
Please contact our customer service department at 1-877-7RAVEMP (1-877-772-8367)
to repair or replace your product, at Rave-MP’s option, if it proves to be defective in
material or workmanship under normal use, during the warranty period listed above,
effective from the date of original consumer purchase of the product. Repaired or
replacement units are warrantied for the remaining period of the original warranty.
Please retain dated sales receipt. Within the warranty period, the customer pays for
inbound shipping charges and Rave-MP pays return shipping charges.
For Customer Care, please visit us online at
www.rave-mp.com
1
Stereo Headphone Jack - Connects to the supplied earbuds or other headphones
equipped with a 1/8” (3.5mm) stereo mini-plug.
2
Microphone - Speak here when using the built-in voice recorder.
3
Battery/Memory Card Cover - Remove to install a single AAA battery (alkaline or
NiMH). Also remove to install an optional MMC or SD memory card (up to 512MB).
4
LCD Screen - Displays the current status of the player.
5
VOLUME +/- Buttons - Adjust the volume.
6
MENU
Button - Displays the player’s main menu. While in Menu mode, press to
return to Play mode.
7
HOLD Switch - Locks the controls to prevent accidental operation.
8
POWER
9
Control Pad - Controls playback and selects menu options:
- Starts and pauses playback.
• PLAY/PAUSE
• STOP - Stops playback.
• PREV - Skips to the previous track (or to the start of the current track). Press and
hold to scan backwards.
• NEXT - Skips to the next track. Press and hold to scan forwards.
• ENTER - Makes selections in the menu system.
02:23
VOL18
6/77
6
7
8
Indicators:
1 EQ Setting - Displays current EQ mode (Normal, Rock, etc.)
2 Shuffle - Displays current Shuffle mode (On or Off).
3 Repeat - Displays current Repeat mode (Repeat One, Repeat All, or Off).
4 Hold - Displays current Hold status (On or Off).
5 Battery Level - Displays current Battery status (Full, Medium or Low).
6 Track Info - Displays current Title, Artist, and Album.
7 Progress Bar - Graphically displays elapsed playback time.
8 Track Status - Displays:
• Elapsed Time
• Volume Level
• Playback Status Icon (Play, Pause, Stop, etc.)
• Current Track Number/Total Number of Tracks
Important Safety Instructions
•
•
•
•
•
•
ALL IMPLIED WARRANTIES, INCLUDING IMPLIED WARRANTIES OF MERCHANTABILITY
AND FITNESS FOR A PARTICULAR PURPOSE ARE LIMITED IN DURATION TO THE
DURATION OF THIS WARRANTY PERIOD. Some states do not allow limitations on how
long an implied warranty lasts, so the above limitation may not apply to you.
•
This Exclusive Limited Warranty gives you specific legal rights and you may also have
other rights which vary from state to state.
•
Rave-MP WARRANTY ADMINISTRATOR
7835 East McClain Drive • Scottsdale, Arizona 85260-1732
www.rave-mp.com
1-877-7RAVEMP (1-877-772-8367)
5
Forever is Rock
Ten Songs in the Key Of
Rave-MP is not responsible for any shipping, handling or insurance charges.
This Exclusive Limited Warranty excludes all incidental and consequential damages.
Some states do not allow the exclusion of incidental and consequential damages, so
the above exclusion may not apply to you.
4
Alien Crime Syn
10 Mini-USB Port - Connects the player to your computer using the
supplied USB cable.
What are the Exceptions
This warranty does not cover: (1) Normal maintenance service, such as cleaning. (2)
Damage from misuse, abuse neglect or accident, natural disasters or Acts of God.
(3) Cabinetry, decorative parts, A/C adapters, knobs or buttons. (4) The foreign
country use of this product. (5) Rave-MP product which has been electronically
or mechanically modified in any way or incorporated into other products. (6)
Installation and setup service adjustments. (7) Owner instruction. Your Owner’s
Guide provides information regarding operating instructions and user controls. For
additional information, contact your authorized Rave-MP dealer.
3
ROCK
Button - Turns the player on. Press and hold to turn the player off.
Other Warranty Coverage
Commercial, Industrial or Educational use has the same warranty coverage as stated
in this warranty.
2
•
•
Read and keep these instructions. Follow all instructions. Heed all warnings.
To reduce the risk of fire or electric shock, do not use or operate this apparatus
in or near water or wet locations. Do not spill liquid on this apparatus.
Apparatus should not be exposed to dripping or splashing and no objects filled
with liquids, such as vases, should be placed on the apparatus.
Risk of electric shock—Do not disassemble or modify this apparatus. No userserviceable parts are inside. Refer all servicing to qualified service personnel.
Servicing is required when the apparatus has been damaged in any way, such
as when liquid has been spilled or objects have fallen onto the apparatus, the
apparatus has been exposed to rain or moisture, does not operate normally,
or has been dropped. Do not use in places exposed to strong magnetic or
electrostatic fields (close to TV or speakers). Do not use in places where the
humidity is excessively low.
Risk of explosion, damage or battery leakage is possible if the battery is replaced
incorrectly or by an incorrect type. Never attempt to charge a non-rechargeable
alkaline battery. Dispose of used batteries according to instructions or local laws.
Use of headphones while operating a vehicle is not recommended and is unlawful
in some states and areas. Stop operating this apparatus if you find it disruptive
or distracting while operating any type of equipment.
Listening to music at full power over extended periods of time can be damaging
to the hearing of the user.
Do not clean the apparatus with solvents, chemicals or abrasive cleaners. If
necessary, use a soft cloth to clean the apparatus.
Only use attachments/accessories specified by the manufacturer.
© 2004 Rave-MP. All rights reserved.
20040728V7