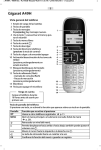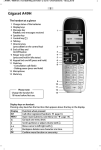
1
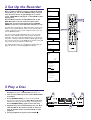
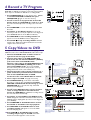
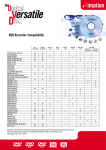
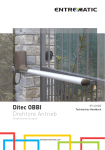
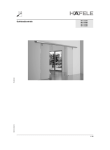
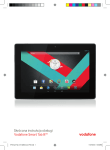
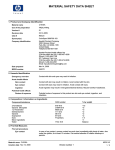
QUICK START GUIDE
Simple instructions to get your new DVD Recorder working quickly
1 Hook It Up
This guide explains the most common setups.
To connect other equipment or if your TV has different jacks, see pages 9-15 of the owner’s manual.
You must complete the Initial Setup before using the
DVD Recorder. See the next page of this Guide for
details after you complete your hookup.
Without a Cable Box
1. Connect your Antenna or Cable TV signal to the
ANTENNA jack on the rear of the DVD Recorder.
2. Connect the supplied video cable (which has yellow
markings) to the yellow VIDEO OUT (CVBS) (EXT
2) jack of the DVD Recorder and to the VIDEO IN
jack on your TV.
Antenna or Cable TV signal
to the DVD Recorder's
ANTENNA jack
5. Press STANDBY-ON y to turn on the DVD
Recorder. Turn on the TV and set it to the correct
Audio/Video In channel. You should see the Initial Setup
menu on the TV screen the first time you turn on the DVD
Recorder.
LEFT AUDIO IN
VIDEO IN
Power
cord to
the DVD
Recorder's
MAINS
jack and to
a power
outlet
RIGHT AUDIO IN
Audio and Video cables to the
DVD Recorder's red and white
AUDIO OUT (EXT 1/2) and
yellow VIDEO OUT (CVBS) (EXT2)
jacks and to the TV's AUDIO IN
and VIDEO IN jacks
EXT 3
LEFT AUDIO IN
VIDEO IN
EXT 3
COMPONENT VIDEO
3. Connect a supplied two-strand audio cable (which
has red and white markings) to the red and white
AUDIO OUT (EXT 1/2) Left/Right jacks on the
DVD Recorder and to the Left/Right AUDIO IN
jacks on the TV.
4. Connect the supplied power cord to the MAINS
(AC Power) jack on the rear of the DVD Recorder.
Connect the power cords of the DVD Recorder and
the TV to a power outlet.
RIGHT AUDIO IN
PROG
SCAN
Y
Y
Y
PB
PB
PB
PR
PR
PR
L
L
R
R
L
R
IN
RC 6
EXT 2
EXT 1
EXT 1/2
• If your TV has only an RF-style jack, such as Antenna In or 75
ohm, you need an RF modulator (not supplied). Ask your dealer
for details on RF modulator availability and compatibility. Follow
the instructions provided with the RF modulator to connect the
Recorder to your TV.
• Your TV’s Audio/Video In channel may be called AUX or
AUXILIARY IN, AUDIO/VIDEO or A/V IN, EXT1 or External In,
etc., and may be near channel 00. See your TV manual for
details. Or, change TV channels until you see the blue Philips
DVD background picture or the Initial Setup Screen on the TV.
Using a Cable Box/Satellite Receiver
1. Connect the Cable TV or Satellite signal to the IN
jack on your Cable Box or Satellite Receiver.
2. Connect an RF coaxial cable to the OUT jack of the
Cable Box/Satellite Receiver and to the ANTENNA
jack on the rear of the DVD Recorder.
Power cord to the
DVD Recorder's
MAINS jack and
to a power outlet
RIGHT AUDIO IN
LEFT AUDIO IN
VIDEO IN
3. Connect the supplied video cable (which has yellow
markings) to the yellow VIDEO OUT (CVBS) (EXT
2) jack on the DVD Recorder and to the VIDEO IN
jack on your TV.
RIGHT AUDIO IN
Audio and Video cables to the
DVD Recorder's red and white
AUDIO OUT (EXT 1/2) and
yellow VIDEO OUT (CVBS) (EXT2)
jacks and to the TV's AUDIO IN
and VIDEO IN jacks
4. Connect a supplied two-strand audio cable (which
has red and white markings) to the red and white
AUDIO OUT (EXT 1/2) Left/Right jacks on the
DVD Recorder and to the Left/Right AUDIO IN
jacks on the TV.
EXT 3
LEFT AUDIO IN
VIDEO IN
EXT 3
COMPONENT VIDEO
PROG
SCAN
Y
Y
Y
PB
PB
PB
PR
PR
PR
L
L
R
R
L
R
IN
RC 6
5. Connect the supplied power cord to the MAINS
(AC Power) jack on the rear of the DVD Recorder.
Connect the power cords of the DVD Recorder,
Cable Box/Satellite Receiver, and TV to a power
outlet.
6. Press STANDBY-ON y to turn on the DVD
Recorder. Set the DVD Recorder to channel 3 or 4
(the output channel of your Cable Box/Satellite
Receiver). Turn on the TV and set it to the correct
Audio/Video In channel. You should see the Initial Setup
menu on the TV screen the first time you turn on the DVD
Recorder.
EXT 2
RF coaxial cable
to the OUT jack
of the Cable Box
or Satellite
Receiver and
to the DVD
Recorder's
ANTENNA jack
EXT 1
EXT 1/2
OUT
IN
Cable TV or Satellite
signal to the IN jack
on the Cable Box
or Satellite Receiver
2 Set Up the Recorder
Before you can use your new DVD Recorder to play
Discs or make recordings, you must complete the Initial
Setup. When you turn on the DVD Recorder for the first
time, the menus shown at right will appear on the TV
screen. TURN ON TV will appear on the DVD Recorder’s
display panel.
Use the Arrow buttons and the OK button on the
DVD Recorder’s remote control to select items.
Follow the on-screen instructions. Press SYSTEM
MENU to clear the screen when TV channels are set.
You will choose languages for different features, choose a TV
Shape, and set up TV channels. This process will only take a
couple of minutes, but you must complete it before you can
use the DVD Recorder.
You can not turn off the DVD Recorder or use any of the
buttons on the DVD Recorder until you finish the Initial
Setup.The only way to quit the Initial Setup is to disconnect
the power cord. If you quit, the Initial Setup will appear again
the next time you turn on the DVD Recorder.The menus will
not go away until you finish the Initial Setup.
For detailed instructions on completing the Initial Setup, see
pages 16-17 in the accompanying Owner’s Manual.
~
Initial Setup
Menu Language
English
Español
Français
K
L
MONITOR
Press OK to continue
ON/OFF
REC/OTR
PREVIOUS
~
Initial Setup
REVERSE
PAUSE
STOP
Audio Language
English
Español
Français
Português
Italiano
Press OK to continue
NEXT
SLOW
FORWARD
FSS
PLAY
SYSTEM
MENU
K
L
~
Initial Setup
ARROWS
SELECT
CLEAR
TIMER
CH
VOL
Subtitle Language
English
Español
Français
Português
Italiano
Press OK to continue
MUTE
OK
K
L
T/C
~
Initial Setup
TV Shape
4:3 letterbox
4:3 panscan
16:9
A/CH
ZOOM
ANGLE
SUBTITLE
AUDIO
DIM
REPEAT
REPEAT
SCAN
K
L
Press OK to continue
If you have connected
the antennapress OK
To continue
Press OK
Installation
Auto Ch. Programming
Searching for TV channels
012 Channels found
Please wait
Installation
Auto Ch. Programming
Auto ch. search complete
024 Channels found
To exit press
SYSTEM MENU
3 Play a Disc
1. Press STANDBY-ON y to turn on the DVD
Recorder. The green STANDBY-ON light will be on.
2. Turn on your TV. Set it to the correct Audio/Video
In channel.
1
4
DVDR985
VDR985 DVD RECORDER
RECORD
3. Press OPEN/CLOSE A on the front of the DVD
Recorder to open the disc tray. Put a Disc in the tray,
with the label facing up and the shiny side facing down.
Press OPEN/CLOSE A again to close the tray.
4. Playback may start automatically. If not, use 9 8
; : and OK on the remote control to select an
item in the Disc menu or press PLAY : to start
playback.
5. To stop playback at any time, press STOP C.
3
5
4 Record a TV Program
The DVD Recorder can record TV programming onto a
DVD+RW or DVD+R. To quickly record a TV program, follow
these steps. See the Owner’s Manual for recording details.
DVDR985
RECORD
1. Press OPEN/CLOSE A to open the disc tray. Insert
a recordable DVD+RW or DVD+R, then press
OPEN/CLOSE A again to close the disc tray.
MONITOR
PREVIOUS
1
2. Press 9 to select an empty Title box in the Index
Picture Screen on a DVD+RW. On a DVD+R, the DVD
Recorder automatically starts recording at the end of the
Disc.
3
REVERSE
STOP
ON/OFF
REC/OTR
PAUSE
NEXT
SLOW
FORWARD
FSS
PLAY
5
6
3. Press MONITOR to see TV channels through the DVD
Recorder.
4. Press CH+/- or the Number buttons to select the
channel you wish to record. (To adjust the recording speed,
press SELECT. Details are in the Owner’s Manual.)
SELECT
CLEAR
TIMER
2
CH
VOL
MUTE
5. Press REC/OTR to start recording. RECORD will
appear in red on the DVD Recorder’s display panel.
4
6. Press STOP C to stop recording. RECORD will flash
briefly on the display panel.The Index Picture Screen will
reappear after a few seconds.
T/C
A/CH
5 Copy Videos to DVD
To copy home video recordings from a cassette playing on a
VCR/camcorder onto a DVD+RW/DVD+R, follow these steps.
1. Connect the DVD Recorder and TV as shown at
right and on the first page of this Guide.
2. Connect audio cables to the VCR’s AUDIO Out
jacks and to the red and white AUDIO In (CAM1/2)
jacks on the front of the DVD Recorder.
Connect a video cable to the VCR’s VIDEO Out jack
and to the yellow VIDEO In (CAM2) jack on the
front of the DVD Recorder. (To access the DVD
Recorder’s front jacks, remove the protective cover by
pulling the left side of the cover toward you.)
Power cord
to the DVD
Recorder's
MAINS jack
and to a power
outlet
Antenna or Cable TV
signal to the DVD Recorder's
ANTENNA jack
RIGHT AUDIO IN
EXT 3
COMPONENT VIDEO
5. Press OPEN/CLOSE A on the front of the DVD
Recorder to open the disc tray. Insert a recordable
DVD+RW or DVD+R with the label facing up. Press
OPEN/CLOSE A to close the disc tray. The Index
Picture Screen will appear.
8. Press MONITOR on the DVD Recorder’s remote.
Press PLAY on the VCR to start tape playback.
9. Press RECORD on the DVD Recorder to start
recording. RECORD will appear in red on the DVD
Recorder’s display panel.
10.Press STOP C on the DVD Recorder to stop
recording. Stop the tape on the VCR. The Index
Picture Screen will reappear in a few seconds.
VIDEO IN
Audio and Video cables to the
DVD Recorder's red and white
AUDIO OUT (EXT 1/2) and
yellow VIDEO OUT (CVBS) (EXT2)
jacks and to the TV's AUDIO
and VIDEO IN jacks
4. Insert a tape in the VCR. Stop play if necessary.
7. Press CH+/- to select CAM2 at the DVD Recorder.
CAM2 will appear in the Tuner Information Box and on the
DVD Recorder’s display panel. (To select a recording speed,
press SELECT.)
LEFT AUDIO IN
REAR OF TV
3. Connect the power cords of all the equipment to a
power outlet after you finish all other connections.
Turn on the TV, DVD Recorder, and VCR.
Set the TV to the correct Audio/Video In channel.
6. Press 9 on the DVD Recorder’s remote control to
select an empty Title box in the Index Picture
Screen on a DVD+RW. On a DVD+R, recording starts at
the end of the Disc automatically.
RIGHT AUDIO IN
LEFT AUDIO IN
VIDEO IN
EXT 3
PROG
SCAN
Y
Y
Y
PB
PB
PB
PR
PR
PR
L
L
R
R
L
R
IN
RC 6
EXT 2
EXT 1
EXT 1/2
REAR OF DVD RECORDER
DVDR985 DVD RECORDER
RECORD
S-VIDEO
VIDEO
L AUDIO R
DV
FRONT OF DVD RECORDER
Audio and Video
cables to the
VCR's AUDIO
and VIDEO OUT
jacks and to the
DVD Recorder's
AUDIO and
VIDEO IN jacks
AUDIO
IN
L
VIDEO
(You can use the
AUDIO and VIDEO IN
jacks on the rear of the
DVD Recorder instead
if you prefer.)
ANT
IN
R
OUT
OUT
OUT
IN
CH3 CH4
REAR OF VCR
6 Know the DVD Recorder
Index Picture Screen
Cue
Go to previous Title or
screen
2
C10 07:56AM
00:01:24 . SP
Index Picture
Recording or space available for recording
Wed 10/02/2002
K
C06 11:20AM
Timer Information Box
Current time or time/date
of next timer recording
X !
Wed 10/24
Tuner Information Box
Current TV channel or
video source (CAM1,
CAM2, etc.)
¡
012
B 0100:00:22 . SP
Title
description
Program name
and details
Disc Pointer
Current Title
number and its
position within
the Disc
Sun 07/28/2002
L
Disc Bar
C10 12:01AM
00:58:53 . SP
Sun 01/06/2002
Cue
Go to next screen
Current Title
4
System Menu Symbols
Use the System Menu to set up features of the DVD Recorder or Discs.The symbols in the System Menu
have these meanings. For System Menu details, see page 25 in the accompanying owner’s manual.
W
X
User
Title/Track
Preferences
a
d
Zoom
Sound
Mode
Chapter
Y
Z
Audio
Language
Subtitle
Language
H
Frameby-frame
playback
Slow
motion
Angle
E
Fast
motion
Time
Search
Acceptable Discs
These Discs will play and record on the DVD Recorder.
DVD+RW
DVD+R
These Discs will only play on the DVD Recorder.
SUPER AUDIO CD
DVD
Video CD
DVD-R
Super
Video CD
DVD-RW
Audio CD
Recordable
ReWritable
CD-R
Super
Audio CD
CD-RW
DVDs must be labelled for ALL REGIONS or REGION ONE as shown below. Also make sure
your Discs are labelled as NTSC or PAL compatible. These logos and information should appear
on the Disc case or on the Disc.
IB8373E001
3104 125 24601
Printed in Belgium