1
KW-XC777
KW-XC828
LVT0834-002A
[U]
中文
ENGLISH
1201MNMMDWJEIN
EN, CH,TH,AR
—U??O?ð W??D?Ý«u??Ð j??I? q??L?F??O? “U??N?'« «c??¼ r?L?? b?I?? •
W?O?zU?Ðd?N? W?L?E?½« ¨X?u? ±≤ ¨DC d?ýU?³? w?zU?Ðd?N?
ÆVUÝ i¹—Qð
• 本機使用直流12V,負極接地的電源系統。
INSTALLATION (IN-DASH
MOUNTING)
安裝(裝設,固定在億表
板內)
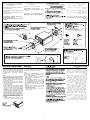
The following illustration shows a typical
installation. However, you should make
adjustments corresponding to your specific car.
In this case consult the manual included with the
installation kit (option).
In some case, depending of the type and the
model of your car, it is not possible to install the
unit into the center console.
If you have any questions or require information
regarding installation kits, consult your JVC car
audio dealer or a company supplying kits.
下面的圓解表示了典型的安裝程序。然而,您應當做
些適當的調整,以便適應您自己的汽車,請參考配套
元件內隨附的使用手冊(選用)。
在某些情況下,對於某些類型或型號的汽車,不可能
將本機裝入中央控制台。
如果您有問題,或需要有關配套元件的資料,請向
JVC汽車音響分銷商或配套元件供應公司詢問。
• To prevent short circuits, it is recommended to
disconnect the battery’s negative terminal and
make all electrical connections before installing
the unit.
• For reason of security, do not install the unit in
a place where it may disturb your driving or
where there is not enough ventilation space
around the unit.
• When the installation position has been
determined, confirm that the cords are
sufficiently long.
• When mounting the unit, be sure to use the
screws provided, as instructed. If other screws
are used, there is a possibility that parts could
become loose or damaged.
• If you are not sure how to install this unit
correctly, consult a JVC car audio dealer or
have it installed by a qualified technician.
• When tightening screws or bolts be careful not
to pinch any connection cord.
C
wd
• This unit is designed to operate on 12 volts DC,
NEGATIVE ground electrical systems.
Before installing the unit
V
J
qOu«ØVOd« ULOKF VO
Ò
uKU≠q«œ® “UN'« VOd
©…—UO
«
V?O??d?²??« W?I??¹d?Þ w??U?²??« w?×??O?{u??²?« r??Ýd?« s??O?
Ò ³??¹
o?ÐUD?ð ö?¹b?Fð q?L?Ž p?OK?Ž V?−?¹ ¨p– l? ÆW?O?U¦?*«
Ÿułd« vłd¹ WU(« Ác¼ w ÆUNJK²9 w²« …—UO« Ÿu½
VOd²« «Ëœ« WŽuL− l od*« ULOKF« VOÒ² v«
Æ©W¹—UO²š«®
¨pð—UOÝ q¹œuË Ÿu½ vKŽ «œUL²Ž« ¨ ôU(« iFÐ w
h?B<« ÊU?J*« q?š«œ “UN?'« V?Od?ð sJ?L*« s? fO?
ÆVOd²K
’uB
Ð UuKF* WłUŠ Ë« «—UH²Ý« „UM¼ ÊU «–«
Ÿ“u? …—U?A?²?? v?łd?¹ ¨V?O?d??²?« «Ëœ« U?Žu?L?−?
W?d?A?« Ë« JVC W?—U?? «—U?O??K? W?O?ðu??B?« …e?N?łô«
ÆVOd²« «Ëœ« UŽuL: WŽ“u*«
在安裝本機之前
• 為防止短路,建議在安裝本機之前,斷開電池的負
極,並把所有電路都連接好。
• 為安全起見,不要把本機安裝在可能影響您駕駛或
通風不足的地方。
• 安裝位置確定之後,請確保有足夠長的連接線。
• 在固定本機時,確保按照提示使用所提供的螺絲
釘。若使用其他螺絲釘,零件可能會變鬆或受損。
• 如果您不能確定如何正確地安裝本機,應向JVC
汽車音響分銷商請教或請合格的技術人員來安裝。
• 在旋緊螺絲釘或螺拴時,小心不要夾斷任何連接
線。
…bu« VOd q
wu½ ¨WOzUÐdNJ« dz«Ëb?« w dOBIð ‰uBŠ lM*
öOu²« qLŽ rŁ VU« W¹—U?D³« ·dÞ qBHÐ
Æ“UN'« VOdð q³ WOzUÐdNJ«
Ê« s?J?1 ÊU?J? w? “U?N?'« V?Òd?ð ô ¨ÊU?ô« q?ł« s?
pK?²1 ô ÊUJ w? Ë« …—UO?« …œUOI q?dFð V³?¹
Æ“UN'« ‰uŠ WOU W¹uNð
Ê« s b?Q𠨓U?N'« VO?dð ÊU?J d¹d?Ið r²?¹ Ub?MŽ
Æ·U qJAÐ WK¹uÞ „öÝô«
…œËe*« wž«d³« ‰ULF²Ý« s bQ𠨓UN'« VOdð bMŽ
wž«d³« dOž wž«dÐ XKLF²Ý« «–« Æ ULOKF²« VŠ
¡U
ð—« ‰uBŠ ‰UL²Š« pUM¼ ¨÷dG« «cN WBB<«
Æ¡«ełô« ÁcN —d{ qB×¹ Ê« sJ1 Ë« “UN'«
vłd¹ ¨“UN'« VOdð WOHOJÐ p²dF ÂbŽ WUŠ w
W—U «—U?OK W?OðuB« …e?Nłô« Ÿ“u …—UA?²
h²
h
A “UN'« VOdð WOKLŽ „dð« Ë« JVC
Æ…eNłô« Ác¼ q¦ VOd² q¼RË
s t³²M ¨W³uK*« dOU« Ë« wž«d³« XO³¦ð bMŽ
ÆqOu²« „öÝ« ‘bš Ë« ÷d ÂbŽ qł«
注意:
要把固定托座安裝到本機上,僅能使用所提供的螺絲
釘(M5×6mm)。
若使用超過6mm長的螺絲釘,會損壞本機。
在安裝本機之後
檢查所有剎車燈、車燈、信號燈、刮水器等的操作是否正常。
•
•
•
•
•
•
∫dc%
Caution:
To install the mounting brackets to the unit, use
only the supplied screws (M5 x 6 mm).
If you use any screw longer than 6 mm, the unit
can be damaged.
jI q?LF² ¨“UN'« vK?Ž VOd²« UOH²? VOd²
Æ©3 ∂ ™ M5® …œËe*« wž«d³«
Ê« s??J?1 t??½U?? ¨3 ∂ s? ‰u??Þ« w??ž«d?Ð X??K??L??F?²??Ý« «–«
Æ“UN−K —d{ qB×¹
中文
After installing the unit
Check if all the brake lamps, lights, flasher, wiper,
etc. work correctly.
Parts list for installation and
connection
The following parts are provided with this unit.
After checking them, please set them correctly.
“UN'« VOd bF
«“U?? L??G??«Ë ¡«u??{ô«Ë U??J?? ¹d??³??« U??³??* Ê« s?? b??Q??ð
Æ`O× qJAÐ qG²Að ¨a« ¨ UŠU*«Ë
用於安裝和連接的零件表
qOu«Ë VOd« ¡«e« WLzU
下列零件是隨本機提供的。
清點以後,正確的將其裝配。
Æ“UN'« l …œËe WOU²« ¡«ełô«
Æ`O× qJAÐ rN³Odð vłd¹ ¨¡«ełô« Ác¼ h× bFÐ
For KW-XC777
用於 KW-XC777
For KW-XC828
用於 KW-XC828
¥â«¬ KW-XC777
¥â«¬ KW-XC828
KW-XC828 ‡
KW-XC777 ‡
©3 ∂ ™ M5® W¹u² fDž ”«— wž«dÐ
CR2025
WOzUÐdNJ« WUD« pKÝ
ÊUO½ Ÿu½ …—UOÝ l WKLF²*« W×OHB«
bFÐ sŽ rJײ« …bŠË
U¹—UD³«
bFÐ sŽ rJײ« …bŠË
©3 ∂ ™ M5® jЗ wž«dÐ
故障排除
TROUBLESHOOTING
• The fuse blows.
* Are the red and black leads connected
correctly?
• Power cannot be turned on.
* Is the yellow lead connected?
• No sound from the speakers.
* Is the speaker output lead short-circuited?
• Sound is distorted.
* Is the speaker output lead grounded?
* Are the “–” terminals of L and R speakers
grounded in common?
• Unit becomes hot.
* Is the speaker output lead grounded?
* Are the “–” terminals of L and R speakers
grounded in common?
Õöô«Ë ‰UDô« s Y«
“uOH« ‚d •
ø`O× qJAÐ Wuu œuÝô«Ë dLŠô« pK« q¼ ¿
保險絲燒斷。
檢查紅色導線接頭和黑色導線接頭是否連接正確?
電源不能接通。
檢查黃色導線接頭是否接上?
揚聲器沒有聲音。
檢查揚聲器輸出導線接頭是否短路?
聲音失真。
檢查揚聲器輸出端子是否接地?
檢查揚聲器的左(L),右(R)端子的負極
(-)是否共同接地?
• 本機發熱。
* 檢查揚聲器輸出端子是否接地?
* 檢查揚聲器的左(L),右(R)端子的負極
(-)是否共同接地?
•
*
•
*
•
*
•
*
*
ÆWOzUdNJ« WUD« qOu sJ1 ô •
øôuu dHô« pK« q¼ ¿
ÆUUL
« s u —bB ô •
øWŽUL« Ãdš pKÝ …dz«œ w dOBIð pUM¼ q¼ ¿
ÆÁuA uB« •
ø÷—ôUÐ ôuu WŽUL« Ãdš pKÝ q¼ ¿
L Èd?? ??O?? « W??ŽU??L?? ??K?? å≠ò W??³??U?? ??« ·«d?? Þô« q??¼ ¿
øiFÐ l ÷—ôUÐ Wuu R vMLO«Ë
Æ“UN'« s
•
ø÷—ôUÐ ôuu WŽUL« Ãdš pKÝ q¼ ¿
vMLO«Ë L ÈdO« WŽULKå≠ò W³U« ·«dÞô« q¼ ¿
øiFÐ l ÷—ôUÐ Wuu R
1
1
Remove the audio system originally installed.
Note: Be sure to keep all the screws and parts
removed from your car. They are to be
used in the future.
2
Install the mounting brackets, removed from
the car, to this unit.
3
Connect the wires (see the diagrams on the
reverse side).
4
Fix this unit to the car using the screws
removed in step 1.
1
拆下原先安裝的音響系統。
注意: 請保存好從汽車上取下的所有螺絲釘和零
件,以備將來使用。
2
3
4
將從汽車上拆下的固定托座安裝到本機。
將電線連接好(請參閱背面的圖示)。
使用上面第一步中拆下的螺絲釘將本機固定
到汽車上。
下面以丰田牌(Toyota)汽車為例對安裝進行說明。
欲瞭解更多資料,請向 JVC 汽車音響分銷商詢問。
The following example shown is for
installation in a Toyota.
For more details, consult your JVC car audio
dealer.
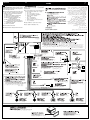
Æqô« w Vd*« uB« “UNł Ÿe½«
W?ŽËe?M*« ¡«e?łô«Ë w?ž«d?³?« k?HŠ s? b?Q?ð ∫WEö
Æ…—UO« s
ÆoŠô XË w UNULF²Ýô WłUŠ pUM¼
±
vK?Ž …—UO?« s WŽËe?M*« VO?d²« U?OH²? VÒ—
Æ“UN'« «c¼
≤
œułu*« rÝd« dE½«® Æ`O× qJAÐ „öÝô« qË«
Æ©wHK)« V½U'« vKŽ
≥
wž«d³?« ‰ULF²?Ý« WDÝ«uÐ …—UO?UÐ …bŠu?« X³ÒŁ
Ʊ …uD)« w WŽËeM*«
¥
ÆUuu Ÿu …—UO q«œ “UN'« VOd WOHO wU« ‰U*« sOÒ
«—UO
K? WOuB« …eNô« Ÿ“u dA« ¨d?« qOUH q« s
ÆJVC W—U
“UN'« «c¼ l …œËe*« wž«d³«
∫“UN'« «c l …œËe*« w«d«
…—UO« s WŽËeM*« VOd²« WOH²
W?DÝ«uÐ w?½dF*« …—U?O?« qJO?¼ l rJ?× qJ?AÐ w?{—ô« pK?« qË«
Æw½bF*« …—U« qJO¼ vKŽ X³
Ò ¦*« vKô« wžd³« ‰ULF²Ý«
Æpð—UOÝ l oÐUD²¹ Íc« wžd³« Ÿu½ d²š«
…—UO« s WŽËeM*« VOd²« WOH²
jЗ wždÐ
©3 ∂ ™ M5®
W¹u² fDž ”«— wž«dÐ
©3 ∂ ™ M5®
“UN'« «c¼ l …œËe*« wŽ«d³«
± …uD)« w …—UO« s ŸËeM*« wžd³«
ÆWł—œ ≥∞ s q« W¹Ë«“ vKŽ “UN'« VÒ—
Æu² qJAÐ ¡u²M« sŁ« ¨‰Ušœö ¡u²½ pUM¼ ÊU «–«
ELECTRICAL CONNECTIONS
電路連接
To prevent short circuits, we recommend that you
disconnect the battery’s negative terminal and
make all electrical connections before installing
the unit. If you are not sure how to install this unit
correctly, have it installed by a qualified
technician.
為防止短路,建議在安裝本機之前,斷開電池的負
極,並把所有電路都連接好。如果您不能確定如何正
確地安裝本機,應請合格的技術人員來安裝。
Note:
This unit is designed to operate on 12 volts DC,
NEGATIVE ground electrical systems. If your
vehicle does not have this system, a voltage
inverter is required, which can be purchased at
JVC car audio dealers.
• Replace the fuse with one of the specified
rating. If the fuse blows frequently, consult your
JVC car audio dealer.
• If noise is a problem...
This unit incorporates a noise filter in the power
circuit. However, with some vehicles, clicking
or other unwanted noise may occur. If this
happens, connect the unit’s rear ground
terminal (see connection diagram) to the car’s
chassis using shorter and thicker cords, such
as copper braiding or gauge wire. If noise still
persists, consult your JVC car audio dealer.
• Maximum input of the speakers should be more
than 45 watts at the rear and 45 watts at the
front, with an impedance of 4 Ω to 8 Ω.
• Be sure to ground this unit to the car’s
chassis.
• The heat sink becomes very hot after use. Be
careful not to touch it when removing this unit.
Wł—œ ≥∞ s q«
WOzUdNJ« öOu«
w?u?½ ¨W?O?zU?Ðd?NJ?« d?z«Ëb?« w? d?O?B?I?ð ÀËb?Š l?M?*
öO?u?²« q?L?Ž rŁ V?U?« W?¹—U?D?³« ·d?Þ q?BH?Ð
p²dF ÂbŽ WUŠ w Æ“UN'« VOdð q³ WOzUÐdNJ«
WOKLŽ „dð vłd¹ ¨`O× qJAÐ “UN'« VOdð WOHOJÐ
q¦ VOd² q¼R Ë h²
h
?A “UN'« VOdð
Æ…eNłô« Ác¼
WEö
wzUÐdN —UOð WDÝ«uÐ jI qLFO “UN'« «c¼ rL bI
ÆVUÝ i¹—Qð WOzUÐdN WLE½« ¨Xu ±≤ ¨DC dýU³
V−¹ ¨pð—UOÝ w ÂUEM« «c¼ q¦ œułË ÂbŽ WUŠ w
s ‰u?;« «c¼ ¡«d?ý s?J1Ë ¨ÃU?²u? ‰u?× Â«b?
²?Ý«
ÆJVC W—U «—UOK WOðuB« …eNłô« ¡öË
U?? ÝU??O??I??« f??H?? ½ q??L??×??¹ d?? šP??Ð “u??O??H??« ‰b?? ³??²??Ý« •
…—UA²Ý« vłd¹ ¨“uOH« ‚«d²Š« —dJð «–« ÆWuu*«
ÆJVC W—U «—UOK WOðuB« …eNłô« ¡öË
ìWKJA*« u¼ ZO−C« ÊU «–« •
WUD« …dz«œ qš«œ ZO−{ d²K “UN'« «c¼ Âb
²¹
Ê« sJ?1 ¨ «—UO?« iF?Ð w ¨p– l? ÆWO?zUÐdN?J«
»u?žd*« dOž Z?O−C« Ë« W?IDI?D« s Ÿu½ Àb?×¹
i??¹—Q?²??« ·d??Þ q?Ë« ¨p??– q?¦?? ÀËb?Š W??U?Š w??
l ©qOu²?« rÝ— dE½«® “UN?'« WOHKš w? œułu*«
d??B?« „ö??Ý« «b??
?³??Ý« W??D?Ý«u??Ð …—U??O???« q??J?O??¼
ÆwÝUOI pKÝ Ë« ‰Ëb:« ”U×M« pKÝ q¦ ¨pLÝ«Ë
v?łd¹ ¨Z?O?−C?« Ë« W?I?DI?D?« nu?ð Âb?Ž W?UŠ w?
W—U? «—U?O?K W?Oðu?B?« …eN?łô« ¡öË …—U?A²?Ý«
ÆJVC
d?¦« UŽU?L« q?šb vBô« b?(« ÊuJ¹ Ê« V?−¹ •
UŽULK ◊«Ë ¥µ Ë WOHK)« UŽULK ◊«Ë ¥µ s
ÆÂË« ∏ v« ¥ 5Ð WF½U2 l ¨WOUô«
Æ…—UO« qJO¼ l “UN'« i¹—Qð s bQð •
b??F??Ð «b??ł W??M??šU??Ý …—«d??(« i??H??š W?? ×??O??H?? `??³??B??ð •
Æ“UN'« Ÿe½ bMŽ UN²ö ÂbŽ s bQð Æ«b
²Ýô«
注意:
本機使用直流12V、負極接地的電源系統。如果您的車
輛沒有這一電源系統,則需要一個電壓變換器,您可以
在 JVC 汽車音響分銷商處買到它。
• 把保險絲更換為額定負荷值的保險絲。如果保險絲經
常燒壞,請嚮 JVC 汽車音響分銷商詢問。
• 若出現噪音問題 ...
本機在電源回路帶有一個噪音瀘器。但是,在某些車
輛上,會出現喀喀聲或其它噪音。如果發生這類情
況,將本機後面的接地端子用短而粗的導線,如編織
銅線或標準電纜,連接到汽車底盤上(見電路接線
圖)。如果噪音仍然持續存在,請嚮JVC汽車音響分
銷商詢問。
• 後置揚聲器的最大輸入功率應大於 45 瓦,前置揚聲
器的最大功率 45 瓦,其阻抗的為 4-8 歐姆。
• 務必將本機接地到汽車底盤上。
• 本機使用後,散熱片會很熱。因此,在移出本機時,
小心不要觸摸散熱片。
…—«d(« iHš W×OH
2
中文
ENGLISH
wd
A Typical Connections/ 典型的接線方法/
Before connecting: Check the wiring in the
vehicle carefully. Incorrect connection may cause
serious damage to this unit.
1
2
3
Connect the colored leads of the power cord
to the car battery, speakers and automatic
antenna (if any) in the following sequence.
1 Black: ground
2 Yellow: to car battery (constant 12V)
3 Red: to an accessory terminal
4 Blue with white stripe(Remote out):
to other equipment
5 Blue: to automatic power antenna
(requires power more than 250 mA.)
6 Orange with white stripe: to illumination
or small lamp terminal
7 Others: to speakers
/WO–uLM« öOu«
接線前:仔細檢查汽車內的線路。不正確的接線會導
致本機嚴重損壞。
1
2
3
…—UO« w „öô« WJ³ý s bQð ∫qOuU ¡b« q
‰uBŠ v« ¡vÞU)« q?Ou²« V³¹ Ê« sJ1 ÆWbÐ
Æ“UN−K wIOIŠ qDŽ
按下述順序將配線束各個不同色標的導線接頭分別
接至電池,揚聲器和自動昇降天線(如有裝設):
1 黑色:接地
2 黃色:接至車裝電池(恆定 12V)
3 紅色:接至保險絲單元內的附屬端子
4 藍色帶白色條紋(遠端輸出):
往其它設備
5 藍色:往自動電動天線
(需要大於 250mA 的電力。)
6 橙色帶有白色條紋:接至照明或小燈泡端子。
7 其它:接至揚聲器
將連接天線插頭的一端插入本機的天線端子。
最後,把配線束的插頭插接在本機上。
Connect the antenna cord.
W?? ?U?? D?? « b?? ?¹Ëe?? ð p?? K?? ?? ? W?? ½u?? K?? *« „ö?? ?Ýô« q?? Ë«
wz«uN«Ë UŽUL« ¨…—UO« W¹—UDÐ l WOzUÐdNJ«
ÆwU²« qK²« VŠ ©błË Ê«® wJOðUuðËô«
©…—UOÝô qJO¼ l® ÷—ô« l ∫œuÝô« pK« 1
±≤ XÐU?Ł® …—UO?« W¹—U?DÐ l? ∫dH?ô« pK?« 2
©Xu
wU{ô« ·dD« l ∫dLŠô« pK« 3
iOÐôUÐ jD
‚—“« pKÝ 4
dš¬ “UNł v« ∫©bFÐ sŽ rJײ« Ãdš®
wJOðUuðËô« WUD« wz«u¼ v« ∫‚—“« 5
©ÆdO³« wKO ≤∞∞ s d¦« WUÞ VKD²¹®
W?UD« w?z«u¼ VK?D²¹ U?bMŽ U?C¹« q?LF²?¹ ∫
ÆdO³« wKO ≤∞∞ s d¦« WUÞ wJOðUuðËô«
·d?Þ l? ∫i?O?ÐôUÐ j?D?<« w?U?I?ðd?³« p?K??« 6
Æ…dOGB« W³LK« Ë« …¡U{ô«
UŽUL« l ∫ Èdšô« „öÝô« 7
±
Æwz«uN« pKÝ qË«
≤
≥
Finally connect the wiring harness to the unit.
Æ“UN'« l „öÝô« qUŠ qË« ¨«dOš«
X½U½u³L “UNł Ë« JVC W—U CD W−b W½«uDÝ« ‰bÒ³
dš« wł—Uš
F-OUT R-OUT
L
L
L
R
R
R
ÆCH-X WKKÝ sCD W−b*« W½«uDÝô« ôb³ bŠ« qOu²Ð wu½ ¨CD W−b*« W½«uDÝô« ‰b
Ò ³ qOuð bMŽ •
Æ©KS-U15K® wU{« pKÝ v« ÃU²% ·uÝ ¨KD-MK WKKÝ s tJK²9 Íc« CD W−b*« W½«uDÝô« ‰bÒ³ ÊU «–«
j)« qšœ ¡v¹UN qOuð WDÝ«uÐ qIM² MD p¹œ wMO qGA q¦ wł—Uš X½U½u³L “UNł qOuð UC¹« pMJ1 •
© B rÝd« dE½«® Æ©œËÒe dOž® KS-U57
2
1
…—UO« wz«u¼ v«
wHK)« i¹—Q²« ·dÞ
Æ“UN'« «c¼ l od dOž
dO³« ±µ “uO
3
W½«uDÝô« ‰bÒ³ f³I
JVC W—U CD W−b
*
qOGA²« ÕU²H
*
1
œuÝ√
w½bF*« …—UO« qJO¼ Ë« w½bF*« r'« v«
L
R
±¿
dH√
2
©“UN'« «c¼ l œËe dOž® …—Uýô« pKÝ
W¹—UD³« l Wuu*« “uOH« WŽuL− w w(« ·dD« v«
Æ©‰UF²ýô« ÕU²H0 «—Ëd®
3
dLŠ√
© B rÝd« dE½«® dš« “UNł v«
“uOH« WŽuL− w wU{ô« ·dD« v«
iOÐôUÐ jD
‚—“« pKÝ
“uOH« „uKÐ
6
4
© B rÝd« dE½«® dš« “UNł v«
V?−?¹ ¨VO?d?²?« q?³? “U?N?'« «c?¼ q?O?G?A?ð h?×? q?³? ∫ ±¿
ÊËbÐ “UN'« qOGAð sJ?1 ô YOŠ ¨pK« «c¼ qOuð
ÆpK« qOuð
‚—“«
…dOGB« W³LK« Ë« …¡U{ô« ·dÞ v«
5
wJOðUuðËô« wz«uN« v«
7
jD
iOЫ pKÝ
œuÝôUÐ
iOÐ√
iOÐôUÐ jD
wUIðdÐ pKÝ
œuÝôUÐ jD
ÍœU—
ÈdO« WŽUL«
©WOUô«®
ÍœU—
œuÝôUÐ jD
dCš√
vMLO« WŽUL«
©WOUô«®
dCš«
œuÝôUÐ jD
v½«uł—«
ÈdO« WŽUL«
©WOHK)«®
v½«uł—«
vMLO« WŽUL
©WOHK)«®
ÆÊU
O Ÿu …—UO q«œ “UN'« “UN'« VOd bM
ÊUO½ Ÿu½ …—UOÝ l WKLF²*« W×OHB«
3
ÆrÝd« w sOÒ³ u¼ UL …œËe*« W×OHB« X³ÒŁ
PRECAUTIONS on power supply
and speaker connections:
• DO NOT connect the speaker leads of the
power cord to the car battery; otherwise,
the unit will be seriously damaged.
• Connect the black lead (ground), yellow lead
(to car battery, constant 12V), and red lead
(to an accessory terminal) correctly.
• BEFORE connecting the speaker leads of the
power cord to the speakers, check the
speaker wiring in your car.
– If the speaker wiring in your car is as
illustrated in Fig. 1 and Fig. 2 below, DO
NOT connect the unit using that original
speaker wiring. If you do, the unit will be
seriously damaged.
Redo the speaker wiring so that you can
connect the unit to the speakers as
illustrated in Fig. 3.
– If the speaker wiring in your car is as
illustrated in Fig. 3, you can connect the
unit using the original speaker wiring in your
car.
– If you are not sure of the speaker wiring of
your car, consult your car dealer.
qOuË WOzUdNJ« WUD« bËe ‰u UNOM
∫UUL
«
電源和揚聲器接線注意事項:
• 切勿把揚聲器導線接頭接至電池,否則本機將會嚴重
損壞。
p– Êô ¨…—UO
« W—UD l UUL
« WU bËe „ö« quÒ ô •
ÆUUL
K —d{ ‰uB v« ÍœR
l® dHô« pK«Ë ¨©w{—ô«® œuÝô« pK« qË« •
dLŠô« pK«Ë ¨©Xu ±≤ XÐUŁ ¨…—UO« W¹—UDÐ
Æ`O× qJAÐ ©vU{ô« ·dD« l®
l? U?ŽUL??« W?UÞ b?¹Ëe?ð „öÝ« q?O?u?ð q³? •
qš«œ UŽUL« „öÝ« WJ³ý h׫ ¨ UŽUL«
Æpð—UOÝ
w? UL p—UO? q«œ UUL?
« „ö« WJ? XU «–« ≠
ô ¨qH?ô« w …œu?u*« ≤ q?JA«Ë ± q?JA?« w W?MO?
„öÝ« W?J³?ý «b
²?Ý« WD?Ý«uÐ “U?N'« q?Òuð
ÁcNÐ “U?N'« qOu?ð - «–« ÆWOK?ô« UŽUL?«
qLŽ bŽ« Æ—d{ ‰uBŠ v« p– ÍœROÝ ¨o¹dD«
qOuð pMJ1 YO×Ð UŽUL« „öÝ« WJ³ý
qJ?A« w sOÒ³ u?¼ UL UŽUL?« l “UN'«
Æ≥
pð—UOÝ qš«œ UŽUL« „öÝ« WJ³ý X½U «–« ≠
“UN'« qOuð pMJ1 ¨≥ qJA« w WMO³ u¼ UL
U?ŽU??L???« „ö?Ý« W??J?³??ý «b?
??²?Ý« W??D?Ý«u??Ð
Æpð—UOÝ qš«œ WOKô«
UŽUL« „öÝ« WJ³AÐ p²dF ÂbŽ WUŠ w ≠
«cNÐ …d³)« ÍË– Ë« qOu« dA²Ý« ¨pð—UOÝ qš«œ
Æ’uB)«
• 正確地連接黑色導線接頭(接地),黃色導線接頭(接
車裝電池,恆定 12V)和紅色導線接頭(接至保險絲
單元的附屬端子)。
• 在把揚聲器導線接頭接至揚聲器之前,檢查您汽車上
的揚聲器線路:
-如果您汽車上揚聲器線路象圖 1 和圖 2 所示,不要
使用原裝的揚聲器線路。如果使用,本機將嚴重損
壞。要重新連接揚聲器線路,可按圖3 所示,把本
機與揚聲器相連接。
-如果您汽車上揚聲器線路象圖 3 所示,可使用原裝
的揚聲器線路與本機相連接。
-如果您不能確定您汽車上揚聲器線路,請向您的汽
車分銷商詢問。
+
L -
+
R -
+
L -
+
-
-
+
R -
+
-
Fig. 2
Fig. 1
+
L -
+
-
+
R -
+
+
-
+
-
Fig. 3
„öô« qOu
注意
dO „ö?ô« ·«d« vK oôË ‰“U? jd l{ ¨WO?zUdNJ« ≠ d?z«Ëb« w dO?BI« lM? q« s •
ÆWKLF
*«
ÆqOu²« q³ `O× qJAÐ „öÝô« ÂdЫ
ÆqOu²« bFÐ rJ×Ë `O× qJAÐ „öÝô« r(«
B Connections Adding Other Equipment/ 連接附加的其他音響設備/
You can connect an amplifier and other
equipment to upgrade your car stereo system.
• For connections, refer also to the instructions
supplied for other components.
• Connect the remote lead (blue with white
stripes) to the remote lead of the other
equipment so that it can be controlled through
this unit.
• For amplifier only:
– Connect this unit’s line-out terminals to the
amplifier’s line-in terminals.
– Disconnect the speakers from this unit,
connect them to the amplifier. Leave the
speaker leads of this unit unused. (Cover
the terminals of these unused leads with
insulating tape, as illustrated above.)
tOM
/WOU{ô« Èdô« …eNô« qOu
你可以接上放大器和其它設備,以提升你的汽車立體
音響系統。
• 連接時,請參閱其它裝置所提供的指南說明。
• 把遠端到線接頭(藍色帶有白色條紋)和遠端的其他
音響設備的接頭連接,則可通過本機供電。
• 只供擴音機用:
-連接此裝置的輸出端子到放大器的輸入端子上。
-將揚聲器和本機拆開,再連接至擴音機。請不要使
用本機的揚聲器導線。(依下圖所示,用絕緣膠布
將這些不用的導線接頭遮掩起來。)
p?–Ë Èd?š« «Ëœ«Ë u? r??
?C? q?O?u?ð p??M?J?1
Á—UO« u¹dO²Ý “UNł …—bI …œU¹e
ULO?KF²« v« UC¹« lł—« ¨ öOu²« qł« s •
ÆÈdšô« X½U½u³LJ« …eNł« l …œËÒe*«
j?? D??<« ‚—“ô«® b??F?? Ð s??Ž r??J?? ×??²??« p??K?? Ý q??Ë« •
dšô« “UN−K bFÐ sŽ rJײ« pKÝ l ©iOÐôUÐ
«c?¼ d³?Ž WO?zU?ÐdN?J« W?UD?« b?¹Ëeð s?J1 Y?O×?Ð
Æ“UN'«
∫ uB« r
C* jI •
·«dÞ« l “UN'« «cN j)« ≠Ãdš ·«dÞ« qË« ≠
Æ uB« r
C* j)« ≠ qšœ
l UU?L
« qË« r ¨“UN'« «c s UUL
« qB« ≠
ÊËb “UN?'« «c UUL „ö?« „d« ÆuB« r?C
d?O „öô« ·«d« v?K oô jd? l{® ƉULF?«
©ÆvKô« w `{u u UL ¨WKLF
*«
©“UN'« «c¼ l œËe dOž® …—Uýô« pKÝ
©“UN'« «c¼ l œËÒe dOž® KS-U57 j)« qšœ T¹UN
©CD ‰b³ l œËe® pK«
L
L
L
L
R
R
R
R
Ë«
*JVC CD ‰b³
(R-OUT) wHK)« Ãd)« v«
F-OUT
L
R
R-OUT
L
R-OUT
L
wł—U)« X½U½u³LJ« “UNł
…—Uýô« pKÝ
©“UN'« «c¼ l œËe dOž®
R
R
L
L
R
R
*
L
R
JVC W—U WOðu WUÞ r
C
dš¬ wðu WUÞ r
C qOuð pMJ1
ÆWOU_« UŽULK
bFÐ sŽ rJײ«
bFÐ sŽ rJײ« qšœ
WOHK)« UŽUL«
*
(F-OUT) wUô« Ãd)« v«
F-OUT
L
INPUT
L
©“UN'« «c¼ l œËe dOž® …—Uýô« pKÝ
R
R
* Firmly attatch the ground wire to the
metallic body or to the chasis of car—to the
place not coated with paint (if coated with
paint, remove the paint before attaching
wire). Failure to do so may cause damage
to the unit.
L
L
R
R
JVC W—U WOðu WUÞ r
C
WOUô« UŽUL«
v?« Ë« w?b?F?*« r?
?'« v?« ÂU?JS i—Q« pK XO r *
¨¡öD ÎUOKD ÊU «–«® ¡öD wKD dOG« ÊUJ*« v« …—UO
« tOU
V
b «c qL w ‚UHù« Æ©pK
« XO q ¡öD« W«“S r
Æ…buU —d{ ÀËb
* 請將接地線與汽車的金屬車身或底盤的未塗有油漆的
部分(如果塗有油漆,請在連線之前去除油漆)牢固
地連接一起。
如果不按此法連接,可能會損壞本機。
4