1
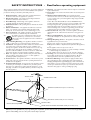
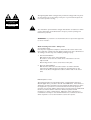
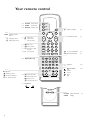
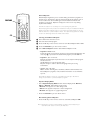
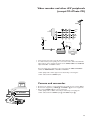
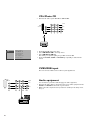
B
H
G
A
A
I
tv
2
3
4
CABLE
AUDIO
L
AUDIO
Pr
L
Pb
Pr
DISPLAY POWER
Y
CONNECTION
H
V
L
R
AUDIO
5
R
R
5
6
A/V
A/V
A/V
IN
OUT
IN
AUDIO
AUDIO
DISPLAY VIDEO
SUBWOOFER
CONNECTION
CONNECTION
8
1
INTERNAL
S-VIDEO
CVBS
RGB
AUDIO L / R
EXTERNAL
SPEAKERS
VIDEO
EXTERNAL
L
CENTER
SPEAKER
AUDIO
VHF / UHF
75
CABLE
R
3
2
1
A/V
A/V
A/V
VIDEO
AUDIO
IN
IN
IN
OUT
OUT
8
6
R
R
EXTERNAL
FRONT
SPEAKERS
REAR
SPEAKERS
L
POWER
110V
L
8
6
6
5
SAFETY INSTRUCTIONS - Read before operating equipment
This product was designed and manufactured to meet strict quality and
safety standards. There are, however, some installation and operation
precautions which you should be particularly aware of.
1. Read Instructions - All the safety and operating instructions
should be read before the appliance is operated.
2. Retain Instructions - The safety and operating instructions
should be retained for future reference.
3. Heed Warnings - All warnings on the appliance and in the
operating instructions should be adhered to.
4. Follow Instructions - All operating and use instructions should
be followed.
5. Water and Moisture - The appliance should not be used near
water - for example, near a bathtub, washbowl, kitchen sink,
laundry tub, in a wet basement or near a swimming pool, etc.
6. Carts and Stands - The appliance should be used only with a
cart or stand that is recommended by the manufacturer.
6A.
An appliance and cart combination should be moved
with care. Quick stops, excessive force, and uneven
surfaces may cause the appliance and cart combination
to overturn.
7. Wall or Ceiling Mounting - The appliance should be mounted
to a wall or ceiling only as recommended by the manufacturer.
8. Ventilation - The appliance should be situated so that its location
or position does not interfere with its proper ventilation. For
example, the appliance should not be situated on a bed, sofa, rug,
or similar surface that may block the ventilation openings; or,
placed in a built-in installation, such as a bookcase or cabinet that
may impede the flow of air through the ventilation openings.
9. Heat - The appliance should be situated away from heat sources
such as radiators, heat registers, stoves, or other appliances
(including amplifiers) that produce it.
10. Power Sources - The appliance should be connected to a power
supply only of the type described in the operating instructions or
as marked on the appliance.
11. Power-Cord Protection - Power supply cords should be routed
so that they are not likely to be walked on or pinched by items
placed upon or against them, paying particular attention to cords
and plugs, convenience receptacles, and the point where they exit
from the appliance.
GROUND CLAMP
12. Cleaning - The appliance should be cleaned only as recommended
by the manufacturer.
13. Power Lines - An outdoor antenna should be located away from
power lines.
14. Outdoor Antenna Grounding - If an outside antenna is
connected to the receiver, be sure the antenna system is grounded
so as to provide some protection against voltage surges and built
up static charges.
Section 810 of the National Electric Code, ANSI/NFPA No.70,
provides information with respect to proper grounding of the mats
and supporting structure, grounding of the lead-in wire to an
antenna discharge unit, size of grounding connectors, location of
antenna-discharge unit, connection to grounding electrodes and
requirements for the grounding electrode. See Fig. below.
15. Non-use Periods - The power cord of the appliance should be
unplugged from the outlet when left unused for a long period of
time.
16. Object and Liquid Entry - Care should be taken so that objects
do not fall and liquids are not spilled into the enclosure through
openings.
17. Damage Requiring Service - The appliance should be serviced
by qualified service personnel when:
A. The power supply cord or the plug has been damaged; or
B. Objects have fallen, or liquid has been spilled into the appliance;
or
C. The appliance has been exposed to rain; or
D. The appliance does not appear to operate normally or exhibits
a marked change in performance; or
E. The appliance has been dropped, or the enclosure damaged.
18. Servicing - The user should not attempt to service the appliance
beyond that described in the operating instructions. All other
servicing should be referred to qualified service personnel.
19. Alternate Warnings - This product is equipped with a threewire grounding-type plug, a plug having a third (grounding) pin.
This plug will only fit into a grounding-type power outlet. This is a
safety feature. If you are unable to insert the plug into the outlet,
contact your electrician to replace your obsolete outlet. Do not
defeat the safety purpose of the grounding-type plug.
ANTENNA LEAD IN WIRE
ANTENNA DISCHARGE UNIT (NEC SECTION 810-20)
GROUNDING CONDUCTORS (NEC SECTION 810-21)
GROUND CLAMPS
ELECTRIC SERVICE EQUIPMENT
POWER SERVICE GROUNDING ELECTRODE SYSTEM (NEC ART 250, PART H)
Note to the CATV system installer: This reminder is provided to call the CATV system installer’s attention to Article 820-40 of the
NEC that provides guidelines for proper grounding and, in particular, specifies that the cable ground shall be connected to the grounding
system of the building, as close to the point of cable entry as practical.
!
The lightning flash within a triangle tells you that the voltage inside may cause
an electrical shock. For the safety of everyone in your household, please do
not remove product covering.
CAUTION
RISK OF ELECTRIC SHOCK
DO NOT OPEN
ATTENTION
RISQUE DE CHOC ELECTRIQUE
NE PAS OUVRIR
!
The exclamation point within the triangle calls attention to features for which
you should read the enclosed literature closely to prevent operating and
maintenance problems.
WARNING : to prevent fire or shock hazard, do not expose this equipment
to rain or moisture.
!
Wall mounting instruction - Safety note
See supplied booklet.
Use the poster supplied as template to determine the location of the holes.
Use at least two outside holes. The distance between the two outside holes is
16”. Failing to do this may cause instability resulting in injury.
1. Wood stud installation
Drill holes into the center of the wall studs.
Be certain to center the two outside holes of the bracket over two
adjacent studs.
Attach using the two or three center holes in the plate.
2. Concrete wall installation
Drill the holes and secure the anchor bolts in accordance with the
instructions for HILTI anchor bolts. Place the mounting plate on the
anchor bolts. Place and tighten the washers and the nuts on the anchor
bolts.
FCC Compliance notice
This equipment has been tested and found to comply with the limits for a
Class A digital device, pursuant to Part 15 of the FCC Rules. These limits are
designed to provide reasonable protection against harmful interference when
the equipment is operated in a commercial environment. This equipment
generates, uses and can radiate radio frequency energy and, if not installed and
used in accordance with the instruction manual, may cause harmful
interference to radio communications. Operation of this equipment in a
residential area is likely to cause harmful interference, in which case the user
will be required to correct the interference at his own expense.
Contents
Your remote control . . . . . . . . . . . . . . . . . . . . . . . . . . . . . . . . . . . . . . . 2
Preparation . . . . . . . . . . . . . . . . . . . . . . . . . . . . . . . . . . . . . . . . . . . . . . . 3
Installation
4
4
5
5
6
6
7
8
English
Store TV channels . . . . . . . . . . . . . . . . . . . . . . . . . . . . . . . . . . . . . . . . .
Select the menu language and channel system . . . . . . . . . . . . . . . . . . . .
Automatic installation . . . . . . . . . . . . . . . . . . . . . . . . . . . . . . . . . . . . . . .
Manual installation . . . . . . . . . . . . . . . . . . . . . . . . . . . . . . . . . . . . . . . . .
Enter or modify a channel name . . . . . . . . . . . . . . . . . . . . . . . . . . . . . .
Select favorite TV channels . . . . . . . . . . . . . . . . . . . . . . . . . . . . . . . . . .
Install TV setup . . . . . . . . . . . . . . . . . . . . . . . . . . . . . . . . . . . . . . . . . . . .
The keys on the front of the receiver box . . . . . . . . . . . . . . . . . . . . . .
Operation
Use of the remote control . . . . . . . . . . . . . . . . . . . . . . . . . . . . . . . . . . . 9
Picture menu . . . . . . . . . . . . . . . . . . . . . . . . . . . . . . . . . . . . . . . . . . . . 11
Sound menu . . . . . . . . . . . . . . . . . . . . . . . . . . . . . . . . . . . . . . . . . . . . . 12
Features menu . . . . . . . . . . . . . . . . . . . . . . . . . . . . . . . . . . . . . . . . . . . 14
Closed Caption . . . . . . . . . . . . . . . . . . . . . . . . . . . . . . . . . . . . . . . . . . . 16
Dual Screen . . . . . . . . . . . . . . . . . . . . . . . . . . . . . . . . . . . . . . . . . . . . . 17
Peripheral equipment
Connect peripheral equipment . . . . . . . . . . . . . . . . . . . . . . . . . . . . . . 18
Select peripheral equipment . . . . . . . . . . . . . . . . . . . . . . . . . . . . . . . . . 23
Record with your videorecorder . . . . . . . . . . . . . . . . . . . . . . . . . . . . . 25
Tips . . . . . . . . . . . . . . . . . . . . . . . . . . . . . . . . . . . . . . . . . . . . . . . . . . . . 26
Index . . . . . . . . . . . . . . . . . . . . . . . . . . . . . . . . . . . . . . . . . . . . . . . . . . . 26
Conversion tables . . . . . . . . . . . . . . . . . . . . . . . . . . . . . . . . . . . . . . . . . 27
1
Your remote control
PICTURE
picture menu
p. 12 SOUND
sound menu
p. 14 FEATURE features menu
p. 11 PICTURE
SOUND
B
p. 23
π
FEATURE
VIDEO
VIDEO selection of video
V volume key
¬ switch sound
off temporarily
p. 17
p. 9
p. 9
b dual screen
q picture format
X mono-stereo-SAP
selection
OK
+
+
π
p. 9
A select your choice
K activate your choice
p. 9
π
π
source
p. 4
B switch to standby
V
CH
TV channel selection
p. 9
CH
-
-
¬
b
1
2
3
q
4
5
6
X
7
8
9
CC
i
p. 16 CC closed caption
0
A/CH
i on screen information
p. 9
A/CH previous TV channel
p. 9
U sleeptimer
p. 10
DVD
p. 24 Digital Video keys
AUDIO
j
o
MENU
π
i
‡
p
OK
Ò
π
†
œ
VCR
‡
Ò
†
®
π
p. 17
Dual Screen
c switching screens
d freeze the subpicture
p. 10
CH -/+ channel selection
p. 4
S
P
fi
s
freeze the picture
c
d
S
P
b
CH
CH
fi
s
yÚ
‡
Ò
®
†
π
Videorecorder
stop
rewind
p. 24
record
wind
play
reduce image noise
mosaic screen
personal preferences
Installation
S
s
yÚ
SMART CONTROLS
PICTURE
2
SOUND
PICTURE
picture and sound
SOUND
settings
p. 9
Preparation
Do not insert the power plug in a wall socket before all connections
are made.
& Place the receiver box wherever you want, but leave at least 5 cm space free
all around the box for ventilation.
(E.g. on the ground, in a cupboard, behind a wall, in another room....)
é Connect one of the supplied antenna cables 1, and the DISPLAY POWER
3, DISPLAY VIDEO 2, and SUBWOOFER 4 cables as shown in the inside
frontcover of this handbook.
Make sure all screws of the cables 2 and 3 are tighted well.
8
6
R
EXTERNAL
FRONT
SPEAKERS
L
R
“ Check if the red speaker button at the back of the receiver is in the INTERNAL
SPEAKERS position.
REAR
SPEAKERS
R
L
‘ Connect the two Surround Sound rear speakers supplied 5.
Always connect both Surround Sound speakers: the left rear speaker at
REAR L; the right rear speaker at REAR R.
Push the connector clip down and insert the end of the wire into the opening: the
positive wire (the one with the black line) to the grey speaker connection; the negative
wire to the black speaker connection. Do not insert the wires too far.
The Surround Sound speakers should always be located behind or to either side of the
listener. If preferred you can also hang the speakers on the wall.
( To connect your multimedia peripheral, see p. 22.
To connect other peripherals, see p. 18.
In order to obtain the best result, please use only the supplied antenna cables
between the receiver box and videorecorder, and between videorecorder and
antenna connector.
§ Insert the power cord supplied 6 into the power socket in the rear of the
receiver and in the wall socket with a mains voltage of 110V.
Please, only use the supplied rim-earthed power cord with its built-in
suppressor to ensure safety and EMC.
RO3 / AAA
è Remote control: Remove the cover of the battery compartment.
Insert the two AAA batteries supplied (Type R03G/AAA-1,5V).
The batteries supplied do not contain the heavy metals mercury and cadmium.
Nevertheless in many countries dead batteries may not be disposed of with your
household waste. Please dispose of dead batteries according to local regulations.
! Turn TV on: Press the power button A on the front of the receiver.
A green indicator and the screen light up.
If the indicator is red, press the + CH - key on the remote control.
The green indicator blinks every time you press a key on the remote control.
When you turn on your set for the first time, the MENU LANGUAGE automatically
appears on the screen. Alternately the explanation appears in the different languages.
3
i
CC
0
A/CH
Installation
DVD
j
o
MENU
i
‡
p
OK
π
Ò
π
†
œ
‡
Ò
®
c
d
b
S
P
AUDIO
& Open the door of the remote control.
VCR
†
Select the INSTALLATION MENU
π
CH
CH
fi
s
yÚ
é Press S and s at the same time.
To use the menus
& Use the A keys to select a menu or menu item.
é Press the OK key to activate.
B
B
“ Press the PICTURE, SOUND or FEATURE key on the remote control to return
or to turn menu off.
B
B
B
INSTALLATION
Menu Language
Channel System
Automatic Installation
Manual Installation
Channel label
Favorite channels
Setup
B
B
B
INSTALLATION
Menu Language
Channel System
Automatic Installation
Manual Installation
Channel label
Favorite channels
Setup
Store TV channels
INSTALLATION
MENU
LANGUAGE
Menu Language
Channel System
Automatic Installation
Manual Installation
channel label
English Français Español
First, you have to select your language and your channel system.
& Select the Menu Language in the INSTALLATION menu and press the
OK key.
é Select your language and press the OK key.
The INSTALLATION menu reappears.
“ Select Channel System and press the OK key.
‘ a. If you have your own antenna, select VHF/UHF (for terrestrial
transmission).
b. If you are connected to a cable system, select Cable.
4
Automatic installation
All possible broadcasted TV channels have been programmed at the factory
and are put in a favorite list.
Menu Language
Channel System
Automatic Installation
Manual Installation
Channel Label
Favorite channels
Setup
INSTALLATION
Automatic Installation
AUTOMATIC
& Select Automatic Installation in the INSTALLATION menu.
é Select On with the pπ keys to activate.
All TV channels you can receive are put in a favorite list.
Wait until the Searching bar at the bottom of the screen has disappeared and
the message Ready is displayed.
On
INSTALLATION
Searching
O%.....................100%
Note: Every time you change the Channel System or move to another place, repeat
the automatic installation.
TV channels broadcast by a cable company.
Some cable systems operate in frequency offsets that are as much as
+ .20 MHz or - .20 MHz. See Conversion tables, p. 27.
Go to Enter or Modify a channel name, p. 6.
Off-air TV channels
The frequencies for TV channels used by a cable company may differ from the
frequencies of off-air TV channels.
Consult the tables on p. 27.
Channel
Favorite
MANUAL
Manual installation
INSTALLATION
Manual installation is characterized by the ability to include or exclude a TV
channel in the Favorite list.
& Select Manual Installation in the INSTALLATION menu and press OK.
é Select the TV channel number you want to change into a favorite or a non
favorite TV channel.
“ Select Favorite TV channels
PICTURE
SOUND
B
B
FEATURES
VIDEO
B
a
CH
L
E
K
B
K
OK
B
L
c
1
After leaving the installation menu, you can browse through the TV channels
by pressing the CH - or + key. Only those TV channels which are in the
favorite list will be displayed. The non-favorite TV channels can still be selected
with the digit keys.
It is recommended that you put channels in this list that have a good reception
or you watch often.
2
‘ Press the PICTURE, SOUND or FEATURE key to return to the installation menu.
3
5
Enter or modify a channel name
INSTALLATION
CHANNEL
LABEL
Menu Language
Channel System
Automatic Installation
Manual Installation
Channel label
Favorite channels
Setup
90
91
92
93
94
95
96
97
98
99
A/V
A/V
A/V
A/V
A/V
A/V
5
6
1
2
3
4
0
1 CNN
2 NBC
3 ....
4 ....
5 ....
.......
You can assign a name to the TV channel.
A name with up to five letters or numbers can be given to each TV channel.
For example: CNN, SUPER,...
You can also name any peripherals that are connected.
& Select Channel label in the INSTALLATION menu with the o or œ keys
and press the OK key.
é Select the TV channel to be modified or assigned a name with the o, œ,
p or π keys and press OK.
“ Select with the p or π keys the position of the letter or number you want
to change or to enter.
‘ Select with the o or œ keys the correct letter or number you want to
enter. A space, numbers or other special letters are located between Z and
A.
•
•
Did you fill in a wrong letter or number ?
Select with the p or π keys the position of the letter or number you want to
change.
Select with the o or œ keys the correct letter or number.
When the complete name is entered,
( Press OK.
§ Select another TV channel to be modified or named with the o, œ, p or π
keys and press OK.
è Press the PICTURE, SOUND or FEATURE key to return to the INSTALLATION
menu.
Select Favorite TV channels
After leaving the installation you can browse through the TV channels by
pressing the + CH - key. Only those TV channels which are in the favorite list
will be displayed. The non-favorite TV channels can still be selected with the
digit keys.
You can also do this for channel numbers reserved for external A/V devices.
A/V
A/V
A/V
A/V
A/V
A/V
FAVORITE
CHANNELS
5
6
1
2
3
4
0 ....
1 ....
2 ....
3 ....
4 ....
5 ....
......
Channel Number
Favorite
10 ....
11 ....
12 ....
13 ....
14 ....
15 ....
.......
& Select Favorite channels in the INSTALLATION menu and press the OK
key.
é Select your channel number.
“ Select Favorite.
‘ Select Yes or No.
( Repeat é to ‘ for every TV channel or external A/V device you want to
change into a favorite or a non-favorite TV channel.
§ Press the PICTURE, SOUND or FEATURE key to return to the INSTALLATION
menu.
6
Install TV setup
INSTALLATION
SETUP
Menu Language
Channel System
Automatic Installation
Manual Installation
Channel Label
Favorite channels
Setup
Audio Output
CD-i/Photo CD
Surround Mode
Center Mode
Ext. Amplifier
Picture mute
& Select Setup in the INSTALLATION menu and press the OK key.
é Use the PICTURE, SOUND or FEATURE key to return or to switch menu off.
Audio Output
If you have audio equipment connected to your receiver, you can select two
types of audio output.
•
Select Variable with the p or π keys if you want to adjust the volume via
the TV when using your audio equipment to reproduce the TV sound signal. It
is possible that the volume control of the audio equipment needs to be
adjusted.
Select Constant if you want to adjust the volume with the volume control of
your audio equipment or if you want to record the sound of a TV program to
an audio recorder (tape, DCC,...).
CD-i/Photo CD
See Connect Peripheral Equipment, Other equipments, p. 20.
Surround Mode
According to the broadcast sound modes, select the Surround Sound
possibilities:
Pro Logic with Dolby Pro Logic broadcasting. Nice effects can be reached in
Pro Logic mode with good stereo broadcasts.
Dolby 3 Stereo if no surround speakers are connected or if oversynthesized
sounds result in annoying surround effects.
Hall with mono or poor stereo broadcasting.
Off if you want to switch off Surround Sound.
Which speakers are active, depends on the selected Surround mode.
See Dolby Pro Logic Install, p. 13.
Note: If you have only connected a right and left external speaker and no center
speaker, select Pro Logic and not Dolby3 Stereo in the Surround Mode menu
item. See also Center mode, Phantom selection.
Center Mode (only selectable in Dolby 3 Stereo or Pro Logic when you have
connected and selected external speakers)
With internal speakers: the item center mode can not be selected.
With external speakers: (external left and right speakers and a center speaker.
See Connect Peripheral Equipment, External Speakers, p. 21)
Note: Do not forget to put the red speaker button at the back of the receiver in
the EXTERNAL SPEAKERS position.
•
When in Surround Mode you have selected Pro Logic, you can select
Normal, Phantom or Wide in the Center Mode;
• When in Surround Mode you have selected Dolby 3 Stereo, you can select
Normal or Wide in the Center Mode;
• Select Phantom if no external center speaker is connected;
• Select Normal if you have connected a small center speaker which can not
reproduce low frequencies (< 100 Hz);
• Select Wide if you have connected a full range external center speaker.
7
External amplifier
This menu item can only be selected in case you did NOT select external
speakers (with the red speaker button at the back in INTERNAL SPEAKER
position).
•
Select No: - if you did not connect an audio amplifier at the back of your
receiver. The menu item Center Mode can not be selected;
- if you want to make a sound recording from your TV on an
audio recorder. See also Audio Output;
- if you do not want to use the external audio amplifier for
reproduction of the left and right channel of the Dolby signal.
•
Select Yes: - if you connected an audio amplifier to AUDIO L and R at the
back of your receiver, see Connect Peripheral Equipment,
Audio Equipment, p. 20, and you want to enjoy even more
impressive sound.
All TV speakers only function as center speaker and the
speakers connected to the audio amplifier reproduce the left
and right channel.
The menu item Audio Output can not be selected.
In the menu item Center Mode you can select either Normal
or Phantom (the sound from the center speaker is reproduced
via the left and right speakers of the amplifier).
•
•
•
Picture mute
Press the p or π keys to select a Blue or Black screen when there is no
picture or information.
Press the PICTURE, SOUND or FEATURE key.
The INSTALLATION menu reappears.
Fast exit from the menus
Press the PICTURE, SOUND or FEATURE key repeatedly to switch off all
menus.
The keys in front of the receiver box
Should your remote be lost or broken you can still change some of the basic
picture and sound settings.
•
•
LOCAL
MENU
Press the LOCAL MENU key behind the door at the front of the receiver
repeatedly to select Volume, Brightness, Color or Contrast.
Press the Volume - or + key to adjust the chosen selection.
The CHANNEL - and + keys enable you to select the TV channels.
Note: If the message Lock On appears, the lock must be switched off before you
can use the CH - and + keys on the receiver to select a TV channel. See p. 14.
The selected adjustment automatically switches off when after 10 sec. no
action has been executed.
8
Use of the remote control
B
Standby
The set is turned off and the red indicator
lights up in front of receiver box and the
screen.
To turn the TV on again, press the B key
for two seconds or press - CH +.
PICTURE, SOUND or FEATURE menu
VIDEO
Your TV consumes energy in the standby-mode.
Energy consumption contributes to air and water
pollution. We advise to switch off your TV
overnight instead of leaving it on standby. You
save energy.
Selecting your external
A/V sources
PICTURE
Press this key repeatedly to select
A/V 1, A/V 2, A/V 3 CVBS, A/V 3 RGB,
A/V 4, A/V 5, A/V 6, according to where you
connected your external source (see p. 23.)
SOUND
B
π
FEATURE
VIDEO
π
Dual screen
See p. 17
q
Picture format
Press the q key repeatedly to select
another picture format: 4:3, Movie Expand
14:9, Movie Expand16:9 with or without
subtitling, Super Wide, Wide Screen or
Auto Format.
When in Movie Expand 14:9 or 16:9 picture
format, you can make subtitles, when
available, visible or not with the o or œ
keys.
Sometimes video recorders or TV programs
carry special signals which will automatically
switch the TV to the correct screen format.
Selecting Auto format, the screen will be
filled as much as possible with the picture
when TV programs are not carrying special
signals detecting the correct screen format.
Auto format is disabled when in Dual Screen.
Note: In A/V 5 mode press the q key to switch
between a 4:3 or a 16:9 picture format.
In Dual screen mode press the q key to switch
between a full or a squeezed picture format.
X
Bilingual choice and sound mode
selection
Press this key
• to switch from Stereo to Mono sound, in
case of stereo transmission;
• to switch from Main Stereo to Main
Mono or SAP (second audio program).
The setting is stored for each TV channel
separately.
CC
+
π
+
b
OK
π
V
CH
-
-
¬
V Volume
The volume is adjusted. If you want to store
the volume adjustment in the memory, see
the Features menu, Personal Preference,
p. 14 to store the same volume adjustment
for all the stored TV channels.
b
1
2
3
CH Channel selection
q
4
5
6
X
7
8
9
To browse through the TV channels
activated in the Favorite channels menu. See
p. 6.
CC
i
0
A/CH
SMART CONTROLS
PICTURE
SOUND
¬ Mute key
Interrupt the sound temporarily or restore it.
0/9
Digit keys
To select a TV channel.
For a two or three digit channel number,
enter the second or third digit within 2
seconds.
A/CH Previous channel
The previously selected TV channel is
displayed.
i
Permanent channel number
Screen information
Press for 5 seconds to activate/de-activate
the continuous display of the channel
number.
Press briefly to display information about the
selected TV channel, the sound reception,
the selected DNR setting and picture format
and the remaining time set with the
sleeptimer.
Closed Caption on/off
See p. 16
9
7
8
9
0
Digital Video Disc keys see p. 24
S
Freeze
When pressed, Dual Screen is activated and
the displayed picture is frozen on the right
side of the screen.
Press again to de-activate the frozen picture.
j
o
MENU
π
i
‡
p
OK
Ò
π
†
œ
Video recorder keys see p. 24
Dual Screen keys see p. 17
U
DVD
AUDIO
VCR
‡
Ò
®
c
d
b
S
P
†
π
CH
CH
fi
s
yÚ
P
Digital Noise Reduction
To reduce the image noise and improve
picture quality when receiving weak signals.
Press this key to select DNR min, DNR med
(optimum picture quality for normal strength
signal), DNR max (for poor picture quality)
or DNR off.
V
P
-
Smart Control keys
(Not in A/V 5 and A/V 6 mode)
To select predefined picture and sound
settings.
Picture
Each time it is pressed, a different picture
setting is selected, corresponding with a
specific predefined setting of Contrast,
Sharpness and Dynamic Contrast.
Sound
Each time it is pressed, a different sound
setting is selected, corresponding with a
specific predefined setting of Treble and
Bass values in the Graphic Equalizer.
Personal refers to the personal preference
setting of picture and sound which you have
stored with Personal Preference in the
FEATURES menu, p. 14.
The smart picture and sound settings are set
to Manual until the personal adjustments
are stored or you switched the TV off and
on again.
10
Sleeptimer
The time, set in the Sleeptimer, see Features
p. 14, is displayed in the upper left corner of
the screen.
-
¬
b
1
2
3
q
4
5
6
j
7
8
9
b
i
0
0
SMART CONTROLS
PICTURE
SOUND
fi
Mosaic screen
A menu line MOSAIC appears.
Select the desired function with the p or π
keys and press the OK key.
Scan: the TV channels placed in the favorite
list appear sequentially.
Press the - CH + key to select a next series of
12 channels. Press the ckey to make the
main picture in the center of the screen
equal to the active small picture. The active
TV channels, indicated by a red border, can
be selected immediately with the OK key.
Photo Finish: the main picture is displayed
in successive frozen pictures.
Press the OK key again to have a new
sequence of frozen pictures.
Strobe: the picture is reproduced image by
image.
Press the OK key again to have a faster
speed.
Press fi to switch off the mosaic screen.
Never perform a scan while recording a TV
program with a video recorder recording from
A/V 2 or 3, since the scan will be recorded on tape.
s
Personal Preferences
Restore picture and sound settings, stored in
the features menu (see p. 14).
Use of the menus
PICTURE
SOUND
OK
& Press the PICTURE, SOUND or FEATURE key to display/cancel the PICTURE,
SOUND or FEATURES menu.
π
+
é Use the A key to select a menu item.
¬
-
B
π
FEATURE
VIDEO
π
π
+
V
-
b
q
1
4
P
2
5
activate
‘ Press the same menu key again to return or to turn menu off.
3
6
X
7
8
9
CC
i
0
A/CH
“ Press the OK key to activate.
select
adjustments
Picture menu
•
Store the modified adjustments for Contrast, Brightness, Color, Tint and
Dynamic Contrast for all TV channels with Personal Preference in the
FEATURES menu.
Sharpness (not available in A/V 5 and A/V 6 modes)
You can adjust the Sharpness for each TV channel separately.
•
FEATURES
PICTURE
Sleeptimer
Lock
Personal Preference
Message
Timers
Closed Caption
Caption Display Mode
A/V 5 Input
Contrast
Brightness
Color
Tint
(Sharpness)
Color Temperature
(Dynamic Contrast)
(A/V 5)
Dynamic Contrast (not in A/V 5 and A/V 6 modes)
To make the contrast between darker and brighter picture parts more
outspoken, it is preferred to select Med or Max.
In certain circumstances it may be preferred to select Min or Off.
A/V 5
•
•
•
•
•
A/V 5
Horizontal Shift
Vertical Shift
Color Temperature
Select the color temperature: Normal, Warm or Cool.
Turn your device on.
Select Rear or Front in the A/V 5 Input of the FEATURES menu (see p. 15),
according to where you connected your device, to the back or to the front of
the receiver.
The selection of the display mode (640x350, 640x400, 640x480) is made
automatically.
If it is necessary you can optimize the position of the picture.
Select A/V 5 with the o and œ keys.
Select with the p or π keys the adjustments of the picture:
• Horizontal Shift to adjust the picture position horizontally
• Vertical Shift to adjust the picture position vertically
Press the p and π keys to alter the selected adjustment.
The A/V 5 menu disappears and only the selected menu item remains
(including its bar) on the screen.
The A/V 5 menu reappears after a few moments or by pressing OK.
Now you can select another adjustment with o and œ keys.
The adjustments made in the A/V 5 menu are automatically stored after the
menu is switched off.
Note: When the A/V 5 signal is not recognizable and > 35 KHz is displayed, the
picture is muted.
11
Sound menu
•
SOUND
GRAPHIC
Volume
Balance
Graphic Equalizer
Sound Style
Sound Mode
Loudness
Speech
Spatial
Headphone
Dolby Pro Logic Install
Bass
Store the modified adjustments for Volume, Balance, Treble and Bass values
from the Graphic Equalizer menu and Spatial, as well as the headphone
volume and balance for all TV channels with Personal Preference in the
FEATURES menu.
Sound style / Graphic Equalizer
This menu item has the same functions as the Smart Controls key Sound on
the remote control.
Also here you can select the preferred sound style which corresponds with a
specific predefined setting of the graphic equalizer.
The sound style is set to Manual until the personal graphic equalizer settings
are stored and until you switched your TV off and on again.
Treble
EQUALIZER
Sound mode
Select Stereo or Mono if the TV channel transmits stereo sound.
In case of weak stereo signals, due to the transmission, select mono.
0.1KHz
0.3KHz
1KHz
3KHz
Turn Loudness on or off
When Loudness On is selected, the low and high frequencies are amplified
so that the natural balance is restored when listening at a low volume.
The selected setting for Loudness is stored for all TV channels.
10KHz
Select Speech
When Speech On is selected, the treble settings are enhanced and the bass
settings are suppressed.
The selected setting for Speech is stored for all TV channels.
Select Spatial sound
When Spatial On is selected, it seems as though the speakers are spread
further apart from one another.
You get a spatial sound effect. The setting for Spatial is stored per TV
channel.
Headphone
See Connect Peripheral Equipment, p. 21, for the connection of the
headphone.
HEADPHONE
Volume
Balance
Source
•
Select the source you want to listen to with your headphone: Automatic,
TV, A/V 1, A/V 2 or A/V 3.
Select Automatic if you want to listen to the sound of the picture you are
watching on the screen.
Also for sources coming from A/V 5 or sources connected to A/V 6 or
A/V 4.
Note: in the Dual Screen picture, you will only hear the sound of the left picture
through your headphone, except if a picture from a connected peripheral has
been selected.
12
•
Select TV when you want to listen to the sound of a TV channel or an
external via your TV tuner and watch a program via your video recorder or
other peripheral.
E.g. you can watch a film from your video recorder while listening to the
commentary of a broadcasted football match.
•
In all other cases select the source where you connected your equipment.
SOUND
Volume
Balance
Graphic Equalizer
Sound Style
Sound Mode
Loudness
Speech
Spatial
Headphone
Dolby Pro Logic Install
Left
Right
DOLBY
PRO LOGIC
INSTALL
Adjust the volume balance level of the speakers
Most programs will sound good with the volume balance between the center,
left, right and rear speakers in an equally loud position.
However, some programs may benefit from an adjustment of the level of the
respective speakers.
Which speakers are active depends on the selection you have made in the
Setup menu, p. 7, or on the Surround Mode selection you make below.
& Select Pro Logic in Surround Mode of the DOLBY PRO LOGIC INSTALL
menu.
Center
Rear
Dolby* Pro Logic Install
Rear
Test
Center Volume
Balance
Rear Volume
Surround Mode
é Select Test On.
A steady noise tone is switched sequentially through the left, center, right and
rear speakers, for 2 seconds each. This enables you to adjust the volume of
the separate speakers.
The speakers activated light up in the on screen graphic.
“ Select Center Volume, Balance or Rear Volume and alter the selected
adjustments until all speakers sound equally loud from the listeners position.
‘ Switch Test Off again.
Surround mode
According to the broadcast sound modes, select the Dolby Surround Sound
possibilities:
Pro Logic
Pro Logic (with Dolby Surround encoded broadcasting or video material)
In addition to the left and right front speakers, the center and the rear
surround speakers reproduce the Dolby Surround Pro Logic sounds, when the
movie or program is marked with
Dolby Surround.
This mode is especially recommended for such programs or movies.
Dolby 3 Stereo
Dolby 3 Stereo (using only the 3 front speakers for enhanced stereo
reproduction)
Note there is no Dolby 3 Stereo sound signal.
This mode is intended if no rear surround speakers are connected although
you may wish to take advantage of the benefits of surround sound.
The Dolby Surround encoded sources are reproduced from the left, the right
and the center speakers. Surround information is now reproduced in the left
and right front speakers.
Hall (without Dolby Surround broadcasting)
This mode is recommended when you wish to add surround sound to a
broadcast which is not encoded Dolby Surround or to a mono or poor stereo
broadcast. The center speaker does not produce any signal.
Off
This mode reproduces only the left and right front sound signals.
This mode is recommended if no surround sound is desired or if there is no
surround broadcasting.
You only hear a stereo sound if the broadcast which you are watching or
listening to is transmitted in stereo sound.
Hall
•
Press the SOUND key repeatedly to switch off the menu.
Off
*
‘Dolby’ ‘Pro Logic’ and the double-D symbol
are trademarks of Dolby
Laboratories Licensing Corporation.
Manufactured under license from Dolby Laboratories Licensing Corporation.
13
Features menu
PICTURE
SOUND
π
VIDEO
é Use the A key to select a menu item.
OK
π
π
-
π
+
V
FEATURES
& Press the FEATURE key to display/cancel the FEATURES menu.
B
FEATURE
+
¬
-
P
b
1
2
3
q
4
5
6
X
7
8
9
CC
i
0
A/CH
“ Press the OK key to activate.
activate
Sleeptimer
With the sleeptimer you can set a time period after which the TV should turn
itself off to standby.
The counter runs from Off up to 180 min. or from 180 min. down to Off.
One minute before the TV is set to go to standby, the remaining minute and
the message Good Night appear on screen. You can always turn off your set
earlier or change the set time.
select
adjustments
Lock
If the lock is on, the TV can only be turned on with the remote control.
The keys CH - and + behind the front door of the receiver cannot be used to
select a TV channel. In this way you can prevent unauthorized use of your TV.
If the message Lock On appears, the lock must be turned off before you can
use the CH - and + keys on the receiver to select a TV channel.
Sleeptimer
Lock
Personal Preference
Message
Timers
Closed Caption
Caption Display Mode
A/V 5 Input
Personal Preference
The adjustments of Contrast, Brightness, Color, Color Temperature and
Dynamic Contrast made in the picture menu and the adjustments of Volume,
Balance (of the internal speakers) and Graphic Equalizer made in the sound
menu and Volume and Balance in the headphone menu can be stored in
memory for all the stored TV channels.
Message
With this function you can enter a personal message on 2 lines which will be
displayed automatically when the set is turned on from standby.
For example: I’ll be late this evening. Don’t wait for dinner.
Message ...................
...........................
MESSAGE
Change
Clear
Type
Run
•
•
•
Change
Select with the o or œ keys the letter or number you want to enter.
Select with the π key the next position.
Press the OK key when you have entered the complete message.
•
Clear
Press the OK key to remove a previous message.
•
•
•
14
Type
Press the p or π keys to select the way the message will be displayed:
Wipe, Slide, Fall or Fade.
The Fade display is a randomly selection of the three other display types.
Run
Press the p or π keys to select the display frequency: Continuous, Once
or No.
Display message
Turn the TV to standby.
The message appears on the screen when the TV is turned on again.
If you selected Once, the message will disappear from the screen after
30 seconds.
If you selected Continuous, the message will appear on the screen until the
display frequency is switched off in the Message menu.
FEATURES
TIMERS
Timers
With the Timers menu you can make your TV automatically turn to a specific
channel number from standby or turn over to a different channel number at a
specific time and date.
Sleeptimer
Lock
Personal Preference
Message
Timers
Closed Caption
Caption Display Mode
A/V 5 Input
Actual Time
Channel
Start Time
Cancel Timer
•
Actual time
The time is set to --:-- and should be set manually.
You must use 24 hour, or military time. For example, 2:15 p.m. is 14:15.
Enter the actual time with the digit keys.
•
If you entered an incorrect digit:
Complete the actual time with arbitrary numbers, then start again.
•
Channel
Enter with the digit keys the channel number of the TV channel you want your
TV to switch over to.
•
Start time
Enter with the digit keys the start time of the selected TV channel number you
want your TV to turn over to.
•
•
Cancel timer
Select Cancel timer and press OK to reset the Start time to --:--.
A/V 5 Input
Select Rear or Front according to where you connected your device, to the
back or to the front of the receiver.
15
Closed Caption
Closed Captioning allows you to read the dialog of television programs on
the TV screen. Designed to help the hearing impaired, this feature uses on
screen "text boxes" to show dialogue and conversations while the TV
program is in progress. Captions will appear on the screen only during
captioned broadcasts.
PICTURE
FEATURE
SOUND
B
π
FEATURE
VIDEO
π
-
CC
π
+
V
OK
π
+
¬
-
Remark: the captions do not always use correct spelling and grammar.
Not all TV programs and product commercials are made for broadcast with Closed
Caption information included. Refer to your area's TV program listings for the TV
channels and times of Closed Caption shows. The captioned programs are usually
noted in the TV listings with service marks such as "CC".
P
b
1
2
3
q
4
5
6
X
7
8
9
CC
i
0
A/CH
Turning on/off Closed Caption
& Turn off all menus from the screen.
é Select the desired TV program.
b
æ
“ Press the CC key on the remote control to turn Closed Caption On or Off.
‘ Press the FEATURE key on the remote control.
( Select Closed Caption and the desired Closed Caption mode.
• Caption 1-mute mode:
Select this mode if you want the captions to appear automatically when the
mute key ¬ is pressed, if the watched TV program provides CC info.
• Caption 1, 2, 3 or 4 mode:
Dialogue (and descriptions) for the action on the captioned TV program
shows on screen.
Usually Caption 1 is the most used mode.
Caption 2 may be used for alternate languages if they are being
transmitted.
• Text 1, 2, 3 or 4 mode:
Often used for channel guide, schedules, bulletin board information for
Closed Caption programs, news, weather information or stock market
reports.
Not all Closed Caption modes are necessarily being used by a TV channel
during the transmission of a Closed Caption program.
•
Caption Display Mode
Select Caption Display Mode and the desired display mode: Normal,
Video or Meshed. (Not valid for Text mode.)
• Normal: Text appears on a dark background.
• Video: Text appears and picture is in the background.
• Meshed: Text appears on a gray background.
•
Press the FEATURE key to turn off the menu.
•
Deactivating Closed Caption
Press the CC key on the remote control to select Closed Caption Off.
Note: This television receiver provides display of television closed captioning in
accordance with Section 15.119 of the FCC rules.
16
Dual Screen
& Press the b key to turn on Dual Screen.
PICTURE
The TV screen will be divided in 2 different pictures.
The picture on the left side is the selected TV channel.
The picture on the right side is the picture from the next TV channel in the
favorite list.
SOUND
B
π
FEATURE
VIDEO
π
q
CH
+
π
+
b
OK
π
V
é Press the q key to select a vertical squeezed or a non vertical squeezed
CH
-
-
¬
picture size.
b
1
2
3
q
4
5
6
X
7
8
9
CC
i
0
A/CH
Select left and right pictures
& Press + CH - to run through the TV channels in the left picture.
é Press the dual screen CH - or CH + keys under the door of the remote
DVD
AUDIO
c
d
S
j
o
MENU
π
i
‡
p
OK
Ò
π
†
œ
VCR
‡
Ò
®
c
d
b
S
P
†
CH
CH
π
CH
CH
fi
s
control to select the TV channels or an external in the right picture. Also TV
channels which are not in the favorite list may be selected.
Pressing the dual screen CH - or CH + keys for 3 seconds, starts auto scan
down or up of the TV channels in the right picture.
Press again to stop the auto scan.
Remarks
• Programs in the subpicture via a peripheral (e.g. videorecorder) can be heard via
the headphone.
• A/V 5 and A/V 6 cannot be displayed in Dual Screen mode.
• On screen sound information of the left main picture appears in the right
upper corner.
yÚ
Switch screens
Press the c key to swap the right and left picture. The sound is swapped as
well.
•
•
•
•
NBC
CNN
NBC
EXT 2
Select still picture
Press the S key to get a still picture of the left picture on the right side of the
screen.
Press the S key again to de-activate the still picture and the dual screen
mode.
Press the d key to freeze only the program in the right picture.
Press the d key again to de-activate the still picture. The screen remains in
dual screen mode.
EXT 2
Possible Dual Screen combinations
TV channel/TV channel
See Select left and right pictures.
-
TV channel/Peripheral
See Select left and right pictures.
-
Peripheral/TV channel
See Select left and right pictures.
NBC
17
Connect Peripheral Equipment
There is a wide range of audio and video equipment that can be connected to
your receiver.
The following connection diagrams show you how to connect it to the back or
the front side of the receiver.
Video recorder
Note: Do not place your video recorder too close to the screen as some video
recorders may be susceptible for signals out of the display.
CABLE
S-VIDEO
CVBS
RGB
AUDIO L/R
VIDEO
L
AUDIO
R
VHS/UHF
75
3
A/V
2
A/V
1
A/V
VIDEO
AUDIO
IN
IN
IN
OUT
OUT
CABLE
VTR
& Connect the antenna cable 1 to the antenna socket x of your video
recorder.
é Connect another cable 2 from the output j of your video recorder to the
input x of your receiver.
Better recording quality can be obtained if you also connect the Video, Audio
Left and Right (only for stereo equipment) cables 3 to the VIDEO, AUDIO L
and R inputs A/V IN 1 or A/V IN 2.
The MONITOR OUT connectors can be used for daisy chaining or to record
programs from your TV. See Record with your video recorder, p. 25.
If you are using only mono equipment, connect only the VIDEO and the
AUDIO L sockets.
S-VIDEO quality with a S-VHS videorecorder is obtained by connecting the
S-VIDEO cable with the S-VIDEO input. (See the instructions of your video
recorder.)
18
Video recorder and other A/V peripherals
(except CD-i/Photo CD)
CABLE
S-VIDEO
CVBS
RGB
AUDIO L/R
VIDEO
L
AUDIO
R
VHS/UHF
75
3
A/V
2
A/V
1
A/V
VIDEO
AUDIO
IN
IN
IN
OUT
OUT
CABLE
VTR
•
•
Interconnect your video recorder with extra antenna cables.
To obtain better picture quality, also connect the Video, Audio left and Audio
right (only for stereo equipment) cables to the VIDEO, AUDIO L and AUDIO R
inputs of A/V IN 1 or A/V IN 2 sockets.
If you are using mono equipment, only connect the left VIDEO and AUDIO L
sockets for MONITOR OUT or A/V IN 1 and A/V IN 2.
S-VIDEO
S-VIDEO
quality with S-VIDEO equipment is obtained by connecting the
cables with the S-VIDEO inputs.
Camera and camcorder
L
1
2
A
U
D
R
IO
VI
E
EO D
D -VI
S
O
•
•
•
Connect your camera or camcorder at the front side of your receiver (A/V 4).
Connect the equipment to VIDEO 2 and AUDIO L 1 for mono equipment.
Also connect AUDIO R 1 for stereo equipment.
S-VIDEO quality with a S-VIDEO camcorder is obtained by connecting the
S-VIDEO cables with the S-VIDEO input 3 and AUDIO inputs 1.
3
19
CD-i/Photo CD
•
Connect the cable of your CD-i/Photo CD A/V IN 5.
S-VIDEO
CVBS
RGB
AUDIO L/R
VIDEO
L
AUDIO
R
3
A/V
2
A/V
1
A/V
VIDEO
AUDIO
IN
IN
IN
OUT
OUT
CD-i
SETUP
Audio Output
CD-i/Photo CD
Surround Mode
Center Mode
Ext. Amplifier
Picture mute
•
•
•
•
Press S and s at the same time.
Select CD-i/Photo CD in the Setup menu.
Select CD-i/Photo CD Yes.
This offers you optimum quality for you CD-i or Photo CD.
Press the PICTURE, SOUND or FEATURE key repeatedly to switch off all
menus.
CVBS/RGB input
The euroconnector A/V 3 can be used for special applications.
CVBS
RGB
AUDIO L/R
Audio equipment
S-VIDEO
VIDEO
•
L
AUDIO
3
A/V
R
IN
20
3
A/V
2
A/V
1
A/V
VIDEO
AUDIO
IN
IN
IN
OUT
OUT
•
You can listen to your TV sound through your audio equipment.
Connect the audio cables to the audio input of your audio equipment and to
AUDIO L and AUDIO R at the back of your receiver.
Make your audio output selection (constant or variable) in the Setup menu.
See p. 7.
External speakers
EXTERNAL
SPEAKERS
You can replace the left, right and center speakers of your set by three extra
speakers, min. 8 Ohm.
INTERNAL
SPEAKERS
•
EXTERNAL
CENTER
Connect the three speakers to the connector clips at the back of the
receiver. Connect the left front speaker at FRONT L; the right front speaker
at FRONT R, and the center speaker to CENTER.
SPEAKERS
8
Push the connector clip down and insert the end of the wire into the opening: the
positive wires of the front speakers (the ones with the black line) to the red
speaker connections; the negative wires to the black speaker connections. The
positive wire of the center speaker to the blue speaker connection; the negative
wire to the black speaker connection.
Do not insert the wires too far.
6
R
R
EXTERNAL
REAR
FRONT
•
SPEAKERS
SPEAKERS
L
L
Select a low volume adjustment and put the red speaker button in the rear in
the EXTERNAL SPEAKERS position.
The internal right, left and center speakers and the subwoofer of your TV are
now switched off.
Remark: use full-range external speakers for good audio reproduction.
Consult your dealer.
High Definition input
•
Pr
Pr
Pb
Y
H
V
Connect the cables of your High Definition peripheral to the A/V 6
connectors at the back of the receiver.
(See the handbook of your High Definition peripheral.)
L
R
AUDIO
6
A /V
IN
Headphone
•
•
n
Insert the plug into the headphone socket L at the front side of the
receiver.
Press ¬ to switch off the internal speakers of the TV.
The headphone impedance must be between 8 and 2000 Ohm. The headphone
socket has a 3.5 mm jack.
In the SOUND menu select Headphone to adjust the headphone volume and
balance and to select the audio source for your headphone sound. See p. 12.
If you want to connect more equipment to your TV, consult your dealer.
21
A/V 5 connections
A/V 5 input cluster provides one 15-pin D-Sub female multimedia input and
two (left and right) audio inputs.
These inputs are verified to meet FCC Class A requirements for commercial
use. (See full statement on the backside of the safety instructions)
•
•
•
Connect one end of a cable (not supplied) to the multimedia device and the
other end to the A/V 5 input on the rear side of the receiver or at the A/V 5
input at the front of the receiver.
Fix the connectors firmly with the screws on the plug.
In case audio is required, connect audio cables (not supplied) to the audio
output of your multimedia device and to the AUDIO R (right) and L (left)
inputs next to the 15-pin input.
Daisy chaining
The active loop through facility makes it possible to make e daisy chain.
Connect all devices (maximum of two) before inserting the mains plug in the
wall socket.
•
•
Connect one end of another cable (not supplied) to the A/V 5 output in the
rear of the receiver and the other end to a second display device.
In case audio is required, connect audio cables (not supplied) to the AUDIO
outputs R (right) and L (left) for A/V 5 and the other end of the cables to the
second display service.
Multimedia display modes
• 640x480
31.468 kHz
• 640x400
31.468 kHz
• 640x350
31.468 kHz
• 640x480
35.000 kHz
60 Hz
70 Hz
70 Hz
67 Hz
Note: When the video signal is not recognizable and > 35 KHz is displayed, the
picture is muted.
22
To select connected equipment
TV
VCR 1
TUNER
VCR 2
u PICTURE
TV
FEATURE
b
VIDEO
-
•
Do you want to watch TV channels again ?
Enter the channel number of the TV channel which you want to watch with the
digit keys.
B
OK
π
π
V
•
CD
π
+
Equipment connected with audio/video and multimedia cables
Press repeatedly the VIDEO key to select the desired video input, according to
where you connected your equipment at the back or the front side of your
receiver.
SAT
π
AMP
SOUND
Equipment connected with an antenna cable only:
Select the channel number under which you have stored the test signal of that
equipment with the digit keys.
TAPE
DVD
M
•
+
CH
¬
-
23
PICTURE
SOUND
B
π
FEATURE
VIDEO
π
+
π
π
+
V
CH
-
Video recorder keys
OK
Most of the audio and video equipment from the Philips range of products can
be operated with the remote control of your TV.
-
¬
b
1
2
3
Press one of the video recorder keys under the door of the remote control:
q
4
5
6
X
7
8
9
CC
i
0
A/CH
‡
Ò
π
†
DVD
AUDIO
j
o
MENU
π
i
‡
p
OK
Ò
π
†
œ
‡
Ò
®
c
d
b
S
P
for stop,
for rewind,
for play,
for fast forward,
® for record,
VCR
†
π
CH
CH
fi
s
yÚ
These keys function with specific Philips video recorders.
DVD (Digital Video Disc) keys
To operate your DVD player, press the following DVD keys:
PICTURE
SOUND
B
π
FEATURE
VIDEO
OK
π
to activate your choice,
AUDIO
-
π
¬
b
1
2
3
q
4
5
6
X
7
8
9
CC
i
0
A/CH
DVD
AUDIO
A to select a menu or a menu item,
OK
CH
-
to switch the DVD menu on or off,
+
π
+
V
MENU
j
o
MENU
π
i
‡
p
OK
Ò
π
†
œ
g
j
i
‡
Ò
π
†
to select your choice of audio language,
to select the angle adjustment,
to select your choice of subtitle language,
to display information about the selected DVD chapter or title,
for stop,
for rewind,
for play,
for fast forward,
VCR
‡
Ò
®
c
d
b
S
P
†
π
CH
CH
fi
s
yÚ
These keys function with specific Philips DVD players.
24
Record with your video recorder
If you have connected a S-VHS videorecorder you can only record S-VIDEO
quality from a S-VIDEO peripheral connected to the front side of the TV or from
a S-VIDEO peripheral connected immediately to the S-VHS videorecorder. (E.g.
from a S-VHS camcorder)
1. Record a TV program
using audio/video cables connected to
using only an antenna cable
MONITOR OUT
•
•
Select the channel number on your video
recorder.
Set your video recorder to record.
(See the instructions for your video
recorder.)
•
•
Select the channel number on the TV.
Set the video recorder to record via its
external input.
(See the instructions for your video
recorder.)
During recording, do not turn off your TV,
change channel numbers, or select another
source.
2. Record a program from Audio/Video equipment connected to the
inputs A/V 1, A/V IN 2, 3 or 4
•
•
•
Turn on the equipment.
With the VIDEO key, select the connection A/V 1, A/V 2, A/V 3 or A/V 4 from
which you want to record.
A/V 5 or A/V 6 recording is not possible.
Set your video recorder to record via its external input.
(See the instructions for your video recorder.)
During recording, do not turn off your TV, change channel numbers, or select
another source.
25
Tips
Care of the screen
Clean the TV with a slightly damp soft cloth.
Do not use abrasive solvent as it can damage
the TV screen.
Plasma Display characteristics
When switching over to another picture
after having displayed the same still picture
for a long time (many hours), it may happen
that some parts from the previous picture
will remain on screen due to a kind of
memory effect. This ghost picture will
disappear after some time. To avoid this
effect change TV programs regularly.
Philips built in an automatic slight shift of the
picture every 15 minutes to avoid this
effect and to prolong the life of the screen.
Very incidentally and after a longer period of
unuse (approx. 1 year) the screen may
display some strange color deficiencies. This
is quite normal for plasma displays and these
effects will disappear after the set has been
turned on for some time.
A plasma display consists of more than 1,2
Million color pixels. It is within industry
standards that very few pixels (< 0,001%)
may be defective, even for a new set. There
is however no reason to doubt about the
quality of the set.
The plasma display technology operates with
rare gasses which are being influenced by air
pressure. Up to an altitude of 6000 ft above
sea-level, the display is functioning fine.
Operating the set at a higher altitude, the
picture becomes unstable and the picture
performance is deteriorating. Bringing the set
below 6000 ft it works fine again.
Transportation has no influence.
Poor Picture
Is your TV or house antenna located too
close to speakers, non-earthed audio
equipment or neon lights, etc. ?
Mountains or high buildings can cause double
pictures or ghost images. Sometimes you can
improve the picture quality by changing the
direction of the outside antenna.
Are brightness and contrast out of
adjustment ? Press the s key.
Turn off your TV overnight using A on the
front of the receiver.
No picture or no sound
Are the supplied cables connected properly?
(The antenna cable to the TV, the other
antenna to your VCR, the power cable to
the display, the video cable, the subwoofer
cable, the cables to the surround speakers.)
The message No picture means that the
selected peripheral equipment is not
transmitting a picture.
Has the Lock been switched off ?
(p. 14). In case of weak or bad signal, consult
your dealer.
Connections
Make sure your peripheral equipment is
connected properly. See p. 18.
Have you turned on the peripheral
equipment?
Control of peripheral equipment
The infrared signals of the screen may
influence the reception sensibility of other
peripherals. Solution: replace the batteries of
the remote control or change position of
other equipment.
Remote control
If your TV no longer responds to the remote
control, the batteries may be dead.
You can still use the LOCAL MENU keys at
the front of your receiver.
Menu
Have you selected the wrong menu ? Press
the same key again to exit from the menu.
Black or blue screen
According to the selection made in the Setup
menu, the screen turns black or blue when
there is no signal available.
No solution
Switch your TV off and then on again.
Never attempt to repair a defective TV
yourself.
Check with your dealer or call a TV technician.
End of life directives
Your new TV contains materials which can
be recycled and reused.
At the end of life specialized companies can
dismantle the discarded TV to concentrate
the reusable materials and to minimize the
amount of materials to be disposed of.
Please ensure you dispose of your old TV
according to local regulations.
How to dispose of dead batteries ?
The batteries supplied do not contain the
heavy metals mercury and cadmium.
Nevertheless in many countries dead batteries
may not be disposed of with your household
waste. Please ensure you dispose of dead
batteries according to local regulations.
Index
a audio equipment, 20
automatic installation, 5
b bilingual broadcast, 9
c cable TV channels, 5
camcorder, 19
CD-i / Photo CD, 20
channel label, 6
closed caption, 16
color, 11
color temperature 11
cvbs/rgb input, 20
d daisy chaining, 22
DNR, 10
Dolby, 13
dual screen, 9
dvd keys, 24
dynamic contrast, 11
e extra speakers, 21
f favorite channels, 6
freeze, 10
frequency, 5
h headphone, 21
26
i info on screen, 9
interrupt the sound, 9
l language, 4
lock, 14
loudness, 12
m manual installation, 5
menu language, 4
message, 14
mono sound, 12
mosaic screen, 10
mute the sound, 9
o off-air TV channels, 5
p peripheral equipment, 18
permanent channel number, 9
personal preferences, 10
picture adjustments, 11
picture format, 9
r recording, 25
remote control, 2
s select TV channels, 9
select peripheral device, 23
setup, 7
sharpness, 11
sleeptimer, 14
smart controls, 9
sound adjustments, 12
sound mode, 12
spatial, 12
speech, 12
standby, 9
stereo/SAP, 11
store TV channels, 4
subtitles, 16
surround mode, 13
S-VIDEO, 19
t timers, 15
turn TV on, 3
v video recorder, 18
Conversion Table A: channel to frequency (in MHz) for off-air channels.
The frequencies used by a cable company may differ from the frequencies on the table.
Consult your cable company or your dealer for detailed information.
Channel
2
3
4
5
6
7
8
9
10
11
12
13
MHz
55.25
61.25
67.25
77.25
83.25
175.25
181.25
187.25
193.25
199.25
205.25
211.25
Channel
14
15
16
17
18
19
20
21
22
23
24
25
26
27
28
29
30
31
32
33
34
35
36
37
38
MHz
471.25
477.25
483.25
489.25
495.25
501.25
507.25
513.25
519.25
525.25
531.25
537.25
543.25
549.25
555.25
561.25
567.25
573.25
579.25
585.25
591.25
597.25
603.25
609.25
615.25
Channel
39
40
41
42
43
44
45
46
47
48
49
50
51
52
53
54
55
56
57
58
59
60
61
62
63
MHz
621.25
627.25
633.25
639.25
645.25
651.25
657.25
663.25
669.25
675.25
681.25
687.25
693.25
699.25
705.25
711.25
717.25
723.25
729.25
735.25
741.25
747.25
753.25
759.25
765.25
Channel
64
65
66
67
68
69
MHz
771.25
777.25
783.25
789.25
795.25
801.25
Conversion Table B: Channel to frequency (in MHz) for cable TV channels.
The frequencies used by a cable company may differ from the frequencies on the table.
Consult your cable company or your dealer for detailed information.
Channel
C1
C2
C3
C4
C5
C6
C7
C8
C9
C10
C11
C12
C13
C14
C15
C16
C17
C18
C19
C20
C21
C22
C23
C24
C25
C26
C27
C28
C29
C30
C31
C32
MHz
73.25
55.25
61.25
67.25
77.25
83.25
175.25
181.25
187.25
193.25
199.25
205.25
211.25
121.25
127.25
133.25
139.25
145.25
151.25
157.25
163.25
169.25
217.25
223.25
229.25
235.25
241.25
247.25
253.25
259.25
265.25
271.25
Channel
C33
C34
C35
C36
C37
C38
C39
C40
C41
C42
C43
C44
C45
C46
C47
C48
C49
C50
C51
C52
C53
C54
C55
C56
C57
C58
C59
C60
C61
C62
C63
MHz
277.25
283.25
289.25
295.25
301.25
307.25
313.25
319.25
325.25
331.25
337.25
343.25
349.25
355.25
361.25
367.25
373.25
379.25
385.25
391.25
397.25
403.25
409.25
415.25
421.25
427.25
433.25
439.25
445.25
451.25
457.25
Channel
C64
C65
C66
C67
C68
C69
C70
C71
C72
C73
C74
C75
C76
C77
C78
C79
C80
C81
C82
C83
C84
C85
C86
C87
C88
C89
C90
C91
C92
C93
C94
MHz
Channel
MHz
463.25
469.25
475.25
481.25
487.25
493.25
499.25
505.25
511.25
517.25
523.25
529.25
535.25
541.25
547.25
553.25
559.25
565.25
571.25
577.25
583.25
589.25
595.25
601.25
607.25
613.25
619.25
625.25
631.25
637.25
643.25
C95
C96
C97
C98
C99
C100
C101
C102
C103
C104
C105
C106
C107
C108
C109
C110
C111
C112
C113
C114
C115
C116
C117
C118
C119
C120
C121
C122
C123
C124
C125
91.25
97.25
103.25
109.25
115.25
649.25
655.25
661.25
667.25
673.25
679.25
685.25
691.25
697.25
703.25
709.25
715.25
721.25
727.25
733.25
739.25
745.25
751.25
757.25
763.25
769.25
775.25
781.25
787.25
793.25
799.25
27
LIMITED WARRANTY
TELEVISION
One Year Free Labor
One Year Free Replacement of Parts
WHO IS COVERED?
BEFORE REQUESTING SERVICE ...
You must have proof of purchase to receive warranty service. A
sales receipt or other document showing that you purchased the
product is considered proof of purchase.
Please check your owner’s manual before requesting service.
Adjustments of the controls discussed there may save you a service call.
WHAT IS COVERED?
TO GET WARRANTY SERVICE IN U.S.A.,
PUERTO RICO OR U.S.VIRGIN ISLANDS
Warranty coverage begins the day you buy your product. For one
year thereafter, all parts will be repaired or replaced free, and labor
is free. After one year from the day of purchase, you pay for the
replacement or repair of all parts, and for all labor charges.
All parts, including repaired and replaced parts, are covered only
for the original warranty period.When the warranty on the product expires, the warranty on all replaced and repaired parts also
expires.
WHAT IS EXCLUDED?
Your warranty does not cover:
• labor charges for installation or setup of the product, adjustment
of customer controls on the product, and installation or repair
of antenna systems outside of the product.
• product repair and/or part replacement because of misuse, accident, unauthorized repair or other cause not within the control
of Philips Consumer Electronics Company.
• reception problems caused by signal conditions or cable or
antenna systems outside the unit.
• a product that requires modification or adaptation to enable it
to operate in any country other than the country for which it
was designed, manufactured, approved and/or authorized, or
repair of products damaged by these modifications.
• incidental or consequential damages resulting from the product.
(Some states do not allow the exclusion of incidental or consequential damages, so the above exclusion may not apply to you.
This includes, but is not limited to, prerecorded material,
whether copyrighted or not copyrighted.)
WHERE IS SERVICE AVAILABLE?
Warranty service is available in all countries where the product is
officially distributed by Philips Consumer Electronics Company. In
countries where Philips Consumer Electronics Company does not
distribute the product, the local Philips service organization will
attempt to provide service (although there may be a delay if the
appropriate spare parts and technical manual(s) are not readily
available).
Take the product to a Philips factory service center (see enclosed
list) or authorized service center for repair.When the product has
been repaired, you must pick up the unit at the center. Centers
may keep defective parts.
(In U.S.A., Puerto Rico and U.S.Virgin Islands, all implied warranties,
including implied warranties of merchantability and fitness for a
particular purpose, are limited in duration to the duration of this
express warranty. But, because some states do not allow limitations on how long an implied warranty may last, this limitation may
not apply to you.)
TO GET WARRANTY SERVICE IN CANADA...
Take the product to a Philips consumer service center (listed
below), self-servicing dealer or authorized service depot.
Philips Electronics Ltd.
601 Milner Avenue, Scarborough, Ontario, M1B 1M8
(416) 292-5161
4977 Levy Street, St.Laurent, Québec, H4R 2N9
(514) 956-0210
3695 Grandview Hwy.,Vancouver, B.C.,V5M 2G7
(604) 435-4411
(In Canada, this warranty is given in lieu of all other warranties. No
other warranties are expressed or implied, including any implied
warranties of merchantability or fitness for a particular purpose.
Philips is not liable under any circumstances for any direct, indirect,
special, incidental or consequential damages, howsoever incurred,
even if notified of the possibility of such damages.)
REMEMBER...
Please record the model and serial numbers found on the product
below. Also, please fill out and mail your warranty registration card
promptly. It will be easier for us to notify you if necessary.
MODEL # _ _ _ _ _ _ _ _ _ _ _ _ _ _ _ _ _ _ _ _ _ _ _ _ _ _ _
SERIAL #
__________________________
MAKE SURE YOU KEEP ...
Please keep your sales receipt or other document showing proof
of purchase. Attach it to this owner’s manual and keep both nearby.
Also keep the original box and packing material in case you need
to return your product.
This warranty gives you specific legal rights.You may have other rights which vary from state to state.
Philips Service Company
P.O. BOX 555
Jefferson City,Tennessee 3776
(423) 475-8869
EL603IE / 9-95
Printed on recycled paper
Printed in Belgium
3104 305 4694.3